
Online Teaching Tools: 3 Manuscripts - MyBibleTeacher
422
-
Upload
khangminh22 -
Category
Documents
-
view
1 -
download
0
Transcript of Online Teaching Tools: 3 Manuscripts - MyBibleTeacher


Online Teaching Tools
3 Manuscripts: Google Classroom,Google Apps, Teaching with Zoom
Emily Crawford

© Copyright 2020 by Emily Crawford - All rights reserved.This document is geared towards providing exact and reliable informationin regards to the topic and issue covered. The publication is sold with theidea that the publisher is not required to render accounting, officiallypermitted, or otherwise, qualified services. If advice is necessary, legal orprofessional, a practiced individual in the profession should be ordered.- From a Declaration of Principles which was accepted and approvedequally by a Committee of the American Bar Association and a Committeeof Publishers and Associations.In no way is it legal to reproduce, duplicate, or transmit any part of thisdocument in either electronic means or in printed format. Recording of thispublication is strictly prohibited and any storage of this document is notallowed unless with written permission from the publisher. All rightsreserved.The information provided herein is stated to be truthful and consistent, inthat any liability, in terms of inattention or otherwise, by any usage or abuseof any policies, processes, or directions contained within is the solitary andutter responsibility of the recipient reader. Under no circumstances will anylegal responsibility or blame be held against the publisher for anyreparation, damages, or monetary loss due to the information herein, eitherdirectly or indirectly.Respective authors own all copyrights not held by the publisher.The information herein is offered for informational purposes solely, and isuniversal as so. The presentation of the information is without contract orany type of guarantee assurance.The trademarks that are used are without any consent, and the publicationof the trademark is without permission or backing by the trademark owner.All trademarks and brands within this book are for clarifying purposes onlyand are the owned by the owners themselves, not affiliated with thisdocument.

Table of contentGOOGLE CLASSROOM: INTRODUCTION
CHAPTER1: BASICS OF GOOGLE CLASSROOM1.1 Getting Started with Google Classroom
1.2 Importance and Benefits of Google Classroom
1.3 Features of Google Classroom
CHAPTER 2: STEP BY STEP GUIDE TO GOOGLE CLASSROOM2.1 Getting Started using RosterSync
2.2 Basics of Google Classroom
2.3 Student Management
2.4 Creating and Grading Assignments
2.5 How to Educate the Employees
CHAPTER 3: TIPS AND TRICKS USING GOOGLE CLASSROOM3.1 How to Motivate Students to Use Google Classroom?
3.2 Tips for Using Google Classroom
3.3 Google Classroom Management Tips
3.4 You Couldn't Say Anything About Google Classroom
3.5 You Do Want to Know About the New Google Classroom
3.6 Google Starting Classroom Approaches Today
CHAPTER 4: USE GOOGLE CLASSROOM EFFECTIVELY
4.1 Works with Google for Education
4.2 Gооglе Clаѕѕrооm Еxtеnѕіоnѕ And Apps
4.3 Best Extensions and Apps for Google Classroom
4.4 How Google Classroom Will Boost Your Teaching
4.5 Google Classroom vs. Apple Classroom

GOOGLE CLASSROOM: CONCLUSION
GOOGLE CLASSROOM REFERENCES
GOOGLE APPS: INTRODUCTION
CHAPTER 1: UNDERSTANDING GOOGLE APPLICATIONS1.1 Significance of Google Apps
1.2 What Are the Different Google Apps?
1.3 What Are the Key Benefits of Using Google Apps?
CHAPTER 2: GOOGLE DRIVE - FOR CLOUD STORAGE,SYNCHRONIZATION, AND FILE SHARING2.1 Introduction to Google Drive
2.2 Upload and Download Files and Folders on Google Drive
2.3 Managing Files on Google Drive
2.4 Sharing Files and Folders
2.5 Google Drive- Other Functionalities
CHAPTER 3: GOOGLE DOCS - FOR CREATING AND SHARINGTEXT DOCUMENTS3.1 Signing Up for an Account
3.2 Create or Import Files
3.3 Edit and Format a Document
3.4 Share and Collaborate On Files
3.5 Print and Download Documents
CHAPTER 4: GOOGLE SHEETS - FOR CREATING ONLINESPREADSHEETS
4.1 Introduction to Google Sheets
4.2 Creating a Spreadsheet
4.3 Share, Protect, and Move Your Data

4.4 Collaboration on Documents with Others
4.5 Data Formatting and Adding Formulas
4.6 Using Google Sheets Offline
4.7 Removing Duplicates
CHAPTER 5: GOOGLE SLIDES - FOR CREATING ANDCOLLABORATING ON PRESENTATIONS5.1 Creating a Presentation
5.2 Importing a Microsoft PowerPoint Presentation
5.3 Adding Comments on Google Slides
5.4 Collaborate and share Presentations
5.5 How to make templates on google slides?
CHAPTER 6: GOOGLE CALENDARS-SIGN INTO ACCESS & EDITYOUR SCHEDULE6.1 Getting Started
6.2 Adding Calendars by URL and sharing them
6.3 Editing Your Calendar
CHAPTER 7: OTHER FEATURES OF GOOGLE7.1 Google Forms-Free Online Surveys for Personal Use
7.2 Google Photos
7.3 Google Keep-Notes and Lists
7.4 Easy and Secure Emailing with Gmail
GOOGLE APPS: CONCLUSION
TEACHING WITH ZOOM: INTRODUCTION
CHAPTER 1: INTRODUCTION TO ZOOM- AN EFFECTIVE TOOL1.1 History of Zoom App

1.2 Zoom App's Uses
1.3 Zoom App's Subscription and Pricing Plans
CHAPTER 2: GETTING STARTED WITH ZOOM2.1 Equipment Needed to Use Zoom for Effective Learning Smoothly
2.2 Steps for Downloading and Installing Zoom
2.3 Making an Account or Signing Up
2.4 Different Features and their Functionality
CHAPTER 3: SETTING UP AND CONDUCTING VIRTUAL CLASSES3.1 Popularity of Virtual Learning Mode in Recent Years
3.2 Scheduling a Class
3.3 Inviting Students
3.4 Delivering a Lesson Over Zoom
3.5 Setting up an Assignment or Discussion Board
3.6 Recording a Zoom Class
3.7 Virtual Instructions
3.8 Using Different Zoom App Features for Teaching
CHAPTER 4: GUIDE FOR STUDENTS TO USE ZOOM EFFECTIVELY4.1 Check Equipment before Joining a Class
4.2 Using Chat Options to Ask Questions
4.3 Delivering Assignments through File Sharing
4.4 Record Presentations Using Zoom
4.5 Schedule Meeting for Group Discussion
CHAPTER 5: TIPS AND TRICKS TO USE ZOOM APP5.1 Additional Tips for Teachers and Students
5.2 Troubleshooting Common Problems
TEACHING WITH ZOOM: CONCLUSION

Google Classroom: IntroductionThe book will provide some practical tips about how to get started in googleclass, and why a middle school teacher will find it useful.Most high school elective teachers are searching for tools and resources tosave time and make their lives easier. Such a large part of your classroomtime is taken up by the process of organizing students work and makingsure your students are aware of all the upcoming assignments as a solution,several teachers have started using google classrooms to assist withclassroom management. If your school provides you with a G Suite forEducation (previously Google Apps for Education) account, you may wantto look at setting up and maintaining google classrooms for all of yourclasses.Google Classroom makes it very easy for all the teachers to provide adigital or hybrid learning classroom. Designed from the ground up withteacher feedback, the platform allows teachers to communicate withstudents, share innovative and technologically productive tools, and createcreative projects and educational elements in their everyday lessons.Google Classroom streamlines the process of having students on the samepage, connecting with others, and exchanging ideas through collaborativeprojects. You should continue using google classroom as a way to collectwork and files that students turn in for grading. Like with every new device,the problem is: what can I do about it? You'll find practical ideas for usingGoogle Classroom in this book, along with comprehensive guidance andscreenshots to help you through the learning process. We're excited to teachyou how to use this vital tool in your classroom. Once you start reading thisbook, you'll be able to see how far we've come to help you learn more aboutGoogle Classroom.

Before getting started with a Google Classroom summary, I’d love to sharesome information about me. I am a 26-year public high school Americanteacher. I hold a Bachelor's Degrees in History, and my passion istechnology applied to teaching. I have always used Google tools since2000, and now write books about teaching online in order to explain toother teacher how to use those tools for an effective learning.
Thank you for choosing this book, please leave a short review on Amazon,if you enjoy it. I would really love to hear your thoughts!
Thank you so much!-Emily

Chapter1: Basics of Google Classroom
1.1 Getting Started with Google ClassroomWhat Is Google Classroom?Google Classroom is an application that allows teachers to streamline thelearning process for their students. Teachers can create a class within theGoogle Classroom, provide their students with an add-on code, or emailthem, and quickly start interacting with students about class details,assignments, and documents. As part of the Google Apps for Educationseries, Google Classroom incorporates the other Google Apps to provide amore seamless learning experience. Google Classroom is a free web servicecreated by Google for Schools to simplify the creation, delivery, andgrading of assignments in a paperless manner. The primary goal of GoogleClassroom is to streamline the process of sharing files between teachers andstudents. Google Classroom is an application only available for schoolswith Google Apps installed for Education or Google Apps for Non-ProfitAccounts.Google Classroom incorporates Google Drive for the creation anddistribution of tasks, Google Docs, Sheets and Slides for writing, Gmail forcorrespondence, and Google Calendar for scheduling. Students can beinvited to join a particular class using a secret code or automaticallyimported from a school domain. Each class creates a separate folder on therespective user's drive, where the student can send a job to the instructor.Mobile apps, available on iOS and Android devices, let users take imagesand add to assignments, share files from different apps, and accessinformation offline. Teachers can track the progress of each pupil, and aftergraduation, teachers can return to work with feedback.

Google Software for Education (GAfE) is a free suite of Mobile resourcesavailable for schools. GAfE includes Gmail, Google Calendar, GoogleDrive, Google Docs, Google Pages, YouTube, Google Classroom, etc.Schools can sign up to https:/www.google.com/work/apps/education.Google Apps schools will have a Google Apps domain manager who canallocate accounts to staff and students. The Apps Manager can also allow ordisable the features and products of Google Apps, depending on the needsof the school. By default, Google Classroom is available for teachers andstudents, so the Google Apps domain manager in the school or district doesnot need to be available.HistoryGoogle Classroom was released on 6 May 2014, with a preview available tosome of the participants of Google's G Suite for Education program. Thiswas made public on 12 August 2014.In 2015, Google introduced a Classroom API and a website sharing buttonto enable school administrators and developers to further connect withGoogle Classroom.Google also incorporated Google Calendar into Classroom in 2015 for taskdates, field trips, and class speakers.

In 2017, Google opened the classroom to allow any personal Google usersto enter classes without the need to have a G Suite for Education account. InApril of the same year, any private Google user was able to build and teachclasses.In 2018, Google announced the redesign of the classroom, the inclusion of aclasswork area, the enhancement of the grading system, the re-use ofclasswork from other schools, and the introduction of teacher tools toorganize material by subject.In 2019, Google launched 78 new illustrated themes and the ability to dragand drop items and assignments in the classwork section.What Does Google Classroom Do?Google Classroom is situated between you and Google Drive and offers ateacher / student-friendly way to handle classroom documents. Here's whatthings can be done with Google Classroom:
Making AssignmentsThe critical thing you, as a teacher, can do with Google Classroom is tomake homework assignments for your students. Once you make anassignment, you will upload the documents you need for students to read orwork on. Students may receive email notification of a new task. Students"turn in" assignments when they're done, and then you can list duties.• Make AnnouncementsWhen you have a short report for the whole class, you can quickly type astatement that is sent to all the students in the class.• Store Classroom ItemsThe items you apply to the assignment are not the only documents you canstore. You can save any other materials you need for students on GoogleDrive.• Allow Students to Communicate With Each OtherStudents can comment on assignments and announcements, as well as toemail each other through the Classroom app.

Overview of Google Drive and DocsGoogle Docs (https://drive.google.com) provides users with online storageof digital documents. Google Docs for text documents, Google Slides forpresentations, Google Sheets for spreadsheets, Google Drawing, andGoogle Forms can also be created on Google Drive. Students and teacherscan use these collaboration resources to build documents from the cloud.This means that no hardware needs to be mounted on student devices; onlyan Internet connection is required. Students and teachers can accessdocuments on Google Drive from any Internet-enabled computer, includingmobile devices. Students are exempted from having to be on a particularnetwork to do their work.
One of the most critical capabilities of Google Documents is real-timecollaboration. Students and teachers can edit the text at the same time.Documents are accessed via a shared web connection or through GoogleDrive.

Collaborators of the same material just need to open the paper so that theycan locate the new version and function side by side with other users. Sincethis collaboration is all cloud-based, there is no need for collaborators to bein the same space. Some classrooms have students working with students inother countries around the world. This ability eliminates confusion in theversion. Collaborators on the document have the confidence to know thatthey are looking at the current version. Real-time collaboration hasencouraged the process of peer review and input from students.
1.2 Importance and Benefits of Google ClassroomWhy Is Google Classroom Important?In today's changing world, students need to leave school with a range oftechnical skills that can help them succeed in the world job market. There'sa great, fantastic resource for teachers that can help us give students theskills they need: Google Classroom.Whether you've been using Google Classroom for the last few years, you'reprobably already "sold" why it's a good thing to use. But if it's new to you,you might want to learn why this change is a good thing for students. Hereare a few things to consider:
Google Classroom Is Easy to Useas compared to other LMS (Learning Management Systems) that have beenpopular over the last decade; Google Classroom is incredibly simple. Itdoesn't take much time or experience to set up a new classroom. Our techteam had been trained for about an hour, and all of us had a class set up andrunning by the end of the training.

More Efficient Means of CommunicationYou reach the students ' email addresses only once, and the contact in theclassroom is completed. Only by joining the student at the school, theinstructor immediately generates an email address, a discussion group, anda Google Calendar. And it's simple to add and remove students from theclassroom as needed.
The Dominant Way of CommunicatingGoogle Classroom allows you to communicate more effectively. Perhapsmore important than being easy to use and effective, communication toolsare also handy. Since it's all cloud-based, there's no more "loss" of studentassignments. If the student is not present, contact is seamless. Just lastmonth, Google Classroom introduced a parent notification feature to keepparents updated on what's going on in the "classroom."
More Cost-Effective and Better for The CommunityPaperless learning is not particularly satisfying for younger students. Yet aparticular advantage for schools is that they are more profitable when itcomes to copying and printing. If every student has a laptop that alreadylinks to the Internet, every sheet of paper that we save can just make theschool more effective and environmentally friendly.

Method of Studying in The FutureThis is how students can continue to study in the future, which is why weneed to let our "paperless" hang-up go. University campuses no longerrequire undergraduates to print their five-page essays. As K-12 educators,we will take notice and train our students for the world in which they live.
Suitable for Students Who StruggleIt's better for students who struggle as long as you help them manage thesystem. (The computer itself can be a hassle at times, so handling it needsto be taught.) The reason why Google classroom is better is theorganizational benefit it offers them. The assignments never get lost, andthe instructor already coordinates every class.However, something has to be taught to these students to handle. Eventhough students are digital natives, that doesn't mean they understand howadults structure their environment to help them learn.
More Straightforward Collaboration Outside of SchoolWith Google Classroom, collaboration outside of school, is more candid(i.e., Flipped classroom). Again, it is cloud-based and available fromanywhere with a connection. Students will exchange home assignments andwork together to complete them. Collaboration is not limited to interactingwith other peers in a group. Teachers can flip the classroom by uploading avideo to go live in the evening, allowing students to watch it that night topractice for a quiz the next day. There are infinite possibilities.

Teacher Planning Is EasyTeacher preparation is simple, and the up-front time is worth it. Some morenew features in Google Classroom allow teachers to schedule assignmentsin the future. Designated tasks may be programmed to go live on a Mondayin October, and then close on a Friday. When a teacher has a long absence,she would be able to arrange tasks and not have to rely on a sub to do all ofthem. Classrooms can also be used for the semester or year system. It wouldbe horrible for a teacher to simply copy and paste a lesson for the next fewgroups of students, but it does save some time to have some stuff already inplace (lesson curriculum, grading standards, etc.).
Instant FeedbackThrough embedding elements, feedback is immediate and accessible. Oneof the teachers the other day had students complete a multiple-choice quizwhile watching the film. It enhances interaction and transparency but stillallows the instructor to see the results at the end of the lesson.Instead, if students failed to respond with the correct answers, they maycover the material again.Providing positive input to students is a crucial part of the learning process.Within the Classroom grading tool, teachers will give feedback onassignments to every student. The ability to create a comments bank forfuture use is also included in the grading method. Also, the Classroommobile app helps users to annotate their work.
Updates Are ConstantThis is, by far, one of Google Classroom's bestselling points. If somethingneeds to be changed or corrected, Google will listen and respond (both theassignment schedule and the parent contact have come from this). It alsomeans that teachers will have to start learning how to use it, which isn't abad thing either!Google Classroom BenefitsGoogle Classroom provides a range of opportunities for students andteachers as a free online learning site. Some of the main reasons whyteachers should seek it out are discussed below.
Accessibility

The Google Classroom can be accessed from any computer through GoogleChrome or from any mobile device on any platform. All files shared byteachers and students are stored in the Google Drive Classroom tab. Userscan access the classroom at anytime, anywhere. Students no longer need tothink about broken machines or hungry dogs.ExposureToday, many colleges expect students to take at least one online class beforetheir graduation.If you get a master's degree in education, some of your coursework may beonline. Sadly, many of the students have never had any experience withonline learning. That's why you want to make sure that you give yourstudents as much exposure as possible at a young age. Google Classroom isa simple way to help students make this move because it's super user-friendly, making it a perfect intro to technology.Paperlessteachers and students do not have too much paper to sort because theclassroom is entirely paperless. When teachers upload tasks and tests to theclassroom, they are saved to Drive simultaneously. Students will completeassignments and analyses directly from the school, and their research willalso be collected to Drive. Students may access lost work due to absencesand find other services that they may need.
Time SaverThe classroom is a huge time saver. For all the money available in one placeand the freedom to access the class anytime, teachers will have more timeto perform other tasks. Because the classroom can be accessed from amobile device, teachers and students can participate in their phones ortablets.

CommitmentThe majority of digital natives are confident with technology and would bemore likely to take control of their learning by using technology. Theclassroom provides several ways to make learning immersive andcollaborative. It provides teachers with the opportunity to separateassignments, to include videos and web pages in classes, and to createshared group assignments.

DifferentiationTeachers are quickly able to distinguish instruction for learners in theclassroom. Assigning lessons to the entire class, to individual students, orgroups of students takes only a few easy steps to build assignments on theClasswork board.
Data AnalysisTo make learning meaningful, teachers should evaluate evaluation data toensure that students recognize learning goals. Evaluation data can bequickly transferred to sorting and review sheets.
1.3 Features of Google Classroom

Google Classroom Google Classroom is a versatile resource for classroommanagement. This is a unique forum for student evaluation, assessment, andteacher-student contact. This is not as effective as LMS, maybe, but it stillallows all participants in the learning process to produce better outcomes.Google Classroom links all various Google resources to help teachers andorganizations get paperless. Google Drive provides the assignments. Gmailis used for correspondence in the classroom. Students can receive updatesin two ways: via an organization database and an individual file, which canthen be applied to the student interface or exported from the LMS.Some essential features of the Google Classroom can be used by bothteachers and students to enhance learning and interaction.
GradingGoogle Classroom grading can work with various grading schemes.Teachers should add assignments to text files that students should access,edit, and copy. Students can also build files. We will add their records to thetask unless the instructor does it. Instructors can track the progress of everystudent working on the assignment. We can comment and edit it, too.
Assignments

Teachers store assignments in the Google Class and share them withstudents. The files are stored on the student's drive and then submitted whenthey are finished.
CommunicationTeachers can post announcements to students, and students can vote onthem. Students will also post class sources, but their places do not have thesame degree of priority as announcements.

Archive CourseThe classroom allows students to archive lessons at the end of the year.Once a course is filed, it is removed from the site and put in the ArchivedClasses section to allow teachers to keep their current classes organizedaccordingly. When a course is finally archived, teachers and students caneasily access it, but would not be able to make any kind of changes to ituntil it is restored.
Mobile ApplicationsThe Google Classroom mobile applications, released in January 2015, areavailable for iOS and Android devices. Apps let users take pictures and addthem to their assignments, share files from other devices, and allow offlineaccess.

PrivacyIn comparison to Google's consumer services, Google Classroom, as part ofG Suite for Education, does not display ads in its student, staff andinstructor app, and user data is not scanned or used for advertisingpurposes.
New Features Added to Google Classroom
Originality ReportsGoogle Classroom's originality reports act as a tool to correct uncitedcontent and potential plagiarism. Additional functionality added to GoogleOriginality reports. This feature is no longer in beta mode-it's now availablein French (French, French, and Portuguese are in beta) for those using theclassroom.Teachers must simply check the box to make this function appropriate for amission.
Teachers are currently able to view originality reports for three tasks free ofcharge (if the school uses G-Suite Business, there are no constraints). Allteachers and students are free to comment on the assignment at any time.The reports have expiry dates (because web content changes continuously).They will use the tool up to 3 times before students return theirassignments. For each file sent, teachers can view reports.After the completion of the originality study, the 'View Originality Report'link opens the report, highlighting any problems.

The study reveals the meaning of the flagged material, and confidentlyhighlights the commonalities. When you click on the section, you candirectly access the dubious content website. Eventually, school-ownedrepositories for content within each domain should be available to teststudent research internally. There is a difference between the overallpercentage of the mission flagged and the number of flagged passages.
The method is less about "catching" a student in wrongdoing and moreabout helping them to recognize possible errors and to correct them beforethey finish their research.
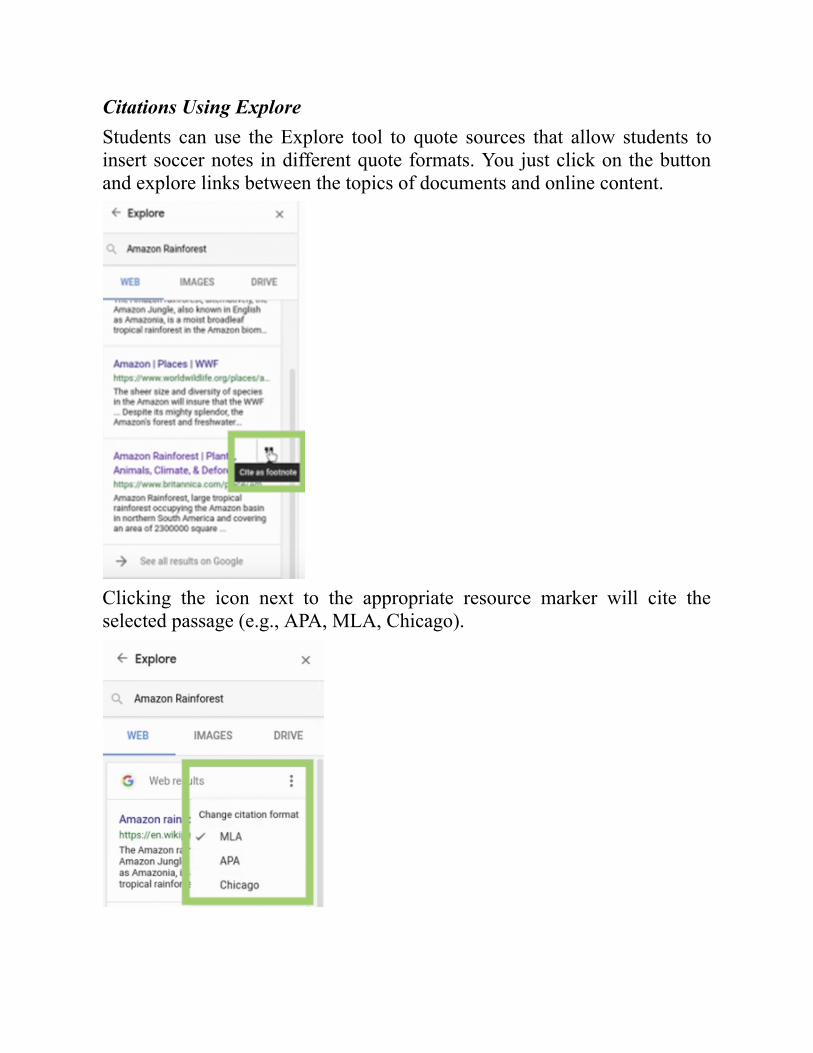
Citations Using ExploreStudents can use the Explore tool to quote sources that allow students toinsert soccer notes in different quote formats. You just click on the buttonand explore links between the topics of documents and online content.
Clicking the icon next to the appropriate resource marker will cite theselected passage (e.g., APA, MLA, Chicago).

When the link is quoted, a footnote appears, like this:
maintain a plagiarism-free document. Even when passages are quoted,when an originality report is produced, the reference(s) will show. Teacherswill also use their judgment to assess if there has been plagiarism.
RubricsRubrics allow students to look at the degree qualifications before applyingand to help teachers graduate more efficiently.For rubrics, there can be several parameters and points. As of now, anumeric value must be assigned to each location. Clicking on the arrows onthe right (next to the points total), the information for each criterion willshow or hide.

Assignment rubrics can be made from scratch, or a Google Sheets file withthe requirements can be uploaded. Note time-saving tricks of duplicatecriteria when building a section (click on the 3-point 'more' button, as seenhere), and of course, copying and pasting!
The scoring is optional; if the teachers agree to score the work of thestudents, the degrees are automatically added to the grade book in the'Grades' column.

If using a grade work object, open the task to be graded and click on thegrading button underneath the files.
If appropriate, you can adjust the total score and input scores for variousparameters here.You may also provide private feedback for each student, as with otherassignments.Rubrics will provide timely, detailed descriptive input on student work!
Drag & Drop on The Classwork Page"Last fall, we created the new Classwork page where teachers can stayorganized and schedule their classes”. They recognize, however, thatteachers plan their classes differently and require additional flexibility intheir school resources. You can now drag and drop entire subjects andclassified objects and easily rearrange them on the list. You may transfer anentire subject to a different position on the classroom page or drag itemsinto and from subjects. This feature was released on mobile last year, andnow the web is ready.

Refreshed UxStarting January 2019, you can also see that classroom has a fresh look, firston the website, and then on mobile devices in the school. In 2014, welaunched Google's latest content style to make Google products andservices more reliable. Among the improvements, there is a more naturalflow of design — plus a modern approach to both the web and the mobileapp for form, color, iconography, and typography. We also make the classcode simpler for students to access and project. Finally, we show 78 newthemes, ranging from history, mathematics, hair styling, photography, andpersonalized illustrations. Now, you can more than ever adapt to yourclassroom. "

Improved Preparation and Help"The need for more assistance with new resources and improvements. Inour First Day of Classroom training, you can find updated videos with thelatest design and features, which we built-in 2018. While we were there, wemade a new and enhanced Help Centre, along with our Community andBrand Hub. "Other / Previous Google Classroom Updates Before The 2019-2020Year
1. Post QuestionsYou can ask questions to your school and encourage the students to speakby answering the responses of each other (or not, depending on theenvironment you choose). For example, you can post a video to students orpost an article and ask them to write a paragraph in reply.

2. Reuse AssignmentsIf you repeat curricula year after year– or at least repeat papers, you willwant an upgrade. You can repeat assignments, journals, or questions in allof your classes – or any class you co-teach from last year or last week. Youwill also be able to make adjustments before you post or allocate them afteryou have selected what you want to copy.
3. Bump A PostSticking posts on forums, tweets, or Facebook updates was a thing for along time. You can do it now on Google Classroom by pushing every job tothe top.4. Due Dates OptionalIf you use long-term assignments or other duty-free activities, you can nowbuild jobs in Google Classroom without due dates.

5. Attach A Google Form to A PostIf you're a fan of Google Forms, this is a step you're going to appreciate.Most teachers use Google Forms to allocate a questionnaire, or survey tothe class. Teachers and students will soon be able within the next few weeksto add Google Forms from Drive to the posts and assignments and toconnect them in the classroom to read the answers.6. YouTube FunctionalityYouTube Features, but with inappropriate content? Google is listening toyou. "We introduced advanced YouTube settings for all Google Appdomains last month as an add-on feature because they often containmaterial that a company or school does not find suitable. Such parametersallow Apps to limit the YouTube videos viewed by signed-in users as wellas signed-out users on admin-managed networks.

Google Classroom Special FeaturesWith new generations so sensitive to interactive learning, teachers seem tohave little choice but to implement innovative approaches to involvestudents in the process.Google's first appearance in 2014 has been a success in K-12 schools, notbecause they introduced anything technological, but because they providedtheir software to all teachers around the world, thereby supplying them withthe resources they needed to revolutionize the program. Since then,developers at G-12 and other technology firms have enhanced existing toolsand developed new tools to support teachers in the classroom.A compilation of some of the most relevant developments concerning theGBP, which will undoubtedly come in handy at the beginning of the newyear, is discussed below.UnicheckOne of the most awaited features that Google did not have: the possibilityof testing submitted plagiarism papers Unicheck is the first plagiarismchecker to integrate with google classroom, and what it means for teachersis that the plagiarism issue in the documents has now become moreaccessible to solve and avoid.The resource is one of the favorites among teachers because it can identifyparallels to the school's internal library, which means that peer-to-peerplagiarism has been left in the past. Unicheck is capable of presentingcorrectly formatted citations and references in the paper in almost allacademic styles. Unicheck automatically conducts tests and sends acomprehensive and easy-to-follow report to Gmail teachers.Unicheck also overcomes the financial challenge that many teachers facewhen searching for a quality plagiarism checker, as unicheck provides afree choice.

QuizizzAnother valuable application is Quizizz, a free app that turns contentanalysis and student evaluation into a fun-filled game-based experience. Itoperates in such a fantastic way to take away some of the excessiveworkloads of the teachers.You don't need to compile quizzes manually or spend hours looking for anacceptable exam online since this quick integration of the API does it forstudents.Both teachers will be delighted to hear how their quiz practices will workright now: first, choose a quiz; then, choose a class to use it. Students willbe provided with a connection that will take them directly to the game. Assoon as the quiz is finished, answers and scores will be submitted to theteacher. No work was expended on putting together the questionnaire, notime spent on the technical task of classifying each inquiry.A further benefit of Quizizz is that it brings excitement to the educationalprocess and lets students review the content and evaluate their skills in agamified way.
Decimal GradesGoogle Classroom teachers may take the following action: showassignments, rate assignments, return them, adjust grades, and show ratehistory. The default value of each grade is set at 100 points. It is nowpossible to define any assignment using decimal numbers. Teachers are freeto use multiple digits after the decimal point, but the amount will berounded to two decimal digits after the decimal point. Teachers can also usegrades less than 1.
Class CalendarGoogle Calendar and School, as well as other smartphone and webapplications, can now be incorporated via the Calendar API.This update is what makes it worthwhile to use Google Calendar: runningon a single platform, calendar entries can appear automatically whenteachers add assignments.It is easy for students to have due dates for papers and assignments in theircalendars without having to design them manually. It's one more excuse notto be late with the documents.

Other applications can also be built into Google Calendar, such as a hikingapp that adds a path to the calendar entry. Google BarIt's now possible to conveniently juggle classroom and other G SuiteGoogle resources, as the Google bar offers you direct access to allapplications. Teachers can find it most convenient to handle alerts,configure menus, search, and do certain things they need with their GoogleAccount.
Confirmed Teacher RecognitionAll users who have been checked by Google can now be found. Not onlydoes this enhance the visual aspect of Classroom use, such as gettingpeople's names adequately written; the program also provides someprivileges and rights to the teachers that have been checked.
Google Group InvitesGoogle is actively working on removing unnecessary steps and clicks whileworking in the classroom. Teachers will now add classes of students insteadof adding each one separately. To do this, teachers need to be members ofthe community they are linking to and using Google Groups.It is still possible to add pupils, or co-teachers, inviting them or giving thema code to add themselves, so it saves time and energy in the case of othermembers to add.

Class Cards ReorderThis may sound trivial, but it contributes significantly to productivity.This feature offers teachers the ability to rearrange how classes are viewedin the Google Classroom. The new class order will be accordingly synced toall computers. The most recently added classes would show first, as well asunarchived ones, so if teachers need them elsewhere, they'll have to movearound.
Single ViewHere is another useful feature that makes school life easier for teachers. TheSingle View will do as it says: it provides teachers and students with a viewto all the research, grades, and feedback that have been made or submittedfor each class. -- student has a filter: success can be evaluated by the statusof their job, as assigned, turned in, done late, or absent.
Class Ownership TransferClass ownership is not an issue, because the Domain Administrator can doit now in a few clicks using the Classroom API. The move would also makethe new teacher owner of the Class's Drive folder, all resources, and thestudent's turn-in works. Deleted materials and practices would remain theproperty of the previous teacher, who will become a co-teacher in theclassroom.
Real Presence in ClassroomsThere are conflicting views on the extent of the actual presence of GoogleClassrooms in K-12 schools in the US and internationally, but one thing isclear: Google is developing itself as a forum for teachers to operate andmanage their classrooms based on accessible apps. And although mosthigher education institutions still need more sophisticated resources, GoogleClassroom is increasingly appealing to secondary schools.Recent research reveals that in the US, the preschool to the 8th-grade grouphas embraced Google Classroom as the primary platform.Approximately 35.4 million children attend preschool to Grade 8, and 1⁄2 ofthem use Google Classroom daily. This is an astonishing number, evenwithout counting high school students in the U.S. or any other schoolboy inthe world.

The future of Google Classroom looks promising, and teachers should restassured that further changes and integrations will take place, allowing evenmore excellent opportunities to be realized in classrooms.
Google Classroom Hidden FeaturesOver the last two years; Google Classroom has become a popular teacher'slearning platform. Google Classroom provides a productive workflow forteachers and students by arranging courses and class contents in an easy-to-navigate online environment, thanks to its capabilities to seamlesslyincorporate G Suite tools such as Google Documents, Google Slides,Google Papers, Gmail and Google Calendars. Although Google Classroomprovides many great opportunities, three can save teachers and students alot of time and improve workflow capacity. So, let's use these exciting apps!
The Assignment CalendarGoogle Classroom Assignment Calendar automatically generates anassignment calendar to better coordinate students and teachers. Whenever ateacher inside the Google Classroom creates a job or query and adds a duedate, the task will automatically be on the class calendar inside GoogleClassroom.Find the three lines in the top left corner of the screen for this calendar andclick date. Teachers and students can see the work assigned to the class onthis computer.
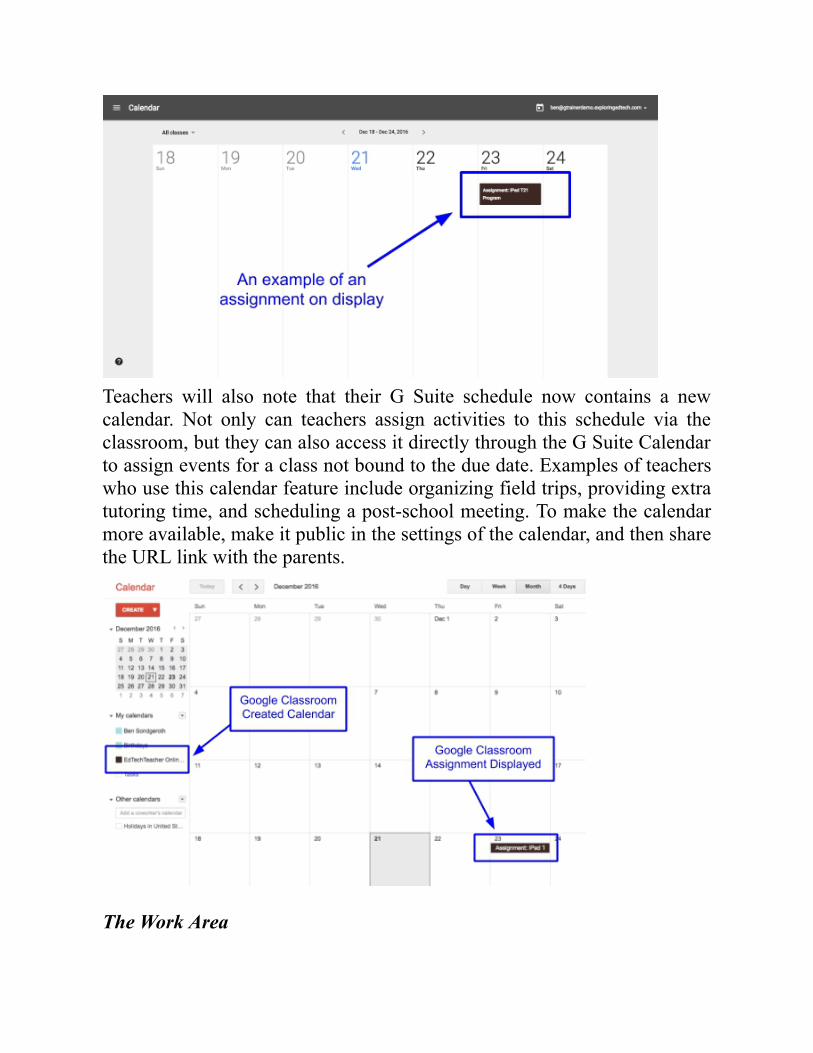
Teachers will also note that their G Suite schedule now contains a newcalendar. Not only can teachers assign activities to this schedule via theclassroom, but they can also access it directly through the G Suite Calendarto assign events for a class not bound to the due date. Examples of teacherswho use this calendar feature include organizing field trips, providing extratutoring time, and scheduling a post-school meeting. To make the calendarmore available, make it public in the settings of the calendar, and then sharethe URL link with the parents.
The Work Area

Teachers and students may also take advantage of the Google Classroom'sworkspace to gather all outstanding jobs in one place. If a teacher has stillnot graded a particular assignment, it will show in this field. Likewise, if astudent does not enter a job, he will also be shown in his workplace. TheWorkaround may also serve as a default task list and allow teachers andstudents to define and control their workflow efficiently.

Organize A Class Stream with TopicsA new function inside Google Classroom that will enable teachers toorganize the posts that they attach to the 'Path' classroom, and now teacherscan allocate a subject to the announcement, assignment or query, which canbe organized efficiently for each post.When a new topic is created, the problem will be displayed on the left sideof the classroom stream, and all the posts related to that topic will appearwhen an item is selected. The Themes feature now enables teachers toorganize all material in their course. A history teacher may, for instance,create a subject for each study unit such as "Ancient Rome." A math teachercan choose to create a topic for each study unit or chapter.

Share to Classroom ExtensionFor teachers in school classrooms using Chromebooks or tablets, ChromeExtension Sharing helps teachers to view and sharing student work andscreens quickly. The Share to Classroom extension allows students toaccess a website on the machine of the instructor. Students first click on theexpansion and then select Move to Instructor. When done, the instructorwill receive a pop-up message on their computer that they must approve itbefore the student's page is shown
Through following the same steps, a teacher will push a website in real-timeto the devices of his students!

Teachers can also create Google Classroom material directly from theextension. When a professor discovers a website he or she needs to add aspart of a mission, query, or announcement in Google Classroom, he or shemay use the extension to build any of those choices.
With the Share to Classroom extension, teachers and students now canquickly and efficiently share new insights and stories.

Wrapping It UpOn the other hand, Google Classroom is well known for organizing theirstudent's research on Google Drive, making copies of Google Docs and theorganization of digital materials, these three under-used features of GoogleClassroom will help you and your students make their use of classroomtechnology much more productive!

Chapter 2: Step by Step Guide toGoogle Classroom
2.1 Getting Started using RosterSyncThe technology of step by step has become one of the main drivers ofeducational progress in recent years, increasing learning and teachingpossibilities, by expanding the range of teacher-student resources, data, andlearnings available.Roster sync is a free Google Sheets Add-on that allows Google Apps tocreate and update Google Classroom teacher's courses and lists directlyfrom its Student Information System.This tool works together with Google's launch of the Classroom API,allowing developers to build learning apps that connect with class lists ofteachers in an open, widely accepted, and stable network. Classroom,launched by Google in August 2014, has already served as a criticalresource for teachers through the development of a simple, intuitiveworkflow to manage Google Docs and Drive assignments. Classroomenables teachers to monitor and review cloud-based student writing in real-time by allowing bulk copying and distribution of templated "starter files"in Drive.
RosterSyncThe roster sync tool can be installed conveniently from the Google SheetsAdd-ons tab, but it only runs for Google Apps domain managers. Thedomain administrator is asked for the first time when launching roster sync,to define and map the relevant student data sources (e.g., CSVs or GoogleSheets) with the corresponding classroom data fields.

The Add-on begins when the user uploads the student data file (called the"Information Source Registrations"). Additional sources of data may be"joined" for the required mappings, such as course information or instructorand student emails. In different data files, where similar column headingsexist, RosterSync will also automatically identify the "join" columns. Oncesuch mappings are made, they will be stored for use with all updates afterthe column, so that any CSV files can be easily re-documented to allowrosters to be modified. Respond to this guide to learn how to optimize andcreate roster sync from the NYCDOE STARS info.RosterSync is only in the early version of the beta. Since we don't haveaccess to each student information system to check, we want to invite alldomain administrators in the roster sync Google+ group to help evaluateand develop the tool.Powering Personalized LearningThe purpose of building roster sync was to increase the adoption of teachersthrough cloud-based tools that help to streamline writing instruction both inNew York City schools and across the country. We agree that GoogleDrive's low-cost, device-agnostic platform provides teachers critical andincomparable opportunities to enhance writing education for students whoare most in need. Google has built with the Classroom API a richframework for a simple, scalable, and interoperable platform that can useroster data to help individual students learn.Teacher Version allows teachers to sync a course roster – including studentemail addresses – with Google Sheets for easy use of complements such asDoctopus, formMule, autoCrat, formRanger, and others.Features• Switch from a friendly sidebar app is to be done manually.• Sync can be executed in either direction: classroom — > board — >classroom.

When Running in ClassroomSheet mode, the Add-on inserts the First Name, Last Name, Email Address,and Classroom Status columns into the sheet and populates the sheet withall active and invited students. On subsequent syncs, new students areadded, and the students removed are flagged. Formulas and formatting willtypically be copied when new students are added to the Classroom board.
When Running in SheetClassroom mode, the Add-on can change (add/remove) the student list inthe Classroom section using the email address in the Email Address columnof the document. A preview is given before any other action is taken toavoid the error by the user!• Several tabs (sheets) inside the spreadsheet may be linked to the same anddifferent parts.• Headers are designed to suit those used in the English version of theDoctopus Add-on to allow for reasonably simple interoperability andnetwork synchronization.Use Cases• Use to quickly move a class list to a sheet for use with any number of add-ons that can use student name and email address to improve personalizationand teacher workflow: Doctopus, AutoCrat, FormMule, FormRanger, etc.• Use to create informal record-keeping sheets that are always up-to-date foryour classroom segment.• Using to circumvent the enrolment code process by producing classinvites for a list of students.
Syncing Your Class with Google ClassroomWith Actively Practice, Google Classroom can help organize classes andcentralize where you exchange assignments with students.To use Google Classroom with Actively Learn, both teachers and studentsneed to build Actively Learn accounts using their Google Accounts school.Note: Popup blockers will prevent you from importing your classescorrectly. Don't forget to either disable your popup blocker or allowactivelearn.com popups to ensure smooth import!Step 1

Click "Add a new class"
Step 2Select "Export courses from Google Classroom"

Step 3Choose the classes you want to export from Google Classroom, then select"Import"
Note: If you are not the original developer of the course in GoogleClassroom, you cannot import the course and list to Learn Actively.Furthermore, if the original developer has imported the class into ActivelyLearn, you may be asked to co-teach for entry.
Advance tips to begin using Google ClаѕѕrооmGoogle Classroom is designed to help teachers and students connect andcollaborate, handle tasks on a paperless basis, and remain organized.Google Classroom is a part of the Google Apps for Education toolkit and isonly accessible on Google Apps for Education accounts.
Creating a Google ClassroomThe Classroom is the first step for teachers who want to set up a GoogleClassroom online space.

Customize the Appearance of Your ClassWhen you first build your course, you will be given the default headerpicture. This is the picture students will see when they click on your level toaccess assignments and announcements. You can customize this picturewith a couple of fast moves.There are several images to choose from, but most of them are about somekind of academic Subject. For starters, you might choose books forlanguage classes, pianos for music, colored pencils for painting, and so on.You can also upload your photo by clicking the Photo Upload button.
Add Syllabus to Google ClassroomIn previous versions of Google Classroom, use the About tab to add asyllabus or other class tools. In the new edition, you use a feature calledMaterials, which you can find on the Classwork tab. Here's how to add toyour class what you like.Remember that if appropriate, you can delegate materials to differentclasses, or even to individual students. Select the choice you need from thetop left corner when you build a new Material for your class.If you want your Syllabus Subject to be at the top of your Classwork tab,click the three arrows in the top right corner of the Subject and select StepUp. Repeat as often as needed. Additionally, you can drag and drop Topicsor Materials by clicking and dragging them up and down on the Classworktab.
Adding Students to Google ClassroomOnce you've built all the classes you need, you can easily add students toyour page. It can be achieved in one of two ways. The first is to let studentssign on their own.Remember that the teacher's class code can be changed or disabled at anytime. Just click the drop-down next to the class code and choose to reset ordisable it as required. Reset or disable the system does not impact a studentwho has already registered for your class.The second way to add students is to assign them manually to the instructor.It is relatively simple, and maybe not as cumbersome as you wouldimagine.

Remember that G Suite for Education teachers can only connect studentsthat are part of their Google domain. When your students use public Gmailaccounts, they will not be able to access your online material in the GoogleClassroom. It is deliberate and is part of the protection and privacy thatGoogle needs to ensure that teachers and students use this platform.
Move, Edit or Archive a ClassWhen you first try Google Classroom, you could end up building some testclasses just to get a feel for what it has to offer. That's perfectly normalbecause we all want to try new products and see if they're going to work forus.Nonetheless, you might want to change the name of your test class orsimply delete it when you're done.Renaming your class or change the section, topic, or room number ispossible through the edit button. The Moving button helps you to rearrangethe class order in your dashboard. The archive button will delete andarchive the class from your dashboard. When a course is archived, you canstill access it through Settings by clicking on the icon of the menu in the topleft corner and selecting Archived Classes. From here, you can eitherrestore or permanently remove archived classes.

Classroom ContactThere are two ways to promote interaction between students and teachers inthe Google Classroom. The first is the Stream-a Facebook-like wall ofmessages that can be accessed by all members of the class. Thisfunctionality is open to students and teachers alike.The second way to connect is via email. Students should press the threedots next to their teacher's name on the class homepage to open a Gmailmessage that is auto-filled with their instructor's email address. Studentsmay also contact each other by clicking on the Students tab and clicking onthe three dots on the very right side of the student name and choosing theStudent Contact.Teachers can do the same by clicking on the "People" tab, but they have theoption of selecting several students and then clicking Actions > Email tosend a message to a group of students.
Create an Assignment in Google ClassroomAssignments can be created and assigned to students from inside GoogleClassroom, and there are a variety of useful choices for educators. A lot ofteachers using Google Classroom are likely to opt to add assignments fromtheir Drive, as that is potentially where a lot of teacher tools are now kept.However, there's an additional value of selecting a Drive tool of GoogleClassroom, and that's obvious with the choices you get when you pick a filefrom Drive.
Grading and Returning Assignments to StudentTeachers can identify student submissions in a variety of different ways.Nonetheless, maybe the most productive approach is to join the class thatyou're involved in grading by clicking on the assignment name from theStream view. If you notice that tasks are hidden between studentconversations, look at the sidebar at the top left of the Stream screen, andyou will see the "Upcoming Tasks" tab. Tap on and do the task you want toscore.
2.2 Basics of Google ClassroomLogging in With Google Classroom

Step 1Go to class.google.comStep 2Sign in with your school Google account details

Step 3Scroll down and select "Teacher."
Step 4Build your first class by clicking "+" Adding class

Adding A Class
Step 1Sign in to Classroom using your email addressStep 2Click at the top of the page and click create class
Step 3Enter the class name in the first text box
Step 4Enter a short description in the second text box, such as section, grade level,or class time
Step 5Click "Create"
Applying A Theme

Step 1Locate “change class theme” on the header (top right-hand corner)
Step 2Select a theme you like from the gallery by clicking on it.

Step 3Click “Select class theme”
Setting Notifications
Step 1Click the three bars in the top left-hand corner, scroll to the bottom andclick “Settings”

Step 2Put a checkmark next to the “Send email notifications” if you would like toreceive them or deselect if you would no longer like to receive thenotifications. You will recently receive notifications any time a studentposts or comments on the stream. You do not receive notifications aboutstudents turning in assignments.
Will Receive Notification
Will Not Receive Notifications
Step 3Automatically all the changes will be solved
2.3 Student Managementhow to get students enrolled in your course and change the settings thataffect your students will be discussed in this section. Students are the mostcrucial part of the school, and having them adequately registered is vital tothe success of the school.

Inviting Students to A ClassThrough email, you will ask a group of students to enter your level.However, you must first build a group of students in your Gmail account
Step 1Click the "students" button at the top of the page.
Step 2Select "invite"
Step 3Pick a group of students that you would like to invite.
Step 4Click "Pick All" then "Invite Students" Add Students by Code

Adding Students by Code
Step 1A "Class File" is created automatically by Google Classroom and willappear on the left side of your "path"
Step 2Ask students to visit classroom.google.com and from their home page, click"+" in the top right corner, and then "Enter Class". If this is their first timeto log in to classroom.google.com See the tech leader get students to entertheir first class.
Step 3Ask students to insert the code you are giving them in the box provided.Students can then pick "Enter".

Reset or Disable Class Code
Step 1Go to your "Source" and find the class code on the left sidebar.
Step 2Press the drop-down arrow next to the code to update the class code andpress "Delete." Google Classroom is going to create a new application foryou. You are not in a position to build your system.


Step 3To disable the account code (no one would be able to enter your account bydefault), select the drop-down arrow next to the negligence and press“Disable”
Sorting of Students
Step 1Pick "STUDENTS" from the top menu bar.
Step 2Choose "Students" and then select "Sort by First Name" or "Sort by LastName"

Email Students
Step 1Choose "STUDENTS" on the top navigation screen.
Step 2Pick students you want to email or press "Select all" button
Step 3Press "ACTIONS" at the top of the screen and then "Email."

Step 4You will be sent to your Gmail account, and all selected students willappear in the "BCC" area.
Remove Students from Class
Step 1Click "STUDENTS" on the top navigation screen
Step 2Select the student you want to delete by clicking the checkbox next to thestudent's name.
Step 3Pick "ACTIONS" at the top of the window and then "Delete."

Step 4Click "Delete"
2.4 Creating and Grading AssignmentsIn this section, you'll learn how to create an assignment, get it to yourstudents, and then grade it once it's completed. Also, you can learn how togive your students feedback on their work and how to improve theimportance of assignments in the Classroom.
Create an Assignment
Step 1The Classroom will always be set to Announcement by default. To getstarted, click "Assignment" on your page.

Step 2Enter the name and description of your task.
Step 3Pick the due date (you can change it later). After the assignment is due, thestudent stream will be labeled "LATE."
Step4Add an optional video / file. You can add a file to your computer, aworksheet from your Google Drive, a photo, or a connection. You shouldadd multiple tools to your task.

Step 5Determine if you want students to be able to access the file, whether youwant all students to be able to write to the same document, or whether youwant each student to receive a specific student name in the file name.
Step 6Select the parts that you would like to delegate to.
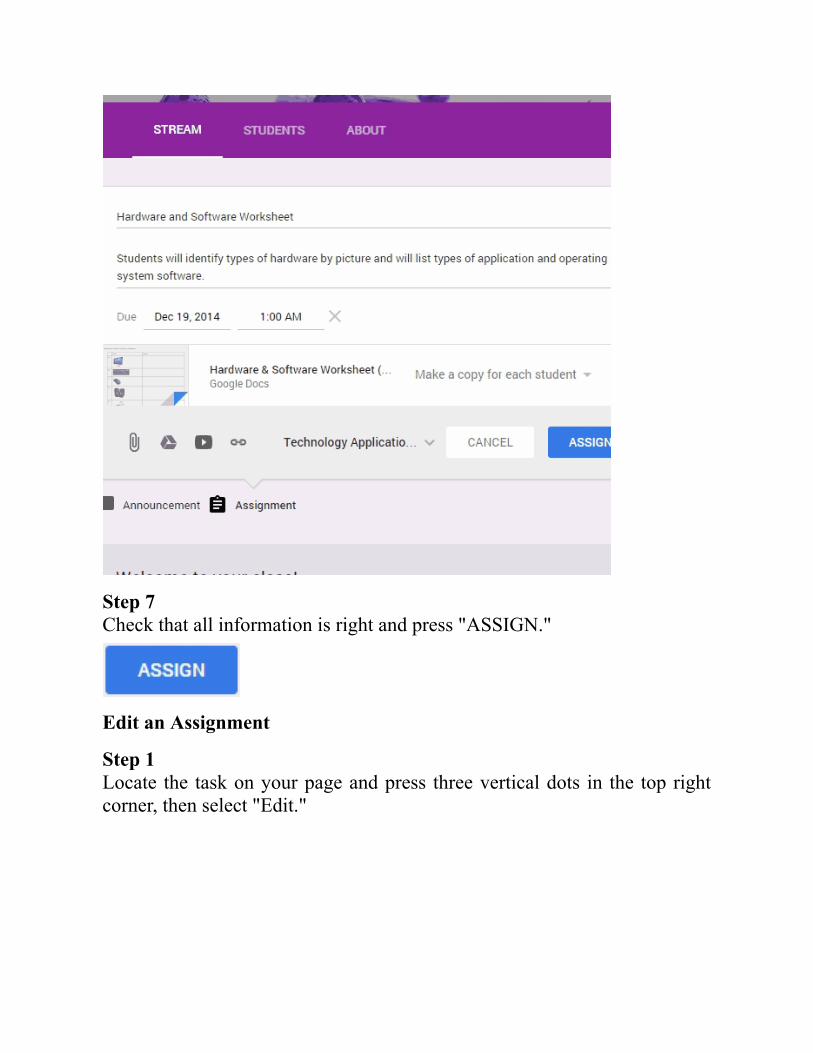
Step 7Check that all information is right and press "ASSIGN."
Edit an Assignment
Step 1Locate the task on your page and press three vertical dots in the top rightcorner, then select "Edit."

Step 2You can change:
● Task Name● Definition● Due Date
● Apply additional resources● Task Worksheet● Task Grading Worksheet

Grade an Assignment
Step 1Click the title of the assignment you are ready to grade on your stream.
Step 2OR press the Finished number to see only the students who have completedthe task.

Step 3Navigate to a student who has not completed his / her task. Tap on thestudent name and tap on the Worksheet to open it and rate it.
Step 4Use the formatting toolbar to put comments on the assignment or label onit.

Step 5The Worksheet was opened in a new window. Your comments/markups willbe saved automatically. You should close the tab that will take you back tothe student assignment list in the Google Classroom. You should join thegrade for the student right now.
Step 6Scroll to the top and press "RETURN" to give the file back to the student.

Send Feedback to StudentsStep 1Choose the assignment that you want to leave with any suggestions orremarks. Find the student you wish to write to and click on the student'sname.
Step 2When it says, Private comments write a message to the student and thenpress "POST"
Step 3The actual student will be able to respond to the explanations you havemade.

Change Points
Step 1Open the assignment where you want to the set point value. Locate the"Points" box in the top right corner.
Step 2You can either press the drop-down arrow next to the point value and pickthe number.
Step 3OR click on "10" and enter the value of the point you want to use.
Step 4Click "Fix" when you ask if you are sure you want to update the value ofthe amount.

Download Student Grades
Step 1Open the assignment in which you would like to access the score. Find the"DOWNLOAD" button at the top of the list.
Step 2Click the button to either access "This assignment" or "All assignments."
Step 3Select the location of the file, name of the data, and then press "Save"

Step 4Find the file on your computer and open it to see the ratings on thespreadsheet.
2.5 How to Educate the Employees

Using google classroom Professional development and work-relatedtraining can be a source of frustration for many people. So, what ifemployers could break the mold by making exercise fun, engaging, andmemorable? Google Classroom gives life to the possibility. Using the manytools that the Classroom has to offer, it can broaden employee awarenessand provide multiple opportunities for development. With a few necessarymeasures, employers can set up a Google Classroom that is worth the timeof their workers.
Set Up A Classroom and Invite StudentsGoogle Classroom for employees must be set up before training can begin.Remember to give the Classroom an apt, descriptive title that suits yourneeds. Separate classrooms can be set up for various topics; however, themost effective approach is to set up a classroom that divides themes fromlearning modules. Don't forget to invite workers to join the class or sharethe code of the Classroom.
Creating A Training ModuleOrganization is the most critical part of using the Classroom as aprofessional development method. Setting up the Classroom with trainingtopics or modules will save managers time and include workers. When thebasic setup is completed, it is time to build training modules. Click the plussign on the Classwork tab to create a new subject and name it according tothe content of the course. For example, the following Classroom is namedProfessional development & training with a "Differentiated Training"training theme that serves as the first section.
Add Content to Your ModuleThere are several options in the Classroom for adding material to a class.Adding tasks or questions is an easy task, but producing interesting contenthas a benefit for the Classroom. Adding a problem is an easy way to engageworkers in a professional conversation.

When adding an assignment, users can add files and other Google Drivecontent, such as slides or forms. YouTube videos or links to assignmentsmay also be included. This offers the ability to generate content that relatesto multiple types of learning and prevents workers from creating a space for"sitting and getting" professional growth. Setting a timetable to completehelps students to participate in activities at their own pace.

Assess LearningA central aspect of professional growth is evaluating learning. TheClassroom offers various tools for workplace evaluations. When making aquestion, it is possible to open the issue for user answers or to makemultiple choices. Users can also submit a Google Form to allow a moredetailed evaluation of their learning. This is also an effective way to obtaininput on the training itself and the need to make improvements oradjustments to the curriculum for the client.

Follow UpFollow-up is one of the main components of professional development. Thedevelopment of a follow-up discussion allows workers to provide input onthe delivery of learning materials. It also offers a platform to address areasin which assistance is required and helps peers to give each other guidance.You'll learn how to adjust the settings in a classroom and exploring someadditional features the Classroom has to offer in this segment.

Display Deleted Items
Step1See the menu on the left sidebar, "STREAM"
Step 2To view items deleted (by you or a student), click on "x" in the slider nextto the words "Display items deleted."

Step 3The checkmark means deleted items shows, X means deleted items are notdisplayed.
Step 4Retrieve a deleted object from your computer. An element that is removedwill say "removed" and faded.
Post an Announcement
Step 1Navigate the "Path" on your Classroom and click "Share your class withyour teacher"

Step 2Type your message where it says, "Share with your teacher"
Step 3Add any tools that you would like the notification by clicking theattachment, Google Drive, YouTube, or connection icons provided

Step 4Choose which section you would like to receive this message
Step 5
Edit/ Delete an Announcement
Step 1Locate the announcement you would like to edit or delete. Click the threevertical dots in the top right-hand corner of the announcement.
Step 2Click "Edit" if additional services or relevant details are to be included.

Step 3Click "SAVE" Phase 4. To delete Announcement, pick "Delete"
Step 4Choose “Delete” if you would like to delete the announcement.* Note: the segment you are on will only be removed. If you have postedthe ad on many pages, you have to delete them separately.
Step 5Click "DELETE"

Edit Student Posting Permission
Step 1On the top navigation pane, click "Students"
Step 2Locate the words "Students can post and comment" and right-click thedown arrow.By default, students can post and comment to the tube. This can be updatedso that students may attach comments to items that you post or requirestudents to post or comment on the stream.
Step 3To change the permits for individual students, pick the student(s), and thenpress "Actions" and then "Mute" so you won't allow the student(s) to postor comment on the stream while others still are allowed

Step 4Click "MUTE" As soon as you click "create" in the first section; Googlewill create a folder for the Google Drive materials that you have. Follow thegiven instructions to access this tab.Go to your Google Drive by clicking on the 'Apps button' icon or by typingin drive.google.com on the address bar tab on Google Drive

Classroom Folder on Google Drive
Step 1Go to your Google Drive by clicking the ‘Apps Button’ then select ‘Drive’icon or by typing in drive.google.com in your address bar

Step 2Select "My drive" on the left sidebar and find the "Classroom" folder
Step 3Open the folder to see a different folder for each class you made

Step 4Open the class folder to see all the materials/assignments used for that class.

Step 5Open the task folder and see all student documents together. From here, youcan leave feedback on assignments/worksheets.

Send Feedback to GoogleStep 1Is there going to be a floating 'where you're in the Classroom? "In thebottom right corner. Tap on the question mark.
Step 2If you want to "Submit Feedback" you can request new features for theClassroom or send a message to Google.When you select "Next" you will be able to take a screenshot of the areawhere you are proposing a new feature.You can then record additional details and request your feedback.

Step 3If you click "Get Help" you will be taken to the Google Classroom Supportpage
Step 4If you choose "Ask Query" you will be taken to the Google Education Helpforum

Chapter 3: Tips and Tricks UsingGoogle Classroom
3.1 How to Motivate Students to Use GoogleClassroom?Motivation is, in reality, one of the critical pillars of a successful classroom.As a coach, you're never going to accomplish your goal without inspiringyour students. Motivation is not a complicated concept, and it is not adifficult job to motivate the students. We live our lives with joy andhappiness, with pain and sorrow, because we are inspired to move forward.Yeah, often being ignored and disheartened in our lives, we avoid our hopeof moving forward, but when human nature is encouraged, we start to thinkagain about moving forward. Likewise, in most cases, without beinginspired, the student loses hope to learn. That's why students need to beinspired.A teacher can't be a good teacher unless he knows how to inspire a student.An excellent educator is a person who knows the facts and techniques ofhow to create an active classroom, where the student can participateenthusiastically. In reality, without motivating your students, you won't beable to fulfill your sole responsibility.There are a variety of approaches to inspire students in the classroom. Someof the best ideas for encouraging the students in the school are discussedbelow. In reality, these tips on motivating your students can help you tomake your classroom more productive and creative.

Ensure Anxiety-Free ClassroomWhat do you know? Fear also inhibits learning outcomes. So, never seek toimpose terror by enforcing punishments in your classroom. I have foundthat some of us, the teachers, are implementing extra assignments aspunishment, because physical disciplines do not occur in teaching today, asin the old and conventional period. Also, negative remarks often give rise tofear among students in the classroom. The fear in the classroom, whetherit's for retribution or threatening comments, will never inspire the pupils. Inreality, fear is an obstacle to participating successfully in the learningsession. The student should never seek to take an active part in theclassroom. That's why every teacher should maintain a fear-free class toinspire the students. So, never make negative statements and burdeningtasks as punishments.
Promote Their Ideas and DecisionsPromote creative learning in the classroom offering assignments andcoursework, giving them their freedom to choose the subject on their own.Your students are going to be inspired. You know, after all, that humanbeings want gratitude. In reality, appreciation changes a lot of studentslives. Your students are unable to wait to take part in your next lecture. Andif you enjoy fresh ideas, hundreds of excellent ideas will also be exposed toother students in your classroom. So always welcome new ideas to inspireyour students.
Clarify the ObjectiveEvery student likes clear instructions. Clarify each goal and target goal tobe accomplished at the beginning of the course. Don't forget to mention theobstacles they might face during the session. Discuss possible antidotesabout the challenges they might face. They will, therefore, be inspired toaddress more problems, which will make the topic more accessible. As aresult, you will find that your classroom has become successful becauseyour students are encouraged.“As a teacher, you are preparing a country, a new world that will soon ruleyou and the earth.”~Md. Akbar Ali
Improve the Environment of The Classroom
Don't always sit down to discuss the lesson. Move beside the students andthink about the experience. Keep them out of your class occasionally. Tellthem to visit the library sometimes for research purposes. The shift in theclassroom environment stimulates the excitement of the learning brain,which is, in fact, a prerequisite for motivation.
Be A Good ListenerListen carefully to what your student needs to say. Appreciate theiremotions and opinions. Take the right steps to solve the problems they talkabout. Be a great listener, guy. They're going to start loving you when youlisten to them with proper care. You will win their confidence, therefore.Now, is it not easy to inspire them? If you want your students to listen toyou, you have to listen to them first.
Share Their ExperienceNot all students can share their experience in the course of the class. Someof them will be occupied by reading books. Yet as sure students discusstheir lessons-related expertise, others may be inspired to participateactively. Prepare the lesson in such an inspiring way that various types oflearners can engage actively in the sharing of lessons. In this situation, otherstudents are often inspired to share their own experiences. You can,therefore, ensure that the classroom is successful.

Positive CompetitionConstructive competition is, in essence, a useful strategy in the school.Ensure the rivalry is constructive. A good rivalry in group work motivateslearners tremendously. We are also prepared to carry out community work,which will also bring significant benefits to their professional life. There isno doubt that healthy competition sparks excitement among the students inthe classroom.
Know Your Student WellYou need to know your students well. You should also know theirpreferences, their dislikes, their effectiveness, and their lack ofperformance. When your students realize that you know them well, theywill begin to like you and disclose their obstacles. This would be easier foryou to inspire your students on the right path. You will not be able toencourage them because you know them well.
Support Them and Give Them ResponsibilityGive them the responsibility of the pupils. Assign them a class project.They're going to work with determination for sure. In such a situation,individual students may also have to fulfill their obligations. When you givethem responsibilities, trust within themselves will grow, and they will beginto feel that they are valuable because they get value from you. They wouldthen be inspired to engage more in the classroom. When you trust them,they will always trust you in return.
Show Your EnthusiasmTo Convey your enthusiasm in the classroom during a lecture while meetingyour duties. Share your excitement about their great success. Again, itshows an optimistic interest when every learner presents a new idea. Yourexpression of enthusiasm will encourage them.

Hold Your RecordWrite a report for you. Write down every success of your pupil. If you findthat a specific student is changing, speak to the student about change. Showthe student the record. Rewards and support the student in front of theclassroom. Even share the changes with your friends. If a student discoversthat you're taking care of the student while you address from your record,the student is inspired.
Constructive FeedbackIf a student is not doing well, include positive feedback. When necessary,offer a second chance. Be a friend and seek to understand the case of such abad result. Encourage the student to inspire him/her to improve quickly nexttime as he/she did not understand how to do well in this subject with properknowledge and technique. Okay, you know what? Your constructivereviews will change a lot of lives. Look closely at the worst students in yourschool; you're going to get a lot of good qualities. Inform them of thebeautiful conditions they possess. In reality, value them, which will inspirethem significantly in return.
Real-Life Situation In the classroomRelate your lesson plan to a real-life scenario. Make the lesson enjoyablewith the fun of the game. Tell them a remarkable story with a mixture ofhumor. The reading thus makes it possible for the student to respond to hisor her own experience. Let them also apply the lesson to their personalexperience. Only track it accurately. In reality, when you're dealing withyour reading in real-life scenarios, students are encouraged to learn andattend your class.

Bottom LineIt is the responsibility of a teacher to ensure that the classroom is active.Teachers should not say that they can just enter and exit the classroom with'Good Stories' without providing a successful class. Through inspiring yourpupils, you can make the best classroom you're expecting. After all, asbeing a teacher, you are preparing a country, a new world that will soon ruleyou and the planet.
Communicate with Your Parents and GuardiansUse the classroom to keep the parents and guardians in the loop. You shouldinvite parents to sign up for a regular or weekly e-mail rundown of what'sgoing on in their children's schools. Emails contain the pending orunfinished work of a student, as well as updates and questions that you postin the class stream.
Assigning Assignments to A Group of StudentsTeachers may delegate work and post-announcements to individual studentsor a group of students in a class. This functionality helps teachers todistinguish instruction as required, as well as to promote collaborativegroup work.
Using the Classroom Mobile App AnnotationsStudents and teachers can use the Mobile Classroom on Android, iOS, andChrome mobile devices. You can provide input in real-time by annotatingthe student's work in the app. Students may also write down their tasks toconvey an idea or concept more easily.
Explore the Integration of Classroom with Other ResourcesGoogle Classroom uses an API to link and exchange knowledge with avariety of your favorite devices. Thousands of applications and websites areincorporated, like Pear Deck, Actively Read, Newsela, and many, manymore.
Encourage Supervisors to Use Classroom Metrics

While this feature is for administrators — not teachers — it is still worthmentioning here. Administrators may use the Admin console to see statssuch as how many classes have been created, how many posts have beenposted, and the teachers use the tool. Access to this knowledge will helpcustomize teacher support.
3.2 Tips for Using Google ClassroomUsing Google Classroom is relatively easy for teachers and students. Thereare, however, some tips and tricks that you can use to make your life andthe lives of your students much more comfortable.
1. Using Google Apps to Build DocumentsSince Google Classroom is based on Google Drive, all Google Drive apps(such as Docs, Papers, Slides, and so on) are entirely incorporated into theClassroom. So, for instance, when you create a homework sheet in GoogleDocs, a student can open a document in Google Docs, complete the work,and turn it on. You can then open the same text, comment on it, rate it, andreturn it to the student. If you are using another program, such as MicrosoftWord, you have to upload a text, and the student has to download it to workon it. Then, the student has to re-upload the paper and re-attach it to theassignment before handing it in. Then you've got to download it to make acomment and score it. Using Google Drive software should take out all theuploading and download and make it a smooth experience.

2. Inviting Students Using Class CodeYou can save much time encouraging students to your class if you simplyprovide them with the class code and, thus, the duty to ask them. Otherwise,each student must be invited individually, which can be time-consuming.Only find your class code at the bottom left of the Stream class tab, andthen distribute it to your entire class. Tell your students to visitclassroom.google.com, sign in with their Google account, and click the plussign on the top of the page, and select Enter Class.
3. Choose to Make A Particular Copy of a Document for Each StudentMuch of the time, when you create a homework assignment, you want tochoose to Make a copy for each student, which helps each student to focuson a copy of the document. If you decide Students Can View File, studentswon't be able to edit it at all, and if you choose Students Can Edit the File,only then will students be operating the file.
4. Join Other Classes as A StudentIf you're only learning how to use Google Classroom, as an instructor, andyou can enter other courses as a student to appreciate the student'sperspective better and learn from others who are more familiar with GoogleClassroom. Just ask for the class code from the other trainer and join theclass when one of your students enters your level.

5. Explain the Shift in Ownership in Assignment Documents to YourStudentsYou can make students aware that they can no longer alter assignmentswhen they turn on duty unless they "unsubmit" jobs. After the transfer hasbeen turned in, control returns to the instructor so that you can assess andhave input on the task. You will return it to the student after you do so, afterwhich the student will edit the document again. If the student unsubmit theassignment before it is marked, he or she must return the task when it iscompleted.
6. Create Reports from Inside the JobTell you to make an assignment in which you ask your students to write anessay on a particular subject. You have not provided a workbook or othertools for students to work on. The best way for students to begin is to createa new Google Doc from within the assignment just by clicking the Createbutton and selecting the type of document they want to create. The paper isautomatically generated on Google Drive and attached to the task, sostudents don't need to go to Google Drive. This approach can also be usedto construct assignment materials.
Useful Tips for TeachersGoogle Classroom streamlines the management of student workannouncing, assigning, receiving, marking, providing reviews, andreturning. It saved several hours of work for the teachers.Without a reliable workflow and some strategy, the grading of digital workcan be cumbersome. Google Classroom makes working with students moreefficient — but only if you understand how Classroom works and how touse it for your advantage.Often a few quick tips will make a difference.

1. Number Your AssignmentsNumbering your tasks is one of the best tips I've ever got. This lets youorganize files not only in the Classroom but also keep Google Drive cleanand tidy.
2. Using CTRL + F to Find Numbers and Words in ClassroomEven the most structured Classwork page can be very long after a fewweeks of assignments. Use the keyboard shortcut, Control + F (Command +F on a mac), to check for keywords or allocate numbers (as mentionedabove) on the tab. Teach your students this trick, too!3. Pick an Organizing Method for Using TopicsThe topics feature on the classwork page helps coordinate assignments forstudents and teachers. There are a variety of different ways to coordinate.There are many ways to do so, and what works for one teacher doesn't workfor all of us. It is a personal choice for an instructor. Select a technique thatwill work with your subject area and grade level.
4. Create A "Stuff" Subject and Keep Top of The Classwork PageEach class requires a place to store stuff, links, class rules, syllabus, etc.Mindy Barron recommends that you create a unique theme for resourcesand class materials and keep it close to the top for easy access. Make sure toname these files only so that students know exactly what's in there.

5. Build A Google Classroom Class ModelWhen you have chosen your preferred Google Classroom organizingapproach (and checked it!), Make a copy of the class as your reference. Youwill continue to make a copy any time you need a new class, and all of yourtopics have been produced and arranged, and your assignments will besaved as drafts!To make a copy of the class in Google Classroom: go to your home GoogleClassroom, then click on the three dots on the class card and pick "CopyClass".
6. Using Direct Assignment LinksDo you know that you can get a direct connection to a particularassignment? It makes it so easy to refer students back to a specific lesson.Just go to the Classwork tab, find the task, click the three dots on the rightside of the job, and copy the link.
7. Using Google Docs as A Syllabus (Secondary)Most teachers using Google Docs to create a syllabus so that it is a livedocument that can be modified throughout the year. Add connections toexternal services, regular tasks, significant dates, etc. You can also connectto Google Classroom assignments (see above) to prevent a long search forstudents.

8. Breaking Smaller Tasks with Separate DatesProject-based learning is so critical, and when we continue to push beyondstatic, one-and-one tasks, we need to think differently about how we workin our classrooms.Big projects can be daunting for students, particularly those who have notlearned how to manage their time. It is necessary to give them milestonesand split the project into smaller tasks with checkpoints.
9. Build a Separate Enrichment and Extension ClassIn class, completing the assignment early did not mean free time or games.This included reading and learning programs for my pupils. Considerbuilding a separate class inside Google Classroom for expansion orenrichment activities.You might also gamify this concept and offer digital badges to carry out amission or challenge.
10. Using Private Comments for Meaningful Feedback and StudentConversationsOne of my favorite features in Google Classroom is a unique commentfeature. This little tool will help to streamline communication with yourstudents and strengthen the feedback loop. Teacher feedback is one of themost critical factors in student development!Private comments are just a private one between you and your student. (Noone else can read these.) Remember to use private comments not only at theend of the task but throughout!And this doesn't negate the power of face-to-face conversations, but it doeshelp to record how students can remember feedback, as well as allowstudents to connect who don't usually speak in front of the class.There are some different places where you can add private messages to yourstudents.Add A Private Message on The Student Work Page :
1. From the Classwork tab, press the assignment for which you would liketo provide feedback.2. Click the "Show Task" button.

3. Select the student from the list on the left.4. Towards the bottom of the right-hand row, you can see "Add PrivatePost"5. Click to type and add a private message for your student.
You can also add private comments using the latest grading feature inGoogle Classroom from inside the student paper.
Add A Single Statement Using the Grading Tool:1. From the Classwork tab, press the assignment on which you would liketo provide feedback.2. Click the "Show Task" button.3. Click on the student file that you would like to give feedback.4. Using the right-hand panel to add your private message.
11. Using Private Comments for Reflection

Teachers take-private comments a step further and make them part of theassignment by asking students to include a reflection as a private commentafter submitting their job. Sean Fahey suggests using an open-endedquestion or giving students a prompt like, "What did you like most aboutthe assignment? "Or" Which part did you question the most? "Make sure toadd this to your instructions, so they don't forget about it!12. Add A Sample Paper to Each TaskAs a copy for each student, add a blank Google Doc or prototype to eachtask. You can view the assignment page in Google Classroom and see athumbnail for each student. It helps you to see improvement, or lack ofprogress, at a glance.Even if you don't have a template for your task, add a saved black documentto be used as a source so that you can still show the thumbnail!

13. Invite Teachers Who Are Hesitant to Use Google Classroom toBecome A Student or Co-Teacher in Your Class
Not every teacher is on board the Google Classroom. If you're dealing witha reluctant teacher or maybe a little technophobic, invite them to join yourclass as a student or co-teacher.Invite them to be a student first, so they get an idea of how it works beforegiving them the ability to add and edit the class as a co-teacher. Co-teacherscan do all you can in a class.Inviting teachers:1. Go to the folder where you're going to add them,2. Then press the People tab at the top of the list.3. To prompt as a co-teacher, click the Invite Teachers button, type theirname or email address, and press Invite.4. To inspire an instructor as a student, click the Invite Students icon, entertheir name or email address, and press Invite.

14. Build A Student Demo Account to Show Your Students GoogleClassroom.Google Classroom does not currently give teachers a way to view theirclasses as students. But, if you want to see your course as a student, youmust have a student account. The solution suggested is to use a demoaccount to sign in as a student so that you can see how the school sidefunctions to demonstrate how to use the classroom for your students.If you have access to Google Accounts in the domain of your school, it'ssimple. Some of the teachers don't have this kind of access.In that case, please contact your tech coach or tech support to see if you canget a demo account.
15. Pack Your Digital AssignmentsHow to Pack Digital Assignments This guide is a series of tips to help youenhance how your directions and bundle everything your students need intoyour Google Classroom assignments.These are the tips that will save you time and save your wellbeing!The more detail you provide in the report, the fewer questions you have toanswer, and the fewer reasons students have for not completing the reporton time.
16. Using Moving to The Top to Put Back Relevant Older Content toStudents 'Attention
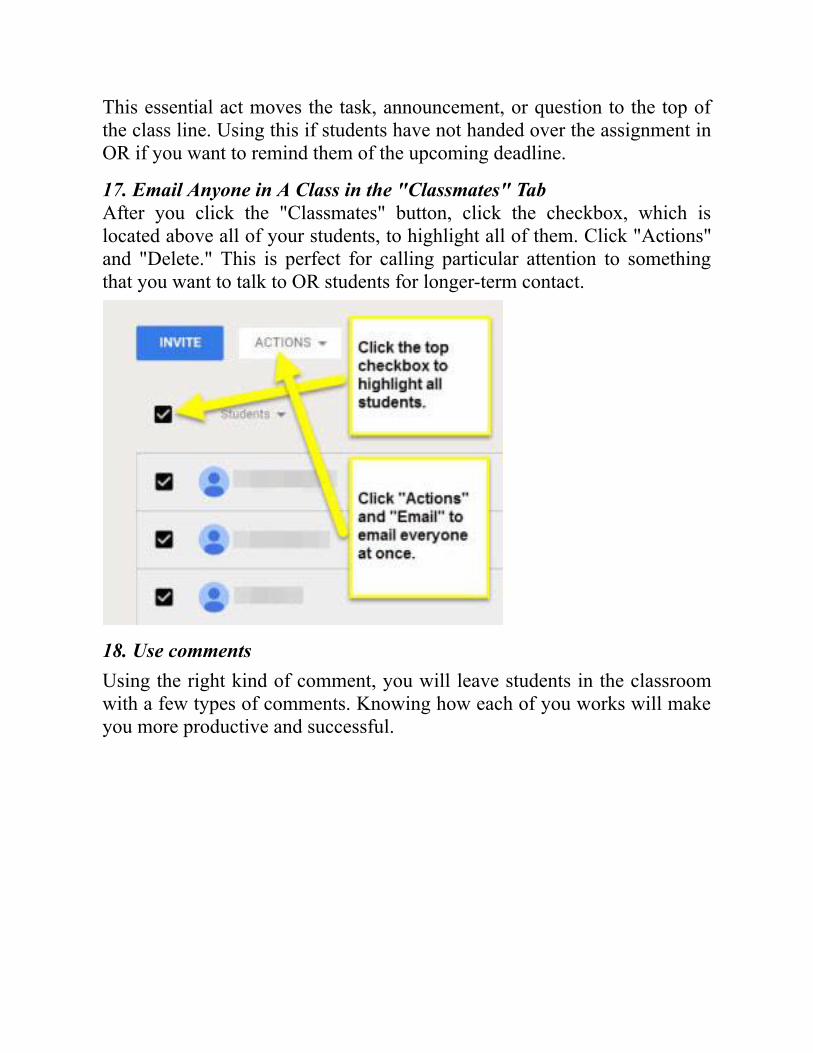
This essential act moves the task, announcement, or question to the top ofthe class line. Using this if students have not handed over the assignment inOR if you want to remind them of the upcoming deadline.
17. Email Anyone in A Class in the "Classmates" TabAfter you click the "Classmates" button, click the checkbox, which islocated above all of your students, to highlight all of them. Click "Actions"and "Delete." This is perfect for calling particular attention to somethingthat you want to talk to OR students for longer-term contact.
18. Use commentsUsing the right kind of comment, you will leave students in the classroomwith a few types of comments. Knowing how each of you works will makeyou more productive and successful.

• Inserting Class CommentsDo so by adding a line in your class stream to the "outside" of the task orannouncement. It would make the statement available to the entire class(vital if it is the response to a question that someone may have).• Add Private Commentsdo so by displaying the results of the test and clicking on the specific test.On the right corner, where you can see student submissions, the commentbar at the bottom adds a message that only the student can see (vital if theyhave a sensitive grade or feedback information).• Making Notes in The Doc/Slide/Sheet/Drawingdo so by clicking on the student file he/she sent to you. Tap the blackspeech bubble button to highlight what you'd like to comment on. It makesa very pointed perspective on particular aspects of student work (essentialto be very precise in feedback).
19. Using Announcements to Share "Right Now" LinksAnnouncements to bring material in the classroom stream without creatinga task for students. Using them to provide students with vital connections,documents/files, and videos they're going to need right now. (If it's aresource that they use, add the support to the "About" tab instead.)
20. Keyboard CommandsUsing the keys instead of the mouse to guide the keys. Keyboard commandsbeat every time you move and press the mouse. When entering classes, typethe grade for a particular student assignment, then click the down key to getto the next student. Use keystrokes instead of mouse clicks to cycle throughstudents to save a lot of time.

21. Reuse PostsDon't recreate projects, announcements, or questions that are identical tothose you've already made. Click the "+" button in the bottom right cornerand select the "reuse post" button. Choose the task, announcement, or queryyou created before. Before you reset it, you can change and upgrade it.You can also opt to make new copies of all the attachments you used beforewhen you reuse a message.
22. Grade Everything in One PlaceClick the three-line button at the top left of the Classroom and pick "Job" atthe right. Here, you'll find all assignments for all of your classes in oneplace. Work your way down the entire list and get to the top of it all in oneposition.

23. Use Email from The Classroom the Way You LikeWould you spend too much time deleting email alerts from the Classroomand wish you could turn it off? Tap the three-line button at the top left of theClassroom and select "Menu" at the bottom. There's a checkbox locatedwhere you can turn off your e-mail alerts. (Or if you turn it off and wishyou could get texts, that's where you turn them on!)
24. Get Ideasfrom other educators who are already using Google Classroom to hang outin a lot of online forums where you can read their posts and ask questions.• Google Classroom Community on Google +• Google Applications on Google Plus Education Community (with GoogleClassroom category)• Twitter hashtag: # Google Classroom (for Google Classroom relatedposts)• Twitter hashtag: # Googled (for general Google updates)• General Pinterest tools on Google Classroom• Pinterest board on Google Classroom by shakeup learning
25. Get the Features You Want in The ClassroomDo you have any suggestions for a new Google Classroom feature? Is theresomething you can do, but I wish you could make things easier? This kindof input is what the Google Classroom team needs from the teachers. Clickin the bottom left corner of the screen and select "Send Feedback".According to a member of the Google Classroom team who spoke to myGoogle Teacher Academy community in December 2014, someone fromtheir team reads every single feedback sent that way.It's how they made a lot of significant improvements to the GoogleClassroom app. And the simpler a feature request, the more likely it is to beimplemented. So, give feedback and send it back regularly!
3.3 Google Classroom Management Tips

Google Classroom will streamline assigning, storing, marking, andreturning student work. It saves hours and removes the dreaded piles ofpaper that need grading (you know the ones that taunt you from the cornerof your desk). One significant advantage for remote work and managementis that you only need internet access to work on assignments and grading.Your large teacher's bag full of papers and workbooks will start gatheringdust.You may need to set up a system for assigning and assessing digital jobs.This can be just as intimidating and frustrating as conventional grading ifyou don't have a way to get through it all. Google Classroom is much likeyour school book or textbook. The way you use it will decide your successwith it.
1. Organizing Your Google ClassroomContent Arrange your contents by folders (subject, month, subject) to makeit easier to access the activities you want to delegate. Many of the items youcharge to Google Classroom come directly from your Google Drive. Whenyou have a robust content management program, the next year with yournew class would be a breeze.
Are your school purchasing the "digital" edition or CD edition of yourtextbooks and worksheets?

You can view these and then save the page to your drive or screen as a JPG(picture format). Next, open Google Slides and set the size of your page to8.5 x 11 inches (regular paper size). Right-click on the slide and click"Context Folder." You may insert a picture instead of selecting a color. Pickthe workbook that you want to delegate, and it will become the backdrop ofthe slide.This means that the students can't push the page around or unintentionallyremove parts of it. Though they can also erase the slide, and you will haveto reassign the lesson to that particular student. When you teach yourstudents how to create text boxes, they will be able to complete assignmentsand apply all of them digitally.Pro Tip : It's time-consuming to transform all your worksheets into GoogleClassroom, so it's not a valid "application incorporation." It's a fantasticpaper saver as well as an organizing resource, but if the task is a digital"filling in the blank," it's no different from "filling in the blank" on paper.Perhaps pick and choose the essential tools that you'd like to offer inGoogle Classroom and start by transforming those worksheets to digitalassignments. There are wholly collaborative and integrated Teachers PayTeachers lessons that you can check out as well.
2. Sharing Links and ServicesThere are two ways to connect to websites. You can create a "connection"as an assignment and submit it to all your students to access it. It also workswith videos that you want your students to use for a lesson orsupplementary information. If this is a connection that you will useregularly, you will want to consider adding this to the "about portion" ofyour class. It's a perfect place to incorporate typing apps, learning tools, orapps that your students need to use regularly. Don't overuse this tool, butyou're sure to put some details here to save yourself time.


3. Keep Your Google Classroom Feed CleanGoogle Classroom feed can be very busy and frustrating if you delegateseveral items every week. Removing older assignments that you haveranked is a perfect way to keep the feed clean and easy to navigate. Theexception to that will be tasks that you would regularly delegate, and thatwon't change much. Such assignments can be re-used and re-posted, withthe option to re-use them in the following year. How you handle your feedis a personal choice. If you want to re-use all those things, then setting themup in such a way that they can be easily edited and re-used the first timeyou allocate them can save you time later.
For younger students, it's best not to "return" the assignment after you'vegraduated. This will clutter the feed of your students, and they won'tunderstand why you're sending it out. They can see the ranking, but it'smysterious, so they probably won't spend time checking it out. Returns canbe reserved for tasks that require corrections only. That way, the studentswill know that if the assignment is back in their feed and not labeled"finished," they need to boost the standard before they apply it again.

More Google Classroom Tips
Email TipsWhen you have older students, use the email feature. You won't want tomess with this feature for the younger classes. Besides, you would like todetermine your expectations for email updates sent to you if your studentmarks a "finished" job. Through a course of 20-25 emails, your SUPERinbox would be easy to complete when a student receives news each timethe job is completed. In the top, left corner of your Google Classroomwindow is three lines (the burger icon). Select "Settings" at the bottom andthen check the checkbox for your email preference.
Online Conversation TipsStudents can launch a conversation about a mission. The interface is closeto a chat window or a website. You may choose to let them use this featureor use it as part of their partnership in specific projects. Until you do so, youmay undoubtedly want to lecture on class standards and digital citizenship.You should interrupt the discussions if they cannot hold the conversation onthe subject or simply use the arguments to talk meaninglessly.
Grading TipsThis might or may not integrate with Google Classroom if you have anonline grading site. You will have to do some work to see what the uniqueprogram options are. You have to open your grade book system in onewindow or tab and raising the size of your monitor to one half. Next, openthe grade list of your Google Classroom and shrink it to fill in the other halfof your computer. Now you can look at your Google classroom ratings byadding them quickly to your classification system.

Tips Shortcut KeyboardsTeach your students the power of Command / Control Z. When they panicthe first time, they have removed a page in the slideshow or a long passagethat they only tap 20 minutes and touch the 'undo' knob unexpectedly,they'll be surprised. Then you should show them how to do the samekeyboard shortcut to undo their mistake before they panic, and they will allbe grateful. Teach them to copy and paste while you are at it. You will needthose skills as your digital career progresses, and the more effective youwill be, the faster you master them.Read about the magic of keyboard shortcuts. Keystrokes are more effectivethan shifting your hand to a mouse and dragging the cursor to the nextwindow. For example, you can use the down key to transfer the cursor tothe next student when entering grades.Google Classroom Proficient (and Freebie!)The software is best used when you delegate digital work and practicemany times a week in Google Classroom. When you want the students touse technology, they have to use it daily. You will use it yourself and alwayswork with it if you intend to be competent.
You Can Start with Free Resources Such as My Google Math CardsAnalysis

This collection of dispositive can be used for group analysis, small groupdiscussion, and practice or individual activities. Once you allocate the set toall students in your class, they will mark "over" when they have completedtheir course. You can see, at a glimpse, who has turned and who wants to dotheir work. Open your submitted presentation to rate your slides and showyour responses. The best way possible to mark them is to transform red (orcolor of your choice) into an incorrect answer.Using this freebie or other tools in Google Classroom to delegate andexecute specific tasks. The more usage of Google Classroom, the more youlearn what you can do with this fantastic software.
3.4 You Couldn't Say Anything About GoogleClassroomLook for The Lines and Points

If you see a three line or three-point button, you can click it for moreoptions. The three lines typically represent the main menu; the three pointsusually contain further actions.
Get It Right the First Time You Sign in To Google ClassroomWhen a teacher or student first selects the correct role – the position of astudent or instructor. If you pick the wrong location, the IT administrator ofGoogle Apps must be contacted to change it.
Place Classes in OrderWhen you teach several classes, create them in reverse chronological orderwhen creating these classes in the Google Classroom. By so doing, they arepresented in the classroom in chronological order.
Don't Clutter the About TabJust add the most relevant links to you About tab all year round. It'll be hardto find something if you overwhelm it with too much stuff!
See the Students SideTo see what the students see, ask a friend to invite you to one of his / herclasses. In this way, you will be a student, and you will see what theclassroom feels like as a student.

Set Comment SettingsDecide as to what students should do on your Google Classroom stream(where students view all the applications, articles, and other contents).Students can then post and comment (students can write themselves postsand class commentary) Just say on (students can't post jobs, but commenton posts of teachers) Just teachers can post or comment (students can't writeposts or comment)
Save It for LaterYou can then schedule your statements, discussion questions, and tasks forlater use without immediately publishing them. Write it now and press the"Assign" button to save it as a draft.
Assign Without a Google FileAssign students who don't have to switch to a Google Paper, slideshow, oranother file for the assignment without a Google account. When the taskdoes not include a script, the students should click on "Mark as done" toinform the instructor that they have completed the job.
Add More Than OneYou can connect multiple images, videos, and links to a task. Be sure toprovide all the student wants and can give the student several choices!
Access Your GradesChoose a list of categories for a particular task or all tasks. When displayingdegrees, click on the gear wheel settings in the top right corner and select"Select assignment degrees" or "Select all degrees"

Annotate and Draw on Documents Using the Android AppThe first two Google Classroom tips on this list are unique to the mobileapp. Do you know there are features in Google Classroom that are onlyavailable on mobile devices (iOS and Android)?The ability to annotate and draw on documents is one of the best features.This can be PDF, Google Docs, Microsoft Word Docs, JPEG, or GIF files.This feature is useful for many forms of tasks, learners, and teachers alike.Students can use this to draw an answer, annotate text, mark an image, andmore. Teachers may use this to give positive input to students.
Randomly Pick Students Using the Mobile AppThe student selector is another nice feature of the Google Classroom mobileapp. Again, this is only possible on the iOS device.The student selector helps you to pick a student from your class list atrandom. It is a smart way to label students equally in the classroom. Go tothe people section and select the icon in the top-right corner.

Subject Organize and Filter ClassworkThe Google Classroom Classwork page helps you to create topics for theorganizing of assignments and materials. Speak of things like categories foryour tasks and supplies.You can arrange the Classwork page in any way that makes sense to youand your students. Most teachers want to build subjects for subjects (greatfor elementary), weeks, study days, and more.Once you've built your themes, you'll see a list of themes on the left-handside and click on a theme to filter the page and see only those things that arelabeled with that theme.
Using Locked Google Forms QuizzesTeachers have been looking for a way to lock up a Google Form Quiz forseveral years to keep students from opening other tabs and being tempted tocheat.The vision is now a reality for people with controlled Chromebooks! Thelocked mode will require students to be "locked" to the Google Form Quiz.

Here’s how it works:Important: To Use Locked Mode, You Need:A G Suite for Education Account.A Chromebook managed by your school for each student.Chrome OS 75 and up.When the Quiz Is Locked: Students Can't Open Other Doors to TheWindowThe teacher will receive an email if the student exits the exam and then re-opens it.Unmanaged computers would not be able to access the quiz.When you build your quiz assignment in Google Classroom, next toChromebook Locked mode, click Switch on.
Distinguish AssignmentsGoogle Classroom provides teachers with the ability to differentiateassignments. Each student does not have to obtain precisely the same task atthe same time.When creating a new assignment, click on the student's drop-down arrowand uncheck "all students," then only check the students or groups ofstudents who need that particular assignment.This is useful for group distinction, as well as shifts, PBL, and evenenrichment.

Label Students in Class FeedbackOur next two Google Classroom tips are for feedback. Tagging specificstudent comments is a perfect way to leave feedback and connect withstudents in a collaborative environment.Google Classroom has two kinds of comments: teacher comments andprivate comments. Tagging students in-class observations allows you tointeract and answer questions to individual students.Although this post aims to provide Google Classroom tips, it is useful tonote that you can also tag students with comments in collaborative papers,slides, etc. and delegate tasks to them.To tag someone with a tweet, simply type the "+" followed by the student'semail address.This is particularly useful if you allow students to post and comment inGoogle Classroom.
Tag Students in Class CommentsAdd Resource Links to Comments and the User Bank Overwrite thecomments by inserting resource links! Even a statement is not enough.Often, we need to provide students with a guide or a summary of adefinition.For example, if I provide feedback on grammar, I might suggest that there isa "comma splice" in the sentence, but if students don't know what it is, itmay be difficult for them to take action. That's why I'm adding a resourcelink to a web page, video, or lesson that will help them revisit the definitionand make the required changes.Note, when you add a link to some form of message, it must contain theHttp:/part of the link so that it can be clicked in the news.

You can set up your most commonly used tool ties comments in thecomment bank for use in Google Classroom grading.
Customize Stream Notification ClassworkThe Stream is your Google Classroom contact portal. It is where you postyour announcements and keep your students updated.

By default, Stream can also show updates of new things posted on theclasswork list. For others, it sounds like repetition, and it can be messing upthe shore. (Ha! See what I did there.) When you are using the Classworktab, you can select a compressed or extended view for Classwork updateson the Stream tab. You can remove them entirely from the Stream tab, too.Go to class.google.com.Please click on the name.Tap Settings on the Stream tab.Under General, select an option next to Classwork on the stream
Bookmark Classwork PageThis Google Classroom tip will save you some time! Often GoogleClassroom navigation can be frustrating and take a few too many clicks toget where you want to go. Since you spent most of your time on theClasswork tab, here is a recommendation for you to bookmark it.In Google Chrome, you can add it to your Easy Access Bookmarks tab.To activate the bookmarks bar, click the three dots near the top right inChrome, then select the bookmarks, and make sure the bookmarks bar isenabled.Go to the Classwork page for the class you want to bookmark.Then simply click-and-drag the lock next to the URL in the Omnibox to adda bookmark to your tab.Right-click the bookmark to edit or shorten the name.It is suggested to bookmark the Classwork page for each of your classes inthe Google Classroom. This will save you much of your money!

Student View Is Different from TeacherView, one of the most useful things you can do as a teacher using GoogleClassroom is to experience it as a student. Students just see an overview ofthe definition. Clicking on the task, students can see a "Your Job" bubble inthe upper right where they will find work that you have assigned to them orwork that they want to add.
Student view when opening the assignment In the Teacher view, clicking onthe assignment strip on the Classwork pages will take you to the assignmentevaluation screen.
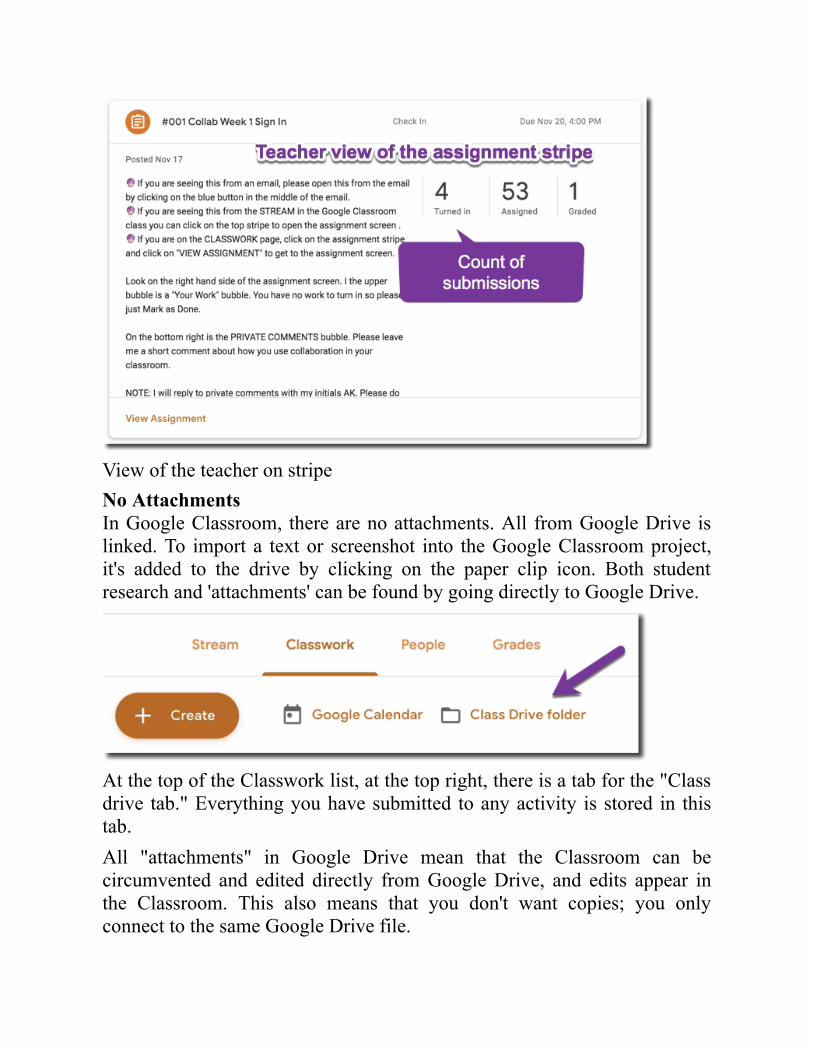
View of the teacher on stripeNo AttachmentsIn Google Classroom, there are no attachments. All from Google Drive islinked. To import a text or screenshot into the Google Classroom project,it's added to the drive by clicking on the paper clip icon. Both studentresearch and 'attachments' can be found by going directly to Google Drive.
At the top of the Classwork list, at the top right, there is a tab for the "Classdrive tab." Everything you have submitted to any activity is stored in thistab.All "attachments" in Google Drive mean that the Classroom can becircumvented and edited directly from Google Drive, and edits appear inthe Classroom. This also means that you don't want copies; you onlyconnect to the same Google Drive file.

You Can Not Edit “Make a Copy for Each Student.”When you're adding a document on Google Drive and pick 'Make a copyfor each student,' be mindful that you're doing a copy. When editing theoriginal, copies do NOT change.
If you have allocated the assignments and failed to move from 'Students candisplay file' to 'Make a copy for each student,' otherwise you will no longerbe able to copy the assignment for each student. If you edit the task tocorrect your mistake, the alternative is unavailable.To correct this, please press the Create button at the top of the Classworkpage and pick "Reuse Article." Do NOT copy the attachments when theyare reused. This makes your Google Drive a mess. The reused post has theoption "Write a copy for every student." After reusing the article, delete theoriginal mistake.
Students Lose Editing PermissionsOnce students click the 'Turn in' key, the document's ownership rights willbe transferred from the student to the instructor. The student is a VIEWER.If the student comments are left in the paper, then the statement isINVISIBLE. You can't see the message until you return it.
Only Ten Objects in A Google Classroomsubject is designed for organizing by themes on the classroom tab. Just tenthings will be displayed in each theme. If the item includes over tenelements, students will see a subtle "See more" click.

Tap the title of the topic to search for it and see ALL activities in thesubject, not just the last ten.
3.5 You Do Want to Know About the New GoogleClassroom

Google Classroom has undergone several improvements over the past fouryears and, with the growing use of Chromebooks in classrooms, theclassroom has become more and more popular. Recent enhancements to theClassroom give students a smart interface with several whistles found inother, more complex classroom management software systems. Would youwant to continue with the new Google Classroom? This is what you need tosay.Control
Many previous Classroom features are integrated on the new Class Settingstab. You can edit the class description here, modify or view the class codeand control stream settings in one place.

Separate TabsThe new classroom has a different source, classes, and people tabs thatmake it easier to organize each portion.
Before the update, it was often difficult to find older assignments byorganizing the current. The latest source is focused solely on advertisingand classroom discussions and effectively removes the ambiguity existingin previous releases. Students may also see new assignment updates on thepage.The new classroom page allows teachers to post tasks and ask questions tocreate subject modules for ease of organizing. As the About tab feature haschanged with the update in the classroom, teachers can use the topic featureto post a curriculum or class resources. Themes can be pushed up or downto allow the user to organize the page in a class-friendly order.

The People page is a forum to connect or remove students, parents, and co-teachers. A dedicated room makes class leaders easy to access andcoordinate.Notifications- No ProblemTeachers and students can now easily access alerts. Notifications can bepersonalized for each course by pressing a few buttons. Teachers can votefor reviews, planned updates, student research, and co-teaching invitations.Students can select invitation notices, tasks, ratings, reviews, private notes,and unsubmitted work.

Present StatusStudents and teachers should keep up to date on the status of all activities.Teachers will see how many users have completed tasks at a glance on theClasswork tab, and the user provides a more general condition whendisplaying the actual job. Students may also see future assignments, orthose turned in or assessed.

Switching GradesThe new platform enables teachers to switch between grades, feedback, andsubmitted tasks quickly. During the graduation of a student, teachers canleave feedback and save commonly used comments on other tasks. TheGUI makes it easy to move between submissions without leaving theclassification method.Why Reinventing the Wheelis simpler than ever to reuse topics and activities for a new class Professorscan now copy a class even if it is deleted. Be mindful, however, that in thecopied class, only some objects are duplicated. The title, section, definition,subject, subject matter, and class posts saved as drafts shall be transferred toa newly produced copy. Teachers will have to introduce students and anynew class announcements.Eventually, teachers will be able to build quizzes directly through the taskstab, with a toggle switch to allow locked mode. The closed way blocksstudents from opening new tabs and from completing a questionnaire. Inclassrooms, this feature can be useful in minimizing cheating by browsingthe internet.
3.6 Google Starting Classroom Approaches Today1. Cover and Store Packed and Posted Tasks That You Did Not GetThrough During Class Time (Do Not Delete Them).Google Classroom does not currently require teachers to hide posted tasks.This makes some sense on the Google side when you think about all theways a single job posted in Classroom embedded itself on Google Driveand Calendar.But teachers may have a frustrating problem. Take this example:Let's say that the night before your English class, you posted an excellentshort story practice. The text is enclosed in .pdf. Two hand-picked videos asa shared meditation task attached to a Google Doc are also included. InGoogle Slides, a supplementary tool provides students with appropriateliterary tools. And you have put in the overview of the assignment aspecified learning target and added instructions.

It takes at least five minutes — maybe more — to pool all these resourcesand post them as a mission.But then the day comes, and we don't get to the activity that was scheduled.There is something else in the way, and we never get a chance to continue.

You Are Left with A Hard Call.Do you delete the post and re-create it before your next class? Or can youleave the job, just change the due date, and agree that some students canread the story, watch the photos, explore Google Slides, and absorb thewhole activity before the second class?There is an answer to this question.What you did is build a dumb classroom called the Staging Area. Wheneveryou find yourself in such situations, you use Re-Post to copy the whole taskinto the school of your staging area. If you withdraw it from the school, it isgoing to work.
This way, none of my planning is lost, and the next day, I'm not repeatingthe entire posting process. My lovely short story operation is saved — nospoilers. Until the next lesson, you simply re-post the assignment from theStage Area back to the correct Classroom, and you're back on track.
2. Allow Real-Time Feedback on PresentationsDo yourself and your learners a great favor by copying and pastingassessment templates to could private comment in advance ofperformances.Include spaces for the overall assessment, performance metrics, star andwish emojis, etc. and input spaces for each student in your class. Having allof this put in place before student presentations, you can give studentsreliable and insightful feedback in real-time — while they present it. Thismeans you don't review their submissions after school, so they're notlooking for input.

Here's the test summary that you put in all the private comments of yourstudents before their last Genius Hour presentations.

3. Using Emojis To Code Learning ActivitiesBegin and unit title and assignment name with the related emoji
and give completed units and assignments an emoji checkmark to indicateat a glance that they are behind us.

4. Include Learning Goals in Any Given Task or JobIt is not as much a matter of convenience as it is an excellent pedagogy.These will also bring you back to the unit plan or curricular expectations,keeping you grounded. And it's always going to be there to remind studentswhat the purpose of the increasing learning experience is. "Why are wedoing this? "
5. Get A Fast Sense of Your Students 'Progresspost-self-assessments in the Google Classroom, particularly in the MathUnits. It's an easy but effective way to collect information about yourstudents 'learning and development, which guides my next steps.Place a multiple-choice question right on the Classroom; you get these tests.Tap on any button, and see which students have selected the level ofproficiency.

6. Share Homeroom Classes with Other Teachers Who Teach the SameGrade Level Courses You DoIt makes it fast and simple for teachers to keep track of where their studentsare in the curriculum to see what they've been doing recently, and it's also aconvenient way to exchange resources. Use the Re-Post command to drop itright into your class.
7. Share Homeroom Classrooms with All Specialized TeachersAllow your Art Teachers, language teachers, and Band Teachers to dropannouncements and services into your lessons. Sure, your band instructormay have a Google Classroom set up for your homeroom students. Even ifthey don't, getting access to the classroom is a perfect option.
8. Post to Several Classes OnceIf you are a specialist instructor, take advantage of this feature. You don'tneed to post assignments in each classroom separately. Post all relatedclasses at once.

9. Change Google Classroom Alerts to Mute Emails and ClassroomMessages That Do Not Belong to YouAfter sharing the previous two strategies on sharing Google Classrooms,this strategy has become relevant. Switch off the Classroom alerts that youdon't teach.

If you haven't taken this step, you will receive email updates from anyassignment resubmission or private comment that each student in eachclassroom makes. Within my house, some teachers and EAs have access toup to ten or more classes, which makes for a lot of notifications!Consider this by restricting the alerts to the classes you teach. With thatsaid, you can respond to private comments when you can. Any excellentcommunication can happen to some students.
10. Structure of The Homeroom Students Every Week to Review EmailInboxes and Arrange Classroom Assignments
Email is dull for most middle and high school students. My 8th-grade stepis going to tell. They're not involved in it.But the classroom encourages important teacher-student communication viaemail. I will post reviews in private comments in the school to students inthe form of an email. I may email selected students to remind them to sendassignments, post announcements about upcoming events, or post-self-assessment check-ins to track learning. Some or all of these interactions runby email, so students must check their inbox once a week.

They're not going to do it on their own, so we can't ask them to. We need toset aside 15 minutes or more per week to make sure this life skill is goingon.Others would say the email isn't going to be around forever, and maybethey're right. Yet it's been operating well for the last 25 years, so it's notgoing anywhere fast. Make sure that all of your students know how tomaximize their inbox.

11. Build A Google Classroom Around the SchoolThis allows school-wide polls, debates, hot lunch order submissions,student photo submissions for the yearbook, delivery of announcements,etc. Full disclosure: I am not using this at the moment — partly to slowdown the influx of ideas that I am moving colleagues in new teachingculture. But I set this up at the previous high, and it works wonderfully.
12. For Administrators: Build A Google Classroom for StaffEmployees, With Administrators as Employees and Teachers asStudentsThis is a smart way to reduce e-mail traffic. Conduct staff assessmentsrapidly and effectively. Post "assignments" such as professionaldevelopment plans and require "students" (teachers) to apply whencompleted. Or, post reporting tools and open comments so that teachers canview posts as boards of discussion.It's Google Classroom. It isn't a mind-blowing benefit, but it works. Followthese techniques to get the most out of Google Classroom, optimize yourtime and resources, and better serve your students.

Chapter 4: Use Google ClassroomEffectively
4.1 Works with Google for EducationTo develop technology to help students learn, they are trying to envisionwhere the future of education is heading. The latest Future of the ClassroomGlobal Study describes emerging developments in education, assisted byresearch. Here's how goods and projects resonate with each of these trends:New TechnologyGoogle allows students to go on virtual field trips, and there are 1,000 toursto choose from, including Carmen Sandiego tours published by HoughtonMifflin Harcourt. Throughout the rest of the year, they've been rolling outan enhanced Expeditions experience across a range of Chrome OS apps.Students may also use the Tour Creator recognized as the AASL 2019 BestTeaching & Learning Website to create their virtual reality tours. They cantake their fellow students or parents on trips of their city or school using theExpeditions App.
Innovating TeachingThe Teacher Center, a library of free online training for educators, continuesto expand. For teachers to get started with this software for the first time,they have added courses for Expeditions and G Suite Editors (GoogleDocuments and Slides) to supplement existing training sessions onClassroom, Forms, and Jamboard.They've also built shorter courses around a range of subjects, such ashelping teachers support English-language learners, using Chromebookaccessibility tools, or getting started with CS First and Applied DigitalSkills curriculum.And local experts are there to help educators who want to get the best out ofGoogle technology.
Classroom Coaching

For educators to benefit from technology innovation, they need to knowhow to incorporate it into their classrooms. The Innovative Learning Projectteaches teachers how to make effective use of classroom technology, andhave a new training program for administrators, teaching them how to helpinstructional coaches in their schools.They are also helping school administrators measure the Google forEducation implementation of their organization through goods (G Suite andChromebooks) and programs (Certification and Transformation) with thelaunch of the EDU Transformation Study.Also, we have extended our services to help school and community leadersthink about centering equity in their school transition. So, they have built anew Educational Equity page with tools and case studies to help schoolleaders understand how investment can be essential to the seven pillars ofthe Transition Process.
Digital AccountabilityApplied Technical Skills has seven new lessons in technical well-being.Teachers can use these project-based free lessons to teach their studentshow to develop healthy digital habits, prevent online scams, consider theirdigital footprint, and more.

Life Skills and Job ReadinessRelated Digital Skills now have new lessons to train middle and high schoolstudents to use G Suite fluently in college, the workplace, and beyond. Toprove their mastery, students should take the technical G Suite credentialand apply it to their resumes and applications. Other new lessonsconcentrate on exposing students to machine learning, making art withGoogle Papers, measuring the chance, and discussing the past of women.
Computational ThoughtCS First, a coding program for elementary and middle school students, ishosting a new professional development session for teachers to incorporatecoding practices into English Language Arts, math, and science classes.Google acquired last year; Workbench is a software repository for educatorsto explore, develop, customize, and share lessons and tools. At ISTE, weare announcing a new integration with Workbench Blockly programmingcanvas and Google Boards. This enables people to create Blockly programsto monitor multiple Bluetooth devices (robots, drones, sensors,microcontrollers) and to send or retrieve data from Google Sheets.They help their students develop problem-solving skills, navigate the digitalworld safely, and prepare for future careers. As classrooms continue togrow, their products also enable educators and students to develop.
Helping Developers Make More Choices for EducatorsAs those involved in education know, learning is a team sport. Teachers,school staff, administrators, teachers, parents, guardians, and developers allplay a role in ensuring that teachers leave the classroom with moreinformation and skills than they did when they began. That's why Google ispartnering with developers to build on what's possible in the school.From virtual lab simulations to literacy help for people with differentlearning needs, we're inspired by the applications that developers havedeveloped for Google Classroom and G Suite for Education. We arecommitted to helping developers through our software APIs and opendeveloper ecosystem, allowing all kinds of apps to be integrated withGoogle tools.How Google For Education Empowers Developers

The Google for Education Technology Partner Program offers developersaccess to:• Technical SupportDedicated developer relations support and tools, training, Google eventssuch as Google I / O, access to Google User Groups, and more.• Marketing SupportBranding collaboration support, apps on Google for Education platforms,involvement in co-marketing programs, access to market growth funds(primary partners only), invites to exclusive partner events, and more.• Google InitiativesCloud incentives for start-ups, developer grants, and launchpad rooms.

4.2 Gооglе Clаѕѕrооm Еxtеnѕіоnѕ And AppsThe simple setup process for the Google Classroom is relatively intuitive,even for first-time users.There are now hundreds of third-party applications and websites thatintegrate with Google Classroom. Many of these apps may be partneredwith Google, while others may be developing and releasing their third-partyadd-ons in the Chrome Store. When you use Google Classroom extensively,incorporating other EdTech resources may be a way to streamline yourteaching. For example, say that you want your students to learn somevocabulary words using Quizlet; you can use the Google Classroomintegration to share and allocate a similar flashcard to your class directly.And, if you're looking for other online learning material, there's integrationwith publishers like Newsela, Khan Academy, and BrainPOP, among others— you'll find all sorts of posts, videos, and other educational content toshare with your students.
The Benefit of an Еxtеnѕіоn For Tеасhеrѕ?Generally speaking, Google Classroom uses an API (application programinterface) to link and exchange knowledge with all of your favorite devices.Hundreds of applications and websites are incorporated, and we'll highlighta few of our options below.EdTech integrations that seem complicated, but we've narrowed it down tothe basics. Here are three main ways to streamline classroom management:1. Export Class Rosters from Classroom to an app or website.2. If you've shared the list between the app and the classroom, organize thecoursework and presentations that integrate material from the app.3. Using the Google Sharing button to share content from a website to theclass.If you love Google Classroom and any of the resources, combining themwill make the teaching process much more straightforward. If you're not toofamiliar with the classroom, check out the teacher feedback to learn more.Google Classroom isn't for everybody, of course. If you miss theintegrations, you'll probably still want to explore how these fantasticresources will make your classroom better.

Excessive Numbers of Extensions?Before you skim through these and remember that there are so many otherchromes to slow down your browser and speed is one of the chromes.There is no pattern on how many to use – here your kilometer. The speed ofyour computer, your usable memory, your wireless Internet speed, howmany tabs you have open can all affect your browsers' apparent pace, soattach and delete extensions so that Chrome stays snappy and useful as ateacher removing applications, plugins, and attach-on. Leaving unused add-ons will slow down Google Chrome and Chrome OS. Remove these unusedapplications, plugins, and add-ins for Google Docs whenever possible tokeep up with the best results for Google Apps.
Deleting Apps, Extensions, And Add-OnsAs you continue to explore different Chrome apps, extensions, and GoogleDocs add-ons, there will be ones that you try and decide not to use. Leavingthose available add-ons can slow down Google Chrome and Chrome OS. Tomaintain the best performance when using Google Apps, delete theseunused apps, extensions, and Google Docs add-ons whenever possible.Deleting Google Chrome apps and extensions follow similar steps. Forapps, right-click on the App icon when viewing apps in Google Chrome orthe App Launcher of Chrome OS and select Remove from Chrome... asshown in the following screenshot:

For deleting extensions, right-click on the extension icon beside the omnibar and choose Remove from ChromeRemoving add-ons in Google Docs involves a few steps, which are asfollows:1. Select Control add-ons in Google Documents. From the menu Add-ons

2. In addition to the add-on, click on a Control button.
4.3 Best Extensions and Apps for GoogleClassroomExtensions and Apps Every Teacher Should Know
ClassDojoClassDojo allows teachers to change actions in their classes quickly andeasily. The extensions and apps to the Google Extensions and apps everyTeacher should learn. It tracks and produces behavior data that can beshared by teachers with parents and managers."
Google Keep"Catch easily what you think and share these thoughts with your family andfriends. Talk a voice memo on the go and get it transcribed automatically."

Glogster Edu'Glogster Edu' lets you build Glugs – online multimedia posters – with text,pictures, graphics, sounds, links, sketches, data attachments, etc. '

Sketchpad"You can play with images by incorporating new elements into thecomposition, inserting notes, changing graphics, overlaying text onsomething, or going backward and forwards in time forever through thechanges you make."
VoiceNoteII: Speech to Text"Typing with your voice and speech recognition. Simple and functionalnotepad."
LucidchartLucidchart is a visual communication device that simplifies and simplifiesdrawing diagrams. Work with infinite numbers of others to build and editpictures in the real-time, fuse, and synced changes instantly-perfect forcollaborating with teams and customers.
Socrative TeacherEngage, analyze, and personalize your class with Socrative! Educators canperform formative evaluations with their Socrative Chrome app throughquizzes, quick question polls, exit tickets, and space race events. Socrativecan instantaneously rate, compile, and include findings to assist you indefining opportunities for more instruction.
Any.doAny.do is used by over 10 million people to coordinate everything theywant to do.

Loup Collage"Loupe takes hundreds of pictures and, in second, instantly producesbeautiful photo collages in whatever form you want. Any.do makes it easyto recall your personal and work activities wherever you are going. Turnyour images, objects, words, and even logos into your heart. You can shareyour collages with friends, with relatives, place them on a website or yourblog!"
Pixlr ExpressPixlr Express is a powerful and fun photo editor that allows you to quicklycreate, resize, and change any image with an entirely ad-free experience.Choose from more than 2 million free effects, overlays, and borderscombinations to personalize your pictures further. You look like a pro, eventhough you have never edited a photo before when you are Pixlr Express.
Pixlr-o-MaticPixlr-o-Matic is an amusing and easy-to-use photography/darkroom tool toadd effects, overlays, and borderlines to your images easily. If you want tolook vintage, grunge, clean, or trendy, Pixlr-o-Matic makes it easy in threesimple steps. You will never come out of new styles with more than 2million editing combinations to choose from that make your pictures lookstunning.
DictanoteDictanote offers you a highly advanced text editor and an integrated multi-lingual speaker recognition.
PowToonPowtoon is an interactive video software and interactive presentationprogram. A simple animated video can be easily generated and transformedinto an animated show!

Class Charts"Seating and behavior charts are an integral part of a useful tool kit forteachers. They help organize the students into suitable learning groups andmitigate problems with school conduct – the classroom teacher expresses itsauthority before the lesson even begins.
PearDeckYou can open a Google Slides presentation once enabled and use PearDeckto add questions to any slide. There can be multiple choices, briefresponses, or numerical questions. Students must sign up for a video, whichthen appears on their computers.The questions that you have inserted will appear on every student computeras you move through the presentation and give them a chance to respond.You can see what each student responds to, but you can share theirresponses anonymously with the class to see how others respond. Whenyou've skipped to the next slide, you've answered the following question forstudents. Ultimately, you can save and export student responses to GoogleSheets and later test how students respond, and decide the course of actionusing the data you collect.
Auto Text ExpanderAuto Text Expander allows you to type a shortcut into emails for lengthytexts. In reaction to the parent or student inquiries about their grade, forexample, maybe you also type "Thank You for your email." You can createa shortcut with Auto Text Expander, such as 'ty,' which automatically insertsthe text you like. You can set up various alternatives based on text bits,which you often use. This lets you write emails and respond to emails youreceive efficiently.

CheckmarkCheckmark is an extension that lets you leave quick feedback on GoogleDocs for a student's article. Instead of typing out all of the comments youwant to add, you can make any comments that you often make in studentpapers like "new paragraph," "run-on," or "comma mistake" and insert yourcomment easily. You have to open the student document and highlight asection of the text after downloading and opening the extension. Then asmall box with the options for comment will appear, pick the correctexplanation, and it will be added automatically. You do have the right tomake additional notes, but Checkmark can help you with correct feedbackin grading papers more quickly.
Goobric + DoctopusGoobric and Doctopus work together and work exceptionally well withGoogle Classroom. Doctopus pulls ties to each task in Google Classroomassignments and essays. Goobric helps you to create a rubric in which eachdocument can be opened. You can build your products or use the models inGoobric. Goobric opens a page when you open a student assignment andGoobric simultaneously, so you can click on the boxes of the element youwant to join, so leave the comments. Goobric adds and offers an averageranking, so it can notify the student that their assignment is marked andready for display. Such two additions help to streamline student reviews.
PocketPocket is an extension to save products, videos, and websites you'd like tovisit later. After downloading Pocket, you just press the extension in yourChrome browser when you come to a video or site that you want toremember, and Pocket saves it to you. You will access all the blogs, videos,and articles you have saved when logging into Pocket. It is a perfect way tokeep track of stuff you want for future lessons or professional growth.

ScreencastifyScreencastify is an extension that lets you video something on your screen.This is special because you can open your laptop with a website or articleinstead of having to make PDF versions of all that you want in your photo.You can even choose to record the Open tab, the entire monitor, or even addyour webcam to your video in the lower corner after downloading andopening Screencastify. You can also use your mouse to write and highlightmultiple parts of your screen once you start recording. You can save yourvideo to your Google Drive, where students and staff can share it. This isespecially useful for eLearning or updating your LMS lessons.Hopefully, these Google Chrome teachers' extensions can help you rate andinteract more effectively.
Best Chrome Apps and Extensions for StudentsChrome Apps and Extensions for Elementary School
IXLDirect input and depth plus amid focus on Bottom line drills: Students willdevelop targeted skills with lots of practice exercises and visually appealingtasks.Grades: Pre-K–12 Price: Free to try, Paid
Raz KidsLeveled readings with progress-tracking improve the differentiated readingprogram Bottom line: it is worth considering as a complement to yourreading curriculum with a wide variety of leveled books, simple assignmentand evaluation, and comprehensive progress reports.

Learning JournalA flexible, interactive collection appeals to instructors, students, andparents Bottom line: a robust online learning and communication platformthat illustrates student development over time.Grades: K–12 Price: Free, Paid
Applications and Extensions for Middle SchoolCK-12Super STEM, Social Studies, Highly Customized Learning Tool Bottomline: Making content available to children with various learning styles, CK-12 could be the path to mastery for individual students.Grades: K–12 Price: Free
EdulasticA useful training evaluation tool measures the achievement of expectations.Bottom line: Efficient program helps teachers who are expected to analyzeand monitor student success in achieving aspirations.Grades: K–12 Price: Free, Charged
TES Teaching with BlendspaceBuild multimedia lessons with engaging but not - so-interactive styleBottom line: allows you to add a lot of multimedia tools, but distinguishcontent and assessment to avoid lazy teaching or learning.Grades: 3–12 Price: Free

Apps and Extensions for High School
PlayPositThe comfortable design makes it simple to leap into interactive videoBottom line: with features that are both basic and useful, it's easy to learn;adding interactivity to video is a snap.Grades: 2–12 Price: Free, PaidEdmodoManage classes, content, and communication with the social LMS platformBottom line: this free platform enables teacher-monitored classroomcommunication but lacks excitement.Grades: 4–12 Price: FreeThinkCERCAWell-structured lessons promote in-depth review, reflective writing Bottomline: this is a ready-to-go, research-backed tool that focuses on CCSS-aligned and AP-level critical reading and writing skills.Grades: 3–12 Price: Free, Pay
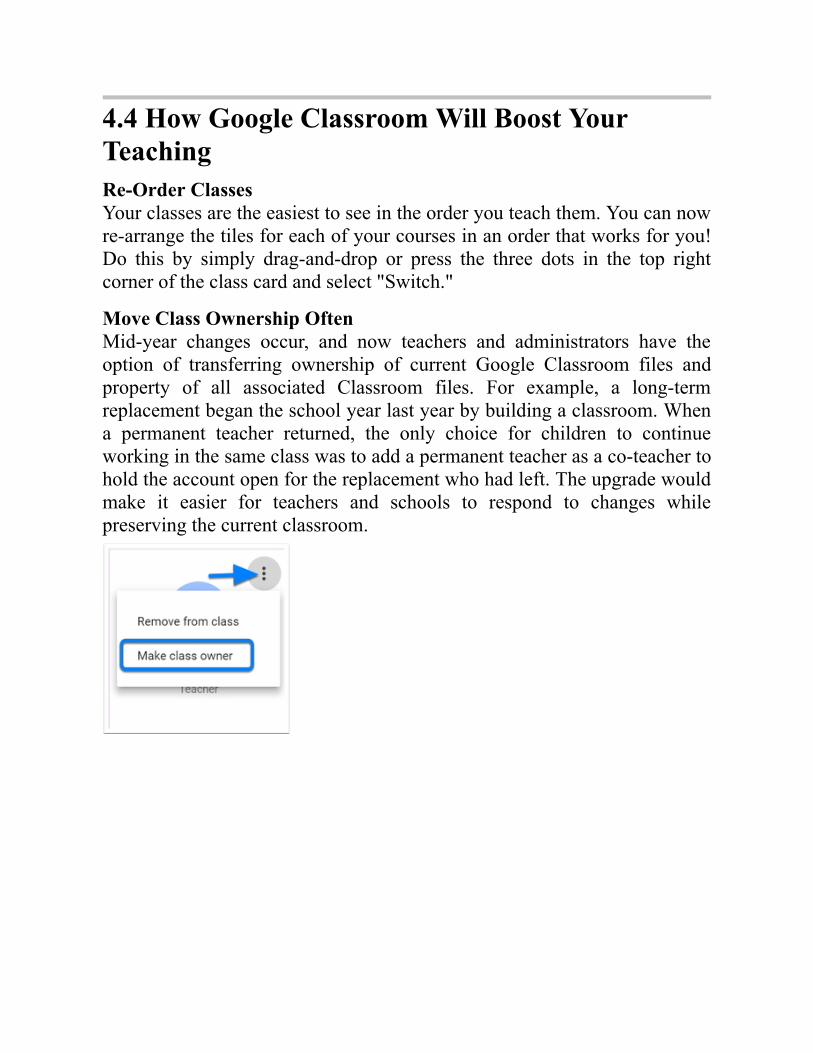
4.4 How Google Classroom Will Boost YourTeachingRe-Order ClassesYour classes are the easiest to see in the order you teach them. You can nowre-arrange the tiles for each of your courses in an order that works for you!Do this by simply drag-and-drop or press the three dots in the top rightcorner of the class card and select "Switch."
Move Class Ownership OftenMid-year changes occur, and now teachers and administrators have theoption of transferring ownership of current Google Classroom files andproperty of all associated Classroom files. For example, a long-termreplacement began the school year last year by building a classroom. Whena permanent teacher returned, the only choice for children to continueworking in the same class was to add a permanent teacher as a co-teacher tohold the account open for the replacement who had left. The upgrade wouldmake it easier for teachers and schools to respond to changes whilepreserving the current classroom.

Keeping Kids Involve While at HomeThey are keeping students involved while at home Digital learning may beisolation and disengagement for students. Sitting always in front of thescreen for several hours watching videos can force a student to moveforward quickly or even miss a lesson altogether. To keep them engaged,open virtual conversations about what they're learning. Inexperience on thewater cycle, invite students to pause the video and enter an interview in theGoogle Classroom (using the Stream) about the last time they encountered athunderstorm. You can also use Google Docs and Classroom comments tohave a two-way conversation with students as you give feedback on theirwork — another perfect technique to indulge in when you can't see them inperson.
Frequent Assessment of Student LearningFormative tests help you ensure that students continue to develop whenaway from school. Test for comprehension during community teaching byposing a survey question in the middle of the lesson and presenting theresults in real-time. It can also help you "take part" in a virtual world.Quizzes in Google Forms provide auto-grading features that allow you toadd videos, photos, and as many answers as you want. You can alsodelegate graduated discussions to Google Classroom, and students candemonstrate their expertise through project-based free learning assignmentsusing slide presentations, Docs, or Pages.
Continue to Connect with Hangouts MeetWhen the routine of students is interrupted, many realize how much theyenjoy the structure of the school and learn with their Teacher. In a time ofuncertainty, it is necessary to retain this feeling of comfort and protection.You can see them on Hangouts Meet if your students have Wi-Fi access.You can also use this forum to create video discussion parts for students tointeract and help their colleagues who may have difficulty with concepts.Switch on vital phrases to help students concentrate and make them able toread the spoken language during the call.

Scheduling is an extra task. Using Calendar Term Slots, students who needadditional support can sign up to meet 1:1 or with you in small groups. Dueto sporadic or non-Wi-Fi connectivity, or because children's careapproaches are evolving, not all students can enter a virtual classroom at thesame time. Your lesson will probably be a combination of live videos andthe sharing of experiences for students who can't do it. Fortunately,advanced features in Hangouts allow you to record your lessons withstudents.
Check in With How Your Students Are FeelingCheck out how your students feel social, emotional learning can also go onat a distance. Much like you can use Hangouts Meet to "work" for yourstudents and preserve the atmosphere of your classroom, you can providethe students with other ways to express their feelings, when away fromschool. Using Google Forms, create mood tests for students to share theirpassion every day. In the form, students can apply for a conference with theinstructor if additional help is required. You may also create a private blogfor students to think about the experience by journaling or capturing videoreflections.
Think Beyond the ClockFor distance learning, you don't have to think about the time constraints ofthe regular day: rush students into school or hurry to complete your coursebefore the bell rings.Students may take more time to do other things and learn lessons naturally.Make the most of this opportunity and expand your experiences to includemore "choose your adventure" activities instead of a set lecture and lessonschedule.
Explore More Approaches to Distance LearningAs educators and administrators draw up contingency plans and discussmaking classrooms completely immersive, we are here to help. We saweducation leaders reaching out to each other, exchanging ideas, and helpingthrough Google Educator Groups and other social networks such as Twitterand Facebook. See this webinar on approaches for distance learning.
Google Classroom Bolsters

Using Google Classroom, teachers can carry their papers in a singledashboard for all their lessons. Just a few clicks, you can allocatehomework to every classroom digitally.Google Classroom makes the work of educators simpler as it prevents travelto the copier."If a teacher decides to produce a sheet of paper for his students, she mustbuild it into a word processor then print it out, make photocopies, send it totheir students, hope no one will ever lose it (which, of course, somebodystill does) and then pick it up at the end of the class," Souderton writes.Google Classroom for education streamlines this cycle because teacherssimply create worksheets online.Google also supported collective learning. Teachers will share content withtheir peers in one way — editing a document and then sharing a differentversion with them — a record without editing functions.Discussions in the classroom are encouraged more efficiently by a studentresponse system, which allows teachers to start conversations led byquestions on the virtual page of the class.The Share to Classroom extension allows educators to give all of theirstudents a website or other material for a lesson at once.Catherine Davis, Director of Instructional Technology at the Pilgrim Schoolin Los Angeles, writes in a Google blog: "The new extension helps me toengage my students and help them perform their learning at our school in1:1 app.Google Classroom is being used in the Colony High School "as a forum forstudents to access regular assignments and have faster, morecomprehensive, and meaningful input on their work.""With Google Classroom, students have immediate feedback, and theinstructor may evaluate in depth the questions have been answered properlyor wrongly by which students," writes McKenney. "The teacher can seeareas at a glance that need reteaching or clarification." Students who skipclasses can quickly catch up on the assignments using a web-basedclassroom.
Ease IT Workflow

Google Classroom is also ideal for managers and IT teams. Alerts informthem whether suspicious activity happens. Teachers and students can alsomonitor password reset by IT teams, so the wait time is minimal.The application program interface (API) can quickly synchronize GoogleClassroom rosters with other systems, such as a learning managementsystem, or a student information system.In the classroom area, API also allows teachers to use add-ons and otherdevices easily.Google Classroom administrators have access to all types of data. You canmonitor patterns in usage, active users and classes, and posts made bystudents and teachers."With these reports and new ones to be implemented in the future, we hopeadministrators can have the experience they need to give their teachers andstudents the best help possible," wrote Andrew Garrett, a Google Classroomsoftware developer, on a blog announcing the latest update.
Google's Classroom Updates Remain Consistent with TrendsGoogle has kept classroom updated, including personalization, with currentlearning patterns. A recent update makes it easy for teachers to build jobsfor each student or community. Google has marketed it as a safe way ofoffering educational support to struggling students.The integration of Google classrooms with Chromebooks and G Suite forEducation apps have made it possible for students to take care of theirlearning, which is a critical element of personalization.Google Chat help constant foster conversation between students andteachers.Teachers can provide input in real-time that is impossible in a purely pencil-and-paper environment. Google tools and software have built a networkingatmosphere that allows even younger students in challenging circumstancesto reach out to their teachers. Second-grade students in California's ArcadiaUnified School District also contact their teachers when they have issueswith their assignments.

Google Classroom has grown into new learning opportunities, such as adultlearning programs and seminars. Google has examined the technologyintimidation aspect by using the classroom to bind the students into aninternational exchange program.
4.5 Google Classroom vs. Apple ClassroomGoogle Classroom helps teachers to coordinate their classroom materialwhile incorporating Google Drive to improve workflow and studentorganization. Next, with the advent of Apple Classroom, teachers have thepower to assist in the management of classrooms in their hands.If you're teaching in an environment using both Google Apps and iPads,combining these two items will help take your classroom technology skillsto an impressive level!Google Classroom1 – Managing Digital WorkflowAt its heart, Google Classroom links directly to Teacher and student GoogleDrive accounts by providing an easy-to-follow digital workflow that alsoapplies file naming conventions through the assignment creation phase. Forinstance, when a teacher assigns a Google Doc via Google Classroom, acopy can be made automatically for each student and then saved in theDrive Classroom folder. By making individual digital copies of tasks,exchanging problems and permissions can be avoided. For moreinformation on Google Classroom, visit the Google Classroom page ofEdTech Teacher.
2-Sharing KnowledgeA difficulty that many teachers face in managing a digital world is thesuccessful sharing of digital tools with their students. Google Classroomprovides teachers with a place to centralize their digital resources andefficiently distribute them to students. If it's holding a permanentconnection to the Teacher's website in the About section or sharing aninteresting article in the Flow, Teachers can use Google Classroom toadequately house and allocate resources to students while saving time,reducing stress, and streamlining job performance.

3 – Making an Assignment Calendar for StudentsAfter a class has been created, Google Classroom automatically generates acalendar for that class inside the Google Classroom. It can be viewed as acalendar on the Google Calendar teacher and student page. When teachersmake an assignment or add a due date in the Google Classroom, an eventwill be created automatically in the class calendar. This summer, a group ofhigh school students clarified that the value of the calendar should not beseen as "just a fun feature." They swore the schedule produced by GoogleClassroom and its ability to be accessed through their devices. Teachersmay also consider accessing the calendar settings withincalendar.google.com and modifying the access permissions to the public.Through doing so, teachers will share a public connection to a calendar withparents to create a direct assignment calendar for their students.
Apple ClassroomWhile Google Classroom offers a platform for teachers and students toconnect and communicate, the Apple Classroom App provides teacherswith management functionality lacking from the iPad app marketplace.Teachers use Apple Classroom will not only have the software on their iPadto disseminate content and tools but will also have the opportunity toconnect and track student iPads while in class.
1-Air Viewing Student ScreensThe Apple Classroom App provides teachers with the opportunity to viewstudent research. By selecting the student's iPad from the list in their AppleClassroom app, teachers would be able to see the student's iPad throughtheir Apple TV or other mirroring apps.When using Classroom instead of Airplay, the instructor is the manager andcan pick the student computer to view. If you use Airplay, students areresponsible for choosing the right Apple TV. With the instructor in charge,the workflow is much more manageable. The opportunity to share studentscreens with minimal interference in classroom teaching would make thetechnology and learning process more open for teachers and students.
2-Grouping Students for Distinction

The Apple Classroom also offers teachers the ability to build groups ofstudents directly from the app. After classifying students, the instructor mayname a group based on any category and then launch specific groupapplications, open particular websites, or lock the students' screens. A groupof students may benefit from using Google Docs, but another one might dobetter in Google Slides. By using the Apple Classroom, the instructor willbe able to open these apps to students without calling different groups ofstudents by name. This ability to put out differentiated content andresources will change learning and interaction in the classroom whileteaching a diverse group of students.
3-Managing the iPad Classroom Separately from ClassesTeachers do have several new features to control better a classroom full ofiPads, such as reset forgotten Apple ID passwords, remotely lock studentscreens, and remote monitoring of student screens. Although no technologywill take the place of a teacher in terms of classroom management, the useof these devices can improve the iPad classroom experience as well as helpteachers and students learn how to use the computer properly.

Putting the Two TogetherIt is not uncommon for teachers entering the world of classroom technologyto be overwhelmed by the additional computers, electronic documents,applications, and classroom management strategies required for students tolearn successfully. It is in these circumstances that both Google Classroomand Apple Classroom may be of great value. Although different in theirskills, both can work hand-in-hand to create a better learning atmospherefor students.

Google Classroom: ConclusionIt is not rare for teachers entering the world of classroom technology to beoverwhelmed by the additional devices, electronic documents, applications,and classroom management strategies needed for students to learnsuccessfully. It is in these circumstances where it can be of great help While Google is well-known for organizing students to work on GoogleDrive, creating individual copies of GPMs and organizing digital content,these three underutilized features of Google classroom will help you andyour students become much more productive while using technology in theclassroom. What teachers will learn about Google is the organized andaccessible system of assigning work and turning in work and also the factthat it is 100% paperless, so they don't need to worry about having largepiles of work cluttering the desks. The most likely to get the most out ofGoogle Classroom are those teaching English or even Science, as studentscan easily add essays and research papers from google classroom. However,while some may think that Google classroom is more advantageous togoogle classroom, others may prefer google classroom, which is providedby apple. The use of iPads at school has become more popular in the world.It seems appropriate, therefore, that these pads will have an app that willallow 'teachers to concentrate on teaching so that students will focus onlearning, which is the primary purpose of the iPad.The Classroom App focuses on making the lesson more engaging betweenthe teacher and the student. First, students will be given a shared iPad thatthey can use in the class while working on the assignment.So, as they work, teachers can use the iPad to see what device every studentis using, as well as the method that was most recently used by that student.There is also a Screen View option where teachers can see the same screenthat is displayed on the student iPad (the student will be alerted when theirteacher is watching their screen). This software will help teachers makesure students don't get sidetracked.If you enjoyed this book, please let me know your thoughts by leaving anAmazon review.I would really love to hear your thoughts!

Thank you so much!-Emily

Google Classroom ReferencesTen Reasons Why You Should Use Google Classroom.Blog.mimio.com. Retrieved from https://blog.mimio.com/ten-reasons-why-you-should-use-google-classroom .Gettingsmart.com. Retrieved fromhttps://www.gettingsmart.com/2016/11/6-reasons-google-classroom-great-tool/ .10 Benefits of Google Classroom Integration - The Tech Advocate.The Tech Advocate. Retrieved fromhttps://www.thetechedvocate.org/10-benefits-of-google-classroom-integration/ .Teachthought.com. Retrieved fromhttps://teachthought.com/current-events/changes-new-features-in-google-classroom/ .What's New in Google Classroom? [2020 Updates] - EdTech Team.EdTech Team. Retrieved fromhttps://www.edtechteam.com/blog/2020/02/whats-new-in-google-classroom-2020-updates/ .4 Hidden Features of Google Classroom - EdTech Teacher. EdTechTeacher. Retrieved from https://edtechteacher.org/4-hidden-features-google-classroom/ .How to Use Google Classroom to Train Your Employees - TheTech Advocate. The Tech Advocate. Retrieved fromhttps://www.thetechedvocate.org/how-to-use-google-classroom-to-train-your-employees/ .6 Great Google Classroom Tips for Teachers | Common SenseEducation. Common Sense Education. Retrieved fromhttps://www.commonsense.org/education/articles/6-great-google-classroom-tips-for-teachers .7 Things You Need to Know About the New Google Classroom -The Tech Advocate. The Tech Advocate. Retrieved fromhttps://www.thetechedvocate.org/7-things-you-need-to-know-about-the-new-google-classroom/ .Tips for Using Google Classroom - dummies. dummies. Retrievedfrom https://www.dummies.com/education/internet-basics/tips-

for-using-google-classroom/ .How to use Google Meet for eLearning, online learning - DitchThat Textbook. Ditch That Textbook. Retrieved fromhttps://ditchthattextbook.com/google-meet-elearning/ .10 Google Classroom Tips You Didn't Know. Shake Up Learning.Retrieved from https://shakeuplearning.com/blog/10-google-classroom-tips-you-didnt-know-suls029/ .Google Classroom Management Tips. Lauracandler.com. Retrievedfrom https://www.lauracandler.com/google-classroom-management-tips/ .Can overthinking kill you? What are the ways on how to eliminatenegative thoughts from recurring? Mindfulness. Reddit.com.Retrieved fromhttps://www.reddit.com/r/Mindfulness/comments/c58umy/can_overthinking_kill_you_what_are_the_ways_on/ .
Google Apps: Introduction
Google Apps (formerly known as Google Applications for Your Domain) isa built-in suite of Google purposes that consists of an email program, aWYSIWYG webpage editor, an online calendar, on the spot messagingcustomer with voice skills, and a web-based phrase processor cumspreadsheet software.Business organizations, instructional establishments, and even humans (likeyou and me) can use the Google Apps provider for free (though a premierversion is additionally available). And since Google Apps require little orno technical expertise, it can also be a blessing for small commercialenterprise proprietors who have little or no price range for IT.Google servers host a range of factors of Google Apps (like calendar, email,spreadsheet, phrase processor, etc.), and so the quit customers are savedfrom the hassles of putting in or upgrading software programs at their end.Administrators can get entry to and control a person’s bill even though aweb-based manipulate panel is present. The digital collaboration points ofGoogle Docs are some distance greatest and effortless than what ispresently presented via Microsoft Office applications. To get commencedwith Google Apps, you’ll want a net area name. Recently, Google partneredwith registrars, Go Daddy and eNom, to promote area names at $10/year.Domains offered thru Google come in bundled with Google Apps requiringno configuration via the owners. The drawback is that India’s unique arealike .in or .co.in can’t be bought by way of Google yet, even though theycan nevertheless be built-in with Google Apps.

If you plan to use a current internet area with Google Apps, simply makepositive that you have to get entry to your DNS settings, which is usuallyreachable with the area host.Google Apps is handy in two flavors – the well-known (aka free) versionand a premier (aka paid) edition. The premier version subscribers get 10GBof email storage house (as hostile to 2GB+ in the free edition) and a 99.9%uptime assurance for email.Other top-class amenities encompass getting entry to 24/7 to assist viaphone, covering all contextual classified ads on Google offerings, andnumerous superior aspects tailor-made for the enterprise.The premier version doesn’t come low cost — it charges a whopping $50per consumer account per yrs. - however, the desirable information is thatmost families, enterprise proprietors, and persons will be pretty contentmaterial with the choices of the well-known version because, besides phoneguides and small inboxes, Google is supplying the identical functions ineach the editions.Google Apps provider is a runaway success, and plenty of that can beattributed to Gmail, the web-based email software of Google.In a generation where 86% of all electronic mail messages that hit ourinboxes are spam, Gmail is geared up with some of first-class unsolicitedmail filtering algorithms that have proved to be very fantastic in preservingjunk mail out of our mailboxes.Other than anti-spam technology, Gmail offers more significant than twoGB of storage house even in the free version of Google Apps. If yourpersonnel or household participants choose a laptop mail purchaser likeMicrosoft Outlook or Thunderbird as an alternative to the AJAX-basedinternet interface of Gmail, they can nevertheless use their computersoftware program with Gmail. The usage of the POP gets entry to thecharacteristic of Gmail, which is once more free for all users. Google Docs& Spreadsheets is any other beneficial utility bundled with Google Appsthat might also exchange the way you write and share archives with co-workers and clients.Think of it as an online model of Microsoft Word or Excel softwareprogram where the appear n’ experience and facets are pretty comparable toMicrosoft software program, barring that you compose archive interior,internet browser, and information is saved online (on Google servers). Bythis, you can access information from any pc related to the internet.

Google Docs & Spreadsheets is tightly built-in with GTalk, the immediatemessaging customer from Google. In quite a several areas, workers can editthe same file/spreadsheet concurrently – they can open a chat window andtalk about /review adjustments made via different authors in actual time.The subsequent massive query is whether or not corporations must ditchMicrosoft Office in favor of Google Apps? Well, it’s a no-brainer thatGoogle Apps pose an actual hazard to Microsoft Office, the money cow ofRedmond. The digital collaboration points of Google Docs are excellentand straight forward than the present provision with the aid of MicrosoftOffice applications.There are some downsides, as well. Google Apps doesn’t have anyPowerPoint fashion software program for developing presentations.Secondly, it saves all your private information (in the shape of spreadsheetsand Word documents) on Google servers freeing the firewall of yourcompany. That can also no longer be to the liking of some companies.Microsoft is also readying Google Apps like hosted provider (dubbed‘Office Live’) that is presently accessible solely in the US, Japan, and a fewdifferent nations. Microsoft Office Live offerings will additionally provideinternet-based applications, branded electronic mail, and internet sites;however, in contrast to Google Apps, the Microsoft online provider willseamlessly combine with Microsoft Office software.
Before getting started with a Google Apps summary, I’d love to share someinformation about me. I am a 26-year public high school American teacher.I hold a Bachelor’s Degree in History, and my passion is technology appliedto teach. I have always used Google tools since 2000, and now write booksabout online teaching to explain to other teachers how to use those tools foreffective learning.
Thank you for choosing this book! If you have a few seconds, please leavea short review; it means a lot to me, I would so much love to hear yourthoughts!

Thank you so much!-Emily

Chapter 1: Understanding GoogleApplicationsApps related to google are a suite of web-based messaging andcollaboration purposes that Google hosts on their servers. Google affordsthese purposes as a “service,” as a substitute rather than a software programto download and install. To get admission to these applications, you use anet browser on a pc related to the internet.Google Apps is backed via the equal infrastructure and assets supplied byusing the general Google services. It aspects 99.9 share uptime availability,administrative support, and different company assist elements explicitlydescribed in the Google Apps Service Level Agreement (SLA).Google Apps customizes purposes for distinctive industries, as describedbelow:
✓ Google Apps (Free)Gmail has (up to ten free email accounts), Google Calendar, Google Sites,and Google Docs.
✓ Google Apps for EducationFree functions for schools.
✓ Google Apps for BusinessThe paid version affords Web-based utility equipment for collaboration.
✓ Google Apps for GovernmentWeb-based and authorities licensed collaboration tools.
✓ Google Apps for Non-Profit OrganizationsCollaboration and conversation equipment for US nonprofit organizations
1.1 Significance of Google Apps

Many elements contributed to our choice to “go Google.” Increasing licensecharges and the complexities of working the previous Novell GroupWisemachine supposed escalating prices and risk. The current price rangedisaster mixed with the projected boom of the University required us tolocate an extra fine and cost-effective solution. Many higher schoolingestablishments have confirmed that Google Apps have been an answer and,to a massive extent, established right here at Georgia Southern with theprofitable implementation of college students and preliminary checking outusing a group of workers and school volunteers. Based on what weunderstand today, we estimate that Google Apps saves the group more than$200,000 yearly while promoting accelerated collaboration and innovationall through the University.
More specifically, Google Apps provides:
Lower Infrastructure Costs
All your email is saved securely on Google’s servers, so we are going towant to keep email servers no longer on-site.
Ability to Similarly Consolidate Email Platforms
We get rid of duplication of offerings by way of shifting to one email,calendar, and file sharing answer offering students, college, and a group ofworkers with a nation of the artwork tools.
Lower help Costs
Because Google hosts the email and calendar services, there is no extraemail patron software program to hold on your computer.
Innovative Options
We can leverage the Google Apps platform’s capable collaborationequipment to furnish the University neighborhood with the easy-to-use kitfor sharing data and getting work completed efficiently.
Highly scalable Surroundings

With Google Apps, the potential of our electronic mail continues to developrobotically as Georgia Southern grows, and we keep away from manycomplexities, dangers, and future costs.Access to offerings from anywhere, whenever – Google Apps are designedto function in our online world and is purposeful with any pc or cell systemwith an Internet connection, somewhere in the world;
Security and Survivability
Google’s protection assets are world-class, and some distance outpaces thesources that any single more fabulous schooling group should ever provide.Google Apps gives a sturdy and enormous protection infrastructure that hasexceeded the American Institute of Certified Public Accountants Statementon Auditing Standard 70. Google facts facilities grant redundancy ofofferings and duplication of statistics throughout large geographical areas,making them resilient to common catastrophe scenarios.
State of the Art Aspects
With Google’s next-generation applications, faculty, college students, and agroup of worker function in the surroundings of facts collaboration. Googleis continuously innovating new functions and capabilities. Googleadditionally presents a programming interface that approves the Universityto create our very own Google-based applications.
1.2 What Are the Different Google Apps?Google has a lot of applications. Perhaps too much, in specific cases.Amid all the conspicuous titles and strangely covering contributions,Google’s wing of the Play Store holds some truly helpful fortunes —cunning manifestations by the maker of Android that is merely standing byto be found.

Here are several unexpected directions that Google applications will assistyou in doing a wide range of intriguing stuff with your Android gadget. Ofcourse, any of them could vanish any day with almost no notice — this isGoogle we’re discussing, all things considered — yet for the occasion, inany event, they’re out there and prepared for the taking. Furthermore,indeed, they’re all free.Here are several special applications that must be considered by everybody.
Google MapsGoogle’s whiz application needs no presentation. Google Maps is thepioneer in the handy guide and GPS space. With speedy and dependablebearings, Google Maps get clients where they have to go via vehicle, openvehicle, or doggin’ it by walking.On the head of their underlying guide achievement, Google Maps likewiseoffers indoor guides (think exhibition halls, air terminals), 3D maps, and aroad sees include. Google Maps additionally has a worked-in-lookalternative for finding close-by neighborhood organizations in yoursnapshots of need.
Google NowGoogle Now is an ongoing expansion to the Google applications group,giving clients the most recent news and updates for what is essential to mostof them as people. It does this through a card determination frameworkwhere clients mark “cards” (fundamentally classifications) that they esteemsignificantly.Sports addicts can get prompt game updates about their preferred groups,while music fans can get the most recent news about shows going on intheir regions. Google Now can likewise follow your drive course anddisclose to you the following train you have to catch or which streets to beatthe traffic.
Google+ LocalGoogle+ Local lets clients find close by diners, shops, and amusementscenes profoundly appraised utilizing the Zagat framework.Some may state that it energizes a total absence of arranging and that it isgotten endemic of present-day society. Others may say it supportssuddenness! Take your pick.

One of a kind part of Google+ Local that separates it from other what‘s-close me-right-now applications is the capacity to see close-by food jointssuggested by your companions in your Google+ Circles. (This would be allthe more energizing if more individuals were utilizing Google+; right now,you might be unable to discover any buddies investigating cafés onGoogle’s online life stage.)
Google Play BooksGoogle Play Books is Google’s rendition of Kindle. Google Play Books letsclients read their digital books in a hurry with determinations like NewYork Times successes, just like a lot of free works of art like Pride andPrejudice.Google Play Books has some social highlights, similar to an original wordreference and the capacity to match up your bookmarks across gadgets tokeep perusing on your telephone where you left off on your tablet.Eventually, however, Google Play Books comes up short on the sparklingchimes of Kindle. It feels like an application Google felt committed tomaking... yet, it didn’t try investing an excessive amount of energy.
Google WalletGoogle Wallet carries shopping into the future, letting clients storeMasterCard’s, platinum cards, faithfulness cards, and gift vouchers on theirtelephone to be utilized on the web and in-store buys. Card data is put awayon secure Google cloud servers, adequately taking out the blasting wallet ofages past. Making a buy is as necessary as tapping your telephone to anNFC terminal at checkout.While Google Wallet is an incredibly slick thought, an absence of broadappropriation (of both the Google Wallet application and NFC terminals)has denied this progressive installment alternative the “credit” it merits.
Google VoiceGoogle Voice is an inviting move to the exemplary voice message thatcomes standard for most versatile clients. Google Voice permits clients toset up their personal Google Voice number. This can be utilized to causemodest universal calls, to redo phone message messages, send free instantmessages, and read voice message transcripts (this one is particularlyuseful.)

There are more highlights as well, similar to call recording and call sending,which initiate an extra cost.
Google Search AppThe Google Search application gives clients a similar accommodation forversatile inquiry, likewise with a work area search. The Google Searchapplication additionally contains extra highlights like customized resultsdependent on the immediate area, voice proficient pursuit alternatives, andthe capacity to look through the Web or telephone/tablet substance.
Google ShopperGoogle Shopper is a value correlation application that has been deceivedout with someone of a kind highlights; the Google Shopper application canperceive items by spread craftsmanship, standardized identification, voice,and text search.Clients can think about costs between online merchants versus naturalareas, read audits, and the sky is the limit from there.
Google GogglesGoogle Goggles is a picture acknowledgment application in which clientscan snap a photograph of a physical item, and Google reacts by producingdata about the captured image.Google Goggle is a truly fantastic bit of app manship; at present, GoogleGoggles can react to anything 2D and do things like giving accurate dataabout milestones, deciphering an outside menu, and perceiving work of art.

Google ChromeGoogle Chrome is a portable Internet program that interprets a portion ofthe application’s most notable highlights, similar to numerous tabs and indisguise mode, from work area perusing to versatile perusing. Likewise,clients can adjust bookmarks across Chrome programs, proceeding tosmooth, versatile, and working areas, while keeping away from hiccups.
1.3 What Are the Key Benefits of Using GoogleApps?Google is a solid trendsetter in the specialized administration industry. Overten years prior, they spearheaded requests in the enormous confusion ofdata that made up the internet. Today the turmoil develops, but they keep onhaving the option to support demand in their hunt administration. It’s no bigsurprise that they would, in the long run, branch out to handle the confusionthat exists. For getting organizations associated with the data, they have toremain on top of their staff and clients. Google Apps for Business carriessome cloud benefits that most organizations in the present market require tostay in line with their objectives. Here are the key advantages of utilizingGoogle Apps for your Business.
Accommodation of Remaining AssociatedIt has become standard for many businesses to work permanently and in thecloud. Email, archive sharing, and visit carry that administration to even thelittlest business, which is an enormous advance up from the times ofsending documents and sorting out telephone calls as the primary methodsfor remaining associated.So far, in my current utilization of the framework, it’s been straightforwardto make a report and offer it, video, or message immediately with someonewithout going through the motions.The best accommodation factor is the point at which you discover thisshould all be possible from any cell phone, cutting the line and letting youremain associated with anyplace. Even though the weight of requiring aweb association may back you off, the remainder of what you need isreadily available.
Unwavering Quality in a very much Perceived Brand

The advantages of unwavering quality originate from the diminishedmultifaceted nature that would regularly be related to any of the aboveadministrations. This qualification as a Google administration is significantbecause the brand has gotten very much perceived for its unwaveringquality in the administrations it gives. I have utilized other self-facilitatedemail administrations before while at past organizations. There were timeswhen the email would lose all sense of direction in travel or set aside anextended effort to contact its crowd. There were even examples where emailsimply didn’t work by any stretch of the imagination. Would you be able toenvision two or three days or even seven days without email operational? Itresembled being sent back to the stone ages.
Productivity with High Esteemed AssignmentsThe client experience is natural for any event. The usefulness is utilized fora business, which implies practically zero preparation for theirrepresentatives. Since it’s on the cloud, there is no requirement forprogramming updates to be introduced routinely. It’s likewise packagedwith their quick pursuit device to discover things rapidly and effectively yetnot be secured by the tumult of developing data.This outcome expands profitability and a more joyful working environmentsince it’s no pleasant battling innovation to complete things.
Administering Google Apps is SimpleThe administrator interface is dead-easy to utilize and simple. All that youneed to control for your space is a catch or switch in the back end.The Admin Control Panel makes it far simpler to explore essentialadministrator capacities than any Microsoft server programming. You caninclude, erase, or suspend clients, move responsibility for archives, makenom de plumes, and change the least secret phrase necessities.You can likewise give innovation capable individuals (TRPs) in yourbranch workplaces the capacity to include/erase clients without wreckingother area settings.
Spend Staff Time on Preparation and Improvement; not on lookingafter Frameworks

Appropriately keeping up an email and schedule server with 99.9% uptimeis tedious and requires a talented administrator to be accessible about everyminute of every day to investigate blunders. Google Apps liberates thattime and conveys plenty of extra instruments.The most well-known choice to Google Apps in legitimate administrationshas been Microsoft Exchange. Accord is that any shop should commit asegment of tech just to keep up Exchange and envision issues.The time expected to keep things running would only now be utilized toprepare and bolster clients.
Google Apps is Free for Non-Profit OrganizationsOne of the significant preferences of Google Apps is that it is exceptionallymodest. On the off chance that you are not qualified as a non-benefit,Google Apps is generally modest, and you can locate their full chargingInfo on their site.This incorporates the accompanying highlights:
Gmail, Calendar, and other Google ServicesEmail relocation devicesExtensibility APIsCustomer Service
Contrast: this cost with the least expensive choices from Google Docs’rivals:
WordPerfect Office: $179.99/seat (no non-benefit rebate)Microsoft Office: $199.99/seat ($30/seat with non-benefitrebate)Apple iWork: $79.00
These devices imitate just a small piece of the Google Apps environment –that is, the word processor. Full undertaking frameworks, for example,Microsoft Exchange with SharePoint, include substantial extra expenses.

Google Apps exceptional Capacities can help Lawful AdministrationAssociationsPast supplanting capacities gave by another programming; Google Appsoffer obvious highlights intended to change and improve office working.
A. Collaboration
Features like archive sharing, synchronous altering, shared schedules, andtalk makes bunch work more uncomplicated, and urge office individuals toturn out to be progressively mindful of every others’ work.
B. Searching
Documents and messages in Google Apps are intended to be looked at asopposed to arranged by the client. This implies that clients can invest lessenergy in arranging documents and don’t need to know and recall a specificarrangement of association to discover what they are searching for. Asshown by the “LSNC Findability” Project, moving to a framework wherealmost all office information is accessible through Google SearchAppliance (GSA) can help workplaces fundamentally increment theirviability.
C. Integration
Google Apps are intended to associate with one another and are all the moreimpressive in the blend.

Chapter 2: Google Drive - For CloudStorage, Synchronization, and FileSharing
The range of far off employees is on the rise, and the want for these out-in-the disciplines to get admission to data on demand is growing. It’s estimatedthat 70% of the international team of workers works from domestic at leastin a week. The cellular personnel is right here to stay, and the influence onmany organizations is turning out to be a wonderful one ensuing in highercommunication, collaboration, and flexibility.The advantages of mobility can be helped or hindered with the aid of theincorrect technology, however. Cloud gets the right to digital files,correspondence, workflows, and different work-related features that want tobe comfortable, intuitive, dependable, and, most importantly, secure. Thescience additionally desires to be configured to work across a couple ofdevices, from smartphones and pills to computer systems and laptops.
2.1 Introduction to Google Drive

The perfect best-distributed storage arrangements play pleasantly withdifferent applications and administrations, making reviewing or alteringyour records feel normal. Particularly when applying business settings, youneed your other programming and claims to have the option to recover inensuring the utilization of assistance that effectively validates with differentapparatuses by the use of a severe deal. Box and Dropbox are excellent insuch a manner.The scope of the abilities of cloud-based capacity administrations isinconceivable. A considerable lot of them have some expertise in aparticular region. For instance, Dropbox and Sugar Sync center on keepinga matched up envelope open all over the place. Spider Oak underscoressecurity. Some distributed storage administrations, for example, AppleiCloud, Google Drive, and Microsoft OneDrive are generalists, offeringenvelope and record matching up, yet additionally, media-playing andgadget synchronizing. These items, even twofold as joint effortprogramming, offers continuous archive co-altering.Particular from, however, covering now and again with distributed storageis online to reinforcement administrations. For example, a portion of thisCarbonite is about catastrophe recuperation, while In the Drive is theobjective with matching up and sharing abilities.Most cloud administrations do offer some degree of reinforcement, nearlyas a result of their planned capacity. It follows any records legitimatelytransferred to a cloud administration that are likewise shielded fromfrontline disappointment faced since there are duplicates of these items inthe cloud. In this case, genuine online reinforcement administrations canback up the entirety of the documents in your device, not only those in asynchronized organizer structure.Though adjusting is tied in with overseeing select materials, reinforcementwill generally be a mass, just on the off chance that play. With adjusting,you pick the envelopes, reports, and media that you need prepared access toand spare them in the cloud for simple access. With reinforcement, youensure all that you figure you may lament losing. Simple, prompt accessisn’t provided with online support, nor is it the point. Genuine feelings ofserenity are.
The Deal with the Cloud

Just to clear up any disarray, your drive is some portion of cloud-basedcapacity administrations alludes to putting away your documents someplaceother than your PC’s hard drive, as a rule on the supplier’s servers.As one tech savant put it: “There is no Cloud. It’s simply another person’sPC.” Having information in the cloud enables you to get to those documentsthrough the web. Your information is typically scrambled before making theexcursion over the internet to the suppliers’ servers, and keeping in mindthat it lives on those servers, it’s likewise encoded.All around structured administrations don’t transfer whole records eachtime they change. They simply move the changes, sparing your associationtransmission capacity. You can get to your cloud records through anapplication or utility programming introduced on your PC.When presented, it generally shows a little warning symbol and makes youradjusted organizer structure that fits into Windows Explorer or the macOSFinder.You can likewise get to the documents utilizing your internet browser. Youneed a web association for this to work; however, if you are incidentallywithout a good association, the administration holds up until you have anassociation to puts everything in order at that point.

Free vs. PaidMany distributed storage administrations have an open record that usuallyaccompanies a few confinements, such as the measure of capacity or a sizebreaking point on documents you can transfer. It helps lean towardadministrations that offer some degree of free assistance, instead of time-sensitive, which is preliminary since that lets you completely coordinateand help your daily life for a period of half a month, during which youdiscover how it functions and what may turn out badly with your specificarrangement.What might turn out badly? Human mistake represents a decentarrangement of distributed storage disasters. However, the dropped internetweb network is another normal miscreant.What’s more, every network access endures the incidental blackout. Make afew inquiries, and you’ll hear tragic accounts of how distributed storage canturn out badly for your routine usage. The advantage of paying for datastorage is that it, as a rule, accompanies extra help from the supplier. Thereare rare chances that anything turns out badly, you can get somebody on thetelephone to assist you with settling the issue.There are different reasons to pay for distributed storage software andapplications, from getting significantly more space (a terabyte truly doesn’tcost all that much any longer) to having the option to transfer hugedocuments. That last advantage is pertinent to visual originators, videoeditors, and other visual artisans who regularly have colossal records.Different benefits of paying for your distributed storage usually incorporateexpanded access to document form history (which means you can re-establish a significant strategic agreement to the adaptation you had beforeyour partner made a lot of incorrect changes), greater security, or morehighlights for joint effort and collaboration.There are numerous online record sharing programming projects and stagesaccessible on the commercial center with differing levels of usefulness andvalue focuses. Most sharing locales offer free record alternatives andobvious highlights. However, most businesses should put resources into alayered arrangement. Some additionally fill in as an archive stockpilingcenter point for a whole association. In contrast, others center only onsafely getting a document starting with one spot then onto the next. All inall, what’s the best document sharing site? Contingent upon yournecessities, here are some mainstream alternatives to consider.

Numerous clients are now acquainted with Google Drive since they’veutilized the stage’s 15 GB of free extra room for sponsorship up close tohome records. This recognition can help associations that pick the step tolimit the expectations to absorb information among representatives.Information is consequently adjusted with all gadgets connected to therecord, and changes are spared naturally.Authorizations can be set ready for survey or altering, and others outsidethe association can be welcome to see download and team up — no emailconnection required. Archives, pictures, spreadsheets, and more can besorted out effectively; however, regardless of whether you experiencedifficulty finding a document, the coordinated inquiry included that Googleis known for.
2.2 Upload and Download Files and Folders onGoogle DriveYou can transfer, view, share, and alter documents with Google Drive. Atthe point when you move a record to Google Drive, it will occupy room inyour drive, regardless of whether you transfer to an organizer possessed byanother person.Documents including:
RecordsPicturesSoundVideo

Transfer Documents and OrganizersOn your PC, you can transfer documents from drive.google.com or yourwork area. You can transfer documents into private or shared envelopes.On your PC, go to drive.google.com.
At the upper left, click New and afterward File Upload orFolder Upload.Pick the record or container you need to transfer.Drag records into Google DriveOn your PC, go to drive.google.com.Open or make an organizer.
To move files and envelopes, drag them into the Google Drive organizer.
Use Backup and SyncIntroduce the application on your PC.On your PC, you’ll see an organizer called “Google Drive.”Drag documents or organizers into that envelope. They will transfer toDrive, and you will see them on drive.google.com.

Convert Records into Google GroupsIf you need to transfer records as Microsoft Word reports, you can change asetting to change over documents.Note: You can just shift Google Drive settings from your PC.Utilizing a PC, Go to drive.google.com/drive/settingsClose to “Convert Uploads,” check the crate.
Transfer records with a similar nameIt is a rare chance that you transfer a document with the same name, GoogleDrive will move the File as an update of the document as of now in GoogleDrive.
To keep Two DocumentsOn your PC, go to drive.google.com.Transfer a document.Snap Keep as a discrete document.
2.3 Managing Files on Google DriveOne of the ways is to see how to oversee documents and envelopes onGoogle Drive is by getting knowing the basics of managing your googledrive. It is straightforward stuff too, yet at the same time, something thatneeds a couple of tips to liven up our enthusiasm about it.There are specific points of interest in utilizing Google Drive for yourexamination work. It’s free and accessible from wherever. Everybody witha Google account has it, as a matter of course, attached to your Googleaccount.
Set Specific Share Permissions for Files inside Shared FoldersGoogle Drive is a community situation with share organizers and free. Youcan open up an envelope on Google Drive to explicit individuals in yourgroup with email addresses as the screen capture underneath shows you.

For this, you need to imagine a scenario in which you are required to shareeach record of the typical organizer diversely with a various blend ofindividuals. It’s simple. Offer the organizer by identifying your colleaguesas you typically would. At that point, open every individual record andprecisely expel the individuals you would prefer not to place in that specificFile. This is a simple stunt to shroud specific documents even inside astandard envelope.
Reveal to How Many Files Are in a FolderWindows makes it simple to perceive what number of sub-organizers anddocuments are there inside an envelope with a straightforward right-clickand choosing Properties from the setting menu. Google Drive doesn’t makeit so natural. However, you can observe the number with a right-click.
1. Right-click an organizer and select download.2. In the Download exchange box, click on All Items to uncover
the all outnumber of records. Snap-on Cancel if you don’t planto download the files. The one preferred position of thisalternate way over others is that it remembers the number ofrecords for the sub-organizers.

It probably won’t give you a simple method to tell the number of entiredocuments, yet Google Drive, in the best of Google Search, makes it easyto look through all your put away records. On the hunt, the box clicks thedropdown menu symbol to uncover the pursuit boundaries – Type,Visibility, and Ownership. Enter the search query and start your pursuit.You can likewise utilize Google Search administrators to fine-tune yourpursuit. An incredibly valuable hunt administrator is the date administratorthat limits your inquiry, as indicated by the document date. It is aconvenient, efficient device when you have several records bolted on thecloud.Include File(s) to Multiple Folders
Now and again, document association may include rapidly adding a specificrecord to numerous envelopes. Suppose you are making organizer sets forvarious groups, and every File needs to have a typical rule document.Follow the straightforward strides to add different documents to numerousorganizers.
1. On Google Drive, select the records you wish to add to manyenvelopes by tapping the checkbox for the documents.
2. Select the Move to fasten or on the other hand, you can tap onthe dropdown for more and afterward click on Move to.

3. Select the different envelopes you need to move the scrapes toby holding down the ‘Control’ key for Windows or the ‘Order’key for Mac.
4. Click on Move.
Any progressions made to the files in a single folder will be reflected indifferent documents in different organizers as google already doesn’t makemany copies of a file.
Expel Duplicate Files from Google DrivePhysically searching for copies by arranging the records indicated by namecould be an activity in dissatisfaction concerning the chance that you havetwo or three hundred transferred there. A more straightforward tiporiginates from Marco Merman on his Google+ post. You should downloadand adjust your documents to your work area with the Google Driveapplication and afterward utilize a copy record discoverer on the GoogleDrive envelope on your nearby hard circle. The Google Drive organizerusually is situated at this way: C:\Users\Your Name\Google Drive
Erase Duplicate Files Quickly with These Tools
Perhaps the quickest approach to stop up your hard drive is to store copyrecords. Mostly it happens that likely you aren’t mindful that you have

copied documents available in the drive. They originate from an assortment.Consequently, Delete File Versions and Save Storage SpaceGoogle Drive keeps past variants of a document. This can include somesignificant downfalls of the complete extra room on the drive as it adds onthe off chance that you have a great deal of them put away in the cloud. Youcan empower Google Drive to naturally erase past adaptations when they’remore established than 30 days or in situations when there are more than 100recent renditions of a similar document.
1. Select a record in Google Drive on the web.2. Snap-on the more dropdown and select Manage corrections.3. For record renditions, you need consequently erased, uncheck
the Do not auto-delete setting. Old variants will be naturallyeradicated, and Google Drive will just keep the most recentversions.
Make Your Google Drive Folder the Default Documents FolderClients moving can utilize this tip to make the Google Drive envelope onthe work area their default report organizer. Using the Google Driveorganizer as another Library area makes it simpler to spare archives with atick instead of moving the records around indeed.
1. Right-click on the Documents envelope and select Properties.

2. Select include an organizer and find your Google Driveenvelope. Select the Google Drive as in the screen captureunderneath, and select the Set spare area. Snap-on Apply.
3. Presently, when you need to spare any record, you can pickfrom the areas in the Open/Save discourse box and pull on theoff chance that you need to spare the archive in yourDocuments organizer or on Google Drive.
2.4 Sharing Files and FoldersThe capacity to share reports and work cooperatively is the most crucialaspect concerning Google Drive! Here are hints for the way to begin.This substance is obtained from Google’s full assistance site on sharing andget started with shared drives
Offer a Solitary Thing with Explicit IndividualsUtilize this technique when you realize the email address (Hampshire orsomething else) of everybody you are sharing.Open a document in Google Docs, Sheets, or Slides.In the upper right corner, click share. Under “Individuals” in the “Offerwith others” box, type the email address (Hampshire, or something else) ofthe individual or Google Group, you need to impart it.

Tip: Search for Hampshire contacts by composing a name in the crate. Topick an individual’s view, remark, or alter the record, click the Down boltclose to the content box down bolt symbol.Click Done. The individuals you imparted to will get an email telling themyou’ve shared a record.
Offer a Solitary Thing utilizing a ConnectionUtilize this strategy when you don’t have the foggiest idea abouteverybody’s email address, aren’t sure on the off chance that they all have aGoogle account, or necessarily need a record to be all the more broadlyaccessible. You can have the connection available to the Hampshire peoplegroup or the entire world.Open a record in Google Docs, Sheets, or Slides. In the upper right corner,click share.Snap “Get shareable connection” in the upper right of the “Offer withothers” box.To pick whether an individual can view, remark, or alter the document,click the Down bolt close to “Anybody with the connection.” Down boltsymbol.Note that the connection will default to be perceptible by HampshireCollege accounts as it were! To extend access outside of Hampshire, clickthe Down bolt close to “Anybody at Hampshire College” and select “More”for extra choices.A record connection will be duplicated to your clipboard. Attach the link inan email or anyplace you need to share it.
Sharing a FolderIf you intend to work together with a gathering of individuals on a familiarpremise, for example, inside a division or class, we recommend making amutual organizer or a shared drive. At that point, each thing set in thisenvelope will consequently be imparted to the gathering.
Making a FileGo to drive.hampshire.eduOn the left, click New > Folder.
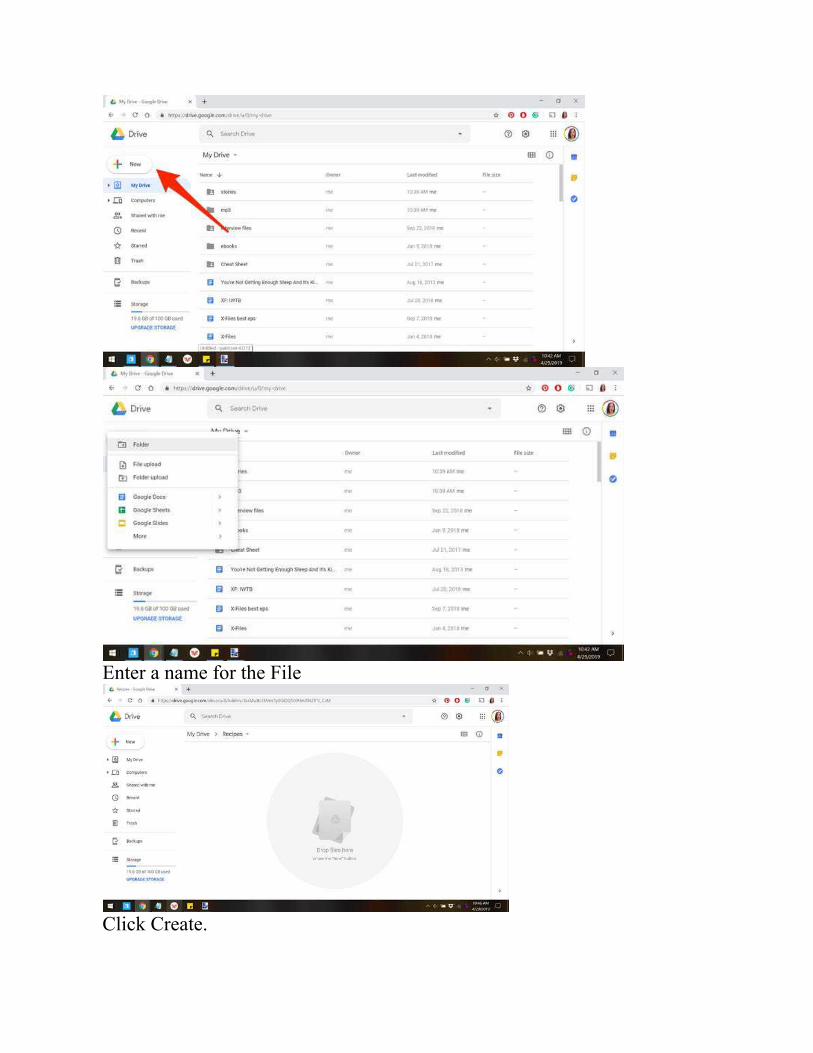
Enter a name for the File
Click Create.

At that point, share the File: Select the name of the envelope on Google Drive. At the top, click share.Tip: You can likewise right-tap the organizer and pick share.Under “Individuals” in the “Offer with others” box, type the email addressof the individual or Google Group with whom you need to share. Tip:Search for contacts by composing a name in the crate.Ensure their entrance level is set to “Can Edit.”
Mutual DrivesMutual drives are shared spaces where groups can without much of astretch, store, search, and access their documents in any place, from anygadget. In contrast to documents in My Drive, records in a shared drivehave a place with the group, rather than a person. Regardless of whetherindividuals leave, the files stay precisely where they are, so your group canshare data and complete work.Uncertain about whether to utilize My Drive or a mutual drive?Ask yourself these inquiries: Are the records relevant to most or allindividuals from a specific task group? Do the records share a steady topic?If your answers are yes to the two inquiries, making another mutual drive isa smart thought. For this purpose, the records are explicitly used as anassortment tool for tasks, make numerous mutual drives. For a correlationof My Drive and shared drives, see Differences between My Drive andshared drives.What would you be able to do with shared drives?
Changing Responsibility for Document or File

You might need to dole out another person to be the “proprietor” of a recordor envelope. The proprietor has full power over access, permeability andcan decide to erase the document.
Instructions to Change Organizers
You can change who possesses a document or organizer in the drive.
1. Go to Drive or Docs, Sheets, or Slides home screen.2. Open the sharing box:3. In Drive: Select the document or envelope and snap the offer
symbol at the top offer symbol.4. In a Docs, Sheets, or Slides home screen: Open the document
and snap share in the upper right corner of the record5. If the new proprietor, as of now, has altered get to, jump to Step
4. Something else, follow these means:6. Type the original proprietor’s email address in the “Welcome
individuals” field, click Share, and spare.7. Click Advanced in the base right corner of the sharing box.8. Click the drop-down menu close to the name of the individual
you need to possess the document or envelope.9. Select is the proprietor.
10. Click Done.
Moving Proprietorship to or from a Non-Hampshire Google AccountA few of us may have Hampshire-related records “possessed” by anindividual Google account. A best practice is to move these things to beclaimed by your Hampshire account. While you can move proprietorshipbetween Hampshire College accounts, you can’t move possession to orfrom a non-Hampshire account! Lamentably, the first workaround is todownload all the records from your history onto your PC, and afterward re-transfer them when signed into your Hampshire account.
2.5 Google Drive- Other Functionalities

In your routine, if you use Google Drive each day, you may utilize it forwork, or you may compose blog entry in Google Docs, indeed. For me, Imake use of it at home, in the case of using Sheets to delineate the latespring plan for my children, or adding to an ever-extending envelope ofideas. This makes it simple to impart top picks to companions or accessrequired fixings on my telephone when I’m at the market. It’s difficult toenvision my computerized life before Google Drive.I’ve utilized drive long enough and found a couple of concealed pearls endroute that makes Google’s cloud administration a surprisingly better device.Here are nine highlights that use Google cloud administration that maylikewise support you.You go to Google Drive’s recent view to discover the archives; I’m taking ashot at this week or this month. Or on the other hand, I did before youbegan utilizing Google Photos to back up photographs on my iPhone.Presently, photographs obstruct my recent view, rendering it to a greatextent pointless. You wish Google would give me a choice to bar photosfrom my current rundown of documents; however, you can utilize thisworkaround until it does.In the hunt field, enter - jpg, and the entirety of your photographs will besifted through, letting you peruse the records you’ve as of late made oraltered. You can utilize this workaround in Google Drive on the web andthe versatile application.
Turn on Quick AccessThis new component includes a belt of thumbnails over the head of the MyDrive to see that it gives you a well, speedy access to as of late alteredrecords. (Furthermore, fortunately, it does exclude photographs as the recentview does.) You’ll discover a line for Quick Access in Drive’s settings.Simply click the crate for Make pertinent records convenient when youneed them and afterward invigorate the page.
Channel your SearchesThis present one’s covering up on display. In the inquiry box at the head ofGoogle Drive, there’s a down-bolt button along the right edge. Snap it, andyou’ll get a board of search alternatives to channel your query items.Besides this, if you’ve utilized Google Drive for quite a long time and haveaggregated an enormous library of records, at that point, these huntalternatives are massively valuable to limit your outcomes. You can channel

by record type, date changed, and proprietor. For shared reports, you candirect by somebody with whom you’ve shared a record. Thus you don’tleave somebody hanging. You can likewise lead by documents that have athing to do, doled out to you, or have recommendations sitting tight for youin a record.
Send Connections to Documents Rather than ConnectionsThere’s a little Drive symbol at the base of Gmail’s create a window. It letsyou join records you have put away in drive or necessarily send aconnection. For Google Drive designs - Docs, Sheets, Slides, etc. - youronly alternative is to send a connect to the record. For other document types- PDFs, Word docs, pictures - you can send them as a connection or a Driveinterface, which lets you share records bigger than Gmail’s 25MB size cut-off for relationships.
Rapidly Clear OrganizingYou have a couple of alternatives for clearing the designing for the text youglue into Docs. You can feature the content and select Normal content fromthe toolbar at the top. Or then again, you can go to Format > Cleararranging. (For the last mentioned, you can utilize the alternate consoleroute Ctrl-\ or Command-\ for Mac.) You can evade the arrangementevacuation process by holding down Shift when you glue text. That’s right,Ctrl-Shift-V fixes with no arranging.
One-Tap Telephone ReinforcementNeed to back up your telephone’s vital information to Drive? You can!Also, with a solitary tap. On the portable application, go to Settings >Backup and pick what you need to back up - contacts, schedule occasionsor photographs, and recordings (or every one of the three). Simply tap theStart Backup catch to get this show on the road. It’ll likely take some time,so you should begin the procedure short-term. Your telephone should beconnected and associated with Wi-Fi.

Backup envelopes on PC or MacWith Google’s Backup and Sync application, you can back up the substanceof your Mac or PC - or chose folders. As an addition to this, you can go theother way and sync the records you have put away on Google Drive to yourPC for simple, disconnected access. Look at how, to begin with, Google’sBackup and Sync application for guidelines on the best way to fire back upand match up your records.
Remark Legitimately on Microsoft Office RecordsNot long ago, Google included the capacity to remark on Microsoft Officerecords, sparing you from expecting to change over a Word document, forinstance, to a Google Doc to comment or utilizing a Chrome augmentation.You can now open a Word document, Excel record, PowerPointintroduction, and so forth and add your remarks legitimately to thedocument. Your comments will show whether your teammates opened theFile in Google Drive or the pertinent Microsoft application. To include yourcomment, click the include remark button - it would seem that a squarediscourse bubble with an “or” sign inside it. For what reason wouldn’t weall get along too and Google and Microsoft with regards to remarking onrecords?
Set up Disconnected AccessNeed to work during your drive or on different occasions when you are notassociated with the web? Forget about it. Google Drive lets you get to yourrecords when you are disconnected, and afterward, it’ll synchronize yourprogressions when you get back on the web, yet you should complete twothings first to set up disconnected access:
Introduce the Google Docs Offline ExpansionSign in to Google Drive, click the gear-tooth catch to open Settings, andafterward check the crate in the Offline segment for Sync Google Docs,Sheets, Slides, and Drawings records to this PC can alter disconnected.
Chapter 3: Google Docs - For Creatingand Sharing Text Documents

The entire Google Apps appears to turn gold. No longer handiest has thebrand helped online groups generate billions of greenbacks via its searchengine, but it is also — and maintains — department out and create othermerchandise. One of the products is google docs, a loose word-processorand opportunity to Microsoft office that allows all the apps to create andedit their shareable file. The device is so multi-faceted and multi-functional.I wrote this guide to educate you approximately how to use google docs tocreate great content and collaborate with your group. We’ll also see faucetinto a few hints and hints to make this manner even simpler—no softwareprogram downloads. No bills. No particular browser or laptop important. Isthere genuinely any product obtainable these days that is this simple toacquire and use? The answer is sure. Google docs is a very loose, go-platform (syncs files throughout telephones, drugs, and computer systems)phrase processor that works both online and offline. All you need to have agoogle account, the same email account which you use in your G Suite orGmail. The cloud-based device consists of a horizontal format and uniquefeatures for users, including the capability to paintings, share, andcollaborate from everywhere. The platform even mechanically syncs andsaves all your work so that you don’t also fear pressing shop. With thesefeatures, it is clear why thousands and thousands of customers decide upongoogle docs over other Microsoft Word.

Google Docs vs. Microsoft Office
Microsoft office has been around longer than google docs and remainsrather popular today. Thousands and thousands of man or woman customersand organizations nonetheless pay significant cash to use words. So, how dogoogle docs and Microsoft Word compare? For one, google docs areunfastened with a google account. Microsoft office should be purchased asa part of a Microsoft workplace package deal, which includes otherMicrosoft merchandise such as PowerPoint, Excel, and outlook.The house and commercial enterprise packages run from $69. 99 (for aperson at home) up to one hundred and fifty dollars (for a person consumerat work) for an annual membership. On the other hand, Google docs let youcollaborate with any wide variety of humans, everywhere within the globe,free of charge. Some other differentiating thing is that, with google docs,you can save all of your paintings to the cloud. That means you may notlose your 20-page document even if your pc croaks. (Whew!) WithMicrosoft Office, your records stay to your computer; your coworkers cannot check them out unless you shop and share them through email. Whetheryou pick google docs or Microsoft word, it’s not hard to sync the

Another way is that you may create a brand new google doc by way ofgenuinely uploading an existing word file.Right here’s how;Open your google drive and click on new. Changing Microsoft word file togoogle docs google force newFaucet report upload to access the data stored in your pc. ConvertingMicrosoft Office document to google docs google force file addTo pick your word file and then click open. This can upload your text foryour google drive. As soon as uploaded, double-click on it to open. As soonas free, click on google docs from the drop-down menu on the top.Changing Microsoft office file to google docs; open new documents ingoogle docsVoila! It is how you convert a word document to a google doc’s record.Now, it allows digging a chunk deeper on how to use google docs.
3.1 Signing Up for an AccountTo use google drive, you’ll want a google account. Google accounts areeasy to create and sign up for one in all fairness simple. For you to create agoogle account, you will need to go into a few records, including your call,delivery date, and place. Developing a Google account will roboticallycreate a Gmail email cope with and google+ profile. When you have aGmail address, you already have a Google account, so that you won’t needto create an account—you can sign up to force the usage of your Gmailinformation.
To Create a Google Account

Go to www.google.com. Find and select the check-in button within the top-right nook of the web page. Sign up button. Click on create an account.Create an account link. The sign-up shape will appear. Comply with thedirections and enter the desired statistics. Join up form. Next, input yourcell phone range. Google will ship a verification code for your telephonethat you may use to complete the sign-up method. Enter telephone quantity.Input the verification code sent for your cell phone and click on verify.Affirm smartphone quantity with the system. This is your statistics webpage. Observe the instructions and enter your statistics, which includes yourdelivery date and gender. Input non-public statistics. Overview Google’sterms of provider and privacy policy, then click on, I agree. Clicking, Iagree with phrases of service. Your account could be created. Just like withany online carrier, it’s essential to pick out a strong password—in differentexpressions. One that is tough for a person to wager. For more criticalinformation, check out our password guidelines lesson. Gaining access togoogle powerOnce you’ve installed your google account, you can get admission togoogle power by going to http://drive.google.com on your internet browser.You may also navigate to google drive from any google web page (whichincludes Gmail or google search) by using selecting the grid icon near thepinnacle-proper corner, then clicking force.
The Google Drive Interfaces

Your google drive can be empty right now, but as you start uploading andcreating files, you will want to realize how to view, manipulate, andorganize them in the interface. Click on the buttons in the interactiveunderneath to become acquainted with the google force interface.Google power cellular interfaceGoogle additionally has separate mobile apps for creating and enhancingfiles, spreadsheets, and shows. To study higher, test out Google’s blog,publish on new cell apps for doctors, sheets, and slides.Google power for a computing deviceIn case you prefer to paintings at the computing device, you can downloadthe google force laptop app on your PC. To be challenging for windows andso x, this app makes it a bit simpler to upload your present documents andpaintings offline. Once it is established, you will see a new google powerfolder for your PC. You can routinely upload any materials you move intothis folder for your google power.
3.2 Create or Import FilesGoogle Power gives you access to a set of devices that allow you to createand edit a wide range of files, including documents, spreadsheets, anddisplays. There are five styles of documents you may make on googlepower:
Documents
Composing letters, flyers, essays, and different text-based files (just likeMicrosoft Word files)
Spreadsheets
For storing and organizing data (similar to Microsoft Excel workbooks)
Displays
For growing slideshows (just like Microsoft PowerPoint shows)
Bureaucracy

For gathering and organizing information drawings: for creating easy vectorpictures or diagrams,The technique for creating new documents is the same for all documentkinds. Watch the video underneath to analyze more.To create a new document:Google power, discover and pick out the new button, and then pick the formof the file you want to create. In our instance, we’ll choose google docs tocreate a new record. By selecting google docs from the menu, your originalfile will appear in a brand new tab in your browser. Find and select theuntitled report within the top-left corner.
Choosing untitled reportThe rename conversation container will display; link a name to your record,then click ok. Typing a new call. Your file will be renamed. You may accessthe file from your google drive at any time, in which it will likely be savedautomatically. Sincerely double-click to open the report again. Displayingdocument after renaming,You could word that there’s no keep button for your files. This is due to thefact google power makes use of autosave, which automatically and withoutdelay saves your files as you edit them. All modifications, stored.
Developing and Writing in Google DocsGoogle docs will assist you and your crew in creating essential files, nomatter your vicinity? Here are a few options to be able to try.
Voice TypingGoogle Docs AppDiscoverWork Offline

An advantage to the use of google docs is that you’re capable of the edit,save, and create documents through your net browser even while you’renow not connected to the internet. This might are available handy in caseyou want to get some work carried out even as traveling. The modificationsyou make are nonetheless stored and will sync while you move returnedonline. However, this isn’t an automatic characteristic. You’ll want to set-upoffline connections on your account. To do this, go to the google doc’shomepage and discover the menu button on the left-hand facet—Googledocs menu, then press settings.
Google Docs Menu Settings
1. A pop-up field will then be seen on your display screen. To setup offline enhancing, toggle the offline button to on. (Thisneeds to turn the button blue, instead of grey.)
2. google docs offline toggle3. Your browser will then alter to offline modifying, and you’ll
see the next icon when modifying your report without theinternet. Google docs paintings offline icon
4. voice typing5. Voice generation is a developing industry, and Google has been
at the forefront of this trend. You can speed up the writingcycle by using voice typing in google docs. To apply thefeature, start via checking your device settings to confirm thatyour microphone works. Then head to tools > voice typing.You’ll see a microphone icon. Google docs voice typing,
6. Click it and start speaking. Google will convert your spokenwords into textual content that you’ll see seem at the page.
Google Docs AppWith the google doc’s app, users can hold to edit, share, collaborate in real-time, upload snapshots, and create content while on-the-cross. Even freeapp works offline once you’ve grown to become in that setting — theidentical manner you did in your computer— and it robotically saves yourwork to the cloud. ExploreIf you have ever been writing approximately a subject and stopped toassume, “wow, I could use an offer or on the way to enhance my piece,”
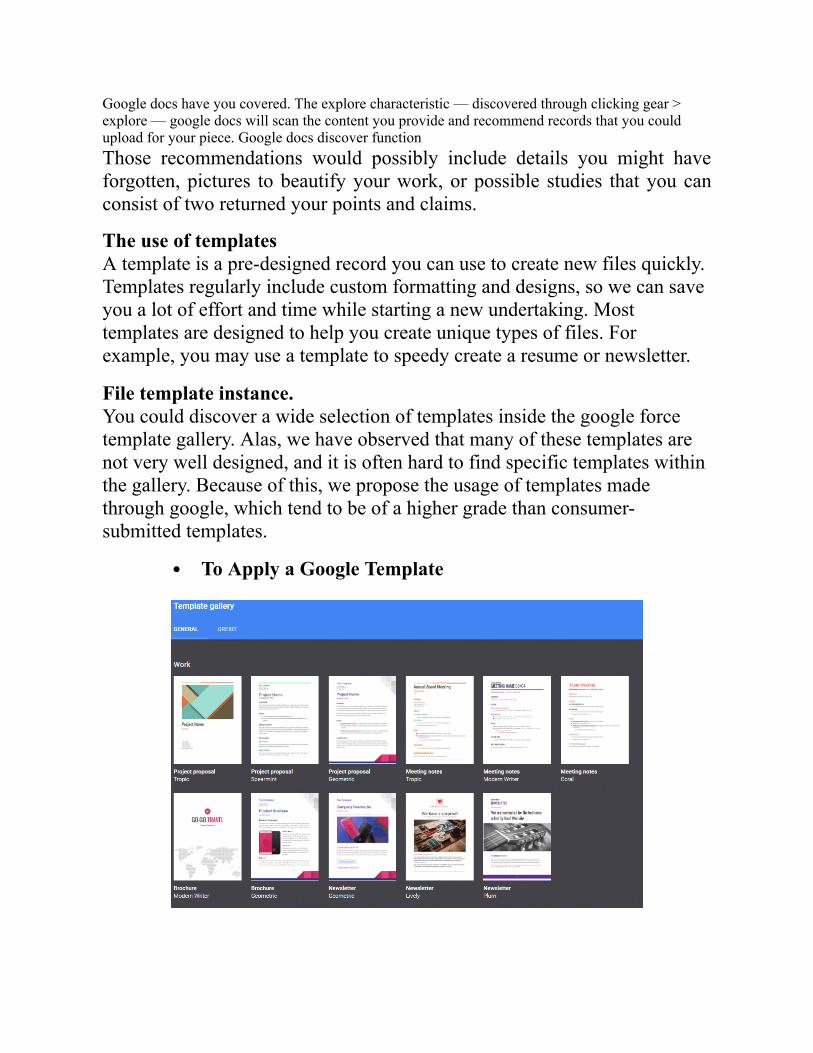
Google docs have you covered. The explore characteristic — discovered through clicking gear >explore — google docs will scan the content you provide and recommend records that you couldupload for your piece. Google docs discover functionThose recommendations would possibly include details you might haveforgotten, pictures to beautify your work, or possible studies that you canconsist of two returned your points and claims.
The use of templatesA template is a pre-designed record you can use to create new files quickly.Templates regularly include custom formatting and designs, so we can saveyou a lot of effort and time while starting a new undertaking. Mosttemplates are designed to help you create unique types of files. Forexample, you may use a template to speedy create a resume or newsletter.
File template instance.You could discover a wide selection of templates inside the google forcetemplate gallery. Alas, we have observed that many of these templates arenot very well designed, and it is often hard to find specific templates withinthe gallery. Because of this, we propose the usage of templates madethrough google, which tend to be of a higher grade than consumer-submitted templates.
To Apply a Google Template

Navigate to the template gallery. Google template gallery, while you’vediscovered a template you want to use, click on the template to pick it.Decide on a resume template within the template gallery; a new record willbe created with the selected template. You can then customize the reportwith your personal information.
3.3 Edit and Format a DocumentGoogle docs empower you to create a report that works for you and thecontent material you’re developing. Whether or not it’s the web pageorientation, pix, or web page numbers, those recommendations will helpyou layout your file any manner you need.
✓ Changing Page Margins✓ Converting Page Orientation✓ Adding a Textual Content Container✓ Adding Page Numbers✓ Growing a Placing Indent✓ Putting a Picture✓ Growing a Table of Contents✓ Converting Web Page Margins
In case you’re seeking to make the maximum of the clean area for yourreport or format your report for printing, you may need to change themargins. In advance of doing this, you will want to make sure the ruler isseen above your document. Surely head to view > display ruler.
Google Docs; Displays a Ruler
You need to see a ruler underneath the formatting bar to your document.Then, to alternate your page’s margins, discover the small blue button at theleft-hand facet of the ruler and slide the button to modify your left margin.Google docs change margins, left marginto trade your proper margin in google docs, repeat this procedure using theblue button on the right facet of your ruler.

Google Docs; Change Margin; Proper Margin
If you want strict margins for your document, click record > web page set-up. Google docs web page set-up, you’ll then see the following pop-up fieldwhere you may alternate the margins.
Google Docs; Web Page Margins Settings
In case you need the same margins in each file you create, shop time, andhit set as default. This may mechanically replica your margin set-up to allnew files. Changing web page orientation to panoramaSeeking to exchange the orientation of your record? Head to file > webpage set-up, Google docs web page set-up menu, then select landscapeunder orientation. Google docs page set-up orientationIf you want all of your files to have the identical orientation, press set asdefault.
Including a Textual Content Container
Textual content bins are a fantastic choice if you’re seeking to add a visibleelement in your document. They help you function additional texteverywhere on your web page without changing the format of your currentreport. In google docs, textual content containers are categorized asdrawings. You can insert one by clicking insert > drawing.
Insert Drawing in Google Docs
This can open the drawing characteristic. Subsequent, press the textualcontent box. Drag the cursor into the drawing space to create a containerthat suits your requirements
Google docs; Drawing New Textual Content Field
Once you create your field, it’s time to go into text. This can change thefont, color, and alignment of the textual content to your field by utilizing thenavigation bar in the pop-up window.
Google Docs; New Text Container Drawing

Glad about your textual content box? Hit save & close to insert it into thedocument. Google docs insert drawing textual content containers. This is atextual content fieldFrom here, treat your text container as an image. Select the picture toalternate the alignment or flow the box around your document for idealplacement.
Adding Web Page Numbers
And web page numbers make your document smooth to navigate andpermit for the higher company while published — you’ll avoid askingyourself, “Does this page cross here, or there?”Upload web page numbers in your document by clicking insert > header >web page wide variety. Then choose the choice of your desire.
Google Docs; Adding Page Numbers
Growing a putting indent striking indents are indents that mechanicallytrade the margin of a paragraph without interrupting the layout usedelsewhere in your web page. To add a putting indent in google docs, makesure your ruler is seen through an urgent view > show ruler.
Google Docs; Display a Ruler Menu
Then, head back to your essential record and spotlight the text you need toformat. Upload a striking indent via locating the ruler above your documentand sliding the blue arrows in the specification. Slide the button to the leftto regulate the left indent, and the arrow on the proper aspect to alternatethe appropriate indent.
Google Docs; Exchange Indent Putting a Photo
To add a photo in your file, you can place your cursor anywhere you need toinsert the image. Scroll up to the pinnacle of the web page and click insert >picture.
Google Docs; Insert Photo Menu

Pick the picture region — multiple options consist of your laptop, the web,google power, or through URL. Select your photo, click open, and voila!Your picture should appear. For extra in this technique, take a look at thisweb page.
Developing a Table of Contents
If you’re writing a presentation or whitepaper, a desk of contents is a terrificmanner to display every phase you’re developing and the page range that itcan be located on. You may insert a desk of contents on your googledocument through ensuring all subheadings are formatted with a headingtag. To do this, spotlight your subheading and press the proper tag on yourformatting bar.
Google Docs; Heading Tags
As a standard rule of thumb, the heading one tag should be your first name.Heading two tags need to be subheadings, and heading three tags must besections beneath a subheading. Now you’re equipped to create a desk ofcontents. Preserve your cursor where you’d like to insert it and click theinsert > desk of contents to pick a choice based on your selection.
Google Docs; Inserting a Table of Contents
Google docs offer a ramification of enhancing features to ensure your workreaches complete potential.✓ Monitoring Changes✓ Adding Feedback✓ Finding Word Rely-On✓ Walking Spell Take a Look at✓ Strikethrough✓ Tracking Changes
In case you’re working with another individual for your report, you can askthem to track their modifications and edits. This will display you who madethe edits, after they made the one’s edits, and what the text turned intobefore their edits. You could make song adjustments in google docs by

changing enhancing to suggesting in the top right-hand corner of the webpage. Google docs tracking modifications suggest that when someone editsyour document, any changes will show up in an exceptional shade, with abox at the right-hand aspect to expose their call, photograph, and modifyinginformation. Google docs tracking changes instance; you may then browsethe tracked adjustments and accept or reject them as necessary.
Adding Feedback
With google docs, you and your crew can depart remarks in any record forevery different to view. These are often used as reminders to return to aspecific section, go away greater detailed revision thoughts, or uploadURLs to other sites and photos for reference. To do so, highlight the word,sentence, or paragraph you need to touch upon and click the uploadcomment button (the text container with the plus sign internal). You maythen write a remark — or paste a URL — in the comment box. Clickremark while you are geared up to publish your box. Google docs go awaywith the new remarkTo edit the facts in the container, click on three dots on the right, and chooseedit. You can additionally thread remarks under the unique comment viatyping in the reply box.
Google’s Docs; New Comment Responds
To eliminating a remark box, you may either delete it or solve it. Click thethree dots at the right and choose to delete the box. Click on resolve withinthe pinnacle proper of the box while the problem has been resolved, you donot need the remark.
Google Docs; Remark Clear-up
If you are seeking out more in-intensity data on including and resolvingfeedback in google docs, take a look at this web page. Locating phrasecountHave you ever struggled at the same time as writing a paper, report, or blogsubmit due to a required phrase count number that you have been seeking toreach? Even though achieving a count of phrase needed number might notalways be smooth, google docs make them depend on itself simple. When

you’re in your report, click on gear > phrase rely on. (You could also usethe shortcut ⌘ + shift + c.)
Google Docs; Word Count Number Menu
Google will then show the full variety of words (along with the overallquantity of pages, characters, and characters aside from areas). Google docsphrase rememberTo count the phrases within a particular sentence, paragraph, or page,highlight the text you need to consist of and follow the same steps above.Going for walks spell test is no longer uncommon for expert writers tomake an occasional spelling mistake. Google docs can assist all writers withthis predicament. Run a spelling test to locate and accurate any errors youmay have neglected. Think about it as your proofreader or editor. To run aspellcheck in google docs, click on gear > spelling > spell check.
Google Docs Spelling Check
Google docs will then test your complete file for misspelled phrases andgrammatical errors. You’ll be given an option to accept or ignore Google’sconcept simply. In case you find which you’re often with the use of a phrasethat Google doesn’t understand, you could upload it to your dictionary. Thismay prevent google docs from highlighting the phrase in future spellassessments.
Strikethrough
In google docs, you can upload a strikethrough in highlighting the text youneed to strike and clicking layout > strikethrough.
3.4 Share and Collaborate On FilesYou can share the files and folders you saved in google power with everyperson. While you share from google power, you can manage whether ornot human beings can edit, comment on, or simplest view the record. Whileyou share content material from google drive, the google power programpolicies practice on Laptop, Android, iPhone & iPad

Step – 1
Locate the file you need to share
Open an unarranged fileOn a PC, go to google docs, sheets, or slides. Click on thedocument you need to share. Click share. Share multipledocumentsSend & share google paperwork
Step – 2
Pick out who to share with & how they can use your document
Share with precise peoplePick the report you need to shareClick share
Below "share with human beings and corporations," enter the email addressyou need to share with. Vital: If you share with an email deal with that isn'ta Google account, they could use the simplest view of the report. Toalternate what human beings can do for your document, at the right, clickthe down arrow down and then viewer, commenter, or editor. Pick out toinform human beings. If you want to notify humans that you shared adocument with them, take a look at the field next to educate people. In caseyou notify humans, every electronic mail address you input might becovered in the email. If you don't want to notify human beings, uncheck thecontainer. Click on the share or send it.

Adding a Hyperlink to the FileAdding a file publicly or collaborating in google docs, there are manyguidelines and tricks that customers can take advantage of at the same timeas using google docs — whether working as a person or with a crew.Google docs allow a couple of people to collaborate and edit inside anavailable record in real-time through any web browser.
Sharing your Google DocumentPeople can share their documents with as many people as they need and edittheir permissions to limit what they can do. To get began sharing, clickreport > share.
Sharing your Google Docs RecordsThere are four sharing options — the one you choose is entirely your desire.✓ Create a Shareable Hyperlink. The only manner of sharing a google
doc’s page is to generate a shareable link. This lets you in all andsundry to click on a unique URL and view your file. After clickingshare, tap the get shareable hyperlink button within the top proper nook.Google docs get a shareable link to choose sharing permission in yourrecord. Google docs are placing approval for documents after definingpermissions, press the reproduction link.
✓ Google docs sharing copy link the URL will then be copied to yourclipboard, which will send everyone who needs to view the file.

✓ Share through electronic mail addresses. You also have the option toshare your file with an email address. This will ship an invitation to thatindividual's inbox and upload the document to their google account. Todo this, head again to the sharing field. Input the email address of thecharacter you'd want to share your record with and pick out analternative from the drop-down to edit their permissions.
✓ Google docs sharing through email in case you add a word to thisinvite, it will likely be displayed within the email invitation. Choose theadvanced sharing alternatives. Head back on your sharing box and hitadvanced. You may see all sharing settings — along with who has toget entry to in your record, their permission settings, and the option toask extra people or put off others. Google docs are sharing preferredsettings. Make your document editable for everybody. Need to supplyanyone permission to edit the contents of your file?
Hit document > share to get your shareable link. Google docs getshareable hyperlinks inside the drop-down menu displayed, clickgreater Google docs share with others extra, after that, pick on —everybody with the link, and set the permissions inside the bottomdrop-down menu.
✓ Google Docs link sharing as this selection virtually states; all of us,together with your precise URL, could make adjustments, edit, andeven delete your document. Be careful about who you're sharing it with.Share & collaborate on a record with more than 100 people as much asa hundred people with a view, editing, or comment permissions canpaintings on google docs, sheets, or slides report at identical times.While more than a hundred human beings are accessing a file, mosteffective the owner and a few users with modifying permissions canedit the report.
✓ To share and collaborate on a file with more than a hundred humans:submit the report in case you want many people to view a file withoutdelay, put it up, and create a hyperlink to share with viewers. You candeliver edit get admission to people who want to edit or touch upon thefile. Learn how to post a record. Publishing a report makes it seen toevery person on the web. Be careful when publishing personal or

touchy info. When you have an account via paintings or college, youradministrator can restrict who can view a published report. If you're anadministrator, discover ways to manipulate who can post documents tothe net. To remove a document from the net, you have to stoppublishing it. Learn how to forestall publishing a record. To stopsharing a file with the collaborators, learn how to trade sharingpermissions.
✓ Create a google website online. Create a google site to share data withmany people. You could embed files, spreadsheets, and presentations onthe web page, which may be regarded with many customers' aid.Discover ways to embed documents on a domain. In case you expectexcessive site visitors on your website online, first post your record ingoogle docs, sheets, or slides, then embed the published URL intogoogle sites. Discover ways to post a file.
✓ Collect feedback with google bureaucracy in case you want to acquiresome information. Create a google form—record feedback in a googlesheet. Give edit access only to individuals who need to work with theresponses. To allow more than a hundred human beings to view theresponses, post the spreadsheet to the net, and create a link to share withvisitors. Learn how to publish a file. Fix issues with documents sharedwith many people. If your record is shared with many people and it'scrashing or not updating quickly, attempt these troubleshooting tips:
✓ Instead of allowing people to touch a record or spreadsheet, create agoogle form to accumulate remarks. Discover ways to create a googleform. In case you're duplicating a report, don't consist of it withresolved comments and suggestions. Discover ways to make a copy.Delete older statistics or flow records into a brand new document. Askvisitors to close the report when they aren't making use of it. Consist ofthe simplest the maximum vital facts in a posted document. Shorterdocuments load faster. Reduce the number of humans with edit, get

entry to a report. If accumulating statistics from a couple of documents,create a new, view-only record to share with a big wide variety ofpeople.
3.5 Print and Download DocumentsOnce you've created a report, it will likely be accessible every time youcheck in to google drive. There might be times when you need to import orprint a paper offline for entry.
To Download a DocumentFind and right-click on the report you need to download, then pickdownload. You could download the file on your pc. To select a file layout:Use the default; google drive will choose the most not unusual report layouteach time you download a file. For example, if you're downloading agoogle document, it's going to be saved as a routine. Docs files that areutilized by Microsoft word have maximum different word processors. But,there may be examples when you need to choose a different PDF format.Double-click on the desired record to open it. The article will appear in thenew window. Choose description> download as, then select the favored filetype. In this example, we'll pick the pdf document (. Pdf). The file could bedownloaded in your pc within the selected document kind.


To Print a RecordDouble-click the approved document to open it. Pick out document > print.The print conversation container will seem, alongside a preview of your fileat the right. Pick out the desired alternatives, then click print. Be aware thatthose options will vary relying on the type of report you're printing. Forexample, you'll have different options for writing a spreadsheet then you'llfor writing a presentation.

Chapter 4: Google Sheets - ForCreating Online SpreadsheetsYou could be surprised! Can google sheets be like Microsoft Excel? Theanswer is: no longer precisely. But before we talk about the functions andtools that can be unique to sheets, let's start by highlighting what you haveto bear in mind with the usage of a spreadsheet. I'm a massive proponentthat more humans have to be the use of spreadsheets to organize andmanage their lives. While you want to be aware or begin organizing achallenge, in which you do it? Many people might open a new report ingoogle docs or Microsoft office, for instance. The clean slate is anincredible manner to begin scribbling thoughts down. To me, a spreadsheetcan try this as well, but with plenty of introduced features. In case you startmonitoring something that includes numbers and needs to do simple math, aspreadsheet is continually going to be a better preference for running withstatistics. You can use columns and rows to prepare content on the fly asnicely. Sheets were designed with the wishes of active groups in thought.AI capabilities suggest that you have to faucet into the proper insights formeaningful enterprise selections. A cloud-primarily based structure allowsyou to collaborate with anybody, each time, anywhere. Compatibility withoutside structures, including the Microsoft office, gets rid of the friction ofrunning with more than one data source. And constructed on top ofGoogle’s infrastructure, sheets give you the liberty to create, at the sametime as assisting in keeping your facts comfy.
4.1 Introduction to Google Sheets

Even if you want to utilize spreadsheets, you are probably thinking, how dogoogle sheets work? There's lots of official opposition in Microsoft's exceland apple's numbers apps. Both have additionally carried out versions ofpaintings within the net browser. Although sheets now have differentbrowser-based opposition, I nevertheless suppose that it's the utmost desirefor simple spreadsheets. It is lightweight and smooth to get started. Excelhas every viable characteristic you could need in a spreadsheet but bringscomplexity with it. Apple numbers are easy to use; however, the mannerthat some capabilities paintings are counterintuitive, and it would not wellsupport different spreadsheet codecs. Do not leave out the fact that sheetshave a few specific features that set it aside from the other alternatives.Let's look at the functions that make sheets worth thinking about as yourspreadsheet app of choice. With such a lot of options for spreadsheet apps,what are google sheets that you must flip to? In short, assume that googlesheets shine because it's both loose and smooth-to-use. It best takes agoogle account to log in and start constructing a google doc’s spreadsheet.It is difficult to compete with loose, and even though other apps have looseelements, sheets are unfastened to use. However, don't think of sheets as ashoestring-price range substitute for Microsoft excel. Sheets have severalfunctions implemented to excel and also possess some functions that workbetter in the browser. Allows study five features of google sheets that makeit well worth using.
1. Which easy enter shape integration have you ever needed to getfeedback or enter from a vacationer on your internet site? Sheetsgives an easy way to do that and prepare the responses. Whetheryou are taking lunch orders from your group at work or gettingdetails from a new client, google makes it clean to take the entryfrom the shape. Google can also put it without delay into a googledoc spreadsheet, rather than receiving these statistics thru email ortext and having to re-type it or reformat it. With an input form, youcould install questions, selections, and text bins for site visitors tofill out. Immediately the user fills out their reply, that statistics willautomatically be logged and captured into your google sheet for

evaluation. To get commenced with this selection, leap into agoogle docs spreadsheet, and browse to insert > form to set up abrand new input form. You may then use the wizard to addinquiries to the shape, as you can see within the screenshot below.Google paperwork to sheets with google sheets; you can use anentry form to seize responses from a traveler or purchaser andinsert that records seamlessly into the spreadsheet.
2. Connect spreadsheets. One of the motives that have seen peopleresistant to the usage of google sheets is because they think certainfunctions from excel are missing. In truth, the maximum of thosecapabilities are already applied in sheets— you simply ought torealize which to move in searching out for them. A traditionalinstance of this is the ability to grab statistics from differentspreadsheets. The use of functions like =import range makes itpossible to go and get statistics from absolutely separateworkbooks. Ensure you read the academic below to stroll via theusage of a couple of spreadsheets in sync and pull data to and fro.
3. Examine even as you operate the product. While they are easy toget commenced with, it's the formulas and features that can senseto learn.
4. This brings some other one among the capabilities of googlesheets:
The documentation lives right in the interior of the app.As you begin typing a function call, you'll get a simple, practical drop-down choice that facilitates using the characteristic, as you can seebeneath. Components instructions as you begin to type a feature; you'llsee statistics that enable you to learn how to apply the characteristic.This consists of examples of the way to use every function. This"documentation on the fly" technique is one of the motives that supposesheets is perfect for overcoming the spreadsheet studying curve.
5. Google sheets accessories.

Google has taken a relatively open approach to develop sheets,welcoming accessories from different developers to decorate whatsheets can do natively. Think about accessories in two essentialcategories:Pure accessories that upload greater functions and capability to googlesheets connectivity tools like zapier and ifttt that help you hyperlink upsheets to almost some other provider. An instance of a pure upload-on isapps to remetrix, which is an add-on that you could use to tune yourapp's performance in first app shops like google play or apple's appshop. Instead of going into those dashboards and copying pasting factsto a google sheets spreadsheet, use the apps to remetrix to attach thetwo. However, you've got services like zapier and ifttt. These areofferings that exist for one purpose: to connect things collectively! Forexample, twitter and sheets do not include paintings collectively ontheir own, so you need an app that sits within the middle. You can useone of those offerings to take tweets and mechanically insert them rightinto a spreadsheet. Fortunately, we've got an education that lets you setthat up. Check it out to analyze more about connecting google sheets toa ramification of offerings.

4.2 Creating a Spreadsheet
To kick matters off, let's cowl some spreadsheet terminology that will helpyou understand this the terms in this e-book:✓ Cell: A single statistics point or element in a spreadsheet.✓ Column: A vertical set of batteries.✓ Row: A horizontal set of batteries.✓ Range: A spread of cells extending throughout a row, column, or each.✓ Function: An integrated operation from the spreadsheet app, which
may be used to calculate mobile, row, column, or variable values,manipulate records, and extra.
✓ Formula: The combination of capabilities, cells, rows, columns, andranges used to attain a particular result.
✓ worksheet (sheet): The named units of rows and columns making upyour spreadsheet; one spreadsheet may have a couple of coats
✓ spreadsheet: The entire report containing your worksheets
In case you've in no way used google sheets—or, in particular, in caseyou've by no means used a spreadsheet earlier than—make sure to checkout Google’s getting commenced manually for sheets. You may also wish tobookmark Google’s spreadsheet feature listing as a short reference. Withthat understanding in hand, allows dive in and begin constructing ourspreadsheets. Create a spreadsheet and fill it with statistics.

The first-rate element about google sheets is that it is unfastened and workson any device—which makes it clean to follow alongside the tutorials onthis e-book. All you'll want is an internet browser (or the google sheets appin your IOS or android tool) and an unfastened google account. To yourmac or computer, head over to sheets. Google. You and Corer are equippedto get commenced.There is three-course of action to create a new spreadsheet in google sheets:
1. Click the purple "new" button for your google power dashboardand pick out "google sheets."
2. Open the menu from inside a spreadsheet and pick "report > newspreadsheet."
3. Click "clean" or choose a template at the google sheets homepage
This will create a brand new blank spreadsheet (or a pre-populated templateif you pick out one of these). For this tutorial, although you need to startwith a clean spreadsheet, the google sheets interface must remind you of atleast another spreadsheet app you've seen earlier than familiar textualcontent editing icons and tabs for additional sheets. The only distinction isthat Google has reduced the muddle and quantity of displayed interfacefactors. So your first task has to be self-evident: add some facts!
Adding facts on your spreadsheetLook around the white-and-grey grid that occupies a maximum of yourdisplay, and the first issue you'll observe is a blue define around the selectedmobile or cells. As swiftly as you open a brand new spreadsheet, if yousimply start typing, you'll see that your information starts populating theselected cell without delay. Generally, the top left cellular. There is no wantto double click on cells while you add statistics, and no longer need plentyto apply your mouse. A character square in a spreadsheet is referred to as acellular; they're organized into rows and columns with range and letter Ids.Each cellular needs to incorporate one price, word, or piece of statistics.Experience free to select any cellular you'd like, then cross beforehand andtype something in there. While you've performed coming into statistics intoa cellular, you can do one in every of four matters:

1. Press enter to keep the records and circulate to the start of the nextrow
2. Press the tab to keep the facts and flow to the right inside the samerow
3. Use the arrow keys to your keyboard (up, down, left, and proper)to move one cell in that direction
4. Click any mobile to leap without delay to that cellular
If you don't want to kind in the whole thing manually; you may additionallyupload statistics for your sheet and masse through a few differenttechniques:
1. Copy and paste a list of documents or numbers into yourspreadsheet
2. Copy and paste an HTML writing table from a website3. Import an existing worksheet in CSV, Xls, xlsx, and other codecs4. Replica any cost in a cell across a variety of cells via a click on and
drag
Copy & paste is quite self-explanatory, but there are instances. At the sametime, you'll try to copy a "spreadsheet-y" set of statistics from a website orpdf, and it'll merely paste into one mobile or layout everything with theauthentic styling. Attempt looking for statistics directly in an HTML table(like film information from IMDB, as an instance) keeps away from gettingfunky pasted statistics for your spreadsheet. Observe: ensure your handiestclick on once on a cell before gluing information so that google sheets willflip it right into a list with every object in its cell. In case you double-clickon a mobile, google sheets will paste all the information into one cellularthat is likely not what you want now. If you grow to be with oddlyformatted data, don't worry: we'll restore that inside the subsequent phase!Uploading a report is simple as nicely. You can either import immediatelyinto the contemporary spreadsheet, create a brand new spreadsheet, orreplace a sheet with the imported data. The maximum not unusual filesyou'll import are CSV (comma separated values) or xls and xlsx (files from

Microsoft excel). To import a document from out of doors of your googledrive, visit the file > import > upload menu. You favor importing theinformation into a brand new sheet every time to keep my vintage statisticsand newly introduced records separate. Instead, when you have a googlesheet (or a CSV, Xls, or different spreadsheet file) saved to your googlepower account, you may import that directly into your spreadsheet. To usethe identical technique—seek your power from the import window.Dragging to duplicate a cell fee desires a piece of explanation. Due to thefact you'll use this one, load once you've installed formulation to yourspreadsheets. Through dragging the small blue dot (pictured below) withinthe bottom-proper corner of a highlighted cell across or down a numbercells, you may perform some of the one-of-a-kind functions. There aresome of the ways you may use this selection:
1. Copying a cell's information to many neighboring cells (inclusiveof formatting)
2. Copying a mobile's "formulation" to neighboring cells (this is asophisticated function, and we'll cowl it in element later)
3. Growing an ordered list of textual content records
here's an example of how developing an ordered listing may work: tryincluding the textual content contestant 1 to cellular a1, then clicking anddragging the little blue dot within the backside-proper corner of thehighlighted mobile both down or throughout any range of neighbouringcells. If there was no wide variety after contestant, this dragging actioncould reproduction "contestant" to any cells you drag over. However,because the range is there, sheets know to increment the next cell +1. Let'ssuppose you have either copied, pasted, imported, or typed in a fantasticchew of facts and that your spreadsheet is calling pretty healthful. Now,how can we use this information?
4.3 Share, Protect, and Move Your DataWhat makes sheets so compelling is how "in sync" you'll feel together withyour co-workers. Collectively modifying a spreadsheet is one of the

important functions of sheets, and google has made it a whole experience.Right here's how it works:
1. Click both report > share or use the blue "share" button insidethe pinnacle proper
2. Click on "superior," then enter e-mails of who can view or edityour spreadsheet
3. Pick some other privacy options and hit achieved
When you open the "superior" sharing panel, you'll see some of the options.The default capability when you click on the "share" button is to copy a linkto the spreadsheet to your clipboard. While you share this link with a personthrough a messenger or email, if they click on the hyperlink, it will bringthem to the spreadsheet. Unless you've invited them via email (within theemail field) and decided on "can edit," they will still need to appealpermission to make modifications. In case you'd like to offer each personwithin your organization or business enterprise editor-stage get entry toclick on the "alternate…" button inside the "who has got right of entry to"segment and pick "on - (your employer call) **." (Note: this selection willonly appear if you're using google apps for paintings.)
Sharing Spreadsheets with Your Devices and Apps

Even though google sheets and drive are built for sharing among users,you'll word that normally your spreadsheets are created as personaldocuments, and sharing is secondary to get work done truly. You couldstreamline your spreadsheet workflows and actual-time data-sharing bytaking gain of these helpful add-ons:
✓ Google doc’s cellular apps. You could use the google sheets cellularapp to view and edit your spreadsheets, share hyperlinks at the move,and upload customers. It's a stable partner to—however now not asubstitute for—the web app.

Google Drive Sync on your Desktop
Google force allows you to without difficulty add files from your nearbylaptop environment in your online force. This makes them reachable onyour collaborators and additionally permits you to import them intospreadsheets and different documents fast. Three. A third-celebration devicelike zapier. You may use zapier to upload information on your spreadsheetsmechanically, ship documents in your google drive account, and warn youof the other sheet you name. This helps to hold working on our spreadsheetinstance to demonstrate the use of zapier. An app integration device helps tomake google sheets even possess greater power. In preference to hitting the"share" button on my spreadsheet to send it to my colleagues, I'd want tosend a slack message alerting them that I've created this new spreadsheet.You may routinely ship a message to a Slack channel with zapier's googlesheets cause and slack action. Share new google sheets spreadsheets toslack. You could installation filters and conditions to decide while tosubmit, and you've got entire manage over what facts you'd like toencompass for your message.You can additionally trigger messages based on exclusive moves in googlesheets—like when someone a new row or modifications the statistics in acell. Now let's switch the direction of the statistics-glide and consider howour colleagues would engage with our spreadsheet.Without an automatic technology tool like Zapier, duties like this fast growto be why people fail to collaborate with the use of spreadsheets correctly.Think about it; if this were a regular spreadsheet with none automation,you'd be asking someone to:

1. Escape in their current activity2. Song down spreadsheet3. Fill in some pieces of doubtlessly inconsequential statistics4. Keep and re-share this record (if it's not already a web and
synced file)5. Repeat for any number of duties/files
That is wherein automating obligations becomes so critical. Allows set upour spreadsheet so that it has an easy sheet to receive some automatedinformation. Create a new worksheet with the use of the + button in thebackside left. Now, use zapier once more and make slack the triggeringmotion with google sheets at the receiving quit of the automation (the"action" facet of the zap). I've installed my zap to immediately take a slackmessage published right into a devoted channel and make a new row in thebreakfast log alongside the time and person who posted it. Take a look at itout in actual-time:This can be paintings for masses of other applications that you could use astriggers or moves with zapier. You could ship facts on your spreadsheet thruemail, screen your social channels, set it on a schedule; there are dozens ofvarious approaches to accomplish any given mission with the apps you'realready using.

Downloading your Information
If you need to ship your documents to external collaborators, add a recordinto some other machine, or similar to having backups for posterity, thenturn towards certainly one of google sheets' many information exportoptions. The most common exports could be either. Xls (excel record) or.CSV (comma-separated values). If you're not certain which format to apply,a. CSV is commonly a satisfactory wager. Use your spreadsheet in offlinemode. If you love what you've visible to this point but have been involvedin which you wouldn't be able to make use of sheets without a link, thenfear not. Google sheets have an "offline mode" to sync your adjustments tothe report routinely when you reconnect to the net. That is beneficial forany state of affairs in which you'll want to deal with google sheets like acomputing device software—on a flight or an avenue journey, as anexample. Right here's what you'll want:
1. Google Chrome2. Google Drive Chrome Web App3. Google Power Sync
Commands for putting in your offline sync are certainly straight-ahead.However, the bulk of the technique is just downloading and using the threecore components above. Turning it on looks like this (get prepared to besurprised):

And much like that, you can use google sheets even while you're offline—no wife necessary.
4.4 Collaboration on Documents with OthersSelect the file you want to share. Click on share. Below "share with humansand companies," enter the e-mail cope with you need to share with.Essential: in case you share with an e-mail address that isn't a Googleaccount, they could get the most effective view of the document. To changewhat people can do on your text, on the proper, click the down arrow downand then viewer, commenter, or editor. Choose to inform humans. In caseyou want to notify people you shared doc with, take a look at the containerafter educating people. You tell people, each email deal with you may beblanketed inside the electronic mail. In case you don't want to informhuman beings, uncheck the field.Click on share or import. Share a link to a file or folder and set getadmission to ranges:In power, right-click the document or folder you want to share and pick outshare. In docs, sheets, or slides, on the pinnacle, click on share.Word: you can best share files that you own or have edit, get right of entry.(Optionally available) to specify what people can do along with yourdocument while you share it, beneath your organization name, clickalternate:To exchange the permission, at right, click the down arrow and pick out theviewer, commenter, or editor. To permit sharing the hyperlink outdoor ofyour organization, after your enterprise call, click on the down arrow andthe public. Be aware: if you don't see this feature, contact your g suiteadministrator. Click the reproduction link. Click on finished. Paste the linkin an e-mail, on a website, or anyplace you need to share it—sharedocuments in a file.

See with whom a folder is shared withIn google drive, double-click the shared folder to open it. Hover overhumans to get a brief study of the folder sharing settings, including whoowns the folder and permissions, and view folder information or edit getadmission to.

Alternate Permissions on a Shared Document or Folder you ownIn force, click on a record or folder, then click share. Click advanced—othersanctions as preferred. Click on store modifications and click complete.
Forestall Sharing a Report or Folder you ownOpen the home screen for google force, google docs, google sheets, orgoogle slides. Pick a file or folder. Click on share. Locate the person youwant to stop sharing with. To the proper of their name, click on the downarrow down and then do away with. To shop adjustments, click on save.
Delete a Hyperlink to a Report or Folder you ownOpen the home screen for google drive, google docs, google sheets, orgoogle slides. Select a document or folder. Click share. Find the person youwant to prevent sharing with. To the proper in their call, click the downarrow down and then dispose of. To save changes, click the shop. Open thehome screen for google drive, google docs, google sheets, or google slides.Open or select a file. Click on share or share, after which get hyperlinks,underneath "get hyperlinks,” Click on the down arrow down. Select restricted. Click done

4.5 Data Formatting and Adding Formulas

Whether you're monitoring charges, recording college students' grades, orpreserving clients' tunes in a homebrew CRM (as we're going to build inbankruptcy three), you may want to control and format your records. Thesimple formatting alternatives in google sheets are available above yourfirst cellular, and you can categorize them in the photograph beneath.However, for quick reference, even as you are working on a leaf, simplyhover over an icon to peer its description and shortcut key. Print, undo/redo,and font settings/styling characteristics in addition to what you'd count on,out of your favored phrase processor. The shortcut keys are similar, so justdeal with it like you're enhancing any other document! As for the entiretyelse, the pleasant way to show you how everything works is to dive rightinto an instance. I'm going to create a shortlist of potential breakfastalternatives for tomorrow morning, at the side of their substances, counts,expenses, and links to YouTube films for a way to lead them to (who knewyou could make a 3-minute video approximately scrambled eggs?). It'spurposeful, sufficient that you could use this without problems to hold tuneof information. A vast majority of my spreadsheets seem like this—googlesheets makes it so simple to seize statistics, share it, and return to it later forreference that it acts as my incredibly-structured notice-taking device. Butlet's expect that you have to address dozens of spreadsheets in line with day(or worse, that you need to share spreadsheets again and forth), and that iswhat someone sends you. It's uninteresting, and if it becomes a vast dataset, it might be painful to skim through. For the simple instance above, aloss of sizable formatting is "okay." it does the basics, storing my facts andallowing me to shop. However, it's no longer something you might want toreturn to each day. Given that you eat breakfast each morning, permits takesome time to make this spreadsheet more person-pleasant with someformatting! First, we'll "freeze" the first row in the area. Meaning if wescroll down the worksheet, the first row will nevertheless be visible, nomatter how plenty of facts lies beneath it. This permits you to have aprotracted listing and maintains tabs on what you're honestly looking at.There are methods to freeze rows:
1. Click view > freeze > 1 row inside the navigation bar to lockthe first row in the vicinity

2. Hover the darkish grey bar within the top left of thespreadsheet (until it becomes a hand) and drag between rowsone and a column of
Freezing my header row is the primary element to do in each sheet youmake. Now, let's create the header text pop with a few simple textformatting (don't forget, the textual content formatting gear are in thetoolbar, simply above your first row):
1. Drag to pick out the cells you need to layout2. Formidable the textual content3. Growth font size to 12pt4. Center-align the entire row5. Give or provide your cells a grey fill
The next issue due to easy this up is a chunk format my "average"charge/serving to be a dollar value. Here's how matters look at first:Now, allows easy that up with the "format as $" button for the precisevalues (or complete row) highlighted. You will see that your chosen cellsare displayed as a dollar amount, as opposed to a regular number.Note: if you conduct this operation with the complete row/columnhighlighted, future values will take the formatting as well! Now whichyou’ve were given the hold of placing and formatting your records, it’sapproximately time we begin really calculating some sums, averages, andmore out of your data.
1. Add, Average, and Formula Filter Data
Unlike other spreadsheet software, Google Sheets has many built-inmethods for executing a variety of mathematical and data processingactivities. You may also merge formulas to allow more dynamic equationsand add activities together. And if you're still used to crunching numbers inExcel, the same calculations function much of the time in Google Pages.In this guide, we should concentrate on the five most growing formulasseen in the calculation drop-down menu from the top navigation. You canselect a method to add it to a cell, or you can begin to type any formula with

a = sign in a cell accompanied by the name of the equation. Sheets canauto-film or recommend methods depending on what you do, so you don'tneed to recall every formula.
The simplest formulas in the Sheets are:✓ SUM: includes a number of cells ( e.g. 1 + 2 + 3 + 4 + 5 = 15)✓ AVERAGE: sees the normal number of cells ( e.g. 1,2,3,4,5 = 3 on
normal)✓ COUNT: counts the values in a number of cells (e.g. 1, blank, 3, 4, 5 =
4 total cells with values)✓ MAX: finds the highest value in a variety of cells (e.g., 1,2,3,4,5 = 5 is
the highest)✓ MIN: finds the lowest cost in a variety of cells (e.g., 1,2,3,4,5 = 1 is
the lowest)✓ Simple Arithmetic: You can also execute operations such as addition,
subtraction, and multiplication directly in a cell without naming aformula.
We're going to explore these formulas by improving our breakfastspreadsheet.

Using the Sum MethodAllows begin with including up the entire wide variety of ingredientsrequired for every recipe. I'll use the sum formula to add each cost withinthe recipes and get a total quantity. There are three methods to use simpleformulas accessible through pinnacle navigation:
1. Select a range, then click on the system. (This may position theresult both under and to the aspect of the field).
2. Select the resulting mobile (i.e. the cellular where you want theresult to seem), then click at the method you need to use fromthe toolbar.
Eventually, select the variety of cells to carry out your operation on. 3. Typethe system into the result cell (remember the = sign), then manually find a

selection or pick the variety to display all three methods inside the gifbeneath. First, sum all ingredients with the aid of choosing a collection, andclicking the sum from the formula menu. 2d, pick out a result cell andhighlight the variety of cells to be summed together. Finally, I will showtyping a method and type manually. Notice: for you to pick out quite aseveral cells, click on the primary cellular and maintain shift, then click onthe last mobile within the variety. So if you want a1 thru a10, click on a1,then preserve shift and click a10. At the same time, you've finishedchoosing the cells which you wish to feature together, press input. In anexample, you notice a grey assist section pop up once you begin typing thecomponents. When you create a method for the first time, you'll, as asubstitute, be aware of a blue spotlight and a query mark after the mobile.You could click on the query mark to toggle for an assist context forformulation on or off. Those hints will tell you what sort of records can beused in each method and make your system advent (notably while you startcombining formulation) a good deal simpler. Now, since we've got acomponent set up to sum all the ingredients together, let's make sure itapplies to all the cells in that row. Pick parts cellular and drag the blue dotacross the alternative cells to replicate the components to the one's batteries.You'll say that while you reproduce the formulation to a neighboringmobile, it shifts the variety that the brand new formula is referencing. As anexample, within the "scrambled eggs" column, it turned into sum (b2: b8);however, in "French toast," its sum (c2:c8).
The use of the average formula
Now that we’ve recognized how many components are wished for eachcalculation, realize how complicated it is to make. It is simplified viaassuming that fewer components approach that the recipe is lesscomplicated. To remember the number of ingredients in each component,

you’ll use the count components. They depend on formulation tests to peerif the cells in a selection are empty or now not and return the whole stuffed.This method could be an installation in your spreadsheet in the samemanner as the sum row. If you've highlighted a pure list of numbers, sheetswill robotically sum them for you and show the result. In case you'vehighlighted a combined variety of numbers and text, it will count thevalues. You also can carry out any of the five range-based operations onmore than a few numbers via clicking the sum button inside the backsideright and selecting the brand new default formulation from the pop-outmenu. From then on, anytime you highlight a range, it will carry out thefinal-decided on components. So consistent with your spreadsheet, "cereal"is the least complicated breakfast. However, I'm nonetheless now notconvinced that an easy breakfast is worth it. What if it charges an excessiveamount of? What if the more attempt to cook another meal saves me cash?Permits refine our choice by using identifying the average price per servingof the breakfast alternatives through using the average formulation. Theusage of the common componentsFor example, you have brought some faux minimal and most costs per uniton my substances list to the proper of my breakfast options. We'll need toget an average price for every factor using the low and high charges, thenmultiply the resulting average charge of the ingredient through itsrespective unit count in every recipe. I'll start by highlighting the variety ofvalues (in this example, its two aspect-by means of-side as opposed to avertical variety) and deciding on the average formula from the toolbar. Thiscan drop the result into the column to the right of the most price column.Subsequently, drag the formula down to use it to the opposite min and maxcharge combos. I'll label my column "average unit fee," so we recognizewhat we're looking at. Then, it allows moving directly to calculating theprice of breakfast using simple mathematics.Using Simple Mathematics Formulation

If we want to calculate the full price of the breakfast by multiplying theaverage charge of every element by using its unit matter in the recipe. Toperform this, manually type a system into the "average fee" row. Ourfundamental mathematics system could appear to be this for the "scrambledeggs" column:=$i2*b2+$i3*b3+$i4*b4+$i5*b5+$i6*b6+$i7*b7+$i8*b8The $ image earlier than column I (the average charges) tells sheets that nomatter where we positioned the formula in our spreadsheet, we usually needto refer to the “I column.” If we reproduce the formula to the alternativerecipes, it'll usually use the average unit fee column rather than moving theconnection with the next column over while you drag to replicate (like it didinside the sum and count examples). In case you do not need to kind thosevalues manually, there are cleanser ways to perform this form of the system:you could accomplish the same rate calculation by using this superiorformulation:=sum (array formula (b2: b8*$i2: $i8))There are numerous formulas in sheets that take care of complicated dutiesfor you, lots of which we'll dig into in the subsequent chapters. Now thatwe've got some working records and calculations, perhaps my co-workers(who're probably planning to devour breakfast day after today) mightbenefit from this sheet. It allows prepare to share our spreadsheet, andinvite some collaborators to view, edit, and use our data.
4.6 Using Google Sheets Offline

In case you aren't related to the net, you can still view and edit files,including:✓ Google Docs✓ Google Sheets✓ Google Slides
Store and open google docs, sheets & slides offline. Earlier than you turn onoffline, get right of entry to you ought to be connected to the internet. Youmust use the google chrome browser. Do not use private surfing. Install andswitch on Google Docs offline Chrome extension. Make certain you've gotenough available area in your tool to keep your files. Open google docs,sheets, and offline slidesOpen chrome. Ensure you're signed in to chrome. Go to drive.Google.com/force/settings. Check the field after "sync google docs, sheets,slides & drawings documents to this PC so you can edit offline." savegoogle docs, sheets & slides for offline use to your computer, go toforce.google.com. Proper click on the google docs, sheets, or slidesdocument you need to keep offline. Switch on "to be had offline."To store more than one files offline, press shift or command (mac)/ctrl(home windows) even as you click on different documents. To previewoffline documents on your computer, go to drive.google.com. Ensure youturn on offline access first. On the pinnacle right, click ready for offlineequipped for offline. Click offline preview.

4.7 Removing DuplicatesGoogle sheets help you remove duplicates from your document with threestrategies, ranging from a simple included feature to a custom script. Whileit's now not as apparent as in excel, sheets give a new numerous way to castoff duplicates in your spreadsheet.
Get rid of copies using the particular feature.The first approach we're going to study uses the integrated google sheetsfeature that reveals all precise entries, letting you eliminate the entirety elsewithin the facts set. Fireplace up your browser and open up a spreadsheet toget started. Subsequent, click the empty cellular where you want the facts tooutput, type =precise, and click on at the suggested characteristic thatappears in the dialog window. Choose an empty cellular and begin typing=specific, then click on at the thought that arises.From here, manually enter the variety of cells, or highlight them for thefunction to parse. When you achieve this, hit enter.Highlight the rows/cells you need the feature to search thru, then hit entersimilar to magic, sheets pick out all of the specific results and display theminside the decided on cell. The particular entries that have been discoveredwill seem out of doors your desk underneath the function's cell.If you replica and paste the information again into a google sheet, makesure to proper-click on where you want to stick and then choose, pastespecial > paste values only—in any other case, simplest the method getscopied into the new mobile. If you copy and paste back the information tothe google page, make certain to proper-click, then pick paste unique >paste values handiest
Cast-off duplicates using an add-onFor the following technique, you'll want to install and upload-on to googlesheets. In case you've never used an upload-on earlier than, they're just likebrowser extensions that unencumber extra additional capabilities for youinside of google apps, like docs, sheets, and slides. For this example, we'llbe using “do away with duplicates” by clever bits. It proceeds with a freetrial for 30 days; top-class memberships are $59. 60 for an entire lifesubscription or $33. 60 annually.
Putting in the upload-on

Get an upload-on, open a report in google sheets, click "accessories," andthen click "get accessories." open the accessories menu, then click on getadd-onsType "duplicates" into the hunt bar, after which click on the "loose" button.Good duplicates into the hunt bar, then click loose at the upload-on youwant to install. Click at the google account you need to apply to put in theupload-on. Pick out an account to put in the add-on upon installingaccessories that you want to furnish them with appropriate permissions.Those are fundamental to the operation of the add-on. Make sure youcompletely understand the permissions and agree with the developer beforeinstalling any add-on. Click "permit."Examine and evaluate the permissions for the add-on, then click on allowthe usage of the add-on. You could use the dispose of duplicates upload-onfor a single column or throughout multiple rows. In this example, we'll belooking for duplicates in rows, but it works, in general, the identical for asingle column. In your spreadsheet, highlight all of the rows you need tosearch for duplicates. After that, click accessories > get rid of duplicates >discover replica or unique rows. Spotlight the rows you want to look, clickaccessories, factor in disposing of duplicates, click on discover replica, orparticular rows. After the add-on opens, check to ensure the variety listed isaccurate, and then click on "next."Test to make certain the range indexed is correct, then click on next, selectthe sort of data you want to discover. Due to the fact we're doing away withduplicates, select "duplicates" and then click "subsequent." selectduplicates, then click on subsequentPick out the columns for the add-on to look. In case you didn't consist of theheaders—or perhaps your desk doesn't have any headers in any respect—ensuring to untick the "my desk has headers" choice. Otherwise, the firstrow may be left out. Click "next."In case your tables would not have headers, deselect my table has headers,click nextUltimately, select what the upload-on will do with its findings, after whichclick "end."Select what you want to take place with the results, then click subsequent.On the effects web page, the add-on tells us that four reproduction rowswere discovered and removed. The results web page is showing how many

entries have been found on your record. Voila! All duplicate rows disappearoff of your sheet. The up to date table with none of the duplicated entries
Eliminate Replica rows with Google Script EditorThe final technique for eliminating duplicates in your sheet entails usinggoogle app script, a free-to-use cloud-based development platform fordeveloping custom, mild-weight internet packages. Even though it involveswriting code, don't allow that scare you off. Google provides vastdocumentation or even materials you with the script for doing away withduplicates. Simply copy the code, verify the upload-on, and then run itinterior your sheet. From the new google sheet, click on "tools" and click on"script editor."✓ Click on equipment, then click on the script editor✓ Google apps script opens in a brand new tab with an empty script. An
empty function in your sure script✓ Delete the empty feature in the file and paste inside the code✓ Store and rename your script. Hit the "run" icon when you're
accomplished. Click the run icon✓ You’ll review the permissions your script requires and grant it access
to your spreadsheet. Click "overview permissions" to see what accessthis script wants. Click on assessment permissions to view the requestedpermissions
✓ Be given the prompts, after which click on "allow" to authorize thescript. Evaluate the permissions, click on allow
✓ After it finishes jogging, cross returned on your sheet, and, similar tothe previous techniques, all replica entries vanish from your document!The duplicate information factors were removed! Regrettably, if yourinformation is internal of a desk—like, an instance proven above—thisscript will not resize the desk to in shape the number of entries in it.Also, you'll repair that manually.

Chapter 5: Google Slides - ForCreating and Collaborating OnPresentationsGoogle Slides is a free program and a piece of Google's set-up of onlineapplications, including Google Docs (word handling), Sheets(spreadsheets), Slides (introductions), and Forms (gathering and sorting outdata). What's most incredible about Google Slides is that you can make,alter, team up and present consistently across working frameworks andwithout potential document similarity or contamination issues, overseeingstreak drives or making sense of connector links. Utilizing an automatedprogram likewise disposes the danger of moving an infection. Likewise, it is genuinely simple to move an introduction from PowerPointto Google Slides and back once more; however, you may lose somedesigning simultaneously. If you do run a presentation, page through toensure the slides despite everything, look how you need to do them. Be thatas it may, all the substance should change over fine and dandy if you areutilized to PowerPoint and end up expecting to use Google Slides (or theother way around), dread not! The orders and techniques are comparableamong them, and on the off chance that you stall out, there are heaps ofacceptable online assets to respond to your inquiries.
5.1 Creating a Presentation

Before we make a plunge, it's imperative to characterize what we mean by'intelligent introduction.' 'Intelligent' is once in a while used to depictintroductions that incorporate test questions or crowd investment – but thatis not what we're discussing here. At the point when we state 'intelligent,'we're talking about an interactive introduction that utilizes hyperlinks toassist clients with exploring various areas. An introduction with hyperlinksis 'intuitive' because it permits the client to pick what data they see andrequest. When in doubt of thumb, a quick introduction functions admirablywhen your crowd needs to connect legitimately with what's on the screen,placing them in charge of how they digest the data. In this blog entry, we'llstroll through how to make a quick introduction to Google slides.
Specialized viewpoints, bit by bit Presently now that we're in the same spot, how about we dig into how tomake a viable intuitive introduction in Google Slides. It's simpler than youmay suspect. Stage 1Start by opening another introduction! From the Google Slides landingpage, look to the upper left, and snap the Blank catch to open anotherpresentation. This is your clear record from which to make an excellent,intelligent introduction! Stage 2Google Slides naturally embeds a title slide when you open anotherintroduction, so you should simply tap on the title text box and type in atitle. Make the title something bright and snappy that your crowd canundoubtedly comprehend.

Stage 3Now, how about we proceed onward to the immensely significant menuslide. We will make something that resembles a catch, so your crowd knowsit's interactive. Later on, we'll include hyperlinks. You can utilize any shapefor your score, yet rectangular shapes with adjusted corners regularly lookthe most 'button-like'. Find the Shape button on the toolbar in slides, andselect a form in the first place. At that point, double tap on the slide, andthat shape will show up—Snap and drag utilizing the hubs along the edgesof the form to change its size. You can include marks either by composing legitimately on to the shape ortapping the content box button (likewise on the toolbar) and situating abook box on the head of the form. You may also need to include a littlebolt-shaped head of your catch to help show that the trap is interactive. If you have an increasingly authoritarian personality, this is a chance to beinnovative! You don’t need to produce your catch using shapes. The snapson the menu slide in our model introduction are real pictures.Don't hesitate to get those imaginative juices streaming, yet remember thatyour catches need to look interactive. One method of doing this is byinvolving a drop shadow or outskirt. To add a suburb, utilize the fringeshading and outskirt weight catches found on the toolbar. To embed a drop shadow correctly, click, at that point, select Formatalternatives, and check the crate for the Drop shadow. You could likewise make your catches a differentiating shading from thefoundation and other content – nonetheless, stay away from excessivelysplendid hues, as this can be diverting. This first catch you have made is the reason for your menu. When you'recontent with what it looks like, reproduce it, so the number of scorescompares to the number of segments in your introduction. You can do thisby reordering. Essentially select the whole catch – click with your mouseand drag over the score, so all components are featured – at that point,reorder it by right-clicking, choosing Copy, and afterward Paste anywayordinarily you need. Alter the content of each catch to compare to the areaof the introduction it will connect to. Next, guarantee that the snaps areadjusted in a type of request. You can choose different fastens and afterwardmodify or circulate them as you like utilizing the arrangement apparatusesfound under the Arrange tab.

Note: If you choose to utilize symbols or symbolism, it's a smart thought toensure the significance is clear. For example, we, as a whole, discern thatthe house image signifies 'go to the landing page.' There's no point utilizinga zebra symbol to come back to the landing page since individuals will getconfounded. Stick to what exactly individuals discover natural; the greatroute is about usability! Tip: Use symbols in your quick introduction in Google Slides, click theAdd–on tab, select Get additional items, and afterward select the Insertsymbols add-on. At that point, under the Add–on tab, another alternative will show up,which is Insert symbols for Slides. Float over this, and select Open sidebarto choose symbols. At that point, when the sidebar shows up, guarantee that the symbol putchose on the drop-down menu is 'Material Design.' Stage 4Make area header slides for each segment in your introduction. Do this byexploring the head of the page and clicking a new slide on the upper left ofthe instrument bar. Rehash this progress the same number of times asfundamental. Next, form the same amount of catches as you require for thesubsection utilizing the means laid out above. You can likewise essentiallyreorder the scores you've just made and simply alter the content. Stage 5Add the data you need to remember for each segment. On the off chancethat this is pictures, as in our model introduction, at that point, embedphotos utilizing the Insert tab. Suppose this is text, type on the slide utilizing a book box. Be that as it may,it's most suitable to use visuals rather than long passages of text. Keep yourmessage clear and brief. Stage 6Rehash stages 4 and 5 for each segment. Ensure each section has a headerslide, with catches if vital. Glance through your introduction so far – ensureyou requested all parts accurately, and that there is a header slide toward thestart of each. Stage 7

Come back to your underlying menu slide. Make straightforward shapes tocover each 'button' you have made. We will transform these straightforwardshapes into hyperlinks that permit clients to explore through your deck.First, press the Shape button on the toolbar, and afterward make a shape thatcovers the catch that you have made, however no void area outside them. Atthat point, select the form and snap the Fill shading button on the toolbar,select Transparent from the drop-down menu. Spot these straightforward shapes over the head of each catch in your deck.Utilizing direct forms along these lines makes it a lot simpler to alter thehyperlinks if necessary, and makes it more uncertain that a client will missan interactive territory! Stage 8Presently we are prepared to hyperlink each fasten! Select the firststraightforward box on your menu slide, right snap, at that point, select link,and pick Slides in this introduction. From here, choose the slide you needyour catch to explore when clicked. Tip: If your slide has a title, it will have a similar title in the connectionsegment, making it simpler to discover. After you have connected these twoslides, the connection will remain associated with the particular slide, notthe slide number – so it doesn't make a difference if you move thingsaround.

Stage 9Rehash this procedure for all catches, with the goal that everyone connectsto the right slide.
Stage 10Make catches to come back to the principle menu. To do this, follow themeans plot already and utilize a straightforward box that connections backto the principle menu slide. If you include various subsections inside asegment, you can likewise make a catch connecting back to the area titleslide from every paragraph.
5.2 Importing a Microsoft PowerPointPresentationGoogle Drive has upset gathering work, giving devices that variousindividuals can make and alter at the same time. In any case, numerous individuals, despite everything, want to utilize theMicrosoft set-up of items when working alone. This can be hazardous ifyou're using Microsoft PowerPoint to make an introduction, yet need toimpart it to others to give input or make changes. Fortunately, changing over PowerPoint introductions to Google Slides —the PowerPoint equal — can be practiced in a couple of ways, and theprocedure is simple and basic. Here's how to do it. The most potent way of converting from PowerPoint to Google Slides
1. Open Google Drive.2. Click "Fresh" in the upper left corner of the computer. 3. Select "Transfer File."4. Select the ideal PowerPoint introduction.5. In the wake of transferring, right snap, and select "Open With," at
that, point select "Google Slides." 6. Select "Document."7. Select "Spare as Google Slides."
The most effective method to change over a PowerPoint to Google Slidesby bringing in slides
1. Go to Google Drive.

2. Select Slides.3. Open a "Clear" introduction.4. In another Presentation, select "Record," at that point, "Import
Slides." 5. Transfer the PowerPoint document.6. Select the recently changed over Slides.

5.3 Adding Comments on Google SlidesWhen you've shared your Google Slides introduction, you're prepared tostart working together with colleagues. We should investigate a portion ofthe Google Slides introduction joint effort choices:
1. Leave a Comment
One of the most popular ways for colleagues to team up on anintroduction is through the Google slides Comments highlight. To utilize remarks, select the content or item that you need toremark on or place your cursor close to it. Snap the Commentsbutton in the upper right. The Comments jump out shows up: Remarks include on Google Slides

Utilize the Google Slides Comment include for introduction coordinatedeffort. Snap Comment symbol on the right (it has a + image close to it). You'll seean unfilled remark:
Void remark in Google Slides Leave a remark in Google Slides.
Type your remark in the field. Press the Comment button when you're set. 2. Answer to a Comment and "Visit"
In instances you are taking a gander at a similar slide as a pundit, click onthe remark to leave your answer:

Answering to a remark Snap-on the remark to reply to it.
You can likewise open a Chat mode on the off chance that you see thatanother colleague is in the introduction simultaneously as you. To do this,search for the colleague's symbol in the thumbnails. Dynamic clients showup as a splendidly shaded square or profile picture on the thumbnail of theslide they're taking a gander. If a visit is now open, you'll see the talksymbol at the head of the screen. When you discover a colleague's symbol, click on it to open continuous talkmode with that colleague:
Introduction joint effort through talk Google Slides constant talk include is useful for introductioncoordinated effort.
1. Turn Comment Notifications On
Since remarks are such a valuable introduction coordinated effort include, ittends to be useful to know when a colleague leaves a remark. To do this,you'll have to turn on remark notices. To begin with, empower remark notices in Google Drive. Typedrive.Google.com into the location field of your program. Snap the Settingssymbol (it would seem that an apparatus) in the upper right of your GoogleDrive screen. The Settings screen shows up:Google Drive Settings screen

To get Google Slides notices, ensure notices are turned on in Google Drive. Ensure all the cases are checked and click “Done.” Next, open yourintroduction once more. Snap the Comments button and select theNotifications symbol (it would appear that a chime). A drop-down menushows up:

Turning on Google Slides notices
Utilize the Notifications drop-down menu to guarantee that you get notes ofany new remarks. For you to get a warning, select “All.” To get notice of remarks, includingyou, select “Only yours.” To kill getting remarks, choose “None.” When you turn remarks on, you'll get an email when changes are made tothe introduction. Note: Each colleague must choose for themselves whether they need to getwarnings. You can't turn alerts on for another client.

2. Email Collaborators
Another convenient Google Slides introduction coordinated effort device isthe capacity to email a few or all associates on the double from inside theslide introduction. To get to the capacity, go to File > Email Collaborators.The Send Message discourse box shows up: Make an impression on online introduction colleagues Utilize the Send message discourse box to make an impression on onlineintroduction partners. Type your message, select the teammates you need to send it to, and clickSend.

3. Resolve a Comment
The last cooperation instrument you may wish to utilize has to do withoverseeing remarks. After a remark has been tended to, it's conceivable youno longer need it to show up on the introduction. Notice that each remark has a Resolve button on it: Google Slides Resolve button When a remark is tended to, mark it as set out to conceal it from differentteammates. When you've tended to the issue raised by the remark, click the Resolvebutton. The remark is not, at this point, noticeable on the slide.
5.4 Collaborate and share PresentationsThe initial step to working together is giving others access to your onlineintroduction. To begin, open Google drive by composing the accompanyingin your program's location field: drive.google.com. In your Google Drive, click on the thumbnail of the online introduction youneed to work on to open it:
Google Slides online introduction A Google Slides online presentation.

Note: This introduction utilizes the Everland layout from Graphic River.For progressively extraordinary expert Google Slides formats, check EnvatoElements or Graphic River. Snap-on the Share button in the upper right corner to start sharing yourGoogle Slides introduction with others. The Share with other exchange boxshows up: Offer with an others exchange box Utilize the Share with others exchange box to share your online presencethrough email. There are serval different ways you can share your Google Slidesintroduction through the exchange box: 1. Offer through Email The first and least complicated technique for sharing your online presencethrough the Share with others exchange box is to type an email address intothe People field. As you type the email address, the exchange box extendsto permit you to add a note to your challenge to share:
Offer your online introduction through email Welcome a partner to your online presence.
2. Control Email Presentation Access (Edit, Comment, View) Although you're working together on your introduction, you might not haveany desire to give your colleague full access. Luckily, you can control thedegree of presentation you get to your colleague had. To control the introduction, click on the Edit records legitimately symbol (itwould appear that a pencil) in the upper right corner of the Share withothers exchange box:
Dole out access level Utilize the drop-down to dole out the joint effort level.
The drop-down menu gives you three alternatives for getting to level: Can alter: The framework defaults to this alternative, as your associate hasfull access rights to the online introduction. They can make changes andremark on the presentation. Can remark: Your associate can see the introduction and offer remarks;however, they can't make changes to the presentation itself.

Can see: Your partner can see the introduction, yet they can't remark ormake changes to it. To choose the degree of access, click on it in the drop-down menu. Snap theSend button on the lower-left corner of the exchange box to send an emailgreeting to your colleague. Note: Your colleague needn't bother with a Google record to get to yourGoogle Slides introduction. They can get to it through the connection in theemail they get. 3. Offer via Shareable Link A subsequent method to work together on a Google Slides onlineintroduction is to give your colleague a shareable connection: Get shareable connectionSnap the contact to open the Share with other discourse boxes. Snap the “Get shareable connection symbol” (it would appear that a chain)in the upper right corner of the Share with other discourse boxes. Theexchange box grows to show the shareable connection: Shareable connect to an online introduction Utilize the shareable connect to share your online presence. Of course, the connection is replicated to your PC's clipboard when youextend the discourse box. Nonetheless, you can ensure it's in your clipboardby tapping the “Copy Link button” on the privilege of the discourse box. You can send the connection through email, online life, instant message, oreven link it on a site if you need to make your introduction open. Theshareable connection choice is a decent decision if you're working togetherwith numerous individuals, but don't have all their contact data. Alert: Anyone with the shareable connection can get to your introduction.For instance, if a contact advances the connection to another person, thatoutsider can utilize it to get to your presentation. 4. Control Shareable Link Presentation Access (Edit, Comment, View) Luckily, you can control the level access individuals who utilize theshareable connection have to your introduction. Snap the down bolt close to anyone with a connection can see. A drop-down menu shows up: Control access to your online introduction You can select what level of approach your associates have.

The alternatives can alter, can remark, or can see. Snap the choice you needto apply to the shareable connection. Snap the “done faster” when you'redone. 5. Step by step instructions to Change or Revoke Presentation Access The online introduction joint effort is incredible; however, imagine ascenario in which somebody leaves the group. You may not need them evennow to have the option to get to your introduction. You can change or repudiate access to your introduction. Here's the ticket: Snap the Advanced connection in the lower-left corner of the Share withother discourse boxes. The Sharing settings exchange box shows: Introduction coordinated effort with the Sharing Settings exchange box Utilize the Sharing settings exchange box for online introduction concertedeffort. We're having a gander at the collaborative initiative choices on the Sharingsettings exchange box field by field: Connection to ShareShareable link for online introduction Utilize the Shareable connect to give others access to your online presence. In this field of the Sharing settings exchange box, you see the shareableconnection once more. Duplicate the link to share it. Likewise, you can tapon one of the internet-based life symbols underneath the connection tonaturally share the connection through web-based life. Who Has AccessSee who approaches your online introduction This area of the discourse box shows who approaches your onlinepresentation. In this area of the Sharing settings discourse, the box you see a rundown ofevery individual who approaches the introduction. In this model, you can see that there's a shareable connection, and oneindividual has been welcomed through email. As an organizer, you ought tolikewise observe your name on this rundown. To alter an associate's introduction access or give them organizer status,click the Edit documents legitimately symbol to one side of their name. Todeny an associate's entrance to the online introduction, click the X image bytheir name. Note: An organizer has full access to the introduction and can't be erasedfrom it.

To change the shareable connection choices, click the Change interfaceclose to anyone who has the connection can see. The Link sharing discoursebox shows up: Utilize the Link sharing exchange box to change shareable connection getto levels Utilize the Link Sharing exchange box to improve shareable connectionsget to levels. From this discourse box, you can kill the shareable connection or switch on.You can likewise change the degree of access a connection holder has toyour introduction. At the point when you're done making changes, click the Save button. Welcome PeopleWelcome individuals to get to your online introduction Utilize this area of the exchange box to welcome individuals to get to youronline presence. The Invite individuals field of the Sharing settings discourse box works likethe Share with others exchange box above. Use it to offer access tocolleagues through email. Utilize the Edit documents straightforwardlysymbol to control the entrance level for each colleague. Organizer SettingsOrganizer settings for a coordinated online effort Utilize the Owner settings segment to control what partners do with yourintroduction. The Owner settings area of the Sharing settings exchange box gives someadditional checkboxes to provide you with extra command over who gets toyour introduction and how they get to it. The first checkbox shields associates from offering your introduction toother people and change the entrance level of other colleagues. The second checkbox implies that solitary teammates with supervisors getto (Can alter) can download, print, or duplicate your introduction. Thischeckbox is especially significant in case you're sharing your presentationopenly.
5.5 How to make templates on google slides?

There's no requirement for all your Google Slides introductions to appear tobe unique. Spare time and accomplish a steady picture by re-utilizing asimilar Google Slides introduction format over and over. One approach to do this is to structure and make your own Google Slidesintroduction layout. In this instructional exercise, we look at why youshould make an introduction format. We'll additionally clarify what an aceslide and an ace format are. At last, we'll present a bit by bit control thatdiscloses how to make your own Google Slides introduction layout. Your Google Slides layout decides the impression your introduction leavesin the psyches of your watchers. While numerous expert introductionlayouts are accessible, you need something somewhat more one of a kind insome cases. When you need to utilize an introduction topic that you know nobody elseis using, you can make your own reusable Google Slides introductionformat. Be cautious, however. Any subject you make should be proficient. Theachievement of your introduction could rely upon it. On the off possibilitythat your association utilizes a structured group, talk with them during yourintroduction layout arranging process. What's a Master Slide, and what's a Master Layout?The principal thing you have to comprehend while making an introductionlayout is the idea of an ace slide in Google Slides. The components that youplace on the ace slide show up on each slide in your introduction.

Conversely, an ace format characterizes the design just for the slides it isapplied to. To make an ace design, you'll utilize a mix of placeholders andrealistic components on each ace format. An ace design can be used for atleast one slide in your introduction, or it may not be utilized by any stretchof the imagination. Access the Master Slide apparatus by choosing slide>Edit Master from theprimary Google Slides menu. The ace slide and ace designs show up: The Master Slide apparatus permits you to alter the ace slide and aceformats. A change made to the ace slide shows up on all the slides in theintroduction, including the ace formats. For instance, I've added a vertical bar to one side of the ace slide. As shouldbe obvious, the bar is naturally added to all the ace designs: Changing the Google Slides Master Slide Changes you make to the ace slide show up on all the slides in theintroduction. Expert Tip: While plan components added to the ace slide show up on eachslide in your introduction, you can cover an ace slide component on anindividual slide by attracting a shape over it. It is a shading that coordinatesthe foundation of transparency. Instructions to Plan Your Own Google Slides Template Before you make a Google Slides layout, the first arrangement for it. A fewinquiries to pose to yourself include:
What will I utilize this introduction layout for? Who'll see the introductions made with this layout? How might I make this layout fit into my present showcasingand marking?
To address these inquiries, you have to think about the accompanying: Stage 1. Remember Your Audience This progression tended to the investigation: "Who'll see the introductionsmade with this layout?" The crowd of the presentation(s) you'll make has any effect on what you putin your Google Slides layout. An introduction format utilized by aneducator of primary understudies should be unique concerning anintroduction layout used by the showcasing branch of an organization.

Additionally, ask yourself whether the introduction will be given by a livemoderator or got online through a website like SlideShare by individualsfrom the intended interest group. If the presentation is acquired from theweb initial, hardly any slides are critical to catching the pursuer’sconsideration. They should be attractive, or your introduction will bedisregarded. When you've pondered your crowd, it's ideal to proceed onward toarranging the real plan.

Stage 2. Consider Design Elements Your Google Slides layout is made of numerous parts, including the textualstyles. While there are multiple surprising and masterful text stylesaccessible, center around utilizing textual styles that are profoundlycoherent. On the off chance that your introduction will be seen on the web,pick a usually available textual style. Remember that if the watcher doesn'thave the text style you select on their machine, a textual style they do havewill be subbed. Hues: While picking a shading plan for your marking and introductionlayout, recollect that hues may represent various things relying upon theway of life of the individual who sees it. Pick hues that have a positiverelationship for your crowd. Or, on the other side, work with yourorganization image hues. Pictures: It's ideal for keeping your introduction format planstraightforward. Include images and other realistic components to thedifferent introduction slides. You can even utilize them on your lorddesigns. However, be saving on the ace slide. The last layout arranging step is to design the structure itself.Stage 3. Plan Your Template Design In this progression, you plan what sorts of slides you'll remember for yourlayout. The types you settle on become the ace designs of your format. Numerous expert fashioners make wireframes that are fundamentallyoutlined for each kind of slide they might want to remember for the GoogleSlides layout. Wireframing can be very helpful since it gives a harsh visualof what your introduction will resemble.In case you're not open to making wireframes, make a rundown of the slidetypes you wish to remember for your introduction. For instance:
• Title slide• Intro slide (no pictures)• Text and single picture slide• Columns slide• Conclusion slide
Since you'll likely utilize a similar slide format more than once in anintroduction, you don't have to make plenty of ace designs. Make sense ofthe basic designs you need and spotlight on those.

After the arranging is done, you're prepared to make your Google Slideslayout. Include a GraphicYou can likewise add a realistic component to your Google Slide format.This component shows up on each slide, so it's ideal to be unobtrusive. Forthis situation, I'll include a logo. Here's how to do it:
1. Select the ace slide:
Ace Slide with Insert Image Icon Snap the Insert Image symbol to get to the Insert Image discourse box.
2. Snap the Insert Image symbol from the device bar underneath theprinciple menu. The Insert Image discourse box shows up:
Google Slides Insert picture screen Utilize this screen to add a picture or photograph to the ace slide.
3. Drag a picture from your work area onto the exchange box or snapthe Choose an image to transfer catch to download an image fromyour PC. For this situation, download a logo for my organization:
Adding a Logo to a Google Slides Master Slide The downloaded picture shows up on the ace slide.
4. Drag the picture where you need it to show up on your slides. Forthis situation, you need the photo to show up in the lower rightcorner: position the Image on the Master Slide
Select and drag the symbol to where you need it to be in your Google Slideslayout. We've quite recently included a vertical blue bar, changed the text style, andadded a logo to the ace slide. These progressions will be thought about allthe slides in the introduction. Note: There is a page number underneath the logo on the ace slide. We needthis to show up on all the slides in the introduction, aside from the titleslide, so it's essential to leave it here.Alter a Master Layout After you expel undesirable ace formats, you're prepared to change anydesigns you left in the format to coordinate your design structure. In thismodel, I'm going to change the ace design for the title slide to make thecontent left-adjusted. How about we begin;
1. Snap-on the title slide ace design to choose it:
Title Slide of Google Slides ace designs Select the content you need to change on your lord design.
2. To change the content arrangement, select the content to bereplaced.
3. Snap the down bolt close to the More catch in the Tools menu. Atthat point, click the Left Alignment button. This is what the title aceformat slide looks like with the content left adjusted:
Ace Layout for Title Slide with Text Left-adjusted This is the title ace slide with the content left-adjusted. Each time you apply the title slide format to a slide in your Google Slidesintroduction, it'll resemble your lord design. Clear Master LayoutThis is changing a clear ace format in Google Slides. For the ace format I'm making, I need to leave space for a picture on the leftand supplement a book placeholder on the right. Note: There's no real way to embed a picture placeholder in an ace format.
1. Leave space for a picture on the left of the slide. When we return tothe slide creating mode, we'll draw a placeholder that can orwithout much of a stretch be expelled, so the client of the formatrealizes what to do.
2. To draw the placeholder, click the bolt to one side of the Text Toolfrom the Tools menu. Select the Body text placeholder alternativestarting from the drop menu. Presently the ace design resemblesthis:
Adding a Text Placeholder to a Master Layout in Google Slides Add a book placeholder to one side of your lord design. The space on theleft is for a picture. Alert: If you utilize the Text Tool without picking the placeholder choice,the content turns into an unchangeable piece of the slide format.
3. Utilize your cursor to draw the content box placeholder on the ceformat.
4. To include a caption placeholder, utilize the Subtitle placeholderchoice starting from the drop menu:
Ace Layout with Text Placeholder and Subtitle Placeholder There are likewise text placeholders for titles and captions.

Keep changing existing formats, or you can include another ace design slidethrough the Master Slide apparatus. Apply the Masters to Your Google Slides Template When you've made all the ace formats you need, come back to the slidecomposing view. Your format will be an example introduction youmanufacture utilizing the ace slide and ace designs you just made. It verywell may be changed when you need it. To begin, all I have in my Google Slides layout is the title slide: You'll manufacture your Google Slides format utilizing the ace designs youmade before. 1. To add another slide to your format, click the down bolt close to the Newslide button in the upper left (it would seem that a + image). A spring upshows up, demonstrating the accessible ace designs: Utilize the New Google Slides Template When you've finished your layout, you're prepared to utilize it. You can dothis by changing the format guide to make a real introduction. 1. Duplicate the format utilizing the File > Make a duplicate alternative onthe primary menu. Rename Google Slide Template Duplicate and rename your Google Slide layout to make a realintroduction. 2. Rename the duplicate, so you don't overwrite over your layout. 3. Right-click on any example slides you mean to utilize and utilize theCopy order from the spring up menu to make a copy of it. Erase any formatslides you don't have to use. Duplicate and Delete Slide Commands You can utilize a format slide more than once by duplicating it. 4. Move the slides into the request you need them to be in your introductionby tapping on each slide and hauling it into position. 5. Type your data into the presentation. Include any pictures that yourequirement for the introduction.

Chapter 6: Google Calendars-Signinto Access & Edit Your Schedule
There used to be when organizing a calendar implied getting out a journaland flicking through the pages. It meant looking past the scrawls and theincomprehensible penmanship to locate an extra space. It suggested seeingthe arrangements you missed because well, you neglected to take a ganderat your journal in time. What's more, it implied searching for an hour thatadditionally fit the calendar of every other person going to the occasion. Itwas, in every case, such an agony. Be that as it may, this manual forutilizing Google Calendar in 2020 and past will tell you the best way to takeadvantage of this advanced schedule. The development of computerized schedules had made everything so a lotsimpler. You no longer need to keep a journal with you consistently. Forwhatever length of time that you have your cell phone with you, you'llapproach your schedule.The schedule will send warnings so you can be sure that you didn’toverlook anything, and no arrangement is missed. What's more, you caneven impart your plan to other people to perceive what an associate hasarranged and can locate an extra an ideal opportunity to meet. It's anentirely different approach to sort out time, and it's been a pleasant change.It's likewise been an unexpected and unnatural change.

In October 2017, that absence of clearness turned out to be precise. Googleredesigned its schedule just because of 2011. It revealed a device that iscleaner and neater that gathers up some superfluous highlights (and a notmany that individuals delighted in. The outcome is a hugely incredible time the board apparatus that we don'tgenerally have the foggiest idea of how to utilize. We mollify ourselveswith including an occasion, and we're astounded, here and thereobnoxiously, when our Google schedule consequently consists of an eventtaken from a private email. Be that as it may, we just utilize a small numberof its capacities, and we disregard a considerable lot of the manners bywhich our schedule can improve our lives. In this manual for Google Calendar, we're going to take you through all ofGoogle Calendar's astounding capacities. We'll begin with the basic stuff. At that point, our manual for GoogleCalendar will go entirely through its propelled settings and take a gander attwo or three separate ways to broaden the forces of Google's spare time theexecutive's stage.
6.1 Getting StartedFortunately, you don't have to begin with Google Calendar successfully. Forwhatever length of time you have a Google account, and about 1.2 billionindividuals do, you don't have to do anything over opencalendar.google.com or raise your application. On the off possibility thatyou've marked into your Google account, you'll as of now be signed in. Onthe off possibility that you don't yet have a Google account, when you openthat page, you'll be welcome to enroll. It's free and doesn't take over a fewseconds. On the off possibility that your cell phone utilizes Android, at that point,you should find that Google's schedule application is as of now introduced.On the off chance that it's not on the landing page, you may think that it'scovered in your application cabinet. The one resembles this: When you've opened a calendar in your program or on your cell phone, youdon't have to do whatever else. It will, as of now, be set up and prepared foruse. Both the site and the versatile application have a settings symbol thatlets you play with the method that Google Calendar looks and works—andyou may likewise need to bring your old schedule into your new one.

Bringing in Your Calendar Not many individuals start their schedules with a clear record. On the offpossibility that you've been utilizing an alternate schedule application, forexample, Outlook or Apple Calendar, you'll have to import yourinformation to Google Calendar. That shouldn't be hard! To start with, open your schedule on your PC. That will make it simpler tospare your information and move it around, and regardless, bringing in toGoogle Calendar must be done on a PC, not on a cell phone. In your source schedule, look in the menus for an Export work. Scheduleinformation can take various organizations. CSV is the best with GoogleCalendar, yet if you're sending out from an Apple Calendar, pick a card.Ensure that you know where you spared the data! In Google Calendar onyour PC, click the settings symbol at the upper right. Under Import andfare, pick Import.
Other Calendar Importing Options That technique ought to be sufficiently clear, and it shouldn't present youwith any issues. Be that as it may, if moving from an Apple Calendar toGoogle Calendar does not go as smoothly as you would like, there is asubsequent strategy. First, you'll have to change the default schedule on your iOS gadget to yourGoogle account. Open Settings > Calendar on your iPhone or iPad, andpress Default Calendar, pick your Google account. Snap iCloud >Accounts, and slide the catch with the goal that it's in the on position. The following piece is the place it begins to get fun. Sign in to iCloud and tap the Calendar symbol. Pick the schedule you wishto fare and snap the communicate logo on the right. You'll see a windowchecked Calendar Sharing.
Schedule Website Settings

When you've set up your Google Calendar, you can begin playing with thesettings. The settings symbol for Google's Calendar site is at the upper rightof the screen. Snap the machine gear-piece, and you'll create a drop-down menu, with theSettings at the head of the rundown. Pick Settings, and on the left of thescreen, you'll see a rundown of the entirety of the settings that you can alterin your schedule.
Language and RegionA portion of those settings is direct. Google will set the Language and areadependent on the data it gathers naturally from your Internet association;however, you can transform them if you need to utilize a language andlocale that is not the same as your immediate area.

Time RegionThe equivalent is valid for your Time zone, yet this is somewhat moremind-boggling. Make an occasion, and Google will naturally utilize yourneighborhood time. Welcome another person to join that occasion, andthey'll see it in their neighborhood time as well. So on the off possibility that you were writing in your schedule in NewYork that you needed to put a call to somebody in California, you mayconsider them to be of the call at 11 a.m.; however, your partner wouldthink it to be 8 a.m. As you travel, the occasions utilized by your scheduleconform to the neighborhood time region. That change ought to happen naturally. Google will change its time regiondependent on your IP address or your phone information. No matter how itmight be, on the off chance that it doesn't occur—if you're utilizing a VPN,for instance, or not associated with the Internet—you can likewise showseveral time region settings in your scheduled place, where you happen tobe.You can change your schedule's time region settings physically. To show more than one time-region setting on the schedule, open Settings,pick a time zone and check Display secondary time region.

You'll, at that point, have the possibility to choose a subsequent time regionfrom a drop-down menu, and you'll even have the opportunity to apply amark to those time regions to separate them. (By and by, you're probablynot going to require those names; the spot name should be adequate.) This is likewise where you can uncheck the choice to refresh your essentialtime region to coordinate your immediate area, keeping the occasions onyour schedule to one zone paying little heed to your area. What's more, if you're utilizing many schedules, a component we'll talkabout later, you can once in a while make distinctive time regions for eachschedule. Snap the schedule in the Settings; at that point, select CalendarSetting and change the time region. Few out of every odd schedule permitsthat change, yet it very well may be a helpful method to monitor anotherperson's occasions in another time region.
World Clock
On a PC, you can likewise add a World Clock to your schedule. It impliesthat you can include the time in different pieces of the world to the side ofyour schedule.

Pick the World Clock alternative in General > Settings, check Show worldclock, and add the areas you need to pick. They show up on the left of thescreen beneath the month see. This is not something you're going to see on your cell phone, yet whenyou're pulling up your Google Calendar on your more widescreen, havingthe option to see the time in various pieces of the world can be a decenttouch.
Event SettingsUnderneath the default span settings is the choice to make SpeedyMeetings. Check the container and 30-minute gatherings will naturally beplanned to the most recent 25 minutes, while more extended gatherings willbe cut by ten minutes. The point says Google is to improve productivity; however, a superior useis a point at which you're planning consecutive gatherings. If you need torun starting with one gathering then onto the next, it merits utilizing thatopportunity to allow yourself to arrive at the gathering room, get a much-needed refresher, or take a restroom break. The Default Guest Permissions isn't the easiest to use in a bit of plan;however, it sets the capacities that others welcome to an occasion can useon that schedule occasion. There are just three alternatives: visitors canadjust an occasion, changing the time, area, or the span; for instance, theycan welcome others and visitors on occasion, and they can see a list ofpeople to attend.For the various individuals going to the occasion, it merits rec.They can change those settings. On the off possibility that you needsomeone to have the option to change the hour of the gathering on the offchance that they have to, or you don't need everybody to see who else willbe there, those settings will give you more authority over the passage inyour schedule.

SolicitationsThe following setting is indistinct to such an extent that Google needed toinclude a logical note.The Automatically Add Invitations setting decides if you see solicitationsconsequently in your schedule or whether you'll just observe them afteryou've acknowledged them. You have three alternatives. In the first place,add all solicitations to your schedule. Second, put all solicitations to yourschedule; however, just get warnings about the occasions you haven'tdeclined. Or then again, third, pick only to see occasions that you'veacknowledged on your schedule. None of those alternatives are more productive than the other, yet on the offchance, your schedule is now swarmed, and you're hoping to pruneoccasions from your dates. At that point, just naturally, embeddingoccasions you've acknowledged is a decent spot to start.

NoticesThe sort of Notifications you decide to get when you're sitting in your workarea is significant. You can turn notes off, limit them to program warnings,or go the entire hoard and pick interruptive Alerts. Those interruptivealarms are truly interruptive. In case you're highly involved with work, theloud bongs they send—and remember that they'll be rehashed on your cellphones—will positively wake you up. If you discover them excessivelytroublesome, this is the spot to come to restrain the agony. At long last, in this segment, you can decide to add video calls to occasionsnaturally. Besides utilizing Google Hangouts for each occasion you make,you'll need to ensure that crate is unchecked. It won't do you any damage,yet observing a chance to make a Hangout bring in each occasion depictionjust stops up the passage.

View OptionsThe “View Options” decides the presence of your Google Calendar. Once more, these settings are shrouded down in the Settings menu; yet theydirectly affect the presence of your schedule both on a cell phone and onPC. Some of them are likewise more valuable than others. You most likelydon't need the schedule to show declined occasions or show week numbers,an element that puts a number close to every week in the year. In any case,deciding to diminish the splendor of past events will help keep the schedulelooking clean. Having the option to see schedules one next to the other inDay View is probably going to be exceptionally helpful if you're utilizing ordealing with various schedules used by multiple individuals. Clericalspecialists at large organizations will need to ensure that they have thatalternative. The last three alternatives permit you to change the day to begin the week.Not all nations start the working week on Monday, and you should have theoption to take a gander at a schedule that puts Saturday above all else. Youcan decide to begin the week on Saturday, Sunday, or Monday. You canlikewise change the number of days visible in each view and includevarious schedules from around the globe, such as Chinese schedules, aHebrew schedule, or a Persian schedule. Those dates show up,notwithstanding the Julian schedule.The following setting is especially significant. Google can examineapproaching messages and include any occasions from Gmail it finds toyour schedule naturally. It tends to be valuable. It implies that when yourequest a ticket on the web or get a messaged greeting to supper when youcheck your schedule, you'll discover those occasions previously entered—frequently with a perfect structure. Yet, if you're not mindful that Google isperusing your email along these lines, it tends to be astonishing. Thesettings permit you to kill the element.Console ShortcutsAt long last, you can empower console accessible routes, an element we'llcome to later in this guide.

Those are the settings that are accessible when you utilize your GoogleCalendar on the web. Yet, what makes the schedule so valuable is that thesepassages stay with you when you leave your work area and get your cellphone or tablet PC. Your PC or your screen may be simpler to peruse andutilize the schedule, yet on your telephone, it is consistent. The settings onyour cell phone change just somewhat from those on your PC—however,they are considerably less clear.
• Google Calendar App Settings• google versatile schedule settings
At the head of the rundown is the “Connect to General settings,” which areequivalent to those on the site. However, a couple of which are remarkableto the application.

General SettingsThe main general settings are direct. You can change the day when you start the week anddecide to utilize the gadget's time region (a significant element when you're voyaging) andphysically enter a time region. You can likewise decide to show week numbers and declined occasions,and change the default occasion term from an hour to one of five differentchoices from fifteen minutes to two hours. The following settings are all the more intriguing. Notices let you turn offwarnings on the gadget or look over a considerable rundown of varioustones that will signal at you to help you to remember the occasion, and flipthe vibrate settings. It merits remembering that while all schedules will have a similar warningtone (you can't make various sounds similarly that you can create distinctiveringtones), you can change the notification settings for each schedule. InSettings, pick a schedule and select one of the settings under Default noticesand Default warnings throughout the day occasions.
Quick Responses

The last setting in this area is the most valuable and presumably the mostneglected. Brisk reactions let you pick one of four robotized messages tosend to visitors for an occasion if you're running late or can't make it. Snap-on one of the reactions, and you'll have the option to alter the content. Toutilize the response, tap or snap an occasion, select the visitors, and pick theresponse. You can change the content then as well. Come back to the principle settings menu, and you'll discover more settingsto play with, not many of which are plain as day.
OccasionsThe following choice events decide how occasions show up on your variedschedule. You change the shade of the square of time the occasion takes upon the schedule, and you can change the default notices, modifying themeasure of time before the occasion when your telephone gives you a ping.You can likewise include a subsequent warning, and you can decide thesettings for the notices of occasions that take throughout the day. The following setting concerns the shade of Reminders. These are passagesthat must be made on Google's schedule application; while you can seeupdates on your work area and change their hues, cross them out when youcomplete them and erase them, you can't make an update on your PC. Youcan just make an occasion.

We'll disclose how to make an update later, yet they're passages put in theschedule that are restored naturally consistently until you mark them asdone. They show up in the schedule with a symbol as a bit of stringattached to a finger, and they're intended to be somewhat disturbing in anyevent.

TelephoneThe setting stamped Phone couldn't be less precise, and Google does notassist in making sense of what it is for. On many cell phones, it's likewisewholly superfluous. These are sections that have been matched up naturallywith the gadget's schedule application. So on the off chance that you'vebegun utilizing the schedule that accompanied your Samsung or Huaweigadget at that point changed to Google Calendar, you'll discover thosepassages as of now set up. You can change their warning settings and theshading where they're featured. MoreAt long last, under a heading creatively named "More," you can change thesettings of the information from some other schedules you may be utilizing.Birthday celebrations, for instance, let you decide to include any birthdaycelebrations recorded in your contacts and from Your Circles on Google+.That merits remembering. If you've set up hovers in Google+ andsomebody has included their birthday data, you could well find that yourschedule incorporates the birthday celebrations of a lot of individuals youscarcely know. Change the setting to "Contacts," and you'll keep yourschedule individual. Google schedule application birthday settings

Those are the settings. They're not all bright, and they're available on boththe work area and the versatile application. They're likewise dissipated allthrough various pieces of the application. Take a picture of the three spotsafter the rundown of each schedule on the left half of your work areascreen. For instance, you'll be offered a palette to change the shades of theoccasions from each schedule as the settings for that schedule, for example,the wellspring of birthday information. Fortunately, once you’ve set up your schedule, you indeed shouldn't have tocontact the settings once more. In any instance, on the off chance that youfind that you're seeing the birthday events of individuals you don't have aclue or that the default span of a gathering is a few hours, delving aroundthe settings will give you a superior search for your schedule.
Making Multiple CalendarsOne of the most significant highlights of Google Calendar is additionallythe most confusingly named. Adding a schedule to your Google Calendardoesn't include another schedule. Instead, it takes information from analternate schedule and places it in yours. Dissimilar to bringing in scheduleinformation; however, that information is continually refreshed. You cansee others' occasions and, if you need them, they can see yours. Everyinformation source can be set apart in an alternate shading with the goal thatyou can see where it's from. Despite its cumbersome title, the element is precious. It implies that youcan include data from pretty much any schedule to your schedule. You canimport the dates of strict occasions, the installations of your preferredgames group, moon stages, NASA dispatch plans, and a large group ofdifferent occasions—including schedules shared by other colleagues, familymembers, and companions. As far as possible is simply the space in yourschedule.
6.2 Adding Calendars by URL and sharing themThe determination of "schedules of intrigue" will cover the most significanttimetables that you'll need to add to your schedule; however, there are manyothers accessible on the web. You can include them by sticking in theirURL.

Snap from URL alternatives either from the “IN” addition to symbol closeto the schedule or in the settings, and you'll be suggested a field you canenter the URL of a calendar accessible on the Internet. Include google schedule from URL The schedules should be in iCal design. iCalShare, for instance, offers avast number of free schedules covering points that extend from strictoccasions to NASA dispatch plans. You can likewise decide to make that schedule freely available. In caseyou're taking it from an open-source, you won't have to.
Sharing Your CalendarThe capacity to impart your schedule to others is one of the most significanthighlights of Google Calendar. The procedure is additionally a little fiddly.Once more, it must be performed on the schedule's site. Float the cursor over the schedule; you need to share and snap the threespecks that show up toward the stopping point. On a schedule that you'vemade, you'll be offered the choice to Display this lone, an alternative thatexpels the various timetables from your schedule. You can likewise pick areadied shading for that schedule (or blend your very own shade) — andyou can move to the Settings and sharing page. We've just perceived how intricate and far-reaching those settings can be, sowe can jump directly to the two parameters that are pertinent here.

Two Important SettingsThere are two alternatives to get to consents. The first is to make yourschedule accessible to the general society. By doing this, it'll permiteverybody to see your schedule. It will even turn up in Google list items.You should take some time to consider this before picking that alternative.It may merit doing on the off chance that you've made a schedule explicitlyto share the dates of your open occasions; however, for people, it's best keptaway from on the off possibility that you need to shield your security.
On the off chance that you choose to make your schedule open, you canlikewise get a shareable connection that you can provide for other people sothey can discover your schedule. Without tapping the checkbox that makesyour schedule open, that URL will have no utilization.

Google schedule get to authorizations sharing settings Increasingly accommodating is the capacity to impart your schedule toexplicit individuals. Enter their email address, and that individual willapproach the information in that schedule: they'll see the occasions thatyou've entered in your timetable on their schedules.
Offer Your Google Calendar with a Group One of the least known elements of Google Calendar is both of its generallyvaluable and one of the fiddliest to utilize. While correspondences stageslike WhatsApp permit gatherings of individuals to trade messages, Googlepermits groups to share a schedule. It's an incredible path for voluntaryassociations, church gatherings, schools, and work environments to shareoccasions.
There are two or three standard methods to do it. The simplest is to make another schedule by squeezing the in addition tosymbol close to "Include a companion's schedule" and picking a newschedule. In the settings for that schedule, you can Share with explicitindividuals and include each gathering part's email address independently.In case you're just adding a couple of individuals, it's presumably the idealapproach. Gathering Calendar IssuesThat as it may, if you've made a vast gathering, and particularly on the offchance that you need to accomplish something, share a schedule with thatgathering, it's worth initially making a Google gathering. You can do this atgroups.google.com. The fields are quite plain as day, and it won't take youover a couple of moments to finish them. At the point when you're set, and you've made the gathering, that gatheringwill have its email address. It will be something like this:[name]@googlegroups.com. At the point when you need to share aschedule that you've made to list that gathering's occasions, rather thanentering the email address of every part, you'll have the option to enter theemail address of the gathering simply. All the individuals from thegathering will approach that schedule. Remember, however, that sharing the gathering to your schedule isn'tsufficient for the gathering's individuals to see the gathering's occasionsright away. Every part will get initial an email with a connection that theyhave to click.

Organizing Your CalendarsGoogle and its schedule are brilliant, yet they're not prodigies. If you havedifferent occasions around the same time, Google Calendar battles to placethem in the request you need to see. The prioritization it utilizes begins consistently. Occasions are introduced insubsequent requests paying little heed to the calendar on which they showup. In this way, if your schedule says that you have a workforce conferenceat 10 a.m., your schedule records a feast with your folks at 7 p.m.; at thatpoint, the workforce gathering will be recorded first in your schedule, andthe supper will be recorded second. Be it as it can, what happens if you have more than one opportunity duringthe day? Google can't decide which one it's going to mention first, so itreports them in sequential order queries. On the off chance that yourschedule expressed that you were going through the day with your familyand your work schedule advised you that you were withdrawn from theworkplace that day, you'd see whichever throughout the day occasion startsthings out in the letter set. Google's organization, for throughout the day occasions, is alpha-numeric.In the possible chance that you intend to get them organized every day,place a number before each of the occasion names. It's somewhat of acumbersome workaround, yet it works.

It would have been beneficial if they had called those schedules "calendars"or something like recognize them from the real posting of days and weeksthat you can see on the screen. Yet, the production of various schedules willbe a piece of your time during the board work process.
6.3 Editing Your CalendarPresently, you've made your schedule. It's set up how you need it. You'veincluded numerous various calendars. What's more, you've imparted aportion of those calendars to companions, associates, or family. Presentlyyou get the opportunity to put sections into that schedule. There are heapsof various approaches to do that—and more than one sort of passage. Instructions to Add an Event
Make occasion on google schedule site You can include occasions both from the schedule site and from theapplication. What you can do on every one of those, stages; however, ismarginally unique. There are two different ways to make an occasion on the site. You can tap on the in addition to the symbol at the base right of the page tosee the full occasion creation structure. Or on the other, hand you can tap out on the town, which will produce asmaller than expected structure, welcoming you to fill in the occasion'smost significant subtleties. Include Event Form

At the head of the layout is the guidance to Add title and time. Make google schedule occasion structure All you will type is the title. This is the thing that you'll find in the schedule—and recall that in case you're making more than one throughout the dayoccasion around the same time, those titles will be orchestrated in asubsequent request. Next, you can pick between making an occasion or an update. We'll returnto updates later; however, the default setting is to create an occasion. You'd,at that point, get the opportunity to enter a date. Since you tapped on a dayto raise the structure, the default setting is that the occasion will last theentire day and will just happen on that day. Snap-on one of those dates,however, and Google will offer a month to month plan that permits you toenter several days. That single day occasion can turn into seven days inlength happening, for example, a get-away or a gathering.Different OptionsOn the off possibility that it's not occurring throughout the day, you'lllikewise need to enter a beginning and end time by clicking Add Time. Finally, if you've made different schedules, you can pick the schedule youneed to utilize. That is significant and barely noticeable. Pick aninappropriate schedule, and anybody you're imparting that schedule won'thave the option to see the occasion. Snap Save, and you'll be finished. Theoccasion will be on the schedule. In any case, you can accomplish more. Press the More Options interfaceclose to the Save catch, and you'll be taken to a nitty-gritty structure with avast amount of various choices. A large portion of them is apparent;however, some interest a little idea.

• Add Complete Event Form• After the title and the time is a choice to change the
Time Zone.
Google Schedule Make the Event Site Structure This isn't something that you're going to require frequently; however, it maybe valuable if the occasion will occur in an alternate time region. You caneven begin the occasion in a one-time area and end it in another. This isrelevant if you're physically entering the subtleties of a flight or posting agathering on a maritime yacht. You would then be able to stamp the occasion as enduring throughout theday, and you can make it a typical occasion. Clicking does not rehashrecords various approaches to check the occasion as repeating, so you don'tneed to make another passage without fail.Google will offer to make the occasion day by day, week by week, month tomonth, yearly, every weekday or end of the week, or simply let you makesense of it for yourself. For standard occasions, for example, week by weekstaff gatherings, it's a valuable instrument.Event DetailsThe following area is increasingly confusing. This is the place you can enterthe occasion subtleties. You don't need to do this stuff; however, it tends tobe helpful, particularly if you're welcoming others to participate. Begin to include an area, and Google will finish the location for you. Thatis not the only comfort. It likewise transforms the space into a connectionthat a visitor can snap to see on Google Maps. The more exact you makethat area data, the simpler it will be for visitors to discover where they'regoing. On the off possibility that you've changed the settings to expel,conferencing can click Add conferencing to bring back Google Hangouts.You likely won't have any desire to; however, you can't expel this choicefrom the structure.
Other Event Detail Options

The following alternative is the sort of warning you can get. This issurprisingly convoluted. You can decide to get the notice by email or get itas a notice in your program or on your cell phone. You can set to whatextent before the occasion you get that notice in minutes, hours, days, orweeks, and you can include more warnings just if you—or your visitors—may overlook. In case you're setting up a significant occasion, for example,a wedding, those recurrent warnings sent far out can be helpful. You can then change the schedule on which the occasion will be posted, andyou can change the shade of the occasion. That can be valuable as well.When all said is done, occasion hues will coordinate the shading you've setfor the schedule; however, on the off possibility that you need a specificoccasion to stick out, you can likewise give it an uncommon shading. The following choice identifies with protection. The occasion will haveDefault perceivableness. Anybody you've imparted your schedule to willhave the option to see all the occasion subtleties. They'll likewise have theopportunity to see those subtleties if you change the permeability to open.On the off possibility that you set the occasion to private, at that point, evenindividuals who can, for the most, part observe your occasions won't havethe option to see the subtleties of this one. Instead, they'll know that you'reeither occupied or accessible, relying upon the setting you pick. At long last, in this area, you can likewise incorporate a depiction of theoccasion. For most occasions, the title is probably going to be adequate.Yet, including some additional detail here, such as clothing standards ormeeting themes, can be helpful. You can even include connections andconnections, which makes the portrayal highlight especially important whenmasterminding a conference. Transfer the plan, for instance, and individualswill comprehend what's in store. The territory on the screen's privilege lets you include visitors so they cansee it on their schedules and permit them to connect with the occasion invarious manners. You can let them change the occasion, welcome others toparticipate, and see every other person who has been welcomed. Of thosethree, you'll most likely just need to check the last box. There are several more things that you can do when you're making anoccasion on Google Calendar. The head of the page, close to the Save button, is a drop-down menu calledMore activities. Pull that down, and you'll get a suggestion of rundown ofactions that you can perform on the occasion you've made.

Step by step instructions to create a Reminder
Press the “in addition” to the symbol on the Google Calendar applicationand get three choices. These incorporate the alternative to set an objective,make an update, and make an occasion. None of those choices is offeredwhen you click a similar symbol on the PC, yet one is accessible. You willnot see it when you press the logo, yet on the off chance that you click anunfilled spot in your calendar, the smaller than usual structure that Googleoffers permits you to make the two occasions and updates. Snap that Reminder catch, and you'll get a structure that welcomes you toenter a title. Change the beginning date, demonstrate whether you need thesuggestion to rehash and whether you need the idea to take up the entire dayor whether you need it to trigger a warning at a specific time. There are two contrasts between making an update and making anoccasion. Initial, an update shows up on your schedule. It's a little symbol that has afinger with a bit of string tied around it. Second, on the off possibility thatyou don't erase the update or imprint it as "done" on your schedule, it will atpresent show up the following day. While you can make an update on your PC, it's substantially more helpful tomake one on your cell phone. Press the “in addition to” symbol andafterward the Reminder alternative. This offers a rundown of mechanizedupdates. These updates incorporate booking a café by creating a call,sending an email, returning products, and dropping a reservation. Eachoffers a computerized list. In principle, you ought to choose to make an update with only a couple oftaps while never expecting to contact the console.

However, it merits recollecting that update in a schedule is to take back tomind something you've overlooked and done it in time. Step by step instructions to set a Goal in Google Calendar
We've spared defining an objective till the finish of this area since it's soslick. All the highlights we've seen up to this point have beenstraightforward, and they've requested work from you. You have to enter your occasion subtleties and set your updates. Without adoubt, Google can take nuances from your Gmail. In any case, some otherorganization, despite, everything needs to place those subtleties in themessage, or you have to do it when you make your booking. You can just set an objective on the application. Snap the in addition to thelogo in the corner and pick the primary choice. Google will, at that, pointoffer a rundown of various objectives that you should accomplish and thatrequest time. They incorporate exercise, fabricating an aptitude, such aslearning a language, and meeting companions, saving time for yourself, andarranging your life.

Pick one, and Google will offer a rundown of choices. You can enter yourcustom objective. Decide to become familiar with ability. For instance, andGoogle will ask whether you need to gain proficiency with a language,figure out how to code, practice an instrument, or make artistry. Pick one ofthem, and Google will suggest another rundown, for example, a rundown ofdialects; at that point, ask how regularly you need to rehearse, to whatextent, and what time of day. Google won't ask you which time you need to conjugate Spanish actionwords or practice the violin. It will ask you whether you need to do ittoward the beginning of the day, evening, evening, or whenever.If something arises and can't make the Time that Google has discovered,your schedule will naturally search for another time and reschedule. Thatcan occur when you simultaneously enter the second occasion as theobjective or on the off chance that you hit the Defer button when you getthe notice. You can likewise alter the objective by tapping the altered symbol. If youchoose to finish a meeting early, you can bring it up on the schedule and hitthe did it button. When you erase an appointment, you can choose betweendeleting only that solitary meeting or every single after meeting (and quitbooking).

Computer-based intelligence EnabledIt's an exceptionally flawless component, yet what's too cunning about it isthat it urges you to utilize your schedule—likewise, the schedule plans. Thepart uses a type of computerized reasoning to comprehend your timetablemore readily. First, it looks through your schedule information to discover aperiod that suits you, expelling why you don't have the opportunity to workout or practice your Spanish action words. The more you utilize yourschedule, the better the odds. Google will offer you a genuinely accessibleperiod. As you press "Concede" or alter the meeting to move it to another time,Google will better comprehend your way of life and change as needs are. Step by step instructions to add an Event with a Key Press Click the Q key, and Google Calendar will introduce the occasion smallerthan the expected structure, permitting you to enter an occasion for thecurrent day. It's quick and straightforward as long as you need to include anoccasion that day.

Chapter 7: Other Features of GoogleGoogle is a web internet searcher. It utilizes an exclusive calculationintended to recover and arrange query items to give the most significant andreliable wellsprings of information conceivable. Google's expresses strategies to "sort out the world's data and make itgenerally available and helpful." It is the top internet searcher on the planet,a place that has produced analysis and worries about the force it needs toimpact online data progression. Google is prevailing to such an extent that the expression "Google" canlikewise be utilized as an action word, so when somebody looks forsomething on Google, they may state they "Googled" it. Google started as a hunting venture by Larry Page and Sergey Brin whenthey were Ph.D. understudies at Stanford University. The internet searcher calculation they created was remarkable because itpositioned pages’ dependent on their substance, however on what numberof different site pages connected back to them. Page and Brin established that connects to a page were an indication of itsonline position, and Google's calculation in this way returned increasinglyvaluable outcomes, moving Google to turn into the most-utilized websearch tool. Google's calculation was protected and named PageRank. The ebb and flowsearch innovation depend on a portion of these standards; however, it hasdeveloped to a lot more factors impacting everything. Although the Google organization has since spread out to give numerousdifferent items past inquiry, the web crawler is as yet Google's most well-known help. Staying aware of Google can destroy you because the organizationconsistently has something new to offer. Not all things work; however,Google tries continuously. Here are recent highlights that are turning outnow for Google's applications and gadgets.
7.1 Google Forms-Free Online Surveys forPersonal Use

A Google Form is an extraordinary method to assemble data identified withgatherings or meetings. Andy Wolber discloses how to make it work foryou. Google Forms give a quick method to do an online review, with reactionsgathered in an online spreadsheet. Make your review and welcomerespondents by email.Individuals answer your inquiries from practically any internet browser -including versatile cell phone and tablet programs. Every reaction in aseparate line of a spreadsheet, with each question, appeared in a segment.What's more, Google Forms are free. Structures

A Google Form is an extraordinary method to accumulate data identifiedwith gatherings or meetings, for instance, before a group, gather the namesand contact data for participants. On the day of an audience, studyindividuals to smooth out your lunch request. After the gathering, utilize areview to get criticism on meeting meetings and assemble developmentproposals. In any case, Google Forms isn't directly for each circumstance. As ofOctober 2012, Forms needs "skip rationale" found in some online overviewdevices. "Skip rationale" lets you construct an "on the off chance that -"succession: on the off chance that an individual reacts "yes," at that pointpose inquiry and, in any case, raise inquiry B. On the off chance that youneed skip rationale, THEN a Google Form isn't the correct device. You can make a Google Form rapidly: Google discharged a "single tick"Chrome Web Store application to create a Google Form on October 23,2013. The discharge corresponded with the dispatch of a few single tickChrome Web Store applications to make Docs, Sheets, and Slides. Chromeprogram clients can introduce these applications from their separateconnections in the Web Store. (In case you're a Chrome OS client, you cansubstantially hold up a piece. The links ought to show up as a significantaspect of a framework update.) Google Forms in the Chrome Web Store Make a basic overview structure To begin, we should expect you have four things: a Google account withGoogle Drive empowered, the Chrome program, and the Google "a singletick" Forms web application introduced. Follow the connections to getevery one of these three things, if necessary. 1. Snap-on the Forms web application symbol The Forms symbol will be recorded nearby your other Chrome webapplications, which show up when you include another tab. Google Forms web application symbol 2. A single tick The "a single tick" Forms web application opens another program tab,loaded up with a clear Form. New Google Form page 3. Overview arrangementGive your overview a title, alongside an illustrative sentence or two. Three checkbox alternatives show at the head of the overview:

Permit clients to alter reactions Require sign-in to see this structure Consequently, gather respondent's client name 4. Include and alter questions Next, include your inquiries. Each question has a Question Title and HelpText field. The Help Text field can be utilized to clarify a positioningframework (e.g., "Utilize 5 to demonstrate the best, one the most noticeablyterrible.") Each question has a checkbox alternative to "Make this a necessaryinquiry." Utilize this only if the data is fundamental. For instance, you mayrequire an individual's name on a lunch menu overview. At the point when you move the cursor over an inquiry, altering controlsshow up. Snap the pencil symbol to alter. Google Forms offers seven distinct inquiry types: ✓ Text, for short answers;✓ Section text, for article-length reactions;✓ Numerous decision, where one response from many might be
chosen;✓ Checkboxes, where innumerable things might be selected;✓ Look over a rundown (valuable for segment classification
questions, for instance);✓ Scale, for positioning stuff from 0 to 10; and✓ Network, for giving a reaction from 1 to 5.✓ On the off possibility that your study is unusually long, include
Section Headers or Page Breaks between questions. Supplementthese things by tapping on the "+Add Item" menu in the upper leftat the head of the structure.
✓ Separation long studies into areas or pages
5. Alter the Survey Completion Confirmation Alter the content, respondents will see after finishing the education. To dothis, click on the "More activities" drop-down menu found in the upperright corner; at that point, select "alter affirmation." Make sure to thankindividuals for their reactions. Review finishing affirmation6. Convey the overview Snap "email this structure" to convey the overview.

Email the connection to the review Then again, you can convey a connection to the study on Google+. Offer a review on Google+ 7. View reactionsReview reactions assemble in a spreadsheet spared to your Google Drive.Open the spreadsheet to see the responses. View reactions in your Google Drive spreadsheet 8. Alter the review later Should you have to alter the Google Form then, open the spreadsheet fromyour Google Drive. Snap-on the "Structure" menu thing and pick "AlterForm." This will help you to return the first screen, which is used to do thereview. ✓ Alter your Form later✓ More uses for Google Forms
Google Forms can likewise be inserted. This implies you can utilize aGoogle Form on your site. A site guest could enter their name and data,which would go straightforwardly into the spreadsheet.Or on the other hand, utilize a structure to lead a study after a Google+Hangout or occasion, since a Google Form can be shared on Google+. Offerthe review with the general population or any of your Google+ circles.Google Forms makes online studies essential.
7.2 Google Photos
Propelled in 2015, Google Photos is a device that can store photographs,recordings, and screen captures taken by your telephone.

It's a strong media reinforcement available to you. Furthermore, because it'sa cloud-based device, it can let loose space on your telephone. Also, it takesa shot at both Android and iOS gadgets. Here are a couple of more things to think about how Google Photosfunctions:

How accomplished Google Photos work?
Google Photos clients can transfer new photographs, see, alter, spare, andmake original recordings, liveliness, and arrangements, collections, andphotographs books. You can likewise download everything, which meansyour cloud-based reinforcement would itself be able to be effortlesslysponsored up onto your PC or external hard drive. For the individuals who don't have a Google gadget (like the Pixeltelephone), you can select to naturally reinforce and sync your photographsand recordings as you take them. If you have an Android gadget, you canconstrain reinforcement information use, so you don't come up short oninformation transferring things out of sight. You can likewise set your Google Drive to keep a duplicate of yourphotographs and recordings by heading off to your drive's settings, turningon "Make a Google Photos Folder," and clicking save. As pictures areadded to your record, they will be arranged into classifications. You can spare and offer all your photographs and recordings on GooglePhotos. Without much of a stretch, you can offer photographs and collectionsutilizing the offer element, regardless of whether they have pictures inthem. Furthermore, if you have the "reinforcement and sync" include turnedon, you can recover your records from the waste for as long as 60 days afterhitting erase. Or on the other hand, you can generally file photographs tomove them, yet have them stay accessible inside your record. It has the free, boundless capacity — with a couple of warnings

Google Photos accompanies free, limitless capacity — yet that is just if youselect to spare "top-notch" pictures rather than unique quality pictures,which may be a higher goal. That implies those more essential documentswill be compacted to save space, except if your record's settings state in anycase. As far as possible for photographs is 16MP, while recordings arecompressed to 1080p. You can permit auto-pressure for future transfers by heading off to yoursettings and choosing "high caliber." Furthermore, you can apply thatchange to past photographs by clicking "recuperate capacity," which isadditionally situated inside settings. For the individuals who want to go with unique document measures, it'sfree up to 15GB, and that incorporates everything from Photos to Gmail toeverything else in the drive. From that point forward, you could overhaulthrough the Google One membership plan, beginning at $1.99 every monthfor 100GB. It includes an AI-fueled colleague Google Photos gives clients a ton of auto-produced additional items. Forinstance, it can make photograph book assortments, gathering picturesdependent on factors like the date, individuals, and the spots included.Clients are additionally given a choice to print and boat those books (for acharge obviously.) Likewise, the Assistant will take photographs that were caught in quickprogression and transform them into GIFs (alluded to as "activities").At the same time, individual pictures can be spared as movementphotographs — which means they record videos of a couple of momentswhen you've made an effort. These may likewise be known as Live Photosto iPhone clients.It has other savvy highlights The strong hunt alternative is a significant draw for the stage. It lets youlook for normal subjects, similar to "canines" or "seashore" to limit yourchoices, which is particularly helpful because you haven't yet arranged yourphotos into collections.

It additionally gives you a choice to recognize various individuals in yourphotographs by physically putting a name to the face. From that pointforward, pictures with those individuals are naturally arranged so you canlater scan images that highlight explicit people. Tap the inquiry bar andsnap the bolt close to the photograph air pockets to begin givingcountenances friendly personalities inside your Photos. In a comparable vein, you can likewise set it to make "live collections,"which naturally populate with photographs of loved ones. For those looking to reinforce their physical photograph prints, you canrapidly 'examine' those who have them transferred by taking a quick picutilizing your telephone or different Photos-accommodating gadget. What'smore, for the individuals who photo paper reports, Google Photosadditionally lets you feature wanted segments of text, and even harvest outfoundations to make it simpler to do things like transfer and cost a receiptfrom a work trip. Google Photos is a ground-breaking and adaptable instrument that requireslittle exertion to use to its fullest. Also, given the way that it gives free,boundless capacity without relinquishing a lot on the photograph and videoquality, it tends to be a healthy alternative for sponsorship up your mediadocuments.
7.3 Google Keep-Notes and Lists

How about we talk about Google Keep. Do you recollect Google Keep? Itshould change in taking and arranging notes in 2013, yet it's confrontedwith a ton of rivalry. A lot of profitability and hierarchical applications will assist you withshepherding your life over different gadgets. Evernote might be a PCMagEditors' Choice for note-taking applications. Yet, Keep has its advantages asa free, moderate device that improves the way toward sharing thoughts overdifferent gadgets. For instance, you can write down notes in Keep on your Android or iOSgadget while in travel, and get it later on your PC. Or then again, on theother hand, when you're going to take off to an arrangement, includeinformation (like locations or bearings) on the web application so you canget to them out and about. Likewise, you can keep on the head of errandswith daily agendas that can be added to or confirmed from various screens. So if you haven't been utilizing Keep or had no clue it even existed, thereare many reasons you should check out it. Peruse on to show signs ofimprovement feeling of what Google Keep offers you, and how you can allthe more likely sort out your notes. Effectively Copy to Google Docs Probably the best advantage of “Keep” is its consistent incorporation withthe whole Google environment. That implies, on the off possibility that youdepend intensely on Gmail, Google Drive, or Google Docs, without muchof a stretch, offer things in Keep between stages, from inside the Keepapplication or through a Google program that supports Keep. In case you're in the application, you should simply tap a thing, select thethree-spot menu, and pick Copy to Google Docs. A warning will reveal toyou that the note is being spared; at that, point another notice will show upwith a connection to a Google Doc that contains your Google Keepinformation. Import things from Keep by tapping on the Keep symbol on the right sideof the screen. This will open a side menu loaded with every one of yournotes and pictures, which can be added to messages, Drive organizers, orexisting reports. Either utilize the thing's three-spot menu or drag it intoplace.

Share and Collaborate with Others Things in your Keep application can be shared legitimately with differentclients without experiencing the standard offer menu you may see invarious projects. Select a note or picture you wish to share and pick theindividual symbol. You will have the choice to include a client's emailaddress or their name from your contacts. This transforms you both into teammates. Presently at whatever pointanybody makes changes to a note, alters will consequently be noticeable toall individuals with whom it is shared; however, the first organizer canrenounce access whenever.
The Keep Widget: Always On, Always Live Add a gadget to your telephone's home screen for speedy andstraightforward access to your notes. Contingent upon the size of the deviceyou pick, late notes can be seen directly on the home screen withoutopening the application. Include the Android gadget by long-pushing on any vacant space on thetelephone's home screen, tapping the Widget button, at that point, choosingKeep. On iOS, swipe directly from the home screen into Today View, lookto the base, and tap Edit. Discover the Google Keep gadget and tap the,besides, to fasten to include it. Interpret Text from Images Keep on the web can interpret a text from pictures. Snap-on a transferredpicture; at that point, click the three-speck menu and select Grab picturetext. All content in the image will, at that point, be changed over intoaccessible and editable content.

It's ideal for digitizing data on business cards, indications of intrigue, andbits of paper. You can do likewise with transcribed notes, yet your mileagemay change contingent upon your handwriting's nature. Keep Is Your Stenographer Ever had a splendid thought yet didn't record it promptly, and afterward,when you, at last, have a second, you locate that whatever you had as aprimary concern is presently gone? Is it fair to say that you are a columnistneeding an application that can translate interviews? With the Google Keep application, you can direct a note into your gadget,and the chronicle will be deciphered into an accessible, editable note. Set RemindersMake a spring up update in Keep, and it will appear over your Googleaccount. Begin making a note like you typically would and click the ringersymbol. Set an update for a specific date/time or in any event when you arrive at aparticular area. You will get a notice in your program or on your telephone. Of course, Keep furnishes you with specific update times for quick access,yet you can transform them. Open the Settings menu, and you will have theoption to change the default time for Morning, Afternoon, and Evening.
Channel SearchIn case you're utilizing Keep consistently, its workspace will get topped offdecently fast. Be that as it might, this being a Google item, the application'shunt smarts are hearty.

Tap the hunt bar at the head of the screen, which will show search classes—channel by updates, records, pictures, drawings, or connections. Theapplication likewise bolsters shading coding—red for necessary food itemrecords and blue for business-related plans for the day, for instance—so youcan look by tone.
7.4 Easy and Secure Emailing with Gmail
Summer, as a rule, implies an excursion from your Gmail inbox. In anycase, all your new messages won't get replied all alone (well, really, theymay — yet I'll get to that later). More than 281 billion messages were sent ayear ago, as indicated by Radicati, a tech promoting firm. Furthermore, thatnumber will just develop, hitting 330 billion in the following three years.That is a ton of messages that will require our consideration. It's not merely the sheer number of messages that feels overpowering — it'sthe measure of time we spend taking a gander at, reacting to, and stressingover those messages. Almost 80% of Americans are perusing email on theircell phone, MIT Technology and Review found. While the ordinaryAmerican goes through about 24 hours online consistently, that is nearly awhole day of your life every week gazing at your screens — and a greatdeal of that is likely spent in your Gmail inbox. Fortunately, there are approaches to ace your inbox before it aces you. Hereare 10 Gmail tips and deceives to assist you with overseeing your email. This is the only method You Should Sign Your Emails Let Smart Compose assist you with reacting all the more rapidly

Gmail's Smart Compose highlight completes your sentences for you. Whenyou start composing an email, Gmail's human-made brainpower calculationwill describe what you're attempting to state. By squeezing the "tab" key,the proposal will consequently populate the email. It resembles we'recompleting one another's — To turn on the Smart Compose, go to Select General Settings; at that, pointflips the "Keen Compose" button on. By all the while, empowering,"Personalization," Google's AI will tailor its arrangement proposals to yourinclinations and propensities. You can even give input to Smart Composewith the goal that this component can get familiar with your inclinationsand style. To do this, go to the "More Choice" button at the base of youremail toolbar close to the Trash icon and select "Savvy ComposeFeedback." Calendar and Email to send later Is it accountable for sending dismissal messages at 8 p.m. in any case,needing to return home to watch The Bachelorette finale? Reporting asignificant advancement one week from now yet heading on an excursionwith "no Wi-Fi?" With Gmail's planning highlight, you can choose whenprecisely an email gets sent. By tapping the little upward bolt close to"Send," and selecting a period and date, you can keep steady over cutofftimes while as yet carrying on with your life. At the point you're done with your email, click the sliding bolt at the leftbase of your new email that is close to the "Send" button. You will beprovoked with "Calendar Send." Click this choice and pick a date and timeto send the email. When this is chosen, click "Timetable Send" The emailwill send without anyone else without you putting down your glass ofwine. Cut (trackpad) corners with console accessible routes Gmail is crammed with alternate console ways that can make it far simplerto deal with your inbox. Watch your email form screen unexpectedly showup when you press the letter "C" on your console, or consequently, visityour drafts by clicking B+D. Gmail has many adjustable accessible routesthat can make your life simpler.

Go to → Settings → Advanced, and empower Keyboard Shortcuts.Presently there ought to be a tab for alternate console ways in the settingswindow where you can see and modify your choices. You'll have to ensurethat console accessible routes are additionally turned on in Settings →General → Keyboard Shortcuts. To see a full rundown of more Gmail alternatives and accessible routes(counting an entire bundle of choices gathered by work), hold down Shift+/. A sheet will spring up with a registry of available routes. A couple of final top choice Gmail console easy routes:Move +!: Report as spam (messages you don't care for will *poof* fromyour inbox) Move + #: Delete (read previously) R: Reply (rapidly react, additionally keeps you from the humiliating"answer all") U: Mark as new (to return to later, except if you have the nap hackempowered) C: Compose a new email A: Reply all (once more, don't mistake this for "r") E: Archive a message Squeezing G + (I, D, S, or T) takes you to a wide range of inboxes, featuredmessages, or drafts, contingent upon which letter you press.

Un-send an email
The fleeting frenzy set in when you state "Dear Kylie" rather than "DearKendall" on that work email is presently and everlastingly formally takencare of. Gmail now has the choice to review a sent message for as long as30 seconds after you've sent it. To set this up, go to the Settings symbol in the upper right-hand corner ofyour Gmail landing page, pick Settings → General, and switch on "fixsend." You can choose to what extent you have before deciding to get backto your email from the dull web gap vanishes. Anxious Nellies can settle onthe 30-subsequent choice, while the Masochistic Marges can choose fiveseconds. This email will fall to pieces in 3, 2, 1.Sending humiliating photographs of your canine in a tutu or classifiedorganization data is consistently somewhat unsafe — so check out Gmail'sfall to pieces. Like the Snapchat of messages, these messages just remain inthe beneficiary's inbox for whatever length of time that you need them to.The email can't be sent, duplicated, stuck, downloaded, or printed, and youcan even repudiate access from your record before times done. After you've formed your email, click the little clock with a lock symbol onthe base toolbar, and select the beneficiary and period.

That is not secure enough, you state? This new element likewise gives youa choice to the secret key to ensure the message, so the beneficiary alsoneeds to enter a PC produced a secret key that they get by instant messagebefore they can open it. Simply click the choice that says "SMS password"under "Require Passcode" and Gmail will send the beneficiary the passwordexpected to get to the email. (Note: Some corporate Gmail accounts do nothave this component empowered. What's more, if you need something thatis considerably increasingly secure, attempt a security-disapproved ofinforming administration like Signal.) Can itWith Gmail's Canned Replies, you can set up and rapidly import pre-composed reactions into your messages. This component is generally foryour business society out there who send a similar email to variousindividuals again. It's the more current, lazier duplicate/glue, yet without thetension of inadvertently sticking an inappropriate name in your welcome. Iteven imports titles and any connections that you spared with the formatemail. By marking these canned reactions, you'll have the option to rapidlyand successfully discover what you need. To turn on Canned Replies, go to Settings symbol → Settings → General→ empower Canned Responses (Templates). After composing the underlying email, click the "More Options" symbolclose to the Trash symbol in your Gmail toolbar, and select "CannedResponses." From here, select "Spare Draft as Template," and afterward,"Spare draft as a new layout." From here, it will request that you name yourformat — suppose I'm calling mine "Systems administration Template," andI would now be able to send this email at whatever point I have to. Simplyopen another email, select More Options → Canned Responses, and yourlayout will show up. At the point when you press on it, the new email willbe populated with the spared format. Presto! Less composing, increasinglycanned reactions. Put your Gmail on rest Getting an upsetting email after work hours can indeed discourage yourparty time or family time. Actuate Gmail's "nap" include when you need abreak from your inbox, and messages will return at your picked time.

To nap an email, float over the message in your fundamental Gmail screen,and snap the clock symbol to the extreme right. You can nap the email for aday, seven days, a month, hell, you can nap for a year. The email will returnin your inbox when you're prepared to react. Likewise, there's an assignedmark for these napped messages on the left half of your inbox just on theoff possibility that you have to discover them sooner. If that is insufficient for you to make sure to react to Grandma Jane's email,take a stab at clicking and hauling the email from your Gmail inbox directlyto your undertakings tab on the right hand board of your screen. The emailupdate will show up there, with a connection legitimately underneath it thattakes you directly to the message being referred to. Coordinating thesemessages into your schedule can be a successful method to make sure toreact. The individual right hand, you didn't have any acquaintance with yourequired. Rather than scrambling through your Gmail inbox to discoverwhich door you're flying out of or where you're meeting your mother forinformal breakfast, utilize the installment and membership highlight to seeand deal with your flights, supper reservations, memberships, and that'sonly the tip of the iceberg. It resembles out of nowhere getting an individualpartner that you don't need to pay. This Gmail highlight looks your inboxfor any flight, inn, show, occasion, or eatery reservations you've made andperfectly gathers them in once place. It even monitors past reservations andmemberships that have just lapsed. Go to the hover in the upper right-hand corner of your Gmail screen withyour underlying or individual photograph. Snap Google Accounts →Payment and Subscriptions. Select which choice you need to see, regardlessof whether it's memberships, reservations, or buys you've made, to view andtrack them. Put it on your tab

Gmail's tabs update resembles a free close to the home coordinator,isolating your inbox between numerous tabs, including Social messages(like Facebook, Twitter, and Instagram), Updates (Newsletters, and so onon.), Finance, and Promos. The magnificence of this element is that yourcerebrum doesn't need to continually change undertakings from news towork to Mom's new labeled Facebook photographs and back to work oncemore. Instead, pick which inbox mark you need to manage, and go forwardand overcome those new messages. Your essential inbox will contain all themost critical messages to react to, while the different mailboxes take to ahigher degree a secondary lounge. Go to the Settings symbol → Configure Inbox and select which tabs youneed to channel messages coming into your Gmail inbox. You can pickupwards of five unique channels. Never break the chain You need to repeat an affiliate in the Gmail email chain, practically type "+[their name]" in the email section, and pick their email address. Presently,this email will naturally circle them into the discussion. You could likewisetype in their email into the location field; however, along these lines are theonly is the sort of feeling more relaxed.
Google Apps: ConclusionAll organizations need to cover their everyday exercises in officeorganization with a solitary arrangement of office instruments. Having theoption to hide these are the primary advantages of utilizing Google Apps (GSuite). With G Suite, Google gives organizations a cloud answer for theireveryday work. It has numerous applications that cooperate to cover theentirety of the daily exercises in office organization. The charging ofadministrations is client dependent on a membership model, fromfundamental capacities to increasingly extra highlights. Google G Suite segments incorporate interchanges on applications likeGmail or Google Hangouts and arranging board applications like GoogleCalendar, cooperation, and distributed storage applications like GoogleDrive or Google Sites, and requests for Office utilize like Google Sheets,Google Docs, or Google Slides. The best advantage of utilizing Google applications (G Suite) is thatorganizations needn't bother with their framework to send requests. Theapplications can be used through an online association from any gadget andarea. Past supplanting capacities gave by another programming; Google Appsoffers particular highlights intended to change and improve office working. a) Collaboration: Features like report sharing, concurrent altering, sharedschedules, and talk makes bunch work more straightforward, and urgeoffice individuals to turn out to be increasingly mindful of every others'work. b) Searching: Documents and messages in Google Apps are intended to belooked at as opposed to arranged by the client. This implies clients caninvest less energy arranging documents and don't need to know and recall aspecific arrangement of association to discover what they are searching for.As shown by the LSNC Findability Project, moving to a framework whereabout all office information is accessible through Google Search Appliance(GSA) can help workplaces altogether increment their adequacy. c) Integration: Google Apps are intended to connect, and are all the moreimpressive in the mix.

Google client information is put away by Google on its server farms. Asindicated by Google, I just chose representatives to approach the data. Theapplications are affirmed to different protection and security measures.Furthermore, Google partakes in the Privacy Shield Agreement. All together for cloud administrations to agree to European informationinsurance prerequisites, EU clients can utilize Google to conclude their ownEU model agreement provisos and information preparing additional items.Applications like Gmail have worked in spam blockers and infectionscanners. Google Drive transferred information is encoded. Dissimilar toGoogle's free application contributions, clients' data isn't checked andassessed for a limited time. Thus it is demonstrated that google applicationsgive the best of the highlights in it, which are prescribed to each client forroutine utilization, and giving them a short, exhaustive, and a supportiveviewpoint to progressively safe perusing and routine utilization.If you enjoyed this book, let me know your thoughts by leaving an Amazonreview.I would be so glad to hear your thoughts!
Thank you so much!-Emily

Teaching with Zoom: IntroductionZoom is software available on multiple platforms such as Windows,Android, Mac, and iOS devices. It is the brainchild of Eric Yuan. Thissoftware is a videotelephony software even though there are otherapplications in the market. Still, this particular software takes precedenceover others as it is smoother for Online meetings with multiple participants,and this is what made Zoom the primary platform for online education inthis COVID-19 pandemic. The availability of this software on differentplatforms makes it easier for students to get access to online education.Zoom is not only used by teachers but also by people of differentprofessions as it makes the discussions easier over long distances. Whetherone participant is at home, other in-office, and third, in the field, all threeparticipants can easily hold a meeting to discuss any particular project overZoom.Zoom basic is completely free for users to utilize for day to day usage. Still,for different business models, there are also different subscriptions availablethat come with additional features and enables the user to host a conferencecall with multiple participants. The duration of the video conference callexceeds the 40-minute mark. Basic Zoom only allows the user a time limitof 40 minutes per call. But on the basic package, users have access to anunlimited number of video calls, but their duration or time limit cannotexceed 40 minutes. This time limit was scrapped due to ongoing globalpandemic and due to this platform being utilized by educational institutes.The pandemic led to an exponential growth of Zoom, mostly due toeducational institutes using it worldwide.Educational institutes adopted Zoom due to its ease of use, made possibleby a user-friendly graphical user interface (GUI). These features makeZoom stand out from its competitor in the video telephony market.

Some of these features are whiteboard that allows the professors to draw orwrite something on the screen, shared with attendees or students to beprecise. The whiteboard acts like a literal whiteboard that is used byteachers in class during teaching. Another feature that led to the boom ofZoom usage was the ability to share the lecture screen. This feature allowedthe host or teacher to share their computer screen with students, just like in-class lectures. You can share the PowerPoint slides and other notes on thescreen and simultaneously allowing the host or teacher to monitor the videofeed of students if they are paying attention or not. Another feature that isconvenient for both teachers and students alike is of raise hand, this allowsthe students to raise their hands, and this will prompt the professor thatattendee has some questions rather than disrupt the flow of lectures byabruptly asking a question. That student who raised his or her hand, thevideo feed belonging to them will blink in professor's screens, thus lettinghim know about the students' query.Zoom as the software does not require premium hardware but good internetaccess is a must. It will run even on minimum requirements for PC desktopor on any budget laptop with an inbuilt microphone or webcam. But adedicated microphone is at least recommended for the host so that even ifthere is noise around them, they can adequately deliver their message tostudents.Assignments are a major part of the learning curve, and Zoom ensuresstudents can easily submit their assignments through the file-sharing featureof Zoom rather than the hassle of submitting them through a separate email.This also allows the students to carry on with their presentations on Zoom.The host or professor can even divide the ongoing class into small groupsfor students to hold discussions. This allows the students to work in groupsrather than tackling any problem individually.It is strongly recommended for both the host and attendees that before theyjoin the video call, conference, or online classroom, they should take tenminutes and check through the equipment such as a microphone, webcam,and internet connection to ensure smooth working of Zoom. If theequipment is giving an error or an internet connection problem, the problemcan be solved quickly. Still, it is better to tackle the problems before thevirtual lecture rather than facing them during the lecture, as it will be awaste of time for both the host and the attendees.

Writing this book has taken a lot of effort, so if you enjoy it, I'll be veryhappy if you could spend a couple of minutes to leave a review .Thank you so much!
Emily

Chapter 1: Introduction to Zoom- AnEffective ToolThe value of language or communication is highly essential in our lives as itis a medium of thought and contact. English is both a regional and aninternational oral medium of connection. It and many other languages haveled to the exchange of feelings and effects which have contributedsignificantly to any state's socio-economic and political growth. We live ina world where technology is pervasive. Even the pedagogy of teachingmethods has undergone a sea-change due to the pervasive presence oftechnology. The term "Virtual distance learning" has become the buzz wordin the field of education. Even in the business field, as the world becomessmaller and smaller, meetings are held on a computer screen where there areparticipants worldwide. So it is important to infuse technology into the fieldof education and business management as it serves the needs of thecontemporary learners and those in managing departments.Today the classroom atmosphere is completely different from theconventional classroom. Learning's technical aspect is rising all the time.More and more classes take place online – but instead of being merely areplacement for classroom lessons, they may be mixed in with a classroomapproach. It also provides a more stimulating and inspiring experience forstudents.Zoom's online platform has helped introduce various advances intobusinesses, foreign interaction, and language teaching with the widespreaduse of Computer systems, practices, and tools.Assisted Language Learning has allowed many teachers worldwide toenhance their teaching skills for better learning opportunities for theirstudents.Luckily, on the one hand, more and more high schools and, on the other,households have computers and Internet access to allow technology-assisted learning.There are usually two distinct groups of teachers who are involved inexperimenting with online teaching:

• Those who are looking for more collaborative or customized onlineelements to supplement their classroom teaching.• Those who advocate the use of distance learning for students who areunable to attend classes.Zoom is a useful tool to connect in a situation where more and more of ushave to stay home. The online distance learning platforms change the worldin which we live and how we learn to live. One of the latest, initialconference room approaches focused on software is the Zoom system.Zoom is a cloud-based application that offers meetings and webinars andshare content and video conferencing. It helps teachers, for example, gettingtheir students together to get things done in a frictionless environment. Witha fast, secure cloud platform for audio and video conferencing,collaboration, webinars, and chats across desktops, mobile devices, roomsystems, and telephones. Zoom is the pioneer in modern enterprise videocommunication.The features of the Zoom allow teachers to assess and explore the fourcompetencies through rich experiences with students. Teachers can recordtheir lessons on the locally or Cloud – students are also able to record andturn off and on recording several times as they want during a lecture.Zoom motivates teachers to annotate their shared images, thereby makinglessons more interactive.Teachers can record lessons and review them again to assess the strengthsand limitations of students, and by watching recorded lessons, and theselearners can self-assess their abilities. Students can watch the studiesdocumented in a series to see their progress over time. Therefore, thisallows the teachers to evaluate the progress of students by showing thelesson reported to another teacher, whom they trust, and seeking positivefeedback.

Teachers should encourage active questioning by students to evaluatestudent learning during lessons and after watching them. As well, educatorsshould make students reflect on lectures via recording and sharing a video.Zoom gives teachers different ways of expressing the material of theirlessons. The sharing of screens by Zoom will provide teachers with anexcellent opportunity to improve the intercultural skills of many students bysharing engaging resources such as videos and posts, and presentations.Throughout the field of education, online distance learning has become asensation throughout, and today it meets the needs of modern-day learners.Infusing innovations in classroom learning has added stimulation andincreased the engagement of learners within the classroom. Learning fromafar has a large presence in almost every region. Language teaching is oneof those areas where technology has taken over and enhanced the learningmethods.The attributes of an online distance learning course come to mind as to thefollowing. They are:• To promote access to tools for the course. Give teachers and studentsgreater comfort and versatility on time.• It can be personalized that various teachers can meet the skills andlearning goals of each student by offering various online tools to particularstudents so that they can focus on them at their own time.Since the advent of the internet and the world becoming a global village inrecent decades, the influence and importance of education in the world havegrown tremendously. If teachers teach as they taught before, then in thecurrent global scenario, the necessary goals of learning might not beachieved.There will probably be increased dynamism in the area of computer-basededucational applications and teaching techniques. For the future, maybemost universities will benefit from the equipment and services available foronline distance learning. Online distance learning is, therefore, anopportunity within the information society for lifelong learning.
1.1 History of Zoom App
Early Years

It came into being in April 2011 by Eric Yuan, former vice president ofCisco Webex. He left Cisco with 40 engineers, and with their assistance, hestarted a new company, called Saasbee, Inc. initially, since the videotelephony market was saturated, so the company was having difficultyattracting investors. In June 2011, WebEx CEO Subrah Iyar, venturecapitalists Matt Ocko and Bill Tai raised $3 million for funding.The company changed its name from Saasbee to Zoom in May 2012,inspired by the children's book Zoom City. Zoom released a beta version inSeptember 2012, which was capable of hosting conferences of up to 15participants in the picture. The firm signed Stanford University as its firstcustomer.The service was released in January 2013 after Qualcomm Ventures,WebEx creator Subrah Iyar, and General Counsel Dan Scheinman raised a$6 million Series around for the fund. Zoom released version 1.0 of thesoftware, which allows the maximum number of participants to be 25 persession. Zoom had 400,000 users by the end of the first month and had 1million users by May 2013.
Growth of ZoomIn mid-2013, Zoom formed partnerships with software vendors operatingwith B2B, like Redbooth, and also developed a program called Works withZoom. It led to the formation of partnerships with Vaddio, Logitech, andInFocus. In the 4th quarter of 2013, the firm raised more than $6 millionfrom Waze, Facebook, and established investors in Series B. It had aboutmore than 2.5 million users at the time. Zoom was seeing more than 9million users by mid of 2014.The business raised about $30 million from investors, like HorizonsVentures, Emergence Capital, Qualcomm Ventures, in Series C funding inFebruary 2015. After its creation, Zoom had more than 35 million users,with more than 60000 organizations subscribed, and a staggering total ofabout 1 billion minutes of the video telephone. The company merged theapplications with Salesforce, Slack, and Skype throughout 2015 and 2016.With October 2015 version (latest at that time) 2.5, Zoom increased thenumber of entrants enabled for business customers per conference to 50 andthen later to whooping 1,000.

The company managed to raise 100 million USD in funding in January2017 to a valuation of 1 billion USD, making it, unicorn. In April of 2017, atelehealth product by Zoom was launched that allowed doctors to hostpatient consultations remotely.Zoom integrated itself with Polycom's conferencing systems, allowing theuse of features like multiple screens, mobile meetings, and screen sharing(wireless), and integration of calendar with Google Calendar, MicrosoftOutlook, and iCal. In September 2017, Zoom held its first user conference,Zoomtopia. Zoom announced at the conference collaboration with Meta tofacilitate the integration of Augmented Reality, Facebook integration withWorkplace and Slack, and initial steps towards a speech recognitionplatform for artificial intelligence.

IPO and BeyondThe firm became a public company with an initial public offering in April2019. The share price rose over 70 percent on the first day of trading afterpricing at more than US$ 30 per share. At the end of its first trading day, thecompany was valued at 16 billion US$. Dropbox had spent $5 million inZoom before IPO.Throughout the COVID-19 pandemic, Zoom's use for remote work,distance education, and online social connections increased exponentially.Thousands of educational institutions moved to the Zoom to conduct onlineclasses. In several countries, the organization provided its services to K–12schools for free. In 2020, Zoom had reached 2.22 million users in February2020 — more users than it received in 2019. The Zoom app wasdownloaded more than 2 million times in one day in March 2020. Averageusers of Zoom increased from around 10 million in December 2019 to over300 million regular attendees in April 2020. This led to a rising stock pricein the company in early 2020 and a general fall in the stock market. Zoomstock boomed from less than $70 per share to $150 per share at the end ofMarch. The company was estimated at more than $67 billion by June 2020.
Zoom revealed in May 2020 that it had purchased a company thatspecializes in end-to-end encryption, Key base.Zoom launched its first hardware as a service offering in July 2020,bundling its video conferencing program with third-party hardware fromNeat, Yealink, Poly, and DTEN, and running on the network service. Thiswill continue with the offerings of Zoom Mobile and Zoom Rooms, withboth services accessible to US consumers who can buy devices from Zoomat a fixed monthly rate. In July 2020, the company revealed Zoom at home,a range of home-use items tailored for home-workers. The first model withZoom software and DTEN hardware is called Zoom for Home-DTEN ME.It is a 27” screen with eight microphones and three wide-angle cameras,with a preloaded Zoom program onto the unit.
1.2 Zoom App's Uses

Zoom is a platform for video telephony created by Eric Yuan. It facilitates avideo chatting that can allow close to 100 devices, with a time limit of 40minutes (removed due to pandemic) for free user accounts. Users can opt toupgrade by subscribing to their plans, premium subscription allowing 1000people simultaneously, with no time limit.Since the pandemic COVID-19, Zoom's use for distance education, onlinesocial networking, and remote work has increased considerably. Zoom isbeing used by universities, government departments, and banks around theglobe. Zoom formed a collaboration to make a virtual club with FormulaOne. Fans starting with the Grand Prix (Hungarian) in July 2020, can gobehind the scenes and participate in interactive activities through Zoom.Play by written Richard Nelson, this plays over Zoom, where the maincharacters meet online via Facebook during the COVID-19 pandemic.Directed and written by Nelson, the play was presented as a benefit showby Public Theater, with it being premiered on YouTube at the end of April2020. A live reading of the 2009 play by Kristoffer Diaz, The ElaborateEntrance of Chad Deity over Zoom, broadcasted from August 2020 onPlay-PerView.Zoom is an application that has multiple uses for teachers, students, andbusiness professionals.1. For TeachersTeachers can use Zoom for online education as they can use it to:• Time their Training SessionsThey can arrange meetings with the Zoom in different ways. By default, inCanvas course, Zoom is allowed and will be the easiest way for students tofind the meetings. In Canvas course, teachers can schedule a Zoom Meetingand pick repeated meetings where necessary so that the URL stays the sameover the course. If a teacher intends to use Canvas than meetings of thecourse occur inside the platform of Canvas courseCloud recordings are made available automatically via the course platformon Canva. The course meetings can be isolated from other ongoingmeetings. Canvas scheduled meetings also appear in Canvas Calendar asactivities for the class members.• Students Prepare Roles

If you, as a teacher, deputize for someone else to handle aspects of onlinespace, the experience of classroom management will be a lot less stressful.Through default, you can automatically select your TAs and all otherteaching staff as substitute hosts for your meetings, and you can also chooseco-hosts during your meeting.Try asking one student or TA to assist their partners with technical issues.This way, a teacher can teach and offer additional skills such as digital datahandling to the students.• Foster Sense of CultureOnce everybody displays their faces through their webcam, a sense ofexistence is enhanced. Students should turn the video on a key componentof engagement because if you can see them, it becomes easier tocommunicate with class, students are likely to be attentive if they feelmonitored. Coach students to turn to the view of the Gallery (this is a viewof "Brady Bunch" where everybody is simultaneously visible to oneanother).Tips for PupilsMute mics in case you do not participate.Speak in a conversational tone - you would not need to raise your voice.Eye-catch the camera (class and camera are the same)Ensure the source of light is in front, not behind you.2. For StudentsThe Zoom menu contains multiple features that can be used during classmeetings at any time. We can find the menu in PCs, Macs, and even byhovering over the Zoom window at the bottom. You can reach the menu inthe Zoom app by clicking the button at the bottom of the screen.
Invite: If your professor/meeting host offers such permissions,encourage you to bring more people into the class or meeting.Mute: The microphone is quiet and silent.Share Screen: Allows the sharing of a range of windows andapplications. Participants can share their desktop views and

different windows currently open on their device, write on adigital whiteboard, and even display a screen directly.Chat: Works like Messenger on Facebook but without extrafeatures like stickers. Students may send messages toeverybody, just to the professor/meeting host or to a specificindividual.Upload: You can record and save as much of the meeting asyou want if the host allows it.Leave Meeting: Tap this to get some off-screen time when youare ready to chill out.
Some guidelines for the student to follow while on meeting with theirteacher are as follow:
• If a student cannot use photos, upload your face to yourZoom Account with a nice profile picture. Provide somethingfor your classmates to look at as you speak.
• Keep your head high within the frame of the photo. Itconveys confidence.
• Have Professional wear.• Having a simple video is like taking a good selfie —
everything is about contrast. Lighten your face brighter than thebackdrop to make your visibility easier.
• Simply be yourself. Physically turn, and render expression ofthe lips.
• Microphones pick up any ambient noise, so keep themicrophone silenced until it is time to talk.
• Note that other things like eating, shuffling papers, drinking,etc. are highly distracting while the camera is on.
3. For Professionals

Zoom lets you record your online conference calls as videos, a usefulfunction that helps you to share the meeting with people who may havemissed it or replay what has been said. It can even be used by teachers torecord lectures in advance for the class. When recording, you must choosewhether to use the option local or Cloud. Local means that you store thevideo file yourself, whether on your device locally or in another storagespace. With Cloud, which is only for paying members, Zoom saves thevideo for you in its cloud storage. One advantage of the cloud option is that,once it is ready, people can stream the video through a web browser.While making a video from a conference call, adjusting a few settings inadvance allows a significant difference in the end output. Some calls, forexample, maybe broadcast-style, where only the host appears on thecomputer. In this case, set the Zoom to capture only the host's audio andvideo. Some calls can be in the style of a group meeting, in which case youwant everyone to record.

1.3 Zoom App's Subscription and Pricing PlansTo facilitate education through Zoom with the spread of the COVID-19pandemic, Zoom immediately eliminates the 40-minute time limit on freeBasic accounts for Coronavirus-affected primary and secondary schools.Teachers can Sign in to see if they have already approved your account. Ifnot, they can click on the "Request Bid" to request an addition to theirgrade.Overall, Zoom has various subscription plans, including Basic, which isfree. The plans and features are mentioned below:1. BasicFor: Personal MeetingCost: FreeLimit: Hosts 100 participantsFeatures:
• 40 min time limit for group meetings• Unlimited one on one meeting• Ticket Support• Unlimited number of meetings
2. ProFor: Small TeamsCost: $14.99/Mo/hostLimit: Purchase up to 9 hosts/accountFeature:
• Basic features are included in it• 100 participants included• Assign scheduler• Skype for Business (Lync) interoperability• Custom Personal Meeting ID• Duration of Meeting is limited to 24 hours
• REST API• User management• Admin feature controls• 1GB of M4A or MP4 cloud recording
3. BusinessFor: Small and Medium-sized BusinessesCost: $19.99 /Mo/hostLimit: Starts at ten hosts for $199.9/MoFeatures:
• All Basic features• All-Pro features• Single sign-on• Company branding• 300 participants Included• Custom emails• Admin dashboard• Vanity URL• On-premise deployment• Managed domains• Dedicated phone support• LTI integration• Transcripts for Cloud Recording
4. EnterpriseFor: Large EnterprisesCost: $19.99 /mo/hostLimit: Starts at 100 hosts for $1,999/moFeatures:
All Business features +

Enterprise, 500 participants includedBundle discounts on Zoom Rooms and Webinars.Enterprise Plus 1,000 participants includedDedicated Customer Success ManagerCloud Storage (Unlimited)Reviews for Executive Business
5. Zoom PhoneCost: Starting at $10/Mo/userFeature:A single voice and video, fax, meeting, voicemail, and conferencingsoftware! Users can receive and make PSTN calls over mobile Wi-Ficonnections or cellular data. The app is native to iOS, Windows, Android,and macOS.

Chapter 2: Getting Started with ZoomZoom combines quick online meetings, cloud video teleconference, andeasy-to-use community messaging in one single platform for ease of theuser. The solution of the single platform offered by Zoom to these tasksgives the best experience in audio, video, and screen sharing coveringmultiple platforms.
2.1 Equipment Needed to Use Zoom for Effective LearningSmoothlyBefore downloading the application, it is necessary to familiarize oneselfwith its system requirements to ensure its smooth workability without anyhiccups. System requirements of Zoom vary over a great detail due to itsavailability over a large spectrum of platforms covering all major andpopular ones ranging from Windows, MACs, androids, and iOS devices, toeven those used by field professionals such as IT experts including Mint,OracleLinux, Archlinux, Ubuntu, Fedora, and CentOS, etc.System RequirementsThe basic requirements to use Zoom application on any system includes:An internet connection, either link-wired or wireless broadband (mobile-based such as 3G and 4G)Camera or HD camera-built-in (laptops) or webcam plug-in via USBSpeakers and a microphone-built-in or portable Bluetooth plug-in or USBHD monitor and video-capture camcorder
Zoom's bandwidth will be tailored for the optimal experience, depending onthe network of participants. It can automatically switch to environmentswith 3G, Wired, or Wi-Fi. Since the Internet is the basic requirement to useit, the recommended speed and Preferred Meeting Bandwidth and Webinarsby Zoom for various type of calls are as follows:Audio calling in 1:1
1. High-quality video 600kbps (up and down)2. 1.2 Mbps for HD 720p video (up and down)

3. It needs 1.8 Mbps (up and down) to receive HD 1080p video4. It takes 1.8 Mbps (up and down) to send HD 1080p video
For video calls in the group
1. Videos of high-quality 800kbps/1.0Mbps (up and down)2. To display gallery and or recording with 720p HD: 1.5Mbps
(up and down)3. 2.5mbps (up / down) for receiving 1080p HD video4. 3.0 Mbps (up / down) to send 1080p HD video5. for sharing screens (no thumbnails): 50-75kbps6. video thumbnail screen sharing: 50-150kbps7. VoIP audio: 60–80kbps8. Mobile Zoom: 60-100kbps
Webinar Attendee (Students) Bandwidth (Recommended)For one on one video calling: 600kbps (down) for high definition video and1.2 Mbps for videos of HD qualityOnly to share screen (no thumbnail for video): 50-75kbpsFor video thumbnail screen sharing: 50-150kbps (down)VoIP audio: 60–80kbpsAfter getting to know basic system requirements and internet requirements,it is time for equipment that needs to be used by teachers and students foronline classes on Zoom.
PC/LaptopPC/laptop is used in almost every household today. It is the basicrequirement for conducting and taking online classes because the Zoomapplication will be downloaded in it. Mobile phones, as popularly termed as"smartphones," can also be used to download Zoom, but it is notrecommended for a healthy learning environment. However, if there is theunavailability of desktops or laptops, mobile phones can be used for onlinelearning through Zoom.

A teacher can easily sit in front of a PC/Laptop and conduct the onlinesession and even use a whiteboard for writing and explaining the topics tostudents. If a teacher wants to present the lecture by writing then either, theycan conduct the lesson in front of a whiteboard or use the inbuilt function ofa whiteboard. Still, the practice is needed to draw something with thecomputer mouse, so it is recommended to buy some cheap graphics tabletfor better use of whiteboard function.
HeadsetA good headset can cancel noise and deliver quality sound. It is arecommended tool for all, either students or teachers but especially thestudents. By this, they can mostly ignore surrounding noises and focus onlyon the ongoing lecture.

MicrophoneA microphone is an equipment of utmost importance, especially forteachers as without it, it is not possible to deliver the lecture or record it forthe students. If students do not have a microphone, they can still type thequestion in the chatbox, but the whole online lecture cannot be delivered inthe chatbox. A good quality microphone can cancel the surrounding noisesand deliver the sound with clarity that is easy to understand for the studentsor attendees.For PC or desktops, a microphone is an individual peripheral device youneed to buy. Still, if a person is using a Laptop, then it is very likely that itcomes with a microphone pre-built it in them along with a webcam forvideo (almost all the laptops today in the market have built-in webcam andmicrophone).Mobile devices are already equipped with a camera and microphone sincethe primary function is communication. All the other features are luxuryand intend to make it a palmtop computer.
2.2 Steps for Downloading and Installing ZoomIn the current situation, in most sectors, people have started to work fromhome, so there is a need for remote conferencing technology, and it hasnever been more relevant than today. Services such as Zoom, whichprovides online meetings and video calls, are more important than ever inthe present day scenario to help keep companies working smoothly whenphysical offices are closed down due to the pandemic. Fortunately,downloading Zoom on the PC is a quick process. After installing theapplication, the user needs to sign up for a free account. Then, he can easilyuse the Zoom application for the desired purposes.
Downloading on PC/LaptopDownloading Zoom on a PC or Laptop is an easy process. The user justneeds to follow the following instructions:
1. Open the internet browser of your machine.2. After opening the browser, go to the Zoom.us website.

3. Scroll down to the bottom of the website, and in the footer ofthe web page, click "Download.”
4. Tap "Download" on the Download Center page under the"Zoom Client for Meetings.”
5. Then the Zoom app starts downloading. To begin theinstallation process, you can then click on the.exe file.
The installation process begins by clicking on the .exe file.When installed on your system, you will need to log into your Zoomaccount, set up via the Zoom website, if it does not have one already. Onceyou’ve set up the account, the user can use Zoom to meet all their videocalls and online requirements as per their need.To sum up, a person simply needs to go to their website and download theZoom client from the server.After downloading Zoom, it is installed on the platform, and in the case ofiOS devices and windows, it is done as follow:
Download and Install on WindowsIt is effortless to install Zoom once the file is downloaded. Simply click onthe downloaded file, and a pop up will show, click run on it, and showwhere you want to install the application. By default, it will install it in the"C" folder and will install the Zoom client on Windows.
Download and Install on iOS
1. Tap on the Apple App Store icon on your iOS device.2. Press on Search at the bottom right of the screen.3. Enter Zoom in the search text box.4. Select ZOOM Cloud Meetings from the app choices presented,
and then tap on the download button.5. The install process will start.6. Once installed, tap Open.7. In the Zoom app, tap Sign In.
Downloading on Smartphone

1. Tap on the Google Play Store icon on your android device.2. Tap on Search at the top right of the screen.3. Type Zoom in the search text box and select ZOOM Cloud
Meetings from the available app choices, and then tap on theInstall button.
4. The install process will start.5. Tap Open once downloaded.6. In the Zoom app, tap Sign In.
2.3 Making an Account or Signing Up
After installing the Zoom app, it is time for signing up or creating anaccount on Zoom if the user does not have an existing one. Registering for aZoom account is simple-whether the user wants to do on their mobiledevice or a computer.If the person is planning to use the Zoom app regularly, particularly withlarge universities and businesses moving to remote or isolated work becauseof the COVID-19 pandemic, it is better first to download the Zoom file andthen to sign up.To make a profile on Zoom, you will need to access your email address.When a person is signing up, the Zoom app will pop-up in the defaultbrowser. You can join the meetings on Zoom without having an account.However, it is better to create one to track appointments while workingremotely.The method of signing up for Zoom on iOS, Android and/or iPad in themobile app looks and feels the same.Below are instructions to make Zoom account on a smartphone:
1. Tap to open the app after you download it from the App Storeor Google Store. On the Welcome tab, press "Sign Up." Theother choices are "Sign in" (For user already having anaccount) or the option "Join a Conference/Meeting" (if the userreceives a text or email having the conference ID).
2. Press the "Sign in" button. Sign in to your IOS or Android App.

3. Enter the email address user wants for the account and theuser’s first name and last name.
4. Click the "I agree to the terms of service" option.
5. Click the top-right corner to "Sign Up." Type your informationin.
6. A screen showing a message will appear telling the user thatZoom has sent the confirmation email to the address providedby the user. To search your Inbox, press "OK" to shut the pop-up and open the email app.
Tap the "OK" button.
7. Press the email message in the user’s Inbox to open. Scroll andclick the button 'Activate Account' in blue. On your Laptop orphone, that will open the window.
Activating your Zoom account.
8. Start by the first step that is checking the account’s informationthen selecting a password. Type in your first name and lastname again. Type password, and retype to validate thepassword provided.
If the user’s password is not following the criteria of Zoom, instructions, itwill pop up on the screen. The password, for example, must contain aminimum of one letter and number, and it should be eight characters long,at least.Choose a name.
9. The very next step prompts the user to invite co-workers to aconference. You can complete this move if you are in a rush,but if you are merely setting up the account to use, choose toskip instead.
Press Skip

10. The next step now urges the user to initiate a
meeting. Tap "Return to My Account" to skip this part again.
Please go to the user account.
11. Type the email address you have provided and the
password.
12. Enable the option "Stay signed in" and press the
blue "Log in" toggle to go to the user’s account. When youhave completed these measures, users can go to the version ofthe app they downloaded. (Many browsers might even promptthe user to open Zoom at the top of the page).
Type in your login info
13. Tap this time, the option of "Sign In" in place of
the option "Sign Up."
Sign In
14. Enter the password and email address.
15. To complete the process, press the blue button for
"Sign In."
Press the "Sign in" button.
The user has Set up their Zoom account successfully now, and they are nowsigned in on their device.

Signing up for a Zoom account is similar to mobile phones and browsers.However, completing the necessary steps is easier on the browser.When using the Zoom via your browser, installing the app might be helpful,so you can use it whenever you like if you are planning to use Zoomregularly for job-related calls.Below are instructions on how to make a Zoom account for computer andsign in:
1. Tap on your Mac or PC to open the Zoom program.2. Click the "Sign In" button.3. Click the "Sign Up" button.4. This opens the Zoom website automatically on your default
browser.5. Type your email.6. Select the "Sign Up" button in blue.
To sign up, enter your email.Instructions via email.
7. Open your Inbox and find your email to activate.8. Click the "Activate Account" button in blue.
Turn your account on.
9. Now your browser's Zoom signup page will open. The screenwill prompt the user to enter their first name and last name aswell as password.
Type in your password and name.
10. This time the second move will prompt you to add
your colleagues. To proceed to the final step, click on "Skipthis step."
Choose to start or skip a conference.
11.

The final move prompts you to start a testmeeting. Click "Return to My Account" instead. The accountwill already have you signed in.
Please go to your account.
12. If you wish to use the service there, reopen the
Zoom app on your desktop. Tap again on "Sign Up."
13. Type your password and your email address.
Check the option for "Keep me signed in" the button willfollow it “sign-in” click it to complete the process of login,only if the user intends to use this application.
To complete the operation, log in.Now you are logged in to your brand new account.
2.4 Different Features and their FunctionalityThe tale of Zoom started in 2011 when the video conferencing market wascompetitive, as companies were looking for a more efficient way to conveymessages in person. The Zoom has become a revolution in that same marketwhere several businesses offer an innovative approach to thecomplex communication problems with an expensive solution of videotechniques of the modern-day.Zoom showed that present-day companies could interact just as easilythrough video as they could through the medium of audio and talk – and itis possible to do so without the bugs of many previous solutions. The“Zoom Meetings” was the portfolio's main product, offering an impressivemix of audio and HD video, also items like call transcripts and smart apps.The organization has now launched its free tier, so the solution provided byZoom is even more eye-catching as the members of a team cancommunicate without charging anything. Through online training sessionsand webinars, to modern-day art of calls and even video messaging, youcan now use Zoom for anything.Study Zoom Meetings: Features

Zoom offers everything a person needs to keep amazing video conferencingat all price ranges. The quality of the video is outstanding, and the audioquality is crystal clear. People can share several screens and annotateprojects using whiteboard functions. Also, Zoom lets you attach to anydevice – including your Smartphone.Zoom Meetings' most extravagant features include:
Easy use due to WebRTC technology.Enable all reliable security solutions.Support for 1,000 participants in the workshops and 49workshops.Recording built-in and transcripts.Photo HD and calls to audio.Securely meet the requirements that are dependent on userpermissions.Streamlined Google Calendar systems.Built-in Screen Sharing Tools.Unit talk and private messaging for all parties.Join any computer from anywhere.Some extra features such as chat, phone access, and webinars.

Home Screen:
In-home screen, the options at the top of the ribbon are as follow:
Home: Home screen has further options such as new meetings, join, screenshare, and schedule. These are the four big square icons in the middle of thescreen.
At the top right, there is a search bar, and next to it is an account optionfrom where the user can sign out. Just below the account option, there is thesetting icon.Chat: If the user wants to chat with someone, this is the tab user will go to;it is right next to the home tab.Meeting: This tab is situated next to chat, and it is for meetings.

Contacts: All the contacts of the user are located in this tab.
Settings:After pressing the setting icon, the user will have several options. Theyinclude:General:
If the user presses the setting icon, the above menu will pop up on thescreen. The first option will be general, which includes various otheroptions like using dual monitors, showing the connected time, asking toconfirm when leaving a meeting, etc.Video:The next option after general is a video tab, and here the options includedisplaying the participants' names. To touch up the appearances, turning offvideo when joining the meeting, and many more.

Audio:
The audio panel in setting deals with the audio-related settings such asspeaker-test and microphone test.

Share Screen:
This settings panel deals with the share screen to proceed into an advancedoption. For the share screen setting, click on the "Advanced" button at thebottom right. This panel enables the user to switch on or off notificationsilencing when sharing desktop and in side-by-side mode etc.Chat:In this panel, the user can block someone and manage previously blockedusers, and set themes for his/her Zoom app, such as dark mode (which iscomparatively easier on eyes). Status can also be placed in this panel.


Virtual Background:In this tab, users can set virtual backgrounds for meetings; it can beanything like any scenery to even videos.
Recording:

This setting deals with where to save the video for local recording andwhether the user wants to save a separate audio file.

Profile:Below the recording option, there is a profile tab, where the user can viewhis/her profile.Statistics:
This tab deals with statistics like the version of Zoom installed on PC, etc.It also tells about the specs of PC.Keyboard Shortcuts:This tab deals with all the shortcut keys, whether to enable them or changethem.
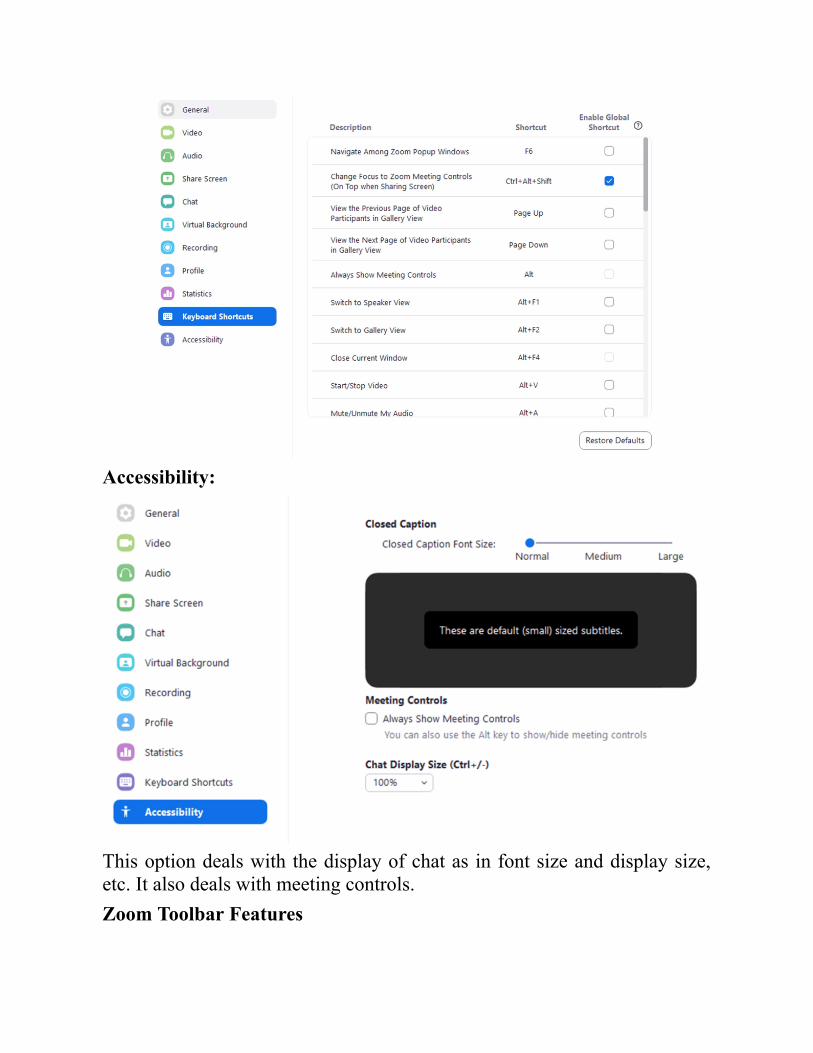
Accessibility:
This option deals with the display of chat as in font size and display size,etc. It also deals with meeting controls.Zoom Toolbar Features

When Zoom is enabled, a new window will open for a meeting session tostart. At the bottom of that screen, there is a toolbar. You will need to allowZoom to use the microphone and camera on your device, or you canconnect through your phone if that feature is available.During the session, you can change your camera and microphone settingsby clicking on the microphone and video icons at the bottom left corner.
The toolbar for the Zoom program has the following buttons across thebottom of the screen:• Invite: to invite people to the meeting.• Manage Participants: Manage the participants (Rename, Mute) at theconference.• Share Screen: share your laptop or computer screen or some other appwith the participants.• Chat: open chat box to communicate with all or individual participants.• Record: record session of the meeting.

Chapter 3: Setting Up and ConductingVirtual ClassesTeachers around the world were forced to transfer their whole classroomonline due to coronavirus or COVID-19 pandemic. Schools worldwide shutdown their physical entrance, and they opened virtual gateways to assiststudents in completing their studies. All students and educators had tochange – at a breakneck pace. What many learn in their hurry to advancethe online system of education is that adding 'internet' before the word'classroom' is not the only distinction between a digital and a traditionalclassroom. It works exceptionally great in one setting, and it cannot workwell in the other; people tend to find it out by experience.Teachers still want to be involved in their online classes, but they certainlydo not want all of their waking hours trying to navigate this contemporarydigital world. In reality, according to a survey conducted in 2017, less than9 percent of the academics prefer the "fully online environment."Instructors may worry in a simulated setting that they will have absolutelyno control over students or their learning environment. Technologicalfailures can undoubtedly take place. Yet virtual classrooms do haveadvantages — a minimum of it is the opportunity to stay in the course in aglobal pandemic.So to conduct a virtual classroom, it is necessary first to set it up, not just tomeet learning needs but also to promote student engagement andinvolvement in such a critical time when it is most needed. Those areabilities that will be in use as the world slowly but surely returns to the'new' culture, present and shortly.

Setting up Virtual ClassroomSome educational institutes and teachers have tried digital educationaldevices such as flipped classes or even interactive textbooks with onlineinstructions. These were just experimental phases on behalf of someinstitutes and teachers. Still, in a matter of weeks, the pandemic forceduniversities and colleges to move infrastructure of classes online — and thatmight lead to overwhelming educators and students.Luckily, many educational institutions now deliver online academic coursesand at least have some of the most relevant resources in place so thatteachers would not need to reinvent the whole process on a trial and errorbasis. Nonetheless, adapting the current lesson plans to the online world andteaching methodologies is not something anyone can do overnight.Firstly, to start hosting your virtual classroom, the classroom would requirea Content Delivery Network (CDN) or a video provider (online) to gainaccess to the delivered lectures. Much higher education institutions have inplace something known as a learning management system, aka LMS, thatprovides at bare minimum functionality a teacher will need. Also, it ispossible but not enough in itself to provide students with good quality andcaptivating learning experience.Students typically log in a portal to attend the class, with live video or audiostreaming. They can also ask questions with the right resources, seek input,attend student forums, transcripts of lectures, access assignments, quizzesand surveys, and written exams.Much like life lessons, a virtual class allows attendees to communicate witheach other and with the teacher.While for everyone involved, there can be a learning curve, it is importantto note that an online classroom is also, in the end, a classroom. Theprimary goal is the same: improving awareness of subject matter andengaging with students.Next, to set up a virtual classroom— The user will be using software andhardware instead of mortar and brick as the focus is on the word "Virtual."This would be made simpler by advancements in eLearning systems, butthose who are not familiar with technology and are not confident in front ofthe camera should take small steps while building up their comfort level.

The user should also search to see if their educational institutes have alearning management system capable of hosting video tutorials, onlinechats, and assignments inputs. Most likely, LMS of many institutes does notsupport any such features). You might need to look in some instances atother solutions to go across the limits of LMS.Your online courses will then be broadcast on a content distributionnetwork. Teachers can share them on social media platforms, but aspecifically tailored platform for education allows them to organize digitalclasses and measure learning. Here, the emphasis is Zoom as an onlineeducation platform. For example, few dedicated eLearning platforms willallow you to take the attendance and track the numbers and participation ofviewers, which is especially useful in a digital class — so teachers know ifany student left the stream. For certain instances, you may choose to createyour lectures that are accessible on request, which includes the capabilitiesof on-demand videos, or VOD.Bear in mind that the Livestream replaces the person to person lecture, soquality must be high if not the same — not only the material but also thestreaming.Grainy footage that cuts is not only frustrating for students, but it alsobecomes difficult to keep focus irrespective of content quality. According toone such survey by Top Hat conducted due to pandemic, most students didnot enjoy the experience of remote learning. More than 65% of studentsfelt that online instruction was worse than classic education, 25% haveexperienced navigating difficulty while utilizing online tools, and 21% facedifficulty accessing digital learning material.
3.1 Popularity of Virtual Learning Mode in Recent YearsMost digital platforms for learning provides free basic access to theirplatform in response to substantial demand, such as BYJU'S, a Bangalore-based digital tutoring firm, came into being in 2011. Tencent classroom,have been extensively used since February after a quarter out of billionstudents were instructed by the Chinese government to continue with theirstudies via an online platform. This culminated in one of the largest "digitalrevolution" in education history, with more than .7 million or 81 percent ofentire K-12 students, attended their classes through the Wuhan TencentOnline Class.

Many businesses are improving their capacities to provide teachers andstudents with a place where everything is covered.A collaboration suite Lark, which is Singapore-based, was initially createdby ByteDance, was an internal resource for its internal exponential growth.It began offering unlimited video conference time to teachers and students,capabilities of auto-translation, project work in real-time co-editing, andscheduling of smart calendar, among other features offered by them.Lark has been ramping up global cloud engineering and infrastructurecapabilities to maintain stable connectivity. Alibaba's distance learningservice and DingTalk faced a completely similar influx. The company tapedAlibaba Cloud, was forced to deploy approximately one hundred thousandcloud servers in a time frame of just over two hours to enable large-scaleremote work – setting a record for capacity expansion.Many school districts developed specific alliances, such as PBS SoCal /KCET and The Los Angeles Unified School District, to provide localeducational programming, with various networks based on ages, number ofmultimedia options, etc. The media organizations like the BBC also supportinteractive learning. On April 20, Bitesize Daily released a curriculum thatoffers 14 weeks of learning for children around the UK, with somecelebrities also help teach some course work.There is proof that learning online can be more useful in various ways forthose who already have access to the appropriate technology.Some research indicates that, on average, when studying online, studentsretain 25-60% more content compared to only 8-10% in a classroom. It isalso due to the students learning online faster; e-learning takes 40-60percent reduced time to learn than in a typical classroom environment asstudents can study at their speed, go back and re-read, skipping, or speedingthrough concepts as they want. Online learning's effectiveness differsamong age groups.The general opinion about children, particularly younger ones, that there isa need for a maintained environment, as children are easily distracted.

To get the full value of virtual learning, a concerted effort for thisframework must be put in place. Also, to go further beyond just simplyreplicating another physical class / reading through video technologies, byusing a variety of interactive resources and communication methods thatencourage the traits of personalization, inclusion, and knowledge, accordingto Tencent's Senior Executive Vice President.According to BYJU's, making learning enjoyable and successful throughtechnology is crucial because studies have shed light on how children usetheir senses extensively to learn. It has been observed over a period thatintelligent game integration has shown higher engagement and increasedmotivation for learning, especially among younger students, thus enablingthem to love learning. Students should adjust them into present obligationsand commitments, and they can interact with learning materials and digitalcontent at whatever time is feasible for them. Perhaps better, they do nothave to go anywhere to school and simply log in from their workplace orhome to the digital campus.There is a second explanation of why learning online became so accepted: itis cheaper. Price is a prohibitive factor in why many individual students donot enroll in courses that do not catch their eye. This is a major concern forbusinesses who want to enable their staff to receive enhanced training, butbudget constraints hinder training courses and conferences. For a smallbudget, online courses are the solution. A great quantity of students isopting for digital learning courses. This is due to cost and convenience.Those serious about improving their existing understanding, new skills aswell as valid certificates only enroll in those courses that are popular.Here are a few reasons as to why digital learning is effective than simplyenrolling in the classic training course:
1. The students learn much more online than in aconventional classroom.

IBM has researched that in virtual learning courses that use digital content,students learn up to five times more than conventional courses. This is dueto online courses offering students control on their learning, and they canfunction at their respective pace. Students usually work much faster thanotherwise, and they take in more details. They are pushed quicker throughcontents, of course, in which they are relaxed but slower in those they needto spend.
2. Online learning always requires a smaller investment oftime.
Regardless of the time commitment it would take, most students put off inenrolling in a conventional course. It usually includes time to commutebetween school and home, plus the waiting period for students and tutors. Astudy by Brandon Hall on eLearning inside companies found that thislearning method usually takes 40-60 percent less time for workers thanlearning through a conventional classroom environment. It is important toremember that eLearning choices typically permit students to divide theamount of time they spend in their course in whatever way it works best.Students do not have to commit huge amounts of time on their course. Itwill work out fine, even setting half an hour per day from their dailyroutine.
3. With online learning, the retention rates of education arehigher.
Most of the conventional offline courses struggle to keep students throughthe course.The American Research Institute found that that is not the case witheLearning. Virtual courses have now raised retention rates of students froma mere 25% to a staggering 60%.This has been proposed that more interactive content of multimedia, moreflexibility over how it incorporates into the material of course, and lessprobability clashing of classes all contribute to the growth.
4. The Greener Choice is eLearning.

Virtual learning is the most convenient choice for students and also safer forthe environment. The Open University in Britain has found that onlinecourses are equal to an average of above 80 percent less electricity and 85percent less CO2 emitted per student as conventional courses cause moreCO2 emission in individuals. This makes online learning and digital contentan even more productive form of education. Promoting and participating inthis form of learning will help the individuals and companies do their partfor the environment and stay committed to their respective goals.
5. More regular appraisals can reduce distractions.Some of the best things about online courses are that assessment canbecome something of an ongoing operation. This is a piece of positive newsfor students as interspersing digital content and learning materials willboost student interaction with daily short tests. In reality, Harvard researchfound that using these brief, daily tests half distracted students, tripled note-taking, and improved overall content retention. It should also beremembered that the students are also human. Sometimes, due to depressionand anxiety, they often choose suicide so tutors can keep track ofproblematic students without them knowing it will be an online lecture.Improved monitoring of students ensures that tutors will step in as soon asstudents need assistance.
3.2 Scheduling a ClassTeachers can conveniently arrange a meeting for each of their class sessionsby conducting online classes in Zoom, and they have their Zoom rooms.This subchapter will lead them through the scheduling process and the startof class sessions in Zoom.Each Zoom user at their respective educational institute has its dedicatedmeeting space. (If their institute has approached Zoom or bought thesubscription for the institute), and the ability to set up a customized URLfor their personal space that is easy to remember. They will use theirmeeting room to hold the meetings they schedule and for sessions notplanned.To build a meeting place

Click Personal Meeting Room in the toolbar over the top of the page to goto the settings for the user's personal meeting place or room. Your roomsettings will load. Scroll to the bottom of the page to initiate the processrequired to change user settings, and press Edit this meeting.Options for the “Edit Meeting” will load. The user can change settings theyneed to modify depending on their class needs.Select Profile in Navigation menu on the left side of the page to edit thepersonalized path to your meeting place.Look up “listing” for the user's link in the profile options. To edit the link,click “Customize” situated on the right side of the user's URL, and typewhat the user wants for their custom link. (Personal URL suggestions is touse the user's educational institute's username or anything easy for otherpeople to remember).Now that the user is done updating their custom URL, press Save Changeswill save the respective changes to the system.Scheduling any MeetingThe user will need to sign in to Zoom for the process to start arranging ameeting.Once a user is signed in, they will be taken to Zoom's Meetings screen. Tostart a new meeting, click the Schedule of a New Meeting on the upper leftof the page.The schedule will show a Meeting option. Users can fill the requiredinformation for their meeting here, such as topics of the meeting, adescription of the meeting, and change in another setting as needed.Teachers will want to arrange a weekly meeting to hold class sessionsonline. After they have set the time and date for the first meeting, the usershould also check the checkbox for recurrence options for meeting in theRecurring Session. For example, they can set the recurrence to Weekly forsuch a class that meets on Tuesdays and Fridays, and the user should usecheckboxes for Tuesday and Friday.Once the settings have been adjusted as needed, press on the Save button tosave the meeting. You will be taken to the Detailed page of the meeting.You can find the link for the meeting on this very page.

This link may be shared with students as needed. Also, teachers can shareout additional information for the Zoom session. Teachers may want thelink to be added to their Canvas course and send it to their students byemail.

Startup any meeting from the desktop application ZoomNote: Screenshots have been taken on PC; the interface on the macOSdevice should be identical. The Zoom graphical user interface (GUI) canalso look subtly different from the screenshots, depending on the iterationof Zoom you are using.To start any conference using the Zoom desktop program, sign in youraccount via the Zoom first, if necessary.In the end:Open the app to Zoom in.The dialogue box for the Cloud Meetings opens, and click Sign In.Tap Sign in with SSO.In the text box "Type user’s company domain," type the name of theorganization whatever it is, and press Continue.Type your username ID and password on the log in panel and press Sign in.You will be prompted to open your window by clicking on the ZoomMeetings.The dialogue box "Pro Account" appears by clicking on the Meetings icon.The list of the meetings that the user arranged will show up:To pick the meeting the user wishes to launch, click on the meeting list onthe left panel of the Zoom window. The specifics of the meeting will showup on the right side of the frame.Press on the Start button to enable the online meeting.Zoom's new window will open, and the meeting will begin.
3.3 Inviting StudentsInviting others while in a meeting
1. Sign in on PC, Zoom Desktop application.2. Users will get the option to either join or start a meeting.3. Click on Participants icon in-meeting controls.

4. Tap on Invite that is shown at the bottom of the participant'spanel.
5. Select any of the invite options available:Email
1. Press the Email icon.2. Select your email provider:
The Default Email: Using the user’s default email to inviteothers.Yahoo mail or Gmail: Invite others using the Yahoo or Gmailwebsite. Users will be shown a message to sign in into theirrespective accounts.Do note that a new email automatically will be created with theinformation about the meeting in the email body.
3. Add recipients and send the email to recipients.Contacts

1. Click the next tab, which is the Contacts tab.2. Select search for a contact or name of the person from the
window shown on screen.3. Click on the name of the individual user you want to invite.
Multiple contacts can be selected. Once it is done, theirname(s) will be highlighted in color blue and will appear at thelist, situated at the top of the window.
4. On the bottom right corner, click Invite.Invitation text or URLClick on Copy Invitation or Copy link to invite if the user wants to sendtheir immediate meeting information elsewhere.
Copy Invitation: invitation text should be thoroughly copied.Copy Invite Link: The link should be copied for joining themeeting.Paste the invitation or URL using Cmd + V on a Mac or Ctrl +V on Windows. Users can also press the right button and pressPaste.

Inviting other users to any scheduled meetingIt is also entirely possible to invite others and schedule meetings beforeeven starting the actual meeting.The Desktop client
1. Sign in to Zoom Desktop Application /Client.2. Then schedule a meeting.3. Click on the Meetings icon.

4. Select a meeting that others should be invited to. Then pressCopy Invitation.
A meeting invitation is going to be copied, and then the user can send thatinformation through an email to anyone so that they join the meeting.Web portal
1. First, Sign-in in the web portal of Zoom.2. Select the navigation menu, press on, meeting icon.3. Press on the option of "topic of the meeting."
4. Next to the icon of the time, there is an option to add things ortasks to the calendar.

If the user clicks on Yahoo Calendar or Google Calendar, thecalendar event will be created automatically in the emailservice chosen by the user.If the user selects Outlook Calendar, a.ICS file will begenerated to import to their Outlook calendar.
5. The user is also able to manually replicate the informationabout the meeting by pressing the Copy Invitation icon.
If the user clicks “Copy Invitation,” a new window will pop upwith the invitation text for the meeting.Click on Copy for Meeting Invitation.The user can replicate the invitation and can send it throughemail.
3.4 Delivering a Lesson Over Zoom

Before moving on to delivering lectures on Zoom, practice it beforehand.Some simple instructions when delivering the lectures as a teacher are asfollows: Check video and audio that they are working. Make sure your facehas a light, and the source of light is not behind you. Also, make sure thatthe screen is free from distractions. Users should practice looking at theirwebcam when they are presenting and not the computer screen. Use screensharing feature of Zoom.Review controls on your host and settings for the meeting. Determine if youshould have other hosts, mute attendees’ microphones (recommended forsizeable meetings or can be done for students and they can ask a questionvia chat box), or record the session to use at later stages.User as a teacher should make slides or discuss the questions which areaccessible through Canvas, etc. Do this in advance so that if screen sharingdoes not work, students can easily access the important content. Anticipatepossible obstacles, including the risk that students do not have perfectcommunications and not listen and watch anything. Use the feature ofscreen sharing to display your slides or screen while you are talking, e.g.,slides on PowerPoint are being discussed in the lecture, so screen sharesthose and continue to elaborate them.Present a schedule from the beginning of the lecture to let students knowexactly what they will gain from the online lecture. Narrate the content youare visually showing on the screen. Just like you would read content outaloud in the class, only, in this case, students can completely see theimportant text, read screen content that the user shares on the screen.

Post questions that need to be discussed on the slides, so students sufferingfrom a poor Internet connection, frequent disconnections, or who fail tohear audio can see these. Use the chat tool for communication with thestudents regularly during meetings. Speak at the start of the lecture(session) to address technical problems if the teacher has access to a TAwilling to help the class with the instruction and with technical assistance,which can also respond to the students in the chatbox with troubleshootingtips. Also, monitor the chat to find queries of students and areas of concernor uncertainty for the students. Assign TA to monitor the chat for largergroups, and ensure you deal with relevant questions and feedback.Particularly in smaller lectures, it might be worth asking some students toassume some important roles like "chat monitors" for voice if questionsarise that are overlooked by the teacher(host).As a teacher, try to engage in conversation with the students. You can dothis by discontinuing a lecture to ask questions from the students andencourage them to comment or answer to find out whether they are payingtheir undivided attention in the class or not. "Call on" the students to clarifywith a text statement or a question.To make the classroom interactions more exciting and involve the studentsin active learning, the teachers should use collaboration tools.Use the Zoom polling tool to gather feedback from students, and thenexchange results with students both online and in-person. Use of breakoutrooms for helping students converse in smaller classes, much as in abroader class setting, they would do breakout classes. As the coach, when itis time to regroup, the user can visit different breakout rooms, relaymessages to different rooms to end the sessions.Consider asking students to work together as a group, to make collaborativeGoogle Doc as a broad group or split groups.Call on the students to cooperate through Zoom as they can hold studysessions on it in groups. Students, including professors, can use the Zoom topresent in the synchronous meeting in real-time or to film presentations ona video to share through Zoom by using the screen-sharing feature.
3.5 Setting up an Assignment or Discussion Board

Instructors can set up an Assignment or Discussion Board in all courses,allowing students to add or upload a file. Sadly, large recording files maytake up too much room in the Canvas course, or the submission region ofthe student's Canvas file.Canvas has an exceptional resource for Zoom recordings that will ensurethat students can keep their quota of files to a minimum. The feature isknown as the Media Record / Upload method. It will allow students toupload 500 MB files to Canvas without limiting either the course or thestudents.Setting up an Assignment or Discussion board post with these resources andletting them know the correct way to apply is particularly important for theteacher.Do not test the "File Uploads" box when setting up your assignment as thestudents will take up much of the course room. Alternatively, you can allowthe "Record / Upload Files" feature to prevent large files for your task.If the user copies Assignments from previous classes, they will also need tochange them. Configure your Canvas Assignment according to thescreenshot below to ensure proper submission of a Zoom image.

3.6 Recording a Zoom ClassIt can be incredibly profitable to schedule, prepare, and deliver a digitalcourse, but it also requires much input in energy and time. Teachers includetheir course material; it is highly customized, but recording all this in videosis a very strenuous and time-consuming task for online content creators,even for veterans.To show your audience that you are serious in assisting them, you’ll need tomake a professional course video, and this turns out to be tricky if they haveto learn about technology. The only positive news there is; is that there is adevice that can be used by anyone to help them: Zoom in.

Zoom, as a company, has something called "Freemium." It ensures that theuser is as long as you can use other elements of Zoom and not spend a centas long as the user goes with less than 40 minutes’ rule. Other aspects of thesoftware are paid options, such as webinars.Phase 1-Sign up.Proceed to the Zoom website on the browser and click on the blue icon atthe top right, which says to Sign Up, It is Free. Some restrictions are inplace, but meetings under 40 minutes are free.Phase 2-Scheduling a meeting.The user needs first to Sign in and pick the Dashboard meeting schedule.Write down the name of the user's video on the next page, and press Save atthe bottom panel of the page.Do not worry about other available options, as the user will start by settingup the tools necessary for recording the video and start shooting it.Click Start the Session. If you do not have a Zoom application on thedesktop already, the user should download it.If you are not ready, do not worry as when users click 'File,' nothing will beregistered.Phase 3-Setting up User’s Documentation and Equipment.Users will see the control panel next for their meeting.Users can start the set up by preparing their microphone and enabling theircamera by pressing the 'Start Video' button (if you have it).> Make sure user is prepared with their notes and other documentation thatthey wanted to share on their video before they hit record.Consider turning off computers, alerts, and everything not needed as thatwill cause annoying background noise.Phase 4-Begin Recording the Video.The user’s camera and microphone are ready and in place, and now it istime to screen-share the video through your computer.

Click the Sharing icon situated on the control panel, pick the folder userwants to be on their video. Customize the paper to fit inside the boundary ofthe outline, which is green in color. Notice that at the bottom panel of thescreen, the control panel is minimized for when it is needed.Calm your nerves down by taking a few breaths, and when the user feelsready, they can start by clicking the button for the record.Take ample time and do not rush through. Stop if you need input, and usealready prepared notes.Once you have your document registered, go to the control panel situated atthe screen's bottom, and select the option for more and Recording Start.On completion, go to the menu of the control panel, pick End Meeting, orthe option to finish the meeting for all.Phase 5-Save the PictureZoom can entirety convert the whole meeting into a recording, and the userwill be shown the Zoom screen folder (desktop folder) where users can seethat their recording is saved for them in both Audio and MP4 files.Phase 6-Edit the Video (optional)If they are kept short and with a clear picture, then editing the videos is notnecessary. Many people make entire videos in one go without facing anyproblems whatsoever. When the user finds it essential that they need editingor remove parts of their images, though, the user will require other toolsthat are outside of the Zoom platform. Most free video software programs,such as HitFilm Express, VSDC, iMovie, or VideoPad, can easily get theediting done.The option of the automatic recording provided by Zoom enables the userto start cloud recording or local recording automatically at the start of themeeting.Whether host joins, mobile devices, telephone dial-ups, or Automaticcomputer, cloud-recording will start regardless of the option selected by thehost to join the scheduled meeting, given that enough space for cloudrecording is available. The local recording option will be automaticallyavailable to use when the user (acting as host with administrative right)joins through the desktop application of Zoom.Turning ON, Automatic Recording

To start the feature known as, Automatic Recording for organization and itsmember:
1. Sign as an administrator into a web portal of Zoom; it allowsthe user to edit the Account settings, and then click on theAccount Settings.
2. Go to the Recording tab and check that Settings for AutomaticRecording is enabled.
In case of it being disabled, press on the Status toggle toactivate it. A verification dialogue will likely be displayed;select the Turn On option to confirm the change.
3. Select an option to record in the cloud or record on the localcomputer and press Save.
4. The setting for Automatic Recording can be made compulsoryfor all the available users in the account, press on the lock icon,then again press Lock to accept the setting so they can besaved.

Note: Owners and Account Admins can disable the feature of Cloudrecording downloads through the Account Settings page.To Activate the Feature of Automatic Recording for any Specific Group
1. As an administrator, sign in to the web portal of Zoom, it grantsadministrative rights for editing User group, press on GroupManagement to proceed.
2. Go to the name of a particular group, and then press on theSettings tab.
3. Go to the Recording tab to verify that the setting for AutomaticRecording is enabled.
Suppose it is disabled, press the “status toggle” to turn it on. Ifverification dialogue pops up, select the option of Turn On; youcan save such a change.
4. Select options to record on the local computer or Record in thecloud and then click to Save.

5. The user can make the Automatic Recording settingcompulsory for all the members in the group, first press thelock icon, and then press Lock to confirm and save the setting.
To Start this Feature Automatic Recording, for Personal Use
1. Go to the web portal of Zoom and sign in and press on thesettings of “My Meeting” (if the user has rights of accountadministrator) or simply Meeting Settings (only if the user is asimple account member).
2. Go to the Recording tab and confirm that the setting forAutomatic Recording is on. If the setting is off, click on theStatus toggle for enabling it.
Note: If Status toggle shows up greyed out, then it is locked, either at theAccount level or group, then Zoom administrator needs to change thesettings.
3. Select options to record and save on a local computer, orRecord in the cloud and Save, to change the settings.

Note: If the user has turned on or enabled automatic recording in theirMeeting Settings, that will be set and saved for any number of meetings thatthe user's schedule is going forward too. It is not going to apply to all theexisting meetings or their ID of Personal Meeting. Users will have toactivate it for such meetings individually.Setting the Automatic Recording, Individual MeetingIf the user does not wish to enable the feature for all meetings of automaticrecording, they can disable it for the individual meetings. They can alsoenable it for a personal meeting, and this setting on at the group, user level,or account level is not needed.To Control Setting of Automatic Recordings, Specific Meeting
1. Select My meeting.2. Press Schedule a (Zoom) Meeting or simply select the topic for
meeting from the list available for Upcoming Meetings, thenpress on Edit Meeting option.
The user should note that they can select their PMI by pressing on the tab.
3. Under the Meeting Options, press on the record meetingautomatically.
4. Click Save.

3.7 Virtual InstructionsVirtual Instruction is a course taught online or face-to-face, such asBlackboard and other course management systems. Digital learning requiresthe delivery of class materials to students in digital form.The Virtual Background function allows the user to display an image orvideo during a Zoom Meeting as your backdrop. With a uniform lightingand green screen, this feature works best to allow Zoom to detect thedifference between user and their surroundings. Users can add images orvideos of their own as a virtual backdrop. They can also use a Zoom Roomwith Virtual History.Zoom suggests using a solid background color, ideally green, to achieve thebest virtual background effect. Better quality cameras result in a betterbackdrop to the interactive session.Using Light and Standard Lighting TechniquesDo not wear a dress that is of the same color as the virtual context. View atthe context.There are no size limitations when adding your virtual backgrounds, butbefore uploading, Zoom suggests that users crop the image that suits theircamera's aspect ratio.If the user's camera is set to a ratio of 16:9, the picture will fit better with1920 by 1080 pixels or 1280 by 720 pixels.Use a background picture with a minimum resolution of 1280 by 720pixels, if you are unsure about your camera aspect ratio. Use those sites forroyalty-free photos: Pexels, Unsplash, Pixabay.Enabling a Virtual ContextNote: Users must sign out of the Zoom Desktop Client and sign in again tobe influenced by Virtual Backgrounds.AccountingTo allow all users in the account to have Virtual Background feature:
1. Sign in as an administrator to the web portal with thepermission to change account settings.

2. Click Account Management and then Account Settings in thenavigation menu.
3. Navigate to the Virtual Background option (under theAdvanced section of in Meeting) in the Meeting tab, and verifythat setting is enabled.
Note: If the setting is deactivated, press the allow toggle. Select Turn On tocheck the adjustment when a verification dialogue appears.
4. (Optional) Click on the lock icon to make this setting automaticfor all the users of your account, and then press Lock toconfirm the setting.
5. (Optional) Click Manage virtual background to upload user-friendly, default background images.
Note: To display the background photos you are uploading; users must haveclient/app version 5.1.1 or greater.
3.8 Using Different Zoom App Features for TeachingZoom comes preloaded with many useful features that help in a virtualclassroom, and they are accommodating for both teachers and students.Some of the features are as follow:The view of the gallery and the speakerZoom provides its user with two options: the gallery view and the speaker'sview. The user can switch between these two distinct modes by pressing onthe top right of the toggle. Speaker view, it is a default option that displays abroad picture of the speakers that are active when the user starts a meeting.The view of the gallery shows all participants of the same size. It issuggested to use the gallery while teaching to track your students betterduring real-time while teaching.Avoiding noise in the backgroundMake sure everyone remains quiet. Students will mute themselves, the sameway as the user mutes himself, but as acting as a host, the user has thepower to mute all the participants as well.

If a student forgets to mute himself or is very young and cannot be trustedwith controls, the user can silence him in gallery mode by hovering itspointer over the student's video feed. Here the user will see a blue button formute. Also, the user can unmute the students.Hand liftZoom gives the students a way to lift their hands digitally. To expand thepanel of participants, students can press the 'Participants' button. There is abutton called "raise hand" at the bottom panel of this screen. Students mayuse that option to get the attention of the teacher when muted; this functionworks surprisingly well for large parts. If the user places pointer on theirfeed in the gallery mode, the user will see the option to lower a student'shand.Remove one studentThe hold function acts similarly to a virtual timeout, which should be usedsimply as a measure of last resort. This will throw the student off themeeting before you want to grant them success to join the meeting again.Those students will have a view of the blank screen showing the message"waiting for the host (user) to let you back in." Users can view the optionfor a hold by placing the pointer over the name of the student on the optionManage Participants and by pressing the "more" icon.Disallow students to change the nameZoom highly suggests using setting to avoid learners or students fromediting their respective Zoom titles. Users can click on the "More" drop-down menu from the Manage Participants screen and by unchecking thesetting "Allow Participants (students) to rename (editing of titles)themselves" to disallow students to change their names in the meeting.Please note this update is stored in the Zoom desktop app, so the user wouldnot need to update it every time you visit.Functions of Zoom for Practical InstructionChatting email

You can use the chatbox, which is accessed from the last panel of thecomputer screen, to send chat messages during class. Users can monitorhow the attendees use this feature by selecting whom to chat with while thelecture is ongoing from the dropdown menu "More." Another feature therepresent is of the group, by default. You can opt to restrict learners to talkwith the host, only you. Or, the user can select the option of "No-one" todisable chat entirely. There is no one on one student chat option available,so the user does not have to fret over private messages between studentswhile teaching the online class.AnnotatingZoom also lets you annotate when sharing a computer. It helps the user tomake the class more engaging, as the user can draw arrows directly onPowerPoint, highlight difficult words in posts, and other helpful things forthe students to follow the material along. You will see the option ofannotation at the top panel of the screen while sharing the screen. It alsogives students access to the same tools for annotation.Clicking on the "More" dropdown situated on top of the screen will allowthe user to adjust the setting for annotations. It will require the user to:Disable / Enable Students Annotation: It can be helpful when students aredistractingly using annotation devices.Show / Hide Annotator Names: When you have several learners annotatedon the shared computer screen, the user can swing over an annotation toview which student has generated it.Breakout SpacesZoom provides teachers with a way to split students into multiple videorooms independent of one another, for discussion about the activities orother work in the group.Among all the Zoom features, two features are most important, namelywhiteboard and Screen Sharing.
Using Whiteboard

The most useful tool for teachers is Whiteboard, as it acts as a board forteachers to write and draw something for students. If many illustrations areinvolved, then it is better that teachers also use any cheap graphic tabletwith it as it makes it easier to write and draw on the Whiteboard.1. Click the Sharing Screen button in the menu bar while you are at anactive Zoom Meeting.
2. Press on the Whiteboard, and tap share.
4. At the bottom of the page on the right side are situated page controls,use them to switch between multiple pages, and to create pages.
5. To annotation tools, use the toolbar. Clicking on Whiteboard will causethe taskbar to disappear. Tap on the Whiteboard again to put it back up.

Select: resize, or move the annotations if the user wants toselect many annotations at an instance, press and drag thepointer to display the selection area.Text: to Insert the text.Draw: arrows, shapes, and Insert lines. To highlight the area ofa whiteboard or shared screen, select the following circle orsquare icon; it is for inserting a semi-transparent circle orsquare. It will function even like a highlighter if the userchanges the color to yellow for format.
Stamp: Insert the predefined icons such as star or checkmark.Spotlight / Arrow: Press the Spotlight icon to select the twoavailable options for switching the user's cursor into an arrowor spotlight.

Spotlight: It shows all participants your mouse cursor when theuser's mouse is inside the shared region. You are using this todirect students on the screen to different parts, like anelectronic laser pointer.Arrow: To show an arrow in place of Mouse, the cursor iddisplays a simple arrow. Press to place an arrow that will revealyour name. Every corresponding click would remove the arrowthat was put before. You may use this particular feature to drawstudents' attention to your annotations.
Eraser: To erase different parts of the user’s annotation, pressand drag the erase icon.Format: To change the options available for annotations toolssuch as line width, font, and color.Clear: All annotations will be deleted. The user can select todelete students' annotations or their annotations. To deletesimply one annotation, use your pointer to select it and simplyuse the eraser tool or press delete on the keyboard.Save: It will save all the annotations shown on the presentscreen as a screenshot. This screenshot is sent to the local (PCstorage) recording location.
5. When the user is done, simply press Stop Share.
Screen Sharing

Perhaps Zoom is the most useful teaching tool. Screen sharing lets learnerssee what is on their display. It could include a PowerPoint slideshow, awebsite, a video, or something entirely different on a computer that wouldprove useful to the class.Zoom also provides an interactive whiteboard as a screen-sharing tool,which can be very useful for multiple groups. To show your screen, click onthe green button at the bottom of your Zoom window and select the optionyou wish to share. Please note: if you are interested in sharing a video withstudents, check the “Use Computer Audio Checkbox” at the bottom left ofthe window screen. Otherwise, the recording will be registered asbackground noise on your side and will not be sent to class.

Chapter 4: Guide for Students to UseZoom EffectivelyFor students to use Zoom effectively, there are some guidelines andespecially some etiquettes since they are still students, whether they arestudying online or in the classic physical class. Some of the etiquettes thatstudents must follow in the digital class are as follows:Proper clothing is necessaryStudents should realize that their professors and colleagues will SEE themeven though they might be at home alone. Students can attend the meetingin pajamas or trouser, but they should be looking presentable because theyhave to appear in front of their teachers. Put some clean shirt on. Have abrush run through the hair, clean the teeth and look presentable and evenput body spray even if teachers cannot detect you in the online class, but itis an excellent habit and common hygiene.Be conscious of the surroundingsYour teacher and classmates will see what is BEHIND too. Ensure there isnothing the background that can detract you as a student from the digitalclass (unkempt bed, laundry pile, etc.). Although attending class from theirmessy bedroom is not always the best option, it entirely possible that theplace is such that the user may be able to find some quiet time and peaceaway from family members or roommates. If such is the issue, the user mayuse a Virtual Backdrop to mask what they do not want their peers to see.Mute is necessary When logging into the virtual online classroom, make sure to mute thestudent's microphone (bottom left corner).It would help minimize background noise capable of disrupting anyone.Always raise the hand and wait for the professor

If students wish to chat, they should either lift their hands physically or usethe "Raise Hand" icon in the middle at the bottom of their screen. If theteacher has called you, unmute and start speaking or ask your question.When students have finished asking the question, show that you are doneusing some phrase something along the lines of "thank you " or "that's it,"and then stop using the microphone by muting it.Better to remain quiet than to say anything not usefulThe feature of Zoom Chat is a convenient tool for commenting and askingimportant questions without even interrupting the host or speaker butalways be mindful that comments in chat are public for the group and alsoregistered in the session minutes. As almost all the users most likely havelearned back in the kindergarten in their first-ever classic physicalclassroom that "If you have nothing good to say, then they should remainsilent. Suppose they do not have anything important to say, they shouldmaintain the decorum of the classroom.
4.1 Check Equipment before Joining a ClassIf the user has not allowed machine audio to enter the setting automatically,you can test your speaker and microphone before they enter a meeting orconference:Select Test Microphone and Speaker after the user enters a group.The conference shows a pop-up window to test the speakers. If the ringtoneis not heard, use the drop-down button, or press No to switch speakersbefore hearing the ringtone. To begin the microphone test, similarly, pressthe icon of yes.If you are not listening to an audio replay, use the drop-down menu or pressNo to turn microphones, but if you hear the replay, press Yes.Select Machine Audio to Join.Click Join Machine Audio to access the microphone and speakers selectedfor the testing.Check Audio SetupNavigate to your audio settings in Zoom application before or after ameeting to test your audio:During a conference

Sign in to your Zoom account.Tap on the image of your profile, then tap on Settings.Tap the audio tab.To test your microphone or speaker, press the tab test mic or test speaker.At a MeetingWhen you are already in a conference, you can access your audio settingsand test your audio.Click the arrow next to Unmute/mute in the controls of the meeting.Tap Options to Audio. This opens up your audio controls.Test the Spokesperson.To play a test tone, press the Test speaker command.If you cannot hear it, pick another speaker from the menu, or change thevolume.User's Microphone TestIn the Microphone area, when Zoom picks up the audio, you will see thegreen Input Level bar rise.To test the microphone, press the Test Button.Your recording will start on your audio. When you are done, pressrecording, and it will playback. From the menu, you can pick anothermicrophone or change the level of input.Check adjustments for the microphone settings automatically if you wantZoom to change the input volume automatically.Troubleshooting MicrophoneIf the user works on macOS 10.14 and has problems regarding themicrophone, the user needs to check system permissions to check whetherZoom has been granted access to use the microphone in the operationsystem. If the user is on the famed and most widespread OS of them all, theWindows 10, and cannot reach the microphone, use the Windows searchbox to navigate to privacy settings for your microphone. Turn on the Allowapplications to access your microphone toggle, and allow it the Zoomaccess.

4.2 Using Chat Options to Ask QuestionsAnother approach is by using the chat feature to ask questions or makecomments. Click the "Chat" button to open the chat window to send a Chatmessage.You may use the drop-down menu in the chat window to select whether togive the message to everyone or the instructor.Recall being respectful and professional this way when asking questions ormaking remarks. Anyone, host or participant, can save the chat at any timeas a text file, so do not type something that you later regret on.The chat feature helps webinar attendees, hosts, co-hosts, and panelists toconnect over the webinar's length.Participants can communicate with anyone in the meeting, but only the hostcan modify the settings.As a webinar attendant, you can chat with other guests, panelists (includingthe moderator), depending on what webinar moderator chat permissions areenabled. Learn about all monitoring guests.Click or tap chat in your controls at the foot of the page.The Chat window will appear when you click on chat. If you are not on thefull screen, it will be on the top. If you are in the full screen, a preview thatyou can pass around your computer will pop up.Type your message and press Submit it to Join.By clicking on the drop-down next to To, you can also pick who you wantto send it.The User will receive a notification at the bottom of his screen when theyget a chat message if the chat window is not open at that time.If the host has Attendee chat disabled, messages sent by the host and otherpanelists will still be viewable.
4.3 Delivering Assignments through File Sharing

Students can easily deliver assignments they get from their online classesthrough a file-sharing feature present in the Zoom. It makes it possible forteachers to handout questions and assignments to students in online classes,so that they can easily practice and apply what is being taught in the onlinevirtual classroom. They can share the file by following the given procedure:Enable file transfer in-meeting
First, go to the account and log in.To allow the transfer of files to all members of yourorganization in-meeting:Log in as an administrator to the web portal of Zoom with theright to change the account settings.Press on the Account Management and then Account Settingsin the navigation menu.Use the Meeting tab to navigate to the File Transfer option andverify that the setting. Allow the settings so that the studentscan share and deliver the assigned files.If the setting is turned off, press the Allow Status toggle. SelectTurn On to check the adjustment when a verification dialogueappears.
This step is completely optional; press on the lock icon to make the settingcompulsory for all the users of your account, and then press Lock forconfirming the setting.For the group
To allow the transfer of the in-meeting file for all the membersof a particular group:First, Log in as an administrator to the Zoom application’s webportal to edit classes.Click on User Management, then Community Management inthe Navigation menu.Click on the group name, and then click on the Settings tab.Use the Settings tab to navigate to the feature of File Transferand check its option to verify that setting is allowed.

If the setting is turned off, press the Allow Status toggle. SelectTurn On to check the adjustment when a verification dialogueappears.
Users should note that if the option is greyed out or cannot be clicked, it islocked at the level of the account and needs changing at such a stage toallow that option to be used.This step is completely discretionary; press on the lock icon to make suchsettings compulsory for all the users in the community or the group, andthen press the Lock icon to confirm the setting.For the UserTo allow the transfer of the in-meeting file for your use:
Log in to the web portal for the Zoom.Press Settings.Use the Meeting tab to navigate to the File Transfer option andverify the setting is allowed.If the setting is disabled, press the Allow Status toggle. SelectTurn On to check the adjustment when a verification dialogueappears.
Users can detect if the options are greyed out, then either the Account orCommunity level has been locked, and they need to contact their Zoomadministrator.It is possible to restrict the types of files which can be exchanged.For security purposes, the file extensions/file types that can be exchangedthrough file transfer may be restricted by the account owner or an accountadmin.Log in as an administrator to the Zoom web portal with the luxury ofchanging account settings.
Click Account Management in the Navigation menu then IMManagement.Tap the Settings tab for IM.Navigate to Option for File Transfer.

Enable Allow specified types of files only.Enter the approved file types/extensions, with each extensionseparated by a comma.Press Save.
No file transfer through in-meetings
Press on the Chat icon during a Zoom Conference.Pick More, and pick the Share file option to submit a file in themeeting.
If the file is successfully submitted, then a sign will be shown, which meansit is uploaded. When a file is submitted, the participants will see a note, andthe option to download the file will be given. They will be able to accessthe file until Download is selected.
4.4 Record Presentations Using Zoom
User can easily share their screencasts or presentations using the Zoomapplication. Users may share or send the cloud-recording connection totheir Canvas task.At first, the user needs to build a Zoom account even to use Zoom.When they have their account, they will certainly be "planning a meeting."Think of the meeting in this case as their show, or screencast, but forstudents, it will be their virtual classroom where they will send theirpresentation.Next, the user will "start the meeting." Again, they just open the applicationto record your presentation.Students will want to share their computer screens to display theirpresentation slides after opening the Zoom program. In the foot of the pageis a "Share" tab. At last, they will follow the cloud recording instructions torecord their presentation for their class. This will allow the user to retrieve ashareable link to their presentation.
4.5 Schedule Meeting for Group Discussion

It is important to schedule the meetings first as spontaneously everyonecannot be available for the meetings or group discussions. So meetingsmust be prepared beforehand so everyone, including teachers and students,can create the time or free time from their schedule to make it possible forthem to attend the online classes, making it possible for the groupdiscussions.How to schedule Zoom Meetings with someone else?1. Download Applications for Zoom Client and Outlook Plugin:• ITS tagged PC: Zoom installs via Software Center.• ITS-Tagged Mac: Zoom installs via Self Service.• Non-tagged device: Install, Zoom via their web site.2. Make sure that you have usual delegate access to the Outlook calendarfor the other person to schedule the conference.3. Make sure you are in Zoom with Schedule Privilege (delegate access).The individual you want to meet or hold the meeting with.Users will need to schedule a meeting to delegate their Privilege Schedule.They will log in to their Zoom account.Press on the "Meeting Settings" in their Zoom account, and then scrolldown to the section.Select the "Privilege plan," and then press Add to add your name.The privileges go right here in Zoom.4. Open a calendar of that person in Outlook.a. Timing a new meeting.b. After timing, press the "Meeting Schedule" button at the top of thewindow.* Note * If the user clicks on the Meeting Schedule button and they are notin the meeting of that person.Invite, you are going to send it out as yourself.The choices on the invite appear this way:The meeting it creates will look like this

As a member, the name at the top of the invitation will change the user'sname to whoever it is.

Chapter 5: Tips and Tricks to UseZoom AppZoom is a platform that has several uses and functions. There are tips andtricks necessary to make it easier for users to utilize correctly.
5.1 Additional Tips for Teachers and StudentsSome tips for professors and students to make lecture easy are as follow:1. The button for the muteThe teacher can easily become agitated when students ignore their lectures,and this situation is far worse in digital classrooms as even if students donot speak. Still, background noise can easily disturb the whole lesson orlecture. So to avoid such problems mute button is there to facilitate teachersand professors so that they can efficiently conduct their class without anydisturbance from the students or unwanted background noise from theirside. With this mute button or whole feature group, chatter can be silencedat once.Users can silence participants individually using the option on their videoprofile or silence them as a group using the "Participants" button at thebottom of the screen in your Zoom toolbar. It is a perfect way to ensure thatindividual students can talk with others without interference and to maintainthe decorum of the class.2. Making NotesWhen viewing your computer, hover your cursor over the top of the screen,and drop down a toolbar. Click "Annotate," and a new menu bar appears.This helps you to highlight, stamp, or write to your shared computer.

3. Disabling "Contributions" for participantsSome students, for fun, like to add annotations to the screen of their teacher,such as smiley faces (or the name of their teacher surrounded by heart-shaped stamps). By the end of their online lesson, the screen is filled withwild annotations while they exchange their screens and unmovingthemselves. While encouraging students to share their work and annotate issometimes astonishing, it is better to verify when and where this occurs.Muting- Pick the "Mute All" option in "Manage Participants." You will beasked to let the participants unmute. Make sure you deselect this option.Annotation — Choose the "More" button on the right while sharing acomputer. Toggle the option "Allow Attendee Annotation" on and off in thedropdown menu.Screen Sharing — Disable screen sharing for the attendee via the menuoption "Screen Share." Choose "Advanced Sharing Options," and pick"Only Host" from the options for screen sharing.Turning Videos Off / On — If there are students who are trying to distractthe class in the video chat, the choices on your video profile can be used toturn off their videos. If their video is switched off, the user can ask them torestart it too.4. Tone while coming in and going outNot everybody has a stable internet connection and, when attendees orstudents wi-fi cuts out, they will start to disappear during the online lecture.It will also probably take them a very long time to get back into the class,and most of the time, the host or professor will fail to notice their presencesince they are gone. Toggling the Enter / Exit chime will let you know whensomeone leaves to welcome them back to ASAP.5. Calls during training, and invites to submitProfessors, when starting the online lecture, should always post theinvitation link to the channel chat meeting. Usually, it seems to beoverlooked by most students, but savvier students can use this connection tohop back into a meeting without any involvement from the professors.
Students should not answer telephone calls during the online lecture. Ifsomeone attends a call, they will move somewhere else or log out of thelecture creating huge problems for themselves and their teachers. Instructyour students not to call but instead to send their professor a message.6. Shortcuts keysReduce the mouse faffing time and use a few keyboard shortcuts byallowing them in the menu of the settings.
5.2 Troubleshooting Common Problems
Some common Zoom problems and detail on how they can be fixed:Audio or Webcam does not function.Nothing is frustrating than getting a Zoom call running on your monitorwith completely no or little audio. If the user’s web camera does not showup or it is selected, it still does not work on the Zoom; then the user shouldtry out some of the commonly employed tips.Just before the user enters a call, Zoom provides two choices that the usercan review on the screen that shows a message to the user to get a Zoommeeting ID: Do Not Link to Audio and also Turn Off the video.If the user wants to enter into a call with automatically activated video andaudio, leave those choices unchecked.If the user web camera does not turn on, the first thing they need is to verifythat all webcam related programs that employ webcam are locked. Zoomcannot use the camera or webcam if the user has already provided it inanother program.User can test their video and audio in Zoom by clicking the link for testingmeetings provided in Zoom if their camera or audio still isn't working. Youcan enter the test call on the Zoom application once opened, and followinstructions shown on screen.The user can also pick their webcam by pressing Start Video (the screencould show Stop Video only if they are in-call) if they have entered thewebcam (or just double-check their webcam in the main Zoom app). Theycan then press the arrow icon next to the video camera button and select the“Same as Device” (or user can see Integrated Monitor) or, more precisely,called webcam from the list if the screen is blank.

Screen video settingAlso, the user may want to download again and reinstall the Zoomapplication.The issue may not be due to the Zoom application at all, at times. If the useris on a computer running macOS or Windows 10, the webcam can beblocked. This can be fixed by testing their App permissions to ensure thattheir web browser or Zoom app can use their camera. You may also verifythis configuration directly on the web by restarting their call and makingsure they have clicked Allow when asked about the connection to themicrophone and camera.You can check on Windows to see if their webcam is blocked by searchingfor the webcam in the search box located in the taskbar of the desktop andselecting from the menu the apps that can access your camera.Scroll down, and the user will see a list of applications enabling them to usetheir webcam. They will need to make sure that the toggle for AllowDesktop Apps to access their camera is moved to non-Microsoft Storeapplications. The user may also check for the microphone in the same way,and select Microphone Privacy Settings to do the same.On macOS, in Device Settings, they will need to select Protection andPrivacy, press the lock and enter the password to make adjustments. Fromthe sidebar, users can then push the camera, and check their web browserand Zoom. They will also need to ensure that the microphone box is alsotested.Few laptops also have a physical webcam switch, which has to be activatedto make the webcam work properly. Double-check if you have one, that theusers are in the correct orientation.Echoes while callingAnother common issue with Zoom during a meeting is the audio echo. If,during the user's meeting, they tend to hear audio feedback or echo, thenthere are few potential explanations for the problems.

First and foremost, someone could simultaneously have both machines andtelephone audio enabled. In this situation, the user needs to ask them to quitone manually in place of the other. By pressing the up arrow next to themicrophone icon and selecting Leave Machine Audio, they would eitherhave to leave the audio or hang up the phone call during the ongoingSession.Another reason may be that users with telephone or computer speakers canbe situated nearby. Finally, there may be several machines in the sameconference room with active audio.You will have to ask the two people who are too close to each other to stepapart to overcome one of these other problems. Or simply ask the attendeeor student to leave the audio conference on their computer, or mute audio.Problems with freezing or lagging in Zoom during meetingsUsually, lagging and freezing suggest the issue with the user's internetconnection. Try switching to another place with a more secure connectionwhile on a mobile device to see whether this helps.For a good video chat, you should also strive for good Internet speed. In ateam environment, when talking to several people, you want to strive for adownload speed of 1Mbps and upload speed of approx. 800kbps. Users canalways take a fast internet speed test to verify your current speeds.By also adjusting their Zoom settings, they can be able to boost the videoquality. Disabling HD options, for example, or the Touch Up MyAppearance setting, can decrease the amount of bandwidth their video linktakes (and the overhead on the hardware of your system), which will help inmitigating lagging issues.Problems with screen sharingSharing your screen is a vital part of many Zoom calls, and is as simple andeasy as clicking the bottom of the window on the Share Screen icon.If the user intends to share their screen during a call, they might need toreview a few settings first. Make sure they have a good internet link and arelinked to the call. Sharing the computer takes up substantial bandwidth.Trying a Share Screen meeting first in Zoom, too, is a smart idea. They cando this by unchecking the Start with Video box under the Home section,and then clicking on the down arrow next to the New Meeting option.

Then, their meeting will start with audio conferencing only, freeing up aspecific bandwidth, not automatically turning on their video.If the user is already on a call and needs to share their phone, try turning offtheir video by pressing on the Stop Video button and then selecting theSharing Phone green button.Remote control issues when sharing screensThe person watching the screen will request remote control while sharingthe screen to help the user fix their issues or clarify a process more clearly— under View Options is a method to request remote control while sharingthe screen. If you want to allow remote control, but it does not workproperly, there are a range of potential problems to consider:The sharer does not consent to the request: A message will appear on theirscreen, and they will have to select Allow screens to be shared.The sharer stops the process: Theoretically, by clicking on their mouse, theremote control can be stopped. In practice, people always do somethingbefore the user can do something that ends the remote control session.Often advise people to leave their machines alone when the remote controlis being initiated.It is also entirely possible that they may be on the wrong device: Forexample, iPad and Android devices currently do not allow remote control tobe requested or provided.Zoom Problems of email messagesAnother popular issue is not being able to get emails from Zoom. This willinclude emails to alert and trigger. It typically takes 30 minutes to arriveand can take longer, but if it does not arrive, the user needs to make suretheir email is correctly configured.This is generally not anything on the user's end, so they will need to asktheir IT department to whitelist the IP addresses of Zoom's account. Usercan also search their spam account if they are using a personal email serviceor a Gmail.Problems of crashing with Zoom

If Zoom crashes and closes itself completely, the first step of a user shouldbe to check the Zoom Service Status and down detect to see if their area hasa regional Zoom problem. Often problems with servers or Zoom doingnetwork maintenance can mean the service will go down for a while, andthen the user will have to wait for it to come back up again.If it does not look regional, it is then recommended that the user try Zoom'sweb version instead of the app. As long as the user's internet connection isappropriate, the web version appears to be a little more stable; the app hasproblems.At last, take a peek at the peripheral settings. Often the audio versus videosettings will cause Zoom to get very confused. For example, if you aretrying to use your webcam link as an audio source, it will always crash as aconsequence. Ensure that video connections are routed to your webcam andthat your audio is routed to connected speakers where appropriate.Zoom bombingZoom bombing is the growing fad of entering and disturbing a privatemeeting with everything from porn to blaring music — and even thecourtrooms are not exempt. If a user has been Zoom-bombed in the past,there is one solution that is amazingly successful in preventing it fromhappening again: a passcode requirement.The host who creates the meeting and sends out invites may requireparticipants to enter a passcode to join the meeting, meaning outsiders havetrouble finding ways to drop in.In reality, as of the 2020 May update, the default is set to require apassword, so all users will need to do is change the Zoom to start using thisfeature.If the user is concerned about hacking in more complicated ways, thenZoom has even got that covered. In June 2020, Zoom revealed it would addend-to-end encryption to all meetings and not just paid premium versions tohelp secure content and avoid more advanced Zoom-bombing versions evenwhile the user is using a free account.

Teaching with Zoom: ConclusionThe purpose of this book is to facilitate the teachers and students byassisting them in how to use Zoom applications for online education asphysical classes cannot be conducted due to the global pandemic.This book deals with the history of Zoom, and the brain behind this projectis Eric Yuan. This platform is primarily dedicated to video calling as itallows multiple people in one conference, thus giving a sense of meetingroom. This particular application is available on multiple platforms. It hasdifferent packages depending on the user needs and demands—also, thesubscription cost for the application increases as the limit of participants inone call.The basic equipment needed to use Zoom is to have a webcam,microphone, and computer with internet access. This platform is availableon smartphones, but as this book is for teachers and students, sosmartphones are not an excellent tool to study with. This book acts as aguide on how to download Zoom on different platforms and make anaccount on it. Different features of Zoom are also discussed in variouschapters of the book.Chapter 3 deals with arranging Zoom classes and how teachers can send aninvitation to their students to the classroom so that they do not end upcompromising their education. Chapter 4 deals with the basic etiquettes that the students need to followwhen attending online lectures.It also discusses how they can check their equipment before attending thelecture and how the assignments can be shared using the file-sharing featureof Zoom to revise what they learned.Even students can create presentations on Zoom and deliver them bysharing their PowerPoint presentations through screen sharing option.The last chapter deals with troubleshooting and common problems whileusing Zoom and tips and tricks for students and their professors to makethis application even easier to use. It has student and business-friendlyfeatures.

Thank you for reading my book! If you enjoyed it, I would be very happy ifyou could spend a couple of minutes to leave a review .Thank you so much!
Emily