Online Check-in: Using Quizzes in LMS - Education at UWA
12
Page 1 of 1 Tests are sets of questions that students answer directly in LMS. Quizzes are self-grading, and can be set up to provide automatic feedback. Why use a quiz in LMS? Quizzes work best as a way for you and your students to ‘check in’. For students, they’re a good way to check in on their own learning and make sure they’re staying on top of the course content. For teaching staff, they’re a good way to check in on where the class is at, identify difficult topics or struggling students early, and provide feedback efficiently. Good quizzes are… Short Keep your questions short so they’re straightforward to understand and answer. Keep your quiz short so students stay engaged and complete it all at once. Concrete Quizzes work best for topics with a clear right and wrong answer. While it’s possible to accept and manually mark subjective answers, long-form or reflective activities may be better suited to an [assignment submission] or a [blog or journal]. Low stakes Quizzes take place outside of class, without supervision. They work best as a chance to check in and get feedback, rather than as a major assessment. Varied Maximising your coverage of content and difficulty will make your quiz a more effective learning tool for students and a more effective diagnostic tool for staff. That means using a mix of question types, a mix of difficulty levels, and a mix of question topics. Useful feedback LMS quizzes are self-grading, and can also be set up to provide feedback on specific problem areas automatically. Setting up a quiz Each step is covered in more detail in the linked fact sheet. 1. Plan your questions Make sure you’re covering a range of content and difficulty levels. 2. Set up a quiz You can find quiz tools under Tests, Surveys and Pools in the UWA LMS. 3. Release it to students Remember to set both an opening and closing date for submissions. 4. Complete any manual marking You can view responses in the quiz’s column in the Grade Centre. 5. Analyse student responses Some analysis is possible in Grade Centre, but you can also download responses as a spreadsheet. Quizzes and assessment at UWA Consider how your quiz fits into the assessment for your unit. Quizzes can be used to provide formative assessment – assessment for learning, providing feedback and suggestions for improvement. At UWA, students must receive formative feedback within the first 5 weeks of semester. They can also be used as part of summative assessment – assessment of learning, to feed into students’ final mark. Remember to consider how a quiz might fit into your limit of 2-3 assessment items under the Assessment Policy. For more help using quizzes for good assessment and feedback, contact your Faculty EEU team: Arts, Business, Law & Education [email protected] Engineering & Mathematical Sciences [email protected] Health & Medical Sciences [email protected] Science [email protected]
-
Upload
khangminh22 -
Category
Documents
-
view
9 -
download
0
Transcript of Online Check-in: Using Quizzes in LMS - Education at UWA

Page 1 of 1
Tests are sets of questions that students answer
directly in LMS. Quizzes are self-grading, and can be
set up to provide automatic feedback.
Why use a quiz in LMS? Quizzes work best as a way for you and your students
to ‘check in’.
For students, they’re a good way to check in on their
own learning and make sure they’re staying on top of
the course content.
For teaching staff, they’re a good way to check in on
where the class is at, identify difficult topics or
struggling students early, and provide feedback
efficiently.
Good quizzes are…
Short Keep your questions short so they’re straightforward
to understand and answer. Keep your quiz short so
students stay engaged and complete it all at once.
Concrete Quizzes work best for topics with a clear right and
wrong answer. While it’s possible to accept and
manually mark subjective answers, long-form or
reflective activities may be better suited to an
[assignment submission] or a [blog or journal].
Low stakes Quizzes take place outside of class, without
supervision. They work best as a chance to check in
and get feedback, rather than as a major assessment.
Varied Maximising your coverage of content and difficulty
will make your quiz a more effective learning tool for
students and a more effective diagnostic tool for staff.
That means using a mix of question types, a mix of
difficulty levels, and a mix of question topics.
Useful feedback LMS quizzes are self-grading, and can also be set up
to provide feedback on specific problem areas
automatically.
Setting up a quiz Each step is covered in more detail in the linked fact
sheet.
1. Plan your questions
Make sure you’re covering a range of content
and difficulty levels.
2. Set up a quiz
You can find quiz tools under Tests, Surveys
and Pools in the UWA LMS.
3. Release it to students
Remember to set both an opening and closing
date for submissions.
4. Complete any manual marking
You can view responses in the quiz’s column
in the Grade Centre.
5. Analyse student responses
Some analysis is possible in Grade Centre, but
you can also download responses as a
spreadsheet.
Quizzes and assessment at UWA Consider how your quiz fits into the assessment for
your unit.
Quizzes can be used to provide formative
assessment – assessment for learning, providing
feedback and suggestions for improvement. At UWA,
students must receive formative feedback within the
first 5 weeks of semester.
They can also be used as part of summative
assessment – assessment of learning, to feed into
students’ final mark. Remember to consider how a
quiz might fit into your limit of 2-3 assessment items
under the Assessment Policy.
For more help using quizzes for good assessment
and feedback, contact your Faculty EEU team:
Arts, Business, Law & Education
Engineering & Mathematical Sciences [email protected]
Health & Medical Sciences
Science

Page 1 of 2
This fact sheet aims to help you make your questions
as useful to you and your students as possible, while
still taking advantage of efficient automatic marking
and feedback.
The best way to do this is to plan your questions in
advance, before even opening your LMS page.
Consistency is important… Before you start writing questions, think about how
you want to use quizzes in your unit:
□ Will you be allocating marks for your quiz?
If so, how many marks? It is difficult to enforce
strict rules around online quizzes, so it’s best to
think of them as open-book assessments.
□ How many quizzes?
When will they be due? Whether this is weekly or
per-topic, make sure the due date and time is the
same each time.
□ How many questions per quiz?
Shorter quizzes are easier for students to
complete, but longer quizzes allow you to cover
more content. Whatever you choose, make sure
the marks allocated reflect the effort required.
□ How much time per quiz?
A good rule of thumb allow one minute for an
automatically marked question (multiple choice
or similar) and five minutes for a text answer.
□ How will you be marking your quiz?
Most questions can be marked automatically, but
if you mark manually (e.g. for text-based short
answers) you’ll need a marking key to keep your
marking consistent.
For each of these considerations, we recommend
making your quizzes as consistent as possible. This
makes it easier for both you and your students to stay
up to date with the unit.
…But so is variety. Quizzes need to cover a range of ideas in order to be a
useful learning tool for students and a reliable
diagnostic tool for you.
□ Are you covering every topic or learning
outcome?
□ Are you covering topics at a variety of levels?
Your questions should reflect various levels of
understanding of your key concepts, to help you
and your students know what they need to learn
next. Strategies to help with this include:
o Using common misconceptions as the
‘distractors’ (incorrect answers) to your
questions
o Asking follow-up questions where
students can explain their reasoning for a
previous answer.
□ Are you covering a variety of activity types?
Testing whether students remember facts is a
good start, but quizzes can also test higher order
skills.
o Could you ask students to analyse or
evaluate something using what they’ve
learned? Perhaps a video or article?
o Could they apply their skills or create
something, and answer based on their
result? Perhaps solve a puzzle or game?
(Look into [blooms taxonomy] for more on this
concept.)
Using the planner To help plan your quizzes, try the quiz planner on the
other side of this fact sheet.
Fill out the top once, then make as many copies
(digital or physical) as you need. This helps you be
consistent where you need to be while still getting
good coverage and variety.
For help planning or implementing your quizzes,
contact your Faculty EEU team:
Arts, Business, Law & Education
Engineering & Mathematical Sciences
Health & Medical
Sciences [email protected]
Science

Page 2 of 2
Quiz ___ of ____
Due at the usual date/time of _____ in week _____.
Question Answer Topic/ Outcome
Difficulty level
Activity type
Point value
Time
Total
M401, Hackett Hall
Page 1 of 2
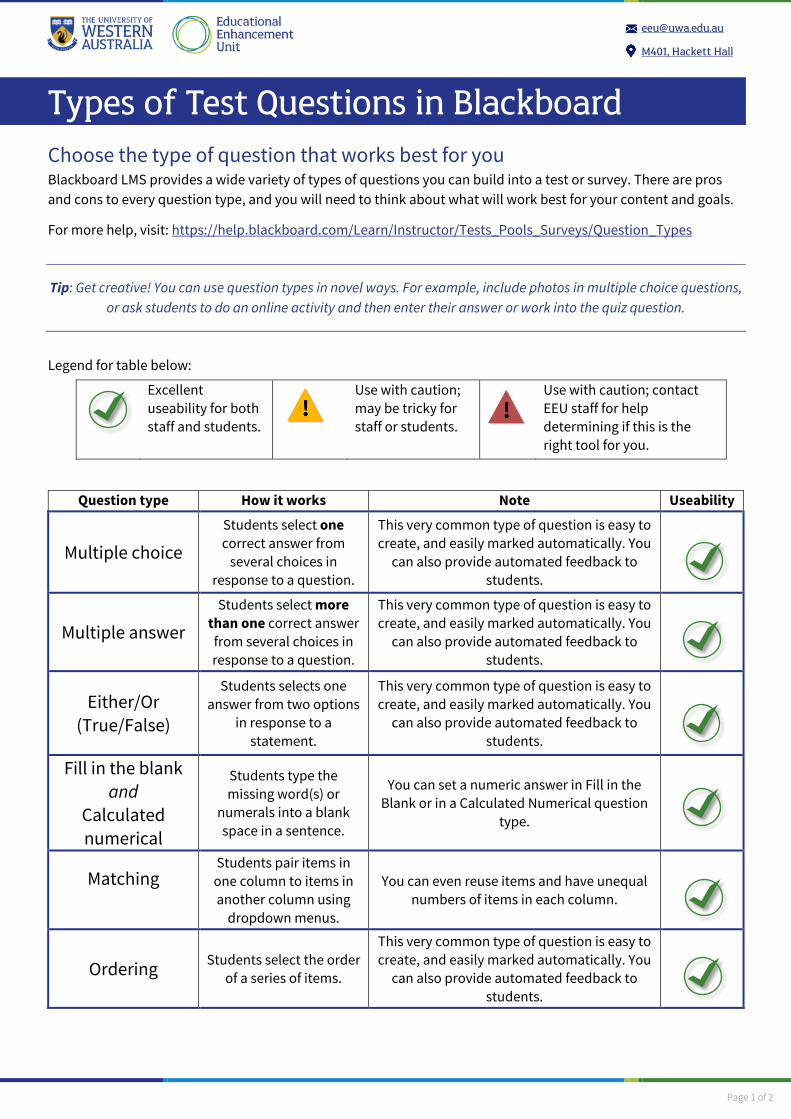
Types of Test Questions in Blackboard Choose the type of question that works best for you Blackboard LMS provides a wide variety of types of questions you can build into a test or survey. There are pros and cons to every question type, and you will need to think about what will work best for your content and goals.
For more help, visit: https://help.blackboard.com/Learn/Instructor/Tests_Pools_Surveys/Question_Types
Tip: Get creative! You can use question types in novel ways. For example, include photos in multiple choice questions, or ask students to do an online activity and then enter their answer or work into the quiz question.
Legend for table below:
Question type How it works Note Useability
Multiple choice Students select one correct answer from
several choices in response to a question.
This very common type of question is easy to create, and easily marked automatically. You
can also provide automated feedback to students.
Multiple answer Students select more
than one correct answer from several choices in response to a question.
This very common type of question is easy to create, and easily marked automatically. You
can also provide automated feedback to students.
Either/Or (True/False)
Students selects one answer from two options
in response to a statement.
This very common type of question is easy to create, and easily marked automatically. You
can also provide automated feedback to students.
Fill in the blank and
Calculated numerical
Students type the missing word(s) or
numerals into a blank space in a sentence.
You can set a numeric answer in Fill in the Blank or in a Calculated Numerical question
type.
Matching Students pair items in
one column to items in another column using
dropdown menus.
You can even reuse items and have unequal numbers of items in each column.
Ordering Students select the order of a series of items.
This very common type of question is easy to create, and easily marked automatically. You
can also provide automated feedback to students.
Excellent useability for both staff and students.
Use with caution; may be tricky for staff or students.
Use with caution; contact EEU staff for help determining if this is the right tool for you.
M401, Hackett Hall
Page 2 of 2
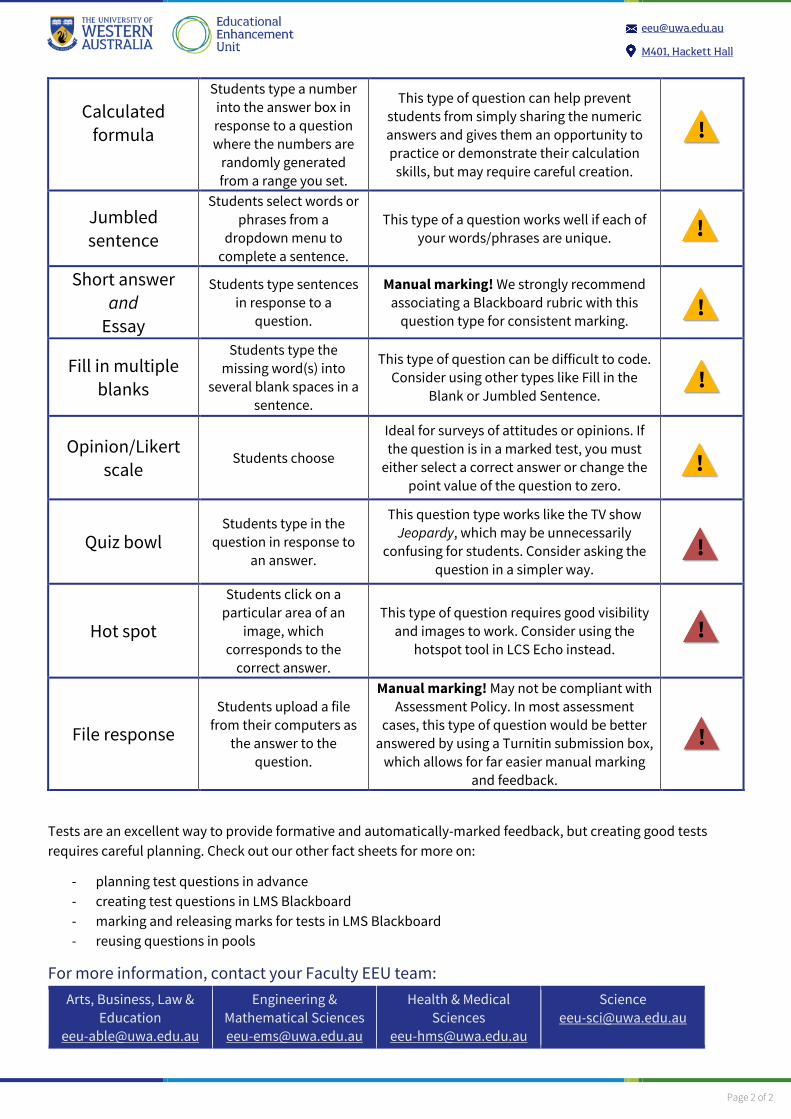
Calculated formula
Students type a number into the answer box in response to a question where the numbers are
randomly generated from a range you set.
This type of question can help prevent students from simply sharing the numeric answers and gives them an opportunity to practice or demonstrate their calculation
skills, but may require careful creation.
Jumbled sentence
Students select words or phrases from a
dropdown menu to complete a sentence.
This type of a question works well if each of your words/phrases are unique.
Short answer and
Essay
Students type sentences in response to a
question.
Manual marking! We strongly recommend associating a Blackboard rubric with this
question type for consistent marking.
Fill in multiple blanks
Students type the missing word(s) into
several blank spaces in a sentence.
This type of question can be difficult to code. Consider using other types like Fill in the
Blank or Jumbled Sentence.
Opinion/Likert scale
Students choose
Ideal for surveys of attitudes or opinions. If the question is in a marked test, you must
either select a correct answer or change the point value of the question to zero.
Quiz bowl Students type in the
question in response to an answer.
This question type works like the TV show Jeopardy, which may be unnecessarily
confusing for students. Consider asking the question in a simpler way.
Hot spot
Students click on a particular area of an
image, which corresponds to the
correct answer.
This type of question requires good visibility and images to work. Consider using the
hotspot tool in LCS Echo instead.
File response Students upload a file
from their computers as the answer to the
question.
Manual marking! May not be compliant with Assessment Policy. In most assessment
cases, this type of question would be better answered by using a Turnitin submission box,
which allows for far easier manual marking and feedback.
Tests are an excellent way to provide formative and automatically-marked feedback, but creating good tests requires careful planning. Check out our other fact sheets for more on:
- planning test questions in advance- creating test questions in LMS Blackboard- marking and releasing marks for tests in LMS Blackboard- reusing questions in pools
For more information, contact your Faculty EEU team: Arts, Business, Law &
Education [email protected]
Engineering & Mathematical Sciences [email protected]
Health & Medical Sciences
Science [email protected]
Page 1 of 2
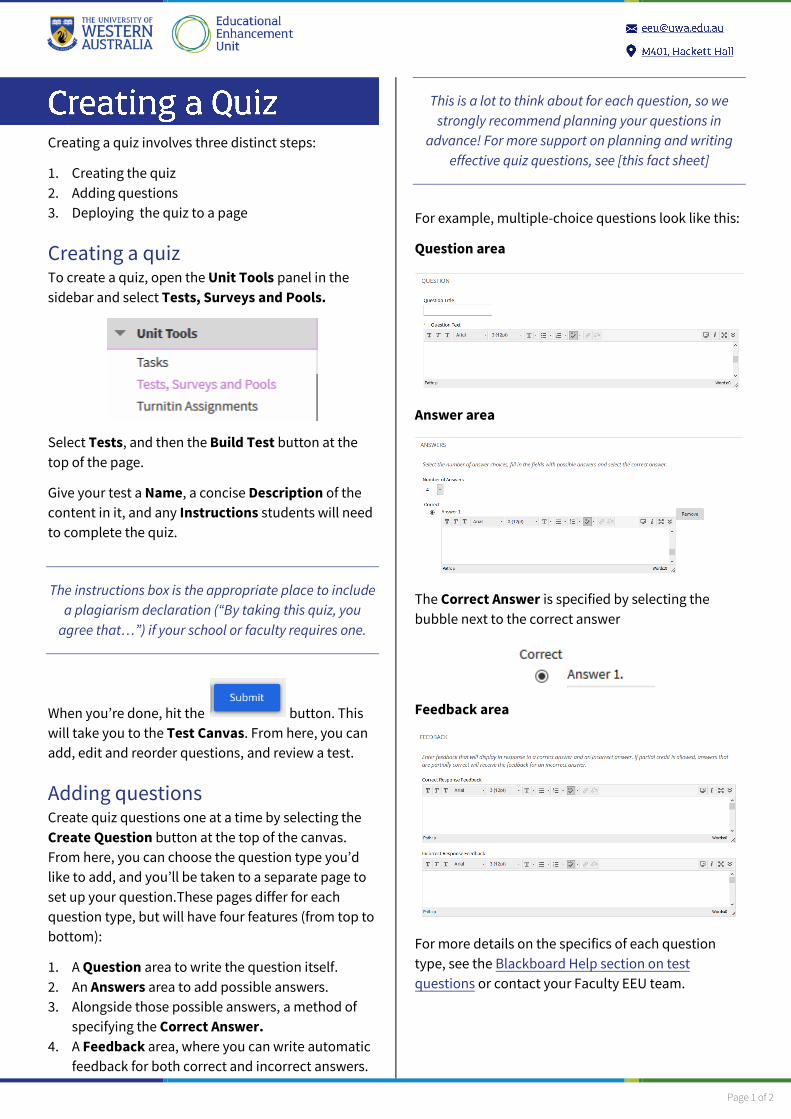
Creating a quiz involves three distinct steps:
1. Creating the quiz
2. Adding questions
3. Deploying the quiz to a page
Creating a quiz To create a quiz, open the Unit Tools panel in the
sidebar and select Tests, Surveys and Pools.
Select Tests, and then the Build Test button at the
top of the page.
Give your test a Name, a concise Description of the
content in it, and any Instructions students will need
to complete the quiz.
The instructions box is the appropriate place to include
a plagiarism declaration (“By taking this quiz, you
agree that…”) if your school or faculty requires one.
When you’re done, hit the button. This
will take you to the Test Canvas. From here, you can
add, edit and reorder questions, and review a test.
Adding questions Create quiz questions one at a time by selecting the
Create Question button at the top of the canvas.
From here, you can choose the question type you’d
like to add, and you’ll be taken to a separate page to
set up your question.These pages differ for each
question type, but will have four features (from top to
bottom):
1. A Question area to write the question itself.
2. An Answers area to add possible answers.
3. Alongside those possible answers, a method of
specifying the Correct Answer.
4. A Feedback area, where you can write automatic
feedback for both correct and incorrect answers.
This is a lot to think about for each question, so we
strongly recommend planning your questions in
advance! For more support on planning and writing
effective quiz questions, see [this fact sheet]
For example, multiple-choice questions look like this:
Question area
Answer area
The Correct Answer is specified by selecting the
bubble next to the correct answer
Feedback area
For more details on the specifics of each question
type, see the Blackboard Help section on test
questions or contact your Faculty EEU team.

Page 2 of 2
For both correct and incorrect answers, feedback
should be encouraging, specific to the question and
topic at hand, and include links or references to
resources (such as lecture recordings or textbook
chapters) where students can go for more information.
When you finish creating a question, click to
save your work, or to create
another question of the same type.
Once you finish creating questions, click the
button on the Test Canvas to save your
quiz and return to the tests page.
Deploying a quiz Before students can see a quiz, it has to be deployed
to a visible page on your LMS unit.
First go to the page where you’d like your students to
access the quiz – maybe you have a folder for quizzes
in your assessments section. Within that page, open
the Assessments menu, and select the Test item.
Choose the test you’d like to add to the page…
And click to deploy the quiz.
Quizzes can only be deployed to one page at a time. If
you don’t see your quiz, it’s probably already
deployed elsewhere in your LMS unit. You can see
where any given test is deployed in the Tests area of
the Tests, Surveys and Pools tool.
Testing & Troubleshooting If you’re having trouble accessing any of the settings
mentioned here, make sure the edit mode switch on
the top right is set to ‘on’.
You can test your quiz by entering Student Preview
mode – click the icon at the top right of your
screen. Make sure that the correct answer is set as
correct for each question, and that the correct
feedback is displayed for each question.
Quizzes won’t be visible to students (including
student preview) until both the page and the quiz
itself are set as available.
Once you’ve set up and tested your quiz, you can set
availability and decide how you want to release
marks and feedback. However, we recommend
building your quiz with these options disabled and
setting them only after your quiz is complete, so you
can test it using Student Preview.
For more on setting availability and releasing marks, contact your Faculty EEU team.
Contact your Faculty EEU Team
Engineering &
Mathematical Sciences
Arts, Business, Law &
Education
Science
Health & Medical Sciences

Page 1 of 2
Releasing a quiz Once you’ve [created a quiz], you need to make it
available to students. Quizzes aren’t visible until:
1. The quiz has been added to a page:
2. That page is visible to students
3. The quiz itself has been set as ‘Available to
students in the Test Options – more on that in
a moment.
Manually releasing a quiz 1. Open the menu next to your test, and
select ‘Edit the Test Options’.
2. Under the ‘Test Availability section, toggle the
‘Make available to students’ option.
3. Click the button at the bottom of
the page to save your changes. Your quiz is
now available to students.
4. To hide a quiz, follow these steps, but set
‘Make available to students’ to ‘No’.
Consider whether you need to close or hide quizzes –
quizzes can be a useful reflection or revision tool for
students. Similarly, consider whether you can allow
multiple submissions for quizzes – this allows students
to use them as a self-assessment tool.
Automatically releasing a quiz You can set quizzes to open and close automatically.
This is can be useful if you have multiple quizzes, each
due at a regular time.
1. Open the menu next to your test, and
select ‘Edit the Test Options’.
2. Under the ‘Test Availability section, set the
dates and times you’d like your quiz to be
visible to students.
3. Click the button at the bottom of
the page to save your changes. Your quiz will
be released and closed automatically.
Late submissions and exceptions
If your quiz is opened and closed automatically, you
may need to add exceptions for students with special
consideration. You can re-open a quiz to certain
students or groups of students using the ‘Test
availability exceptions’ section of the ‘Test Options’
page. This tool allows you to set separate availability
as required for each student in your unit.

Page 2 of 2
If you’d like to allow late submissions, you can set a
Due Date for your quiz. Submissions will still be
accepted after the due date, but will be marked as
Late in the Grade center.
Note that this is a separate setting to quiz
availability. If in doubt, leave this option disabled.
Allowing late submissions can be useful for students to
catch up and self-assess on material they may have
missed, but make sure you clearly communicate how
these will be marked. It may be useful to consult the
University Policy on Assessment on late submissions
Releasing marks and feedback Marks and feedback are visible to students in the ‘My
Grades’ section, and to you in the ‘Grade Centre’
accessible from the sidebar.
Consider whether you need to hide your quiz marks at
all – quizzes work best as formative feedback rather
than summative assessment, and feedback is more
useful if students can access it immediately.
If you do decide to hide your quiz marks and
feedback, make sure you let your students know
when you release it.
All marks and feedback are tied to the quiz’s column
in the Grade Centre. If the column is marked as visible
to students there, their final mark and any feedback
(including correct answers and per-question marks)
will be visible in their My Grades section. Note that
Grade Centre columns are visible by default – this
means that quiz marks are also visible by default
as soon as students submit!
Manually releasing marks & feedback Before students take the quiz, hide the column in the
grade centre.
1. Open the Grade Centre from the sidebar
2. Scroll sideways until you find the column
associated with your quiz.
3. Open the menu next to your test column.
4. Select ‘Hide from students’ from the menu.
5. When the column is hidden, a icon will
appear before the quiz title.
6. Following the same steps, unhide the column
in the grade centre when you’re ready to
release marks
Automatically releasing feedback It’s possible to automatically release per-question
marks and feedback (including correct answers) on a
specific date. This does require the column in the
grade centre to be visible, meaning that students’
overall mark for the quiz will be available upon
completion.
Quiz feedback settings
Visible Hidden
Grade Center Column
Visible Marks and selected feedback
Total marks
only
Hidden None None
These settings can be found under the Quiz Options
page.
For assistance with setting up quizzes in your LMS
unit, contact your Faculty EEU team.
Engineering & Mathematical Sciences [email protected]
Arts, Business, Law & Education
Science
Health & Medical Sciences

Page 1 of 1
There are two ways to mark a quiz:
1. Automatically: student responses are marked by
LMS against correct answers you provide.
2. Manually: student responses are marked by a
human marker against a key you provide.
Automatic marking The easiest way to mark your quizzes is to set the
correct answer when you’re creating your questions.
This setting differs by question type, but is always
found in the Answers section of the question page.
For example: for multiple choice and multiple answer
questions, this is a check box on the left hand side of
the answer:
For more information on setting up correct answers
for specific question types, see the Blackboard Help
system or contact your faculty EEU team.
Manual marking We recommend looking [planning your questions] to
take advantage of automatic marking. However,
some question types, like short answers, cannot be
marked automatically and must be marked manually.
The easiest way to mark these questions is to treat
them as you would automatically marked questions –
decide on the correct answer in advance. Note
down the things that you expect students to write to
get full marks, and decide how many marks each of
those is worth.
You can then provide this marking key in the ‘Correct
Answer’ section in the question setup, where it will
be visible to all markers.
Having a marking key makes marking easier and
fairer if you have a large numbers of students, or
more than one marker. It also ensures you’re
compliant with the University Policy on Assessment.
For more information on efficient, effective marking
and feedback, contact your faculty EEU team:
Arts, Business, Law & Education
Engineering & Mathematical Sciences
Health & Medical
Sciences [email protected]
Science [email protected]
How to manually mark submissions 1. Access the Grade Centre from the sidebar on the
left hand side of your LMS page.
2. Scroll across until you see the Grade Centre
column for your quiz. Submissions that need
marking will be marked with an icon.
3. Hover over the first unmarked item in the column,
and select the button to open the drop-
down menu.
4. Select the unmarked quiz attempt from the drop-
down menu.
5. You will see the student’s entire response,
including automatically marked questions.
Responses that need manual marking will have a
blank score on the right hand side.
6. Enter a mark for the question in this box. You can
also provide written feedback specific to this
question in the box labelled Response Feedback.
7. Once all manual questions are marked, click
to save your feedback and finish, or
to move on to the next response.

Page 1 of 2
The LMS allows you to store test questions in groups
called ‘Pools’. Pools allow you to save and reuse
questions, and also set up quizzes that choose
questions randomly.
You can create questions directly within a pool, copy
questions from existing tests or pools, or upload
questions from a spreadsheet.
Creating a pool To create a pool, open Tests, Surveys and Pools in
the Unit Tools section on the left of your LMS unit.
Select the Pools link. From here, you can create and
modify your pools. To create a new pool, click the
Build Pool button towards the top of the page.
Give your pool a name and a description, and click
the button.
It’s possible to build multiple pools with different
subsets or copies of the same questions. This can be
very useful, but it can also get confusing fast.
Tip: Give your pool a descriptive name and a good
description, and consider planning out your questions
before you build your pool.
Creating questions Creating questions for a pool works the same way as
creating a question for a test.
From the Pool Canvas, open the Create Question
menu, and start by choosing your question type.
Enter your question, your answers, and your
feedback, and hit to save your question to
the pool.
For more detailed instructions on designing and
building questions, check out the other fact sheets in
this series.
Consider setting metadata, like topics or difficulty
levels, for your questions. This makes it easier to find
the question you are looking for when building pools.
Importing questions…
…from another quiz or pool To search your existing tests and pools for questions
to add, open the Find Questions tool from the Pool
Canvas area.
From here, you can browse
through existing tests and pools
and sort questions by type or by
topics and keywords.
Select the questions you’d
like to include in this pool, and
click to include them in
your pool.

Page 2 of 2
…from a spreadsheet Rather than creating your questions one by one, you
can write or copy them into a spreadsheet and upload
them in bulk. To access this feature, choose Upload
Questions from the Pool Canvas.
This feature requires your questions to be in a specific
format. You can view examples and download a
template to fill out on the Blackboard help page.
Using questions from a pool…
…as part of a quiz To search your existing tests and pools for questions
to add, open the Reuse Question menu and choose
Find Questions from the Test Canvas area.
From here, you can browse through existing tests and
pools and sort questions by type or by topics and
keywords. (This works the same as the Find Question
tool in the pool canvas.)
Select the questions you’d like to use, and click
to include them in your test.
By default, Find Questions creates copies of your
questions in your test. Any changes to these questions
won’t be reflected in the original pool. You can choose
to link questions instead, meaning edits in one place
will be reflected everywhere. See Blackboard Help for
more on the difference between copying and linking.
…as part of a random block You can also have the LMS choose a number of
questions at random from your pool to ensure each
student sees a different quiz.
From the Test Canvas, open the Reuse Question
menu and choose Random Block.
Choose a pool and (if required) a question type.
Click to create the random block on your
Test Canvas, and then set the points per question and
number of questions to use out of the block.
You can set more specific criteria and choose specific
questions using the Create Question Set tool, but
these cannot be reused between tests as pools can.
Otherwise, the two tools are fairly similar.
For more support, contact your Faculty EEU team:
Arts, Business, Law &
Education
Engineering &
Mathematical Sciences
Health & Medical Sciences
Science