MX ROTARY RACK OVEN - Mono Equipment
58
FG166 – MXE RevB17 11-04-17 SET UP, OPERATION AND PROGRAMMING INSTRUCTIONS MX ROTARY RACK OVEN ELECTRIC VERSION (STANDARD 45Kw heating and LOW POWER 36Kw heating versions) ECOTOUCH CONTROL FILE 77 Enter Serial No. here.____________________________ In the event of an enquiry please quote this serial number. www.monoequip.com
-
Upload
khangminh22 -
Category
Documents
-
view
1 -
download
0
Transcript of MX ROTARY RACK OVEN - Mono Equipment

FG166 – MXE RevB17 11-04-17
1
SET UP, OPERATION AND PROGRAMMING INSTRUCTIONS
MX ROTARY RACK OVEN
ELECTRIC VERSION (STANDARD 45Kw heating and LOW POWER 36Kw heating versions)
ECOTOUCH CONTROL
FILE 77
Enter Serial No. here.____________________________
In the event of an enquiry please quote this serial number.
www.monoequip.com

FG166 – MXE RevB17 11-04-17
2

FG166 – MXE RevB17 11-04-17
3
CONTENTS
Section - 1.0 Introduction 6 Section - 2.0 Overall Dimensions 7 Section - 3.0 Specifications 8 Section - 4.0 Safety 10 Section - 5.0 Installation 12 Section - 6.0 Isolation 13 Section - 7.0 Cleaning Instructions 14 Section - 8.0 General Maintenance Instructions 15
Section - 9.0 OPERATION 16
9- 1.0 baking using favourites 18 9- 2.0 baking using manual menu 21 9- 3.0 baking using programmes 24 9- 4.0 creating a program 27 9- 5.0 setting 7-day timer 33 9- 6.0 settings 34 9- 7.0 using usb port/stick 41 9- 8.0 diagnostics 44
Section - 10.0 Troubleshooting 45 Setting air slots 46 Section - 11.0 Spares and Services 47 Section - 12.0 Electrical information 48 Section - 13.0 Spares 56
PAGE
FOR SAFE WORKING, PAY SPECIAL ATTENTION TO ITEMS MARKED

FG166 – MXE RevB17 11-04-17
4
Failure to adhere to the cleaning and maintenance
instructions detailed in this booklet could affect the
warranty of this machine.

FG166 – MXE RevB17 11-04-17
5
NOTE
All reference to RIGHT HAND ovens means that the main door is hinged on the right and the control panel is on the left.
All reference to LEFT HAND ovens means that the main door is hinged on the left and the control panel is on the left.
RIGHT HAND

FG166 – MXE RevB17 11-04-17
6
1.0 INTRODUCTION
The MONO MX rotary rack oven is a compact electrically heated oven with a
computerized touch control panel. The oven is designed to accommodate a single
rotating rack of up to eighteen trays capacity.
Ecotouch ovens are supplied with TOUCH displays for user-friendly control panels. This can show pictures of product types or program numbers that have been set by the user. When not being used, the screen can show your company logo. A voice prompt facility is also available for the basic instructions like “Bake over”.
The oven is of stainless steel construction, with easily cleaned interior and exterior
surfaces and smart appearance.
The fan and rack rotator have generously rated, totally enclosed, motors and a
sealed for life gearbox.
The high-speed fan, heating and steam systems give efficient air circulation to
produce a professional bake across a range of products via a diagonal cross-flow
system with efficient air circulation.
The steam system is connected to a standard water supply.
(Pumps are available for very low pressure areas). Steam is generated within the oven chamber by means of a multi-point, water injection cascade. The amount of steam to be generated is controlled by means of a programmable time period on the control panel. No drain is required for the baking and steaming process of this oven. Programmed damper control is provided as part of the programming controls. The oven door incorporates a large glass panel and LED lights to afford an excellent view of the baking progress. To optimise bakery layout the main oven door can be hinged on either side; even if oven is relocated after initial installation.
ECOTOUCH
SCREEN
CONTROLS

FG166 – MXE RevB17 11-04-17
7
2.0 OVERALL DIMENSIONS
1
3
2
4
1. FLUE GAS CONNECTION
(BLANK PLATE ON ELECTRIC OVENS)
2. WATER CONNECTION ¾” BSP
3. POWER CABLE INLET
4. STEAM DIVERTER BOX CONNECTION 10mm DIA.
MAX. RACK DIAGONAL = 885mm
DOOR SWING RADIUS = 790mm

FG166 – MXE RevB17 11-04-17
8
3.0 SPECIFICATIONS Designation: Oven Electrical Power supply: 415V 3ph + N + E 50Hz 47kW – 65amps per phase Low power version 415V 3ph + N + E 50Hz 38kW – 53amps per phase Connection point: See section - Dimensions Mechanical Width/depth/height: See section - Dimensions Maximum tray size: 762mm (30”) x 457mm (18”) Air circulation: Radial fan driven by electric powered motor – 1.5kW Steam system: Mass energy storage, no drain Rack rotation: Electric powered motor/gearbox (0.18kW) driven via belt drive Hanger inside baking chamber No materials containing asbestos have used in the construction of this oven. Heating system Fuel: electricity output,: 45kW (15 elements of 3kW) Low power version - 36kW (12 elements of 3kW)
Flue system Flue connection: See section - Dimensions
Rack rotation The rack hanger is driven by an electric motor situated on the mid left-hand side of the oven roof. Power transmission to the rack-hanger’s central drive shaft is by means of a single tensioned V-belt that affords slippage of the transmission in the event of a blockage to rack rotation. Air circulation system An electrically powered radial fan re-circulates air within the oven. Heated air enters the fan at the upper left-hand side of the oven and is driven within the roof structure to the vertically orientated air door at the rear corner of the baking chamber. Adjustable openings in the air door allow the amount of air entering the baking chamber at various heights to be adjusted to get the optimum baking result. The air door openings are set at the factory and should not require resetting. The factory settings are given in section – Setting the Air Slots for reference. Should these factory setting fail to give a satisfactory baking performance then instructions for adjusting the openings are given.

FG166 – MXE RevB17 11-04-17
9
Steam system The steam generating system is completely contained within the oven and situated at its left hand side in the lowermost region of the air duct, outside of the baking chamber. Only cold water, at a pressure of 4 – 6 bar (58 – 87 PSI), needs to be connected to the oven for the purpose of steam generation. From a cold oven start the steam system will typically require 20 minutes to accumulate sufficient energy to produce satisfactory steaming performance; and during repeated baking cycles it automatically re-energises itself during the bake cycle. No drain is required for the steam system. Under normal conditions of use this oven is not considered a pressure vessel. Heating System Heat is transferred to the baking chamber through the interaction of re-circulating air passing over the hot surfaces of the heating elements. Electrical connection The oven is fitted with built-in automatic fuses, situated in the uppermost region of the compartment behind the control door. The fuses are marked and can be accessed when the control door is opened. Ventilation To ensure the correct operation of the roof-mounted components the ambient temperature should not exceed 50ºC. The oven requires zero clearance on left, right and rear vertical faces for operation or maintenance. Extraction Airborne emissions from the baking process, such as steam, oil, etc., will be discharged from the overpressure duct and the damper duct; both situated at roof level towards the front of the oven. Discharge will also occur from the front of the oven upon opening the door at the end of a bake. See also section – Installation. Noise Emission of airborne noise is less than 70dB
FG166 – MXE RevB17 11-04-17
10
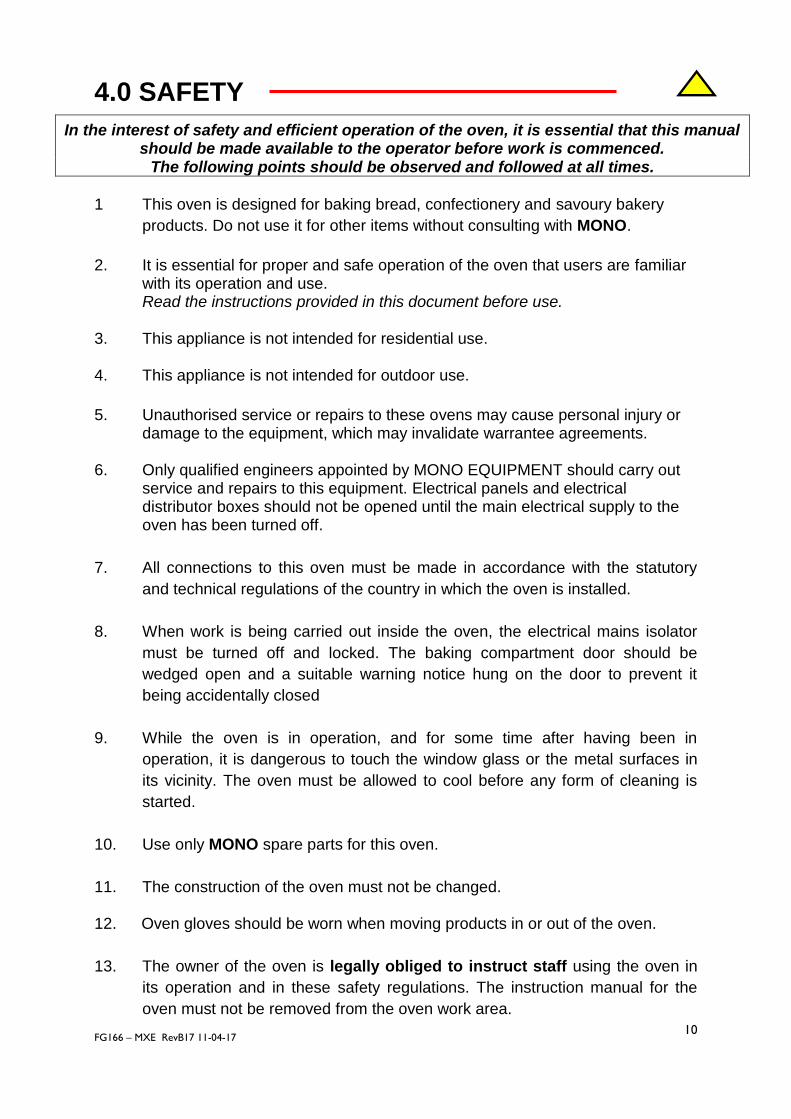
4.0 SAFETY
1 This oven is designed for baking bread, confectionery and savoury bakery
products. Do not use it for other items without consulting with MONO.
2. It is essential for proper and safe operation of the oven that users are familiar
with its operation and use. Read the instructions provided in this document before use.
3. This appliance is not intended for residential use. 4. This appliance is not intended for outdoor use.
5. Unauthorised service or repairs to these ovens may cause personal injury or
damage to the equipment, which may invalidate warrantee agreements. 6. Only qualified engineers appointed by MONO EQUIPMENT should carry out
service and repairs to this equipment. Electrical panels and electrical distributor boxes should not be opened until the main electrical supply to the oven has been turned off.
7. All connections to this oven must be made in accordance with the statutory
and technical regulations of the country in which the oven is installed.
8. When work is being carried out inside the oven, the electrical mains isolator
must be turned off and locked. The baking compartment door should be
wedged open and a suitable warning notice hung on the door to prevent it
being accidentally closed
9. While the oven is in operation, and for some time after having been in
operation, it is dangerous to touch the window glass or the metal surfaces in
its vicinity. The oven must be allowed to cool before any form of cleaning is
started.
10. Use only MONO spare parts for this oven.
11. The construction of the oven must not be changed. 12. Oven gloves should be worn when moving products in or out of the oven.
13. The owner of the oven is legally obliged to instruct staff using the oven in
its operation and in these safety regulations. The instruction manual for the
oven must not be removed from the oven work area.
In the interest of safety and efficient operation of the oven, it is essential that this manual should be made available to the operator before work is commenced.
The following points should be observed and followed at all times.
FG166 – MXE RevB17 11-04-17
11
14. Moving parts remain unguarded on the oven roof as this area is out of reach of
the operator and therefore deemed safe. Care must be taken to avoid these motorised parts when maintenance tasks are performed.
18. Unless trays/containers for the purpose of holding the oven products are
supplied with the oven by the manufacturer, it is the responsibility of the customer to ensure that the nature and surface conditions of materials likely to come into contact with food shall be such that they cannot contaminate or spoil the food.
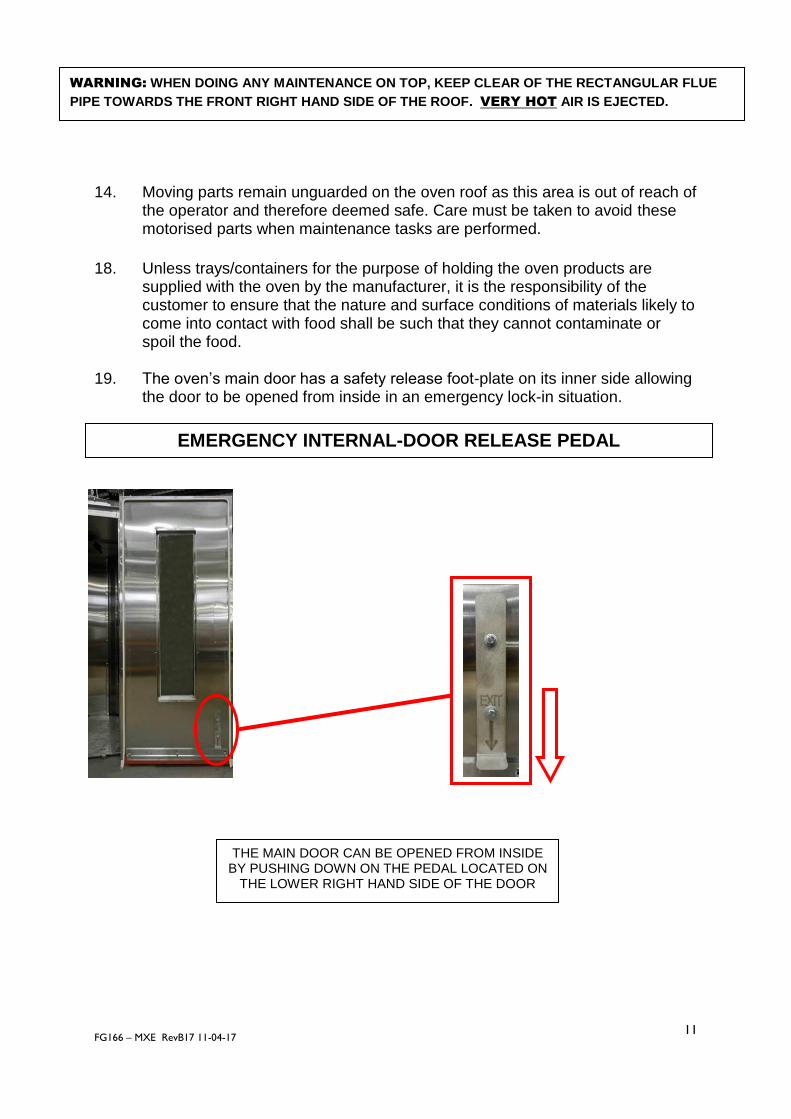
19. The oven’s main door has a safety release foot-plate on its inner side allowing
the door to be opened from inside in an emergency lock-in situation.
WARNING: WHEN DOING ANY MAINTENANCE ON TOP, KEEP CLEAR OF THE RECTANGULAR FLUE
PIPE TOWARDS THE FRONT RIGHT HAND SIDE OF THE ROOF. VERY HOT AIR IS EJECTED.
EMERGENCY INTERNAL-DOOR RELEASE PEDAL
THE MAIN DOOR CAN BE OPENED FROM INSIDE BY PUSHING DOWN ON THE PEDAL LOCATED ON
THE LOWER RIGHT HAND SIDE OF THE DOOR

FG166 – MXE RevB17 11-04-17
12
5.0 INSTALLATION
1 The MONO MXE oven is designed to operate as a freestanding unit, and must
not be bolted down or fixed to the floor in any way.
2 The concrete floor beneath the oven must be smooth, flat and clear of any
obstructions, and must be at least 150mm (6") thick.
3 The foundation must be flush with the overall bakery floor because racks are
wheeled up a ramp (supplied with the oven) into the baking chamber.
4 A minimum headroom clearance of 3 metres (180") between the floor and the
bakery ceiling must be maintained at all times.
5 WATER SUPPLY
The water supply to the oven shall be fitted with protective means against backflow in the water supply and installed according to the national regulations in force. Customers in hard water areas must ensure that an efficient water treatment device protects the supply to the oven. It is the customers’ responsibility to install and maintain an adequate water supply to the oven, which should comply with local water regulations. Connect to a suitable water supply, making sure that the pipes are flushed out to remove all foreign bodies i.e. flux or solder. NOTE Set up of the pressure regulator should not be required as it is factory set to the optimum setting to provide the best steam during a bake.
7. Oven evacuation --- Canopy/Hood It is recommended that evacuation of the oven baking chamber products is achieved with a hood covering the entire oven top and projecting beyond the front of the oven by 600mm. the extraction rate from the hood should be approximately 1700m3/h. The customer is responsible for providing adequate levels of make-up air if an extraction hood is fitted.

FG166 – MXE RevB17 11-04-17
13
6.0 ISOLATION In case of an emergency, switch oven off at mains electrical isolator switch.
NOTE: IF WORKING ON ELECTRICAL BOX AND PANEL, ensure oven is
DISCONNECTED from CONSUMER POWER SUPPLY.
NOT ONLY OVEN ISOLATOR ABOVE, AS SOME PARTS STAY LIVE AFTER ISOLATOR SWITCH IS OPERATED
MAINS ELECTRICAL ISOLATOR SWITCH

FG166 – MXE RevB17 11-04-17
14
7.0 CLEANING INSTRUCTIONS
Caution Do not use high-pressure equipment to clean the oven.
The oven has been designed with sealed components, which are used
wherever possible. The minimum of routine cleaning is required, but it is
essential that it be properly and regularly carried out.
1. Sweep out debris from the oven floor daily.
2. Clean up spillages of product on the oven floor.
3. Wipe off splashes on door window.
Do not use alkaline or abrasive detergents when cleaning the oven. Do not use detergents on the control panel overlay – wipe with a damp cloth only.
Note: Buildup of spillages may result caused by incorrectly placed racks. Also
check for damage to door seals, particularly if operators are careless with rack
handling.
WATER FILTER Water to the steam system passes through a filter situated in the lower region behind the control door.
The filter must be cleaned at regular intervals as follows:
1. Turn off water supply at main tap. 2. Unscrew filter and clean it. 3. Replace and secure filter after cleaning. 4. Turn water supply back on and check for leaks.

FG166 – MXE RevB17 11-04-17
15
8.0 GENERAL MAINTENANCE To maintain the warranty conditions, the oven must undergo service at specific intervals. Below is the service program with the given intervals:
Every 3 months
Lubrication: Door lock Heat resistant grease
Every 12 months
Check/adjust: Door lock mechanism Internal door release mechanism Lighting, including cables Damper function Drive belt tension Limit positions Water connection tightness Solenoid valve operation Rack hanger bearing Function check Chamber temperature calibration
Lighting If the lighting in the door fails to operate, contact the Mono service dept. It cannot be replaced by the user.

FG166 – MXE RevB17 11-04-17
16
Section 9
TOUCH SCREEN OPERATING INSTRUCTIONS

FG166 – MXE RevB17 11-04-17
17
TOUCH THE SCREEN ON THE AREA YOU
REQUIRE TO ACTIVATE
BASIC OPERATION
ALL OPERATIONS ARE ACTIVATED BY TOUCHING AREAS ON THE SCREEN, WHICH WILL PASS YOU ON TO THE NEXT INFORMATION PANEL.
DO NOT USE EXCESSIVE FORCE. (THE PRESSURE REQUIRED TO OPERATE THE PANEL CAN BE ALTERED IN THE SETTINGS SECTION)
STANDBY THE OVEN TURNS OFF.
TOUCH THE SCREEN TO GO TO THE OPTION SCREEN.
SLEEP THE OVEN STAYS AT 100c AND
HEATS TO LAST PROGRAM TEMPERATURE WHEN THE
SCREEN IS TOUCHED. OPTION SCREEN THEN SHOWS.

FG166 – MXE RevB17 11-04-17
18
9 -1 BAKING USING FAVOURITES MENU
TOUCH TO OPEN THE FAVOURITES SELECT SCREEN
TOUCH THE NAME OF THE
PRODUCT REQUIRED
TOUCH THE “FULL LOAD” OR “HALF LOAD” AS
REQUIRED
TO RETURN TO THE PREVIOUS SCREEN TOUCH THE “BACK”
BUTTON AT ANY TIME
1
2
3
OPTION SCREEN
SELECT SCREEN
LOAD SCREEN

FG166 – MXE RevB17 11-04-17
19
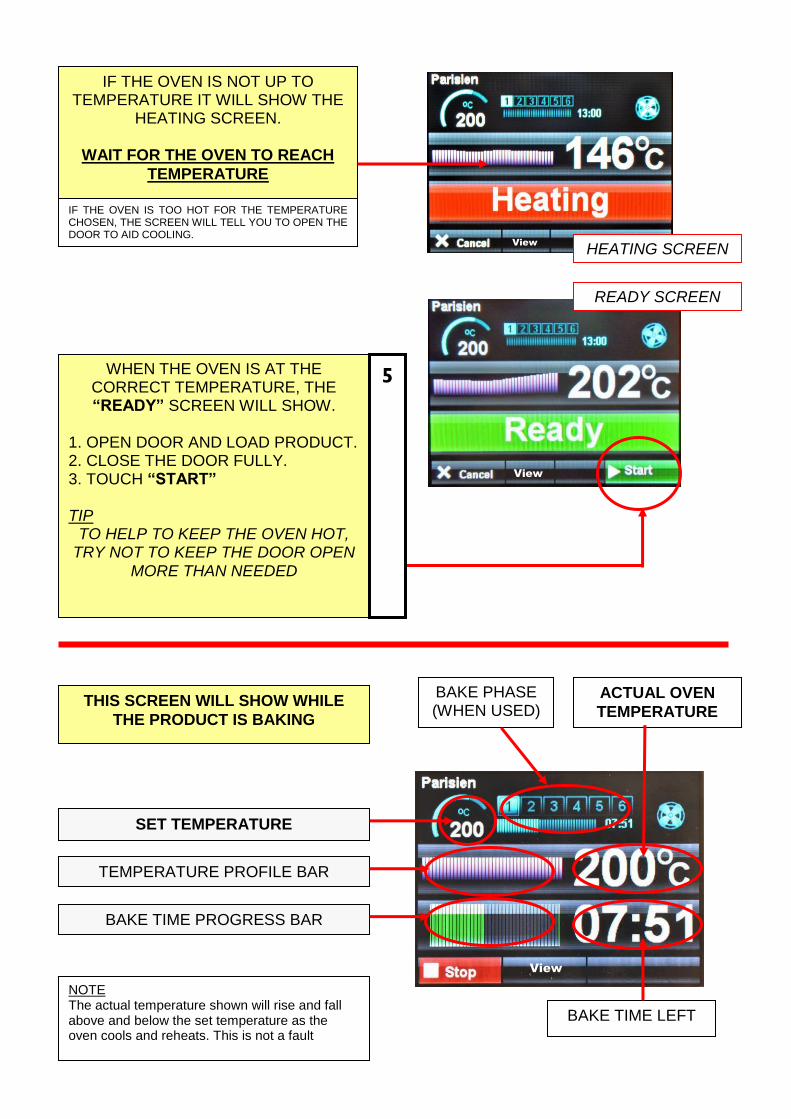
IF THE OVEN IS NOT UP TO TEMPERATURE IT WILL SHOW THE
HEATING SCREEN.
WAIT FOR THE OVEN TO REACH
TEMPERATURE
WHEN OVEN IS AT THE CORRECT TEMPERATURE THE “READY”
SCREEN WILL SHOW.
1. OPEN DOOR AND LOAD PRODUCT. 2. CLOSE THE DOOR FULLY. 3. TOUCH “START”
TIP
TO HELP TO KEEP THE OVEN HOT, TRY NOT TO KEEP THE DOOR OPEN
MORE THAN NEEDED
BAKE IN PROGRESS SCREEN
THIS SCREEN WILL SHOW WHILE
THE PRODUCT IS BAKING
SET TEMPERATURE
TEMPERATURE PROFILE BAR
BAKE TIME PROGRESS BAR
BAKE TIME LEFT
ACTUAL OVEN
TEMPERATURE
BAKE PHASE (WHEN USED)
4
HEATING SCREEN
READY SCREEN
IF THE OVEN IS TOO HOT FOR THE TEMPERATURE CHOSEN, THE SCREEN WILL TELL YOU TO OPEN THE DOOR TO AID COOLING.
View
View
View NOTE The actual temperature shown will rise and fall above and below the set temperature as the oven cools and reheats. This is not a fault

FG166 – MXE RevB17 11-04-17
20
TOUCHING “VIEW” BUTTON DURING A BAKE
TOUCHING “VIEW” BUTTON DURING A BAKE WILL SHOW THE SETTINGS FOR THE BAKE IN PROGRESS. TOUCH “CANCEL” TO GO BACK TO THE PREVIOUS SCREEN.
5
BAKE OVER SCREEN
VIEW SCREEN
AT THE END OF THE BAKE TIME A SOUNDER WILL BE HEARD AND
“BAKE OVER” WILL FLASH. TOUCH “STOP” AND OPEN THE
DOOR TO REMOVE THE PRODUCT.
TO KEEP THE OVEN BAKING FOR EXTRA MINUTES
THE “+ 10 MIN” BUTTON CAN BE TOUCHED.
(THIS TIME CAN BE ALTERED IN SET UP)
View
View
View

FG166 – MXE RevB17 11-04-17
21
9 - 2 BAKING USING MANUAL MENU
TOUCH TO OPEN MANUAL BAKE
SCREEN
1
OPTION SCREEN
MANUAL BAKE SCREEN
SET BAKE TEMPERATURE TOUCH TEMPERATURE ON THE
SCREEN TO ACTIVATE THE KEYBOARD SCREEN.
KEY IN REQUIRED TEMPERATURE AND PRESS “DONE”
2 3 SET BAKE TIME
TOUCH TIME ON THE SCREEN TO ACTIVATE THE KEYBOARD SCREEN.
KEY IN REQUIRED TIME AND
TOUCH “DONE”
SET BAKE TIME AND TEMPERATURE
NOTE:
TIME DOES NOT HAVE TO BE SET IN MANUAL MODE. (ONLY TEMPERATURE) WHEN START IS PRESSED, THE TIME WILL COUNT UP INSTEAD OF DOWN.
TOUCH STOP TO FINISH BAKE.

FG166 – MXE RevB17 11-04-17
22
MANUAL BAKE SCREEN 2
STEAM
TOUCH AND HOLD FOR THE TIME (SECONDS) STEAM IS REQUIRED.
(THIS CAN BE USED BEFORE OR DURING THE BAKE)
DAMPER TOUCH TO OPEN THE DAMPER.
(SYMBOL IS GREEN)
TOUCH TO CLOSE THE DAMPER. (SYMBOL IS RED)
CANCEL TOUCH AT ANYTIME TO
GO BACK TO THE SETTING SCREEN.
4 5
START TOUCH “START” TO START
BAKE
6
USE STEAM TIME AND DAMPER IF REQUIRED
TOUCH “STOP” WHEN END
OF BAKE BUZZER SOUNDS OR WHEN REQUIRED IF NO
TIME WAS ENTERED
7

FG166 – MXE RevB17 11-04-17
23
SAVE SETTINGS IF NO TIME WAS ENTERED AT THE START OF THE
BAKE, WHEN STOP IS TOUCHED “SAVE” WILL APPEAR AT THE BOTTOM OF THE SCREEN. “SAVE”CAN BE TOUCHED AND AN OPTION
SCREEN WILL APPEAR.
TOUCH “ADD TO FAVOURITES” OR “SAVE AS”
USE KEYBOARD TO TYPE THE REQUIRED NAME AND TOUCH “SAVE”
NOTE: In manual mode, only one operation of the steam or damper is saved.
SAVE MANUAL PROGRAM, IF REQUIRED
7
MANUAL BAKE SCREEN 3

FG166 – MXE RevB17 11-04-17
24
9 - 3 BAKING USING PROGRAMMES MENU
TOUCH TO OPEN “CATEGORY” or
“PROGRAM CHOICE” SCREEN
TOUCH THE NAME OR NUMBER OF
THE PRODUCT REQUIRED
TOUCH THE “FULL LOAD” OR “HALF LOAD” AS
REQUIRED
TOUCH THE “BACK” BUTTON AT ANY TIME TO RETURN TO THE PREVIOUS SCREEN
1
3
4
OPTION SCREEN
LOAD SCREEN
TOUCH THE TYPE OF PRODUCT OR PROGRAM RANGE CHOICE WANTED AND “SELECT” SCREEN
OPENS
2
CATEGORY SCREEN
MORE SCREENS
SCROLL DOWN FOR MORE PRODUCTS IF AVAILABLE
PROGRAM CHOICE SCREEN
NOTE : THIS COVERS TWO VERSIONS OF FIRMWARE. (THE OVEN CAN BE PRE-SET TO SHOW ONLY ONE OF THEM).
1. PICTORIAL VERSION SHOWS CHOICES OF PRODUCT CATERGORIES
2. NUMERICAL VERSION SHOWS RANGES OF PROGRAM NUMBERS.
OR
OR
SELECT SCREEN
PICTORIAL NUMERICAL
FG166 – MXE RevB17 11-04-17
25
IF THE OVEN IS NOT UP TO TEMPERATURE IT WILL SHOW THE
HEATING SCREEN.
WAIT FOR THE OVEN TO REACH
TEMPERATURE
WHEN THE OVEN IS AT THE CORRECT TEMPERATURE, THE “READY” SCREEN WILL SHOW.
1. OPEN DOOR AND LOAD PRODUCT. 2. CLOSE THE DOOR FULLY. 3. TOUCH “START”
TIP
TO HELP TO KEEP THE OVEN HOT, TRY NOT TO KEEP THE DOOR OPEN
MORE THAN NEEDED
THIS SCREEN WILL SHOW WHILE
THE PRODUCT IS BAKING
SET TEMPERATURE
TEMPERATURE PROFILE BAR
BAKE TIME PROGRESS BAR
BAKE TIME LEFT
ACTUAL OVEN
TEMPERATURE
BAKE PHASE (WHEN USED)
5
HEATING SCREEN
READY SCREEN
IF THE OVEN IS TOO HOT FOR THE TEMPERATURE CHOSEN, THE SCREEN WILL TELL YOU TO OPEN THE DOOR TO AID COOLING.
View
View
View
NOTE The actual temperature shown will rise and fall above and below the set temperature as the oven cools and reheats. This is not a fault

FG166 – MXE RevB17 11-04-17
26
AT THE END OF THE BAKE TIME A SOUNDER WILL BE HEARD AND “BAKE
OVER” WILL FLASH. TOUCH “STOP” AND OPEN THE DOOR TO
REMOVE THE PRODUCT.
TO KEEP THE OVEN BAKING FOR EXTRA MINUTES
THE “+ 10 MIN” BUTTON CAN BE TOUCHED.
(THIS TIME CAN BE ALTERED IN SET UP)
TOUCHING “VIEW” BUTTON DURING BAKE
TOUCHING “VIEW” BUTTON DURING BAKE WILL SHOW THE SETTINGS FOR THE BAKE IN PROGRESS. TOUCH “CANCEL” TO GO BACK TO THE PREVIOUS SCREEN.
6
BAKE OVER SCREEN
VIEW SCREEN
View
View

FG166 – MXE RevB17 11-04-17
27
"
9 - 4 CREATING A PROGRAM
TOUCH TO OPEN “CATEGORY”
SCREEN
1
OPTION SCREEN
TOUCH THE TYPE OF PRODUCT
WANTED AND THE “SELECT” SCREEN
OPENS
2
CATEGORY SCREEN
SELECT SCREEN
TOUCH THE DOWN ARROW UNTIL A BLANK PROGRAM
IS REACHED.
TOUCH “I” BUTTON NEXT TO THE BLANK PROGRAM TO OPEN
NEXT SCREEN
3
4

FG166 – MXE RevB17 11-04-17
28
TOUCH OPTION TO GO TO PASS CODE SCREEN
6
ENTER “SUPERVISOR” PASS CODE AND THEN TOUCH OK.
(DEFAULT CODE = 123456)
5
INFORMATION SCREEN
PASS CODE SCREEN

FG166 – MXE RevB17 11-04-17
29
7 TOUCH “CHANGE PRODUCT”
INCREASE
DECREASE
OR USE KEYS
ENTER AMOUNT REQUIRED AND TOUCH DONE
8 TOUCH EACH ITEM AND CHANGE THE VALUE BY USING THE UP AND DOWN KEYS OR BY USING THE KEY PAD.
TOUCH “FULL LOAD” TO CHANGE TO “HALF LOAD” SETTINGS IF REQUIRED.
TOUCH AGAIN TO GO BACK TO “FULL LOAD”
TOUCH “SAVE” WHEN SATISFIED WITH THE SETTINGS OF EACH LOAD TYPE.
OPTION SCREEN
VALUE CHANGE SCREEN
BAKE PHASE (IF REQUIRED)
POWER LEVEL
LOAD TYPE
CHANGE PRODUCT

FG166 – MXE RevB17 11-04-17
30
9 TOUCH “CHANGE TRAY LAYOUT”
OPTION SCREEN
INCREASE VALUE
DECREASE VALUE
TOUCH TO ADJUST NUMBER OF PRODUCTS
ACROSS THE TRAY
TOUCH TO ADJUST NUMBER OF PRODUCTS
DOWN THE TRAY
WHEN SATISFIED WITH THE TRAY LAYOUT TOUCH SAVE TO RETURN TO
THE “OPTIONS” SCREEN
CHANGE TRAY LAYOUT
10
W
D

FG166 – MXE RevB17 11-04-17
31
11 TOUCH “SAVE AS”
12 TYPE IN THE NEW NAME AND TOUCH “SAVE”
OPTION SCREEN
KEYBOARD SCREEN
SAVE

FG166 – MXE RevB17 11-04-17
32
ADD A PRODUCT TO THE FAVOURITES LIST
TOUCH THE TYPE OF PRODUCT WANTED AND THE “SELECT”
SCREEN OPENS
1
CATEGORY SCREEN
OPTION SCREEN
SELECT SCREEN
TOUCH THE “i” (INFORMATION)
BUTTON NEXT TO THE PRODUCT YOU WANT
AS A FAVOURITE. THIS OPENS THE OPTION SCREEN
2
TOUCH “ADD TO FAVOURITES”
THE PRODUCT WILL NOW SHOW ON THE
FAVOURITES LIST
3

FG166 – MXE RevB17 11-04-17
33
9 - 5 SETTING 7–DAY TIMER
TOUCH TO OPEN “7-DAY TIMER”
SCREEN
1
OPTION SCREEN
TIMER SETUP SCREEN
CHOOSE DAY
SET “ON” TIME
SET “OFF” TIME
INCREASE VALUE
DECREASE VALUE
NOTE Up to four on/off times can be set for each day. Touch “clear” to clear the settings on the day shown. Touch “save” to activate the times set.
2
3 4

FG166 – MXE RevB17 11-04-17
34
9 - 6 SETTINGS
TOUCH TO OPEN THE “SETTINGS”
SCREEN
OPTION SCREEN
1
ENTER “SUPERVISOR” PASS CODE AND THEN PRESS OK.
(DEFAULT CODE = 123456)
PASS CODE SCREEN
2 CHOOSE THE SETTING TO ALTER
SETTINGS SCREEN

FG166 – MXE RevB17 11-04-17
35
TIME AND DATE
1 TOUCH THE SCREEN TO HIGHLIGHT THE ITEM TO CHANGE
INCREASE
DECREASE
WHEN ALL INFORMATION IS CORRECT, TOUCH “SAVE”.
THIS WILL RETURN TO THE SETTINGS SCREEN
3
SETTINGS SCREEN
TIME AND DATE SCREEN
USE THE INCREASE / DECREASE BUTTONS TO ALTER THE SETTINGS
2

FG166 – MXE RevB17 11-04-17
36
OVEN SETTINGS (GENERAL)
SETTINGS SCREEN
TOUCH “GENERAL SETTINGS” AND THE FOLLOWING SCREEN WILL APPEAR.
SCROLL DOWN TO MOVE THROUGH ALL CHOICES AND ADJUST EACH ONE AS REQUIRED, USING THE ARROW KEYS.
SELECT WALLPAPER. TOUCH “BACK” TO CONFIRM

FG166 – MXE RevB17 11-04-17
37
OVEN SETTINGS EXPLAINED - GENERAL LEVEL
SCREEN BRIGHTNESS – Adjusts the brightness of the viewing screen for user comfort. TOUCHSCREEN SENSITIVITY – Adjusts the pressure required to operate the touch screen. (5 settings)
TEMPERATURE UNIT OF MEASURE – Centigrade (Celsius) or Fahrenheit
BAKE EXTENSION (mins) – Adjusts the extra time at the end of a bake for each “extra time” button touch. (10mins max)
BAKE START ON DOOR CLOSE – This will start the set bake program as soon as the door closes. SLEEP MODE DELAY – Oven will go into sleep mode after the set minutes, providing it is up to temperature and has been through at least one bake cycle.
8 HOUR COUNTDOWN TIMER – After 8 hours the oven gives a warning and then turns off. Touch any button for an extra hour if required.
POWER LEVEL (1-4) – Set these as required for each level to be used.
CHART INTERVAL – Time interval in seconds that the bars show on the heat and bake time progress charts.
SOUNDER SELECT – Set as external or onboard.
SOUNDER TONE – Select a tone – Voice or Off
SOUNDER VOLUME – Adjust to suit the volume required. (onboard sounder only)
SHORTCUT BUTTONS – 1 fn 2 fn 3 fn 4 fn 5 fn
Gives the choice of what buttons are active and in which order they appear on the options screen. Options available = Favourites, Programs, Manual bake, Multi bake, 7-day timer . (Settings at 6fn cannot be changed)

FG166 – MXE RevB17 11-04-17
38
``````````````````````````OVEN SETTINGS (HIGH LEVEL)
SETTINGS SCREEN TOUCH “HIGH LEVEL SETTINGS” AND THE FOLLOWING SCREEN WILL
APPEAR.
ENTER “HIGH LEVEL” PASS CODE AND THEN TOUCH OK.
THE FOLLOWING SCREEN WILL APPEAR.
CHANGE SUPERVISOR PASSWORD HERE
CHANGE HIGH LEVEL PASSWORD HERE
RESTORES ALL SCREENS BACK TO ORIGINAL DEFAULT
SETTINGS (NOT PASSCODES)
SCROLL DOWN TO MOVE THROUGH ALL CHOICES AND ADJUST EACH ONE AS REQUIRED,
USING THE ARROW KEYS.
1
2
3

FG166 – MXE RevB17 11-04-17
39
OVEN SETTINGS EXPLAINED - HIGH LEVEL OVEN TYPE – Set this to MX. MAX. BAKE TEMPERATURE – Can be set up to 300C , (depending on the oven type) TEMPERATURE OFFSET – Can be used to adjust the display to the actual temperature in the oven. BAKE HYSTERISIS – Sets bake temperature cycling around a set point. (Above and below). SLEEP FALLBACK – Temperature of the oven in “sleep mode” (100C is suggested). SLEEP HYSTERISIS – Sets “sleep mode” temperature cycling around a set point. (Above and below). READY ACCEPT HIGH – Highest temperature for the oven to display “READY” READY ACCEPT LOW – Lowest temperature for the oven to display “READY” FAN DELAY AFTER STEAM – Delay before fan starts after the oven has steamed. (60 seconds max) LIGHT OUTPUT SOFT START – On/Off Some lights need this for cold start up to stop them blowing. AUTO FAN CYCLE TIME (MINS) – Set time required.Only used in manual and multibake modes. AUTO FAN DWELL TIME – Set time required.Only used in manual and multibake modes. HEATER CONTROL – Contactor or solid state. Defaults to contactor. (solid state not used at the moment) I/O DIAGNOSTIC – Displays outputs and inputs at the top of the screen to aid fault finding if needed.

FG166 – MXE RevB17 11-04-17
40
SUPERVISOR (LOW LEVEL) -- 123456
HIGH LEVEL -- 654321 MASTER -- 314159 (This is fixed)
DEFAULT PASSCODES
SUGGESTION
To stop unauthorised changes to the oven setup, it is suggested that this page is removed from this manual
and kept in a safe place for future reference.
If tampering could be a problem, It is a good idea to change the passcodes at regular intervals.

FG166 – MXE RevB17 11-04-17
41
9 - 7 USING THE USB PORT
Ensure the Start screen is showing
Insert the USB memory stick into the socket on the oven panel. (Rubber plug may have to be removed first). NOTE The USB stick will only fit in one way. Do not force into the socket.
Wait for the USB symbol to finish moving
If old firmware is found, the firmware version screen will appear. Touch “OK” to update firmware -Wait- Remove USB stick OR Touch “CANCEL” to choose other items to update or change. (see next page)
START SCREEN
1
2
3
4

FG166 – MXE RevB17 11-04-17
42
Choose action you would like to do.
Select the file required.
When confirmation of “file loaded ok” Shows, remove the usb stick.
5
6
7

FG166 – MXE RevB17 11-04-17
43
For a USB stick to function correctly it must have the following folder in the root folder .
Mono Then into that folder add the following: Firmware Products Skins Sounds Start-up Place your recipe/product files in the “products” folder.
The oven will find the "Mono" folder automatically when the stick is plugged into the oven. Any stick can be used (does not have to be blank) but the Mono folder must be in the root folder. The most used folders are explained below: SKINS These control the way the screen looks in different modes. Pictorial is when the screen displays catergories using pictures.
Numerical is when the screen displays program numbers.
STARTUP SCREENS This is the picture/logo you see when the oven is started.
PRODUCT FILES (PROGRAM FILES) These are the files that contain the information for baking each product e.g. bread,buns,cakes etc.
NOTES ON USING USB STICKS
FG166 – MXE RevB17 11-04-17
44
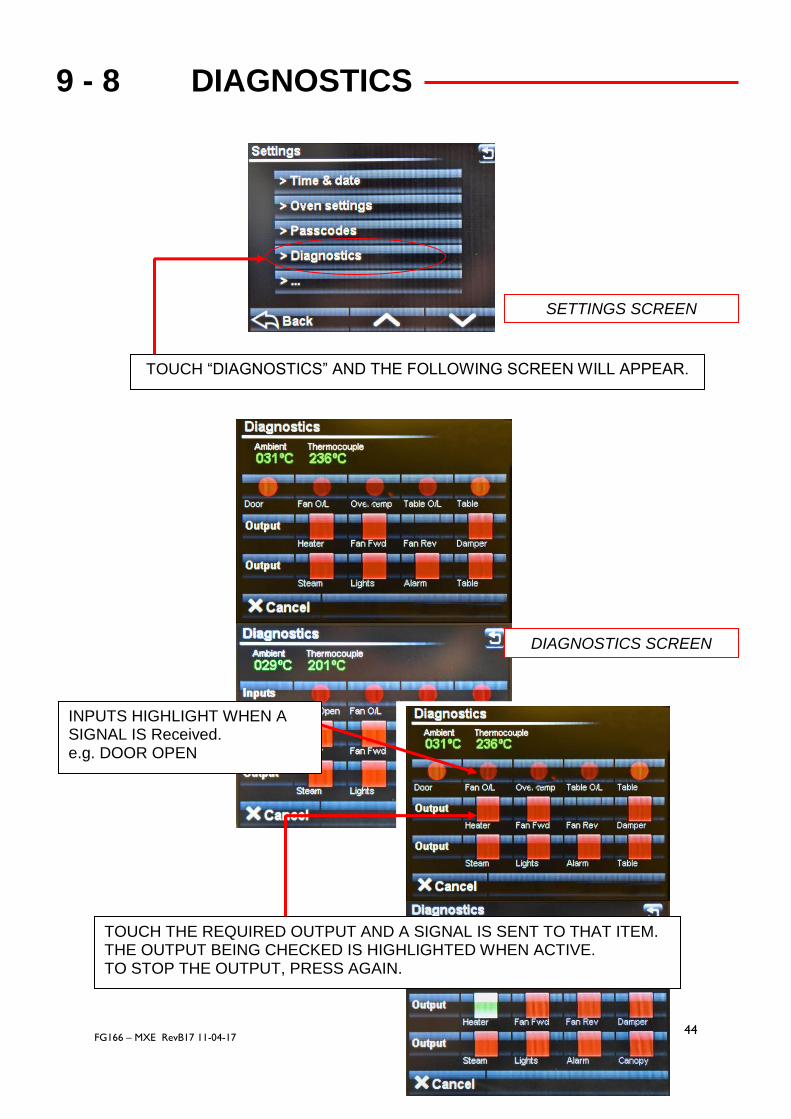
9 - 8 DIAGNOSTICS
SETTINGS SCREEN
TOUCH “DIAGNOSTICS” AND THE FOLLOWING SCREEN WILL APPEAR.
TOUCH THE REQUIRED OUTPUT AND A SIGNAL IS SENT TO THAT ITEM. THE OUTPUT BEING CHECKED IS HIGHLIGHTED WHEN ACTIVE. TO STOP THE OUTPUT, PRESS AGAIN.
INPUTS HIGHLIGHT WHEN A SIGNAL IS Received. e.g. DOOR OPEN
DIAGNOSTICS SCREEN
FG166 – MXE RevB17 11-04-17
45
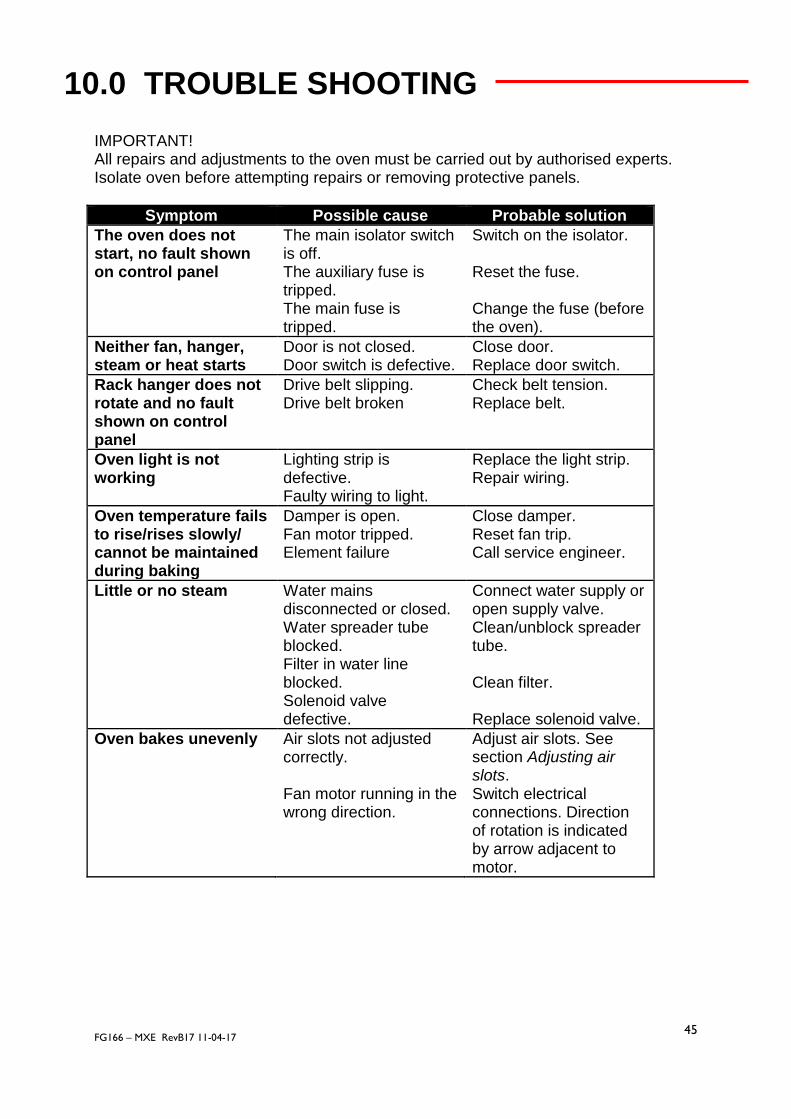
10.0 TROUBLE SHOOTING
IMPORTANT! All repairs and adjustments to the oven must be carried out by authorised experts. Isolate oven before attempting repairs or removing protective panels.
Symptom Possible cause Probable solution
The oven does not start, no fault shown on control panel
The main isolator switch is off. The auxiliary fuse is tripped. The main fuse is tripped.
Switch on the isolator. Reset the fuse. Change the fuse (before the oven).
Neither fan, hanger, steam or heat starts
Door is not closed. Door switch is defective.
Close door. Replace door switch.
Rack hanger does not rotate and no fault shown on control panel
Drive belt slipping. Drive belt broken
Check belt tension. Replace belt.
Oven light is not working
Lighting strip is defective. Faulty wiring to light.
Replace the light strip. Repair wiring.
Oven temperature fails to rise/rises slowly/ cannot be maintained during baking
Damper is open. Fan motor tripped. Element failure
Close damper. Reset fan trip. Call service engineer.
Little or no steam Water mains disconnected or closed. Water spreader tube blocked. Filter in water line blocked. Solenoid valve defective.
Connect water supply or open supply valve. Clean/unblock spreader tube. Clean filter. Replace solenoid valve.
Oven bakes unevenly Air slots not adjusted correctly. Fan motor running in the wrong direction.
Adjust air slots. See section Adjusting air slots. Switch electrical connections. Direction of rotation is indicated by arrow adjacent to motor.

FG166 – MXE RevB17 11-04-17
46
DO NOT ATTEMPT TO MAKE ADJUSTMENTS UNLESS YOU
ARE FULLY AWARE OF THE RESULTS
Setting the air slots The oven has an air panel situated in the rear right-hand corner of the baking chamber with adjustable slots, which are accurately set prior to leaving the factory (the factory settings are given in the diagram below). It is through these slots that heated air passes into the baking chamber to perform the baking task. However, external factors can negatively affect the baking result, such as a poorly designed baking programme or the combination of trays and products to be baked, and adjustment of the air slots may be necessary. However, before making adjustments please consider the following:
Make sure that differences in baking results are not due to differences in product batches;
Make sure that the plates that determine the width of the air slot have not come loose thereby causing a change from the factory setting;
Do not be too hasty in changing air slot settings in response to a sudden change in bake evenness as this may have been caused by other factors, such as, after maintenance of the oven, or a related fault with the oven. Any adjustments to the air slots would be unlikely to cure bake unevenness under these circumstances;
Check that the air circulation fan’s rotation is correct – especially after maintenance or replacement.
If it is considered that adjustments to the air slots are necessary, these should be made in small increments and one slot at a time. Measure the slot opening before adjustment then slacken the screw(s) associated with the slot that requires adjustment, adjust slot opening then retighten screw. Measure slot opening after adjustment is complete to confirm the desired dimension has been achieved.
Factory settings:
A = 5.9mm B = 4.8mm C = 4.8mm D = 4.8mm E = 4.8mm F = 5.9mm
A
B
C
D
E
F
A
B
C
D
E
F

FG166 – MXE RevB17 11-04-17
47
11.0 SPARES AND SERVICE
If a fault arises, please do not hesitate to contact the
Customer Service Department, quoting the machine serial number
on the silver information plate of the machine and on the front cover of this
manual
. All correspondence must state the details shown on the oven’s identification plate.
This will reduce errors and time wasted during communication.
.
Queensway Swansea West Industrial Estate
Swansea. SA5 4EB UK
email:[email protected] Web site:www.monoequip.com
Tel. 01792 561234
Spares +44(0)1792 564039
Fax. 01792 561016
MONO

FG166 – MXE RevB17 11-04-17
48
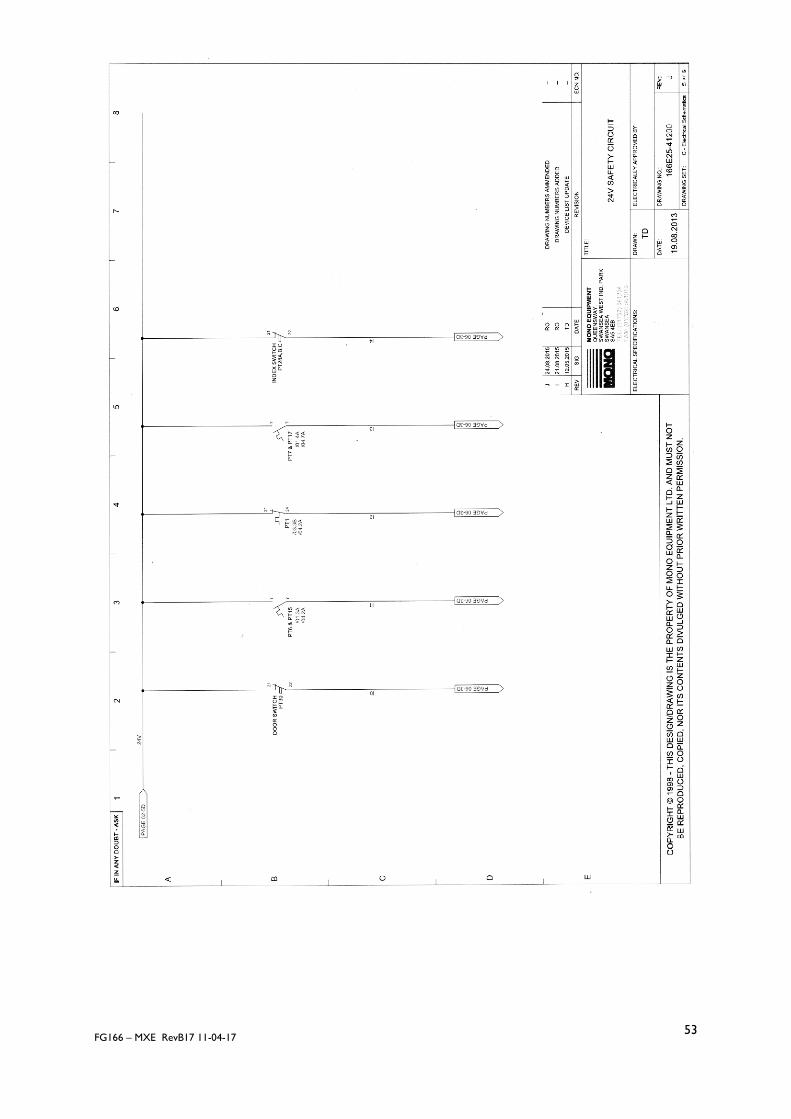
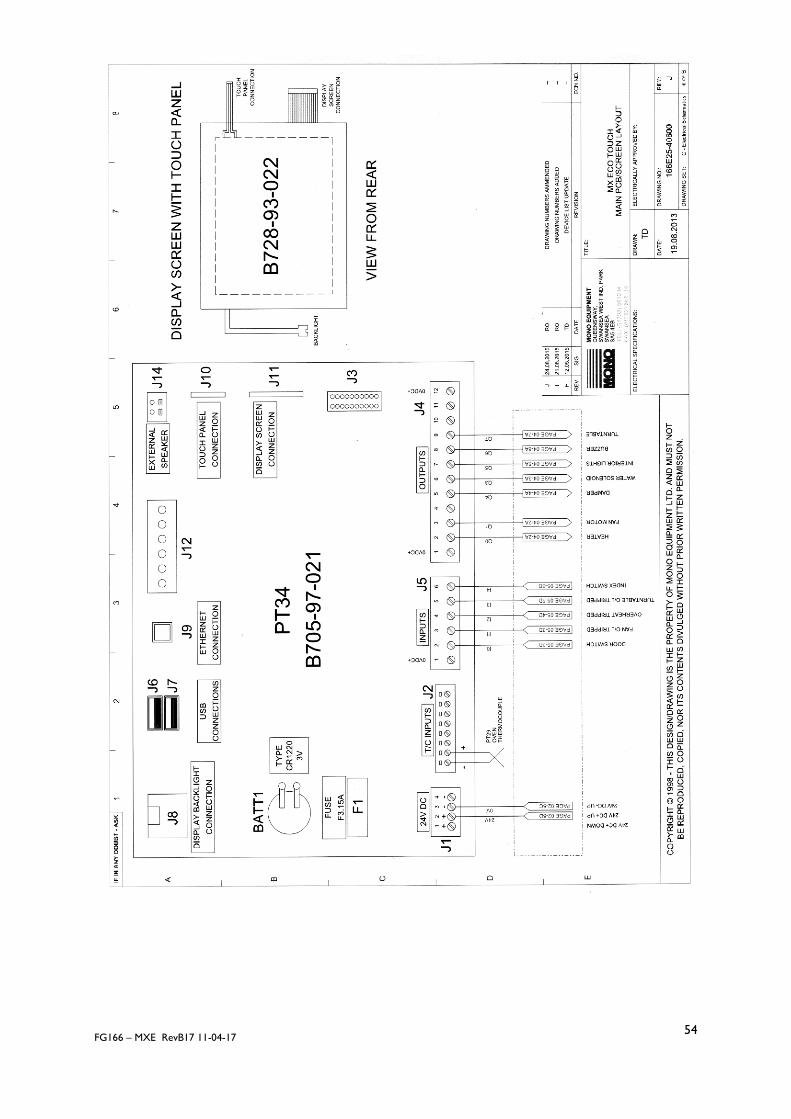
12.0 ELECTRICAL INFORMATION

FG166 – MXE RevB17 11-04-17
49

FG166 – MXE RevB17 11-04-17
50

FG166 – MXE RevB17 11-04-17
51

FG166 – MXE RevB17 11-04-17
52
FG166 – MXE RevB17 11-04-17
53
FG166 – MXE RevB17 11-04-17
54

FG166 – MXE RevB17 11-04-17
55

FG166 – MXE RevB17 11-04-17
56
13.0 SPARES

FG166 – MXE RevB17 11-04-17
57
SPARES ELECTRICAL
SPARES MECHANICAL Fan drive “VEE” belt A900-21-114 Door handle 160-32-02000 Bottom door seal 166-13-00060 Door glass unit 166-13-00035 “U” seal for glass unit 166-13-00055 Touch screen overlay 164-90-00001

FG166 – MXE RevB17 11-04-17
58
Queensway Swansea West Industrial Estate
Swansea. SA5 4EB UK
email:[email protected] Web site:www.monoequip.com
Tel. 01792 561234
Spares +44(0)1792 564039
Fax. 01792 561016
MONO