Best practice 1 Advanced programmes -- Civil Engineering 1 ...
Upload
khangminh22Category
view
2download
0
EN
AR
MultiCook Advanced 45 in 1

107
8
1
5
11
6
3
9
2
4

Fig.1 Fig.2 Fig.3a Fig.3b
Fig.4 Fig.5 Fig.6 Fig.7
Fig.12 Fig.13 Fig.14 Fig.15
Fig.16 Fig.17 Fig.18
Fig.8 Fig.9 Fig.10 Fig.11
ab
MAX.10cups
10cupsMAX.
ab

1
IMPORTANT SAFEGUARDSSAFETY INSTRUCTIONS
Read and follow the instructions for use. Keep them safe.•Thisapplianceisnotintendedtobeoperatedbymeansofanexternaltimeroraseparateremote-controlsystem.
•Thisapplianceshallnotbeusedbychildrenfrom0yearto8years.
•This appliance can be used by children agedfrom 8 years and above if they have beengiven supervision or instruction concerninguseof theappliance ina safewayand if theyunderstand the hazards involved.Cleaning andusermaintenanceshallnotbemadebychildrenunlesstheyareolderthan8yearsandsupervised.Keeptheapplianceanditscordoutofreachofchildrenagedlessthan8years.
•Appliancescanbeusedbypersonswithreducedphysical, sensory ormental capabilities or lackofexperienceandknowledgeiftheyhavebeengiven supervisionor instruction concerninguseoftheappliance inasafewayandunderstandthehazardsinvolved.
•Childrenshallnotplaywiththeappliance.•This appliance is not intended for use bypersons (including children) with reduced

2
ENphysical, sensoryormental capabilities, or lackofexperienceandknowledge,unlesstheyhavebeengivensupervisionorinstructionconcerninguseoftheappliancebyapersonresponsiblefortheirsafety.
•Children should be supervised to ensure thattheydonotplaywiththeappliance.
•Asthisapplianceisforhouseholduseonly,itisnotintendedforuseinthefollowingapplicationsandtheguaranteewillnotapplyfor:− Staffkitchenareasinshops,officesandotherworkingenvironments− Farmhouses− Byclientsinhotels,motelsandotherresidentialtypeenvironments− Bedandbreakfasttypeenvironments
• If your appliance is fitted with a removable power cord: if the power cord is damaged, it must bereplacedbyaspecialcordorunitavailablefromanauthorisedservicecentre.
• If your appliance is fitted with a fixed power cord:if thepower supply cord isdamaged, itmustbereplacedbythemanufacturer,themanufacturer’safter-salesservicedepartmentorsimilarlyqualifiedpersoninordertoavoidanydanger.
•Theappliancemustnotbeimmersedinwateroranyotherliquid.

3
•Use a damp cloth or sponge with washing-upliquid to clean the accessories and parts incontactwith food. Rinsewith a damp cloth orsponge. Dry accessories and parts in contactwithfoodwithadrycloth.
• Ifthesymbol ismarkedontheappliance,thissymbolmeans “Caution: surfacesmaybecomehotduringuse”.
•Caution: the surface of the heating element issubjecttoresidualheatafteruse.
•Caution:riskofinjuryduetoimproperuseoftheappliance.
•Caution: if your appliance has a removablepowercord,donotspillliquidontheconnector.
•Alwaysunplugtheappliance:− immediatelyafteruse− whenmovingit− priortoanycleaningormaintenance− ifitfailstofunctioncorrectly
•Donotleavetheapplianceunattendedwhilstinoperation.
•Burnscanoccurbytouchingthehotsurfaceoftheappliance,thehotwater,steamorthefood.
•During cooking, the appliance gives out heatandsteam.Keepfaceandhandsaway.

4
EN•Cooking appliances should be positioned ina stable situation with the handles (if any)positionedtoavoidspillageofthehotliquids.
•Donotget faceandhands close to the steamoutlet.Donotobstructthesteamoutlet.
• ForanyproblemsorqueriespleasecontactourCustomerRelationsTeamorconsultourwebsite.
• For your safety, this appliance complies withthesafetyregulationsanddirectivesineffectatthetimeofmanufacture(Low-voltageDirective,Electromagnetic Compatibility, Food ContactMaterialsRegulations,Environment…).
•Checkthatthepowersupplyvoltagecorrespondsto that shown on the appliance (alternatingcurrent).
•Given the diverse standards in effect, if theappliance is used in a country other than thatinwhich it ispurchased,have it checkedbyanapprovedservicecentre.
Connecting to the power supply•Donotusetheapplianceif:
− theapplianceorthecordisdamaged.− the appliance has fallen or shows visibledamageordoesnotworkproperly.− Intheeventoftheabove,theappliancemustbesenttoanapprovedServiceCentre.Donottaketheapplianceapartyourself.

5
•Donot letthepowercordhangwherechildrenmayreachit.
•Donotleavethepowercordclosetoorincontactwithsourcesofheatorsharpedges.
•Alwaysplugtheapplianceintoanearthedsocket.•Do not use an extension lead. If you acceptliabilityfordoingso,onlyuseanextensionleadwhichisingoodcondition,hasanearthedplugandissuitedtothepoweroftheappliance.
•Donotunplug theappliancebypullingon thecord.
Using•Use a flat, stable, heat-resistant work surfaceawayfromanywatersplashes.
•Donotallowthebaseoftheappliancetocomeintocontactwithwateroranyotherliquid.
•Never try to operate the appliance when thebowlisemptyorwithoutthebowl.
•The control panel buttonsmust be allowed tooperatefreely.
•Donot removethebowlwhile theappliance isworking.
•Do not put the appliance directly onto a hotsurface,oranyothersourceofheatorflame,asitwillcauseafailureordanger.
6
EN•Thebowlandtheheatingplateshouldbeindirectcontact. Any object or food inserted betweenthesetwopartswouldinterferewiththecorrectoperationandmaydamagetheappliance.
•Donotplacetheapplianceorbowlnearaheatsourceorinahotoven,asseriousdamagecouldresult.
•Donotputanyfoodorwaterintotheapplianceuntilthebowlisinplace.
•Respectthelevelsindicatedintherecipes.• Shouldanypartofyourappliancecatchfire,donotattempttoputitoutwithwater.Tosmothertheflamesuseadampteatowel.
•Any intervention should only be made by anapprovedservicecentrewithoriginalspareparts.
Protect the environment•Your appliance has been designed to run formany years. However, when you decide toreplaceit,remembertothinkabouthowyoucancontributetoprotectingtheenvironment.

7
CONTROL PANEL
DESCRIPTION
1 Lid2 Innerlid3 Removableinnerbowl4 Lidopeningbutton5 Handle6 Powercordsocket7 Ricespoon8 Soupladle9 Measuringcup10 Steambasket11 Powercord12 Controlpanel
a “Keepwarm/Cancel”keyb “Menu”keyc “DIY”keyd “<”keye “>”keyf “Delayedstart”keyg “Start”keyh “Temperature/Timer”key
13 Functionindicatorsa Bakingfunctionb Soupfunctionc Steamfunctiond Stewfunctione Crust/Fryfunctionf Babyfoodfunctiong Porridgefunctionh Yogurtfunctioni Creamcheesefunctionj Dessertfunctionk Rice/Cerealsfunctionl Pilaf/Risottofunctionm Pastafunctionn Breadrisingfunctiono Reheatfunction
14 FoodType-Vegetables,Fish,PoultryandMeat
a13
14
f
k ol m n
g i jh
b c d e
12a
12c 12h
12d 12e
12b 12f
12g

8
ENBEFORE THE FIRST USE
Unpack the appliance• Remove the appliance from the packaging and unpack all theaccessoriesandprinteddocuments.
• Openthelidbypushingtheopeningbuttononthehousing–fig.1.Read the Instructions and carefully follow the operation method.
Clean the appliance• Removethebowl–fig.2,theinnerlidandthepressurevalve–fig.3aand3b.
• Cleanthebowl,thevalveandtheinnerlidwithaspongeandwashingupliquid.
• Wipetheoutsideoftheapplianceandthelidwithadampcloth.• Dryoffcarefully.• Putallthepartsbackintheoriginalposition.Firstfittheinnerlidontheundersideofthelid.Hookthebaseoftheinnerlidintothenotchesatthebottomoftheouterlid.Thenpushthe2tabsatthetopoftheinner lid intothetopcornersuntil theyclick intoposition.Install thedetachablecordintothesocketonthecookerbase.
THE APPLIANCE
• Carefullywipetheoutsideofthebowl(especiallythebottom).Makesurethattherearenoforeignresiduesorliquidunderneaththebowlandontheheatingelement–fig.5.
• Place the bowl into the appliance, making sure that it is correctlypositioned–fig.6.
• Makesurethattheinnerlidiscorrectlyinposition.• Closethelidandyouwillheara“click”.• Installthepowercordintothesocketoftheappliancebaseandthenplugintothepoweroutlet.Theappliancewillsoundalong“beep”,allthe lights on the control panelwill light up for an instant. Then thescreendisplayshow«----»,allthecontrolpanel lightswillgoout.Theapplianceentersintostandbymode,youcanselectthemenufunctionsasyouwish.
• Do not touch the heating element when the product is plugged inor after cooking.Donot carry theproductwhen in use or just aftercooking.
• Thisapplianceisonlyintendedforindooruse.

9
Never place your hand on the steam vent during cooking, as there is a danger of burns – fig.10.Whilst cooking, if you wish to change the selected cooking function because of an error, press «“CANCEL” button» key and re-choose the function you want.Only use the inner pot provided with the appliance.Do not pour water or put ingredients in the appliance without the bowl inside.The maximum quantity of water + ingredients should not exceed the highest mark inside the bowl - fig.7.
Programs Automatic
Manual(adjust temp.
setting)
Food Type
Cooking Time Delayed Start Temperature (°C) Lid Position
Keep warmDefault
time Range Every (min) Range Every
(min) Default Temperature settings Closed Open
Baking 4 4
Veg 25min
5min-4h 5Cookingtime~24h
5
140°C
100/120/140/160 * *
Fish 20min 160°C
Poultry 40min 160°C
Meat 50min 160°C
Soup 4
Veg 40min
10min-3h 5Cookingtime~24h
5 100°C - * *Fish 45min
Poultry 50min
Meat 60min
Steam 4
Veg 35min
5min-3h 5Cookingtime~24h
5 100°C - * *Fish 25min
Poultry 45min
Meat 55min
Stew 4 2
Veg 60min
20min-9h 5Cookingtime~24h
5 100°C 90/100 * *Fish 25min
Poultry 1h30min
Meat 2h
Crust/Fry 4 4
Veg 12min
5min-1h30min 1 - No 160°C 100/120/
140/160 * * *Fish 10min
Poultry 15min
Meat 20min
Babyfood 1 - 45min 5min-2h 5 Cookingtime~24h
5 100°C - * 1hmax
Porridge 1 - 25min 5min-2h 5 5 100°C - * *
Yogurt 1 - 8h 1h-12h 15 - 40°C - *
CreamCheese 1 - 40min 10min-4h 15 - 80°C *
Dessert 4 - 45min 5min-2h 5
Cookingtime~24h
5 160°C 100/120/140/160 *
Rice/Cereals 1 - Automatic Automatic - 5 Automatic - * *
Pliaf/Risotto 1 - Automatic Automatic - 5 Automatic - * *
Pasta 1 - 8min 3min-3h 1 5 100°C - *
Breadrising 1 - 1h 10min-6h 5 5 40°C 40 *
Reheat 2 - 25min 5min-1h 5 5 100°C 80/100 * *
Keepwarm 1 - - - - 5 75°C - * *
DIY 1 - 30min 5min-9h 5 5 100°C 40-160 * * *
Programs 28 17
TOTAL 45
COOKING PROGRAME TABLE
Note:FortheDIYprogram“Keepwarm”isonlyavailableifthefunctionoperates with a keep warm function as shown in the table above.For example, if the yogurt function is selectedasaDIYprogramkeepwarmwillnotbeactivatedattheendofthecookingtime.

10
ENMENU KEY
• Instandbymodethedisplaypanelshows‘----’,pressthe«Menu»keyto cycle through the following functions: Baking Soup Steam
Stew Crust/Fry Babyfood Porridge Yogurt Creamcheese Dessert Rice/Cereals Pilaf/Risotto Pasta Breadrising Reheat.
• Thescreendisplaysthedefaultcookingtimeofeachfunction(exceptfor Rice/Cereals, Pilaf/Risotto). ”Start” button light flickers and theselectedfunctionlightsup.
Note:If you want to cancel the “beep” sound hold the “Menu” button down for 5 seconds. If you want to add the “beep” sound , hold down the “Menu” button a second time for 5 seconds.
BAKING FUNCTION
• Press«Menu»keytoselectfunction«Baking».Thescreendisplaysthedefaultcookingtime,the“Start”lightflashesred.Thenpress«<»or«>»toselectthefoodtype:Vegetables,Fish,PoultryorMeat.
• Press «Temperature / Timer» key to select the time setting functionandthenpress«<»and«>»tochangethecookingtime.Pressagain«Temperature / Timer» to change the temperature by pressing«<»and«>».
• Press “Start” button. The appliance enters into “Baking” mode, the“Start” light stops flashing and the screen displays the remainingcooking time. The appliance beeps when it reaches the selectedtemperature.
• At the end of cooking, the appliance will sound three “beeps” andwillautomaticallyenter intokeepwarmmodewiththe“Cancel/KeepWarm”lightilluminatedandthescreenwilldisplaythelengthoftimetheappliancehasbeeninkeepwarmmode.

11
SOUP FUNCTION
• Press «Menu»key to select function«Soup».The screendisplays thedefaultcookingtime,the“Start”lightflashesred.Thenpress«<»or«>»toselectthefoodtype:Vegetables,Fish,PoultryorMeat.
• Press«Temperature/Timer»keytoselectthetimesettingfunctionandthenpress«<»and«>»tochangethecookingtime.
• Press«Start»key.Theapplianceenters into“Soup”mode,the“Start”lightstopsflashingandthescreendisplaystheremainingcookingtime.
• At the end of cooking, the appliance will sound three “beeps” andwill enter into keepwarmmodewith the “Cancel/KeepWarm” lightilluminatedandthescreenwilldisplaythelengthoftimetheappliancehasbeeninkeepwarmmode.
STEAM FUNCTION
• Press«Menu»keytoselectfunction«Steam».Thescreendisplaysthedefaultcookingtime,the“Start”lightflashesred.Thenpress«<»or«>»toselectthefoodtype:Vegetables,Fish,PoultryorMeat.
• Press«Temperature/Timer»keytoselectthetimesettingfunctionandthenpress«<»and«>»tochangethecookingtime.
• Theapplianceentersinto“Steam”mode,the“Start”lightstopsflashingandthescreendisplaystheremainingcookingtime.
• At the end of cooking, the appliance will sound three “beeps” andwill enter into keepwarmmodewith the “Cancel/KeepWarm” lightilluminatedandthescreenwilldisplaythelengthoftimetheappliancehasbeeninkeepwarmmode.
Recommendations for steam cooking• Thequantityofwatermustalwaysbelowerthanthesteambasket.Donotexceedthe7.5cupmarkontheinsideofthebowl(2.5Lwater-max)otherwiseitmaycauseoverflowsduringuse.Foryourinformation,the2cupmarkontheinsideofthebowlcorrespondstoabout1Lofwater.
• Theapproximatetimethewaterwilllastonsteamfunctionis1hour30minutesfor2Lofwaterand45minfor1Lofwater.
• Addtheingredientstothebasket.• Placethesteambasketintothebowl.

12
ENSTEW FUNCTION
• Press «Menu» key to select function «Stew».The screendisplays thedefaultcookingtime,the“Start”lightflashesred.Thenpress«<»or«>»toselectthefoodtype:Vegetables,Fish,PoultryorMeat.
• Press «Temperature / Timer» key to select the time setting functionandthenpress«<»and«>»tochangethecookingtime.Pressagain«Temperature/Timer»tochangethetemperaturebypressing«<»and«>»toalterthecookingtemperatureto90°Cor100°C.
• Press«Start»key.Theapplianceenters into“Stew”mode,the“Start”lightstopsflashingandthescreendisplaystheremainingcookingtime.
• At the end of cooking, the appliance will sound three “beeps” andwill enter into keepwarmmodewith the “Cancel/KeepWarm” lightilluminatedandthescreenwilldisplaythelengthoftimetheappliancehasbeeninkeepwarmmode.
CRUST FRY FUNCTION
• AlwaysusetheCrustFryfunctionwithoiland food.Donotusewithoilonly.
• Press«Menu»keytoselectfunction«CrustFry».Thescreendisplaysthedefaultcookingtimeandthe“Start”lightflashesred.Thenpress«<»or«>»toselectthefoodtype:Vegetables,Fish,PoultryorMeat.
• Press «Temperature / Timer» key to select the time setting functionandthenpress«<»and«>»tochangethecookingtime.Pressagain«Temperature/Timer»tochangethetemperaturebypressing«<»and«>»toalterthecookingtemperatureto100°C,120°C,140°Cor160°C.Thedefaultcookingtemperatureis160°C.
• Press«Start»key.Theapplianceentersinto“CrustFry”mode,the“Start”light stops flashing and the screen displays the remaining cookingtime.Theappliancebeepswhenitreachestheselectedtemperature.
• At the end of cooking, the appliance will sound three “beeps” andwill enter into keepwarmmodewith the “Cancel/KeepWarm” lightilluminatedandthescreenwilldisplaythelengthoftimetheappliancehasbeeninkeepwarmmode.
Note: Always use this function with oil and food. With oil only, it may cause a failure or danger.

13
BABY FOOD FUNCTION
• Thisfunctionistopreparebabyfoodbycookingthefoodinordertohaveasuitabletextureforyoungchildren.
• Press«Menu»keytoselectfunction«Babyfood».Thescreendisplaysthedefaultcookingtime,andthe“Start”lightflashesred.
• Press«Temperature/Timer»keytoselectthetimesettingfunctionandthenpress«<»and«>»tochangethecookingtime.
• Press «Start» key. The appliance enters into “Baby food”mode, the“Start” light stops flashing and the screen displays the remainingcookingtime.
• At the end of cooking, the appliance will sound three “beeps” andwill enter into keepwarmmodewith the “Cancel/KeepWarm” lightilluminatedandthescreenwilldisplaythelengthoftimetheappliancehasbeeninkeepwarmmode.
• Forfoodsafetyreasons,only1hourofkeepwarmisavailable.Note: Once the baby food is cooked, it should be consumed within 1 hour.
PORRIDGE FUNCTION
• Press«Menu»keytoselectfunction«Porridge».Thescreendisplaysthedefaultcookingtime,the“Start”lightflashesred.
• Press«Temperature/Timer»keytoselectthetimesettingfunctionandthenpress«<»and«>»tochangethecookingtime.
• Press«Start»key.Theapplianceentersinto“Porridge”mode,the“Start”lightstopsflashingandthescreendisplaystheremainingcookingtime.
• At the end of cooking, the appliance will sound three “beeps” andwill enter into keepwarmmodewith the “Cancel/KeepWarm” lightilluminatedandthescreenwilldisplaythelengthoftimetheappliancehasbeeninkeepwarmmode.
• Forbestresultsservetheporridgeimmediatelyitiscooked.Althoughitcanbeleftonthekeepwarmsettingforashorttime,itwillsoonbegintothickenandyoumayneedtostirinsomeadditionalhotliquid.

14
ENYOGURT FUNCTION
TIPS FOR MAKING YOGURT• Youcaneithermakealargebatchofnaturalyogurtdirectlyinthebowl(maximumquantityof1litreofmilk),ina17-cmdiametersoufflédishormakenaturalyogurtinindividualoven-proofglasscontainers.The45in1bowlfitsaboutfouryogurtcontainers,dependingontheirsize.Washthecontainersinwarmwaterandwashingupliquid,thenrinseanddrythemthoroughly.
• All the equipment used in the yogurt making process should besterilisedusingMiltonsterilizingsolutionorcleaned inadishwasher.Sterilising is important to prevent the introduction of undesirableairbourneorganismswhichcouldinterferewiththeincubationoftheculture,andresultsinrunnyyogurtwhichwillnotset.
• Preparetheyogurtmixtureasinstructed(seerecipebookorthesection“Choiceofmilk”and“Fermentationtime”intheinstructions).
• Youcansweetennaturalyogurteitherwhenyoueatthemorwhenyoumakethem.Aftermakingsimplyaddoneortwoteaspoonsofsugaror honey per pot. Alternatively when preparing the yogurt mixturedissolve the sugarwhenboiling themilk or dissolve in the coldmilk(no morethan80gsugarfor1litremilk).
• Press“Menu”buttonandscrollthroughtoselect“Yogurt”.Thescreendisplays the default cooking time of 8 hours. The cooking time isadjustable fromaminimumof 6 hours to amaximumof 12 hours.Selectthecookingtime.
• Press«Menu»keytoselectfunction«Yogurt».Thescreendisplaysthedefaultcookingtime,andthe“Start”lightflashesred.
• Press«Temperature/Timer»keytoselectthetimesettingfunctionandthenpress«<»and«>»tochangethecookingtime.
• Press«Start»key.Theapplianceentersinto“Yogurt”mode,the“Start”lightstopsflashingandthescreendisplaystheremainingcookingtime.
• Attheendofthecookingtime,theappliancewillsoundthree“beeps”andwillreturntostandbymode.
These is no keep warm at the end of the cooking.Use for making yogurt in oven-proof glass containers.

15
• Press the “Start” button. The display will count down in one hourlyintervals.
• Thedelayedstartfunctionisnotavailablewiththe“Yogurt”function.• Attheendofthecookingtime,theappliancewill“beep”severaltimes.• Thereisnokeepwarmfunctionattheendoftheyogurtprogramme.• Chilltheyogurtintherefrigeratorforatleast4hoursbeforeserving.Ideallyleavefor24hours.Thishelpstheyogurttothickenslightly.
• Homemade yogurts do not contain the thickeners and stabiliserscontained incommerciallyproducedyogurtandareoften thinner inconsistency.Sometimeshomemadeyogurthasnutritiousclearwheyontopwhichcanbestirredbackin.Forthickerconsistencyyogurtaddskimmedmilkpowder(seerecipesinrecipebook).
• Homemade yogurt can be flavoured with fresh fruit or cold cookedstewedfruitafterpreparationandchilling.Ifthefruitisaddedbeforefermentation the fruit acids interfere with the setting process andtheyoghurtswillbeveryrunny.Someveryacidicfruits,suchasfreshpineapple, can cause the yogurt to curdle or separate.Acidic fruit isbestservedinaseparatebowl.
CHOICE OF INGREDIENTS FOR YOGURTMilkWhat milk should you use?Allour recipes (unlessotherwisestated)arepreparedusingcow’smilk.Youcanuseplantmilk suchassoyamilk forexampleaswellas sheepor goat’s milk but, in this case, the firmness of the yogurt may varydependingonthemilkused.Untreatedrawmilkorlong-lifemilksandallthemilksdescribedbelowaresuitableforyourappliance:• Long-life sterilised milk:UHTwholemilkresultsinfirmeryogurt.UsingUHTsemi-skimmedmilkwillresultinlessfirmyogurt.However,youcanusesemi-skimmedmilkanddissolve2-5tablespoonsofdriedskimmedmilkpowderper1litreofmilktogiveathickerconsistency.
• Pasteurised milk:pasteurisedwholemilkwillgiveacreamieryogurtwith a little skin on the top. Yogurt made with pasteurised semi-skimmedorskimmedmilkwillresultinarunnytexture.Asthistypeofmilkstillcontainssomeheat-resistantgermswhicharenoteliminatedby pasteurisation, themilkmust be boiled first, cooled to hand-hot(36°C)andthenstrainedthroughafinesievetoremoveanyskinbeforeused for yogurtmaking. For a thicker consistency yogurt, before themilkisboiledadd2 to5tablespoondriedskimmedpowderedmilkper1litreofmilk.

16
EN• Untreated raw milk (farm milk): It is imperative that this type of milk is boiled for a fairly long time and it is dangerous not to do this. After boiling let it cool down to 36°C before using for yogurtmaking.Usingyogurtasaculturestartermadefromrawfarmmilkisnotrecommended.
• Powdered milk:usingskimmedmilkpowderreconstitutedwithwaterwillresultinverycreamyyogurt.Followthemanufacturer’sinstructionsonhowtoreconstituteintoliquidmilk.
Choose a whole milk, preferably long-life UHT.Raw (farm milk) or pasteurised milk must be boiled then cooled and needs the skin removing.
The fermentFor yogurt use one of the following ferments:• Onesmallpot(100g-150g)ofshop-boughtnatural yogurtwiththelongestexpirydatepossible;youryogurtwillthencontainmoreactivefermentforafirmeryogurt.
• Freeze-dried ferment. In this case, follow the activation timespecified on the ferment instructions. You can find these fermentsin supermarkets, pharmacies and in certain health product stores.(For the UK:Freezedriedfermentisonlyavailableonlineandinsomehealthfoodshops.)
• Oneofyourrecently prepared yogurts–thismustbeanaturalyogurtand recently prepared. This is called culturing. After five culturingprocesses, the yogurt used loses active ferments and therefore risksgiving a less firm consistency. You then need to start again using ashopboughtyogurtorfreeze-driedferment.
If you have boiled the milk, wait until it has cooled to room temperature before adding the ferment.Too high a heat may destroy the properties of your ferment.
17
• Thisfunction is tomakesoftcheese.Preferablyusefullcreamwholemilk(seerecipebookforrecipes).
• Press «Menu» key to select function «Cream cheese». The screendisplaysthedefaultcookingtime“0:40”.The“Start”lightsflashesred.
• Press«Temperature/Timer»keytoselectthetimesettingfunctionandthenpress«<»and«>»tochangethecookingtime.
• Press«Start» key.Theapplianceenters into “Creamcheese” cookingmode, the “Start” light stops flashing and the screen displays theremainingcookingtime.
• Attheendofthecookingtime,theappliancewillsoundthree“beeps”andwillreturntostandbymode.
• All theequipmentused in thesoftcheesemakingprocessshouldbesterilisedusingMiltonsterilizingsolutionorcleaned inadishwasher.Sterilising is important to prevent the introduction of undesirableairbourneorganismswhichcouldinterferewithmakingsoftcheese.
CREAM/CHEESE FUNCTION
Fermentation time• Your yogurt will need between 6 and 12 hours of fermentation,dependingonthebasicingredientsandtheresultyouareafter.
Fluid
6h 7h 8h 9h 10h 11h 12h
FirmSweet Acidic
• Oncetheyogurtheatingprocessisfinished,theyogurtshouldbecooledcompletely,coveredwithalidorclingfilmandplacedinarefrigeratorforatleast4hoursorpreferablylongerbeforeconsuming.
• Whencovered,naturalyogurtswillkeepforamaximumof7daysintherefrigerator,dependingonthefreshnessofthemilk.Yogurtswithjamoradditionalingredientswillkeepforupto3days.
• Aclear liquid (whey)mayformontopof theyogurtandthis isbeststirredbackin.Alternativelyyoucanpouritoff.

18
EN
RICE/CEREALS FUNCTION
• Pourtherequiredquantityofwellwashedriceintothebowlusingthemeasuring cup provided – fig.8. Then fill with cold water up to thecorresponding«CUP»markon the insideof thebowl– (see cookingguidepage19and20)fig.9.
• Closethelid.Note: Always add the rice first otherwise you will have too much water.Press«Menu»keytoselectfunction«Rice/Cereal».Thescreendisplays« »,the“Start”lightsflashes,thenpress«Start»key.Theapplianceentersinto“Rice/Cereals”cookingmode,the“Start”lightstopsflashingandthescreenchangestoaflickering« »symbol.
• At the end of cooking, the appliance will sound three “beeps” andwill enter into keepwarmmodewith the “Cancel/KeepWarm” lightilluminatedandthescreenwithdisplaythelengthoftimetheappliancehasbeeninkeepwarmmode.
PILAF/RISOTTO FUNCTION
• Press«Menu»keytoselectfunction«Pilaf/Risotto».Thescreendisplays« »,the“Start”lightsflashes,thenpress«Start»key.Theapplianceentersinto“Pilaf/Risottocookingmode,the“Start”lightstopsflashingandthescreenchangestoaflickering« »symbol.
• At the end of cooking, the appliance will sound three “beeps” andwill enter into keepwarmmodewith the “Cancel/KeepWarm” lightilluminatedandthescreenwithdisplaythelengthoftimetheappliancehasbeeninkeepwarmmode.
DESSERT FUNCTION
• Press«Menu»keytoselectfunction«Dessert».Thescreendisplaysthedefaultcookingtime,the“Start”lightsflashesred.
• Press «Temperature / Timer» key to select the time setting functionandthenpress«<»and«>»tochangethecookingtime.Pressagain«Temperature/Timer»tochangethetemperaturebypressing«<»and«>»toalterthecookingtemperatureto100°C,120°C,140°Cor160°C.
• Press«Start»key.Theapplianceentersinto“Dessert”mode,the“Start”light stops flashing and the screen displays the remaining cookingtime.Theappliancebeepswhenitreachestheselectedtemperature.
• ThereisnoKeepWarmattheendoftheDessertprogramme.

19
Pleasenotethatthereare7steps:Preheat=>Waterabsorb=>Temperaturequick rise=>Keepboiling=>Waterevaporation=>Braiserice=>Keepwarm.Thecookingtimedependsonthequantityandtypeofrice.
*Basmatiwhiterice, longgrainwhiterice,paellarice,shortgrainwhiterice,basmati&wildricemixandsushirice.Forothertypesofwhitericeseecookingtableonpage20.
Note: The rice cooker automatically determines the cooking timedepending on the quantity of rice andwater placed in the bowl. Thecooking phase is automatically followed by a water evaporation andbraisingphase.
COOKING GUIDE FOR WHITE RICE* – 10 cups
Measuringcupsofwhiterice
Weightofwhiterice
Waterlevelinthebowl(+rice) Serves
2 300g 2cupmark 3–4
4 600g 4cupmark 5–6
6 900g 6cupmark 8–10
8 1200g 8cupmark 13–14
10 1500g 10cupmark 16–18
Thistablebelowgivesaguidetocookrice:
RECOMMENDATIONS FOR BEST RICE COOKING (Rice/Cereals and Pilaf/Risotto functions)• Beforecooking,measurethericewiththemeasuringcupandrinsetherice,exceptrisottorice.
• Puttherinsedriceintothebowlanddistributeevenlyaroundthewholesurfaceofthebowl.Fillwithwatertothecorrespondingwatercupmarkprintedontheinsideofthebowl(seecookingguide)
• Thewaterquantitycanbeadjustedtocookthericeaccordingtoyourtaste,firmorsoft.
• Whenthericeisreadyandthe“Cancel/KeepWarm”lightilluminates,stirthericeandleaveitintheapplianceonkeepwarmforafewminuteslongerinordertogetperfectricewithseparatedgrains.

20
EN
PASTA FUNCTION
• Tocookpastaitisimportanttowaituntilthewaterreachestemperaturebeforeaddingthepasta.
• Fillthebowlwithboilingwaterfromakettletotherequiredquantity(seetablebelow).Do not add the pasta.Closethelid.Note: You can use cold water instead of boiling water but this willlengthenthewaterheatingtimeconsiderably.
• Pressthe“Menu”keytoselect“Pasta”function.Thescreendisplaysthedefaultcookingtime“00:08”,the“Start”lightflashes.
COOKING GUIDE FOR OTHER TYPES OF RICE
Typeofrice Measuringcupsofrice
Weightofrice
Waterlevelinthebowl(+rice) Serves
Roundwhiterice(Italianrice-oftenastickierrice)
6 870g 6cupmark 7-8
10 1450g 10cupmark 10-12
WholegrainBrownrice
6 887g 6cupmark 7-8
10 1480g 10cupmark 10-12
Risottorice*(Arboriotype)
6 870g 6cupmark 7-8
10 1450g 10cupmark 10-12
Stickyrice6 736g 5cupmark 7-8
10 1227g 9cupmark 10-12
Brownrice6 840g 6cupmark 7-8
10 1400g 10cupmark 10-12
JapaneseSushirice
6 900g 6cupmark 7-8
10 1500g 10cupmark 10-12
FragrantJasminerice
6 870g 6cupmark 7-8
10 1450g 10cupmark 10-12
*Usetherice/cerealsprogramforcookingplainrisottowithwateronlyand no additional ingredients. For recipes using stock and additionalingredientsusethepilaf/risottoprogram.
21
• Pressthe“Temperature/Timer”keytoselectthetimesettingfunctionandpressthe“<”and“>”tochangethepastacookingtime.
• Pressthe“Start”key.Theapplianceentersinto“Pasta”cookingmode,the “Start” light illuminates and the screen displays the remainingcookingtime.Theapplianceheatsupthewaterandwhenitreachestemperatureit“beeps”.
• Addthepastatothewater,stirwellandclosethelid.Press“Start”keyagainandthetimerbeginstocountdown.During pasta cooking, the lid must be closed.
• Attheendofthecooking,theappliance“beeps”threetimes.Removethepastaanddrainoffthewater.
Note: There is no keep warm function after the pasta programme.
Type of pasta Weight of pasta
Water level in the bowl
Salt (optional)
Approximate cooking time
(in mins)*
Dried pasta
Conchigli(Shells) 400g 6cups 1tsp 12min
Farfalle(Bows) 400g 6cups 1tsp 12min
Fusilli(Twists) 400g 6cups 1tsp 10min
Spaghetti 400g 6cups 1tsp 10min
Tagliatelle 400g 6cups 1tsp 10min
Wholewheat dried pasta
Farfalle(Bows) 400g 6cups 1tsp 14min
Fusilli(Twists) 400g 6cups 1tsp 12min
Chilled fresh pasta
Fusilli 500g 6cups 2tsp 7min
Penne 500g 6cups 2tsp 6min
Spaghetti 500g 6cups 2tsp 7min
Spinach&RicottafilledTortelloni
300g 3cups 1tsp 3min
Tagliatelle 500g 6cups 2tsp 6min

22
EN
BREAD RISING FUNCTION
• Thisfunctionistoprovebreaddoughat40°CaftermanuallykneadingitandbeforebakingitinaconventionalovenorintheMultiCookusing“Baking”function(seedetailsbelow).
• Press«Menu»keytoselectfunction«Breadrising».Thescreendisplaysthedefaultcookingtime,the“Start”lightflashes.
• Press«Temperature/Timer»keytoselectthetimesettingfunctionandthenpress«<»and«>»tochangetherisingtime.
• Press«Start»key.Theapplianceenters into“Breadrising”mode, the“Start”lightstopsflashingandthescreendisplaystheremainingrisingtime.
Recommendationsforprovingdough(Breadrising)• Prepare thebreaddough separatelybyhand, ina foodprocessororinmixer.Maximumrecommendedbreaddoughquantity750gflour.Placetheprepareddoughinthecookingbowl,closethelidandselect“Breadrising”functionandrisingtime.Doughmadeusing500gflourhasarisingtimeofabout40minutesto1hour.
• Whenthedoughisready,youcancookitusing“Bakingfunction”at160°C.Fordoughmadewith500gofflourbakefor25minutes.Thenpress“Cancel”,carefullyremovetheinnerbowlusingovenglovesandturnoutthebreadontoaboard.Turnitover,replaceinthebowlandcook theother sideonBaking functionat 160°C for 20–25minutesor until bread sounds hollowwhen tapped. Adjust the cooking timeaccordingtothequantityofingredientsused.
• Forwhite bread,mix together 330g strongwhite bread flour, 1 tspsalt, ½ tsp sugar, ½ tblsp oil and 3.5 g Easy Bake or Fast Actiondriedyeast(½ asachet).Add200ml lukewarmwaterandkneadfor10 minutesuntilsmoothandelastic.Select“Breadrising”functionsetfor40minutes.Tobake,use“Baking”programat160°Cfor20minutes,removeandturnover,thenbakeat160°Cforafurther20minutesoruntilbreadsoundshollowwhentappedonthebase.
*For ‘al dente’ firmer texture pasta reduce the cooking time by 1 or2 minutes.Fordriedregularandwholewheatpastathecookingtimeisusuallythesameasthecookingtimestatedonthepacket.For chilled fresh pasta the cooking time is usually slightly longer thanstatedonthepacket.
23
REHEAT FUNCTION
• This function is intendedto reheatcookedfoodonly.Donotuse forreheatingfrozenfood.
• Press«Menu»keytoselectfunction«Reheat».Thescreendisplaysthedefaultcookingtime,the“Start”flashes.
• Press«Temperature/Timer»keytoselectthetimesettingfunctionandthenpress«<»and«>»tochangethereheatingtime.
• Press «Start» key. The appliance enters into “Reheat” cookingmodeandthe“Start”lightilluminatesandthescreendisplaystheremainingreheatingtime.
• At the end of cooking, the appliance will sound three “beeps” andwill enter into keepwarmmodewith the “Cancel/KeepWarm” lightilluminatedandthescreenwithdisplaythelengthoftimetheappliancehasbeeninkeepwarmmode.
CAUTION• The cold cooked food should not exceed 1/2 of the appliance’s
volume. Too much food cannot be thoroughly heated. Repeated use of “Reheat“ or too little food will lead to burnt food and a hard layer at the bottom.
• It is recommended not to reheat porridge, or it may become thick and paste like in consistency.
• Only reheat fresh cold cooked food. Do not reheat food that has been stored in the refrigerator for a long time. Do not reheat frozen food.
• Do not use “Reheat” function to defrost food.
CANCEL/KEEP WARM FUNCTION
Thereare2differentfunctionsofthiskey:CancelandKeepwarm.
1. Keep warm function:1.1 Manual Keep warm:You canmanually press the “Cancel/Keep warm” button, the “Cancel”lightilluminatesgreenandtheapplianceentersintokeepwarmmode.Thescreenwilldisplaythelengthoftimetheappliancehasbeeninkeepwarmmode. Press the “Cancel” button again to stop keep warm andreturntostandbymode.

24
EN
DIY FUNCTION
• The“DoItYourself”functionmemorisesyourfavouritecookingchoices.• Press“DIY”keytoselectDIYfunction.Firsttheappliancewilldisplaythedefaultcookingtimeandthe“Start”lightflashes.
• Thereare2possibilitiesfortheDIYsetting:− If you want to set the temperature and cooking time for yourprogramme,pressthe“Temperature/Timer”keytoselectthem.Thetemperaturecanbesetfrom40ºCto160ºCin10ºCincrements.Thenpress“Start”key.− Ifyouwanttouseoneofthecookingprogrammes(Baking,Soup,Steam,etc)asabasisforyourprogramme,press“Menu”keytoselectthedesiredcookingfunction.Thenyoucanmodify itbyusingthe“Temperature/Timer”key.Thenpress“Start”key.
• At the end of cooking, the appliance will sound three “beeps” andwill enter into keepwarmmodewith the “Cancel/KeepWarm” lightilluminatedandthescreenwithdisplaythelengthoftimetheappliancehasbeeninkeepwarmmode.
1.2 Automatic keep warm:Theappliancewill“beep”threetimesandautomaticallyenterthe“keepwarm” mode at the end of the cooking time (except Yogurt, Creamcheese,DessertandPasta functions).The “Cancel/Keepwarm”keywillilluminateandthescreenwilldisplaythelengthoftimetheappliancehasbeeninkeepwarmmode.If you want to cancel the automatic keep warm function operating after a cooking programme, before starting the selected cooking programme hold down the “Cancel” key continuously for 5 seconds. If you want to return to using the automatic keep warm function, press the “Cancel” button again for 5 seconds.2. Cancel function:• Press“Cancel”keytocancelallthesettingdataandreturntostandbymode.

25
Note:• Certain cooking programmes are defined as fully automatic and the
temperature and/or cooking time cannot be adjusted.• When using the DIY function your appliance memorises the last
temperature and cooking time for the next use.• To protect the appliance there is a temperature/time setting
restriction on DIY function:Between 40-100ºC, the cooking time range is 1 min – 9 hoursBetween 105-160ºC, the cooking time range is 1 min – 2 hours
DELAYED START FUNCTION
• The delayed start function is not available for Crust/Fry, Yogurt andCreamcheese.
• Tousethedelayedstartfunction,chooseacookingprogram,cookingtime and temperature first. Then, press the key “Delayed start” andchoosethetimeyouwanttodelaythestartofcooking.Thecombinedcookingtimeanddelayedstarttimemustnotexceed24hours.Eachpressof“<”or“>”willincreaseordecreasethedelayedstarttime.Thescreen will show the combined delayed time and cooking time. Forexample,ifyouwanttocookastewwithacookingtimeof2½hoursandyouwanttodelaythestarttimeby6hoursyousettheappliancetoshow“08:30”onthescreen(2hr30min+6hr=8hr30min).
• Whenyouhavechosentherequiredpresettime,pressthe“Start”keytoenterthecookingmode,the“Start”lightwillremainon.
• Afterthedelayedstarthasbeenbegunyoucancheckonthecookingtime by pressing the “Temperature/Timer” key. The cooking timecannotbealteredoncethedelayedstarttimehasbeenset.
TO ALTER THE COOKING TIME OR TEMPERATURE AFTER COOKING HAS STARTED
• During cooking you can modify the cooking time or cookingtemperaturebypressingthe“Temperature/Timer”key,thenselectthenewcookingtimeor temperature required.Thescreenwill flashandwithin5secondsitwillstopflashingandtheappliancewillusethenewsetting.

26
EN
MISCELLANEOUS INFORMATION
• Theappliancehas amemory function. In case of power failure, theappliance will memorise the cooking state right before the failure,anditwillcontinuethecookingprocessifthepowerisresumedwithin2 seconds. If the power failure lasts for more than 2 seconds, theappliancewillcancelpreviouscookingandreturntostandbystatus.
CLEANING AND MAINTENANCE
• Ensuretheapplianceisunpluggedandcompletelycooleddownbeforecleaningandmaintenance.
• Itisstronglyadvisedtocleanthecookingbowl,upperrimandinnerlidaftereachusewithasponge–fig.12.
• Thebowl,theinnerlid,thecupandspoonaredishwashersafe–fig.13.
Bowl, steam basket• Scouringpowdersandmetalspongesarenotrecommended.• Iffoodhasstucktotheinsideofthecookingbowl,youmayputwaterinthebowltosoakforawhilebeforewashing.
• Drythebowlcarefully.
ON COMPLETION OF COOKING
• Openthelid–fig.1.• When removing the cooking bowl or steam basket always use ovengloves.
• Serve the food using the spoon provided with your appliance andreclosethelid.
• 24hoursisthemaximumkeepwarmtime.• Press«Cance/KeepWarm»keytofinishkeepwarmstatus.• Unplugtheappliance.

27
Taking care of the bowlForthebowl,carefullyfollowtheinstructionsbelow:• Donotcutfoodinthecookingbowl.• Makesureyouputthebowlbackintotheapplianceaftereachuse.• Use thespoonprovidedorawoodenspoonandnotametalone toavoiddamagingthebowlsurface–fig.14.
• Toavoidanyriskofcorrosion,donotpourvinegarintothebowl.• Thecolourofthebowlsurfacemaychangeafterusingforthefirsttimeorafter longeruse.Thischange incolour isdue to theactionofsteamandwateranddoesnothaveanyeffectontheuseoftheappliance,nor it isdangerous foryourhealth, it isperfectly safe tocontinueusingit.
Cleaning the micro pressure valve• Tocleanthemicro-pressurevalve,pullitoutfromtheundersideofthelid–fig.15andturnittotheothersidethenrotateitinthedirectionofthe“openlock”symbol-fig.16aand16b.Aftercleaningit,pleasewipedryitandputthetwopartstogetherandrotateitinthedirection«close»,thenputitbacktothelidoftheappliance–fig.17aand17b.
Cleaning and care of the other parts of the appliance• Cleantheoutsideoftheappliance–fig.18,the insideofthe lidandthecordwithadampclothandwipedry.Donotuseabrasiveproducts.
• Donotusewatertocleantheinterioroftheappliancebodyasitcoulddamagetheheatsensor.
• Cleanthe inner lidaftereachuse toavoid thesmellof strongfoodslingeringintheappliance.
• Wesuggest to soak the inner lid for30minutes inwarmwaterwith2 teaspoonsbicarbonateofsodadissolvedinit,inordertopreventtheresidualodourfrompreviouscooking.
28
EN
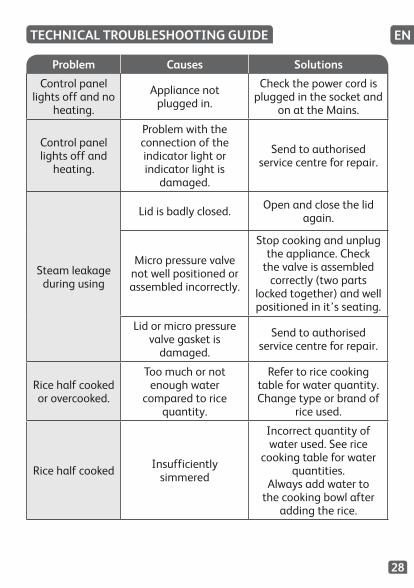
Problem Causes Solutions
Controlpanellightsoffandno
heating.
Appliancenotplugged in.
Checkthepowercordispluggedinthesocketand
onattheMains.
Controlpanellightsoffand
heating.
Problemwiththeconnectionoftheindicatorlightorindicatorlightis
damaged.
Sendtoauthorisedservicecentreforrepair.
Steamleakageduringusing
Lidisbadlyclosed. Openandclosethelidagain.
Micropressurevalvenotwellpositionedorassembledincorrectly.
Stopcookingandunplugtheappliance.Checkthevalveisassembledcorrectly(twoparts
lockedtogether)andwellpositionedinit’sseating.
Lidormicropressurevalvegasketisdamaged.
Sendtoauthorisedservicecentreforrepair.
Ricehalfcookedorovercooked.
Toomuchornotenoughwater
comparedtoricequantity.
Refertoricecookingtableforwaterquantity.Changetypeorbrandof
riceused.
Ricehalfcooked Insufficientlysimmered
Incorrectquantityofwaterused.Seerice
cookingtableforwaterquantities.
Alwaysaddwatertothecookingbowlafter
addingtherice.
TECHNICAL TROUBLESHOOTING GUIDE

29
ENVIRONMENTAL PROTECTION
Help protect the environment!Yourappliancecontainsanumberofmaterialsthatmayberecoveredorrecycled.Leaveitatalocalcivicwastecollectionpoint.
Problem Causes Solutions
Automatickeepwarmfails(nokeepwarmmodeaftercookingprogramorproductstaysoncookingprogram).
Thekeepwarmprogramhas
accidentallybeencancelledbytheuserwhensettingthe
appliance(seesection“KeepWarm”page24)
Readthesection”Keepwarm”intheinstructions.
TheautomatickeepwarmdoesnotoperatewithfunctionsYogurt,Creamcheese,Dessert
andPasta.Iftheproblempersistssendtoanauthorisedservicecentreforrepair.
E0 Temperaturesensoronlidisdamaged
Sendtoanauthorisedservicecentre
E1Temperaturesensorunderthebowlis
damaged
Stoptheapplianceandrestarttheprogram.
If theproblemcontinues,pleasesendtothe
authorisedservicecentreforrepair.
E3
Hightemperaturedetected(notenoughfoodorliquidinthe
bowl)
Unplugtheapplianceforafewseconds,andrestarttheprogram.
If theproblemcontinues,pleasesendtothe
authorisedservicecentreforrepair.
Note: If inner bowl is deformed, do not use it anymore and get a replacement from the authorised service centre for repair.

NC00127858
EN p. 1 – 29
DE p. 30 – 54
EN
AR
Copyright © 2022 FDOKUMEN