LED BionicPro | Recessed Linear - Prudential Lighting
19
Prudential Ltg. reserves the right to change design specifications or materials without notice. Please visit prulite.com for most current data. © 2015 All rights reserved – All products manufactured at: Prudential Ltg. 1774 E. 21st Street, Los Angeles, CA 90058 PRULITE.COM 213.746.0360 WARNING: Ground fixture in accordance with local and national electrical codes. Failure to do so may result in serious personal injury. LED BionicPro | Recessed Linear INSTALLATION INSTRUCTIONS X3 / X11 (HARD CEILING) PART SIZE PART NO. DESCRIPTION LENS TOOL: 2˝ — 100-00462-10 White 100-00508-10 BPRO2 Lens Tool Clamp (REGRESS 3 ONLY) 3˝ — 100-00464-10 Natural 4˝ — 100-00465-10 Black 5˝ — 100-00463-10 White STIFFENER: 2˝ — 106695 3˝ — 106694 4˝ — 106693 FOR FILLER FIXTURES ONLY 5˝ — 106692 100-00299-14 #6-32 x 3/16˝ Phillips Pan Head Screw (4 SCREWS PER STIFFNER) END PLATE REFLECTOR: 2˝ — 100-00482-10 For Non-White Painted Fixtures Only 3˝ — 100-00483-10 4˝ — 100-00484-10 5˝ — 100-00485-10 END PLATES: 2˝ — 111067 Wall-to-Wall 3˝ — 111068 4˝ — 111069 5˝ — 111070 100-00212-14 #6-32 x ˝ Flat Phillips Head Undercut Screw, Type F See Page 2 Light Pocket 100-00300-14 End Cap Counter Sink #6-32 x ˝ Screw PART PART NO. DESCRIPTION See Order Louvers 100-00359-14 #4-40 x ˝ Flat Head Phil Machine Screw 100-00283-14 ˝-20 x 5˝ Round Head Combination Drive Machine Screw 100-00255-14 ˝-20 KEPS Hex Nut 100-00040-20 Tape Strips 100-00299-14 #6 Reflector Screws 100-00311-14 Taper Pin (Shipped Installed) 100-00486-10 Seam Reflector 100-00380-02 Regress Trim Aligner LTR (LINEAR TO RECESSED TRANSITION PLATES): DIRECT TO REC/PER DIRECT/INDIRECT TO REC/PER 2˝ — 135770 135774 3˝ — 135771 135775 4˝ — 135772 135776 5˝ — 135773 135777 FTR (FEATHERING DIFFUSER): 100-00843-10 Diffuser 100-00374-14 Nylon Spacer Washer 100-00182-14 6-32 x ½˝ Screw OVERHEAD MOUNTING BRACKET (OMB) KIT — (OPTIONAL) 108554 2˝ — 108555 3˝ — 108556 4˝ — 108557 5˝ — 100-00242-14 3/8˝ Type 316 Stainless Steel Flat Washer 100-00255-14 -20 Keps Hex Nut 05-25-2022 19 1 of
-
Upload
khangminh22 -
Category
Documents
-
view
1 -
download
0
Transcript of LED BionicPro | Recessed Linear - Prudential Lighting

Prudential Ltg. reserves the right to change design specifications or materials without notice. Please visit prulite.com for most current data. © 2015 All rights reserved – All products manufactured at: Prudential Ltg. 1774 E. 21st Street, Los Angeles, CA 90058
PRULITE.COM 213.746.0360
WARNING: Ground fixture in accordance with local and national electrical codes. Failure to do so may result in serious personal injury.
LED BionicPro | Recessed Linear
I N S T A L L A T I O N I N S T R U C T I O N S
X 3 / X 11 ( H A R D C E I L I N G )
PART SIZE PART NO. DESCRIPTION
LENS TOOL:
2˝ — 100-00462-10 White
100-00508-10 BPRO2 Lens Tool Clamp(REGRESS 3 ONLY)
3˝ — 100-00464-10 Natural
4˝ — 100-00465-10 Black
5˝ — 100-00463-10 White
STIFFENER:
2˝ — 106695
3˝ — 106694
4˝ — 106693 FOR FILLER FIXTURES ONLY
5˝ — 106692
100-00299-14 #6-32 x 3/16˝ Phillips Pan Head Screw (4 SCREWS PER STIFFNER)
END PLATE REFLECTOR:
2˝ — 100-00482-10
For Non-White Painted Fixtures Only3˝ — 100-00483-10
4˝ — 100-00484-10
5˝ — 100-00485-10
END PLATES:
2˝ — 111067
Wall-to-Wall3˝ — 111068
4˝ — 111069
5˝ — 111070
100-00212-14#6-32 x 1/4˝ Flat Phillips Head Undercut Screw, Type F
See Page 2 Light Pocket
100-00300-14 End Cap Counter Sink #6-32 x 3/4˝ Screw
PART PART NO. DESCRIPTION
See Order Louvers
100-00359-14 #4-40 x 1/4˝ Flat Head Phil Machine Screw
100-00283-14 1/4˝-20 x 5˝ Round Head Combination Drive Machine Screw
100-00255-14 1/4˝-20 KEPS Hex Nut
100-00040-20 Tape Strips
100-00299-14 #6 Reflector Screws
100-00311-14 Taper Pin (Shipped Installed)
100-00486-10 Seam Reflector
100-00380-02 Regress Trim Aligner
LTR (LINEAR TO RECESSED TRANSITION PLATES):
DIRECT TO REC/PER DIRECT/INDIRECT TO REC/PER
2˝ — 135770 135774
3˝ — 135771 135775
4˝ — 135772 135776
5˝ — 135773 135777
FTR (FEATHERING DIFFUSER):
100-00843-10 Diffuser
100-00374-14 Nylon Spacer Washer
100-00182-14 6-32 x ½˝ Screw
OVERHEAD MOUNTING BRACKET (OMB) KIT — (OPTIONAL)
108554 2˝ —
108555 3˝ —
108556 4˝ —
108557 5˝ —
100-00242-14 3/8˝ Type 316 Stainless Steel Flat Washer
100-00255-14 1/4-20 Keps Hex Nut
05-25-2022
191 of

Prudential Ltg. reserves the right to change design specifications or materials without notice. Please visit prulite.com for most current data. © 2015 All rights reserved – All products manufactured at: Prudential Ltg. 1774 E. 21st Street, Los Angeles, CA 90058
PRULITE.COM 213.746.0360
WARNING: Ground fixture in accordance with local and national electrical codes. Failure to do so may result in serious personal injury.
LED BionicPro | Recessed Linear
I N S T A L L A T I O N I N S T R U C T I O N S
X 3 / X 11 ( H A R D C E I L I N G )
FLUSH REGRESS 0.5˝ REGRESS 1˝ REGRESS 3˝
X3
BPRO2 100-00073-03 100-00136-03 100-00156-03 100-00176-03
BPRO3 100-00074-03 100-00141-03 100-00161-03 100-00181-03
BPRO4 100-00075-03 100-00146-03 100-00166-03 100-00186-03
BPRO5 100-00076-03 100-00151-03 100-00171-03 100-00191-03
X11
BPRO2 100-00081-03 100-00140-03 100-00160-03 100-00180-03
BPRO3 100-00082-03 100-00145-03 100-00165-03 100-00185-03
BPRO4 100-00083-03 100-00150-03 100-00170-03 100-00190-03
BPRO5 100-00084-03 100-00155-03 100-00175-03 100-00195-03
PARTS LIST SIZE PART NO.
LENS OPTIONS: SAL BTW WWF WWG MGZ
2˝ — 100-00966-18 100-00961-18 100-00973-18 100-00978-18 100-01004-18
3˝ — 100-00967-18 100-00962-18 100-00974-18 100-00979-18 100-01005-18
4˝ — 100-00968-18 100-00963-18 100-00975-18 100-00980-18 100-01006-08
5˝ — 100-00969-18 100-00964-18 100-00976-18 100-00981-18 100-01007-18
END CAPS
CEILING SYSTEMS:
5/8˝
11/32˝
X3: Hard Ceiling
For X11, use the desired height of the bottom face of the fixture as the base measurement point for the wall rail height and screw location.
05-25-2022
192 of

Prudential Ltg. reserves the right to change design specifications or materials without notice. Please visit prulite.com for most current data. © 2015 All rights reserved – All products manufactured at: Prudential Ltg. 1774 E. 21st Street, Los Angeles, CA 90058
PRULITE.COM 213.746.0360
WARNING: Ground fixture in accordance with local and national electrical codes. Failure to do so may result in serious personal injury.
LED BionicPro | Recessed Linear
I N S T A L L A T I O N I N S T R U C T I O N S
X 3 / X 11 ( H A R D C E I L I N G )
W
APERTURE BPRO2 BPRO3 BPRO4 BPRO5
W = FIXTURE WIDTH 2˝ 3˝ 4˝ 5˝
X = CEILING OPENING 25/16˝ 35/16˝ 45/16˝ 55/16˝
FIXTURE ROUGH IN LENGTH = Fixture Length + 15/16˝
CEILING ROUGH-IN DIMENSIONS:
X
X
X
47/16˝
415/16˝615/16˝
LO U V E R
FLSH: REG.5:
LVR:
REG1:
LVR1:
REG3:
LVR3:
W W
X
315/16˝
W
X
47/16˝
W
W
X
415/16˝
LO U V E R
W
X
615/16˝LO U V E R
05-25-2022
193 of

Prudential Ltg. reserves the right to change design specifications or materials without notice. Please visit prulite.com for most current data. © 2015 All rights reserved – All products manufactured at: Prudential Ltg. 1774 E. 21st Street, Los Angeles, CA 90058
PRULITE.COM 213.746.0360
LED BionicPro | Recessed Linear
I N S T A L L A T I O N I N S T R U C T I O N S
X 3 / X 11 ( H A R D C E I L I N G )
LIGHT POCKET (LP):
WALL-TO-WALL (WTW):
POWER FEED LOCATIONS:
FIXTURE LENGTHS TIE ROD LOCATIONS
Start / Intermediate End / Individual Start / Individual Intermediate End
2´ 24˝ 24˝ 20˝ 24˝ 24˝3´ 36˝ 36˝ 32˝ 36˝ 36˝4´ 48˝ 48˝ 44˝ 48˝ 48˝5´ 60˝ 60˝ 56˝ 60˝ 60˝6´ 72˝ 72˝ 68˝ 72˝ 72˝7´ 84˝ 84˝ 80˝ 84˝ 84˝8´ 96˝ 96˝ 92˝ 96˝ 96˝
FIXTURE LENGTH TIE ROD LOCATIONS
FIXTURE LENGTH Start Intermediate
— — — —2´ 24˝ 20˝ 24˝3´ 36˝ 32˝ 36˝4´ 48˝ 44˝ 48˝5´ 60˝ 56˝ 60˝6´ 72˝ 68˝ 72˝7´ 84˝ 80˝ 84˝8´ 96˝ 92˝ 96˝
FIXTURE LENGTH TIE ROD LOCATIONS
FIXTURE LENGTH Filler Filler Individual
1FR 16˝- 26˝ 177/16˝ 147/16˝2F 24˝- 38˝ 257/16˝ 227/16˝3F 36˝- 50˝ 377/16˝ 347/16˝4F 48˝- 62˝ 497/16˝ 467/16˝5F 60˝- 74˝ 617/16˝ 587/16˝6F 72˝- 86˝ 737/16˝ 707/16˝7F 84˝- 98˝ 857/16˝ 827/16˝— — — —
Tie Rod Locations
Tie Rod Locations
Tie Rod Locations
Tie Rod Locations
Tie Rod Locations
Tie Rod Locations
Tie Rod Locations
Tie Rod Locations
Fixture Length
Fixture Length
Fixture Length
Fixture Length
Fixture Length
Fixture Length
Fixture Length
Fixture Length
CUTTABLE
CUTTABLE
2˝
2˝2˝
2˝
2˝
⇠½˝ Light Pocket
⇠ 1/32˝ Wall-to-Wall
½˝ Light Pocket ⇢
½˝ Light Pocket ⇢⇠ ½˝ Light Pocket
1/32˝ Wall-to-Wall ⇢
1/32˝ Wall-to-Wall ⇢
Tie Rod Locations Range for
Tie Rod Locations Range for
31/4˝ 31/4 ˝
⇠ ½˝ Light Pocket 1/32˝ Wall-to-Wall
½˝ Light Pocket ⇢1/32˝ Wall-to-Wall
START
START
INTERMEDIATE
INTERMEDIATE
END
FILLER
FILLER
INDIVIDUAL
BPRO2
9/16˝ to 149/16˝ (2F-7F)9/16˝ to 109/16˝ (1FR)
9/16˝ to 149/16˝ (2F-7F)9/16˝ to 109/16˝ (1FR)
1˝
⇠ 1/32˝ Wall-to-Wall
BPRO2
05-25-2022
194 of
Prudential Ltg. reserves the right to change design specifications or materials without notice. Please visit prulite.com for most current data. © 2015 All rights reserved – All products manufactured at: Prudential Ltg. 1774 E. 21st Street, Los Angeles, CA 90058
PRULITE.COM 213.746.0360
LED BionicPro | Recessed Linear
I N S T A L L A T I O N I N S T R U C T I O N S
X 3 / X 11 ( H A R D C E I L I N G )
BPRO3/4/5
LIGHT POCKET (LP):
WALL-TO-WALL (WTW):
FIXTURE LENGTHS TIE ROD LOCATIONS
Start / Intermediate End / Individual Start / Individual Intermediate End
2´ 24˝ 24˝ 20˝ 24˝ 24˝3´ 36˝ 36˝ 32˝ 36˝ 36˝4´ 48˝ 48˝ 44˝ 48˝ 48˝5´ 60˝ 60˝ 56˝ 60˝ 60˝6´ 72˝ 72˝ 68˝ 72˝ 72˝7´ 84˝ 84˝ 80˝ 84˝ 84˝8´ 96˝ 96˝ 92˝ 96˝ 96˝
Tie Rod Locations
Tie Rod Locations
Tie Rod Locations
Tie Rod Locations
Tie Rod Locations
Tie Rod Locations
Tie Rod Locations
Tie Rod Locations
Fixture Length
Fixture Length
Fixture Length
Fixture Length
Fixture Length
Fixture Length
Fixture Length
Fixture Length
2˝
2˝2˝
2˝
2˝
⇠½˝ Light Pocket
⇠ 1/32˝ Wall-to-Wall
½˝ Light Pocket ⇢
½˝ Light Pocket ⇢⇠ ½˝ Light Pocket
1/32˝ Wall-to-Wall ⇢
1/32˝ Wall-to-Wall ⇢
START
START
INTERMEDIATE
INTERMEDIATE
END
FILLER
FILLER
INDIVIDUAL
1˝
⇠ 1/32˝ Wall-to-Wall
POWER FEED LOCATIONS:
315/16˝ 315/16˝
⇠ ½˝ Light Pocket 1/32˝ Wall-to-Wall
½˝ Light Pocket ⇢1/32˝ Wall-to-Wall
31/4˝ 31/4˝
BPRO3
BPRO4/5
CUTTABLE
CUTTABLE
Tie Rod Locations Range for
Tie Rod Locations Range for
9/16˝ to 149/16˝ (2F-7F)9/16˝ to 109/16˝ (1FR)
9/16˝ to 149/16˝ (2F-7F)9/16˝ to 109/16˝ (1FR)
FIXTURE LENGTH TIE ROD LOCATIONS
FIXTURE LENGTH Start Intermediate
— — — —2´ 24˝ 20˝ 24˝3´ 36˝ 32˝ 36˝4´ 48˝ 44˝ 48˝5´ 60˝ 56˝ 60˝6´ 72˝ 68˝ 72˝7´ 84˝ 80˝ 84˝8´ 96˝ 92˝ 96˝
FIXTURE LENGTH TIE ROD LOCATIONS
FIXTURE LENGTH Filler Filler Individual
1FR 16˝- 26˝ 177/16˝ 147/16˝2F 24˝- 38˝ 257/16˝ 227/16˝3F 36˝- 50˝ 377/16˝ 347/16˝4F 48˝- 62˝ 497/16˝ 467/16˝5F 60˝- 74˝ 617/16˝ 587/16˝6F 72˝- 86˝ 737/16˝ 707/16˝7F 84˝- 98˝ 857/16˝ 827/16˝— — — —
05-25-2022
195 of

Prudential Ltg. reserves the right to change design specifications or materials without notice. Please visit prulite.com for most current data. © 2015 All rights reserved – All products manufactured at: Prudential Ltg. 1774 E. 21st Street, Los Angeles, CA 90058
PRULITE.COM 213.746.0360
WARNING: Ground fixture in accordance with local and national electrical codes. Failure to do so may result in serious personal injury.
LED BionicPro | Recessed Linear
I N S T A L L A T I O N I N S T R U C T I O N S
X 3 / X 11 ( H A R D C E I L I N G )
ROW LENGTH FIXTURE ROW
9´ 4FT STR + 5FT END
10´ 4FT STR + 6FT END
11´ 4FT STR + 7FT END
12´ 8FT STR + 4FT END
13´ 8FT STR + 5FT END
14´ 8FT STR + 6FT END
15´ 8FT STR + 7FT END
16´ 8FT STR + 8FT END
17´ 4FT STR + (1) 8FT INT + 5FT END
18´ 4FT STR + (1) 8FT INT + 6FT END
19´ 4FT STR + (1) 8FT INT + 7FT END
20´ 8FT STR + (1) 8FT INT + 4FT END
21´ 8FT STR + (1) 8FT INT + 5FT END
22´ 8FT STR + (1) 8FT INT + 6FT END
23´ 8FT STR + (1) 8FT INT + 7FT END
24´ 8FT STR + (1) 8FT INT + 8FT END
25´ 4FT STR + (2) 8FT INT + 5FT END
26´ 4FT STR + (2) 8FT INT + 6FT END
27´ 4FT STR + (2) 8FT INT + 7FT END
28´ 8FT STR + (2) 8FT INT + 4FT END
29´ 8FT STR + (2) 8FT INT + 5FT END
30´ 8FT STR + (2) 8FT INT + 6FT END
31´ 8FT STR + (2) 8FT INT + 7FT END
32´ 8FT STR + (2) 8FT INT + 8FT END
33´ 4FT STR + (3) 8FT INT + 5FT END
34´ 4FT STR + (3) 8FT INT + 6FT END
35´ 4FT STR + (3) 8FT INT + 7FT END
36´ 8FT STR + (3) 8FT INT + 4FT END
37´ 8FT STR + (3) 8FT INT + 5FT END
38´ 8FT STR + (3) 8FT INT + 6FT END
39´ 8FT STR + (3) 8FT INT + 7FT END
40´ 8FT STR + (3) 8FT INT + 8FT END
41´ 4FT STR + (4) 8FT INT + 5FT END
42´ 4FT STR + (4) 8FT INT + 6FT END
43´ 4FT STR + (4) 8FT INT + 7FT END
44´ 8FT STR + (4) 8FT INT + 4FT END
45´ 8FT STR + (4) 8FT INT + 5FT END
46´ 8FT STR + (4) 8FT INT + 6FT END
47´ 8FT STR + (4) 8FT INT + 7FT END
48 8FT STR + (4) 8FT INT + 8FT END
49´ 4FT STR + (5) 8FT INT + 5FT END
50´ 4FT STR + (5) 8FT INT + 6FT END
ROW LENGTH FIXTURE ROW MINIMUM
FILLER LENGTHMAXIMUM
FILLER LENGTH9´ 4FT STR + 4FT FILLER 8´ - 0˝ (96˝) 9´ - 2˝ (110˝)
10´ 4FT STR + 5FT FILLER 9´ - 0˝ (108˝) 10´ - 2˝ (122˝)
11´ 4FT STR + 6FT FILLER 10´ - 0˝ (120˝) 11´ - 2˝ (134˝)
12´ 4FT STR + 7FT FILLER 11´ - 0˝ (132˝) 12´ - 2˝ (146˝)
13´ 8FT STR + 4FT FILLER 12´ - 0˝ (144˝) 13´ - 2˝ (158˝)
14´ 8FT STR + 5FT FILLER 13´ - 0˝ (156˝) 14´ - 2˝ (170˝)
15´ 8FT STR + 6FT FILLER 14´ - 0˝ (168˝) 15´ - 2˝ (182˝)
16´ 8FT STR + 7FT FILLER 15´ - 0˝ (180˝) 16´ - 2˝ (194˝)
17´ 4FT STR + (1) 8FT INT + 4FT FILLER 16´ - 0˝ (192˝) 17´ - 2˝ (206˝)
18´ 4FT STR + (1) 8FT INT + 5FT FILLER 17´ - 0˝ (204˝) 18´ - 2˝ (218˝)
19´ 4FT STR + (1) 8FT INT + 6FT FILLER 18´ - 0˝ (216˝) 19´ - 2˝ (230˝)
20´ 4FT STR + (1) 8FT INT + 7FT FILLER 19´ - 0˝ (228˝) 20´ - 2˝ (242˝)
21´ 8FT STR + (1) 8FT INT + 4FT FILLER 20´ - 0˝ (240˝) 21´ - 2˝ (254˝)
22´ 8FT STR + (1) 8FT INT + 5FT FILLER 21´ - 0˝ (252˝) 22´ - 2˝ (266˝)
23´ 8FT STR + (1) 8FT INT + 6FT FILLER 22´ - 0˝ (264˝) 23´ - 2˝ (278˝)
24´ 8FT STR + (1) 8FT INT + 7FT FILLER 23´ - 0˝ (276˝) 24´ - 2˝ (290˝)
25´ 4FT STR + (2) 8FT INT + 4FT FILLER 24´ - 0˝ (288˝) 25´ - 2˝ (302˝)
26´ 4FT STR + (2) 8FT INT + 5FT FILLER 25´ - 0˝ (300˝) 26´ - 2˝ (314˝)
27´ 4FT STR + (2) 8FT INT + 6FT FILLER 26´ - 0˝ (312˝) 27´ - 2˝ (326˝)
28´ 4FT STR + (2) 8FT INT + 7FT FILLER 27´ - 0˝ (324˝) 28´ - 2˝ (338˝)
29´ 8FT STR + (2) 8FT INT + 4FT FILLER 28´ - 0˝ (336˝) 29´ - 2˝ (350˝)
30´ 8FT STR + (2) 8FT INT + 5FT FILLER 29´ - 0˝ (348˝) 30´ - 2˝ (362˝)
31´ 8FT STR + (2) 8FT INT + 6FT FILLER 30´ - 0˝ (360˝) 31´ - 2˝ (374˝)
32´ 8FT STR + (2) 8FT INT + 7FT FILLER 31´ - 0˝ (372˝) 32´ - 2˝ (386˝)
33´ 4FT STR + (3) 8FT INT + 4FT FILLER 32´ - 0˝ (384˝) 33´ - 2˝ (398˝)
34´ 4FT STR + (3) 8FT INT + 5FT FILLER 33´ - 0˝ (396˝) 34´ - 2˝ (410˝)
35´ 4FT STR + (3) 8FT INT + 6FT FILLER 34´ - 0˝ (408˝) 35´ - 2˝ (422˝)
36´ 4FT STR + (3) 8FT INT + 7FT FILLER 35´ - 0˝ (420˝) 36´ - 2˝ (434˝)
37´ 8FT STR + (3) 8FT INT + 4FT FILLER 36´ - 0˝ (432˝) 37´ - 2˝ (446˝)
38´ 8FT STR + (3) 8FT INT + 5FT FILLER 37´ - 0˝ (444˝) 38´ - 2˝ (458˝)
39´ 8FT STR + (3) 8FT INT + 6FT FILLER 38´ - 0˝ (456˝) 39´ - 2˝ (470˝)
40´ 8FT STR + (3) 8FT INT + 7FT FILLER 39´ - 0˝ (468˝) 40´ - 2˝ (482˝)
41´ 4FT STR + (4) 8FT INT + 4FT FILLER 40´ - 0˝ (480˝) 41´ - 2˝ (494˝)
42´ 4FT STR + (4) 8FT INT + 5FT FILLER 41´ - 0˝ (492˝) 42´ - 2˝ (506˝)
43´ 4FT STR + (4) 8FT INT + 6FT FILLER 42´ - 0˝ (504˝) 43´ - 2˝ (518˝)
44´ 4FT STR + (4) 8FT INT + 7FT FILLER 43´ - 0˝ (516˝) 44´ - 2˝ (530˝)
45´ 8FT STR + (4) 8FT INT + 4FT FILLER 44´ - 0˝ (528˝) 45´ - 2˝ (542˝)
46´ 8FT STR + (4) 8FT INT + 5FT FILLER 45´ - 0˝ (540˝) 46´ - 2˝ (554˝)
47´ 8FT STR + (4) 8FT INT + 6FT FILLER 46´ - 0˝ (552˝) 47´ - 2˝ (566˝)
48 8FT STR + (4) 8FT INT + 7FT FILLER 47´ - 0˝ (564˝) 48´ - 2˝ (578˝)
49´ 4FT STR + (5) 8FT INT + 4FT FILLER 48´ - 0˝ (576˝) 49´ - 2˝ (590˝)
50´ 4FT STR + (5) 8FT INT + 5FT FILLER 49´ - 0˝ (588˝) 50´ - 2˝ (602˝)
ROW BUILDER
WALL-TO-WALL (WTW):LIGHT POCKET (LP):
05-25-2022
196 of

Prudential Ltg. reserves the right to change design specifications or materials without notice. Please visit prulite.com for most current data. © 2015 All rights reserved – All products manufactured at: Prudential Ltg. 1774 E. 21st Street, Los Angeles, CA 90058
PRULITE.COM 213.746.0360
WARNING: Ground fixture in accordance with local and national electrical codes. Failure to do so may result in serious personal injury.
LED BionicPro | Recessed Linear
I N S T A L L A T I O N I N S T R U C T I O N S
X 3 / X 11 ( H A R D C E I L I N G )
Run 1/4-20 All-thread from structure to fixture mounting locations for support. Install rough electrical. 1a) 1b)NOTE: See mounting locations (pages 4-5).
— Install drywall.
— Cut rough-in holes See mounting locations (pages 4-5).
— Finish and paint drywall
2)
OPTIONAL Screw Overhead Mounting Brackets (OMB) to joists (screws by others). Install rough-in electrical.
3) Remove screws and reflectors from all fixtures and disconnect wires for LEDs.
Run power into access plate.
4)
0-10V (+) : PURPLE 0-10V (-) : GREY
DALI (+) : PURPLE DALI (–) : GREY
EcoSystem DALI (+): PURPLE EcoSystem DALI (–) : GREY
HOT : BLACK
NEUTRAL : WHITE
GROUND : GREEN
CONSTANT HOT (EM) / DIMMING : RED
EXTRA HOT / DIMMING : BLUE
EXTRA HOT / DIMMING : ORANGE
WIRING:
Slide fixture into slot. 6)
Insert washers
and nuts.
7a)5) BPRO2 + 3 EMHE EMERGENCY AND LUTRON AT SO ONLY.
NOTE: BPRO2 & 3 are not IC-rated for insulation with emergency.WARNING: Warranty voided if insulation detector is removed or not snapped into place.
113/16˝
Insert insulation detector into knockout. (REFER TO PAGE 22).
05-25-2022
197 of
Prudential Ltg. reserves the right to change design specifications or materials without notice. Please visit prulite.com for most current data. © 2015 All rights reserved – All products manufactured at: Prudential Ltg. 1774 E. 21st Street, Los Angeles, CA 90058
PRULITE.COM 213.746.0360
WARNING: Ground fixture in accordance with local and national electrical codes. Failure to do so may result in serious personal injury.
LED BionicPro | Recessed Linear
I N S T A L L A T I O N I N S T R U C T I O N S
X 3 / X 11 ( H A R D C E I L I N G )
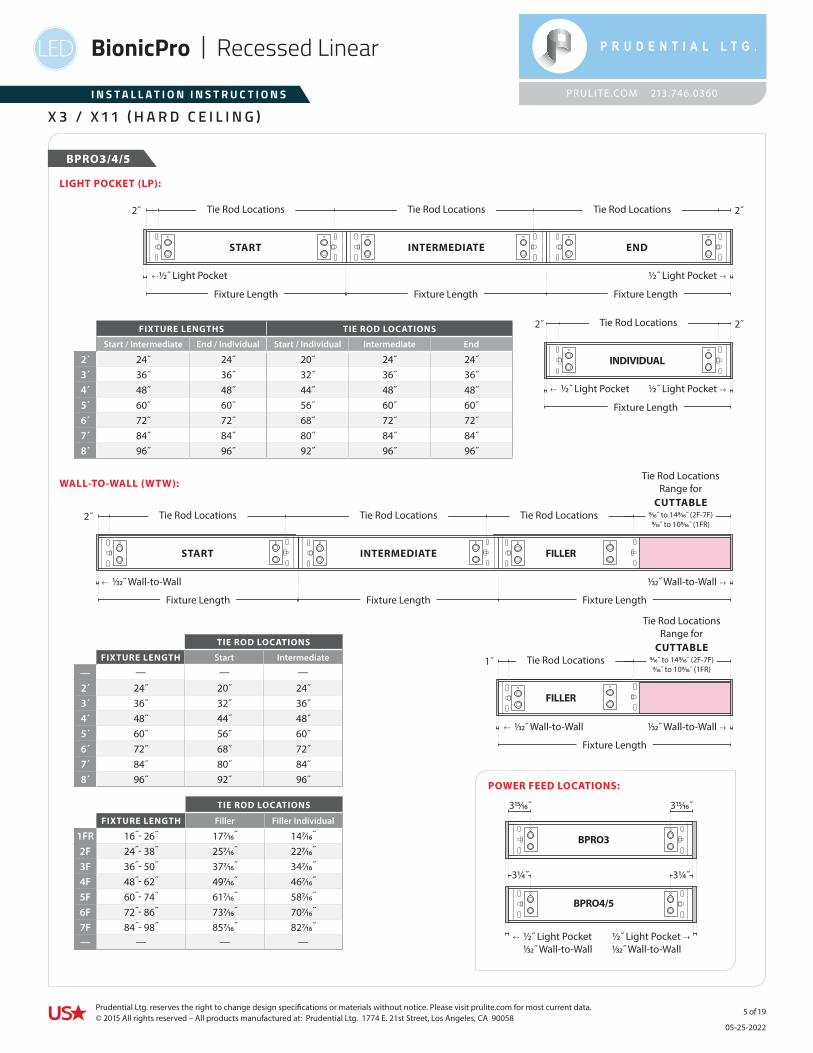
7) Install next fixture
NOTE: Taper Pins ( ) are installed on MALE side of electrical power connections for easy alignment of continuous rowsMALE FEMALE
START INTERMEDIATE END
8a)
Make electrical and dimming harness connections and slide fixtures together —
making sure Taper pins are aligned
MALE
FEMALE
STEPS 11-12 FOR ROWS ONLY, FOR INDIVIDUALS CONTINUE TO STEP 13
Install Bolt & Nut to both sides until snug
8b)
TA P E R P I N S D E TA I L
R E G R E S S A L I G N E R D E TA I L
9) Reinstall the reflector without LEDs (Reflector B).—Make electrical connections to LEDs (See inset).—Tuck all loose wires behind reflector B.—Reinstall reflector with LEDs (Reflector A).
05-25-2022
198 of

Prudential Ltg. reserves the right to change design specifications or materials without notice. Please visit prulite.com for most current data. © 2015 All rights reserved – All products manufactured at: Prudential Ltg. 1774 E. 21st Street, Los Angeles, CA 90058
PRULITE.COM 213.746.0360
WARNING: Ground fixture in accordance with local and national electrical codes. Failure to do so may result in serious personal injury.
LED BionicPro | Recessed Linear
I N S T A L L A T I O N I N S T R U C T I O N S
X 3 / X 11 ( H A R D C E I L I N G )
10) 11) Peel blue protective covering off reflectors.
SEE PAGE xx FOR LENS INSTALLATION
Snap reflectors into place.
INSTALL SCREWS
PUSH TO ENGAGE REFLECTOR
REFLECTOR IN CORRECTLY� NOT ENGAGED
12a) Insert seam reflector under brake.
ADHESIVE SIDE
REFLECTIVE SIDE
Tear seam reflector at perforation. Peel film to reveal adhesive. 12b)
Peel back
Tear seam
FOLD END REFLECTORS AT PERFORATIONS
14) Install Lens (see page 13).
12c) 13)Secure the seam reflector.
Align folded reflector with end cap interior.
Install end reflector so it covers the seam between the
end cap and reflector
05-25-2022
199 of
Prudential Ltg. reserves the right to change design specifications or materials without notice. Please visit prulite.com for most current data. © 2015 All rights reserved – All products manufactured at: Prudential Ltg. 1774 E. 21st Street, Los Angeles, CA 90058
PRULITE.COM 213.746.0360
WARNING: Ground fixture in accordance with local and national electrical codes. Failure to do so may result in serious personal injury.
LED BionicPro | Filler Kit
I N S T A L L A T I O N I N S T R U C T I O N S
05-25-2022
1910 of
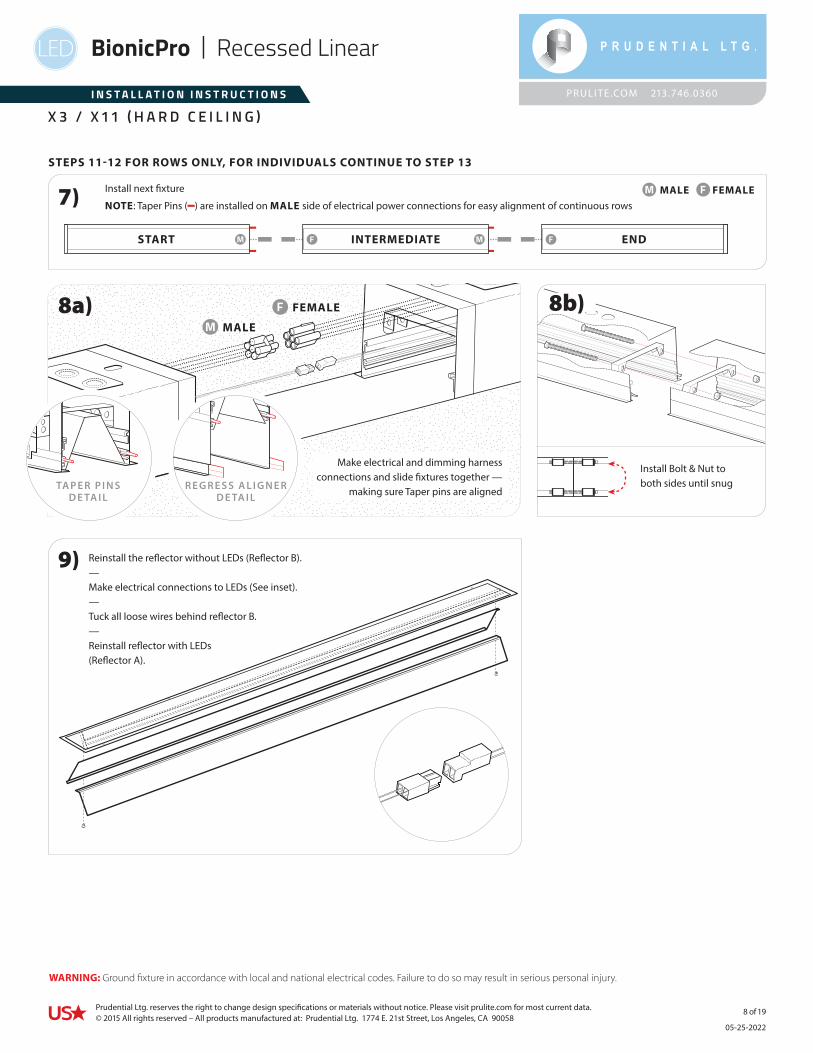
C U T L E N G T H = X ˝
C U T L E N G T H = X ˝
INTERMEDIATE: Fixture-to-Fixture.
INDIVIDUAL: Wall-to-Wall.
x˝
C U T L E N G T H = X ˝ - 1 / 2 ˝
LIGHT POCKET END OF RUN: Previous fixture to end of run.
C U T L E N G T H = X ˝
END OF RUN: Previous fixture to Wall
x˝
x˝
C U T L E N G T H = X ˝ -1 ˝
LIGHT POCKET INDIVIDUAL: Ceiling Opening.
1)
Measure from LED END to FOAM END. Mark for cutting on FOAM END.
2)
Leave Foam Insert
LED END
CUT LENGTH
WARNING: Do not cut wire harness
x˝
x˝
C U T L E N G T H = X ˝
Determine cut length of filler fixture.

Prudential Ltg. reserves the right to change design specifications or materials without notice. Please visit prulite.com for most current data. © 2015 All rights reserved – All products manufactured at: Prudential Ltg. 1774 E. 21st Street, Los Angeles, CA 90058
PRULITE.COM 213.746.0360
WARNING: Ground fixture in accordance with local and national electrical codes. Failure to do so may result in serious personal injury.
LED BionicPro | Filler Kit
I N S T A L L A T I O N I N S T R U C T I O N S
Return to step xx.7)6) Pull telescoping LED reflector to end of fixture.
05-25-2022
1911 of
Cut foam insert side of fixture with chop saw (move screws if needed).
3)IF SCREW IS IN THE WAY,MOVE TO NEXT LOWEST
COMPLETE HOLE PAIR
Pan Head #6-32-3/16˝
Remove foam insert, install stiffener at first available holes.4)
USE MIDDLE “ANGLED” HOLES
Pan Head #6-32-3/16˝
For REGRESS 3 use Jigsaw.
Install (2) Wall End Plates
INDIVIDUAL: Wall to Wall
Pan Head#6-32-3/16˝
5c)
Install (2) Light Pocket End Caps
INDIVIDUAL: Ceiling Opening
Install Taper Pins
INTERMEDIATE:5e)5d)
#6-32 x 3/4˝
Install Light Pocket Diecast End
END OF RUN: Previous fixture to wall
END OF RUN: Previous fixture to end of run5a) 5b)
Install Wall End Plate
#6-32 x 3/4˝
Pan Head #6-32-3/16˝

Prudential Ltg. reserves the right to change design specifications or materials without notice. Please visit prulite.com for most current data. © 2015 All rights reserved – All products manufactured at: Prudential Ltg. 1774 E. 21st Street, Los Angeles, CA 90058
PRULITE.COM 213.746.0360
WARNING: Ground fixture in accordance with local and national electrical codes. Failure to do so may result in serious personal injury.
LED BionicPro | Lens Installation
I N S T A L L A T I O N I N S T R U C T I O N S
ENERGIZE ROWS TO ENSURE ALL LEDS ARE WORKING BEFORE INSTALL LENS REQUIRES TWO PEOPLE TO INSTALL
L E N S I N S T A L L A T I O N — I F A L L F I X T U R E S A R E A L R E A D Y I N S T A L L E D
Measure 18˝ from end cap. Using a pencil, place a small mark on the fixture.
Install tape strip TIGHTLY approximately 16˝ from start.
Make sure lens is square.1)
3)
2)
4) Insert lens into lens tool, then place just before TIGHT tape strip.
SAL – Satin lens has both sides the same, reversible, no orientation
BTW – Batwing shiny side UP, matte frosted side DOWN.
MGZ/WWF/WWG/PFL – Wall Wash and Perimeter lenses, ribbed side UP (they can be seen and felt). NOTE: WWG and PFL are the same with opposite orientation
Stickers indicate WALL and ROOM sides, but the lens also has engraving indicating each as shown.
LENS ORIENTATION
START END
RECOMMENDED: Start lens installation from LEFT to RIGHT.
FOR BPRO2-REG3
16˝
TIGHT tape strip
INTERMEDIATE
Lens tool with clamp
installed into fixture Clamp removed
Install clamp before inserting into fixture. Once installed in fixture, remove clamp and proceed to step 5.
05-25-2022
1912 of

Prudential Ltg. reserves the right to change design specifications or materials without notice. Please visit prulite.com for most current data. © 2015 All rights reserved – All products manufactured at: Prudential Ltg. 1774 E. 21st Street, Los Angeles, CA 90058
PRULITE.COM 213.746.0360
WARNING: Ground fixture in accordance with local and national electrical codes. Failure to do so may result in serious personal injury.
LED BionicPro | Lens Installation
I N S T A L L A T I O N I N S T R U C T I O N S
Use tape strip to pull lens into end cap. Make sure lens is tucked inside end cap. At start of fixture, remove tape strips and as a rough cut trim lens 1˝ past end cap.
Mark lens with pencil where you made the mark 18˝ from start of row inside fixture.
Slide lens tool end cap to insert remaining lens, using other end of tool or fingers to insert at end cap.
7)
11)
8)
10) 12)
6)5) Pull lens through channel with fingers or non-marring pliers.Install LOOSE tape strip about 12˝ from start to hold lens parallel to fixture (easier to pull).
NOTE: Hold lens roll near ceiling, close to horizontal with fixture.
Measure 181/16˝ from mark on lens to near end of lens. Mark and trim lens.
18 ˝181/16˝
END OF ROW END OF ROW
9)
MAKE SURE LENS IS TUCKED INTO END CAP AT END OF ROW AS SHOWN IN STEP 8
1/8˝
1/8˝
MAKE SURE LENS IS TUCKED INTO END CAP AT END OF ROW AS SHOWN IN STEP 8
05-25-2022
1913 of

Prudential Ltg. reserves the right to change design specifications or materials without notice. Please visit prulite.com for most current data. © 2015 All rights reserved – All products manufactured at: Prudential Ltg. 1774 E. 21st Street, Los Angeles, CA 90058
PRULITE.COM 213.746.0360
WARNING: Ground fixture in accordance with local and national electrical codes. Failure to do so may result in serious personal injury.
LED BionicPro | Recessed Linear
I N S T A L L A T I O N I N S T R U C T I O N S
X 3 / X 11 ( H A R D C E I L I N G )
L O U V E R S
F T R ( F E A T H E R I N G D I F F U S E R ) D E T A I L
1) 2) Hold louver in place and install with included screws.
#4-40 x 1/4˝ Painted Flat-Head Screws
SEE SUBMITTAL DRAWINGS FOR LOUVER LAYOUT
STANDARD FIXTURES FILLER FIXTURES
INSTALL LENS FIRST (SEE PAGE 16).
Match the louver holes with the body holes. Lift and shift the louver into place. Insert the side without screw holes first.
Nylon Spacer Washer
6-32 x ½˝ Screw
FTR Diffuser
FTR DiffuserFTR Diffuser
Before installing lens, replace the 1/4˝ screws at locations A and B with ½˝ screws, placing the provided spacer under the screws as shown.
With screws and spacers installed, snap the FTR Diffuser over the LEDs at locations A and B, making sure that the hooks in the diffuser catch on the lip of the spacers. Push the FTR diffuser against the fixture endplate and install lens.
After cutting the filler body to the desired length, at location A, replace the 1/4˝ screws with ½˝ screws, placing the provided spacer under the screws as shown. At location B, use available holes in tele-plate to attach screws and spacers.
With screws and spacers installed, snap the FTR Diffuser over the LEDs at locations A and B, making sure that the hooks in the diffuser catch on the lip of the spacers. Push the FTR diffuser against the fixture endplate and replace lens.
A
B
25˝ 25˝
A
B
Use reflector holes on stationary side for 6-32 x ½˝ screws and spacers
Use available holes on tele-plate side for
6-32 x ½˝ screws and spacers
05-25-2022
1914 of

Prudential Ltg. reserves the right to change design specifications or materials without notice. Please visit prulite.com for most current data. © 2015 All rights reserved – All products manufactured at: Prudential Ltg. 1774 E. 21st Street, Los Angeles, CA 90058
PRULITE.COM 213.746.0360
WARNING: Ground fixture in accordance with local and national electrical codes. Failure to do so may result in serious personal injury.
LED BionicPro | Recessed Linear
I N S T A L L A T I O N I N S T R U C T I O N S
X 3 / X 11 ( H A R D C E I L I N G )
L T R ( L I N E A R T O R E C E S S E D ) D E T A I L
End Cap Counter Sink #6-32 x 3/4˝ Screw
RECESSED FIXTURE
LINEAR FIXTURE
05-25-2022
1915 of

Prudential Ltg. reserves the right to change design specifications or materials without notice. Please visit prulite.com for most current data. © 2015 All rights reserved – All products manufactured at: Prudential Ltg. 1774 E. 21st Street, Los Angeles, CA 90058
PRULITE.COM 213.746.0360
WARNING: Ground fixture in accordance with local and national electrical codes. Failure to do so may result in serious personal injury.
LED BionicPro | Accessory Plates & Sensors
I N S T A L L A T I O N I N S T R U C T I O N S
WATTSTOPPER FS-205
LOREM IPSUM
LUTRON VIVE
LOREM IPSUM
HUBBELL NXSM
LOREM IPSUM
ENLIGHTED MICRO SENSOR
LOREM IPSUM
ACUITY NLIGHT
LOREM IPSUM
IOTA LIGHT/SWITCH
LOREM IPSUM
ACUITY NLIGHT AIR RIO ACUITY NLIGHT AIR RIO
LOREM IPSUM
PHILLIPS LUXSENSE ACUITY NLIGHT AIR RIO
WATTSTOPPER LMFS-601
ACUITY NLIGHT AIR RIO ACUITY NLIGHT AIR RIO
LOREM IPSUM
PHILLIPS LUXSENSE ACUITY NLIGHT AIR RIO
WATTSTOPPER LMFS-601
Hubbell NXSMP-SMI
Phillips LuxSense
Wattstopper LMFS-601
WATTSTOPPER FS-205
LOREM IPSUM
LUTRON VIVE
LOREM IPSUM
HUBBELL NXSM
LOREM IPSUM
ENLIGHTED MICRO SENSOR
LOREM IPSUM
ACUITY NLIGHT
LOREM IPSUM
IOTA LIGHT/SWITCH
LOREM IPSUM
WATTSTOPPER FS-205
LOREM IPSUM
LUTRON VIVE
LOREM IPSUM
HUBBELL NXSM
LOREM IPSUM
ENLIGHTED MICRO SENSOR
LOREM IPSUM
ACUITY NLIGHT
LOREM IPSUM
IOTA LIGHT/SWITCH
LOREM IPSUM
WATTSTOPPER FS-205
LOREM IPSUM
LUTRON VIVE
LOREM IPSUM
HUBBELL NXSM
LOREM IPSUM
ENLIGHTED MICRO SENSOR
LOREM IPSUM
ACUITY NLIGHT
LOREM IPSUM
IOTA LIGHT/SWITCH
LOREM IPSUM
WATTSTOPPER FS-205
LOREM IPSUM
LUTRON VIVE
LOREM IPSUM
HUBBELL NXSM
LOREM IPSUM
ENLIGHTED MICRO SENSOR
LOREM IPSUM
ACUITY NLIGHT
LOREM IPSUM
IOTA LIGHT/SWITCH
LOREM IPSUM
Emergency Light/Test Switch Wattstopper FS-205
Enlighted Lutron Vive
SENSORS NA REG3. TILE MOUNT (BY OTHERS).
05-25-2022
1916 of

Prudential Ltg. reserves the right to change design specifications or materials without notice. Please visit prulite.com for most current data. © 2015 All rights reserved – All products manufactured at: Prudential Ltg. 1774 E. 21st Street, Los Angeles, CA 90058
PRULITE.COM 213.746.0360
WARNING: Ground fixture in accordance with local and national electrical codes. Failure to do so may result in serious personal injury.
LED BionicPro | Accessory Plates & Sensors
I N S T A L L A T I O N I N S T R U C T I O N S
WATTSTOPPER FS-205
LOREM IPSUM
LUTRON VIVE
LOREM IPSUM
HUBBELL NXSM
LOREM IPSUM
ENLIGHTED MICRO SENSOR
LOREM IPSUM
ACUITY NLIGHT
LOREM IPSUM
IOTA LIGHT/SWITCH
LOREM IPSUM
ACCESSORY PLATE ASSEMBLY
Insert slider spring tabs into dovetail slots in the bottom of plate Spring tabs must be oriented to match dovetails in plate
WATTSTOPPER FS-205
LOREM IPSUM
LUTRON VIVE
LOREM IPSUM
HUBBELL NXSM
LOREM IPSUM
ENLIGHTED MICRO SENSOR
LOREM IPSUM
ACUITY NLIGHT
LOREM IPSUM
IOTA LIGHT/SWITCH
LOREM IPSUM
ACCESSORY PLATE REMOVAL
Slide lens several inches away from accessory plate and shift plate away from end of fixture.
Using a small flat screwdriver, retract plastic spring back to clear edge of trim while gently pulling accessory plate away from aperture. Repeat this on the opposite side.
With the plastic spring retracted, pull the plate downward until it releases from the fixture.
When re-installing the plate back into the fixture,use small screwdriver to push springs under trim until caught. Secure to fixture by snapping plate into housing.
1)
WATTSTOPPER FS-205
LOREM IPSUM
LUTRON VIVE
LOREM IPSUM
HUBBELL NXSM
LOREM IPSUM
ENLIGHTED MICRO SENSOR
LOREM IPSUM
ACUITY NLIGHT
LOREM IPSUM
IOTA LIGHT/SWITCH
LOREM IPSUM
2)
3) 4)
WATTSTOPPER FS-205
LOREM IPSUM
LUTRON VIVE
LOREM IPSUM
HUBBELL NXSM
LOREM IPSUM
ENLIGHTED MICRO SENSOR
LOREM IPSUM
ACUITY NLIGHT
LOREM IPSUM
IOTA LIGHT/SWITCH
LOREM IPSUM
Spring
05-25-2022
1917 of
Prudential Ltg. reserves the right to change design specifications or materials without notice. Please visit prulite.com for most current data. © 2015 All rights reserved – All products manufactured at: Prudential Ltg. 1774 E. 21st Street, Los Angeles, CA 90058
PRULITE.COM 213.746.0360
WARNING: Ground fixture in accordance with local and national electrical codes. Failure to do so may result in serious personal injury.
LED BionicPro | Accessory Plates & Sensors
I N S T A L L A T I O N I N S T R U C T I O N S
1)
6)5)
2)
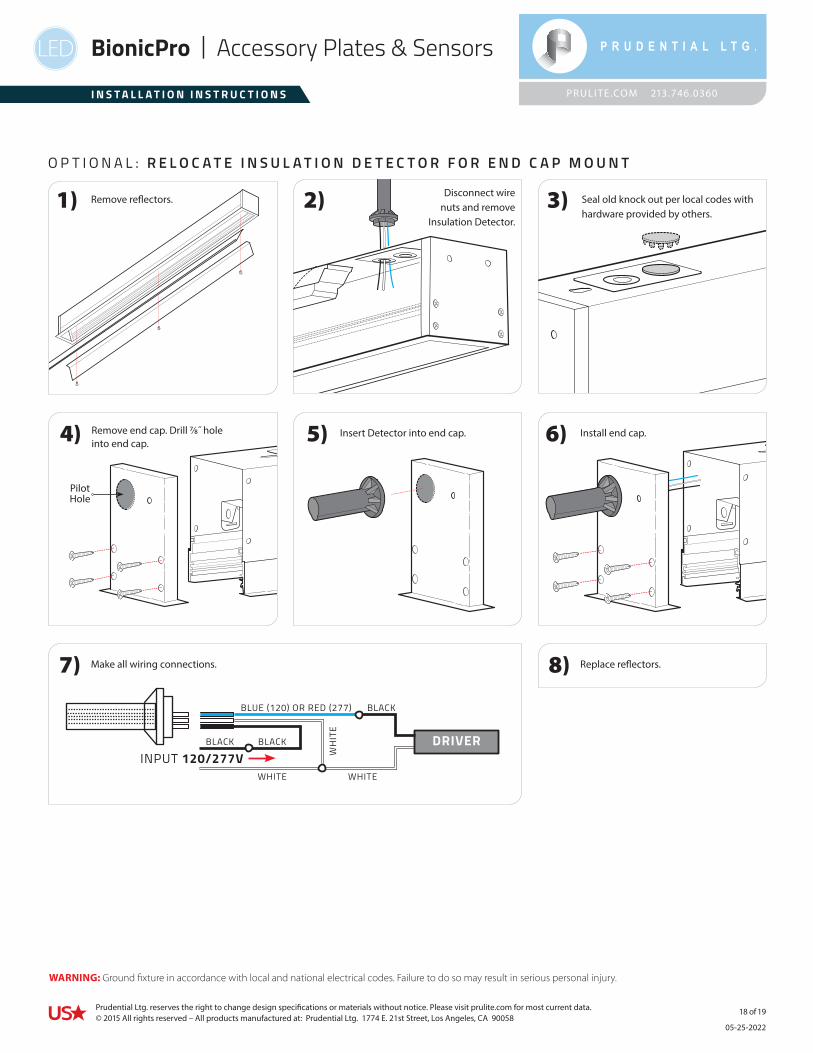
7) 8)Make all wiring connections. Replace reflectors.
4)
Remove reflectors.
Install end cap.Remove end cap. Drill 7/8˝ hole into end cap.
Insert Detector into end cap.
Disconnect wire nuts and remove
Insulation Detector.
O P T I O N A L : R E L O C A T E I N S U L A T I O N D E T E C T O R F O R E N D C A P M O U N T
Pilot Hole
3) Seal old knock out per local codes with hardware provided by others.
DRIVERINPUT 120/277V
BLUE (120) OR RED (277) BLACK
BLACKBLACK
WHITE WHITE
WH
ITE
05-25-2022
1918 of

Prudential Ltg. reserves the right to change design specifications or materials without notice. Please visit prulite.com for most current data. © 2015 All rights reserved – All products manufactured at: Prudential Ltg. 1774 E. 21st Street, Los Angeles, CA 90058
PRULITE.COM 213.746.0360
WARNING: Ground fixture in accordance with local and national electrical codes. Failure to do so may result in serious personal injury.
LED BionicPro | Accessory Plates & Sensors
I N S T A L L A T I O N I N S T R U C T I O N S
O P T I O N A L : R E L O C A T E I N S U L A T I O N D E T E C T O R F O R S I D E M O U N T
5)4)
6)
Punch out 7/8˝ knock out and insert Insulation Detector.
Make all wiring connections.
Replace reflectors.
Remove reflectors. 2)1) Disconnect wire nuts and remove
Insulation Detector.
3) Seal old knock out per local codes with hardware provided by others.
DRIVERINPUT 120/277V
BLUE (120) OR RED (277) BLACK
BLACKBLACK
WHITE WHITE
WH
ITE
05-25-2022
1919 of