it6503 web programming
151
VEL TECH HIGH TECH Dr. RANGARAJAN Dr. SAKUNTHALA ENGINEERING COLLEGE DEPARTMENT OF INFORMATION TECHNOLOGY IT6503 WEB PROGRAMMING Question Bank Prepared By M.Gopinath
-
Upload
khangminh22 -
Category
Documents
-
view
0 -
download
0
Transcript of it6503 web programming

VEL TECH HIGH TECH Dr. RANGARAJAN Dr. SAKUNTHALA
ENGINEERING COLLEGE
DEPARTMENT OF INFORMATION TECHNOLOGY
IT6503 WEB PROGRAMMING
Question Bank
Prepared By
M.Gopinath
IT6503 WEB PROGRAMMING
Syllabus
UNIT I SCRIPTING 9 Web page Designing using HTML, Scripting basics- Client side and server
side scripting. Java Script- Object, names, literals, operators and expressions-
statements and features- events - windows - documents - frames - data types -
built-in functions- Browser object model - Verifying forms.-HTML5- CSS3-
HTML 5 canvas - Web site creation using tools.
UNIT II JAVA 9
Introduction to object oriented programming-Features of Java – Data types, variables and arrays – Operators – Control statements – Classes and Methods
– Inheritance. Packages and Interfaces – Exception Handling – Multithreaded
Programming – Input/Output – Files – Utility Classes – String Handling.
UNIT III JDBC 9
JDBC Overview – JDBC implementation – Connection class – Statements -
Catching Database Results, handling database Queries. Networking–
InetAddress class – URL class- TCP sockets - UDP sockets, Java Beans –RMI.
UNIT IV APPLETS 9
Java applets- Life cycle of an applet – Adding images to an applet – Adding
sound to an applet. Passing parameters to an applet. Event Handling.
Introducing AWT: Working with Windows Graphics and Text. Using AWT
Controls, Layout Managers and Menus. Servlet – life cycle of a servlet. The
Servlet API, Handling HTTP Request and Response, using Cookies, Session Tracking. Introduction to JSP.
UNIT V XML AND WEB SERVICES 9
Xml – Introduction-Form Navigation-XML Documents- XSL – XSLT- Web
services-UDDI-WSDL-Java web services – Web resources.
TOTAL (L:45+T:15): 60 PERIODS
TEXT BOOKS: 1. Harvey Deitel, Abbey Deitel, Internet and World Wide Web: How To
Program 5th Edition.
2. Herbert Schildt, Java - The Complete Reference, 7th Edition. Tata
McGraw- Hill Edition.
3. Michael Morrison XML Unleashed Tech media SAMS.
REFERENCES:
1. John Pollock, Javascript - A Beginners Guide, 3rd Edition –- Tata
McGraw-Hill Edition.
2. Keyur Shah, Gateway to Java Programmer Sun Certification, Tata
McGraw Hill, 2002.

UNIT-I SCRIPTING
PART-A
1.What are some of the common lists that can be used when designing a page?
Some of the common lists that can be used are:
a) Ordered list
b) Unordered list
c) Definition list
d) Menu list
e) Directory list
2. What are new Media Elements in HTML5?
Following are the New Media Elements are present in HTML5:
1. <audio> tag : For playing audio.
2. <video> tag : For playing video.
3. <source> tag : For media resources for media elements.
4. <embed> tag : For embedded content.
5. <track> tag : For text tracks used in media players.
3. What is difference between HTML and HTML5?
The differences between HTML and HTML5 are:
1. Document of HTML is very large as compare to the HTML5.
2. Audio and Video tags are not present in HTML whereas HTML5 contains audio and
video tags.
3. Vector technology is not integral part of HTML whereas HTML5 Vector technology is
the integral part of it.
4. HTML supported by all old browsers whereas HTML5 is supported by new browser.
5. In HTML web sockets are not available whereas in HTML5 Full duplex
communication channel is present.
4. What is the importance of Doctype in HTML?
The doctype declaration should be the very first thing in an HTML document, before the
html tag.
The doctype declaration is not an HTML tag; it is an instruction to the web browser about
what version of the markup language the page is written in.
The doctype declaration refers to a Document Type Definition (DTD). The DTD
specifies the rules for the markup language, so that the browsers can render the content
correctly.
5. What is the purpose of canvas in HTML?
Canvas is an element that is used for the graphics for the web page. It uses JavaScript to
bring the graphics functionality live. It allows easy way to draw the graphics and use different
types of tools to create drawing on the web page. Canvas is just a rectangular area that controls
the pixel of every element that is used in the web page. Canvas uses methods like paths, circles,
etc.
The canvas element will be used as follows:
<canvas id="can" width="200" height="100"></canvas>

6. What are the different types of frames tags used in HTML?
Frames consists of different types of tags and they are as follows:
1. <frameset>...</frameset> : It consists of the frames that includes the layout using the
attributes of rows and cols.
2. <frame> or <frame/> : It consists of a single frame and gets included within the
frameset. It is always come up with a src attribute that provides the source that has to be
shown in a particular frame.
3. <noframes>...</noframes> : It consists of the normal HTML content that is used to
show no frames.
4. <iframe>...</iframe> : It consists of internal frame that will contain the src attribute
to include the frame that is internal to a particular region.
7. What is the difference between HTML elements and tags?
HTML elements communicate to the browser to render text. When the elements are
surrounded by brackets <>, they form HTML tags. Most of the time, tags come in pair and
surround content.
8. What is a marquee?
Marquee is used to put the scrolling text on a web page. You should put the text which
you want to scroll within the <marquee>......</marquee> tag.
9. What is the difference between HTML tags <div> and <span>?
The difference between span and div is that a span element is in-line and usually used
for a small chunk of HTML inside a line (such as inside a paragraph) whereas a div (division)
element is block-line (which is basically equivalent to having a line-break before and after it) and
used to group larger chunks of code.
10. What is CSS?
Cascading Style Sheets, fondly referred to as CSS, is a simple design language intended
to simplify the process of making web pages presentable.
11. What are the components of a CSS Style?
A style rule is made of three parts −
Selector − A selector is an HTML tag at which a style will be applied. This could be any
tag like <h1> or <table> etc.
Property − A property is a type of attribute of HTML tag. Put simply, all the HTML
attributes are converted into CSS properties. They could be color, border etc.
Value − Values are assigned to properties. For example, color property can have value
either red or #F1F1F1 etc.
12. What are the various ways of using CSS in an HTML page?
There are four ways to associate styles with your HTML document. Most commonly used
methods are inline CSS and External CSS.
Embedded CSS − The <style> Element: You can put your CSS rules into an HTML
document using the <style> element.
Inline CSS − The style Attribute: You can use style attribute of any HTML element to
define style rules.
External CSS − The <link> Element: The <link> element can be used to include an
external stylesheet file in your HTML document.
Imported CSS − @import Rule: @import is used to import an external stylesheet in a
manner similar to the <link> element.

13. What is the difference between form get and form post?
Get
With GET the form data is encoded into a URL by the browser. The form data is visible
in the URL allowing it to be bookmarked and stored in web history. The form data is
restricted to ASCII codes. Because URL lengths are limited there can be limitations on
how much form data can be sent.
Post
With POST all the name value pairs are submitted in the message body of the HTTP
request which has no restrictions on the length of the string. The name value pairs cannot
be seen in the web browser bar.
POST and GET correspond to different HTTP requests and they differ in how they are
submitted. Since the data is encoded in differently, different decoding may be needed.
14. What is BOM?
BOM stands for Browser Object Model. It provides interaction with the browser. The
default object of browser is window.
15. What is DOM? What is the use of document object?
DOM stands for Document Object Model. A document object represent the html
document. It can be used to access and change the content of html.
16. What is the use of history object?
The history object of browser can be used to switch to history pages such as back and
forward from current page or another page. There are three methods of history object.
history.back()
history.forward()
history.go(number): number may be positive for forward, negative for backward.
17. What is the difference between == and ===?
The == operator checks equality only whereas === checks equality and data type i.e.
value must be of same type.
18. What does the isNaN() function?
The isNan() function returns true if the variable value is not a number.
19. Difference between Client side JavaScript and Server side JavaScript?
Client side JavaScript comprises the basic language and predefined objects which are
relevant to running java script in a browser. The client side JavaScript is embedded directly by in
the HTML pages. This script is interpreted by the browser at run time.
Server side JavaScript also resembles like client side java script. It has relevant java
script which is to run in a server. The server side JavaScript are deployed only after compilation.
20. What is the difference between undefined value and null value?
Undefined value: A value that is not defined and has no keyword is known as undefined
value. For example:
int number;//Here, number has undefined value.
Null value: A value that is explicitly specified by the keyword "null" is known as null
value. For example:
String str=null;//Here, str has a null value.
21. What are the pop up boxes available in JavaScript?
Alert Box
Confirm Box
Prompt Box

PART-B
1. Explain in detail about basic comments in HTML for designing a web
page
HTML is a markup language for describing web documents (web pages).
HTML stands for Hyper Text Markup Language
A markup language is a set of markup tags
HTML documents are described by HTML tags
Each HTML tag describes different document content
Example
!DOCTYPE html>
<html>
<head>
<title>Page Title</title>
</head>
<body>
<h1>My First Heading</h1>
<p>My first paragraph.</p>
</body>
</html>
Explaination
The DOCTYPE declaration defines the document type to be HTML
The text between <html> and </html> describes an HTML document
The text between <head> and </head> provides information about the document
The text between <title> and </title> provides a title for the document
The text between <body> and </body> describes the visible page content
The text between <h1> and </h1> describes a heading
The text between <p> and </p> describes a paragraph
HTML Tags
HTML tags are keywords (tag names) surrounded by angle brackets:
<tagname>content</tagname>
HTML tags normally come in pairs like <p> and </p>
The first tag in a pair is the start tag, the second tag is the end tag
The end tag is written like the start tag, but with a slash before the tag name
HTML Editors
HTML can be edited by using a professional HTML editor like:
Adobe Dreamweaver
Microsoft Expression Web
CoffeeCup HTML Editor
However, for learning HTML we recommend a text editor like Notepad (PC) or TextEdit
(Mac).
We believe using a simple text editor is a good way to learn HTML.
Follow the 4 steps below to create your first web page with Notepad.
Step 1: Open Notepad
To open Notepad in Windows 7 or earlier:

Click Start (bottom left on your screen). Click All Programs. Click Accessories. Click
Notepad.
Step 2: Write Some HTML
Write or copy some HTML into Notepad.
<!DOCTYPE html>
<html>
<body>
<h1>My First Heading</h1>
<p>My first paragraph.</p>
</body>
</html>
Step 3: Save the HTML Page
Save the file on your computer.
Select File > Save as in the Notepad menu.
Name the file "index.htm" or any other name ending with htm.
UTF-8 is the preferred encoding for HTML files.
ANSI encoding covers US and Western European characters only.
Step 4: View HTML Page in Your Browser
Open the saved HTML file in your favorite browser.
HTML Elements
HTML documents are made up by HTML elements.
HTML elements are written with a start tag, with an end tag, with the content in
between: <tagname>content</tagname>
<p>My first HTML paragraph.</p>
Start tag Element content End tag
<h1> My First Heading </h1>
<p> My first
paragraph. </p>
Nested HTML Elements
HTML elements can be nested (elements can contain elements).
All HTML documents consist of nested HTML elements.
This example contains 4 HTML elements:
<!DOCTYPE html>
<html>
<body>
<h1>My First Heading</h1>
<p>My first paragraph.</p>
</body>
</html>
The <body> element defines the document body.
It has a start tag <body> and an end tag </body>.
The element content is two other HTML elements (<h1> and <p>).
<body>
<h1>My First Heading</h1>

<p>My first paragraph.</p>
</body>
The <h1> element defines a heading.
It has a start tag <h1> and an end tag </h1>.
The element content is: My First Heading.
<h1>My First Heading</h1>
The <p> element defines a paragraph.
It has a start tag <p> and an end tag </p>.
The element content is: My first paragraph.
HTML Attributes
Attributes provide additional information about HTML elements.
HTML elements can have attributes
Attributes provide additional information about an element
Attributes are always specified in the start tag
Attributes come in name/value pairs like: name="value"
The lang Attribute
The document language can be declared in the <html> tag.
The language is declared in the lang attribute.
Declaring a language is important for accessibility applications (screen readers) and
search engines:
<!DOCTYPE html>
<html lang="en-US">
<body>
<h1>My First Heading</h1>
<p>My first paragraph.</p>
</body>
</html>
The title Attribute
HTML paragraphs are defined with the <p> tag.
In this example, the <p> element has a title attribute. The value of the attribute is "About
W3Schools":
<p title="About W3Schools">
W3Schools is a web developer's site.
It provides tutorials and references covering many aspects of web programming, including
HTML, CSS, JavaScript, XML, SQL, PHP, ASP, etc.
The href Attribute
HTML links are defined with the <a> tag. The link address is specified in the href
attribute:
<a href="http://www.w3schools.com">This is a link</a>
Size Attributes
HTML images are defined with the <img> tag.
The filename of the source (src), and the size of the image (width and height) are all
provided as attributes:
<img src="w3schools.jpg" width="104" height="142">

The alt Attribute
The alt attribute specifies an alternative text to be used, when an HTML element cannot
be displayed.
The value of the attribute can be read by "screen readers". This way, someone "listening"
to the webpage, i.e. a blind person, can "hear" the element.
<img src="w3schools.jpg" alt="W3Schools.com" width="104" height="142">
HTML Headings
Headings are important in HTML documents.
Headings are defined with the <h1> to <h6> tags.
<h1> defines the most important heading. <h6> defines the least important heading.
<h1>This is a heading</h1>
<h2>This is a heading</h2>
<h3>This is a heading</h3>
The HTML <head> Element
The HTML <head> element has nothing to do with HTML headings.
The HTML <head> element contains meta data. Meta data are not displayed.
The HTML <head> element is placed between the <html> tag and the <body> tag:
<!DOCTYPE html>
<html>
<head>
<title>My First HTML</title>
<meta charset="UTF-8">
</head>
<body>
<p>The HTML head element contains meta data.</p>
<p>Meta data is data about the HTML document.</p>
</body>
</html>
The HTML <title> Element
The HTML <title> element is meta data. It defines the HTML document's title.
The title will not be displayed in the document, but might be displayed in the browser tab.
The HTML <meta> Element
The HTML <meta> element is also meta data.
It can be used to define the character set, and other information about the HTML
document.
HTML Paragraphs
HTML documents are divided into paragraphs.
The HTML <p> element defines a paragraph.
<p>This is a paragraph</p>
<p>This is another paragraph</p>
HTML Display
You cannot be sure how HTML will be displayed.
Large or small screens, and resized windows will create different results.
With HTML, you cannot change the output by adding extra spaces or extra lines in your
HTML code.
The browser will remove extra spaces and extra lines when the page is displayed.

Any number of spaces, and any number of new lines, count as only one space.
<p>
This paragraph
contains a lot of lines
in the source code,
but the browser
ignores it.
</p>
<p>
This paragraph
contains a lot of spaces
in the source code,
but the browser
ignores it.
HTML Line Breaks
The HTML <br> element defines a line break.
Use <br> if you want a line break (a new line) without starting a new paragraph:
<p>This is<br>a para<br>graph with line breaks</p>
The HTML <pre> Element
The HTML <pre> element defines preformatted text.
The text inside a <pre> element is displayed in a fixed-width font (usually Courier), and
it preserves both spaces and line breaks:
< pre>
My Bonnie lies over the ocean.
My Bonnie lies over the sea.
Oh, bring back my Bonnie to me.
</pre>
HTML Styling
Every HTML element has a default style (background color is white and text color is
black).
Changing the default style of an HTML element, can be done with the style attribute.
This example changes the default background color from white to lightgrey:
<body style="background-color:lightgrey">
<h1>This is a heading</h1>
<p>This is a paragraph.</p>
</body>
The HTML Style Attribute
The HTML style attribute has the following syntax:
style="property:value"
HTML Text Color
The color property defines the text color to be used for an HTML element:
<h1 style="color:blue">This is a heading</h1>
<p style="color:red">This is a paragraph.</p>
HTML Fonts
The font-family property defines the font to be used for an HTML element:
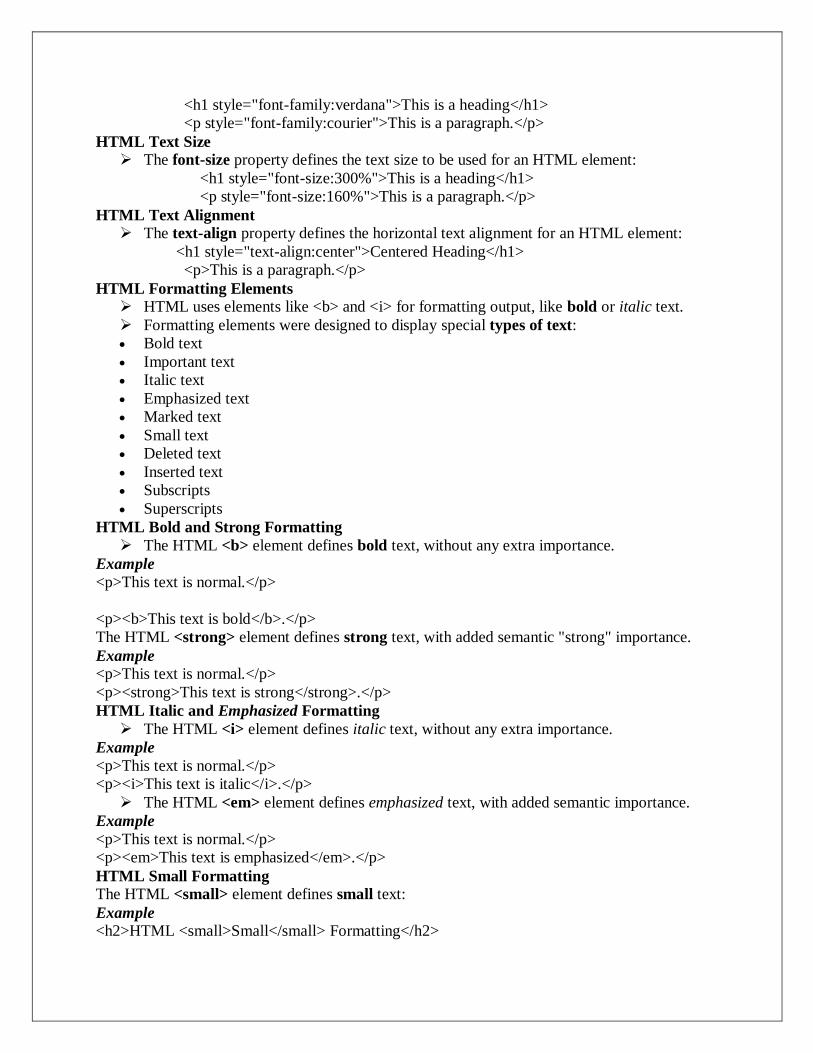
<h1 style="font-family:verdana">This is a heading</h1>
<p style="font-family:courier">This is a paragraph.</p>
HTML Text Size
The font-size property defines the text size to be used for an HTML element:
<h1 style="font-size:300%">This is a heading</h1>
<p style="font-size:160%">This is a paragraph.</p>
HTML Text Alignment
The text-align property defines the horizontal text alignment for an HTML element:
<h1 style="text-align:center">Centered Heading</h1>
<p>This is a paragraph.</p>
HTML Formatting Elements
HTML uses elements like <b> and <i> for formatting output, like bold or italic text.
Formatting elements were designed to display special types of text:
Bold text
Important text
Italic text
Emphasized text
Marked text
Small text
Deleted text
Inserted text
Subscripts
Superscripts
HTML Bold and Strong Formatting
The HTML <b> element defines bold text, without any extra importance.
Example
<p>This text is normal.</p>
<p><b>This text is bold</b>.</p>
The HTML <strong> element defines strong text, with added semantic "strong" importance.
Example
<p>This text is normal.</p>
<p><strong>This text is strong</strong>.</p>
HTML Italic and Emphasized Formatting
The HTML <i> element defines italic text, without any extra importance.
Example
<p>This text is normal.</p>
<p><i>This text is italic</i>.</p>
The HTML <em> element defines emphasized text, with added semantic importance.
Example
<p>This text is normal.</p>
<p><em>This text is emphasized</em>.</p>
HTML Small Formatting
The HTML <small> element defines small text:
Example
<h2>HTML <small>Small</small> Formatting</h2>

HTML Marked Formatting
The HTML <mark> element defines marked or highlighted text:
Example
<h2>HTML <mark>Marked</mark> Formatting</h2>
HTML DeletedFormatting
The HTML <del> element defines deleted (removed) of text.
Example
<p>My favorite color is <del>blue</del> red.</p>
HTML Inserted Formatting
The HTML <ins> element defines inserted (added) text.
Example
<p>My favorite <ins>color</ins> is red.</p>
HTML subscript Formatting
The HTML <sub> element defines subscripted text.
Example
<p>This is <sub>subscripted</sub> text.</p>
HTML Superscript Formatting
The HTML <sup> element defines superscripted text.
Example
<p>This is <sup>superscripted</sup> text.</p>
HTML Comment Tags
You can add comments to your HTML source by using the following syntax:
Example
<!-- Write your comments here -->
Comments are not displayed by the browser, but they can help document your HTML.
With comments you can place notifications and reminders in your HTML:
Example
<!-- This is a comment -->
<p>This is a paragraph.</p>
<!-- Remember to add more information here -->
Conditional Comments
You might stumble upon conditional comments in HTML:
<!--[if IE 8]>
.... some HTML here ....
<![endif]-->
HTML Links
Links are found in nearly all web pages. Links allow users to click their way from page to
page.
HTML Links - Hyperlinks
HTML links are hyperlinks.
A hyperlink is a text or an image you can click on, and jump to another document.
HTML Links - Syntax
In HTML, links are defined with the <a> tag:
<a href="url">link text</a>

Local Links
The example above used an absolute URL (A full web address).
A local link (link to the same web site) is specified with a relative URL (without
http://www....).
Example:
<a href="html_images.asp">HTML Images</a>
HTML Links - Colors and Icons
When you move the mouse cursor over a link, two things will normally happen:
The mouse arrow will turn into a little hand
The color of the link element will change
By default, links will appear as this in all browsers:
An unvisited link is underlined and blue
A visited link is underlined and purple
An active link is underlined and red
You can change the defaults, using styles:
<style>
a:link {color:#000000; background-color:transparent; text-decoration:none}
a:visited {color:#000000; background-color:transparent; text-decoration:none}
a:hover {color:#ff0000; background-color:transparent; text-decoration:underline}
a:active {color:#ff0000; background-color:transparent; text-decoration:underline}
</style>
HTML Links - The target Attribute
The target attribute specifies where to open the linked document.
This example will open the linked document in a new browser window or in a new tab:
Example
<a href="http://www.w3schools.com/" target="_blank">Visit W3Schools!</a>
HTML Links - Image as Link
It is common to use images as links:
Example
<a href="default.asp">
<img src="smiley.gif" alt="HTML tutorial" style="width:42px;height:42px;border:0">
</a>
HTML Links - The id Attribute
The id attribute can be used to create bookmarks inside HTML documents.
Bookmarks are not displayed in any special way. They are invisible to the reader.
Example
Add an id attribute to any <a> element:
<a id="tips">Useful Tips Section</a>
HTML Images
Syntax
In HTML, images are defined with the <img> tag.
The <img> tag is empty, it contains attributes only, and does not have a closing tag.
The src attribute specifies the URL (web address) of the image:
<img src="url" alt="some_text"
Image Size - Width and Height
You can use the style attribute to specify the width and height of an image.

The values are specified in pixels (use px after the value):
Example
<img src="html5.gif" alt="HTML5 Icon" style="width:128px;height:128px;">
Animated Images
The GIF standard allows animated images:
Example
<img src="programming.gif" alt="Computer Man" style="width:48px;height:48px;">
Image Floating
Use the CSS float property to let the image float.
The image can float to the right or to the left of a text:
Example
<p>
<img src="smiley.gif" alt="Smiley face" style="float:right;width:42px;height:42px;">
The image will float to the right of the text.
</p>
<p>
<img src="smiley.gif" alt="Smiley face" style="float:left;width:42px;height:42px;">
The image will float to the left of the text.
</p>
Image Maps
Use the <map> tag to define an image-map. An image-map is an image with clickable
areas.
The name attribute of the <map> tag is associated with the <img>'s usemap attribute and
creates a relationship between the image and the map.
The <map> tag contains a number of <area> tags, that defines the clickable areas in the
image-map:
Example
<img src="planets.gif" alt="Planets" usemap="#planetmap" style="width:145px;height:126px;">
<map name="planetmap">
<area shape="rect" coords="0,0,82,126" alt="Sun" href="sun.htm">
<area shape="circle" coords="90,58,3" alt="Mercury" href="mercur.htm">
<area shape="circle" coords="124,58,8" alt="Venus" href="venus.htm">
</map>
HTML Tables
<table style="width:100%">
<tr>
<td>Jill</td>
<td>Smith</td>
<td>50</td>
</tr>
<tr>
<td>Eve</td>
<td>Jackson</td>
<td>94</td>
</tr>
</table>

Tables are defined with the <table> tag.
Tables are divided into table rows with the <tr> tag.
Table rows are divided into table data with the <td> tag.
A table row can also be divided into table headings with the <th> tag.
Table with a Border Attribute
If you do not specify a border for the table, it will be displayed without borders.
A border can be added using the border attribute:
<table border="1" style="width:100%">
<tr>
<td>Jill</td>
<td>Smith</td>
<td>50</td>
</tr>
<tr>
<td>Eve</td>
<td>Jackson</td>
<td>94</td>
</tr>
</table>
Table with Collapsed Borders
If you want the borders to collapse into one border, add CSS border-collapse:
Example
table, th, td {
border: 1px solid black;
border-collapse: collapse;
}
Table with Cell Padding
Cell padding specifies the space between the cell content and its borders.
If you do not specify a padding, the table cells will be displayed without padding.
To set the padding, use the CSS padding property:
Example
table, th, td {
border: 1px solid black;
border-collapse: collapse;
}
th, td {
padding: 15px;
}
Table Headings
Table headings are defined with the <th> tag.
By default, all major browsers display table headings as bold and centered:
Example
<table style="width:100%">
<tr>
<th>Firstname</th>
<th>Lastname</th>

<th>Points</th>
</tr>
<tr>
<td>Eve</td>
<td>Jackson</td>
<td>94</td>
</tr>
</table>
Table with Border Spacing
Border spacing specifies the space between the cells.
To set the border spacing for a table, use the CSS border-spacing property:
Example
table {
border-spacing: 5px;
}
T able Cells that Span Many Columns
To make a cell span more than one column, use the colspan attribute:
Example
<table style="width:100%">
<tr>
<th>Name</th>
<th colspan="2">Telephone</th>
</tr>
<tr>
<td>Bill Gates</td>
<td>555 77 854</td>
<td>555 77 855</td>
</tr>
</table>
HTML Lists
HTML can have Unordered lists, Ordered lists, or Description lists:
Unordered HTML Lists
An unordered list starts with the <ul> tag. Each list item starts with the <li> tag.
The list items will be marked with bullets (small black circles).
Unordered List:
<ul>
<li>Coffee</li>
<li>Tea</li>
<li>Milk</li>
</ul>
Ordered HTML Lists
An ordered list starts with the <ol> tag. Each list item starts with the <li> tag.
The list items will be marked with numbers.

Ordered List:
<ol>
<li>Coffee</li>
<li>Tea</li>
<li>Milk</li>
</ol>
HTML Classes
<!DOCTYPE html>
<html>
<head>
<style>
.cities {
background-color:black;
color:white;
margin:20px;
padding:20px;
}
</style>
</head>
<body>
<div class="cities">
<h2>London</h2>
<p>
London is the capital city of England. It is the most populous city in the United Kingdom, with a
metropolitan area of over 13 million inhabitants.
</p>
</div>
</body>
</html>
Classing Block Elements
The HTML <div> element is a block level element. It can be used as a container for
other HTML elements.
Classing <div> elements, makes it possible to define equal styles for equal <div>
elements:
<!DOCTYPE html>
<html>
<head>
<style>
.cities {
background-color:black;
color:white;
margin:20px;
padding:20px;
}
</style>
</head>
<body>
<div class="cities">
<h2>London</h2>
<p>London is the capital city of England. It is the most populous city in the United Kingdom,
with a metropolitan area of over 13 million inhabitants.</p>
</div>
<div class="cities">
<h2>Paris</h2>
<p>Paris is the capital and most populous city of France.</p>
</div>
<div class="cities">
<h2>Tokyo</h2>
<p>Tokyo is the capital of Japan, the center of the Greater Tokyo Area,
and the most populous metropolitan area in the world.</p>
</div>
</body>
</html>
Classing Inline Elements
The HTML <span> element is an inline element that can be used as a container for text.
Classing <span> elements makes it possible to design equal styles for equal <span>
elements.
Example
<!DOCTYPE html>
<html>
<head>
<style>
span.red {color:red;}
</style> </head>
<body><h1>My <span class="red">Important</span> Heading</h1>
</body>
</html>
2. Briefly explain in detail about Java Script with suitable example.
HTML Scripts JavaScripts make HTML pages more dynamic and interactive.
The HTML <script> Tag
The <script> tag is used to define a client-side script, such as a JavaScript.
The <script> element either contains scripting statements or it points to an external script
file through the src attribute.
Common uses for JavaScript are image manipulation, form validation, and dynamic
changes of content.
The script below writes Hello JavaScript! into an HTML element with id="demo":

Example
<script>
document.getElementById("demo").innerHTML = "Hello JavaScript!";
</script>
The HTML <noscript> Tag
The <noscript> tag is used to provide an alternate content for users that have disabled
scripts in their browser or have a browser that doesn't support client-side scripting.
The <noscript> element can contain all the elements that you can find inside the <body>
element of a normal HTML page.
The content inside the <noscript> element will only be displayed if scripts are not
supported, or are disabled in the user's browser:
Example
<script>
document.getElementById("demo").innerHTML = "Hello JavaScript!";
</script>
<noscript>Sorry, your browser does not support JavaScript!</noscript>
JavaScript Objects
You have already learned that JavaScript variables are containers for data values.
This code assigns a simple value (Fiat) to a variable named car:
var car = "Fiat";
Objects are variables too. But objects can contain many values.
This code assigns many values (Fiat, 500, white) to a variable named car:
var car = {type:"Fiat", model:500, color:"white"};
Object Properties
The name:values pairs (in JavaScript objects) are called properties.
var person = {firstName:"John", lastName:"Doe", age:50, eyeColor:"blue"};
Property Property Value
firstName John
lastName Doe
age 50
eyeColor blue
Object Methods
Methods are actions that can be performed on objects.
Methods are stored in properties as function definitions.
Property Property Value
firstName John
lastName Doe
age 50
eyeColor blue
fullName function() {return
this.firstName + " " + this.lastName;}
Object Definition
You define (and create) a JavaScript object with an object literal:

Example
var person = {firstName:"John", lastName:"Doe", age:50, eyeColor:"blue"};
Spaces and line breaks are not important. An object definition can span multiple lines:
Example
var person = {
firstName:"John",
lastName:"Doe",
age:50,
eyeColor:"blue"
};
Accessing Object Properties
You can access object properties in two ways:
objectName.propertyName
Accessing Object Methods
You access an object method with the following syntax:
objectName.methodName()
3. Write shorts on datatype in Java Script
String, Number, Boolean, Array, Object.
JavaScript variables can hold many data types: numbers, strings, arrays, objects and
more:
var length = 16; // Number
var lastName = "Johnson"; // String
var cars = ["Saab", "Volvo", "BMW"]; // Array
var x = {firstName:"John", lastName:"Doe"}; // Object
The Concept of Data Types
In programming, data types is an important concept.
To be able to operate on variables, it is important to know something about the type.
Without data types, a computer cannot safely solve this:
var x = 16 + "Volvo";
JavaScript Has Dynamic Types
JavaScript has dynamic types. This means that the same variable can be used as different
types:
Example
var x; // Now x is undefined
var x = 5; // Now x is a Number
var x = "John"; // Now x is a String
JavaScript Numbers
JavaScript has only one type of numbers.
Numbers can be written with, or without decimals:
Example
var x1 = 34.00; // Written with decimals
var x2 = 34; // Written without decimals

JavaScript Booleans
Booleans can only have two values: true or false.
Example
var x = true;
var y = false;
4. Explain in detail about control statement in JavaScript with example
program
Very often when you write code, you want to perform different actions for different
decisions.
You can use conditional statements in your code to do this.
In JavaScript we have the following conditional statements:
Use if to specify a block of code to be executed, if a specified condition is true
Use else to specify a block of code to be executed, if the same condition is false
Use else if to specify a new condition to test, if the first condition is false
Use switch to specify many alternative blocks of code to be executed
The if Statement
Use the if statement to specify a block of JavaScript code to be executed if a condition is
true.
Syntax
if (condition) {
block of code to be executed if the condition is true
}
Example
Make a "Good day" greeting if the hour is less than 18:00:
if (hour < 18) {
greeting = "Good day";
}
The result of greeting will be:
Good day
The else Statement
Use the else statement to specify a block of code to be executed if the condition is false.
Syntax
if (condition) {
block of code to be executed if the condition is true
} else {
block of code to be executed if the condition is false
}

Example
If the hour is less than 18, create a "Good day" greeting, otherwise "Good evening":
if (hour < 18) {
greeting = "Good day";
} else {
greeting = "Good evening";
}
The else if Statement
Use the else if statement to specify a new condition if the first condition is false.
Syntax
if (condition1) {
block of code to be executed if condition1 is true
} else if (condition2) {
block of code to be executed if the condition1 is false and condition2 is true
} else {
block of code to be executed if the condition1 is false and condition2 is false
}
Example
If time is less than 10:00, create a "Good morning" greeting, if not, but time is less than
20:00, create a "Good day" greeting, otherwise a "Good evening":
if (time < 10) {
greeting = "Good morning";
} else if (time < 20) {
greeting = "Good day";
} else {
greeting = "Good evening";
}
The result of greeting will be:
Good day
JavaScript Switch Statement
Use the switch statement to select one of many blocks of code to be executed.
Syntax
switch(expression) {
case n:
code block
break;
case n:
code block
break;
default:
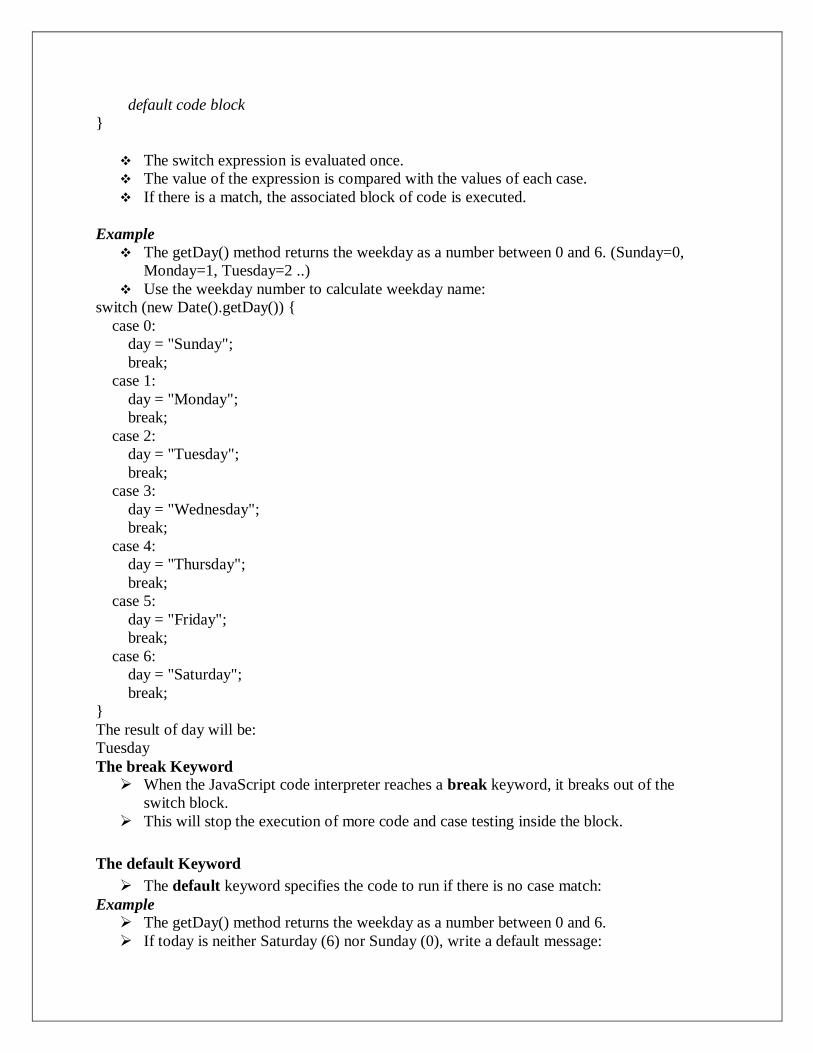
default code block
}
The switch expression is evaluated once.
The value of the expression is compared with the values of each case.
If there is a match, the associated block of code is executed.
Example
The getDay() method returns the weekday as a number between 0 and 6. (Sunday=0,
Monday=1, Tuesday=2 ..)
Use the weekday number to calculate weekday name:
switch (new Date().getDay()) {
case 0:
day = "Sunday";
break;
case 1:
day = "Monday";
break;
case 2:
day = "Tuesday";
break;
case 3:
day = "Wednesday";
break;
case 4:
day = "Thursday";
break;
case 5:
day = "Friday";
break;
case 6:
day = "Saturday";
break;
}
The result of day will be:
Tuesday
The break Keyword
When the JavaScript code interpreter reaches a break keyword, it breaks out of the
switch block.
This will stop the execution of more code and case testing inside the block.
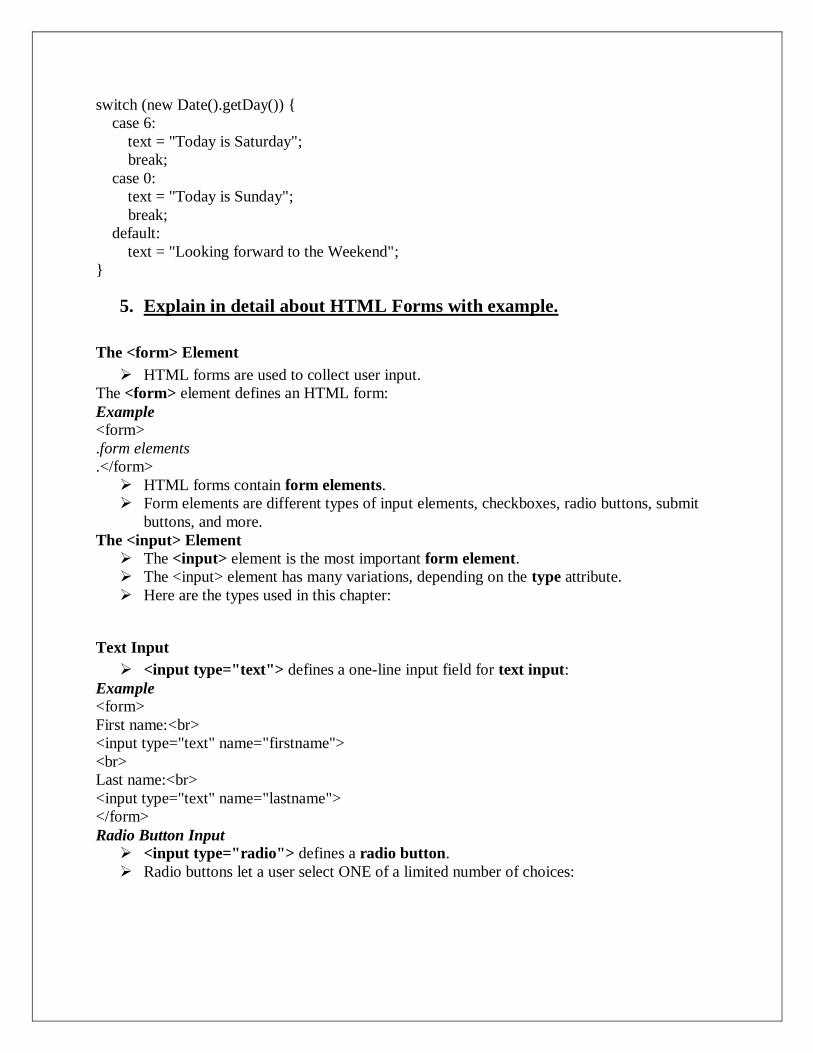
The default Keyword
The default keyword specifies the code to run if there is no case match:
Example
The getDay() method returns the weekday as a number between 0 and 6.
If today is neither Saturday (6) nor Sunday (0), write a default message:
switch (new Date().getDay()) {
case 6:
text = "Today is Saturday";
break;
case 0:
text = "Today is Sunday";
break;
default:
text = "Looking forward to the Weekend";
}
5. Explain in detail about HTML Forms with example.
The <form> Element
HTML forms are used to collect user input.
The <form> element defines an HTML form:
Example
<form>
.form elements
.</form>
HTML forms contain form elements.
Form elements are different types of input elements, checkboxes, radio buttons, submit
buttons, and more.
The <input> Element
The <input> element is the most important form element.
The <input> element has many variations, depending on the type attribute.
Here are the types used in this chapter:
Text Input
<input type="text"> defines a one-line input field for text input:
Example
<form>
First name:<br>
<input type="text" name="firstname">
<br>
Last name:<br>
<input type="text" name="lastname">
</form>
Radio Button Input
<input type="radio"> defines a radio button.
Radio buttons let a user select ONE of a limited number of choices:
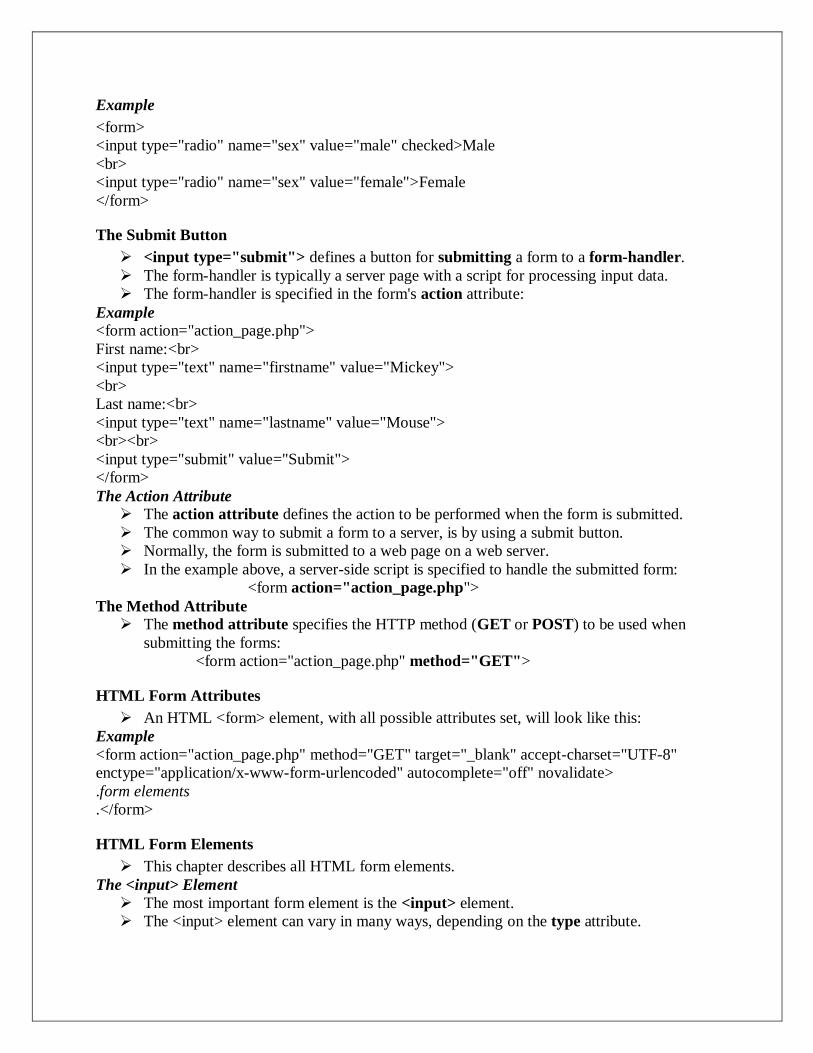
Example
<form>
<input type="radio" name="sex" value="male" checked>Male
<br>
<input type="radio" name="sex" value="female">Female
</form>
The Submit Button
<input type="submit"> defines a button for submitting a form to a form-handler.
The form-handler is typically a server page with a script for processing input data.
The form-handler is specified in the form's action attribute:
Example
<form action="action_page.php">
First name:<br>
<input type="text" name="firstname" value="Mickey">
<br>
Last name:<br>
<input type="text" name="lastname" value="Mouse">
<br><br>
<input type="submit" value="Submit">
</form>
The Action Attribute
The action attribute defines the action to be performed when the form is submitted.
The common way to submit a form to a server, is by using a submit button.
Normally, the form is submitted to a web page on a web server.
In the example above, a server-side script is specified to handle the submitted form:
<form action="action_page.php">
The Method Attribute
The method attribute specifies the HTTP method (GET or POST) to be used when
submitting the forms:
<form action="action_page.php" method="GET">
HTML Form Attributes
An HTML <form> element, with all possible attributes set, will look like this:
Example
<form action="action_page.php" method="GET" target="_blank" accept-charset="UTF-8"
enctype="application/x-www-form-urlencoded" autocomplete="off" novalidate>
.form elements
.</form>
HTML Form Elements
This chapter describes all HTML form elements.
The <input> Element
The most important form element is the <input> element.
The <input> element can vary in many ways, depending on the type attribute.

The <select> Element (Drop-Down List)
The <select> element defines a drop-down list:
Example
<select name="cars">
<option value="volvo">Volvo</option>
<option value="saab">Saab</option>
<option value="fiat">Fiat</option>
<option value="audi">Audi</option>
</select>
The <option> elements defines the options to select.
The list will normally show the first item as selected.
You can add a selected attribute to define a predefined option.
Example
<option value="fiat" selected>Fiat</option>
The <textarea> Element
The <textarea> element defines a multi-line input field (a text area):
Example
<textarea name="message" rows="10" cols="30">
The cat was playing in the garden.
</textarea>
The <button> Element
The <button> element defines a clickable button:
Example
<button type="button" onclick="alert('Hello World!')">Click Me!</button>
HTML5 <output> Element
The <output> element represents the result of a calculation (like one performed by a
script).
Example
Perform a calculation and show the result in an <output> element:
<form action="action_page.asp" oninput="x.value=parseInt(a.value)+parseInt(b.value)">
0
<input type="range" id="a" name="a" value="50">
100 +
<input type="number" id="b" name="b" value="50">
=
<output name="x" for="a b"></output>
<br><br>
<input type="submit">
</form>
6. Discuss in detail about HTML5 Canvas.
The HTML <canvas> element is used to draw graphics, on the fly, via scripting (usually
JavaScript).

The <canvas> element is only a container for graphics. You must use a script to actually
draw the graphics.
Canvas has several methods for drawing paths, boxes, circles, text, and adding images.
Canvas Examples
A canvas is a rectangular area on an HTML page. By default, a canvas has no border and
no content.
The markup looks like this:
<canvas id="myCanvas" width="200" height="100"></canvas>
Always specify an id attribute (to be referred to in a script), and a width and height
attribute to define the size of the canvas.
To add a border, use the style attribute:
Basic Canvas Example
<canvas id="myCanvas" width="200" height="100" style="border:1px solid #000000;">
</canvas>
Drawing with JavaScript
var c = document.getElementById("myCanvas");
var ctx = c.getContext("2d");
ctx.fillStyle = "#FF0000";
ctx.fillRect(0,0,150,75);
Draw a Line
var c = document.getElementById("myCanvas");
var ctx = c.getContext("2d");
ctx.moveTo(0,0);
ctx.lineTo(200,100);
ctx.stroke();
Draw a Circle
var c = document.getElementById("myCanvas");
var ctx = c.getContext("2d");
ctx.beginPath();
ctx.arc(95,50,40,0,2*Math.PI);
ctx.stroke();
Draw a Text
var c = document.getElementById("myCanvas");
var ctx = c.getContext("2d");
ctx.font = "30px Arial";
ctx.fillText("Hello World",10,50);
Stroke Text
var c = document.getElementById("myCanvas");
var ctx = c.getContext("2d");

ctx.font = "30px Arial";
ctx.strokeText("Hello World",10,50);
Draw Linear Gradient
var c = document.getElementById("myCanvas");
var ctx = c.getContext("2d");
// Create gradient
var grd = ctx.createLinearGradient(0,0,200,0);
grd.addColorStop(0,"red");
grd.addColorStop(1,"white");
// Fill with gradient
ctx.fillStyle = grd;
ctx.fillRect(10,10,150,80);
Draw Circular Gradient
var c = document.getElementById("myCanvas");
var ctx = c.getContext("2d");
// Create gradient
var grd = ctx.createRadialGradient(75,50,5,90,60,100);
grd.addColorStop(0,"red");
grd.addColorStop(1,"white");
// Fill with gradient
ctx.fillStyle = grd;
ctx.fillRect(10,10,150,80);
Draw Image
var c = document.getElementById("myCanvas");
var ctx = c.getContext("2d");
var img = document.getElementById("scream");
ctx.drawImage(img,10,10);
7. How do you create frames? Why do we need them? Develop an
application to explain the same. (MAY/JUNE 2014)
Frames To use frames on a page we use <frameset> tag instead of <body> tag.
The <frameset> tag defines how to divide the window into frames.
The rows attribute of <frameset> tag defines horizontal frames and cols attribute
defines vertical frames.
Each frame is indicated by <frame> tag and it defines which HTML document
shall open into the frame.
Format <frameset rows="pixels|%|*">
Attribute Values
Value Description
pixels The row height in pixels (like "100px" or just "100")
% The row height in percent of the available space (like "50%")
* The rest of the available space should be assigned this row
Need for Frame
Frames are a way of organizing your website. They allow you to divide up your window
into various segments for different purposes.
Another reason might be to have your entire site's links visible on the page, while the actual 'content' - i.e. text scrolls as much as it needs.
Example <!DOCTYPE html PUBLIC "-//W3C//DTD HTML 4.01 Frameset//EN"
"http://www.w3.org/TR/html4/frameset.dtd">
<html> <head>
<title>Web Technology</title>
</head>
<frameset cols="200,*" frameborder="0" border="0" framespacing="0"> <frame name="menu" src="menu_1.html" marginheight="0" marginwidth="0"
scrolling="auto" noresize>
<frame name="content" src="content.html" marginheight="0" marginwidth="0" scrolling="auto" noresize>
<noframes>
<p> Frame Example
</frameset> </html>
8. Explain in detail about Client side scripting and server side scripting
Client-side scripting
Client-side scripting generally refers to the class of computer programs on the web that
are executed client-side, by the user's web browser, instead of server-side (on the web
server). This type of computer programming is an important part of the Dynamic HTML
(DHTML) concept, enabling web pages to be scripted; that is, to have different and
changing content depending on user input, environmental conditions (such as the time of
day), or other variables. Client-side scripts are often embedded within an HTML or XHTML document (hence
known as an "embedded script"), but they may also be contained in a separate file, to which the document (or documents)
that use it make reference (hence known as an "external script"). Upon request, the necessary files are sent to the user's computer by the web server (or
servers) on which they reside. The user's web browser executes the script, then displays the document, including any
visible output from the script. Client-side scripts may also contain instructions for the browser to follow in response to
certain user actions, (e.g., clicking a button). Often, these instructions can be followed without further communication with the server. By viewing the file that contains the script, users may be able to see its source code.

Many web authors learn how to write client-side scripts partly by examining the source
code for other authors' scripts. In contrast, server-side scripts, written in languages such as PHP, ASP.NET, Java,
ColdFusion, Perl, Ruby, Go, Python, and server-side JavaScript, are executed by the web
server when the user requests a document. They produce output in a format understandable by web browsers (usually HTML),
which is then sent to the user's computer. The user cannot see the script's source code (unless the author publishes the code
separately), and may not even be aware that a script was executed. Documents produced by server-side scripts may, in turn, contain client-side scripts. Server-side scripts require that their language's interpreter be installed on the server, and
produce the same output regardless of the client's browser, operating system, or other
system details. Client-side scripts do not require additional software on the server (making them popular
with authors who lack administrative access to their servers); however, they do require
that the user's web browser understands the scripting language in which they are written.
It is therefore impractical for an author to write scripts in a language that is not supported
by popular web browsers. Due to security restrictions, client-side scripts may not be allowed to access the user's
computer beyond the web browser application. Techniques like ActiveX controls can be used to sidestep this restriction. Client-side scripting is not inherently unsafe. Users, though, are encouraged to always
keep their web browsers up-to-date to avoid exposing their computer and data to new
vulnerabilities. The latest group of web browsers and web pages tend to employ a heavy amount of
client-side scripting, accounting for an improved user interface in which the user does not
experience the unfriendly "refreshing" of the web page, but instead sees perhaps an animated GIF file indicating that the request occurred and the
page will be updated shortly. Ajax is an important addition to the JavaScript language, allowing web developers to
communicate with the web server in the background without requiring a completely new
version of the page to be requested and rendered. This leads to a much improved user experience in general.
Unfortunately, even languages that are supported by a wide variety of browsers may not
be implemented in precisely the same way across all browsers and operating systems. Authors are well-advised to review the behaviour of their client-side scripts on a variety
of platforms before they put them into use.
Server-side scripting
Server-side scripting is a technique used in web development which involves employing
scripts on a web server which produce a response customized for each user's (client's)
request to the website. The alternative is for the web server itself to deliver a static web page. Scripts can be
written in any of a number of server-side scripting languages that are available (see
below).

Server-side scripting is distinguished from client-side scripting where embedded scripts,
such as JavaScript, are run client-side in a web browser, but both techniques are often
used together.
Server-side scripting is often used to provide a customized interface for the user. These scripts may assemble client characteristics for use in customizing the response
based on those characteristics, the user's requirements, access rights, etc. Server-side scripting also enables the website owner to hide the source code that
generates the interface, whereas with client-side scripting, the user has access to all the
code received by the client. A down-side to the use of server-side scripting is that the client needs to make further
requests over the network to the server in order to show new information to the user via
the web browser. These requests can slow down the experience for the user, place more load on the server,
and prevent use of the application when the user is disconnected from the server.
When the server serves data in a commonly used manner, for example according to the
HTTP or FTP protocols, users may have their choice of a number of client programs
(most modern web browsers can request and receive data using both of those protocols).
In the case of more specialized applications, programmers may write their own server,
client, and communications protocol, that can only be used with one another. Programs that run on a user's local computer without ever sending or receiving data over
a network are not considered clients, and so the operations of such programs would not
be considered client-side operations.
9. Differentiate the client side scripting and server side scripting.
Client-side Environment The client-side environment used to run scripts is usually a browser. The processing takes
place on the end users computer.
The source code is transferred from the web server to the users computer over the internet
and run directly in the browser.
The scripting language needs to be enabled on the client computer. Sometimes if a user
is conscious of security risks they may switch the scripting facility off.
When this is the case a message usually pops up to alert the user when script is
attempting to run.
Server-side Environment
The server-side environment that runs a scripting language is a web server. A user's
request is fulfilled by running a script directly on the web server to generate dynamic
HTML pages.
This HTML is then sent to the client browser. It is usually used to provide interactive
web sites that interface to databases or other data stores on the server.
This is different from client-side scripting where scripts are run by the viewing web
browser, usually in JavaScript.
The primary advantage to server-side scripting is the ability to highly customize the
response based on the user's requirements, access rights, or queries into data stores.
10. Explain in detail about CSS3 with example program
CSS3
CSS3 is the latest standard for CSS.
CSS3 is completely backwards-compatible with earlier versions of CSS.
This section teaches you about the new features in CSS3!
CSS3 Modules
CSS3 has been split into "modules". It contains the "old CSS specification" (which has
been split into smaller pieces). In addition, new modules are added.
Some of the most important CSS3 modules are:
Selectors
Box Model
Backgrounds and Borders
Image Values and Replaced Content
Text Effects
2D/3D Transformations
Animations
Multiple Column Layout
User Interface
CSS3 Rounded Corners
With the CSS3 border-radius property, you can give any element "rounded corners".
CSS3 border-radius Property
With CSS3, you can give any element "rounded corners", by using the border-radius
property.
Here are three examples:
Rounded corners for an element with a specified background color:
Rounded corners!
Rounded corners for an element with a border:
Rounded corners!
Rounded corners for an element with a background image:
Rounded corners!
Here is the code:
Example
#rcorners1 {
border-radius: 25px;
background: #8AC007;
padding: 20px;
width: 200px;
height: 150px;
}
#rcorners2 {
border-radius: 25px;
border: 2px solid #8AC007;
padding: 20px;
width: 200px;

height: 150px;
}
#rcorners3 {
border-radius: 25px;
background: url(paper.gif);
background-position: left top;
background-repeat: repeat;
padding: 20px;
width: 200px;
height: 150px;
}
CSS3 Border Images
With the CSS3 border-image property, you can set an image to be used as the border
around an element.
CSS3 border-image Property
The CSS3 border-image property allows you to specify an image to be used instead of the
normal border around an element.
The border-image property has three parts:
The image to use as the border
Where to slice the image
We will use the following image (called "border.png"):
The border-image property takes the image and slices it into nine sections, like a tic-tac-
toe board. It then places the corners at the corners, and the middle sections are repeated or
stretched as you specify.
Here, the middle sections of the image are repeated to create the border:
An image as a border!
Here is the code:
Example
#borderimg {
border: 10px solid transparent;
padding: 15px;
-webkit-border-image: url(border.png) 30 round; /* Safari 3.1-5 */
-o-border-image: url(border.png) 30 round; /* Opera 11-12.1 */
border-image: url(border.png) 30 round;
}
CSS3 Backgrounds
CSS3 contains a few new background properties, which allow greater control of the
background element.
how to add multiple background images to one element.
You will also learn about the following new CSS3 properties:
background-size
background-origin
background-clip
CSS3 Multiple Backgrounds
CSS3 allows you to add multiple background images for an element, through the
background-image property.
The different background images are separated by commas, and the images are stacked
on top of each other, where the first image is closest to the viewer.
The following example has two background images, the first image is a flower (aligned
to the bottom and right) and the second image is a paper background (aligned to the top-
left corner):
Example
#example1 {
background-image: url(img_flwr.gif), url(paper.gif);
background-position: right bottom, left top;
background-repeat: no-repeat, repeat;
}
CSS3 Background Size
The CSS3 background-size property allows you to specify the size of background
images.
Before CSS3, the size of a background image was the actual size of the image. CSS3
allows us to re-use background images in different contexts.
The size can be specified in lengths, percentages, or by using one of the two keywords:
contain or cover.
The following example resizes a background image to much smaller than the original
image (using pixels):
Original background image:
#div1 {
background: url(img_flower.jpg);
background-size: 100px 80px;
background-repeat: no-repeat;
} Full Size Background Image
Now we want to have a background image on a website that covers the entire browser
window at all times.
The requirements are as follows:
Fill the entire page with the image (no white space)
Scale image as needed
Center image on page
Do not cause scrollbars
The following example shows how to do it; Use the html element (the html element is
always at least the height of the browser window).
Then set a fixed and centered background on it. Then adjust its size with the background-
size property:
Example
html {
background: url(img_flower.jpg) no-repeat center center fixed;
background-size: cover;
CSS3 background-origin Property
The CSS3 background-origin property specifies where the background image is
positioned.
The background-origin property takes three different values:
border-box - the background image starts from the upper left corner of the border
padding-box - (default) the background image starts from the upper left corner of
the padding edge
content-box - the background image starts from the upper left corner of the
content
The following example illustrates the background-origin property:
Example
#example1 {
border: 10px solid black;
padding:35px;
background:url(img_flwr.gif);
background-repeat: no-repeat;
background-origin: content-box; }
CSS3 background-clip Property
The CSS3 background-clip property specifies the painting area of the background.
The background-clip property takes three different values:
border-box - (default) the background is painted to the outside edge of the border
padding-box - the background is painted to the outside edge of the padding
content-box - the background is painted within the content box
Example1 {
border: 10px dotted black;
padding:35px;
background: yellow;
background-clip: content-box;
}
CSS3 Colors
CSS supports color names, hexadecimal and RGB colors.
In addition, CSS3 also introduces:
RGBA colors

HSL colors
HSLA colors
opacity
RGBA Colors
RGBA color values are an extension of RGB color values with an alpha channel -
which specifies the opacity for a color.
An RGBA color value is specified with: rgba(red, green, blue, alpha). The alpha
parameter is a number between 0.0 (fully transparent) and 1.0 (fully opaque)
Example
#p1 {background-color: rgba(255, 0, 0, 0.3);} /* red with opacity */
#p2 {background-color: rgba(0, 255, 0, 0.3);} /* green with opacity */
#p3 {background-color: rgba(0, 0, 255, 0.3);} /* blue with opacity */
HSL Colors
HSL stands for Hue, Saturation and Lightness.
An HSL color value is specified with: hsl(hue, saturation, lightness).
Hue is a degree on the color wheel (from 0 to 360):
0 (or 360) is red
120 is green
240 is blue
Saturation is a percentage value: 100% is the full color.
Lightness is also a percentage; 0% is dark (black) and 100% is white.
Example
#p1 {background-color: hsl(120, 100%, 50%);} /* green */
#p2 {background-color: hsl(120, 100%, 75%);} /* light green */
#p3 {background-color: hsl(120, 100%, 25%);} /* dark green */
#p4 {background-color: hsl(120, 60%, 70%);} /* pastel green */
HSLA Colors
HSLA color values are an extension of HSL color values with an alpha channel -
which specifies the opacity for a color.
An HSLA color value is specified with: hsla(hue, saturation, lightness, alpha), where
the alpha parameter defines the opacity.
The alpha parameter is a number between 0.0 (fully transparent) and 1.0 (fully
opaque).
Example
#p1 {background-color: hsla(120, 100%, 50%, 0.3);} /* green with opacity */
#p2 {background-color: hsla(120, 100%, 75%, 0.3);} /* light green with opacity */
#p3 {background-color: hsla(120, 100%, 25%, 0.3);} /* dark green with opacity */
#p4 {background-color: hsla(120, 60%, 70%, 0.3);} /* pastel green with opacity */
Opacity
The CSS3 opacity property sets the opacity for a specified RGB value.
The opacity property value must be a number between 0.0 (fully transparent) and 1.0
#p1 {background-color:rgb(255,0,0);opacity:0.6;} /* red with opacity */
#p2 {background-color:rgb(0,255,0);opacity:0.6;} /* green with opacity */
#p3 {background-color:rgb(0,0,255);opacity:0.6;} /* blue with opacity */

CSS3 Gradients
CSS3 gradients let you display smooth transitions between two or more specified colors.
Earlier, you had to use images for these effects.
However, by using CSS3 gradients you can reduce download time and bandwidth usage.
In addition, elements with gradients look better when zoomed, because the gradient is
generated by the browser.
CSS3 defines two types of gradients:
Linear Gradients (goes down/up/left/right/diagonally)
Radial Gradients (defined by their center)
CSS3 Linear Gradients
To create a linear gradient you must define at least two color stops. Color stops are the
colors you want to render smooth transitions among.
You can also set a starting point and a direction (or an angle) along with the gradient
effect.
Syntax
background: linear-gradient(direction, color-stop1, color-stop2, ...);

UNIT-II JAVA
PART A
1. When super keyword is used?
If the method overrides one of its superclass's methods, overridden method can be
invoked through the use of the keyword super. It can be also used to refer to a hidden field.
2. Explain Runtime Exceptions?
It is an exception that occurs that probably could have been avoided by the programmer.
As opposed to checked exceptions, runtime exceptions are ignored at the time of compliation.
3. What do you mean by Checked Exceptions?
It is an exception that is typically a user error or a problem that cannot be foreseen by the
programmer. For example, if a file is to be opened, but the file cannot be found, an exception
occurs. These exceptions cannot simply be ignored at the time of compilation.
4. What is the difference between StringBuffer and StringBuilder class?
Use StringBuilder whenever possible because it is faster than StringBuffer. But, if thread
safety is necessary then use StringBuffer objects.
5. What is Abstract class?
These classes cannot be instantiated and are either partially implemented or not at all
implemented. This class contains one or more abstract methods which are simply method
declarations without a body.
6. What is an Interface?
An interface is a collection of abstract methods. A class implements an interface, thereby
inheriting the abstract methods of the interface.
7. What are the two ways in which Thread can be created?
Thread can be created by:
1. implementing Runnable interface
2. extending the Thread class
8. Difference between throw and throws?
It includes:
Throw is used to trigger an exception where as throws is used in declaration of exception.
Without throws, Checked exception cannot be handled where as checked exception can be
propagated with throws.
9. What is the difference between yielding and sleeping?
When a task invokes its yield() method, it returns to the ready state. When a task invokes
its sleep() method, it returns to the waiting state.
10. What is the difference between the Reader/Writer class hierarchy and the
InputStream/OutputStream class hierarchy? The Reader/Writer class hierarchy is character-oriented, and theInputStream/OutputStream class
hierarchy is byte-oriented.
11. What's the difference between the methods sleep() and wait()?
The code sleep(2000); puts thread aside for exactly two seconds. The code wait(2000),
causes a wait of up to two second. A thread could stop waiting earlier if it receives the notify() or
notifyAll() call. The method wait() is defined in the class Object and the method sleep() is
defined in the class Thread.
12. What is the difference between error and an exception?
An error is an irrecoverable condition occurring at runtime. Such as OutOfMemory error.
Exceptions are conditions that occur because of bad input etc. e.g. FileNotFoundException will
be thrown if the specified file does not exist.

13. What is daemon thread?
Daemon thread is a low priority thread, which runs intermittently in the back ground
doing the garbage collection operation for the java runtime system.
14. Difference between the super and this keyword.
In the constructor, this() calls a constructor defined in the current class. super() calls a
constructor defined in the parent class.
15. Does java support multiple inheritance? Justify.
Java does not support multiple inheritance using class, but it provides the facility by
interface in order to avoid multiple instances parent class for child classes.
16. What is the need for Buffered Reader and BufferedInputStream class? What is the
difference between Reader/writer and InputStream/outputStream?
Buffered reader-character oriented, used o read text data and faster.
BufferedInputStream-byte oriented, used to read image, binary and sequential data ,
slower.
17. What is the importance of == and equals () methods with respect to string object?
Both equals() method and == operator is used to compare two objects in Java. == is an
operator and equals() is method. But == operator compare reference or memory location of
objects in the heap, whether they point to the same location or not .
equals() method the main purpose is to compare the state of two objects or contents of the
object are equal or not.
18. What is Inheritance?
Inheritance is a mechanism in which one object acquires all the properties and behaviour
of another object of another class. It represents IS-A relationship. It is used for Code Resusability
and Method Overriding.
19. What is cloning?
The object cloning is a way to create exact copy of an object. For this purpose, clone()
method of Object class is used to clone an object. Less processing task.
20. Mention the purpose of the Keyword 'final'.
It is used with variables to make its values not to be changed.
The final keyword can be applied with the variables, a final variable that have no value
it is called blank final variable or uninitialized final variable. It can be initialized in the
constructor only. The blankfinal variable can be static also which will be initialized in the static
block only.
21. Write down the fundamentals of exception handling?
o Exception is an event that occurs at the time of execution of a program.
o It disrupts the normal flow of the program.
o It is an object that describes the exceptional condition that occurs at the runtime of
the program.
o Exception will happen due to improper input, resource not found and so on..
Exception Handling: Java exception handling is done using five keywords: try, catch,
throw, throws, finally.
Try: This block helps program to monitor whether an exception arises or not.
catch: The exception is catched and handled here.
throw:Manually throws an exception out of the method.
throws:Any exception that is thrown out is specified here.
finally: Any code that has to be executed before a method returns is placed here.

Exception handling block:
Try
{ //code to monitor whether an exception arises or not }
catch (ExceptionType_1 exobject)
{ //Exception handler }
Finally
{ // code to be executed before try block ends } 22. What are Java Packages? What’s the significance of packages?
In Java, package is a collection of classes and interfaces which are bundled together as
they are related to each other. Use of packages helps developers to modularize the code and
group the code for proper re-use. Once code has been packaged in Packages, it can be imported
in other classes and used.
23. How an object is serialized in java?
In java, to convert an object into byte stream by serialization, an interface with the name
Serializable is implemented by the class. All objects of a class implementing serializable
interface get serialized and their state is saved in byte stream.
24. When we should use serialization?
Serialization is used when data needs to be transmitted over the network. Using
serialization, object’s state is saved and converted into byte stream .The byte stream is
transferred over the network and the object is re-created at destination.
25. Why Strings in Java are called as Immutable?
In java, string objects are called immutable as once value has been assigned to a string, it
can’t be changed and if changed, a new object is created.
26. What is multi-threading?
Multi threading is a programming concept to run multiple tasks in a concurrent manner
within a single program. Threads share same process stack and running in parallel. It helps in
performance improvement of any program.
27. How garbage collection is done in Java?
In java, when an object is not referenced any more, garbage collection takes place and the
object is destroyed automatically. For automatic garbage collection java calls either System.gc()
method or Runtime.gc() method.
28. How destructors are defined in Java?
In Java, there are no destructors defined in the class as there is no need to do so. Java has
its own garbage collection mechanism which does the job automatically by destroying the
objects when no longer referenced.
29. What’s meant by anonymous class?
An anonymous class is a class defined without any name in a single line of code using
new keyword.
30. Can we override static methods of a class?
We cannot override static methods. Static methods belong to a class and not to individual
objects and are resolved at the time of compilation (not at runtime).Even if we try to override
static method,we will not get an complitaion error, nor the impact of overriding when running
the code.
PART-B
1. Explain briefly the following object oriented concepts.
(i) Abstraction and Encapsulation.

(ii) Methods and messages.
(iii) Inheritance.
(iv) Polymorphism.
(v) Object and Class
OBJECT:
Objects are key to understanding object-oriented technology.
Examples of real-world objects: dog,desk, television set, your bicycle.
Real-world objects share two characteristics: They all have state and behavior.
Dogs have state (name, color, breed, hungry) and behavior (barking, fetching, wagging
tail).
A software object.
Software objects are conceptually similar to real-world objects: they too consist of state
and related behavior.
An object stores its state in fields (variables in some programming languages) and
exposes its behavior through methods (functions in some programming languages).
Methods operate on an object's internal state and serve as the primary mechanism for
object-to-object communication. Hiding internal state and requiring all interaction to be
performed through an object's methods is known as data encapsulation — a fundamental
principle of object-oriented programming.
Consider a bicycle, for example:
A bicycle modeled as a software object.
Bundling code into individual software objects provides a number of benefits, including:
Modularity: The source code for an object can be written and maintained
independently of the source code for other objects. Once created, an object can be
easily passed around inside the system.
Information-hiding: By interacting only with an object's methods, the details of its
internal implementation remain hidden from the outside world.
Code re-use: If an object already exists (perhaps written by another software
developer), you can use that object in your program. This allows specialists to

implement/test/debug complex, task-specific objects, which you can then trust to run
in your own code.
Pluggability and debugging ease: If a particular object turns out to be problematic,
you can simply remove it from your application and plug in a different object as its
replacement. This is analogous to fixing mechanical problems in the real world. If a
bolt breaks, you replace it, not the entire machine.
CLASS:
It is the central point of OOP and that contains data and codes with behavior.
In Java everything happens within class and it describes a set of objects with common
behavior.
The class definition describes all the properties, behavior, and identity of objects present
within that class.
As far as types of classes are concerned, there are predefined classes in languages like
C++ and Pascal.
But in Java one can define his/her own types with data and code.
Example: In object-oriented terms, we say that your bicycle is an instance of the class of
objects known as bicycles.
A class is the blueprint from which individual objects are created.
The following Bicycle class is one possible implementation of a bicycle:
class Bicycle {
int cadence = 0;
int speed = 0;
int gear = 1;
void changeCadence(int newValue) {
cadence = newValue;
}
void changeGear(int newValue) {
gear = newValue;
}
void speedUp(int increment) {
speed = speed + increment;
}
void applyBrakes(int decrement) {
speed = speed - decrement;
}
void printStates() {
System.out.println("cadence:"+cadence+" speed:"+speed+" gear:"+gear);
}}
The syntax of the Java programming language: The fields cadence, speed, and gear
represent the object's state, and the methods (changeCadence, changeGear, speedUp etc.)
define its interaction with the outside world.
You may have noticed that the Bicycle class does not contain a main method. That's
because it's not a complete application; it's just the blueprint for bicycles that might be
used in an application. The responsibility of creating and using new Bicycle objects
belongs to some other class in your application.

Here's a BicycleDemo class that creates two separate Bicycle objects and invokes their
methods:
class BicycleDemo {
public static void main(String[] args) {
// Create two different Bicycle objects
Bicycle bike1 = new Bicycle();
Bicycle bike2 = new Bicycle();
// Invoke methods on those objects
bike1.changeCadence(50);
bike1.speedUp(10);
bike1.changeGear(2);
bike1.printStates();
bike2.changeCadence(50);
bike2.speedUp(10);
bike2.changeGear(2);
bike2.changeCadence(40);
bike2.speedUp(10);
bike2.changeGear(3);
bike2.printStates();
}}
METHOD
We know that a class can define both attributes and behaviors. Again attributes are
defined by variables and behaviors are represented by methods.
In other words, methods define the abilities of an object.
A method is a group of instructions that is given a name and can be called up at any point
in a program simply by quoting that name.
Creating a method in a Java program
import java.awt.*;
import java.applet.*;
public class calculation extends Applet
{ int first, answer;
public void paint (Graphics g)
{ first = 34;
calculation();
g.drawString("Twice 34 is " + answer, 10, 25);
}
public void calculation ()
{ answer = first * 2;
} }
MESSAGES
A single object alone is generally not very useful and usually appears as a component of a
larger program or application that contains many other objects.
Through the interaction of these objects, programmers achieve higher order functionality
and more complex behavior.

Software objects interact and communicate with each other by sending messages to each
other. When object A wants object B to perform one of B's methods, object A sends a
message to object B.
Sometimes the receiving object needs more information so that it knows exactly what to
do—
For example, when you want to change gears on your bicycle, you have to indicate which
gear you want. This information is passed along with the message as parameters.
Three components comprise a message:
The object to whom the message is addressed (Your Bicycle)
The name of the method to perform (changeGears)
Any parameters needed by the method (lower gear)
The Benefits of Messages
An object's behavior is expressed through its methods, so (aside from
direct variable access) message passing supports all possible interactions
between objects.
Objects don't need to be in the same process or even on the same machine
to send and receive messages back and forth to each other.
ABSTACTION AND ENCAPSULATION
The process of abstraction in Java is used to hide certain details and only show the
essential features of the object. In other words, it deals with the outside view of an object
(interface).
Abstraction is simplifying complex reality by modeling classes appropriate to the
problem, and working at the most appropriate level of inheritance for a given aspect of
the problem.
This is an important programming concept that assists in separating an object's state from
its behavior.
This helps in hiding an object's data describing its state from any further modification by
external component.
In Java there are four different terms used for hiding data constructs and these are public,
private, protected and package.
object can associated with data with predefined classes and in any application an object
can know about the data it needs to know about.
So any unnecessary data are not required by an object can be hidden by this process.

It can also be termed as information hiding that prohibits outsiders in seeing the inside of
an object in which abstraction is implemented.
INHERITANCE
This is the mechanism of organizing and structuring software program. Though objects
are distinguished from each other by some additional features but there are objects that
share certain things common
. In object oriented programming classes can inherit some common behavior and state
from others.
Inheritance in OOP allows to define a general class and later to organize some other
classes simply adding some details with the old class definition
. This saves work as the special class inherits all the properties of the old general class
and as a programmer you only require the new features.
This helps in a better data analysis, accurate coding and reduces development time.
Object-oriented programming allows classes to inherit commonly used state and behavior
from other classes.
In this example, Bicycle now becomes the superclass of MountainBike, RoadBike, and
TandemBike.
In the Java programming language, each class is allowed to have one direct superclass,
and each superclass has the potential for an unlimited number of subclasses:
A hierarchy of bicycle classes.
The syntax for creating a subclass is simple. At the beginning of your class declaration,
use the extends keyword, followed by the name of the class to inherit from the super
class.
POLYMORPHISM
It describes the ability of the object in belonging to different types with specific behavior
of each type
By using this, one object can be treated like another and in this way it can create and
define multiple level of interface.
Here the programmers need not have to know the exact type of object in advance and
this is being implemented at runtime.
For example, given a base class shape, polymorphism enables the programmer to define
different area methods for any number of derived classes, such as circles, rectangles and
triangles.
No matter what shape an object is, applying the area method to it will return the correct
results.

Polymorphism is considered to be a requirement of any true object-oriented
programming language (OOPL).
A variable with a given name may be allowed to have different forms and the program
can determine which form of the variable to use at the time of execution.
A method with a given name may be allowed to have different form of variable
declaration known as overloading.
2. List out the features of java
There is given many features of java. They are also known as java buzzwords. The Java
Features given below are simple and easy to understand.
Simple
Object-Oriented
Platform independent
Secured
Robust
Portable
Dynamic
Interpreted
High Performance
Multithreaded
Distributed
Simple
Java is Easy to write and more readable and eye catching.
Looks familiar to existing programmers: related to C and C++:
Omits many rarely used, poorly understood, confusing features of C++, like operator
overloading, multiple inheritance, automatic coercions, etc.
Contains no goto statement, but break and continue
Has no header files and eliminated C preprocessor
Eliminates much redundancy (e.g. no structs, unions)
It has no pointers
Added features to simplify:
Garbage collection, so the programmer won't have to worry about storage
management, which leads to fewer bugs.
A rich predefined class library
Object-oriented
Java programming is object-oriented programming language.
Like C++ java provides most of the object oriented features.
Java is pure OOP. Language. (while C++ is semi object oriented)
Java is an object-oriented language, which means that you focus on the data in your
application and methods that manipulate that data, rather than thinking strictly in terms of
procedures.
In an object-oriented system, a class is a collection of data and methods that operate on
that data. Taken together, the data and methods describe the state and behavior of an
object. Classes are arranged in a hierarchy, so that a subclass can inherit behavior from its
superclass.

Java comes with an extensive set of classes, arranged in packages, that you can use in
your programs.
Platform Independent
Java code is compiled by the compiler and converted into bytecode.This bytecode is a
platform independent code because it can be run on multiple platforms i.e. Write Once
and Run Anywhere(WORA).
Secured
Java is secured because
No explicit pointer
Programs run inside virtual machine sandbox.
Classloader- adds security by separating the package for the classes of the local file
system from those that are imported from network sources.
Bytecode Verifier- checks the code fragments for illegal code that can violate access
right to objects.
Security Manager- determines what resources a class can access such as reading and
writing to the local disk.
These security are provided by java language. Some security can also be provided by
application developer through SSL,JAAS,cryptography etc.
Java provides secure way to access web applications.
Robust
Java has been designed for writing highly reliable or robust software:
language restrictions (e.g. no pointer arithmetic and real arrays) to make it impossible for
applications to smash memory (e.g overwriting memory and corrupting data)
Java does automatic garbage collection, which prevents memory leaks
Extensive compile-time checking so bugs can be found early; this is repeated at runtime
for flexibilty and to check consistency
Portable
Java programs can execute in any environment for which there is a Java run-time
system.(JVM)
Java programs can be run on any platform (Linux,Window,Mac)
Java programs can be transferred over world wide web (e.g applets)
We may carry the java bytecode to any platform
High-performance
Bytecodes are highly optimized.
JVM can executed them much faster.
Distributed
Java was designed with the distributed environment.
RMI and EJB are used for creating distributed applications.
We may access files by calling the methods from any machine on the internet.
Java supports various levels of network connectivity through classes in the java.net
package
Multi-threaded
We can write Java programs that deal with many tasks at once by defining multiple
threads.
The main advantage of multi-threading is that it shares the same memory.
Threads are important for multi-media, Web applications etc.

Dynamic
Java was designed to adapt to an evolving environment:
Even after binaries have been released, they can adapt to a changing environment
Java loads in classes as they are needed, even from across the network
It defers many decisions (like object layout) to runtime, which solves many of the version
problems that C++ has
Interpreted
The Java compiler generates byte-codes, rather than native machine code.
To actually run a Java program, you use the Java interpreter to execute the compiled
byte-codes. Java byte-codes provide an architecture-neutral object file format.
\The code is designed to transport programs efficiently to multiple platforms.
rapid turn-around development
Software author is protected, since binary byte streams are downloaded and not
the source code
3. Write short on variable and datatype in java
Variable is a name of memory location.
There are three types of variables: local, instance and static.
There are two types of datatypes in java, primitive and non-primitive.
Variable
Variable is name of reserved area allocated in memory.
Types of Variable
There are three types of variables in java
local variable
instance variable
static variable
Local Variable
A variable that is declared inside the method is called local variable.
Instance Variable
A variable that is declared inside the class but outside the method is called instance
variable . It is not declared as static.
Static variable
A variable that is declared as static is called static variable. It cannot be local.
Example
class A{
int data=50;//instance variable
static int m=100;//static variable

void method(){
int n=90;//local variable
}
}//end of class
Data Types
In java, there are two types of data types
primitive data types
non-primitive data types
4. Explain in detail about array with example program
Java provides a data structure, the array, which stores a fixed-size sequential collection
of elements of the same type.
An array is used to store a collection of data, but it is often more useful to think of an
array as a collection of variables of the same type.
Instead of declaring individual variables, such as number0, number1, ..., and number99,
you declare one array variable such as numbers and use numbers[0], numbers[1], and ...,
numbers[99] to represent individual variables.
Declaring Array Variables:
To use an array in a program, you must declare a variable to reference the array, and you
must specify the type of array the variable can reference.
Here is the syntax for declaring an array variable:
dataType[] arrayRefVar; // preferred way.
or
dataType arrayRefVar[]; // works but not preferred way.
Example:
The following code snippets are examples of this syntax:
double[] myList; // preferred way.
or

double myList[]; // works but not preferred way.
Creating Arrays:
You can create an array by using the new operator with the following syntax:
arrayRefVar = new dataType[arraySize];
The above statement does two things:
It creates an array using new dataType[arraySize];
It assigns the reference of the newly created array to the variable arrayRefVar.
Declaring an array variable, creating an array, and assigning the reference of the array to
the variable can be combined in one statement, as shown below:
dataType[] arrayRefVar = new dataType[arraySize];
Alternatively you can create arrays as follows:
dataType[] arrayRefVar = {value0, value1, ..., valuek};
The array elements are accessed through the index. Array indices are 0-based; that is,
they start from 0 to arrayRefVar.length-1.
Example:
Following statement declares an array variable, myList, creates an array of 10 elements
of double type, and assigns its reference to myList.:
double[] myList = new double[10];
Following picture represents array myList. Here myList holds ten double values and the
indices are from 0 to 9.
Processing Arrays:
When processing array elements, we often use either for loop or foreach loop because all
of the elements in an array are of the same type and the size of the array is known.
Example:
Here is a complete example of showing how to create, initialize and process arrays:
public class TestArray {
public static void main(String[] args) {
double[] myList = {1.9, 2.9, 3.4, 3.5};
// Print all the array elements
for (int i = 0; i < myList.length; i++) {
System.out.println(myList[i] + " ");
}
// Summing all elements

double total = 0;
for (int i = 0; i < myList.length; i++) {
total += myList[i];
}
System.out.println("Total is " + total);
// Finding the largest element
double max = myList[0];
for (int i = 1; i < myList.length; i++) {
if (myList[i] > max) max = myList[i];
}
System.out.println("Max is " + max);
}}
Passing Arrays to Methods:
Just as you can pass primitive type values to methods, you can also pass arrays to
methods.
For example, the following method displays the elements in an int array:
public static void printArray(int[] array) {
for (int i = 0; i < array.length; i++) {
System.out.print(array[i] + " "); }}
You can invoke it by passing an array. For example, the following statement invokes the
printArray method to display 3, 1, 2, 6, 4, and 2:
printArray(new int[]{3, 1, 2, 6, 4, 2});
Returning an Array from a Method:
A method may also return an array. For example, the method shown below returns an
array that is the reversal of another array:
Example
public static int[] reverse(int[] list) {
int[] result = new int[list.length];
for (int i = 0, j = result.length - 1; i < list.length; i++, j--) {
result[j] = list[i];
} return result; }
THE ARRAYS CLASS:
The java.util.Arrays class contains various static methods for sorting and searching
arrays, comparing arrays, and filling array elements.
These methods are overloaded for all primitive types.
public static int binarySearch(Object[] a, Object key)
5. Briefly explain the various operator in java
Java provides a rich set of operators to manipulate variables. We can divide all the Java
operators into the following groups:
Arithmetic Operators
Relational Operators
Bitwise Operators
Logical Operators
Assignment Operators
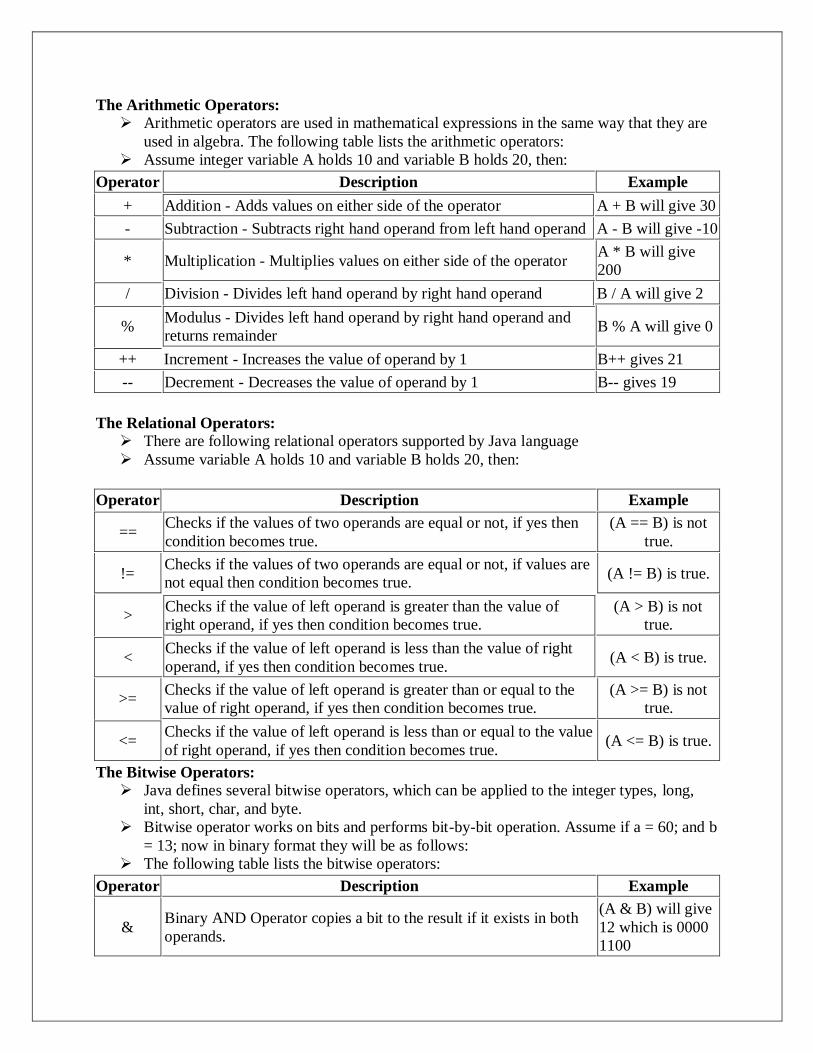
The Arithmetic Operators:
Arithmetic operators are used in mathematical expressions in the same way that they are
used in algebra. The following table lists the arithmetic operators:
Assume integer variable A holds 10 and variable B holds 20, then:
Operator Description Example
+ Addition - Adds values on either side of the operator A + B will give 30
- Subtraction - Subtracts right hand operand from left hand operand A - B will give -10
* Multiplication - Multiplies values on either side of the operator A * B will give
200
/ Division - Divides left hand operand by right hand operand B / A will give 2
% Modulus - Divides left hand operand by right hand operand and
returns remainder B % A will give 0
++ Increment - Increases the value of operand by 1 B++ gives 21
-- Decrement - Decreases the value of operand by 1 B-- gives 19
The Relational Operators:
There are following relational operators supported by Java language
Assume variable A holds 10 and variable B holds 20, then:
Operator Description Example
== Checks if the values of two operands are equal or not, if yes then
condition becomes true.
(A == B) is not
true.
!= Checks if the values of two operands are equal or not, if values are
not equal then condition becomes true. (A != B) is true.
> Checks if the value of left operand is greater than the value of
right operand, if yes then condition becomes true.
(A > B) is not
true.
< Checks if the value of left operand is less than the value of right
operand, if yes then condition becomes true. (A < B) is true.
>= Checks if the value of left operand is greater than or equal to the
value of right operand, if yes then condition becomes true.
(A >= B) is not
true.
<= Checks if the value of left operand is less than or equal to the value
of right operand, if yes then condition becomes true. (A <= B) is true.
The Bitwise Operators:
Java defines several bitwise operators, which can be applied to the integer types, long,
int, short, char, and byte.
Bitwise operator works on bits and performs bit-by-bit operation. Assume if a = 60; and b
= 13; now in binary format they will be as follows:
The following table lists the bitwise operators:
Operator Description Example
& Binary AND Operator copies a bit to the result if it exists in both
operands.
(A & B) will give
12 which is 0000
1100

| Binary OR Operator copies a bit if it exists in either operand.
(A | B) will give
61 which is 0011
1101
^ Binary XOR Operator copies the bit if it is set in one operand but
not both.
(A ^ B) will give
49 which is 0011
0001
~ Binary Ones Complement Operator is unary and has the effect of
'flipping' bits.
(~A ) will give -
61 which is 1100
0011 in 2's
complement form
due to a signed
binary number.
<< Binary Left Shift Operator. The left operands value is moved left
by the number of bits specified by the right operan
A << 2 will give
240 which is 1111
0000
>> Binary Right Shift Operator. The left operands value is moved
right by the number of bits specified by the right operand.
A >> 2 will give
15 which is 1111
>>>
Shift right zero fill operator. The left operands value is moved
right by the number of bits specified by the right operand and
shifted values are filled up with zeros.
A >>>2 will give
15 which is 0000
1111
The Logical Operators:
The following table lists the logical operators:
Assume Boolean variables A holds true and variable B holds false, then:
Operator Description Example
&& Called Logical AND operator. If both the operands are non-zero,
then the condition becomes true.
(A && B) is
false.
|| Called Logical OR Operator. If any of the two operands are non-
zero, then the condition becomes true. (A || B) is true.
!
Called Logical NOT Operator. Use to reverses the logical state of
its operand. If a condition is true then Logical NOT operator will
make false.
!(A && B) is
true.
The Assignment Operators:
There are following assignment operators supported by Java language:
Operator Description Example
= Simple assignment operator, Assigns values from right side
operands to left side operand
C = A + B will
assign value of A
+ B into C
+= Add AND assignment operator, It adds right operand to the left
operand and assign the result to left operand
C += A is
equivalent to C =
C + A
-= Subtract AND assignment operator, It subtracts right operand from
the left operand and assign the result to left operand
C -= A is
equivalent to C =
C - A
*= Multiply AND assignment operator, It multiplies right operand
with the left operand and assign the result to left operand
C *= A is
equivalent to C =
C * A
/= Divide AND assignment operator, It divides left operand with the
right operand and assign the result to left operand
C /= A is
equivalent to C =
C / A
%= Modulus AND assignment operator, It takes modulus using two
operands and assign the result to left operand
C %= A is
equivalent to C =
C % A
<<= Left shift AND assignment operator C <<= 2 is same
as C = C << 2
>>= Right shift AND assignment operator C >>= 2 is same
as C = C >> 2
&= Bitwise AND assignment operator C &= 2 is same as
C = C & 2
^= bitwise exclusive OR and assignment operator C ^= 2 is same as
C = C ^ 2
|= bitwise inclusive OR and assignment operator C |= 2 is same as
C = C | 2
6. Explain the various control statement in java
Java Control statements control the order of execution in a java program, based on data
values and conditional logic. There are three main categories of control flow statements;
Selection statements: if, if-else and switch.
· Loop statements: while, do-while and for.
· Transfer statements: break, continue, return, try-catch-finally and assert.
Selection Statements
The If Statement
The if statement executes a block of code only if the specified expression is true.
If the value is false, then the if block is skipped and execution continues with the rest of
the program.
You can either have a single statement or a block of code within an if statement.
Note that the conditional expression must be a Boolean expression.
The simple if statement has the following syntax:
if (<conditional expression>)
<statement action>
Example
public class IfStatementDemo {
public static void main(String[] args) {
int a = 10, b = 20;
if (a > b)

System.out.println("a > b");
if (a < b)
System.out.println("b > a");
}}
Output
b > a
The If-else Statement
The if/else statement is an extension of the if statement. If the statements in the if
statement fails, the statements in the else block are executed.
You can either have a single statement or a block of code within if-else blocks.
Note that the conditional expression must be a Boolean expression.
The if-else statement has the following syntax:
if (<conditional expression>)
<statement action>
else
<statement action>
Example
public class IfElseStatementDemo {
public static void main(String[] args) {
int a = 10, b = 20;
if (a > b) {
System.out.println("a > b");
} else {
System.out.println("b > a");
} }}
Output
b > a
Switch Case Statement
The switch case statement, also called a case statement is a multi-way branch with
several choices.
A switch is easier to implement than a series of if/else statements.
The switch statement begins with a keyword, followed by an expression that equates to a
no long integral value.
Following the controlling expression is a code block that contains zero or more labeled
cases. Each label must equate to an integer constant and each must be unique.
When the switch statement executes, it compares the value of the controlling expression
to the values of each case label.
The program will select the value of the case label that equals the value of the controlling
expression and branch down that path to the end of the code block. If none of the case
label values match, then none of the codes within the switch statement code block will be
executed.
Java includes a default label to use in cases where there are no matches. We can have a
nested switch within a case block of an outer switch. Its general form is as follows:
switch(<non-long integral expression>) {
case label1: <statement1>
case label2: <statement2>

…
case labeln: <statementn>
default: <statement>
} // end switch
When executing a switch statement, the program falls through to the next case.
Therefore, if you want to exit in the middle of the switch statement code block, you must
insert a break statement, which causes the program to continue executing after the current
code block.
Example program to find the greatest of 3 numbers.
public class SwitchCaseStatementDemo {
public static void main(String[] args) {
int a = 10, b = 20, c = 30;
int status = -1;
if (a > b && a > c) {
status = 1;
} else if (b > c) {
status = 2;
} else {
status = 3;
}
switch (status) {
case 1:
System.out.println("a is the greatest");
break;
case 2:
System.out.println("b is the greatest");
break;
case 3:
System.out.println("c is the greatest");
break;
default:
System.out.println("Cannot be determined");
} } }
Output
c is the greatest
Iteration Statements
While Statement The while statement is a looping construct control statement that executes a block of code
while a condition is true.
You can either have a single statement or a block of code within the while loop. The loop
will never be executed if the testing expression evaluates to false.
The loop condition must be a boolean expression.
The syntax of the while loop is
while (<loop condition>)
<statements> Example program to print numbers from 1 to 10.

public class WhileLoopDemo {
public static void main(String[] args) {
int count = 1;
System.out.println("Printing Numbers from 1 to 10");
while (count <= 10) {
System.out.println(count++);
}
}
Do-while Loop Statement
The do-while loop is similar to the while loop, except that the test is performed at the end
of the loop instead of at the beginning.
This ensures that the loop will be executed at least once.
A do-while loop begins with the keyword do, followed by the statements that make up
the body of the loop.
Finally, the keyword while and the test expression completes the do-while loop.
When the loop condition becomes false, the loop is terminated and execution continues
with the statement immediately following the loop.
You can either have a single statement or a block of code within the do-while loop.
The syntax of the do-while loop is
do
<loop body>
while (<loop condition>);
Example
public class DoWhileLoopDemo {
public static void main(String[] args) {
int count = 1;
System.out.println("Printing Numbers from 1 to 10");
do {
System.out.println(count++);
} while (count <= 10);
}
For Loops
The for loop is a looping construct which can execute a set of instructions a specified
number of times. It’s a counter controlled loop.
The syntax of the loop is as follows:
for (<initialization>; <loop condition>; <increment expression>)
<loop body> The first part of a for statement is a starting initialization, which executes once before the
loop begins.
The <initialization> section can also be a comma-separated list of expression statements.
The second part of a for statement is a test expression. As long as the expression is true,
the loop will continue. If this expression is evaluated as false the first time, the loop will
never be executed.
The third part of the for statement is the body of the loop. These are the instructions that
are repeated each time the program executes the loop.
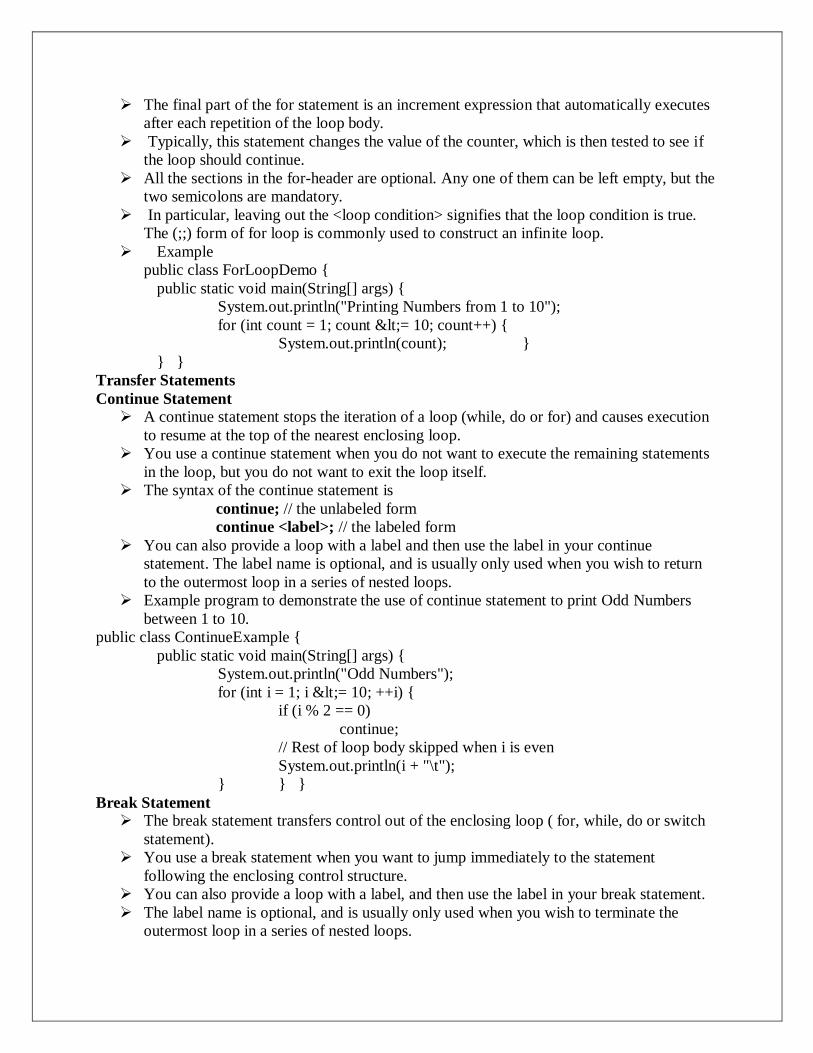
The final part of the for statement is an increment expression that automatically executes
after each repetition of the loop body.
Typically, this statement changes the value of the counter, which is then tested to see if
the loop should continue.
All the sections in the for-header are optional. Any one of them can be left empty, but the
two semicolons are mandatory.
In particular, leaving out the <loop condition> signifies that the loop condition is true.
The (;;) form of for loop is commonly used to construct an infinite loop.
Example
public class ForLoopDemo {
public static void main(String[] args) {
System.out.println("Printing Numbers from 1 to 10");
for (int count = 1; count <= 10; count++) {
System.out.println(count); }
} }
Transfer Statements
Continue Statement A continue statement stops the iteration of a loop (while, do or for) and causes execution
to resume at the top of the nearest enclosing loop.
You use a continue statement when you do not want to execute the remaining statements
in the loop, but you do not want to exit the loop itself.
The syntax of the continue statement is
continue; // the unlabeled form
continue <label>; // the labeled form
You can also provide a loop with a label and then use the label in your continue
statement. The label name is optional, and is usually only used when you wish to return
to the outermost loop in a series of nested loops.
Example program to demonstrate the use of continue statement to print Odd Numbers
between 1 to 10.
public class ContinueExample {
public static void main(String[] args) {
System.out.println("Odd Numbers");
for (int i = 1; i <= 10; ++i) {
if (i % 2 == 0)
continue;
// Rest of loop body skipped when i is even
System.out.println(i + "\t");
} } }
Break Statement The break statement transfers control out of the enclosing loop ( for, while, do or switch
statement).
You use a break statement when you want to jump immediately to the statement
following the enclosing control structure.
You can also provide a loop with a label, and then use the label in your break statement.
The label name is optional, and is usually only used when you wish to terminate the
outermost loop in a series of nested loops.

The Syntax for break statement is as shown below;
break; // the unlabeled form
break <label>; // the labeled form
Example program to demonstrate the use of break statement to print numbers Numbers 1
to 10.
public class BreakExample {
public static void main(String[] args) {
System.out.println("Numbers 1 - 10");
for (int i = 1;; ++i) {
if (i == 11)
break;
// Rest of loop body skipped when i is even
System.out.println(i + "\t");
} } }
7. Give an elaborate discussion on inheritance
It allows the extension and reuse of existing code without having to rewrite the code from
scratch.
Inheritance involves the creation of new classes (derived classes) from the existing ones
(base classes), thus enabling the creation of a hierarchy of classes that simulate the class
and sub class concept of the real world.
Types of Inheritance
Single Inheritance
Multiple Inheritance // does support by java
Multi level Inheritance
Hierarchical Inheritance
Hybrid Inheritance
Single Inheritance
public class Super {
int A=10;
void printA()
{
System.out.printf("A=%d",A);
} }
public class Sub extends Super {
int B=20;
void print()
{
printA();
System.out.printf("B=%d",B);
}
void printsum()
{
int C;
C=A+B;
System.out.printf("sum=%d",C);
Super class
Sub class

} }
public class Sample {
public static void main(String args[])
{
Sub a=new Sub();
a.print();
a.printsum();
} }
Hierarchical Inheritance
The process of creating more than one sub classes from one super class is known as
Hierarchical Inheritance.
public class Sample {
public static void main(String args[])
{
Sub1 a=new Sub1();
Sub2 b=new Sub2();
System.out.println("Subclass1");
a.print();
System.out.println("Subclass2");
b.print();
} }
public class Sub1 extends Super {
int B=2;
{
A=1;
}
void print()
{
printA();
System.out.println("B="+B);
} }
public class Sub2 extends Super {
int B=20;
{
A=10;}
void print()
{ printA();
System.out.println("B="+B);
}}
public class Super {
int A;
{
A=10;
}

void printA()
{
System.out.println("A"+A); } }
Multilevel inheritance
The process of creating new subclass from an already inherited sub class is known as
multilevel inheritance.
publicclass Sample {
publicstaticvoid main(String args[])
{
Sub a=newSub();
a.print();
a.printsum();
} }
package multilevel;
publicclass Sub extendsSubSuper {
intC=30;
void print()
{
printA();
printB();
System.out.println("C="+C);
}
voidprintsum()
{
System.out.println("Sum="+(A+B+C));
} }
publicclassSubSuperextends Super {
intB=20;
voidprintB()
{ System.out.println("B="+B);
} }
publicclass Super {
intA=10;
voidprintA()
{ System.out.println("A="+A);
} }
Hybrid Inheritance:
More than one type of inheritance is used. (Eg. Hierarchical and multilevel).
public class Super {
int A;
void printA()
{
System.out.println("A="+A);
} }
Super class
Sub-Super class
Sub class
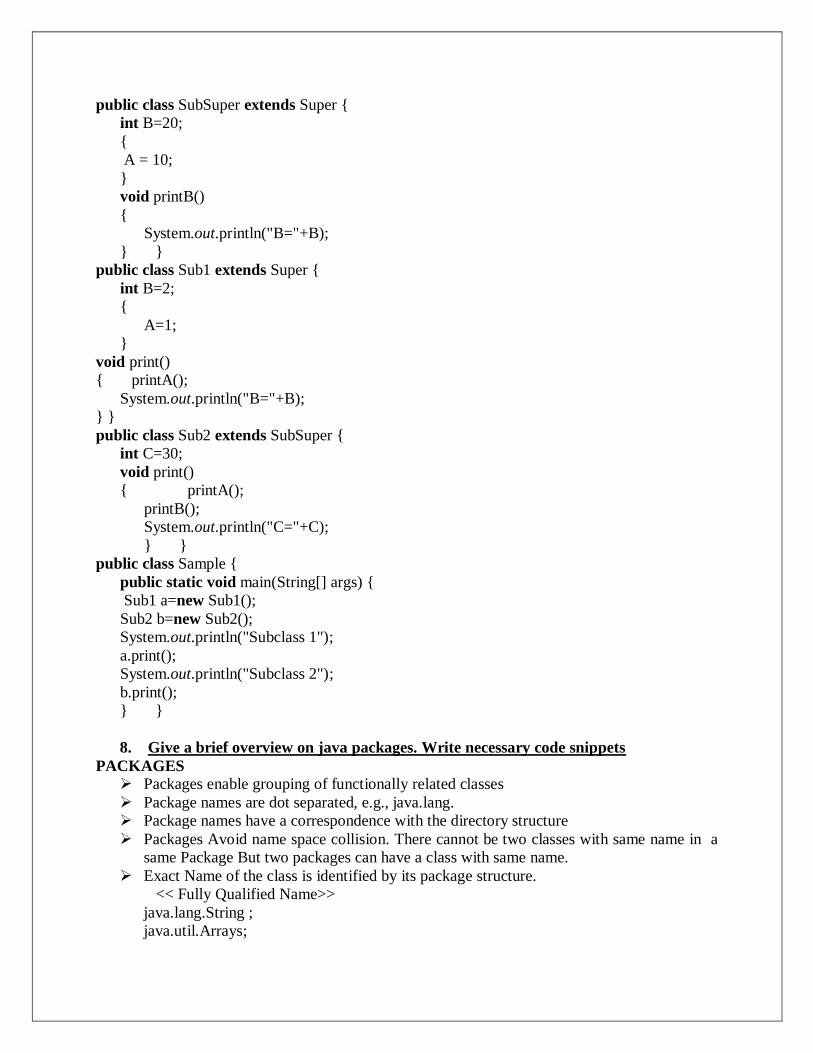
public class SubSuper extends Super {
int B=20;
{
A = 10;
}
void printB()
{
System.out.println("B="+B);
} }
public class Sub1 extends Super {
int B=2;
{
A=1;
}
void print()
{ printA();
System.out.println("B="+B);
} }
public class Sub2 extends SubSuper {
int C=30;
void print()
{ printA();
printB();
System.out.println("C="+C);
} }
public class Sample {
public static void main(String[] args) {
Sub1 a=new Sub1();
Sub2 b=new Sub2();
System.out.println("Subclass 1");
a.print();
System.out.println("Subclass 2");
b.print();
} }
8. Give a brief overview on java packages. Write necessary code snippets
PACKAGES
Packages enable grouping of functionally related classes
Package names are dot separated, e.g., java.lang.
Package names have a correspondence with the directory structure
Packages Avoid name space collision. There cannot be two classes with same name in a
same Package But two packages can have a class with same name.
Exact Name of the class is identified by its package structure.
<< Fully Qualified Name>>
java.lang.String ;
java.util.Arrays;

java.io.BufferedReader ;
java.util.Date
Packages are mirrored through directory structure.
To create a package, first we have to create a directory /directory structure that match the
package hierarchy.
Package structure should match the directory structure also.
To make a class belongs to a particular package include the package statement as the first
statement of source file.
Creation of Package:
Package <Package Name>
Importing classes
Method1:
java.util.Date birthday=new java.util.Date();
util is the package within the package java. Date is the class name.
Method 2:
Import java.awt.Button; // imports Button class in that package
Import java.awt.*; // * imports all class in that package
Method 3:
Imort static MyPackage.A.display(); // Import static members(display() only) in that package
Imort static MyPackage.A.*; // Import All static members in that package
import java.applet.*;
import java.awt.*;
public class AnimApplet extends Applet implements Runnable
{ Image[] images = new Image[2];
int frame = 0;
volatile Thread thread;
public void init() {
images[0] = getImage(getDocumentBase(),
"http://hostname/image0.gif");
images[1] = getImage(getDocumentBase(),
"http://hostname/image1.gif");
}
public void start() {
(thread = new Thread(this)).start(); }
public void stop() {
thread = null; }
public void paint(Graphics g) {
g.drawImage(images[frame], 0, 0, this); }
public void run() {
int delay = 1000; // 1 second
try {
while (thread == Thread.currentThread()) {
frame = (frame+1)%images.length;
repaint();

Thread.sleep(delay);
} } catch (Exception e) {
} } }
9. Explain in detail about interface
INTERFACE
An interface in the Java programming language is an abstract type that is used to specify
an interface (in the generic sense of the term) that classes must implement.
Interfaces are declared using the interface keyword, and may only contain method
signature and constant declarations (variable declarations that are declared to be
both static and final).
An interface may never contain method definitions.
Interfaces cannot be instantiated
. A class that implements an interface must implement all of the methods described in the
interface, or be an abstract class.
Object references in Java may be specified to be of an interface type; in which case, they
must either be null, or be bound to an object that implements the interface.
Syntax
[visibility] interface InterfaceName [extends other interfaces]
{
constant declarations
}
public interface Comparable
{ boolean less(Object m);
boolean greater(Object m);
boolean lessEqual(Object m);
boolean greaterEqual(Object m);
}
All instance methods are implicitly public and abstract. You can mark them as such, but
are discouraged from doing so as the marking is considered obsolete practice.
The interfaces themselves need not be public and several interfaces in the standard
libraries are not public and thus used only internally.
An interface creates a protocol that classes may implement. Note that one can extend an
interface (to get a new interface) just as you can extend a class.
One can actually extend several interfaces.
Interfaces thus enjoy the benefits of multiple inheritance. (Classes do not.) There are
almost no disadvantages to multiple inheritance of interface.
There are large disadvantages to multiple inheritance of implementation as in C++.
These include efficiency considerations as well as the semantic difficulty of determining
just what code will be executed in some circumstances.
The Polynomial class that implements Comparable will need to implement all of the
functions declared in the interface.
public class Polynomial implements Comparable
{ . . .
boolean less(Object m){ . . . }
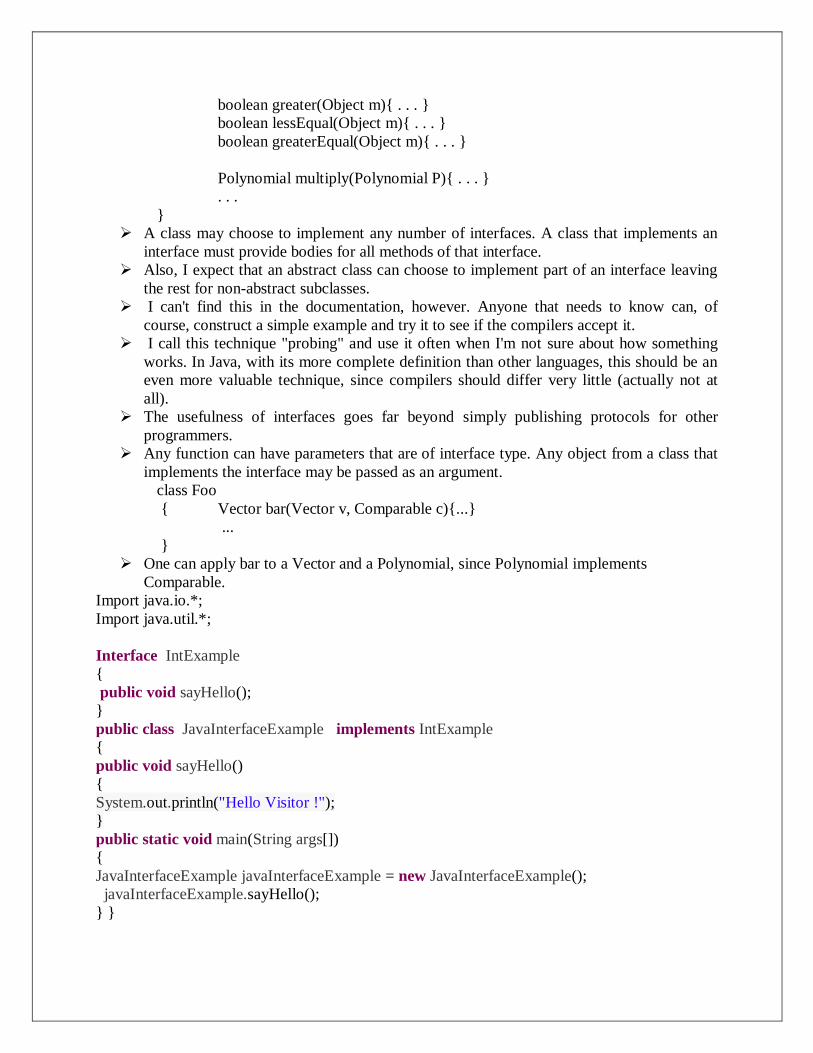
boolean greater(Object m){ . . . }
boolean lessEqual(Object m){ . . . }
boolean greaterEqual(Object m){ . . . }
Polynomial multiply(Polynomial P){ . . . }
. . .
}
A class may choose to implement any number of interfaces. A class that implements an
interface must provide bodies for all methods of that interface.
Also, I expect that an abstract class can choose to implement part of an interface leaving
the rest for non-abstract subclasses.
I can't find this in the documentation, however. Anyone that needs to know can, of
course, construct a simple example and try it to see if the compilers accept it.
I call this technique "probing" and use it often when I'm not sure about how something
works. In Java, with its more complete definition than other languages, this should be an
even more valuable technique, since compilers should differ very little (actually not at
all).
The usefulness of interfaces goes far beyond simply publishing protocols for other
programmers.
Any function can have parameters that are of interface type. Any object from a class that
implements the interface may be passed as an argument.
class Foo
{ Vector bar(Vector v, Comparable c){...}
...
}
One can apply bar to a Vector and a Polynomial, since Polynomial implements
Comparable.
Import java.io.*;
Import java.util.*;
Interface IntExample
{
public void sayHello();
}
public class JavaInterfaceExample implements IntExample
{
public void sayHello()
{
System.out.println("Hello Visitor !");
}
public static void main(String args[])
{
JavaInterfaceExample javaInterfaceExample = new JavaInterfaceExample();
javaInterfaceExample.sayHello();
} }

10. Briefly explain about string class and its methods
STRINGS
Strings, which are widely used in Java programming, are a sequence of characters. In the
Java programming language, strings are objects.
The Java platform provides the String class to create and manipulate strings.
Creating Strings:
String greeting = "Hello world!";
Whenever it encounters a string literal in your code, the compiler creates a String object
with its value in this case, "Hello world!'.
As with any other object, you can create String objects by using the new keyword and a
constructor.
The String class has eleven constructors that allow you to provide the initial value of the
string using different sources, such as an array of characters.
public class StringDemo{
public static void main(String args[]){
char[] helloArray = { 'h', 'e', 'l', 'l', 'o', '.'};
String helloString = new String(helloArray);
System.out.println( helloString ); }}
String Methods:
Here is the list of methods supported by String class:
SN Methods with Description
1 char charAt(int index) Returns the character at the specified index.
2 int compareTo(Object o)
Compares this String to another Object.
3 int compareTo(String anotherString)
Compares two strings lexicographically.
4 int compareToIgnoreCase(String str)
Compares two strings lexicographically, ignoring case differences.
5 String concat(String str)
Concatenates the specified string to the end of this string.
6 boolean contentEquals(StringBuffer sb)
Returns true if and only if this String represents the same sequence of characters as the
specified StringBuffer.
7 static String copyValueOf(char[] data)
Returns a String that represents the character sequence in the array specified.
8 static String copyValueOf(char[] data, int offset, int count)
Returns a String that represents the character sequence in the array specified.
9 boolean endsWith(String suffix)
Tests if this string ends with the specified suffix.
10 boolean equals(Object anObject)
Compares this string to the specified object.
11 boolean equalsIgnoreCase(String anotherString)
Compares this String to another String, ignoring case considerations.
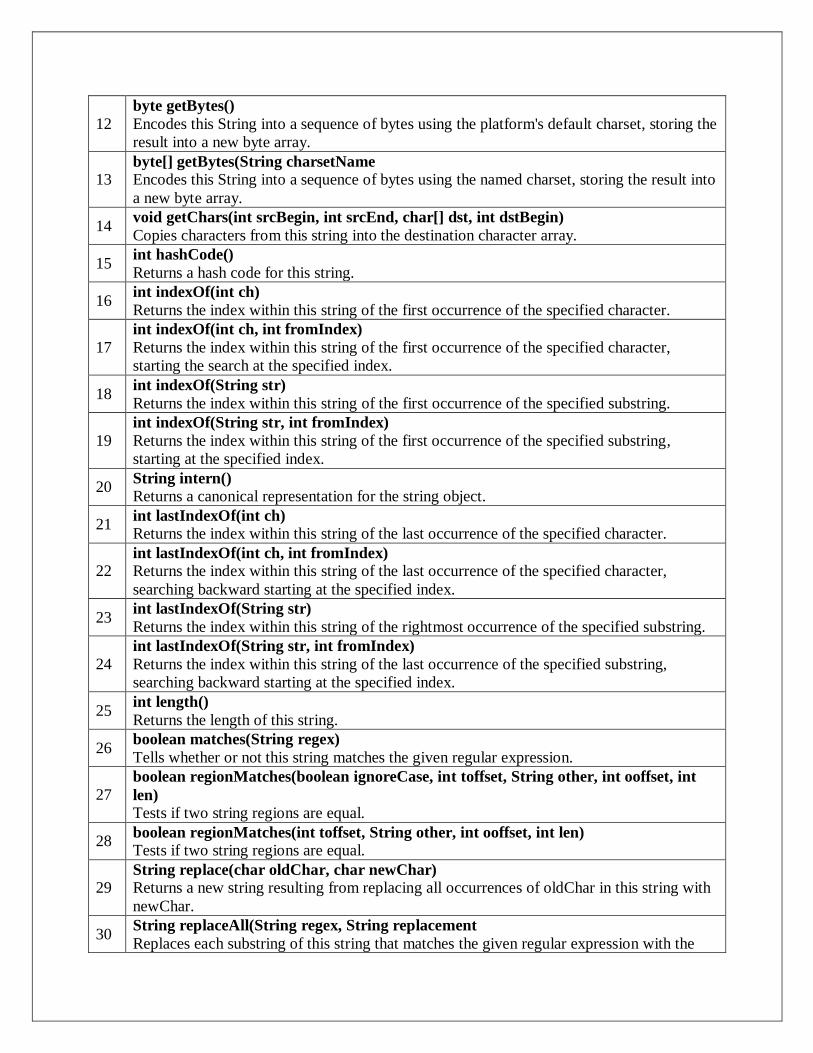
12
byte getBytes()
Encodes this String into a sequence of bytes using the platform's default charset, storing the
result into a new byte array.
13 byte[] getBytes(String charsetName
Encodes this String into a sequence of bytes using the named charset, storing the result into
a new byte array.
14 void getChars(int srcBegin, int srcEnd, char[] dst, int dstBegin)
Copies characters from this string into the destination character array.
15 int hashCode()
Returns a hash code for this string.
16 int indexOf(int ch)
Returns the index within this string of the first occurrence of the specified character.
17
int indexOf(int ch, int fromIndex)
Returns the index within this string of the first occurrence of the specified character,
starting the search at the specified index.
18 int indexOf(String str)
Returns the index within this string of the first occurrence of the specified substring.
19
int indexOf(String str, int fromIndex)
Returns the index within this string of the first occurrence of the specified substring,
starting at the specified index.
20 String intern()
Returns a canonical representation for the string object.
21 int lastIndexOf(int ch)
Returns the index within this string of the last occurrence of the specified character.
22 int lastIndexOf(int ch, int fromIndex)
Returns the index within this string of the last occurrence of the specified character,
searching backward starting at the specified index.
23 int lastIndexOf(String str)
Returns the index within this string of the rightmost occurrence of the specified substring.
24
int lastIndexOf(String str, int fromIndex)
Returns the index within this string of the last occurrence of the specified substring,
searching backward starting at the specified index.
25 int length()
Returns the length of this string.
26 boolean matches(String regex)
Tells whether or not this string matches the given regular expression.
27
boolean regionMatches(boolean ignoreCase, int toffset, String other, int ooffset, int
len) Tests if two string regions are equal.
28 boolean regionMatches(int toffset, String other, int ooffset, int len)
Tests if two string regions are equal.
29 String replace(char oldChar, char newChar)
Returns a new string resulting from replacing all occurrences of oldChar in this string with
newChar.
30 String replaceAll(String regex, String replacement
Replaces each substring of this string that matches the given regular expression with the

given replacement.
31 String replaceFirst(String regex, String replacement)
Replaces the first substring of this string that matches the given regular expression with the
given replacement.
32 String[] split(String regex)
Splits this string around matches of the given regular expression.
33 String[] split(String regex, int limit)
Splits this string around matches of the given regular expression.
34 boolean startsWith(String prefix)
Tests if this string starts with the specified prefix.
35 boolean startsWith(String prefix, int toffset)
Tests if this string starts with the specified prefix beginning a specified index.
36 CharSequence subSequence(int beginIndex, int endIndex)
Returns a new character sequence that is a subsequence of this sequence.
37 String substring(int beginIndex) Returns a new string that is a substring of this string.
38 String substring(int beginIndex, int endIndex)
Returns a new string that is a substring of this string.
39 char[] toCharArray() Converts this string to a new character array.
40 String toLowerCase() Converts all of the characters in this String to lower case using the rules of the default
locale.
41
String toLowerCase(Locale locale)
Converts all of the characters in this String to lower case using the rules of the given
Locale.
42 String toString()
This object (which is already a string!) is itself returned.
43
String toUpperCase()
Converts all of the characters in this String to upper case using the rules of the default
locale.
44 String toUpperCase(Locale locale)
Converts all of the characters in this String to upper case using the rules of the given
Locale.
45 String trim()
Returns a copy of the string, with leading and trailing whitespace omitted.
46 static String valueOf(primitive data type x)
Returns the string representation of the passed data type argument.
11. Explain in detail about string buffer class with its method
STRING BUFFER CLASS
The StringBuffer and StringBuilder classes are used when there is a necessity to make a
lot of modifications to Strings of characters.
Unlike Strings objects of type StringBuffer and Stringbuilder can be modified over and
over again without leaving behind a lot of new unused objects.
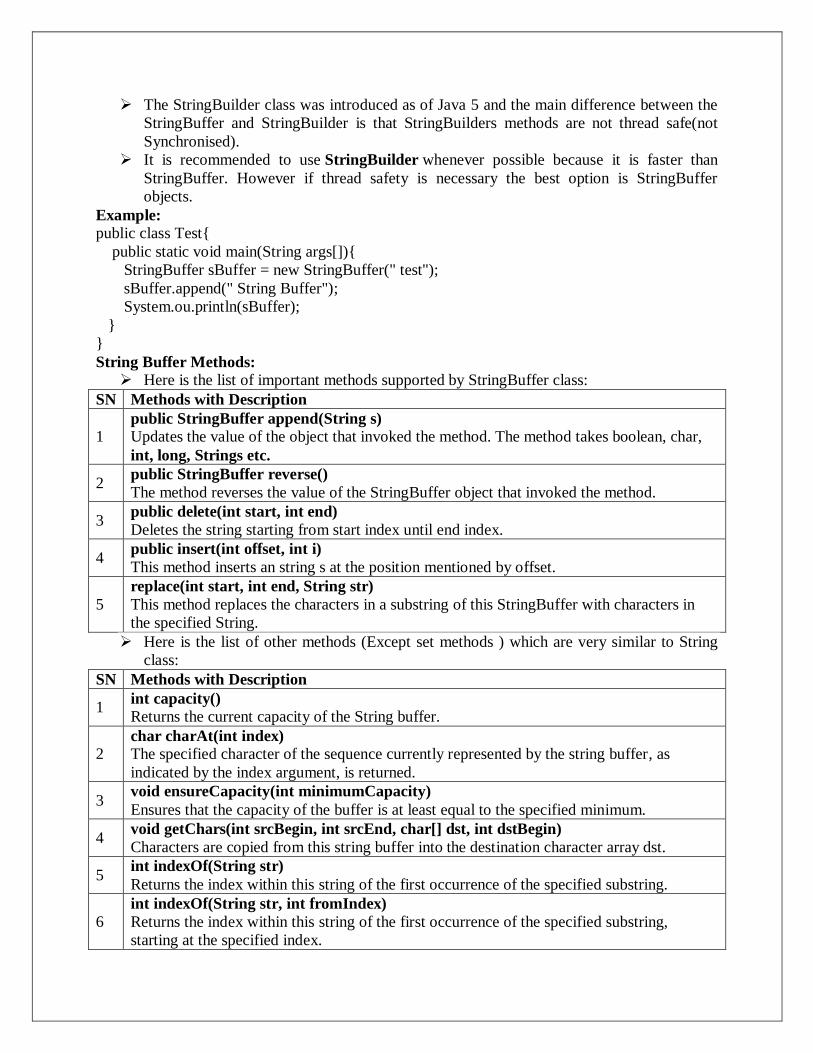
The StringBuilder class was introduced as of Java 5 and the main difference between the
StringBuffer and StringBuilder is that StringBuilders methods are not thread safe(not
Synchronised).
It is recommended to use StringBuilder whenever possible because it is faster than
StringBuffer. However if thread safety is necessary the best option is StringBuffer
objects.
Example:
public class Test{
public static void main(String args[]){
StringBuffer sBuffer = new StringBuffer(" test");
sBuffer.append(" String Buffer");
System.ou.println(sBuffer);
}
}
String Buffer Methods:
Here is the list of important methods supported by StringBuffer class:
SN Methods with Description
1 public StringBuffer append(String s)
Updates the value of the object that invoked the method. The method takes boolean, char,
int, long, Strings etc.
2 public StringBuffer reverse()
The method reverses the value of the StringBuffer object that invoked the method.
3 public delete(int start, int end)
Deletes the string starting from start index until end index.
4 public insert(int offset, int i)
This method inserts an string s at the position mentioned by offset.
5
replace(int start, int end, String str)
This method replaces the characters in a substring of this StringBuffer with characters in
the specified String.
Here is the list of other methods (Except set methods ) which are very similar to String
class:
SN Methods with Description
1 int capacity() Returns the current capacity of the String buffer.
2 char charAt(int index) The specified character of the sequence currently represented by the string buffer, as
indicated by the index argument, is returned.
3 void ensureCapacity(int minimumCapacity)
Ensures that the capacity of the buffer is at least equal to the specified minimum.
4 void getChars(int srcBegin, int srcEnd, char[] dst, int dstBegin)
Characters are copied from this string buffer into the destination character array dst.
5 int indexOf(String str)
Returns the index within this string of the first occurrence of the specified substring.
6
int indexOf(String str, int fromIndex)
Returns the index within this string of the first occurrence of the specified substring,
starting at the specified index.

7 int lastIndexOf(String str)
Returns the index within this string of the rightmost occurrence of the specified substring.
8 int lastIndexOf(String str, int fromIndex)
Returns the index within this string of the last occurrence of the specified substring.
9 int length()
Returns the length (character count) of this string buffer.
10 void setCharAt(int index, char ch)
The character at the specified index of this string buffer is set to ch.
11 void setLength(int newLength)
Sets the length of this String buffer.
12 CharSequence subSequence(int start, int end)
Returns a new character sequence that is a subsequence of this sequence.
13
String substring(int start) Returns a new String that contains a subsequence of characters currently contained in this
StringBuffer.The substring begins at the specified index and extends to the end of the
StringBuffer.
14 String substring(int start, int end) Returns a new String that contains a subsequence of characters currently contained in this
StringBuffer.
15 String toString()
Converts to a string representing the data in this string buffer.
12. What is an Exception? Explain in detail about Exceptions hierarchy.
Error occurred in execution time
Abnormal termination of program
Wrong execution result
Provide an exception handling mechanism in language system
Improve the reliability of application program
Allow simple program code for exception check and handling into source
Treat exception as an object
All exceptions are instances of a class extended from Throwable class or its subclass.
Generally, a programmer makes new exception class to extend the Exception class which
is subclass of Throwable class.
EXCEPTION HIERARCHY:

TYPES OF ECEPTION HANDLIG:
Checked exceptions – inability to acquire system resources (such as insufficient
memory, file does not exist)
Java checks at compile time that some mechanism is explicitly in place to receive
and process an exception object that may be created during runtime due to one of
these exceptions occurring.
Unchecked exceptions – exceptions that occur because of the user entering bad data,
or failing to enter data at all.
Unchecked exceptions can be avoided by writing more robust code that protects
against bad input values. Java does not check at compile time to ensure that there
is a mechanism in place to handle such errors.
GENERAL SYNTAX:
try {
//statements – one of which is capable of throwing an exception
}
catch (ExceptionTypeName objName)
{
//one or more statements to execute if this exception occurs
}
finally
{
//statements to be executed whether or not exception occurs
}
EXAMPLE:
package Exception;
public class MainClass {
public static void main(String args[]) {
int d, a;
try {
d = 0;
a = 42 / d;
System.out.println("This will not be printed.");
}
catch (ArithmeticException e) {
System.out.println("Division by zero."); }
System.out.println("After catch statement.");
} }
FINALLY BLOCK
An optional finally block can be added at the end of the catch blocks to provide a set of
statements that are always executed whether or not an exception occurs. Finally block is
executed independent of exception and catch. It is executed before return statement.
Example:
package Exception;
class FinallyDemo {
static void procA() {
try {

System.out.println("inside procA");
throw new RuntimeException("demo");
} finally
{ System.out.println("procA's finally");
} }
static void procB() {
try {
System.out.println("inside procB");
return;
} finally
{ System.out.println("procB's finally");
} }
static void procC() {
try { System.out.println("inside procC");
} finally {
System.out.println("procC's finally"); } }
public static void main(String args[]) {
try {
procA();
} catch (Exception e) {
System.out.println("Exception caught");
}
procB();
procC();
} }
NESTED TRY – CATCH AND MULTIPLE CATCH BLOCK
Each catch block works like a method definition. If the catch parameter matches with the
type of exception object thrown, then exception is caught and statements in the catch
block will be executed.
The try and catch block within outer try block behaves like independent try and catch
block
Example
public class NestedTry
{
public static void main (String args[])throws IOException
{
int num=2,res=0;
try
{ FileInputStream fis=null;
fis = new FileInputStream (new File (args[0]));
try
{ res=num/0;
System.out.println("The result is"+res);
}
catch(ArithmeticException e)
{ System.out.println("divided by Zero");
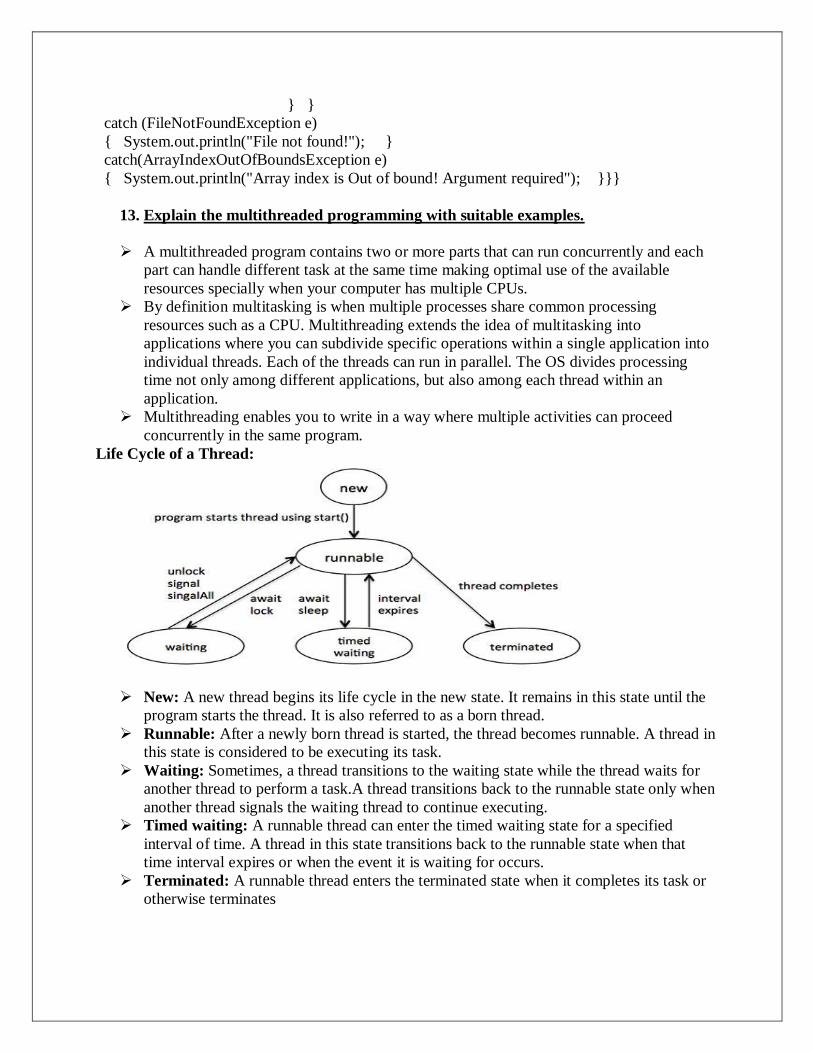
} }
catch (FileNotFoundException e)
{ System.out.println("File not found!"); }
catch(ArrayIndexOutOfBoundsException e)
{ System.out.println("Array index is Out of bound! Argument required"); }}}
13. Explain the multithreaded programming with suitable examples.
A multithreaded program contains two or more parts that can run concurrently and each
part can handle different task at the same time making optimal use of the available
resources specially when your computer has multiple CPUs.
By definition multitasking is when multiple processes share common processing
resources such as a CPU. Multithreading extends the idea of multitasking into
applications where you can subdivide specific operations within a single application into
individual threads. Each of the threads can run in parallel. The OS divides processing
time not only among different applications, but also among each thread within an
application.
Multithreading enables you to write in a way where multiple activities can proceed
concurrently in the same program.
Life Cycle of a Thread:
New: A new thread begins its life cycle in the new state. It remains in this state until the
program starts the thread. It is also referred to as a born thread.
Runnable: After a newly born thread is started, the thread becomes runnable. A thread in
this state is considered to be executing its task.
Waiting: Sometimes, a thread transitions to the waiting state while the thread waits for
another thread to perform a task.A thread transitions back to the runnable state only when
another thread signals the waiting thread to continue executing.
Timed waiting: A runnable thread can enter the timed waiting state for a specified
interval of time. A thread in this state transitions back to the runnable state when that
time interval expires or when the event it is waiting for occurs.
Terminated: A runnable thread enters the terminated state when it completes its task or
otherwise terminates

Thread Priorities:
Every Java thread has a priority that helps the operating system determine the order in
which threads are scheduled.
Java thread priorities are in the range between MIN_PRIORITY (a constant of 1) and
MAX_PRIORITY (a constant of 10). By default, every thread is given priority
NORM_PRIORITY (a constant of 5).
Create Thread by Implementing Runnable Interface:
If your class is intended to be executed as a thread then you can achieve this by
implementing Runnable interface. You will need to follow three basic steps:
Step 1:
As a first step you need to implement a run() method provided by Runnable interface.
This method provides entry point for the thread and you will put you complete business
logic inside this method. Following is simple syntax of run() method:
public void run( )
Step 2:
At second step you will instantiate a Thread object using the following constructor:
Thread(Runnable threadObj, String threadName);
Where, threadObj is an instance of a class that implements the Runnable interface and
threadName is the name given to the new thread.
Step 3
Once Thread object is created, you can start it by calling start( ) method, which executes
a call to run( ) method. Following is simple syntax of start() method:
void start( );
Example
class RunnableDemo implements Runnable {
private Thread t;
private String threadName;
RunnableDemo( String name){
threadName = name;
System.out.println("Creating " + threadName );
}
public void run() {
System.out.println("Running " + threadName );
try {
for(int i = 4; i > 0; i--) {
System.out.println("Thread: " + threadName + ", " + i);
// Let the thread sleep for a while.
Thread.sleep(50);
}
} catch (InterruptedException e) {
System.out.println("Thread " + threadName + " interrupted.");
} System.out.println("Thread " + threadName + " exiting.");
}
public void start ()
{
System.out.println("Starting " + threadName );

if (t == null)
{
t = new Thread (this, threadName);
t.start (); } }}
public class TestThread {
public static void main(String args[]) {
RunnableDemo R1 = new RunnableDemo( "Thread-1");
R1.start();
RunnableDemo R2 = new RunnableDemo( "Thread-2");
R2.start(); } }
Create Thread by Extending Thread Class:
The second way to create a thread is to create a new class that extends Thread class
using the following two simple steps.
This approach provides more flexibility in handling multiple threads created using
available methods in Thread class.
Step 1
You will need to override run( ) method available in Thread class.
This method provides entry point for the thread and you will put you complete business
logic inside this method. Following is simple syntax of run() method:
public void run( )
Step 2
Once Thread object is created, you can start it by calling start( ) method, which executes
a call to run( ) method. Following is simple syntax of start() method:
void start( )
Example
class ThreadDemo extends Thread {
private Thread t;
private String threadName;
ThreadDemo( String name){
threadName = name;
System.out.println("Creating " + threadName );
}
public void run() {
System.out.println("Running " + threadName );
try {
for(int i = 4; i > 0; i--) {
System.out.println("Thread: " + threadName + ", " + i);
// Let the thread sleep for a while.
Thread.sleep(50);
} } catch (InterruptedException e) {
System.out.println("Thread " + threadName + " interrupted.");
} System.out.println("Thread " + threadName + " exiting.");
}
public void start ()
{
System.out.println("Starting " + threadName );

if (t == null)
{ t = new Thread (this, threadName);
t.start ();
} } }
public class TestThread {
public static void main(String args[]) {
ThreadDemo T1 = new ThreadDemo( "Thread-1");
T1.start();
ThreadDemo T2 = new ThreadDemo( "Thread-2");
T2.start();
} }
Thread Methods:
public void start() Starts the thread in a separate path of execution, then invokes the run() method on this
Thread object.
public void run()
If this Thread object was instantiated using a separate Runnable target, the run() method
is invoked on that Runnable object.
public final void setName(String name) Changes the name of the Thread object. There is also a getName() method for retrieving
the name.
public final void setPriority(int priority)
Sets the priority of this Thread object. The possible values are between 1 and 10.
public final void setDaemon(boolean on)
A parameter of true denotes this Thread as a daemon thread.
public final void join(long millisec)
The current thread invokes this method on a second thread, causing the current thread to
block until the second thread terminates or the specified number of milliseconds passes.
public void interrupt() Interrupts this thread, causing it to continue execution if it was blocked for any reason.
public final boolean isAlive() Returns true if the thread is alive, which is any time after the thread has been started but
before it runs to completion.
public static void yield()
Causes the currently running thread to yield to any other threads of the same priority that
are waiting to be scheduled.
public static void sleep(long millisec) Causes the currently running thread to block for at least the specified number of
milliseconds.
public static boolean holdsLock(Object x)
Returns true if the current thread holds the lock on the given Object.
public static Thread currentThread()
Returns a reference to the currently running thread, which is the thread that invokes this
method.
public static void dumpStack() Prints the stack trace for the currently running thread, which
is useful when debugging a multithreaded application.

UNIT – III JDBC
PART A
1. What is JDBC?
JDBC is java database connectivity as name implies it’s a java API for communicating to
relational database, API has java classes and interfaces using that developer can easily interact
with database.
2. Difference between type 2 and type 4 JDBC drivers.
Type 1 JDBC Driver is called JDBC-ODBC Bridge driver (bridge driver)
Type 2 JDBC Driver is referred as Native-API/partly Java driver (native driver)
Type 3 JDBC Driver is called AllJava/Net-protocol driver (middleware driver)
Type 4 JDBC Driver is called All Java/Native-protocol driver (Pure java driver)
3. What are the main steps in java to make JDBC connectivity?
Main steps to connect to database.
Load the Driver: First step is to load the database specific driver which communicates
with database.
Make Connection: Next step is get connection from the database using connection
object, which is used to send SQL statement also and get result back from the database.
Get Statement object: From connection object we can get statement object which is
used to query the database
Execute the Query: Using statement object we execute the SQL or database query and
get result set from the query.
Close the connection: After getting resultset and all required operation performed the
last step should be closing the database connection.
4. What are different types of Statement?
Statement object is used to send SQL query to database and get result from database, and
we get statement object from connection object.
There are three types of statement:
Statement: it’s a commonly used for getting data from database useful when we are using
static SQL statement at runtime. it will not accept any parameter.
Statement stmt = conn.createStatement( );
ResultSet rs = stmt.executeQuery();
PreparedStatement: when we are using same SQL statement multiple time its is useful and it
will accept parameter at runtime.
String SQL = "Update stock SET limit = ? WHERE stockType = ?";
PreparedStatement pstmt = conn.prepareStatement(SQL);
ResultSet rs = pstmt.executeQuery();
Callable Statement: when we want to access stored procedures then callable statement are
useful and they also accept runtime parameter. It is called like this
CallableStatement cs = con.prepareCall("{call SHOW_SUPPLIERS}");
ResultSet rs = cs.executeQuery();
5. How cursor works in scrollable result set?
There are three constant define in result set by which we can move cursor.
TYPE_FORWARD_ONLY: creates a nonscrollable result set, that is, one in which the cursor
moves only forward
TYPE_SCROLL_INSENSITIVE : a scrollable result set does not reflects changes that are
made to it while it is open

TYPE_SCROLL_SENSITIVE: a scrollable result set reflects changes that are made to it while
it is open
6. What is connection pooling?
Connection pooling is the mechanism by which we reuse the recourse like connection
objects which are needed to make connection with database .In this mechanism client are not
required every time make new connection and then interact with database instead of that
connection objects are stored in connection pool and client will get it from there.
7. Does the JDBC-ODBC Bridge support multiple concurrent open statements per
connection?
No, we can open only one statement object when using JDBC-ODBC Bridge.
8. Is it possible to send an object using Sockets, if so, how it can be?
Yes it is Poosible to send an Object using Sockets. Objects that implement Serializable
may be sent across a socket connection using an ObjectInputStream and ObjectOutputStream
combination.
9. How does server know that a client is connected to it or not? When a task invokes its yield() method, it returns to the ready state. When a task invokes its
sleep() method, it returns to the waiting state.
10. What is Domain Naming Service (DNS)?
DNS stands for Domain Name System, an Internet service that translates domain names
into IP addressess.
11. What is Inet address?
InetAddress is a class used to find the ip address of a host in a network. This InetAddress
is divided into two types,
1)Inet4address for the ip version 4(ipv4)=Which has 32bit ip address
2)Inet6address for the ip version 6(ipv6)=Which has 128bit ip address
There are subclasses & abstract in the InetAddress.
12. What is URL?
URL stands for Uniform Resource Locator and it points to resource files on the Internet.
URL has four components. http://www.allinterview.com:80/index.html http - protocol name,
allinterview - IP address or host name, 80 - port number, index.html - file
13. What is meant by TCP, IP, UDP?
TCP:its a protocal for transfering data that is reliable and commonly used. IP: It's
Internet Protocol, every computer available on the network has a unique IP. TCP and IP
both works together and this is called TCP/IP.
UDP:its unreliable but fast mode of transfering data.
14. What is the difference between TCP and UDP ?
TCP is guaranteed delivery, UDP is not guaranteed.
TCP guarantees order of messages, UDP doesn’t.
Data boundary is not preserved in TCP, but UDP preserves it.
TCP is slower compared to UDP.
15. What is the difference between TCP/IP and TCP?
The difference is that TCP is responsible for the data delivery of a packet and IP is
responsible for the logical addressing. In other words, IP obtains the address and TCP guarantees
delivery of data to that address.
16. What is meant by time-slicing?

Preemptive multitasking also called "time slicing". Interrupting the execution of a process
and passing control to another waiting process and performing a context switch after which the
context for the next pending process is restored, and the next process is executed for the duration
of its time slice or "quantum".
17. What is the difference between IO and NIO?
The main difference between NIO and IO is that NIO provides asynchronous, non
blocking IO, which is critical to write faster and scalable networking systems. On the other hand,
most of the utilities from the IO classes are blocking and slow. NIO takes advantage of
asynchronous system calls in UNIX systems such as the select() system call for network sockets.
Using select(), an application can monitor several resources at the same time and can also poll
for network activity without blocking. The select() system call identifies if data is pending or not,
then read() or write() may be used knowing that they will complete immediately.
18. What is javabean?
JavaBeans are classes that encapsulate many objects into a single object (the bean).
They are serializable, have a zero-argument constructor, and allow access to properties using
getter and setter methods.
19. What are advantage and disadvantage of java sockets?
Advantages:
a. Flexible and powerful.
b. Cause low network traffic if efficiently used.
c. Only updated information can be sent.
Disadvantages:
a. The Java applets can establish communication only with the machine requested and not with
any other machine on the network.
b. Sockets allow only raw data to be sent. This means that both client and server need to have
mechanisms to interpret the data.
20. What is Socket?
A socket is an endpoint for communication between two machines.
Java Socket programming can be connection-oriented or connection-less.
Socket and ServerSocket classes are used for connection-oriented socket programming
and DatagramSocket and DatagramPacket classes are used for connection-less socket
programming.
The client in socket programming must know two information:
1. IP Address of Server, and
2. Port number.
PART-B
1. Explain in detail about JDBC Architecture.
JDBC
JDBC stands for Java Database Connectivity, which is a standard Java API for database-
independent connectivity between the Java programming language and a wide range of
databases.
The JDBC library includes APIs for each of the tasks mentioned below that are
commonly associated with database usage.
Making a connection to a database.
Creating SQL or MySQL statements.

Executing SQL or MySQL queries in the database.
Viewing & Modifying the resulting records.
Fundamentally, JDBC is a specification that provides a complete set of interfaces that
allows for portable access to an underlying database.
Java can be used to write different types of executables, such as −
Java Applications
Java Applets
Java Servlets
Java ServerPages (JSPs)
Enterprise JavaBeans (EJBs).
All of these different executables are able to use a JDBC driver to access a database, and
take advantage of the stored data.
JDBC provides the same capabilities as ODBC, allowing Java programs to contain
database-independent code.
Pre-Requisite
Before moving further, you need to have a good understanding of the following two
subjects −
Core JAVA Programming
SQL or MySQL Database
JDBC Architecture
The JDBC API supports both two-tier and three-tier processing models for database
access but in general, JDBC Architecture consists of two layers −
JDBC API: This provides the application-to-JDBC Manager connection.
JDBC Driver API: This supports the JDBC Manager-to-Driver Connection.
The JDBC API uses a driver manager and database-specific drivers to provide
transparent connectivity to heterogeneous databases.
The JDBC driver manager ensures that the correct driver is used to access each data
source.
The driver manager is capable of supporting multiple concurrent drivers connected to
multiple heterogeneous databases.
Following is the architectural diagram, which shows the location of the driver
manager with respect to the JDBC drivers and the Java application −

Common JDBC Components
The JDBC API provides the following interfaces and classes −
DriverManager: This class manages a list of database drivers. Matches connection requests from
the java application with the proper database driver using communication sub
protocol.
The first driver that recognizes a certain subprotocol under JDBC will be used to
establish a database Connection.
Driver: This interface handles the communications with the database server. You will
interact directly with Driver objects very rarely.
Instead, you use DriverManager objects, which manages objects of this type. It
also abstracts the details associated with working with Driver objects.
Connection:
This interface with all methods for contacting a database. The connection object
represents communication context, i.e., all communication with database is
through connection object only.
Statement:
You use objects created from this interface to submit the SQL statements to the
database.
Some derived interfaces accept parameters in addition to executing stored
procedures.
ResultSet: These objects hold data retrieved from a database after you execute an SQL query
using Statement objects.
It acts as an iterator to allow you to move through its data.
SQLException: This class handles any errors that occur in a database application.
The JDBC 4.0 Packages
The java.sql and javax.sql are the primary packages for JDBC 4.0. This is the latest
JDBC version at the time of writing this tutorial.
It offers the main classes for interacting with your data sources.
The new features in these packages include changes in the following areas −
Automatic database driver loading.
Exception handling improvements.
Enhanced BLOB/CLOB functionality.
Connection and statement interface enhancements.
National character set support.
SQL ROWID access.
SQL 2003 XML data type support.
Annotations.
2. Briefly Explain the step to create a JDBC application.
Creating JDBC Application
There are following six steps involved in building a JDBC application −
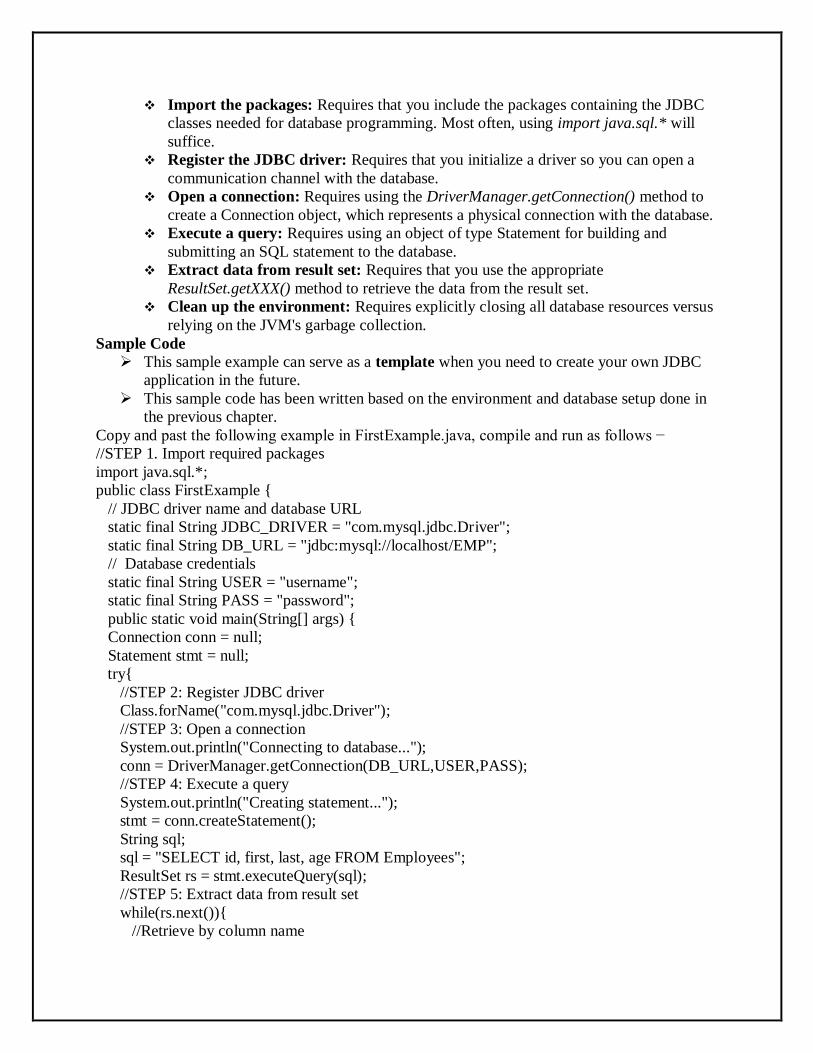
Import the packages: Requires that you include the packages containing the JDBC
classes needed for database programming. Most often, using import java.sql.* will
suffice.
Register the JDBC driver: Requires that you initialize a driver so you can open a
communication channel with the database.
Open a connection: Requires using the DriverManager.getConnection() method to
create a Connection object, which represents a physical connection with the database.
Execute a query: Requires using an object of type Statement for building and
submitting an SQL statement to the database.
Extract data from result set: Requires that you use the appropriate
ResultSet.getXXX() method to retrieve the data from the result set.
Clean up the environment: Requires explicitly closing all database resources versus
relying on the JVM's garbage collection.
Sample Code
This sample example can serve as a template when you need to create your own JDBC
application in the future.
This sample code has been written based on the environment and database setup done in
the previous chapter.
Copy and past the following example in FirstExample.java, compile and run as follows −
//STEP 1. Import required packages
import java.sql.*;
public class FirstExample {
// JDBC driver name and database URL
static final String JDBC_DRIVER = "com.mysql.jdbc.Driver";
static final String DB_URL = "jdbc:mysql://localhost/EMP";
// Database credentials
static final String USER = "username";
static final String PASS = "password";
public static void main(String[] args) {
Connection conn = null;
Statement stmt = null;
try{
//STEP 2: Register JDBC driver
Class.forName("com.mysql.jdbc.Driver");
//STEP 3: Open a connection
System.out.println("Connecting to database...");
conn = DriverManager.getConnection(DB_URL,USER,PASS);
//STEP 4: Execute a query
System.out.println("Creating statement...");
stmt = conn.createStatement();
String sql;
sql = "SELECT id, first, last, age FROM Employees";
ResultSet rs = stmt.executeQuery(sql);
//STEP 5: Extract data from result set
while(rs.next()){
//Retrieve by column name
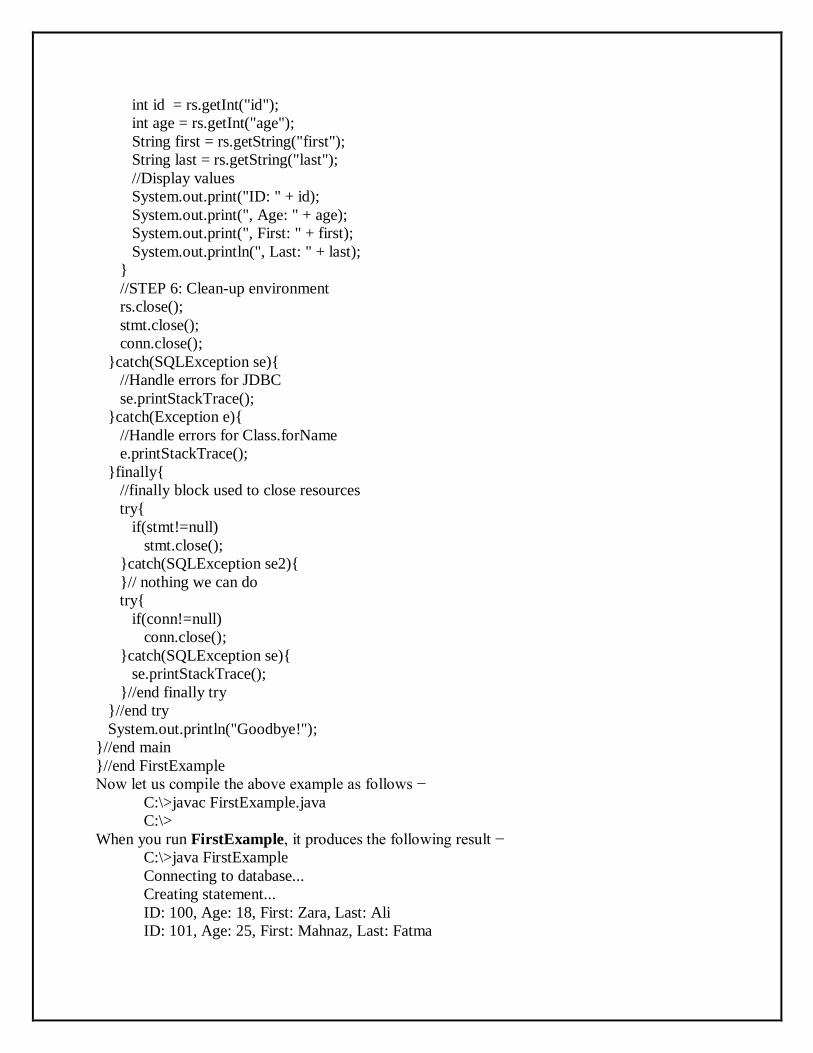
int id = rs.getInt("id");
int age = rs.getInt("age");
String first = rs.getString("first");
String last = rs.getString("last");
//Display values
System.out.print("ID: " + id);
System.out.print(", Age: " + age);
System.out.print(", First: " + first);
System.out.println(", Last: " + last);
}
//STEP 6: Clean-up environment
rs.close();
stmt.close();
conn.close();
}catch(SQLException se){
//Handle errors for JDBC
se.printStackTrace();
}catch(Exception e){
//Handle errors for Class.forName
e.printStackTrace();
}finally{
//finally block used to close resources
try{
if(stmt!=null)
stmt.close();
}catch(SQLException se2){
}// nothing we can do
try{
if(conn!=null)
conn.close();
}catch(SQLException se){
se.printStackTrace();
}//end finally try
}//end try
System.out.println("Goodbye!");
}//end main
}//end FirstExample
Now let us compile the above example as follows −
C:\>javac FirstExample.java
C:\>
When you run FirstExample, it produces the following result −
C:\>java FirstExample
Connecting to database...
Creating statement...
ID: 100, Age: 18, First: Zara, Last: Ali
ID: 101, Age: 25, First: Mahnaz, Last: Fatma

ID: 102, Age: 30, First: Zaid, Last: Khan
ID: 103, Age: 28, First: Sumit, Last: Mittal
C:\>
3. Explain the detail about the step to make a connection to the database.
JDBC - Database Connections
The programming involved to establish a JDBC connection is fairly simple. Here are
these simple four steps −
Import JDBC Packages: Add import statements to your Java program to import
required classes in your Java code.
Register JDBC Driver: This step causes the JVM to load the desired driver
implementation into memory so it can fulfill your JDBC requests.
Database URL Formulation: This is to create a properly formatted address that
points to the database to which you wish to connect.
Create Connection Object: Finally, code a call to the DriverManager object's
getConnection( ) method to establish actual database connection.
Import JDBC Packages
The Import statements tell the Java compiler where to find the classes you
reference in your code and are placed at the very beginning of your source code.
To use the standard JDBC package, which allows you to select, insert, update, and
delete data in SQL tables, add the following imports to your source code −
import java.sql.* ; // for standard JDBC programs
import java.math.* ; // for BigDecimal and BigInteger support
Register JDBC Driver
You must register the driver in your program before you use it.
Registering the driver is the process by which the Oracle driver's class file is loaded into
the memory, so it can be utilized as an implementation of the JDBC interfaces.
You need to do this registration only once in your program. You can register a driver in
one of two ways.
Approach I - Class.forName()
The most common approach to register a driver is to use Java's Class.forName() method,
to dynamically load the driver's class file into memory, which automatically registers it.
This method is preferable because it allows you to make the driver registration
configurable and portable.
The following example uses Class.forName( ) to register the Oracle driver −
try {
Class.forName("oracle.jdbc.driver.OracleDriver");
}
catch(ClassNotFoundException ex) {
System.out.println("Error: unable to load driver class!");
System.exit(1);
}
You can use getInstance() method to work around noncompliant JVMs, but then you'll
have to code for two extra Exceptions as follows −

try {
Class.forName("oracle.jdbc.driver.OracleDriver").newInstance();
}
catch(ClassNotFoundException ex) {
System.out.println("Error: unable to load driver class!");
System.exit(1);
catch(IllegalAccessException ex) {
System.out.println("Error: access problem while loading!");
System.exit(2);
catch(InstantiationException ex) {
System.out.println("Error: unable to instantiate driver!");
System.exit(3);
}
Approach II - DriverManager.registerDriver()
The second approach you can use to register a driver, is to use the static
DriverManager.registerDriver() method.
You should use the registerDriver() method if you are using a non-JDK compliant JVM,
such as the one provided by Microsoft.
The following example uses registerDriver() to register the Oracle driver −
try {
Driver myDriver = new oracle.jdbc.driver.OracleDriver();
DriverManager.registerDriver( myDriver );
}
catch(ClassNotFoundException ex) {
System.out.println("Error: unable to load driver class!");
System.exit(1);
}
Database URL Formulation
After you've loaded the driver, you can establish a connection using the
DriverManager.getConnection() method.
For easy reference, let me list the three overloaded DriverManager.getConnection()
methods −
getConnection(String url)
getConnection(String url, Properties prop)
getConnection(String url, String user, String password)
Here each form requires a database URL. A database URL is an address that points to
your database.
Formulating a database URL is where most of the problems associated with establishing
a connection occurs.
All the highlighted part in URL format is static and you need to change only the
remaining part as per your database setup.

4. Discuss in detail about object.
Create Connection Object
We have listed down three forms of DriverManager.getConnection() method to create a
connection object.
Using a Database URL with a username and password
The most commonly used form of getConnection() requires you to pass a database URL,
a username, and a password:
Assuming you are using Oracle's thin driver, you'll specify a host:port:databaseName
value for the database portion of the URL.
If you have a host at TCP/IP address 192.0.0.1 with a host name of amrood, and your
Oracle listener is configured to listen on port 1521, and your database name is EMP, then
complete database URL would be −
jdbc:oracle:thin:@amrood:1521:EMP
Now you have to call getConnection() method with appropriate username and password
to get a Connection object as follows −
String URL = "jdbc:oracle:thin:@amrood:1521:EMP";
String USER = "username";
String PASS = "password"
Connection conn = DriverManager.getConnection(URL, USER, PASS);
Using Only a Database URL
A second form of the DriverManager.getConnection( ) method requires only a database
URL −
DriverManager.getConnection(String url);
However, in this case, the database URL includes the username and password and has the
following general form −
jdbc:oracle:driver:username/password@database
So, the above connection can be created as follows −
String URL = "jdbc:oracle:thin:username/password@amrood:1521:EMP";
Connection conn = DriverManager.getConnection(URL);
Using a Database URL and a Properties Object
A third form of the DriverManager.getConnection( ) method requires a database URL
and a Properties object −
DriverManager.getConnection(String url, Properties info);
A Properties object holds a set of keyword-value pairs. It is used to pass driver properties
to the driver during a call to the getConnection() method.
To make the same connection made by the previous examples, use the following code −
import java.util.*;
String URL = "jdbc:oracle:thin:@amrood:1521:EMP";
Properties info = new Properties( );
info.put( "user", "username" );
info.put( "password", "password" );
Connection conn = DriverManager.getConnection(URL, info);
Closing JDBC Connections
At the end of your JDBC program, it is required explicitly to close all the connections to
the database to end each database session.

However, if you forget, Java's garbage collector will close the connection when it cleans
up stale objects.
Relying on the garbage collection, especially in database programming, is a very poor
programming practice.
You should make a habit of always closing the connection with the close() method
associated with connection object.
To ensure that a connection is closed, you could provide a 'finally' block in your code. A
finally block always executes, regardless of an exception occurs or not.
To close the above opened connection, you should call close() method as follows −
conn.close();
Explicitly closing a connection conserves DBMS resources, which will make your
database administrator happy.
For a better understanding, we suggest you to study our JDBC - Sample Code tutorial
5. Briefly Explain about the creation of database in JDBC.
JDBC - Create Database
This tutorial provides an example on how to create a Database using JDBC application.
Before executing the following example, make sure you have the following in place −
You should have admin privilege to create a database in the given schema. To execute the
following example, you need to replace the username and password with your actual user
name and password.
Your MySQL or whatever database you are using, is up and running.
Required Steps
The following steps are required to create a new Database using JDBC application −
Import the packages: Requires that you include the packages containing the JDBC
classes needed for database programming. Most often, using import java.sql.* will
suffice.
Register the JDBC driver: Requires that you initialize a driver so you can open a
communications channel with the database.
Open a connection: Requires using the DriverManager.getConnection() method to
create a Connection object, which represents a physical connection with the database
server.
To create a new database, you need not give any database name while preparing database
URL as mentioned in the below example.
Execute a query: Requires using an object of type Statement for building and submitting
an SQL statement to the database.
Clean up the environment . Requires explicitly closing all database resources versus
relying on the JVM's garbage collection.
Sample Code
Copy and past the following example in JDBCExample.java, compile and run as follows −
//STEP 1. Import required packages
import java.sql.*;
public class JDBCExample {
// JDBC driver name and database URL
static final String JDBC_DRIVER = "com.mysql.jdbc.Driver";

static final String DB_URL = "jdbc:mysql://localhost/";
// Database credentials
static final String USER = "username";
static final String PASS = "password";
public static void main(String[] args) {
Connection conn = null;
Statement stmt = null;
try{
//STEP 2: Register JDBC driver
Class.forName("com.mysql.jdbc.Driver");
//STEP 3: Open a connection
System.out.println("Connecting to database...");
conn = DriverManager.getConnection(DB_URL, USER, PASS);
//STEP 4: Execute a query
System.out.println("Creating database...");
stmt = conn.createStatement();
String sql = "CREATE DATABASE STUDENTS";
stmt.executeUpdate(sql);
System.out.println("Database created successfully...");
}catch(SQLException se){
//Handle errors for JDBC
se.printStackTrace();
}catch(Exception e){
//Handle errors for Class.forName
e.printStackTrace();
}finally{
//finally block used to close resources
try{
if(stmt!=null)
stmt.close();
}catch(SQLException se2){
}// nothing we can do
try{
if(conn!=null)
conn.close();
}catch(SQLException se){
se.printStackTrace();
}//end finally try
}//end try
System.out.println("Goodbye!");
}//end main
}//end JDBCExample
JDBC - Select Database
This chapter provides an example on how to select a Database using JDBC application.
Before executing the following example, make sure you have the following in place −
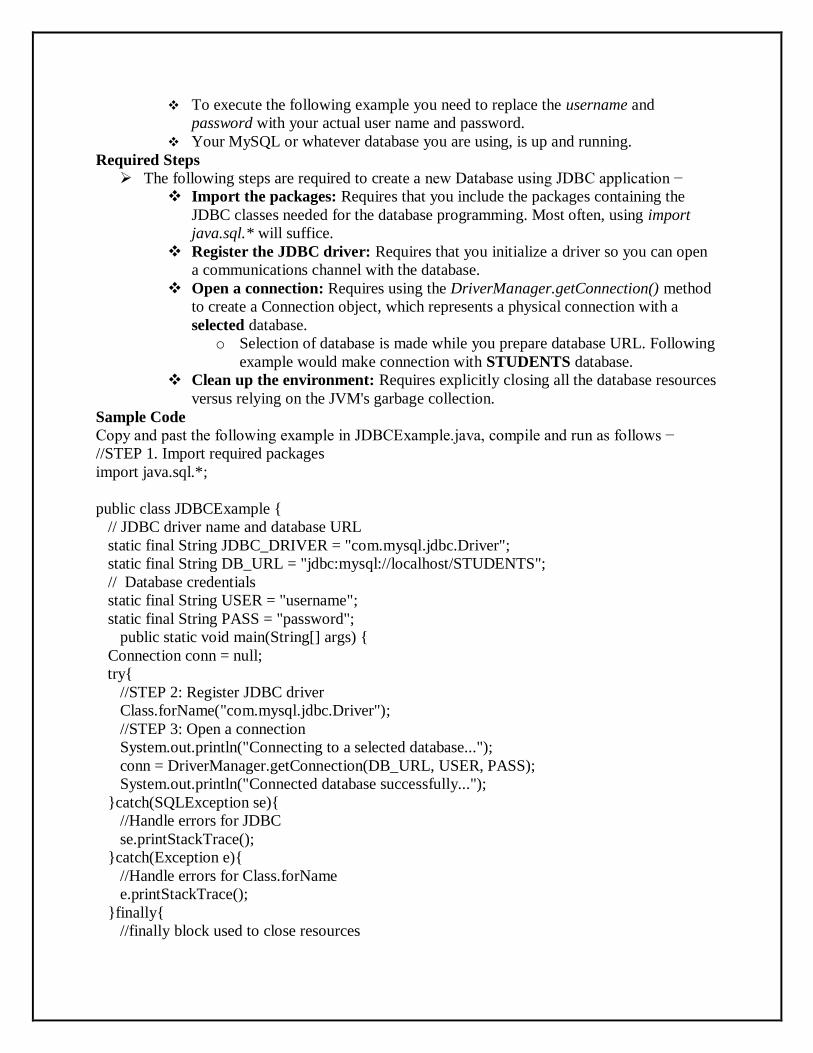
To execute the following example you need to replace the username and
password with your actual user name and password.
Your MySQL or whatever database you are using, is up and running.
Required Steps
The following steps are required to create a new Database using JDBC application −
Import the packages: Requires that you include the packages containing the
JDBC classes needed for the database programming. Most often, using import
java.sql.* will suffice.
Register the JDBC driver: Requires that you initialize a driver so you can open
a communications channel with the database.
Open a connection: Requires using the DriverManager.getConnection() method
to create a Connection object, which represents a physical connection with a
selected database.
o Selection of database is made while you prepare database URL. Following
example would make connection with STUDENTS database.
Clean up the environment: Requires explicitly closing all the database resources
versus relying on the JVM's garbage collection.
Sample Code
Copy and past the following example in JDBCExample.java, compile and run as follows −
//STEP 1. Import required packages
import java.sql.*;
public class JDBCExample {
// JDBC driver name and database URL
static final String JDBC_DRIVER = "com.mysql.jdbc.Driver";
static final String DB_URL = "jdbc:mysql://localhost/STUDENTS";
// Database credentials
static final String USER = "username";
static final String PASS = "password";
public static void main(String[] args) {
Connection conn = null;
try{
//STEP 2: Register JDBC driver
Class.forName("com.mysql.jdbc.Driver");
//STEP 3: Open a connection
System.out.println("Connecting to a selected database...");
conn = DriverManager.getConnection(DB_URL, USER, PASS);
System.out.println("Connected database successfully...");
}catch(SQLException se){
//Handle errors for JDBC
se.printStackTrace();
}catch(Exception e){
//Handle errors for Class.forName
e.printStackTrace();
}finally{
//finally block used to close resources

try{
if(conn!=null)
conn.close();
}catch(SQLException se){
se.printStackTrace();
}//end finally try
}//end try
System.out.println("Goodbye!");
}//end main
}//end JDBCExample
6. Explain about the JDBC-Statement.
JDBC - Statements
Once a connection is obtained we can interact with the database.
The JDBC Statement, CallableStatement, and PreparedStatement interfaces define the
methods and properties that enable you to send SQL or PL/SQL commands and receive
data from your database.
They also define methods that help bridge data type differences between Java and SQL
data types used in a database.
The following table provides a summary of each interface's purpose to decide on the
interface to use.
Interfaces Recommended Use
Statement
Use the for general-purpose access to your database. Useful when
you are using static SQL statements at runtime. The Statement
interface cannot accept parameters.
PreparedStatement Use the when you plan to use the SQL statements many times. The
PreparedStatement interface accepts input parameters at runtime.
CallableStatement Use the when you want to access the database stored procedures. The
CallableStatement interface can also accept runtime input parameters.
The Statement Objects
Creating Statement Object
Before you can use a Statement object to execute a SQL statement, you need to create
one using the Connection object's createStatement( ) method, as in the following example
−
Statement stmt = null;
try {
stmt = conn.createStatement( );
. . .
}
catch (SQLException e) {
. . .
}
finally {
. . .

}
Once you've created a Statement object, you can then use it to execute an SQL statement
with one of its three execute methods.
boolean execute (String SQL): Returns a boolean value of true if a ResultSet object
can be retrieved; otherwise, it returns false. Use this method to execute SQL DDL
statements or when you need to use truly dynamic SQL.
int executeUpdate (String SQL): Returns the number of rows affected by the
execution of the SQL statement. Use this method to execute SQL statements for
which you expect to get a number of rows affected - for example, an INSERT,
UPDATE, or DELETE statement.
ResultSet executeQuery (String SQL): Returns a ResultSet object. Use this method
when you expect to get a result set, as you would with a SELECT statement.
Closing Statement Object
Just as you close a Connection object to save database resources, for the same reason you
should also close the Statement object.
A simple call to the close() method will do the job. If you close the Connection object
first, it will close the Statement object as well.
However, you should always explicitly close the Statement object to ensure proper
cleanup.
Statement stmt = null;
try {
stmt = conn.createStatement( );
. . .
}
catch (SQLException e) {
. . .
}
finally {
stmt.close();
}
For a better understanding, we suggest you to study the Statement - Example tutorial.
The PreparedStatement Objects
The PreparedStatement interface extends the Statement interface, which gives you added
functionality with a couple of advantages over a generic Statement object.
This statement gives you the flexibility of supplying arguments dynamically.
Creating PreparedStatement Object
PreparedStatement pstmt = null;
try {
String SQL = "Update Employees SET age = ? WHERE id = ?";
pstmt = conn.prepareStatement(SQL);
. . .
}
catch (SQLException e) {
. . .
}
finally {

. . .
}
All parameters in JDBC are represented by the ? symbol, which is known as the
parameter marker.
You must supply values for every parameter before executing the SQL statement.
The setXXX() methods bind values to the parameters, where XXX represents the Java
data type of the value you wish to bind to the input parameter.
If you forget to supply the values, you will receive an SQLException.
Each parameter marker is referred by its ordinal position.
The first marker represents position 1, the next position 2, and so forth. This method
differs from that of Java array indices, which starts at 0.
All of the Statement object's methods for interacting with the database
(a) execute(), (b) executeQuery(), and (c) executeUpdate() also work with the
PreparedStatement object. However, the methods are modified to use SQL statements
that can input the parameters.
Closing PreparedStatement Object
Just as you close a Statement object, for the same reason you should also close the
PreparedStatement object.
A simple call to the close() method will do the job. If you close the Connection object
first, it will close the PreparedStatement object as well.
However, you should always explicitly close the PreparedStatement object to ensure
proper cleanup.
PreparedStatement pstmt = null;
try {
String SQL = "Update Employees SET age = ? WHERE id = ?";
pstmt = conn.prepareStatement(SQL);
. . .
}
catch (SQLException e) {
. . .
}
finally {
pstmt.close();
}
For a better understanding, let us study Prepare - Example Code.
The CallableStatement Objects
Just as a Connection object creates the Statement and PreparedStatement objects, it also
creates the CallableStatement object, which would be used to execute a call to a database
stored procedure.
Creating CallableStatement Object
Suppose, you need to execute the following Oracle stored procedure −
CREATE OR REPLACE PROCEDURE getEmpName
(EMP_ID IN NUMBER, EMP_FIRST OUT VARCHAR) AS
BEGIN
SELECT first INTO EMP_FIRST
FROM Employees
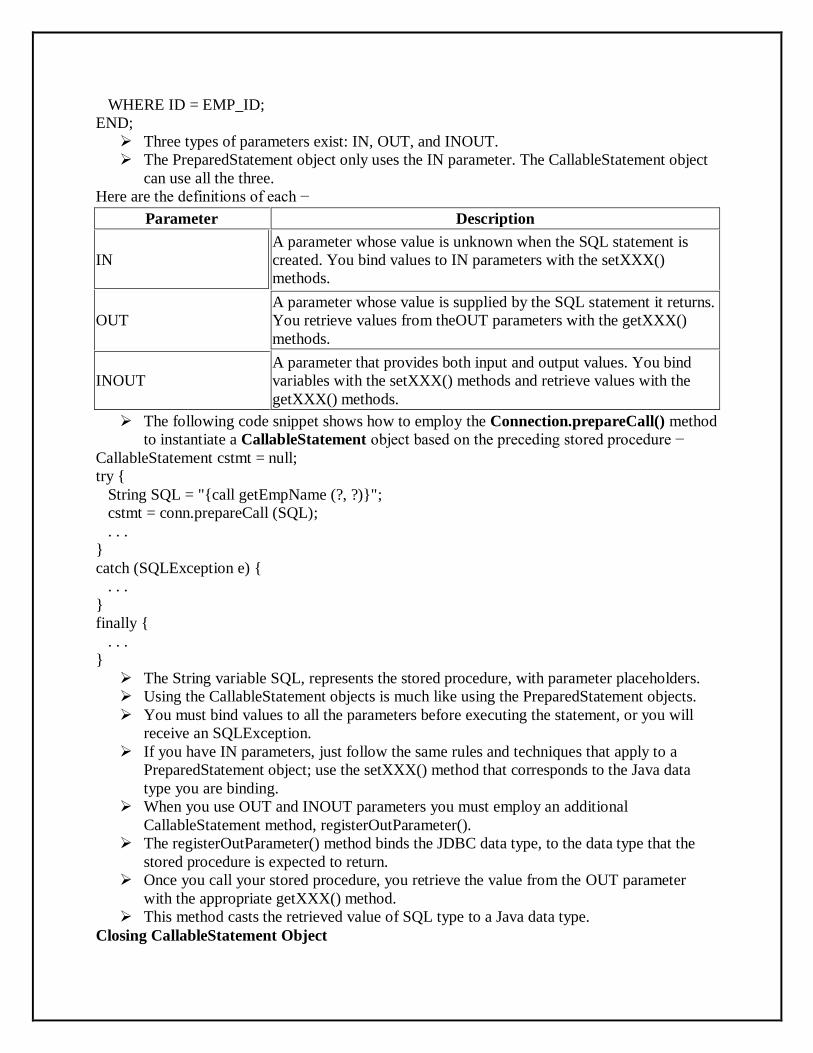
WHERE ID = EMP_ID;
END;
Three types of parameters exist: IN, OUT, and INOUT.
The PreparedStatement object only uses the IN parameter. The CallableStatement object
can use all the three.
Here are the definitions of each −
Parameter Description
IN
A parameter whose value is unknown when the SQL statement is
created. You bind values to IN parameters with the setXXX()
methods.
OUT
A parameter whose value is supplied by the SQL statement it returns.
You retrieve values from theOUT parameters with the getXXX()
methods.
INOUT
A parameter that provides both input and output values. You bind
variables with the setXXX() methods and retrieve values with the
getXXX() methods.
The following code snippet shows how to employ the Connection.prepareCall() method
to instantiate a CallableStatement object based on the preceding stored procedure −
CallableStatement cstmt = null;
try {
String SQL = "{call getEmpName (?, ?)}";
cstmt = conn.prepareCall (SQL);
. . .
}
catch (SQLException e) {
. . .
}
finally {
. . .
}
The String variable SQL, represents the stored procedure, with parameter placeholders.
Using the CallableStatement objects is much like using the PreparedStatement objects.
You must bind values to all the parameters before executing the statement, or you will
receive an SQLException.
If you have IN parameters, just follow the same rules and techniques that apply to a
PreparedStatement object; use the setXXX() method that corresponds to the Java data
type you are binding.
When you use OUT and INOUT parameters you must employ an additional
CallableStatement method, registerOutParameter().
The registerOutParameter() method binds the JDBC data type, to the data type that the
stored procedure is expected to return.
Once you call your stored procedure, you retrieve the value from the OUT parameter
with the appropriate getXXX() method.
This method casts the retrieved value of SQL type to a Java data type.
Closing CallableStatement Object

Just as you close other Statement object, for the same reason you should also close the
CallableStatement object.
A simple call to the close() method will do the job. If you close the Connection object
first, it will close the CallableStatement object as well.
However, you should always explicitly close the CallableStatement object to ensure
proper cleanup.
CallableStatement cstmt = null;
try {
String SQL = "{call getEmpName (?, ?)}";
cstmt = conn.prepareCall (SQL);
. . .
}
catch (SQLException e) {
. . .
}
finally {
cstmt.close();
}
Basics of Statement Caching
Applications use the Statement cache to cache statements associated with a particular
physical connection.
The cache is associated with an OracleConnection object. OracleConnection includes
methods to enable Statement caching.
When you enable Statement caching, a statement object is cached when you call the close
method.
Because each physical connection has its own cache, multiple caches can exist if you
enable Statement caching for multiple physical connections.
When you enable Statement caching on a connection cache, the logical connections
benefit from the Statement caching that is enabled on the underlying physical connection.
If you try to enable Statement caching on a logical connection held by a connection
cache, then this will throw an exception.
There are two types of Statement caching: implicit and explicit.
Each type of Statement cache can be enabled or disabled independent of the other.
You can have either, neither, or both in effect. Both types of Statement caching share a
single cache per connection.
Implicit Statement Caching
When you enable implicit Statement caching, JDBC automatically caches the prepared or
callable statement when you call the close method of this statement object.
The prepared and callable statements are cached and retrieved using standard connection
object and statement object methods.
Plain statements are not implicitly cached, because implicit Statement caching uses a
SQL string as a key and plain statements are created without a SQL string.
Therefore, implicit Statement caching applies only to the OraclePreparedStatement and
OracleCallableStatement objects, which are created with a SQL string.
You cannot use implicit Statement caching with OracleStatement.

When you create an OraclePreparedStatement or OracleCallableStatement, the JDBC
driver automatically searches the cache for a matching statement.
The match criteria are the following:
The SQL string in the statement must be identical to one in the cache.
The statement type must be the same, that is, prepared or callable.
The scrollable type of result sets produced by the statement must be the same, that is,
forward-only or scrollable.
If a match is found during the cache search, then the cached statement is returned.
If a match is not found, then a new statement is created and returned.
In either case, the statement, along with its cursor and state are cached when you call the
close method of the statement object.
When a cached OraclePreparedStatement or OracleCallableStatement object is retrieved,
the state and data information are automatically reinitialized and reset to default values,
while metadata is saved.
Statements are removed from the cache to conform to the maximum size using a Least
Recently Used (LRU) algorithm.
Explicit Statement Caching
Explicit Statement caching enables you to cache and retrieve selected prepared and
callable statements.
Explicit Statement caching relies on a key, an arbitrary Java String that you provide.
Implicit and explicit Statement caching can be differentiated on the following points:
Retrieving statements
o In the case of implicit Statement caching, you take no special action to
retrieve statements from a cache. Instead, whenever you call
prepareStatement or prepareCall, JDBC automatically checks the cache
for a matching statement and returns it if found. However, in the case of
explicit Statement caching, you use specialized Oracle WithKey methods
to cache and retrieve statement objects.
Providing key
o Implicit Statement caching uses the SQL string of a prepared or callable
statement as the key, requiring no action on your part. In contrast, explicit
Statement caching requires you to provide a Java String, which it uses as
the key.
Returning statements
o During implicit Statement caching, if the JDBC driver cannot find a
statement in cache, then it will automatically create one. However, during
explicit Statement caching, if the JDBC driver cannot find a matching
statement in cache, then it will return a null value.
Using Statement Caching
This section discusses the following topics:
Enabling and Disabling Statement Caching
Closing a Cached Statement
Using Implicit Statement Caching
Using Explicit Statement Caching

Enabling and Disabling Statement Caching
When using the OracleConnection API, implicit and explicit Statement caching can be
enabled or disabled independent of one other.
You can have either, neither, or both in effect.
Enabling Implicit Statement Caching
Enable implicit Statement caching in one of the following two ways:
Call setImplicitCachingEnabled(true) on the connection
Call OracleDataSource.getConnection with the ImplicitCachingEnabled property set
to true.
To enable explicit Statement caching you must first set the Statement cache size. For
setting the cache size, call OracleConnection.setStatementCacheSize method on the
physical connection.
The argument you supply is the maximum number of statements in the cache. An
argument of 0 specifies no caching.
To check the cache size, use the getStatementCacheSize method in the following way:
System.out.println("Stmt Cache size is " +
((OracleConnection)conn).getStatementCacheSize());
The following code specifies a cache size of ten statements:
((OracleConnection)conn).setStatementCacheSize(10);
Enable explicit Statement caching by calling setExplicitCachingEnabled(true) on the
connection.
To determine whether explicit caching is enabled, call getExplicitCachingEnabled, which
returns true if explicit caching is enabled, false otherwise.
Closing a Cached Statement
Perform the following to close a Satement and assure that it is not returned to the cache:
Disable caching for that statement
stmt.setDisableStatementCaching(true);
Call the close method of the statement object
stmt.close();
Using Implicit Statement Caching
Once you enable implicit Statement caching, by default, all prepared and callable statements are
automatically cached. Implicit Statement caching includes the following steps:
Enable implicit Statement caching.
Allocate a statement using one of the standard methods.
Disable implicit Statement caching for any particular statement you do not want to cache.
This is an optional step.
Cache the statement using the close method.
Retrieve the implicitly cached statement by calling the appropriate standard prepare
method.
Allocating a Statement for Implicit Caching
To allocate a statement for implicit Statement caching, use either the prepareStatement or
prepareCall method as you would typically.
The following code allocates a new statement object called pstmt:
PreparedStatement pstmt = conn.prepareStatement ("UPDATE emp SET ename = ? WHERE
rowid = ?");
Using Explicit Statement Caching
A prepared or callable statement can be explicitly cached when you enable explicit
Statement caching. Explicit Statement caching includes the following steps:
Enable explicit Statement caching.
Allocate a statement using one of the standard methods.
Explicitly cache the statement by closing it with a key, using the closeWithKey
method.
Retrieve the explicitly cached statement by calling the appropriate Oracle
WithKey method, specifying the appropriate key.
Re-cache an open, explicitly cached statement by closing it again with the
closeWithKey method. Each time a cached statement is closed, it is re-cached
with its key.
Allocating a Statement for Explicit Caching
To allocate a statement for explicit Statement caching, use either the createStatement,
prepareStatement, or prepareCall method as you would typically.
The following code allocates a new statement object called pstmt:
PreparedStatement pstmt = conn.prepareStatement ("UPDATE emp SET ename = ? WHERE
rowid = ?");
Explicitly Caching a Statement
To explicitly cache an allocated statement, call the closeWithKey method of the
statement object, specifying a key. The key is an arbitrary Java String that you provide.
The closeWithKey method caches a statement as is. This means the data, state, and
metadata are retained and not cleared.
The following code caches the pstmt statement with the key "mykey":
((OraclePreparedStatement)pstmt).closeWithKey ("mykey");
Retrieving an Explicitly Cached Statement
Reusing Statements Objects
The JDBC 3.0 specification introduces the feature of statement pooling that allows an
application to reuse a PreparedStatement object in the same way as it uses a Connection
object.
The PreparedStatement objects can be reused by multiple logical connections in a
transparent manner.
This section covers the following topics:
Using a Pooled Statement
Closing a Pooled Statement
Using a Pooled Statement
An application can find out whether a data source supports statement pooling by calling
the isPoolable method from the Statement interface.
If the return value is true, then the application knows that the PreparedStatement object is
being pooled.
The application can also request a statement to be pooled or not pooled by using the
setPoolable method from the Statement interface.
Reusing of pooled statement should be completely transparent to the application, that is,
the application code should remain the same whether a PreparedStatement object
participates in statement pooling or not.

If an application closes a PreparedStatement object, it must still call
Connection.prepareStatement method in order to reuse it.
Closing a Pooled Statement
An application closes a pooled statement exactly the same way it closes a nonpooled
statement.
Once a statement is closed, whether is it pooled or nonpooled, it is no longer available for
use by the application and an attempt to reuse it causes an exception to be thrown.
The only difference visible is that an application cannot directly close a physical
statement that is being pooled.
This is done by the pool manager. The method PooledConnection.closeAll closes all of
the statements open on a given physical connection, which releases the resources
associated with those statements.
7. What is a Socket? Explain in detail about TCP sockets in Java.
A socket is an endpoint of a two-way communication link between two programs running
on the network.
Socket is bound to a port number so that the TCP layer can identify the application that
data is destined to be sent.
Java provides a set of classes, defined in a package called java.net, to enable the rapid
development of network applications.
Key classes, interfaces in java.net package simplifying the complexity involved in
creating client and server programs are:
The Classes
ContentHandler
DatagramPacket
DatagramSocket
DatagramSocketImpl
HttpURLConnection
InetAddress
MulticastSocket
ServerSocket
Socket
SocketImpl
URL
URLConnection
URLEncoder
URLStreamHandler
The Interfaces
ContentHandlerFactory
FileNameMap
SocketImplFactory
TCP Socket Programming:
The two key classes from the java.net package used in creation of server and client
programs are:
(a) ServerSocket

(b) Socket
A server program creates a specifi c type of socket that is used to listen for client requests
(server socket), In the case of a connection request, the program creates a new socket
through which it will exchange data with the client using input and output streams.
The socket abstraction is very similar to the fi le concept: developers have to open a
socket, perform I/O, and close it. Figure 13.5 illustrates key steps involved in creating
socket-based server and client programs.
A simple Server Program in Java The steps for creating a simple server program are:
1. Open the Server Socket:
ServerSocket server = new ServerSocket( PORT );
2. Wait for the Client Request:
Socket client = server.accept();
3. Create I/O streams for communicating to the client
DataInputStream is = new DataInputStream(client.getInputStream());
DataOutputStream os = new DataOutputStream(client.getOutputStream());
4. Perform communication with client
Receive from client: String line = is.readLine();
Send to client: os.writeBytes(“Hello\n”);
5. Close socket:
client.close();
An example program illustrating creation of a server socket, waiting for client request, and then
responding to a client that requested for connection by greeting it is given below:
// SimpleServer.java: A simple server program.
import java.net.*;
import java.io.*;
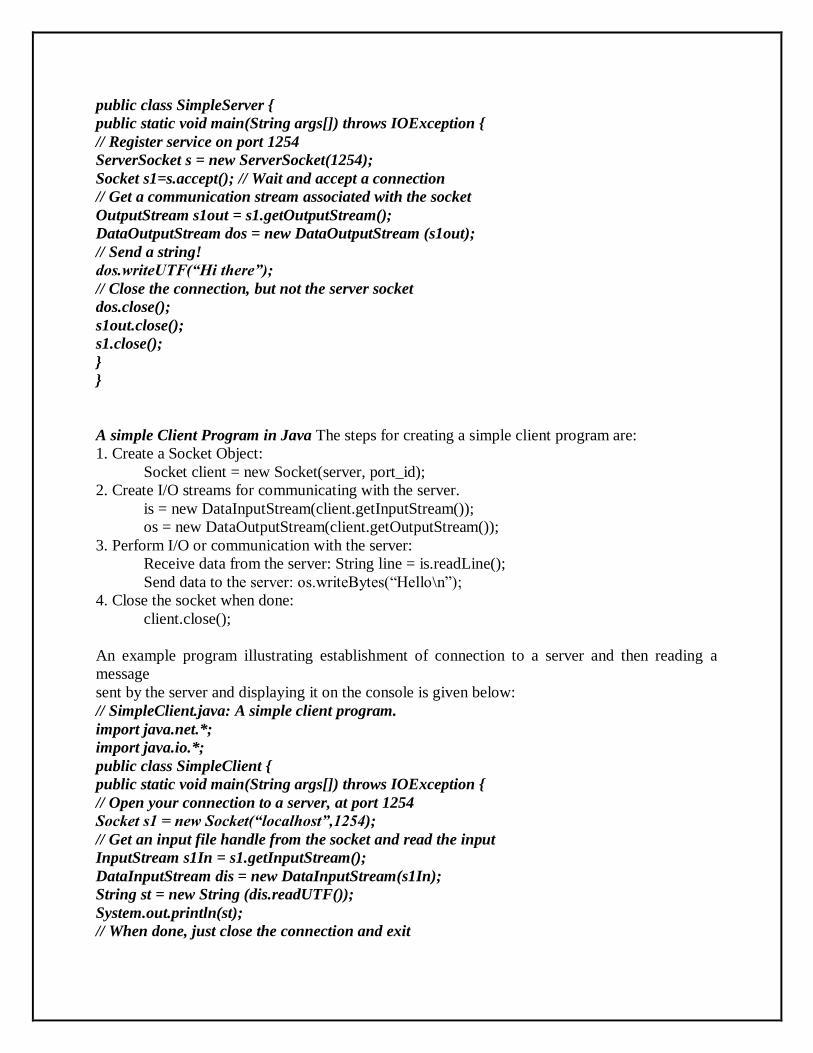
public class SimpleServer {
public static void main(String args[]) throws IOException {
// Register service on port 1254
ServerSocket s = new ServerSocket(1254);
Socket s1=s.accept(); // Wait and accept a connection
// Get a communication stream associated with the socket
OutputStream s1out = s1.getOutputStream();
DataOutputStream dos = new DataOutputStream (s1out);
// Send a string!
dos.writeUTF(“Hi there”);
// Close the connection, but not the server socket
dos.close();
s1out.close();
s1.close();
}
}
A simple Client Program in Java The steps for creating a simple client program are:
1. Create a Socket Object:
Socket client = new Socket(server, port_id);
2. Create I/O streams for communicating with the server.
is = new DataInputStream(client.getInputStream());
os = new DataOutputStream(client.getOutputStream());
3. Perform I/O or communication with the server:
Receive data from the server: String line = is.readLine();
Send data to the server: os.writeBytes(“Hello\n”);
4. Close the socket when done:
client.close();
An example program illustrating establishment of connection to a server and then reading a
message
sent by the server and displaying it on the console is given below:
// SimpleClient.java: A simple client program.
import java.net.*;
import java.io.*;
public class SimpleClient {
public static void main(String args[]) throws IOException {
// Open your connection to a server, at port 1254
Socket s1 = new Socket(“localhost”,1254);
// Get an input file handle from the socket and read the input
InputStream s1In = s1.getInputStream();
DataInputStream dis = new DataInputStream(s1In);
String st = new String (dis.readUTF());
System.out.println(st);
// When done, just close the connection and exit

dis.close();
s1In.close();
s1.close();
} }
Running Socket Programs Compile both server and client programs and then deploy server program code on a
machine which is going to act as a server and client program, which is going to act as a
client.
If required, both client and server programs can run on the same machine.
Run a server program as indicated below:
java SimpleServer
The client program can run on any computer in the network (LAN, WAN, or Internet)
as long as there is no firewall between them that blocks communication.
Run our client program on a machine as follows:
java SimpleClient
The client program is just establishing a connection with the server and then waits for
a message.
On receiving a response message, it prints the same to the console. The output in this
case is:
Hi there
which is sent by the server program in response to a client connection request.
It should be noted that once the server program execution is started, it is not possible
for any other server program to run on the same port until the fi rst program which is
successful using it is terminated.
Port numbers are a mutually exclusive resource. They cannot be shared among
different processes at the same time.
8. What is a Socket? Explain in detail about UDP sockets in Java
A socket is an endpoint of a two-way communication link between two programs running
on the network.
Socket is bound to a port number so that the TCP layer can identify the application that
data is destined to be sent.
Java provides a set of classes, defined in a package called java.net, to enable the rapid
development of network applications.
TCP guarantees the delivery of packets and preserves their order on destination.
Sometimes these features are not required and since they do not come without
performance costs, it would be better to use a lighter transport protocol. This kind of
service is accomplished by the UDP protocol which conveys datagram packets.
Datagram packets are used to implement a connectionless packet delivery service
supported by the UDP protocol. Each message is transferred from source machine to
destination based on information contained within that packet. That means, each packet
needs to have destination address and each packet might be routed differently, and might
arrive in any order. Packet delivery is not guaranteed.
The format of datagram packet is:
| Msg | length | Host | serverPort |

Java supports datagram communication through the following classes:
DatagramPacket
DatagramSocket
The class DatagramPacket contains several constructors that can be used for creating
packet object. One of them is:
DatagramPacket(byte[] buf, int length, InetAddress address, int port);
This constructor is used for creating a datagram packet for sending packets of length to
the specified port number on the specified host. The message to be transmitted is
indicated in the first argument.
The key methods of DatagramPacket class are:
byte[] getData()
Returns the data buffer.
int getLength()
Returns the length of the data to be sent or the length of the data received.
void setData(byte[] buf)
Sets the data buffer for this packet.
void setLength(int length)
Sets the length for this packet.
The class DatagramSocket supports various methods that can be used for transmitting or
receiving data a datagram over the network. The two key methods are:
void send(DatagramPacket p)
Sends a datagram packet from this socket.
void receive(DatagramPacket p)
Receives a datagram packet from this socket.
A simple UDP server program that waits for client’s requests and then accepts the
message (datagram) and sends back the same message is given below. Of course, an
extended server program can manipulate client’s messages/request and send a new
message as a response.
// UDPServer.java: A simple UDP server program.
import java.net.*;
import java.io.*;
public class UDPServer {
public static void main(String args[]){
DatagramSocket aSocket = null;
if (args.length < 1) {
System.out.println(“Usage: java UDPServer <Port Number>”);
System.exit(1);
}
try {
int socket_no = Integer.valueOf(args[0]).intValue();
aSocket = new DatagramSocket(socket_no);
byte[] buffer = new byte[1000];
while(true) {

DatagramPacket request = new DatagramPacket(buffer,
buffer.length);
aSocket.receive(request);
DatagramPacket reply = new DatagramPacket(request.getData(),
request.getLength(),request.getAddress(),
request.getPort());
aSocket.send(reply);
}
}
catch (SocketException e) {
System.out.println(“Socket: ” + e.getMessage());
}
catch (IOException e) {
System.out.println(“IO: ” + e.getMessage());
}
finally {
if (aSocket != null)
aSocket.close();
}
}
}
A corresponding client program for creating a datagram and then sending it to the above
server and then accepting a response is listed below.
// UDPClient.java: A simple UDP client program.
import java.net.*;
import java.io.*;
public class UDPClient {
public static void main(String args[]){
// args give message contents and server hostname
DatagramSocket aSocket = null;
if (args.length < 3) {
System.out.println(
“Usage: java UDPClient <message> <Host name> <Port number>”);
System.exit(1);
}
try {
aSocket = new DatagramSocket();
byte [] m = args[0].getBytes();
InetAddress aHost = InetAddress.getByName(args[1]);
int serverPort = Integer.valueOf(args[2]).intValue();
DatagramPacket request =
new DatagramPacket(m, args[0].length(), aHost, serverPort);
aSocket.send(request);
byte[] buffer = new byte[1000];
DatagramPacket reply = new DatagramPacket(buffer, buffer.length);
aSocket.receive(reply);

System.out.println(“Reply: ” + new String(reply.getData()));
}
catch (SocketException e) {
System.out.println(“Socket: ” + e.getMessage());
}
catch (IOException e) {
System.out.println(“IO: ” + e.getMessage());
}
finally {
if (aSocket != null)
aSocket.close();
}
}
}

UNIT – IV APPLETS
Part A
1.What is an applet?
Applets are small programs transferred through Internet, automatically installed and run
as part of web-browser. Applets implements functionality of a client. Applet is a dynamic and
interactive program that runs inside a Web page displayed by a Java-capable browser.. Applets
can be invoked either through browser or through Appletviewer utility provided by JDK.
2. How to initialize applet?
Using init() method of applet.
3. How will you establish the connection between servlet and applet?
We can use the java.net.URLConnection and java.net.URL classes to open a standard
HTTP connection and "tunnel" to the web server. The server then passes this information to the
servlet in the normal way. Basically, the applet pretends to be a web browser, and the servlet
doesn't know the difference. As far as the servlet is concerned, the applet is just another HTTP
client.
4. What is difference between applet and application?
An applet is a program written in the Java programming language that can be included in
an HTML page, much in the same way an image is included. Anapplication is a standalone
Java program that runs as a true application, outside of a browser. Both require a JVM (Java
Virtual Machine).
5. What is the order of method invocation in applet?
public void init() : Initialization method called once by browser.
public void start() : Method called after init() and contains code to start processing. If the
user leaves the page and returns without killing the current browser session, the start ()
method is called without being preceded by init ().
public void stop() : Stops all processing started by start (). Done if user moves off page.
public void destroy() : Called if current browser session is being terminated. Frees all
resources used by applet.
6. How to pass parameter to applet from html page?how?
We can pass parameters to an applet using tag in the following way:
<param name="param1″ value="value1″>
<param name="param2″ value="value2″>
Access those parameters inside the applet is done by calling getParameter() method inside
the applet. Note that getParameter() method returns String value corresponding to the parameter
name.
7. Which class and interfaces does Applet class consist?
Applet class consists of a single class, the Applet class and three interfaces:
AppletContext,-applet to applet communication.
AppletStub, -The applet stub interface provides the means by which an applet and the browser
communicate.
and AudioClip.
8. Which tags are mandatory when creating HTML to display an applet?
code, height, width.
9. What are applet information methods?
The following are the Applet's information methods: getAppletInfo() method: Returns a string
describing the applet, its author, copyright information, etc. getParameterInfo( ) method: Returns
an array of string describing the applet's parameters.
10. When is update method called?
Whenever a screen needs redrawing (e.g., upon creation, resizing, validating) the update method
is called. By default, the update method clears the screen and then calls the paint method, which
normally contains all the drawing code.
11. What is a servlet?
Java Servlet is server side technologies to extend the capability of web servers by providing
support for dynamic response and data persistence. The javax.servlet and javax.servlet.http
packages provide interfaces and classes for writing our own servlets.
12. What are common tasks performed by Servlet Container?
Servlet containers are also known as web container, for example Tomcat. Some of the important
tasks of servlet container are:
Communication Support: Servlet Container provides easy way of communication between web
client (Browsers) and the servlets and JSPs.
Lifecycle and Resource Management: Servlet Container takes care of managing the life cycle
of servlet. From the loading of servlets into memory, initializing servlets, invoking servlet
methods and to destroy them.
Multithreading Support: Container creates new thread for every request to the servlet and
provide them request and response objects to process. So servlets are not initialized for each
request and saves time and memory.
JSP Support: JSPs doesn’t look like normal java classes but every JSP in the application is
compiled by container and converted to Servlet and then container manages them like other
servlets.
Miscellaneous Task: Servlet container manages the resource pool, perform memory
optimizations, execute garbage collector, provides security configurations, support for multiple
applications, hot deployment and several other tasks behind the scene that makes a developer life
easier.
13. What is ServletConfig object?
javax.servlet.ServletConfig is used to pass configuration information to Servlet. Every
servlet has it’s own ServletConfig object and servlet container is responsible for instantiating
this object.
14. What is ServletContext object?
javax.servlet.ServletContext interface provides access to web application parameters to
the servlet. The ServletContext is unique object and available to all the servlets in the web
application. We can get the ServletContext object via the getServletContext() method of
ServletConfig.
15. What is the difference between ServletConfig and ServletContext?
Some of the differences between ServletConfig and ServletContext are:
ServletConfig is a unique object per servlet whereas ServletContext is a unique object for
complete application.
ServletConfig is used to provide init parameters to the servlet whereas ServletContext is
used to provide application level init parameters that all other servlets can use.
We can’t set attributes in ServletConfig object whereas we can set attributes in
ServletContext that other servlets can use in their implementation.
16. What is the use of servlet wrapper classes?
Servlet HTTP API provides two wrapper classes – HttpServletRequestWrapper
andHttpServletResponseWrapper. These wrapper classes are provided to help developers with
custom implementation of servlet request and response types. We can extend these classes and
override only specific methods we need to implement for custom request and response objects.
These classes are not used in normal servlet programming.
17. What is difference between GenericServlet and HttpServlet?
GenericServlet is protocol independent implementation of Servlet interface whereas
HttpServlet is HTTP protocol specific implementation. Most of the times we use servlet for
creating web application and that’s why we extend HttpServlet class. HttpServlet class extends
GenericServlet and also provide some other methods specific to HTTP protocol.
18. What is Request Dispatcher? RequestDispatcher interface is used to forward the request to another resource that can be
HTML, JSP or another servlet in same application. There are two methods defined in this
interface:
void forward(ServletRequest request, ServletResponse response) – forwards the request from
a servlet to another resource (servlet, JSP file, or HTML file) on the server.
void include(ServletRequest request, ServletResponse response) – includes the content of a
resource (servlet, JSP page, HTML file) in the response.
We can get RequestDispatcher in a servlet using ServletContext getRequestDispatcher(String
path) method. The path must begin with a / and is interpreted as relative to the current context
root.
19. Are Servlets Thread Safe? How to achieve thread safety in servlets? No. HttpServlet init() method and destroy() method are called only once in servlet life
cycle, so we don’t need to worry about their synchronization. But service methods such as
doGet() or doPost() are getting called in every client request and since servlet uses
multithreading, we should provide thread safety in these methods.
20. Why HttpServlet class is declared abstract?
HttpServlet class provide HTTP protocol implementation of servlet but it’s left abstract
because there is no implementation logic in service methods such as doGet() and doPost() and
we should override at least one of the service methods. That’s why there is no point in having an
instance of HttpServlet and is declared abstract class.
21. What are the phases of servlet life cycle? We know that Servlet Container manages the life cycle of Servlet, there are four phases
of servlet life cycle.
Servlet Class Loading – When container receives request for a servlet, it first loads the class
into memory and calls it’s default no-args constructor.
Servlet Class Initialization – Once the servlet class is loaded, container initializes the
ServletContext object for the servlet and then invoke it’s init method by passing servlet config
object. This is the place where a servlet class transforms from normal class to servlet.
Request Handling – Once servlet is initialized, its ready to handle the client requests. For every
client request, servlet container spawns a new thread and invokes the service() method by
passing the request and response object reference.

Removal from Service – When container stops or we stop the application, servlet container
destroys the servlet class by invoking it’s destroy() method.
22. What are different methods of session management in servlets? Session is a conversional state between client and server and it can consists of multiple
request and response between client and server. Since HTTP and Web Server both are stateless,
the only way to maintain a session is when some unique information about the session (session
id) is passed between server and client in every request and response.
Some of the common ways of session management in servlets are:
User Authentication
HTML Hidden Field
Cookies
URL Rewriting
Session Management API
23. What is JSP? Java Server Pages technology (JSP) is used to create dynamic web page. It is an extension to the
servlet technology. A JSP page is internally converted into servlet.
24. What are the life-cycle methods for a jsp?
public void jspInit() ,
public void _jspService(ServletRequest request,ServletResponse)throws
ServletException,IOException
public void jspDestroy()
25. What is the difference between ServletContext and PageContext?-
ServletContext gives the information about the container whereas PageContext gives the
information about the Request.
26. What is basic differences between the JSP custom tags and java beans?
Custom tags can manipulate JSP content whereas beans cannot.
Complex operations can be reduced to a significantly simpler form with custom tags than
with beans.
Custom tags require quite a bit more work to set up than do beans.
Custom tags are available only in JSP 1.1 and later, but beans can be used in all JSP 1.x
versions.
Part B
1.What is an Applet? Explain the life cycle of an Applet with one suitable example?
An applet is a Java program that runs in a web browser. An applet can be a fully
functional java application because it has the entire Java API at its disposal.
There are certain differences between Applet and Java Stand alone Application that are
described below:
An applet is a Java class that extends the java.applet.Applet class.
A main() method is not invoked on an applet, and an applet class will not define
main().
Applets are designed to be embedded within an HTML page.
When a user views an HTML page that contains an applet, the code for the applet is
downloaded to the user's machine.
A JVM is required to view an applet. The JVM can be either a plug-in of the Web
browser or a separate runtime environment.

The JVM on the user's machine creates an instance of the applet class and invokes
various methods during the applet's lifetime.
Applets have strict security rules that are enforced by the Web browser. The security
of an applet is often referred to as sandbox security, comparing the applet to a child
playing in a sandbox with various rules that must be followed.
Other classes that the applet needs can be downloaded in a single Java Archive (JAR)
file.
Life Cycle of an Applet:
Four methods in the Applet class give you the framework on which you build any serious
applet:
init: This method is intended for whatever initialization is needed for your applet. It is
called after the param tags inside the applet tag have been processed.
start: This method is automatically called after the browser calls the init method. It is
also called whenever the user returns to the page containing the applet after having gone
off to other pages.
stop: This method is automatically called when the user moves off the page on which the
applet sits. It can, therefore, be called repeatedly in the same applet.
destroy: This method is only called when the browser shuts down normally. Because
applets are meant to live on an HTML page, you should not normally leave resources
behind after a user leaves the page that contains the applet.
paint: Invoked immediately after the start() method, and also any time the applet needs
to repaint itself in the browser. The paint() method is actually inherited from the
java.awt.
Simple example to Create Applet Program:
To create an Applet program follow the steps:
1. Create a java file containing Applet code and methods
described above.
2. Create a HTML file and embed the .class file of the java
file created in the first step.
3. Run Applet using either of the following methods
a. Open the HTML file in java enabled web browser
b. Use AppletViewer tool (used only for testing purpose)
Code of MyFirstApplet.java
Applet Initialized Init() start()
Applet Running
Applet Stopped
stop()
Destroy()
Applet Destroyed

import java.applet.*;
import java.awt.*;
public class HelloWorldApplet extends Applet
{
public void paint (Graphics g)
{
g.drawString ("Hello World", 25, 50);
}
}
Invoking an Applet:
An applet may be invoked by embedding directives in an HTML file and viewing the file
through an applet viewer or Java-enabled browser.
The <applet> tag is the basis for embedding an applet in an HTML file. Below is an example
that invokes the "Hello, World" applet:
<html>
<title>The Hello, World Applet</title>
<hr>
<applet code="HelloWorldApplet.class" width="320" height="120">
</applet>
<hr>
</html>
Output:
Method – 1: Open the HTML file in java Enabled web browser
Method – 2: Use Appletviewer Tool
2.How will you add images to an applet and how to play audio in applet? Explain with an
example.
An applet can display images of the format GIF, JPEG,
BMP and others.
To display an image within the applet, you use the
drawImage() method found in the java.awt.Graphics class.
Code of Applet image.java
import java.applet.*;
import java.awt.*;
public class Applet_image extends Applet
{
Image img1;
public void init()
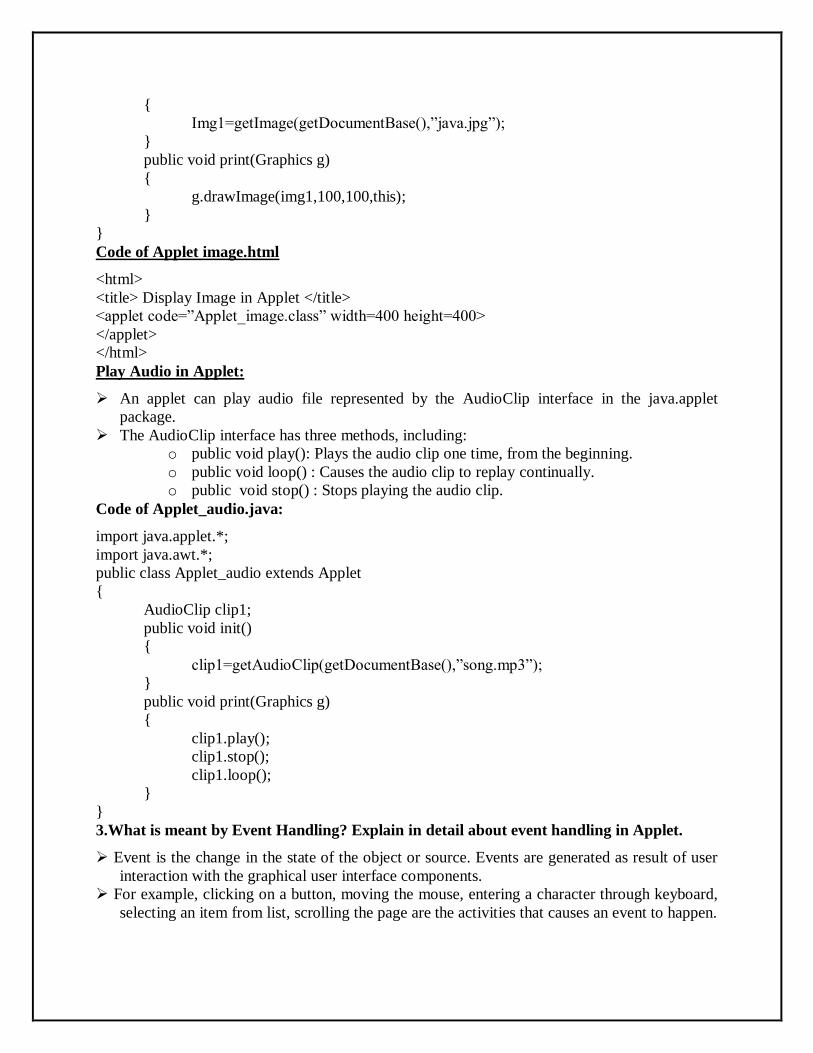
{
Img1=getImage(getDocumentBase(),”java.jpg”);
}
public void print(Graphics g)
{
g.drawImage(img1,100,100,this);
}
}
Code of Applet image.html
<html>
<title> Display Image in Applet </title>
<applet code=”Applet_image.class” width=400 height=400>
</applet>
</html>
Play Audio in Applet:
An applet can play audio file represented by the AudioClip interface in the java.applet
package.
The AudioClip interface has three methods, including:
o public void play(): Plays the audio clip one time, from the beginning.
o public void loop() : Causes the audio clip to replay continually.
o public void stop() : Stops playing the audio clip.
Code of Applet_audio.java:
import java.applet.*;
import java.awt.*;
public class Applet_audio extends Applet
{
AudioClip clip1;
public void init()
{
clip1=getAudioClip(getDocumentBase(),”song.mp3”);
}
public void print(Graphics g)
{
clip1.play();
clip1.stop();
clip1.loop();
}
}
3.What is meant by Event Handling? Explain in detail about event handling in Applet.
Event is the change in the state of the object or source. Events are generated as result of user
interaction with the graphical user interface components.
For example, clicking on a button, moving the mouse, entering a character through keyboard,
selecting an item from list, scrolling the page are the activities that causes an event to happen.

Event Handling is the mechanism that controls the event and decides what should happen if an
event occurs.
This mechanism have the code which is known as event handler that is executed when an
event occurs.
Java Uses the Delegation Event Model to handle the events. This model defines the standard
mechanism to generate and handle the events.
The Delegation Event Model has the following key participants namely:
1. Source - The source is an object on which event occurs. Source is responsible for
providing information of the occurred event to its handler. Java provide as with classes
for source object.
2. Listener - It is also known as event handler. Listener is responsible for generating
response to an event. From java implementation point of view the listener is also an
object. Listener waits until it receives an event. Once the event is received, the listener
process the event then returns.
The benefit of this approach is that the user interface logic is completely separated from
the logic that generates the event. The user interface element is able to delegate the
processing of an event to the separate piece of code.
In this model, Listener needs to be registered with the source object so that the listener can
receive the event notification.
This is an efficient way of handling the event because the event notifications are sent only
to those listeners that want to receive them.
Event Handling Example:
1. Action Listener Example:
This interface is used to handle the events caused by sources like Buttons, Menu Items, Enter
Keys and Double Click of Mouse. When you implements ActionListener Interface following
methods needs to be override.
public void actionPerformed(ActionEvent ae)
Example:

Output:
2. ItemListener Example
Used for Radio Button, List, Choice and Check Box AWT Controls. The method that needs
to be override is as follows:
public void itemStateChanged(ItemEvent e)
Example:
After Button is Clicked

Output:
3. Key Listener Example
This interface is used to handle the events generated from keys of the keyboard. There are
three methods present in the KeyListener Interface and all methods needs to be override.
1. public void keyPressed(KeyEvent ke)
2. public void keyTyped(KeyEvent ke)
3. public void keyReleased(KeyEvent ke)
Example:
After Checkbox is checked

Output:
4.Explain the architecture of Servlet in detail with a sample Servlet program. (APR/MAY
2011)
Servlet Architecture overview:
The combination of HTML JavaScript and DOM is sometimes referred to as Dynamic
HTML (DHTML)
Web pages that include scripting are often called dynamic pages
A simple HTML document without scripting known as static document
Web server response can be static or dynamic
Static: When browser has requested an HTML document
HTML document is retrieved from the file system and returned to the client
Web server not responsible for generating content of response
Find and send the content

Dynamic: HTML document is generated by a program in response to an HTTP request
Eg: Visiting a search engine website
Java servlets are one technology for producing dynamic server responses
Servlet is a Java class instantiated by the server to produce a dynamic response
A particular method is called on this instance when server receives HTTP request
Code in the servlet method can obtain information about the request and produce
information to be included in the response
It is done by calling methods on parameter objects passed to the method
When the servlet returns control to the server , it creates a response from the information
dynamically generated by servlet
Web Server-Servlet Interaction
Web server Operation
1. When an HTTP request is received by a servlet capable server
1. It determines based on URL whether the request handled by the servlet
2. Any URL in which the path component begins with servlet
2. The servlet determines from URL which servlet handle the request and calls a method on that
servlet
1. Two parameters are passed to the method
2. An object implementing the HttpservletRequest interface
3. An object implementing the HttpservletResponse interface
4. Both are defined as part of Java Servlet API which is implemented by server
First method to access the information contained in the request message
Second object to record the information that the servlet wishes to include in the HTTP
response message
3. Servlet method executes by calling methods on
HttpservletRequest and HttpservletResponse objects passed to it.
The information stored in the latter object by the servlet method includes an HTML
document along with some HTTP header information
When servlet method finishes its processing it returns control to the server
4. The server formats the information stored in the HttpservletResponse object by the servlet into
an
HTTP response message then send to the client
INDEX.JSP:
<html>
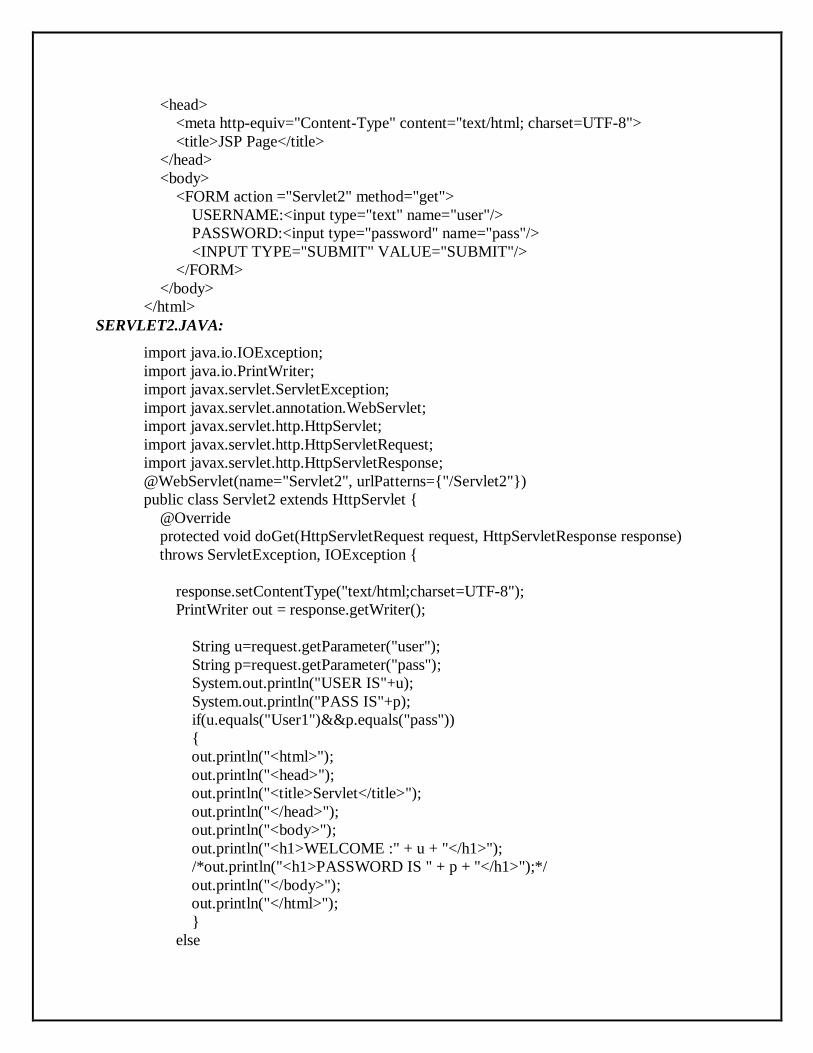
<head>
<meta http-equiv="Content-Type" content="text/html; charset=UTF-8">
<title>JSP Page</title>
</head>
<body>
<FORM action ="Servlet2" method="get">
USERNAME:<input type="text" name="user"/>
PASSWORD:<input type="password" name="pass"/>
<INPUT TYPE="SUBMIT" VALUE="SUBMIT"/>
</FORM>
</body>
</html>
SERVLET2.JAVA:
import java.io.IOException;
import java.io.PrintWriter;
import javax.servlet.ServletException;
import javax.servlet.annotation.WebServlet;
import javax.servlet.http.HttpServlet;
import javax.servlet.http.HttpServletRequest;
import javax.servlet.http.HttpServletResponse;
@WebServlet(name="Servlet2", urlPatterns={"/Servlet2"})
public class Servlet2 extends HttpServlet {
@Override
protected void doGet(HttpServletRequest request, HttpServletResponse response)
throws ServletException, IOException {
response.setContentType("text/html;charset=UTF-8");
PrintWriter out = response.getWriter();
String u=request.getParameter("user");
String p=request.getParameter("pass");
System.out.println("USER IS"+u);
System.out.println("PASS IS"+p);
if(u.equals("User1")&&p.equals("pass"))
{
out.println("<html>");
out.println("<head>");
out.println("<title>Servlet</title>");
out.println("</head>");
out.println("<body>");
out.println("<h1>WELCOME :" + u + "</h1>");
/*out.println("<h1>PASSWORD IS " + p + "</h1>");*/
out.println("</body>");
out.println("</html>");
}
else

{
out.println("<html>");
out.println("<head>");
out.println("<title>Servlet</title>");
out.println("</head>");
out.println("<body>");
out.println("<h1>" + u + " is not a valid user</h1>");
out.println("</body>");
out.println("</html>");
} } }
5.What is a session? Explain how client state is maintained using session and also explain
about session tracking and session management using an example. (NOV/DEC 2011)
Sessions
A session refers to the entire interaction between a client and a server from the time of
the client’s first request, which generally begins the session, to the time the session is
terminated.
The session could be terminated by the client’s request, or the server could automatically
close it after a certain period of time.
Without session management, each time a client makes a request to a server, it’s a brand
new user with a brand new request from the server’s point of view.
.
Server knows that all of these requests are from the same client. The set of requests is known as
a session
INDEX.JSP:
<html>
<head>
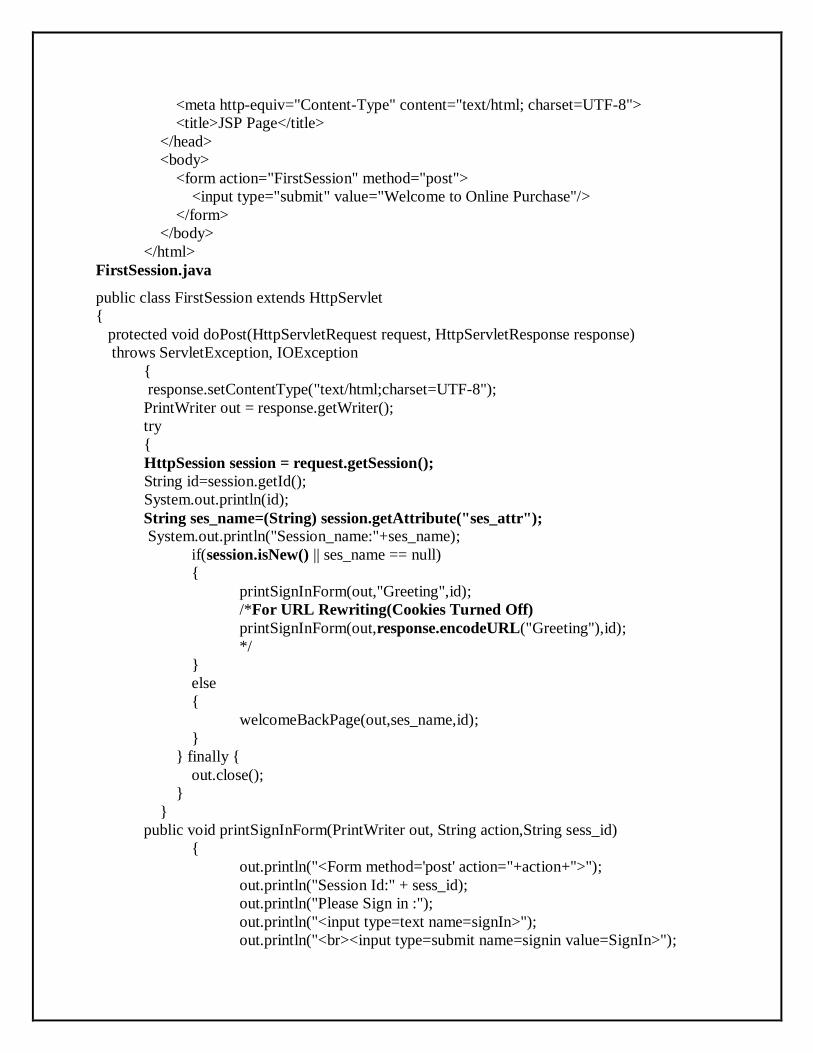
<meta http-equiv="Content-Type" content="text/html; charset=UTF-8">
<title>JSP Page</title>
</head>
<body>
<form action="FirstSession" method="post">
<input type="submit" value="Welcome to Online Purchase"/>
</form>
</body>
</html>
FirstSession.java
public class FirstSession extends HttpServlet
{
protected void doPost(HttpServletRequest request, HttpServletResponse response)
throws ServletException, IOException
{
response.setContentType("text/html;charset=UTF-8");
PrintWriter out = response.getWriter();
try
{
HttpSession session = request.getSession();
String id=session.getId();
System.out.println(id);
String ses_name=(String) session.getAttribute("ses_attr");
System.out.println("Session_name:"+ses_name);
if(session.isNew() || ses_name == null)
{
printSignInForm(out,"Greeting",id);
/*For URL Rewriting(Cookies Turned Off)
printSignInForm(out,response.encodeURL("Greeting"),id);
*/
}
else
{
welcomeBackPage(out,ses_name,id);
}
} finally {
out.close();
}
}
public void printSignInForm(PrintWriter out, String action,String sess_id)
{
out.println("<Form method='post' action="+action+">");
out.println("Session Id:" + sess_id);
out.println("Please Sign in :");
out.println("<input type=text name=signIn>");
out.println("<br><input type=submit name=signin value=SignIn>");
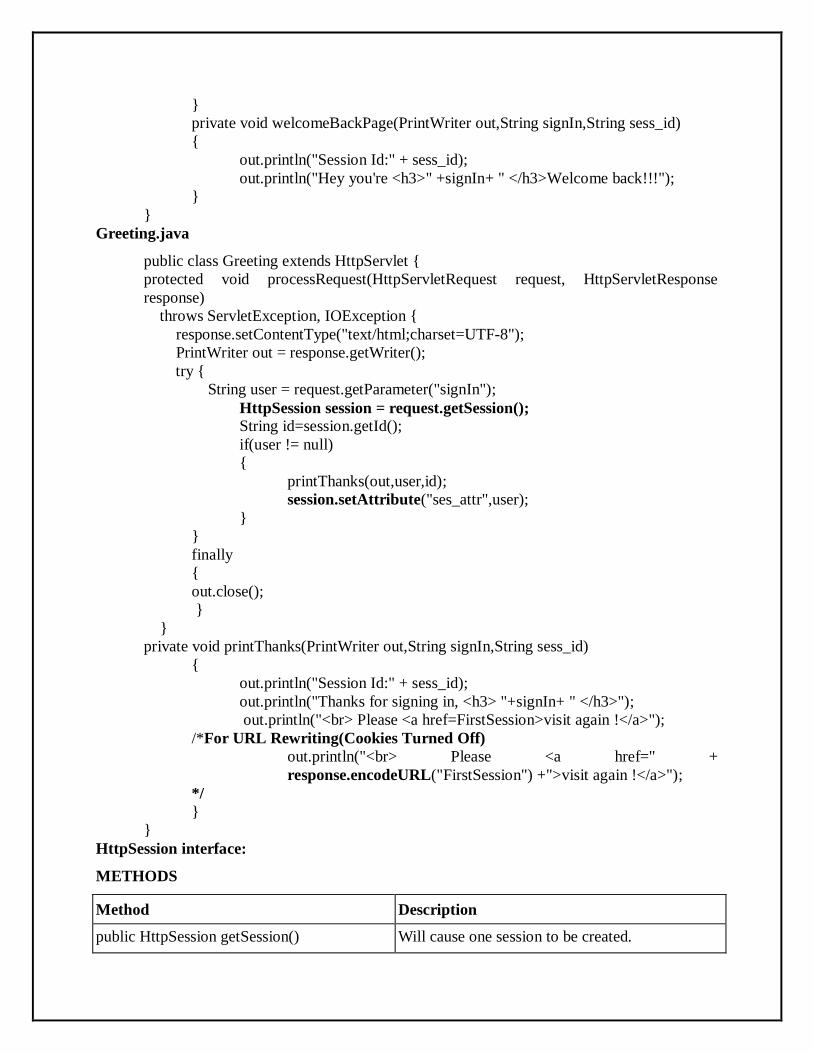
}
private void welcomeBackPage(PrintWriter out,String signIn,String sess_id)
{
out.println("Session Id:" + sess_id);
out.println("Hey you're <h3>" +signIn+ " </h3>Welcome back!!!");
}
}
Greeting.java
public class Greeting extends HttpServlet {
protected void processRequest(HttpServletRequest request, HttpServletResponse
response)
throws ServletException, IOException {
response.setContentType("text/html;charset=UTF-8");
PrintWriter out = response.getWriter();
try {
String user = request.getParameter("signIn");
HttpSession session = request.getSession();
String id=session.getId();
if(user != null)
{
printThanks(out,user,id);
session.setAttribute("ses_attr",user);
}
}
finally
{
out.close();
}
}
private void printThanks(PrintWriter out,String signIn,String sess_id)
{
out.println("Session Id:" + sess_id);
out.println("Thanks for signing in, <h3> "+signIn+ " </h3>");
out.println("<br> Please <a href=FirstSession>visit again !</a>");
/*For URL Rewriting(Cookies Turned Off)
out.println("<br> Please <a href=" +
response.encodeURL("FirstSession") +">visit again !</a>");
*/
}
}
HttpSession interface:
METHODS
Method Description
public HttpSession getSession() Will cause one session to be created.
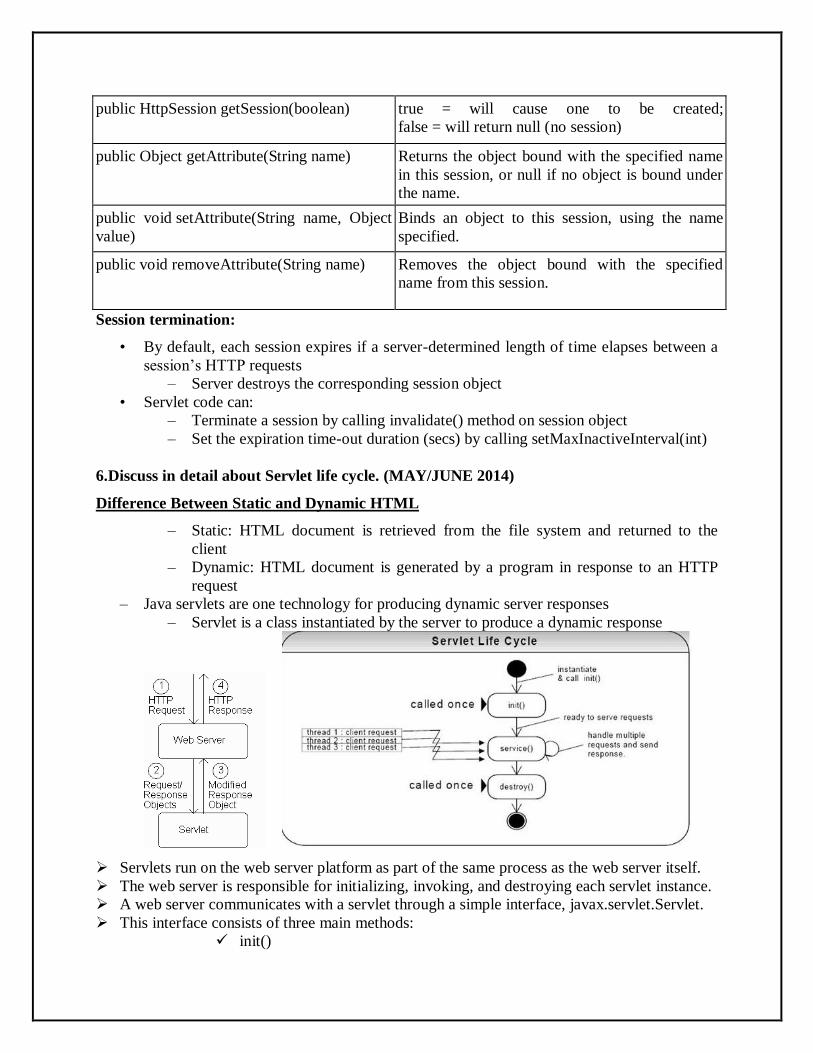
public HttpSession getSession(boolean) true = will cause one to be created;
false = will return null (no session)
public Object getAttribute(String name) Returns the object bound with the specified name
in this session, or null if no object is bound under
the name.
public void setAttribute(String name, Object
value)
Binds an object to this session, using the name
specified.
public void removeAttribute(String name) Removes the object bound with the specified
name from this session.
Session termination:
• By default, each session expires if a server-determined length of time elapses between a
session’s HTTP requests
– Server destroys the corresponding session object
• Servlet code can:
– Terminate a session by calling invalidate() method on session object
– Set the expiration time-out duration (secs) by calling setMaxInactiveInterval(int)
6.Discuss in detail about Servlet life cycle. (MAY/JUNE 2014)
Difference Between Static and Dynamic HTML
– Static: HTML document is retrieved from the file system and returned to the
client
– Dynamic: HTML document is generated by a program in response to an HTTP
request
– Java servlets are one technology for producing dynamic server responses
– Servlet is a class instantiated by the server to produce a dynamic response
Servlets run on the web server platform as part of the same process as the web server itself.
The web server is responsible for initializing, invoking, and destroying each servlet instance.
A web server communicates with a servlet through a simple interface, javax.servlet.Servlet.
This interface consists of three main methods:
init()

service()
destroy()
Servlet API life cycle methods:
Servlet API life cycle methods
– init(): called when servlet is instantiated; must return before any other methods
will be called
– service(): method called directly by server when an HTTP request is received;
default service() method calls doGet() (or related methods covered later)
– destroy(): called when server shuts down
The init() Method
o When a servlet is first loaded, its init () method is invoked. This
allows the servlet to per form any setup processing such as opening files or
establishing connections to their servers. If a servlet has been permanently
installed in a server, it loads when the server starts to run. Otherwise, the server
activates a servlet when it receives the first client request for the services provided
by the servlet.
o The init() method is guaranteed to finish before any other calls are
made to the servlet-- such as a call to the service() method. Note that init() will
only be called once; it will not be called again unless the servlet has been
unloaded and then reloaded by the server.
o The init() method takes one argument, a reference to a ServletConfig
object which provides initialization arguments for the servlet. This object has a
method getServletContext() that returns a ServletContext object containing
information about the servlet's environment
The service() Method
o The service() method is the heart of the servlet. Each request
message from a client results in a single call to the servlet's service () method. The
service() method reads the request and produces the response message from its
two parameters:
A ServletRequest object with data from the client. The data consists
of name/value pairs of parameters and an InputStream. Several methods
are provided that return the client's parameter information. The
InputStream from the client can be obtained via the getInputStream()
method. This method returns a ServletInputStream, which can be used to
get additional data from the client. If you are interested in processing
character-level data instead of byte-level data, you can get a
BufferedReader instead with getReader().
A ServletResponse represents the servlet's reply back to the client.
When preparing a response, the method setContentType() is called first to
set the MIME type of the reply. Next, the method getOutputStream() or
getWriter() can be used to obtain a ServletOutputStream or PrintWriter,
respectively, to send data back to the client.
The destroy() Method
o The destroy() method is called to allow your servlet to clean up any
resources (such as open files or database connections) before the servlet is

unloaded. If you do not require any clean-up operations, this can be an empty
method.
o The server waits to call the destroy() method until either all service
calls are complete, or a certain amount of time has passed. This means that the
destroy() method can be called while some longer-running service() methods are
still running. It is important that you write your destroy() method to avoid closing
any necessary resources until all service() calls have completed.
GET vs. POST method for forms:
– GET:
• Query string is part of URL
• Length of query string may be limited
• Recommended when parameter data is not stored but used only to request
information (e.g., search engine query)
– POST:
• Query string is sent as body of HTTP request
• Length of query string is unlimited
• Recommended if parameter data is intended to cause the server to update
stored data
• Most browsers will warn you if they are about to resubmit POST data to
avoid duplicate updates
7.Write a servlet to illustrate the principles of cookies and Explain. (MAY/JUNE 2014)
Cookies
• A cookie is a name/value pair in the Set-Cookie header field of an HTTP response
• The main difference between cookies and sessions is that cookies are stored in the user's
browser, and sessions are not.
• A cookie can keep information in the user's browser until deleted.
• If a person has a login and password, this can be set as a cookie in their browser so they
do not have to re-login to your website every time they visit.
Servlets can set cookies explicitly
– Cookie class used to represent cookies

– request.getCookies() returns an array of Cookie instances representing cookie
data in HTTP request
– response.addCookie(Cookie) adds a cookie to the HTTP response
Cookies.java:
public class Cookies extends HttpServlet
{
private static final int oneYear=60*60*24*365;
protected void processRequest(HttpServletRequest request, HttpServletResponse response)
throws ServletException, IOException {
response.setContentType("text/html;charset=UTF-8");
PrintWriter out = response.getWriter();
try {
int count = 0;
Cookie[] cookies = request.getCookies();
if(cookies != null)
{
for(int i=0; (i<cookies.length) && (count==0); i++)
{
if(cookies[i].getName().equals("COUNT"))
{
count = Integer.parseInt(cookies[i].getValue());
}
}
}
count++;
Cookie cookie = new Cookie("COUNT", new Integer(count).toString());
cookie.setMaxAge(oneYear);
response.addCookie(cookie);
out.println("<p>You have visited content type page " +count+" time(s) \n in the past year , or
since clearing your cookies</p>");
out.close();
}
finally
{
out.close();
}
}
8.How are HTTP request and response handled by servlet?
The HttpServlet class contains methods that handle the various types of HTTP requests.
These methods are doGet(), doDelete(), doPost(), doPut(), doHead(). The GET and POST
requests are commonly used when handling form input.
Creating a Servlet :
To create a servlet, we create a class that extends the “HttpServlet” class and overrides the
following methods
(i) doGet( ) (ii) doPost( )

• If the WEB Browser sends the data in the Get( ) method then doGet( ) method of servlet will be
executed.
• If the WEB Browser sends the data in the Post method then the doPost( ) method of the servlet
will be executed.
• If the WEB Browser does not specify any method, then the doGet( ) will be executed HTTP
requests are of two type: GET and POST. A web browser after receiving the details from the
user, can forward these to the web server by one of the following ways: GET, or POST.
How to handle HTTP GET requests:
When a web Browser is required to send data to the web Server, the browser converts the
data in a particular format, which is known as URL coding.
The server side program receives the converted data, undoes the conversion, and processes
the data.
The following 4 rules will be used by the WEB Browsers for URL coding.
1. All the fields will be separated by & symbol.
2. Each field contains the name of the field and the value of the field separated by =
symbol.
3. All spaces will be converted to + symbols.
4. All special characters such as +, & etc., will be converted to hexadecimal values
prefixed with % symbol.
Example 1:
http://myserver.com/SSPname?Empno = 101&Ename = abc+xyz&Job = clk
Server param1 value1 p2 v2 p3 v3
How to handle the HTTP POST requests:
When the browser sends an HTTP request using the POST method, the doPost() method is
called.
Consider the following statement in the HTML form code at the client side:
<FORM name=“form1” METHOD=“POST”
action=http://localhost:8080/servlet/ColorPostServlet>
9.(a) Write a servlet that counts the number of times it has been accessed, the number of
instances created by the server, and the total times all of them have been accessed.
import java.io.*;
import java.util.*;
import javax.servlet.*;
import javax.servlet.http.*;
public class SCounter extends HttpServlet
{
static int classCount = 0; // shared by all instances
int count = 0; // separate for each servlet
static Hashtable instances = new Hashtable(); // also shared
public void doGet(HttpServletRequest req, HttpServletResponse res)

throws ServletException, IOException
{
res.setContentType("text/plain");
PrintWriter out = res.getWriter();
count++;
out.println("Since loading, this servlet instance has been
accessed " + count + " times.");
// Keep track of the instance count by putting a reference to this
// instance in a Hashtable. Duplicate entries are ignored.
// The size() method returns the number of unique instances stored.
instances.put(this, this);
out.println("There are currently " + instances.size() + "
instances.");
classCount++;
out.println("Across all instances, this servlet class has been " +
"accessed " + classCount + " times.");
}
}
9.(b) Write a program to display the “Hello, World” message.
import java.io.*;
import javax.servlet.*;
import javax.servlet.http.*;
public class HelloWorld extends HttpServlet
{
public void doGet(HttpServletRequest req, HttpServletResponse res)
throws ServletException, IOException
{
res.setContentType("text/html");
PrintWriter out = res.getWriter();
out.println("<HTML>");
out.println("<HEAD><TITLE>Hello World</TITLE></HEAD>");
out.println("<BODY>");
out.println("<BIG>Hello World</BIG>");
out.println("</BODY></HTML>");
} }
We import the javax.servlet package. This package contains classes and interfaces required to
build servlets.
We define HelloWorld as a subclass of HttpServlet.
The HttpServlet class provides specialized methods that handle the various types of HTTP
requests.
These methods are doGet(), doDelete(), doPost(), doPut(), doHead(). The GET and POST
requests are commonly used when handling form input. In this program we have used the
doGet() method.
PrintWriter – This is a class for character stream I/O. We can use the System.out to write to
the console, but PrintWriter is preferred because it can be used to internationalize the output.
This class supports the print and println methods.
UNIT V XML & WEB SERVICES
Part A
1.What is a well formed XML document? A syntactically correct document is called well formed XML document. A well formed
XML document must follow the XML?s basic rules of syntax:
It must have a closing tag.
The closing tag must exactly match the open tag: XML is case sensitive.
All elements should be included within a single root tag.
Child elements must be closed within parent tag.
2. What is a valid XML document?
A structurally correct element is called a valid XML document. It should follow some predefined
rules of a specific type of document. These rules determine the type of data that each part of the
document can contain. These rules can be written by the author of an XML document or someone other.
A valid XML document may be well-formed but a well-formed XML document may not be
valid.
3. What is DTD?
DTD stands for Document Type Definition. It defines a leading building block of an XML
document. It defines:
Names of elements
How and where they can be used
Element attributes
Proper nesting
4. How can you apply a DTD to an XML document? To apply a DTD to an XML document, you can:
Use the DTD element definition within the XML document itself.
Provide a DTD as a separate file and reference its name in XML document.
5. What is the difference between simple element and complex element? In XML, simple elements are text-based elements. It contains less attributes, child elements, and
cannot be left empty.
But, complex elements can hold multiple attributes and elements. It can contain additional sub
elements and empty element also.
6. Define the concept of XPOINTER.
XPOINTER is used to point data within XML document. It is used to locate the particular part of
the XML document. It is a W3C recommendation.
address.xml#pointer(/ descendant ::streetnumber[@id =9])
7. What is XML encoding error?
There are two types of XML encoding errors:
1. An invalid character was found in text content.
2. Switching from current encoding to specified encoding not supported.
These errors occur because XML document can contain non ASCII characters like Norwegian
and French. These errors can be avoided by specifying the XML encoding Unicode.
8. What is the difference between CDATA and PCDATA?
CDATA means unparsed character data whereas PCDATA means parsed character data.
9. What is XML Namespace?
A namespace is a qualified name that is associated with the DTD/Schema location .
A document may have duplicate elements and attributes. So, the namespace defines a way to
compare duplicate elements and attribute names.
10. Define Structure of XML?
XML declaration
Document Type Declaration
XML Body
11. What is XSLT? \
-XSLT is known as XSL Transformations - It is one of the most important part of XSL - It
transforms an XML document into another XML document - It uses the XPath to navigate in XML
documents - It is a W3C Recommendation
12. What are the roles of XSLT?
The roles of XSLT are:
1. XSLT is used to transform an XML document into another XML document such as HTML, etc.
2. XSLT can be used to add or remove elements and attributes to or from the output file.
3. XSLT can also be used for rearranging and sorting elements.
4. It can also be used for performing tests and making decisions about hiding and displaying of
elements.
13. What is XSLT? What is the relation with XSL?
XSLT stands for eXtensible Stylesheet Language Transformations. It is a language used to
convert XML documents to XHTML or other XML documents. This conversion is done by
transforming each XML element into an (X)HTML element.. it uses XPath to find information in a
XML document. XSLT is nothing but transforming XSL’s. Xpath defines the parts of the source
document that must match one or more predefined templates. Once a match is found, XSLT will
transform the match into the result document.
14. What XSLT style sheet?
XSL stylesheet is just like a XML document used as a program text or a source. It contains sets
of rules and instructions used for transformations. XSLT stylesheet along with the XML source
documents are the inputs to the XSLT processor. The template rule contains two parts: a pattern used to
match the nodes in the source document and a template which can be instantiated to form part of the
result tree. A stylesheet is represented by an xsl:stylesheet element in an XML document.
15. Define the role of XPATH.
XPATH is used to scan the XML document for navigation of elements and attributes. It contains
a library of standard functions string ad numeric values. For navigation, XPATH makes use of path
expressions to select nodes or sets of nodes in a XML document.
16. What is XHTML?
It is the next version of the HTML. - It is the next step evolution of the Internet. - XHTML
stands for Extensible HyperText Markup Language. - It helps to web developers to make the transition
from HTML to XML. - These elements always be closed. - In the declaration of XHTML is mandatory.
17. Define web service.
Web services are client and server applications that communicate over the World Wide Web’s
(WWW) HyperText Transfer Protocol (HTTP). Web services provide a standard means of inter
operating between software applications running on a variety of platforms and frameworks.
18. List the Characteristics of web service.
Main characteristics of the Web Services are : 1. Interoperability 2. Extensibility 3. Machine
processable descriptions.
19. What is the difference between SOA and a web service?

SOA (Service-Oriented Architecture) is an architectural pattern that makes possible for
services to interact with one another independently.
Web Services is a realization of SOA concept, that leverages XML, JSON, etc. and common
Internet protocols such as HTTP(S), SMTP, etc.
SOA is a system-level architectural style that tries to expose business. WOA is an interface-level
architectural style that focuses on the means by which these service capabilities are exposed to
consumers.
20. What is SOAP?
SOAP (Simple Object Access Protocol) is a transport protocol for sending and receiving requests
and responses on XML format, which can be used on top of transport protocols such as HTTP, SMTP,
UDP, etc.
21. What is REST?
REST (REpresentational State Transfer) is an architectural style by which data can be
transmitted over transport protocol such as HTTP(S).
22. What is the difference between a REST web service and a SOAP web service?
Below are the main differences between REST and SOAP web service
REST supports different formats like text, JSON and XML; SOAP only supports XML;
REST works only over HTTP(S) on a transport layer; SOAP can be used different
protocols on a transport layer;
REST works with resources, each unique URL is some representation of a resource;
SOAP works with operations, which implement some business logic through different
interfaces;
SOAP based reads can’t be cached, for SOAP need to provide caching; REST based
reads can be cached;
SOAP supports SSL security and WS-security(Web Service-security); REST
onlysupports SSL security;
SOAP supports ACID (Atomicity, Consistency, Isolation, Durability); REST supports
transactions, but it is neither ACID compliant nor can provide two phase commit.
23. How to decide which one of web service to use REST or SOAP?
“REST vs SOAP” we can rephrased to "Simplicity vs Standard". Of course, "Simplicity" with
REST at most cases wins, it wins in performance, scalability and support for multiple data formats, but
SOAP is favored where service requires comprehensive support for security (WS-security) and
transactional safety (ACID).
24. What is WSDL?
WSDL (Web Services Description Language) is an XML format for describing web services and
how to access them.
25. What is UDDI?
UDDI is an XML-based standard for describing, publishing, and finding web services. UDDI
stands for Universal Description, Discovery, and Integration. UDDIis a specification for a distributed
registry of web services.
26. What is JAX-WS?
JAX-WS (Java API for XML Web Services) is a set of APIs for creating web services in XML
format.
27. What is JAXB?
JAXB (Java Architecture for XML Binding) is a Java standard that defines how Java objects are
converted from and to XML. It makes reading and writing of XML via Java relatively easy.
28. What does a SOAP namespace defines?
SOAP namespace defines the Envelope as a SOAP Envelope.
An example:
xmlns:soap=http://www.w3.org/2001/12/soap-envelope
29. What is the SOAP encoding?
SOAP encoding is a method for structuring the request which is suggested within the SOAP
specification, known as the SOAP serialization.
30. What are 2 styles web service’s endpoint by using JAX-WS?
RPC (remote procedure call) style web service in JAX-WS; document style web service in JAX-
WS.
31. What is the wsimport tool?
The wsimport tool is used to parse an existing Web Services Description Language (WSDL) file
and generate required files (JAX-WS portable artifacts) for web service client to access the published
web services:
32. What is the difference between SOAP and other remote access techniques?
SOAP is simple to use and it is non - symmetrical unlike DCOM or CORBA is highly popular
and usually have complexity in them.
SOAP provides greater platform independent with the language independence unlike DCOM or
CORBA doesn't provide any of these.
SOAP uses HTTP as its transport protocol and the data are being saved in XML format that can
be ready by human, whereas DCOM or CORBA have their own binary formats that are used to transport
the data in complicated manner. SOAP identify the object other than URL endpoint. SOAP objects are
stateless and it is hard to maintain that. Whereas, it is not hard to maintain in case of other remote access
techniques.
33. What are HTTP methods supported by REST?
GET;
POST;
PUT;
DELETE;
OPTIONS;
HEAD.
34. What is the difference between PUT and POST?
Need to use PUT when can update a resource completely through a specific resource. For
example, if know that an article resides at http://javahungry.blogspot.com/article/123, can PUT a new
resource representation of this article through a PUT on this URL. If do not know the actual resource
location for instance, when add a new article, can use POST.
PUT is idempotent, while POST is not. It means if use PUT an object twice, it has no effect.
35. What is WADL?
WADL (Web Application Description Language) is a XML description of a deployed RESTful
web application.
36. What are frameworks available to implement REST web services?
Jersey, Restlet, EasyRest,
37. What is the Restlet framework?

Restlet is a lightweight, comprehensive, open source RESTful web API framework for the Java
platform.
It has advantages such as
websocket and server-sent events support;
HTTP/2 support;
transparent HTTP PATCH support;
client cache service;
fluent APIs.
38. What is the Jersey framework?
Jersey is open source framework for developing RESTful Web Services in Java that provides
support for JAX-RS APIs and serves as a JAX-RS (JSR 311 & JSR 339) Reference Implementation. It
has advantages such as
contains support for Web Application Description Language (WADL);
contains Jersey Test Framework which lets run and test Jersey REST services inside JUnit;
supports for the REST MVC pattern, which would allow to return a View from Jersey services
rather than just data.
39. What is the RESTeasy framework?
RESTeasy is a JBoss project, which implements of the JAX-RS specification.
It has benefits such as
fully certified JAX-RS implementation; supports HTTP 1.1 caching semantics including cache
revalidation;
JAXB marshalling into XML, JSON, Jackson, Fastinfoset, and Atom as well as wrappers for
maps, arrays, lists, and sets of JAXB Objects;
OAuth2 and Distributed SSO with JBoss AS7;
rich set of providers for: XML, JSON, YAML, Fastinfoset, Multipart, XOP, Atom, etc.
40. What is the difference between AJAX and REST?
In Ajax, the request are sent to the server by using XMLHttpRequest objects; REST have a URL
structure and a request/response pattern the revolve around the use of resources;
Ajax eliminates the interaction between the customer and server asynchronously; REST requires
the interaction between the customer and server;
Ajax is a set of technology; REST is a type of software architecture and a method for users to
request data or information from servers.
Part B
1.Explain in detail about XML (or)
Write the structure of XML document and explain briefly about it. (or)
What do XML documents look like? Explain it with an example XML document.
XML is a markup language for documents containing structured information. Structured information
contains both content (words, pictures, etc.) and some indication of what role that content plays (for
example, content in a section heading has a different meaning from content in a footnote, which
means something different than content in a figure caption or content in a database table, etc.).
XML stands for Extensible Markup Language. It is a text-based markup language derived from
Standard Generalized Markup Language (SGML).
XML tags identify the data and are used to store and organize the data, rather than specifying how to
display it like HTML tags, which are used to display the data.
XML is not going to replace HTML in the near future, but it introduces new possibilities by adopting
many successful features of HTML.
Characteristics of XML:
XML is extensible: XML allows you to create your own self-descriptive tags, or language, that suits
your application.
XML carries the data, does not present it: XML allows you to store the data irrespective of how it
will be presented.
XML is a public standard: XML was developed by an organization called the World Wide Web
Consortium (W3C) and is available as an open standard.
Difference between XML & HTML:
XML is not a replacement for HTML.
XML and HTML were designed with different goals:
XML was designed to describe data, with focus on what data is
HTML was designed to display data, with focus on how data looks
HTML is about displaying information, while XML is about carrying information.
XML Usage:
A short list of XML usage says it all:
XML can work behind the scene to simplify the creation of HTML documents for large web
sites.
XML can be used to exchange the information between organizations and systems.
XML can be used for offloading and reloading of databases.
XML can be used to store and arrange the data, which can customize your data handling needs.
XML can easily be merged with style sheets to create almost any desired output.
Virtually, any type of data can be expressed as an XML document.
XML doesn’t do anything: The following example is a note to Tove, from Jani, stored as XML:
<note>
<to>Tove</to>
<from>Jani</from>
<heading>Reminder</heading>
<body>Don't forget me this weekend!</body>
</note>
The note above is quite self descriptive. It has sender and receiver information, it also has a heading
and a message body.
But still, this XML document does not DO anything. It is just information wrapped in tags. Someone
must write a piece of software to send, receive or display it.
Is XML a Programming Language:
A programming language consists of grammar rules and its own vocabulary which is used to create
computer programs.
These programs instructs computer to perform specific tasks. XML does not qualify to be a
programming language as it does not perform any computation or algorithms.
It is usually stored in a simple text file and is processed by special software that is capable of
interpreting XML.
Advantage of XML:
With XML You Invent Your Own Tags
The tags in the example above (like <to> and <from>) are not defined in any XML
standard. These tags are "invented" by the author of the XML document.
That is because the XML language has no predefined tags.
The tags used in HTML are predefined. HTML documents can only use tags defined in
the HTML standard (like <p>, <h1>, etc.).
XML allows the author to define his/her own tags and his/her own document structure.
XML is Not a Replacement for HTML
XML is a complement to HTML.
It is important to understand that XML is not a replacement for HTML. In most web
applications, XML is used to describe data, while HTML is used to format and display
the data.
XML is a software- and hardware-independent tool for carrying information.
XML Syntax:
The syntax rules of XML are very simple and logical. The rules are easy to learn, and easy to use.
All XML Elements Must Have a Closing Tag
In HTML, some elements do not have to have a closing tag:
<p>This is a paragraph.
<br>
In XML, it is illegal to omit the closing tag. All elements must have a closing tag:
<p>This is a paragraph.</p>
<br />
XML Tags are Case Sensitive
XML tags are case sensitive. The tag <Letter> is different from the tag <letter>.
XML Elements Must be Properly Nested
XML Declaration:
The XML document can optionally have an XML declaration. It is written as below:
<?xml version="1.0" encoding="UTF-8"?>
Where version is the XML version and encoding specifies the character encoding used in the document.
Syntax Rules for XML declaration
The XML declaration is case sensitive and must begin with "<?xml>" where "xml" is written in
lower-case.
If document contains XML declaration, then it strictly needs to be the first statement of the XML
document.
The XML declaration strictly needs be the first statement in the XML document.
An HTTP protocol can override the value of encoding that you put in the XML declaration.
Tags and Elements:
An XML file is structured by several XML-elements, also called XML-nodes or XML tags.
XML-elements' names are enclosed by triangular brackets < > as shown below:
<element>
Syntax Rules for Tags and Elements
Element Syntax: Each XML-element needs to be closed either with start or with end elements as shown
below:

<element>....</element>
or in simple-cases, just this way:
<element/>
Root element: An XML document can have only one root element. For example, following is not a
correct XML document, because both the x and y elements occur at the top level without a root element:
<x>...</x>
<y>...</y>
The following example shows a correctly formed XML document:
<root>
<x>...</x>
<y>...</y>
</root>
2. What is WSDL? Explain about it with example.
WSDL stands for Web Services Description Language. It is the standard format for describing a
web service. WSDL was developed jointly by Microsoft and IBM.
Features of WSDL
WSDL is an XML-based protocol for information exchange in decentralized and distributed
environments.
WSDL definitions describe how to access a web service and what operations it will perform.
WSDL is a language for describing how to interface with XML-based services.
WSDL is an integral part of Universal Description, Discovery, and Integration (UDDI), an XML-
based worldwide business registry.
WSDL is the language that UDDI uses.
WSDL is pronounced as 'wiz-dull' and spelled out as 'W-S-D-L'
WSDL Usage WSDL is often used in combination with SOAP and XML Schema to provide web services over the
Internet.
A client program connecting to a web service can read the WSDL to determine what functions are
available on the server. Any special datatypes used are embedded in the WSDL file in the form of
XML Schema.
The client can then use SOAP to actually call one of the functions listed in the WSDL.
Elements:
The three major elements of WSDL that can be defined separately are:
1. Types
2. Operations
3. Binding
A WSDL document has various elements, but they are contained within these three main elements,
which can be developed as separate documents and then they can be combined or reused to form
complete WSDL files.
WSDL Elements
A WSDL document contains the following elements:
Definition: It is the root element of all WSDL documents. It defines the name of the web
service, declares multiple namespaces used throughout the remainder of the document, and
contains all the service elements described here.
Data types: The data types to be used in the messages are in the form of XML schemas.
Message: It is an abstract definition of the data, in the form of a message presented either as an
entire document or as arguments to be mapped to a method invocation.
Operation: It is the abstract definition of the operation for a message, such as naming a method,
message queue, or business process, that will accept and process the message.
Port type: It is an abstract set of operations mapped to one or more end-points, defining the
collection of operations for a binding; the collection of operations, as it is abstract, can be
mapped to multiple transports through various bindings.
Binding: It is the concrete protocol and data formats for the operations and messages defined for
a particular port type.
Port: It is a combination of a binding and a network address, providing the target address of the
service communication.
WSDL Document Structure:
<definitions>
<types>
definition of types........
</types>
<message>
definition of a message....
</message>
<portType>
<operation>
definition of a operation.......
</operation>
</portType>
<binding>
definition of a binding....
</binding>
<service>
definition of a service....
</service>
</definitions>
Definition Element:
The <definitions> element must be the root element of all WSDL documents. It defines the name of the
web service.
<definitions name="HelloService"
targetNamespace="http://www.examples.com/wsdl/HelloService.wsdl"
xmlns="http://schemas.xmlsoap.org/wsdl/"
xmlns:soap="http://schemas.xmlsoap.org/wsdl/soap/"
xmlns:tns="http://www.examples.com/wsdl/HelloService.wsdl"
xmlns:xsd="http://www.w3.org/2001/XMLSchema">
................................................
</definitions>
From the above example, we can conclude that definitions:
is a container of all the other elements.
specifies that this document is called HelloService.

specifies a targetNamespace attribute.
The targetNamespace is a convention of XML Schema that enables the WSDL document to refer
to itself.
In this example, we have specified a targetNamespace of
http://www.examples.com/wsdl/HelloService.wsdl.
specifies a default namespace: xmlns=http://schemas.xmlsoap.org/wsdl/. All elements without a
namespace prefix, such as message or portType, are therefore assumed to be a part of the default
WSDL namespace.
specifies numerous namespaces that are used throughout the remainder of the document.
Types Element:
A web service needs to define its inputs and outputs and how they are mapped into and out of the
service.
WSDL <types> element takes care of defining the data types that are used by the web service. Types
are XML documents or document parts.
The types element describes all the data types used between the client and the server.
WSDL is not tied exclusively to a specific typing system.
WSDL uses the W3C XML Schema specification as its default choice to define data types.
If the service uses only XML Schema built-in simple types, such as strings and integers, then types
element is not required.
WSDL allows the types to be defined in separate elements so that the types are reusable with
multiple web services.
Binding Element:
The <binding> element provides specific details on how a portType operation will actually be
transmitted over the wire.
The bindings can be made available via multiple transports including HTTP GET, HTTP POST, or
SOAP.
The bindings provide concrete information on what protocol is being used to transfer portType
operations.
The bindings provide information where the service is located.
For SOAP protocol, the binding is <soap:binding>, and the transport is SOAP messages on top of
HTTP protocol.
The binding element has two attributes: name and type.
<binding name="Hello_Binding" type="tns:Hello_PortType">
The name attribute defines the name of the binding, and the type attribute points to the port for the
binding, in this case the "tns:Hello_PortType" port.
3. Explain the creation of a java web service Client in detail with examples. (MAY/JUNE 2012)
Writing a Java Web service Client
Goal: write a JSP-based client
Input: currency and value
Output: table of equivalent values
Use wscompile tool to develop client

Input xml document for wscompile tool
Configuration file input to wscompile to create client
Child element wsdl specifies the URL of a WSDL document
Wscompile generate proxy object
Proxy object is a java object called on by a client software in order to access the web service
JWSDP: Client
Directory structure (wscompile generates content of classes and src)
Run wscompile
Run wscompile
Wscompile –gen –keep –d classes –s src config.xml
Wscompile tool creates a class implementing the interface
Interface is shared between webservice server and clients via the wsdl document.
On server side the class implementing the interface is written
On client side the interface is automatically generated by wscompile tool
Structs will be represented as JavaBeans classes, regardless of how they are defined on the
server
Bean obtaining and calling proxy object:
JSP document convert.jspx calls on javaBeans class to perform currency conversion and
displays result in HTML table
Document is placed in ConverterClient directory
4.With a simple example illustrate the steps to create a java web service. (NOV/DEC 2012)
Writing a java web service
Currency conversion Service
Writing a server for a service using JWSDP 1.3 tools
Application: currency converter
Three operations:
fromDollars
fromEuros
fromYen
Input: value in specified currency
Output: object containing input value and equivalent values in other two currencies
Writing server software
1. Write service endpoint interface
• May need to write additional classes representing data structures
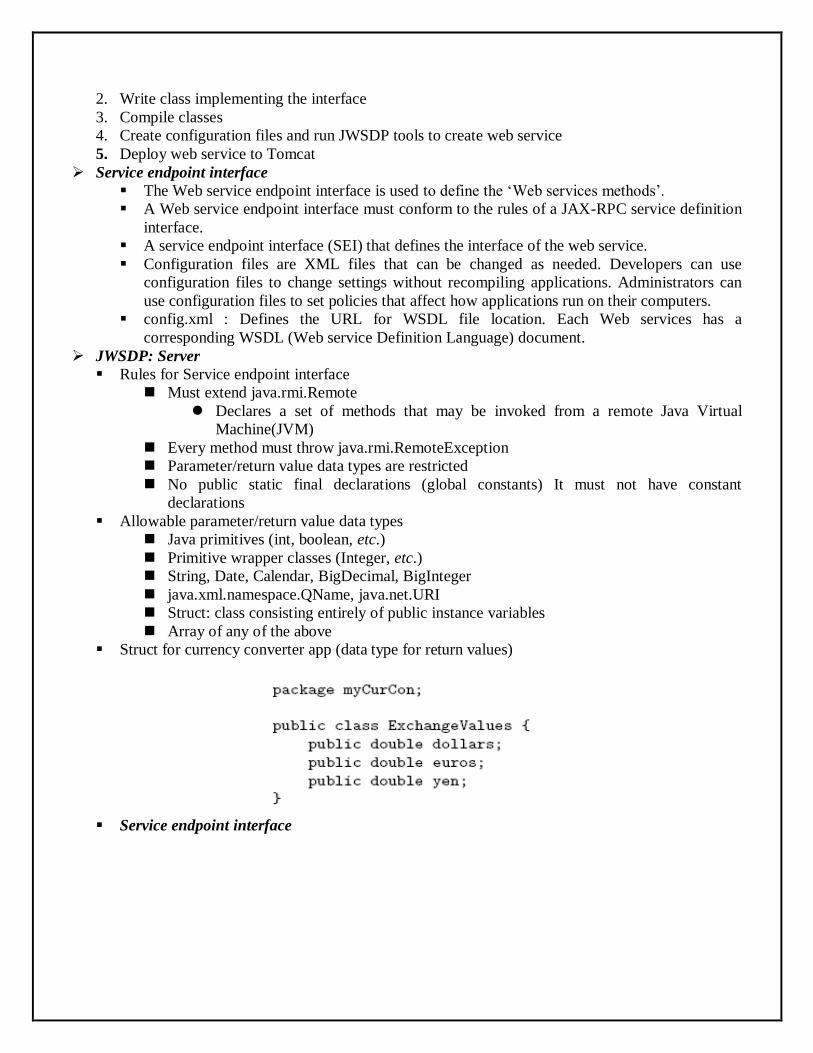
2. Write class implementing the interface
3. Compile classes
4. Create configuration files and run JWSDP tools to create web service
5. Deploy web service to Tomcat
Service endpoint interface
The Web service endpoint interface is used to define the ‘Web services methods’.
A Web service endpoint interface must conform to the rules of a JAX-RPC service definition
interface.
A service endpoint interface (SEI) that defines the interface of the web service.
Configuration files are XML files that can be changed as needed. Developers can use
configuration files to change settings without recompiling applications. Administrators can
use configuration files to set policies that affect how applications run on their computers.
config.xml : Defines the URL for WSDL file location. Each Web services has a
corresponding WSDL (Web service Definition Language) document.
JWSDP: Server
Rules for Service endpoint interface
Must extend java.rmi.Remote
Declares a set of methods that may be invoked from a remote Java Virtual
Machine(JVM)
Every method must throw java.rmi.RemoteException
Parameter/return value data types are restricted
No public static final declarations (global constants) It must not have constant
declarations
Allowable parameter/return value data types
Java primitives (int, boolean, etc.)
Primitive wrapper classes (Integer, etc.)
String, Date, Calendar, BigDecimal, BigInteger
java.xml.namespace.QName, java.net.URI
Struct: class consisting entirely of public instance variables
Array of any of the above
Struct for currency converter app (data type for return values)
Service endpoint interface

Three files ExchangeValues.java, CurCon.java and CurConImpl.java written for the web service
Class CurConImpl contains methods implements sevice endpoint interface, for example:
Packaging server software
Configuration file input to wscompile to create server
Configuration file for web service
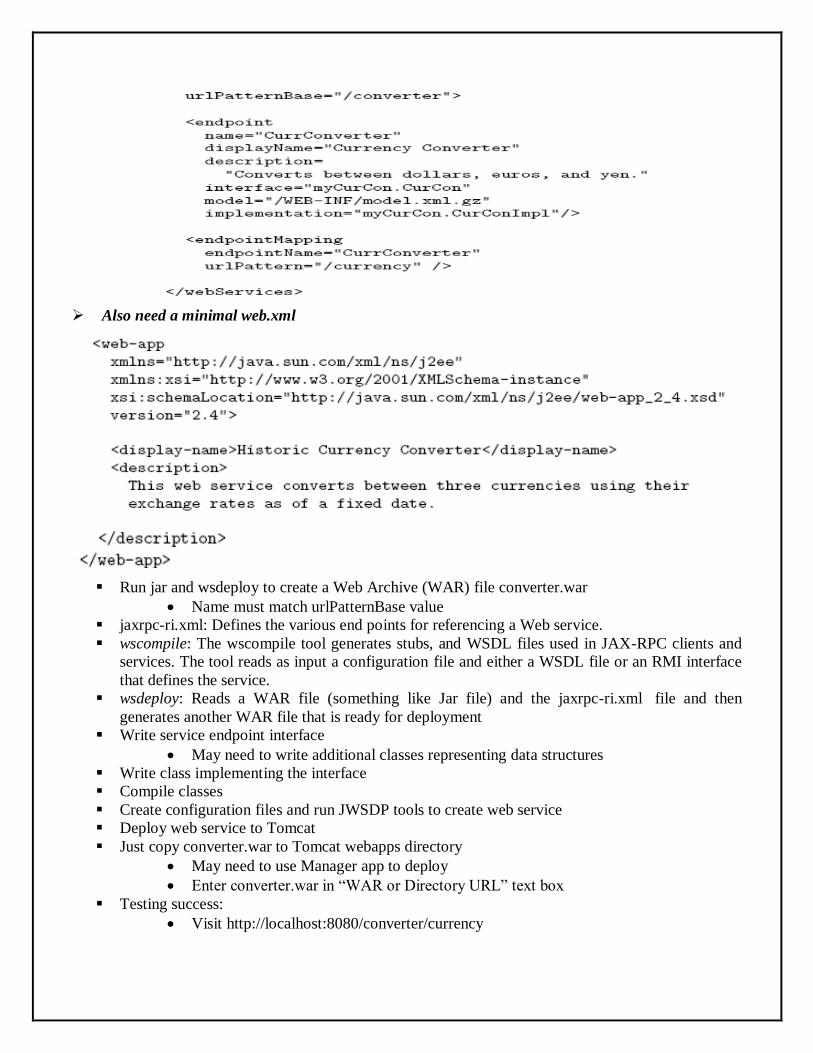
Also need a minimal web.xml
Run jar and wsdeploy to create a Web Archive (WAR) file converter.war
Name must match urlPatternBase value
jaxrpc-ri.xml: Defines the various end points for referencing a Web service.
wscompile: The wscompile tool generates stubs, and WSDL files used in JAX-RPC clients and
services. The tool reads as input a configuration file and either a WSDL file or an RMI interface
that defines the service.
wsdeploy: Reads a WAR file (something like Jar file) and the jaxrpc-ri.xml file and then
generates another WAR file that is ready for deployment
Write service endpoint interface
May need to write additional classes representing data structures
Write class implementing the interface
Compile classes
Create configuration files and run JWSDP tools to create web service
Deploy web service to Tomcat
Just copy converter.war to Tomcat webapps directory
May need to use Manager app to deploy
Enter converter.war in “WAR or Directory URL” text box
Testing success:
Visit http://localhost:8080/converter/currency

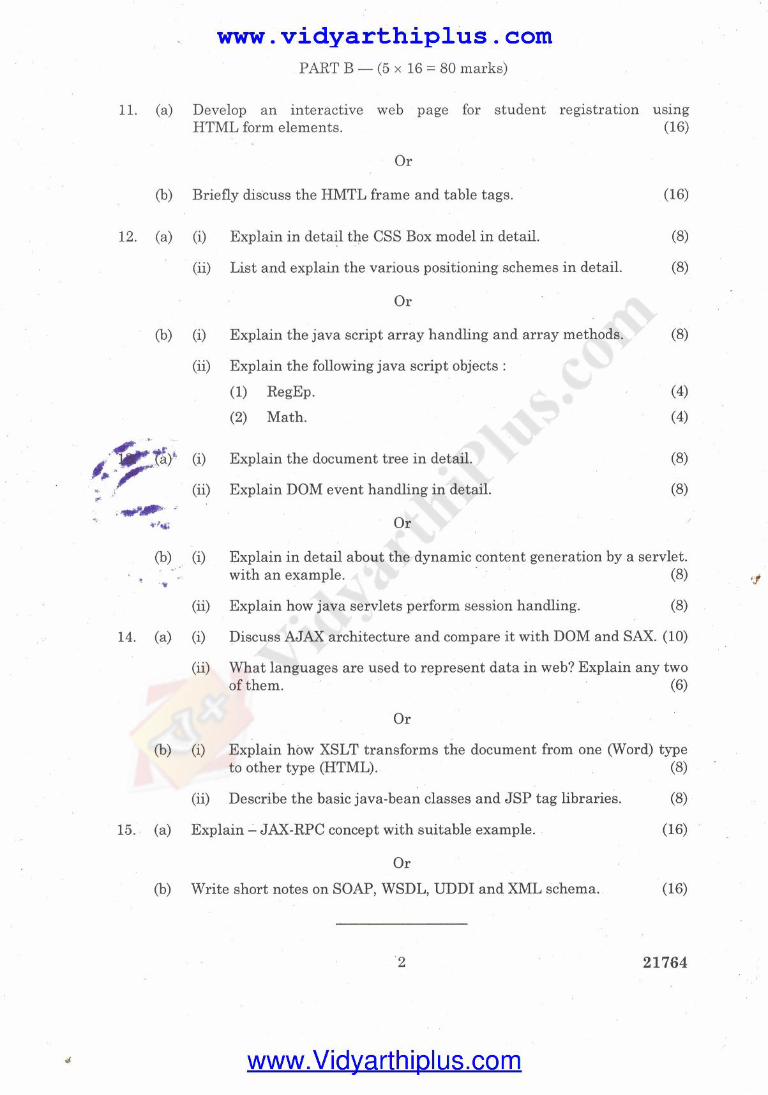

www.vidyarthiplus.com
www.vidyarthiplus.com
ANNA UNIVERSITYB.E./B.Tech. DEGREE EXAMINATION, APRIL/MAY 2015
Sixth SemesterComputer Science and Engineering
IT2353-Web TechnologyRegulation 2008/2010
Time : Three hoursMaximum : 100 marks
Answer ALL questionsPart A
Write short notes on basic Internet protocols.1. Create two rows of horizontal frames using HTML frames.2. Write short notes on text properties in CSS?3. What is Normal Flow Box Layout in CSS?4. Differentiate SAX with Dom parser.5. Write short notes on java servlet life cycle.6. Write short notes on some implicit objects in JSP.7. What is MVC paradigm?8. Display current date using JSP script let.9. What is web service?10.PART B
(a) Write an HTML script which creates a web page which should display some of the11. engineering colleges in Tamilnadu in a tabular form with their name, address and url ofthe web site of the college. A candidate should select the required department which islisted as listed items from a form. Candidates selection should be consolidated anddisplay finally. OR (b). Write an HTML script which creates a web page which should display the availablebook details in a shop in a tabular form with title of the book, author details , quantity andprice of the book. The customer should choose the required books from the list. The shopkeeper should prepare the bill. Prepare web form for the same finally.
(a). Write the registration form for the creation of email account with all possible12. validations using java script. OR (b). Explain-objects and arrays in java script with suitable example.
(a) (1). Write a code for creating cookies with name of person and secret code at the13.

www.vidyarthiplus.com
www.vidyarthiplus.com
server, after getting these details from client using HTML form. How these details at theserver side using Http servlet are displayed? (2). Write a code to display the current and yesterday’s gold rate using sessionobject. OR (b). Write a Java code for getting the details of the items to be purchased from a clientand to update the inventory of the shop after selling. Also bill should be prepared for theclient. Maintain the transaction table also just by inserting these purchase item details aatthe shop use JDBC, for transactions.
(a). Get the students details like name, register number and mark using form. Generate14. DTD for this XML document.
Regno MarkXyz 1000 90Abc 1001 80Rst 1002 89Pqr 1003 87Generate the collected information in the descending order of marks using XSLT. Resultsshould be displayed in the above format. Write a source code and explain the same. OR
(b). Explain – Alax DOM based XML processing Event oriented parsing, XPATH andtemplate based transformations with suitable example.(a). Explain – JAXRPC concept with suitable example.15. OR (b). Write short notes on SOAP, WSDL, UDDI and XML schema.