Introduction of Markup Language Web site creation is ...
135
Introduction of Markup Language Web site creation is important to create visually appealing websites . Web design is the creation and visual design of documents displayed on the World Wide Web . There are more than a handful of different scripting languages and markup languages for attractive web site creation. Web programming languages like HTML, XML and XHTML provide the tools to build and design a web site . These web programming languages or otherwise called as Markup languages are basically used for website creation and to create dynamic and interactive websites. Before we discuss about the markup languages, let us see about the basic terminologies used in the context of Web site creation. o Web server is a system on the Internet containing one or more web site. o Web site is termed as a collection of one or more web pages. o A Web pages is a single disk file with a single file name. o Home pages are the first page in the website. To know about how the Web works, the web information are stored in the form of Web pages. Now let us understand, the web pages are available in HTML format . The web pages are stored in the computers called Web servers in the Web server file system. The computer reading the pages is called web clients with specific web browser. Web standards The Web standards are not defined or setup by the browser companies or Microsoft, but by the World Wide Web Consortium (W3C). The specifications form the Web standards as HTML, CSS, XML, XHTML etc.
-
Upload
khangminh22 -
Category
Documents
-
view
0 -
download
0
Transcript of Introduction of Markup Language Web site creation is ...

Introduction of Markup Language
Web site creation is important to create visually appealing websites. Web design is
the creation and visual design of documents displayed on the World Wide Web.
There are more than a handful of different scripting languages and markup languages
for attractive web site creation. Web programming languages like HTML, XML and
XHTML provide the tools to build and design a web site. These web programming
languages or otherwise called as Markup languages are basically used for website
creation and to create dynamic and interactive websites.
Before we discuss about the markup languages, let us see about the basic
terminologies used in the context of Web site creation.
o Web server is a system on the Internet containing one or more web site.
o Web site is termed as a collection of one or more web pages.
o A Web pages is a single disk file with a single file name.
o Home pages are the first page in the website.
To know about how the Web works, the web information are stored in the form of
Web pages. Now let us understand, the web pages are available in HTML format.
The web pages are stored in the computers called Web servers in the Web server file
system. The computer reading the pages is called web clients with specific web
browser.
Web standards
The Web standards are not defined or setup by the browser companies or Microsoft,
but by the World Wide Web Consortium (W3C). The specifications form the Web
standards as HTML, CSS, XML, XHTML etc.

W3C - World Wide Web Consortium
The World Wide Web Consortium (W3C) is an international community to develop
Web standards. It is led by the Web inventor Tim Berners-Lee and CEO Jeffrey
Jaffe. W3C's mission is to lead the Web to its full potential.
W3C's long term goals for the Web are:
o Universal Access: To make the Web accessible to all by promoting technologies.
o Semantic Web : To develop a software environment that permits each user to make
the best use of the resources available on the Web.
o Web of Trust : To guide the Web's development with careful consideration for the
novel legal, commercial, and social issues raised by this technology.
The History of Markup
In the early 1970s, GML called the Generalized Markup Language was developed
where every tag would be defined like the following
“:h1.The Content is placed here”
Since 1980s, there evolved Standard Generalized Markup Language called SGML
and HTML. SGML was originally created by IBM in 1986. It is actually a meta
language, meaning it is used to create other languages. Hence SGML forms the basis
for the development of Markup languages like HTML, XHTML and XML.
Currently the Markup language that is widely used is eXtensible Markup Language
or in short XML. It is not intended to replace HTML. Later, there evolved XHTML
which does by providing better data description.

Figure 4.1 SGML, HTML and XML
The above Figure 4.1 describes about how the Markup languages evolved over time
and the purpose of these languages.
SGML is a Meta language for the development of other Markup languages. Based
on SGML, HTML invented by Tim Berners-Lee was developed that allows
hyperlinks to display multimedia information as web pages to the web users. XML
is another Markup language whose purpose is to describe information and transfer
information over the Internet. XHTML is another language which combines the
features of both HTML and XML modified to conform to XML standards.
HTML
The expansion of HTML is HTML HyperText Markup Language. HTML is the set
of "markup" symbols or codes inserted in a file intended for display on a World
Wide Web browser. The markup tells the Web browser how to display a Web page's
text, images, sound and video files for the user. It is not a programming language
i.e., it cannot be used to describe computations. In HTML, the individual markup
codes are referred to as elements (but many people also refer to them as tags).
History of HTML

HTML is an evolving standard as new technology/tools are added even now.
HTML 1 (Berners-Lee, 1989): very basic, limited integration of multimedia
HTML 2.0 (IETF, 1994): tried to standardize these & other features
HTML 3.2 (W3C, 1996): attempted to unify into a single standard but didn't
address newer technologies like Java applets & streaming video
HTML 4.0 (W3C, 1997): current standard (but moving towards XHTML) attempted
to map out future directions for HTML, not just react to vendors
XHTML 1.0 (W3C, 2000): HTML 4.01 modified to conform to XML standards
XHTML 1.1 (W3C, 2001): “Modularization” of XHTML 1.0
HTML 5 (Web Hypertext Application Technology Working Group, W3C, 2006):
New version of HTML4, XHTML 1.0, and DOM 2 (still a work in progress), no
longer based on SGML, but “backward compatible” with parsing of older versions
of HTML.
HTML 5 is referred to as a "living language".
XML
XML is the abbreviation of eXtensible Markup Language. It provides a standard
way to represent information so as to allow information to be stored and
interchanged among any Internet-connected devices. It is not a markup language but
it is a meta-markup language that specifies rules for creating markup languages.
Browsers use XML parsers to isolate and extract the information from XML
documents.
XHTML
The eXtensible HyperText Markup Language or XHTML is a reformulation of
HTML 4 in XML 1.0. It consists of all HTML 4.0.1 predefined components
combined with XML standards. This language has been developed as a way of
making XML documents that look and act like HTML documents. Using XHTML
helps to strengthen the structure and syntax of the markup.

WML-Wireless Markup Language
Formerly called HDML (Handheld Devices Markup Languages) allows the text
portions of web pages to be displayed on cell phones or PDAs via wireless media. It
is part of the Wireless Application Protocol (WAP).
Cascading Style Sheets (CSS)
It provides a powerful and flexible way to control the details of web documents.
HTML is more concerned about the content, CSS is used to impose a particular style
on the document. It is named as cascading style sheets because they can be defined
at three different levels to specify the style of a document called Inline, document
level and external.
DHTML
It is used to describe a set of animated web documents that built from HTML, style
sheets and scripts. There are three main parts of DHTML called,
– Positioning
– Style modifications
– Event handing
It relies on the browser for the display and manipulation of the web pages.
Client-side and Server-side Technologies
The Table 4.1 lists the different web technologies to develop web programs or scripts
at client- side and server-side.

Table 4.1 Client-side and Server-side Technologies
Basics of HTML
Hypertext Markup Language (HTML) is a programming tool that uses hypertext
to establish dynamic links to other documents. It is known as the Web's
programming language and provides a general structure for creating web pages. All
web pages are actually HTML files. HTML documents are simply text documents
that uses simple ASCII text files to create HTML documents with HTML file
extensions or suffix as .html or .htm. HTML documents can be created with Notepad
in Windows and TestEdit in MAC OS. HTML editors can also be used.
HTML Document Structure
A HTML document contains the information in the form of text data (content of the
page). The HTML document is divided into two major parts as HEAD and BODY.

The head part of the document contains the information about the page, e.g. the title
and the body part contains the actual content of the page.
The basic document starts with <HTML> and ends with </HTML>
The HEAD part of the document contains information about the document namely,
• Title of the page which appears at the top of the browser window).
• Meta tags which is used to describe the information about the content that is in the
document (used by Search engines).
• The script code written in JavaScript and Style sheets generally appears in the
document Head.
The BODY part of the document contains the actual content of the document. This
is the part that will be displayed in the browser window.
HTML Tags
All HTML tags are made up of a tag name and sometimes they are followed by an
optional list of attributes which all appear between angle brackets < >. The content
will not be displayed by the browser within the brackets unless the HTML is
correctly written and the browser interprets the tags as part of the content. Attributes
are properties that extend or refine the tag’s functions.
Basic Syntax
Most of the HTML tags but not all have a start tag and an end tag like the following
<H1>Hello, world!</H1>
There are a few HTML tags that are standalone tags which do not use an end tag and
are used for representing standalone elements on the page. Some of those tags are
given below,
<img> to display an image
<BR> Line break
<HR> header
Attributes
Attributes are added within a tag to extend a tag’s action. We can add multiple
attributes within a single tag. Attributes appear after the tag name and each attribute
should be separated by one or more spaces. Most attributes take values, which follow
an equal sign “=“ after the attribute’s name. The attribute values are limited to 1024
characters in length. An example of attributes defined within a tag is given below,
<body bgcolor=“khaki” text=“#000000” link=“blue” vlink=“brown” alink=“black”
Information which the browser will ignore are tabs and multiple spaces will appear
as a single space.
For example if the text appears as below in the document,
“Hello,
How are you?”
The browser will ignore the blanks and new line and displays
Hello, How are you?
Line break <BR>
This tag breaks the line and starts text at a new line. It will not add an empty line
like the paragraph tag. Multiple <br> tags will display multiple line breaks in the
text.
Paragraph Tag <P>
<P> is a Paragraph tag. It creates more space than a <BR> tag. It leaves one empty
line after the tag. Multiple <P> tags with no intervening text is interpreted as
redundant by all browsers and will display a single <P> tag.
Horizontal Rule <HR>
<HR> tag creates a Horizontal Rule. We can use attributes with <hr> such as
<hr width=“70%”>
Comments <!-- -->

The text enclosed within the comment tag will not be displayed. It is used to insert
comments in the source code.
<!-- This is a comment -->
<!-- This is another
comment -->
We can also use the following tag as a comment,
<comment> This a comment </comment>
Headings: <h1> .. <h6>
We can create headlines of various sizes on our web page. Headlines normally
appear as bold letters. An empty line will also follow the headlines. It is used for
representing titles and subtitles of various sizes.
For example, H1 is the largest font heading and H6 is the smallest font heading.
These Headings tag need an end tag </H1>.
Character Formatting
Special types of text that can be displayed using HTML are:
Bold text
Important text
Italic text
Emphasized text
Marked text
Small text
Deleted text
Inserted text
Subscripts
Superscripts

The following HTML tags are used to format the appearance of the text on a web
page.
<B> Bold </B>
The text enclosed within the <B> tag are displayed as Bold or it appears as dark
letters.
<I> Italic </I>
The text enclosed within the <I> tag are displayed as Italic letters.
<U> Underline </U>
The text enclosed within the <U> tag are displayed as Underlined text.
<PRE> Preformatted </PRE>
The text enclosed by PRE tags is displayed in a mono-spaced font. Spaces and line
breaks are supported without additional elements or special characters.
<EM> Emphasis </EM>
The text enclosed by <EM> tags are usually displayed as italics.
<STRONG> STRONG </STRONG> Browsers display this as bold. The HTML
<strong> element defines strong text, with added semantic "strong" importance.
Example
<p>This text is normal.</p> <p><strong>This text is strong</strong>.</p>
The above text is displayed as follows.
This text is normal.
This text is strong.
<TT> TELETYPE </TT> The text enclosed by <TT> tag is displayed in a mono-
spaced font. It looks like a typewriter text, e.g. fixed-width font.
<CITE> A Beginner's Guide to HTML </CITE> The text enclosed by <CITE> tag
represents a document citation usually in italics. For example, it appears like this,
(A Beginner's Guide to HTML)
It is used to display for titles of books, films, etc.
<FONT SIZE=“+2”> Two sizes bigger</FONT>
The size attribute can be set within the <FONT> tag as an absolute value from 1 to
7 or as a relative value using the “+” or “-” sign. Normal text size is 3 (from -2 to
+4).
The color attribute can be set within the <FONT> tag,
Color = “#RRGGBB” The COLOR attribute of the FONT element.
For Example, <FONT COLOR=“#RRGGBB”>this text has color</FONT>
Lists
Lists are used to organize items in the browser window. There are two ways to create
a list namely, Unordered list which is a Bulleted list and it is most popular. Here, list
items have no particular order. The other list is an Ordered list or Numbered list.
Ordered Lists (OL): e.g. 1,2,3
UnOrdered Lists (UL): e.g. bullets.
Basic Syntax:
Unordered Lists
Fruit
<UL> <LI>Banana
<LI>Grape
</UL>

Exploring Different Attributes
We have the choice of setting the TYPE Attribute to one of five numbering styles.
<OL type=I or i (for large or small roman numerals) type=A or a (for capital or small
letters) type=1 (for numbers, which is the default) > <UL type=disc (the default for
first level lists) type=round (the default for second level lists) type=square (the
default for third level lists) >
Numbered list/ Ordered List:
Fruit
<OL>
<LI> Banana
<LI>Grape
</OL>
Numbered list/ Ordered List:
Fruit
<OL>
<LI> Banana
<LI>Grape
</OL>

1.1 Introduction: Concept of WWW, Internet and WWW
Definition of WWW:
The World Wide Web (WWW) is an internet based service, which uses common set of rules
known as protocols, to distribute documents across the Internet in a standard way.
The World Wide Web. Or ‘Web’ is a part of the Internet. The Web is viewed through web
browser software such as Google chrome, Internet Explorer, Mozilla Firefox etc. Using browsers
one can access the digital libraries containing innumerable articles, journals, e-books, news,
tutorials stored in the form of web pages on computers around the world called web servers-
Today thousands of web pages/websites are added to the WWW every hour.
In simple terms, The World Wide Web is a way of exchanging information between computers
on the Internet, tying them together into a vast collection of interactive multimedia resources.
History of World Wide Web:
The World Wide Web was invented by Tim Berners-Lee in 1989; in 1995 the first connection
was established over what is today known as the internet.
By the end of 1990, the first Web page was served. In April 1993, the World Wide Web
technology was available for anyone to use on a royalty-free basis. Since that time, the web has
changed the world. It has perhaps become the most powerful communication medium the world
has ever known.
A global web of computers known as the Internet, allows individuals to communicate with each
other often called the World Wide Web. The Internet provides a quick and easy exchange of
information and is recognized as the central tool in this Information Age.
WWW Architecture:
WWW architecture is divided into several layers as shown in the following diagram:

Identifiers and Character Set
Uniform Resource Identifier (URI) is used to uniquely identify resources on the web and
UNICODE makes it possible to built web pages that can be read and write in human languages.
Syntax
XML (Extensible Markup Language) helps to define common syntax in semantic web.
Data Interchange
Resource Description Framework (RDF) framework helps in defining core representation of
data for web. RDF represents data about resource in graph form.
Taxonomies
RDF Schema (RDFS) allows more standardized description of taxonomies and other ontological
constructs.

Ontologies
Web Ontology Language (OWL) offers more constructs over RDFS. It comes in following three
versions:
• OWL Lite for taxonomies and simple constraints.
• OWL DL for full description logic support.
• OWL for more syntactic freedom of RDF
Rules
RIF and SWRL offers rules beyond the constructs that are available from RDFs and OWL.
Simple Protocol and RDF Query Language (SPARQL) is SQL like language used for querying
RDF data and OWL Ontologies.
Proof
All semantic and rules that are executed at layers below Proof and their result will be used to
prove deductions.
Cryptography
Cryptography means such as digital signature for verification of the origin of sources is used.
User Interface and Applications
On the top of layer User interface and Applications layer is built for user interaction.
WWW Operation:
WWW works on client- server approach. Following steps explains how the web works:
1. User enters the URL (say, http://www.tutorialspoint.com) of the web page in the address
bar of web browser.
2. Then browser requests the Domain Name Server for the IP address corresponding to
www.tutorialspoint.com.
3. After receiving IP address, browser sends the request for web page to the web server
using HTTP protocol which specifies the way the browser and web server communicates.
4. Then web server receives request using HTTP protocol and checks its search for the
requested web page. If found it returns it back to the web browser and close the HTTP
connection.
5. Now the web browser receives the web page, It interprets it and display the contents of
web page in web browser’s window.

Definition of Internet:
The Internet is the combination of various networks. We can access the internet through any
device with a network connection like mobile phones and computers. It allows exchange of
information between two or more computers on a network. Thus internet helps in transfer of
messages through mail, chat, video & audio conference, etc.
It can be defined in many ways as follows:
• Internet is a world-wide global system of interconnected computer networks.
• Internet uses the standard Internet Protocol (TCP/IP).
• Every computer in internet is identified by a unique IP address.
• IP Address is a unique set of numbers (such as 110.22.33.114) which identifies a
computer location.
• A special computer DNS (Domain Name Server) is used to give name to the IP Address
so that user can locate a computer by a name.
• Internet is accessible to every user all over the world.

Internet was evolved in 1969, under the project called ARPANET (Advanced Research Projects
Agency Network) to connect computers at different universities and U.S. defence. Soon after the
people from different backgrounds such as engineers, scientists, students and researchers started
using the network for exchanging information and messages.
In 1990s the internetworking of ARPANET, NSFnet and other private networks resulted into
Internet. Therefore, Internet is a global network of computer networks’. It comprises of millions
of computing devices that carry and transfer volumes of information from one device to the
other. Desktop computers, mainframes, GPS units, cell phones, car alarms, video game consoles,
are connected to the Net.
Evolution
The concept of Internet was originated in 1969 and has undergone several technological &
Infrastructural changes as discussed below:
• The origin of Internet devised from the concept of Advanced Research Project Agency
Network (ARPANET).
• ARPANET was developed by United States Department of Defense.
• Basic purpose of ARPANET was to provide communication among the various bodies of
government.
• Initially, there were only four nodes, formally called Hosts.
• In 1972, the ARPANET spread over the globe with 23 nodes located at different
countries and thus became known as Internet.
• By the time, with invention of new technologies such as TCP/IP protocols, DNS, WWW,
browsers, scripting languages etc.,Internet provided a medium to publish and access
information over the web with an existing one.

UNIT-3
3.1 Style sheets: Need for CSS, introduction to CSS
Cascading Style Sheets, fondly referred to as CSS, is a simple design language intended to
simplify the process of making web pages presentable.
CSS handles the look and feel part of a web page. Using CSS, you can control the color of the
text, the style of fonts, the spacing between paragraphs, how columns are sized and laid out,
what background images or colors are used, layout designs,variations in display for different
devices and screen sizes as well as a variety of other effects.
CSS is used to control the style of a web document in a simple and easy way.
Why to Learn CSS?
Cascading Style Sheets, fondly referred to as CSS, is a simple design language intended to
simplify the process of making web pages presentable.
CSS is a MUST for students and working professionals to become a great Software Engineer
specially when they are working in Web Development Domain. I will list down some of the key
advantages of learning CSS:
Create Stunning Web site - CSS handles the look and feel part of a web page. Using
CSS, you can control the color of the text, the style of fonts, the spacing between
paragraphs, how columns are sized and laid out, what background images or colors are
used, layout designs,variations in display for different devices and screen sizes as well
as a variety of other effects.
Become a web designer - If you want to start a carrer as a professional web designer,
HTML and CSS designing is a must skill.
Control web - CSS is easy to learn and understand but it provides powerful control over
the presentation of an HTML document. Most commonly, CSS is combined with the
markup languages HTML or XHTML.
Learn other languages - Once you understands the basic of HTML and CSS then other
related technologies like javascript, php, or angular are become easier to understand.
Advantages of CSS
CSS saves time − You can write CSS once and then reuse same sheet in multiple HTML
pages. You can define a style for each HTML element and apply it to as many Web pages
as you want.
Pages load faster − If you are using CSS, you do not need to write HTML tag attributes
every time. Just write one CSS rule of a tag and apply it to all the occurrences of that tag.
So less code means faster download times.

Easy maintenance − To make a global change, simply change the style, and all elements
in all the web pages will be updated automatically.
Superior styles to HTML − CSS has a much wider array of attributes than HTML, so you
can give a far better look to your HTML page in comparison to HTML attributes.
Multiple Device Compatibility − Style sheets allow content to be optimized for more than
one type of device. By using the same HTML document, different versions of a website
can be presented for handheld devices such as PDAs and cell phones or for printing.
Global web standards − Now HTML attributes are being deprecated and it is being
recommended to use CSS. So its a good idea to start using CSS in all the HTML pages to
make them compatible to future browsers.
Example of CSS:
<!DOCTYPE html>
<html>
<head>
<style>
body {
background-color: lightblue;
}
h1 {
color: white;
text-align: center;
}
p {
font-family: verdana;
font-size: 20px;
}
</style>
</head>
<body>

<h1>My First CSS Example</h1>
<p>This is a paragraph.</p>
</body>
</html>
3.2 Basic syntax and structure
A CSS comprises of style rules that are interpreted by the browser and then applied to the
corresponding elements in your document. A style rule is made of three parts −
Selector − A selector is an HTML tag at which a style will be applied. This could be any
tag like <h1> or <table> etc.
Property − A property is a type of attribute of HTML tag. Put simply, all the HTML
attributes are converted into CSS properties. They could be color, border etc.
Value − Values are assigned to properties. For example, color property can have value
either red or #F1F1F1 etc.
You can put CSS Style Rule Syntax as follows −
selector { property: value }
Example − You can define a table border as follows −
table{ border :1px solid #C00; }
Here table is a selector and border is a property and given value 1px solid #C00 is the value of
that property.
The Type Selectors
This is the same selector we have seen above. Again, one more example to give a color to all
level 1 headings −
h1 {

color: #36CFFF;
}
Example :
<!DOCTYPE html>
<html>
<head>
<style>
p {
color: red;
text-align: center;
}
</style>
</head>
<body>
<p>Hello World!</p>
<p>These paragraphs are styled with CSS.</p>
</body>
</html>
Example Explained
p is a selector in CSS (it points to the HTML element you want to style: <p>).
color is a property, and red is the property value
text-align is a property, and center is the property value
The Universal Selectors
Rather than selecting elements of a specific type, the universal selector quite simply matches the
name of any element type −

* {
color: #000000;
}
This rule renders the content of every element in our document in black.
Example:
<!DOCTYPE html>
<html>
<head>
<style>
* {
text-align: center;
color: blue;
}
</style>
</head>
<body>
<h1>Hello world!</h1>
<p>Every element on the page will be affected by the style.</p>
<p id="para1">Me too!</p>
<p>And me!</p>
</body>
</html>
The CSS id Selector
The id selector uses the id attribute of an HTML element to select a specific element.

The id of an element is unique within a page, so the id selector is used to select one unique
element!
To select an element with a specific id, write a hash (#) character, followed by the id of the
element.
#para1 {
text-align: center;
color: red;
}
Example
<!DOCTYPE html>
<html>
<head>
<style>
#para1 {
text-align: center;
color: red;
}
</style>
</head>
<body>
<p id="para1">Hello World!</p>
<p>This paragraph is not affected by the style.</p>
</body>
</html>
The Class Selectors
You can define style rules based on the class attribute of the elements. All the elements having
that class will be formatted according to the defined rule.
.center {
color: #000000;

}
Example:
<!DOCTYPE html>
<html>
<head>
<style>
.center {
text-align: center;
color: red;
}
</style>
</head>
<body>
<h1 class="center">Red and center-aligned heading</h1>
<p class="center">Red and center-aligned paragraph.</p>
</body>
</html>
Three Ways to Insert CSS
There are three ways of inserting a style sheet:
External CSS
Internal CSS
Inline CSS
External CSS
With an external style sheet, you can change the look of an entire website by changing just one file!
Each HTML page must include a reference to the external style sheet file inside the <link> element,
inside the head section.

Example
External styles are defined within the <link> element, inside the <head> section of an HTML page:
<!DOCTYPE html>
<html>
<head>
<link rel="stylesheet" href="mystyle.css">
</head>
<body>
<h1>This is a heading</h1>
<p>This is a paragraph.</p>
</body>
</html>
An external style sheet can be written in any text editor, and must be saved with a .css extension.
The external .css file should not contain any HTML tags.
Here is how the "mystyle.css" file looks like:
"mystyle.css"
body {
background-color: lightblue;
}
h1 {
color: navy;
margin-left: 20px;
}
Internal CSS
An internal style sheet may be used if one single HTML page has a unique style. The internal style is
defined inside the <style> element, inside the head section.
Inline CSS
An inline style may be used to apply a unique style for a single element.
To use inline styles, add the style attribute to the relevant element. The style attribute can contain any
CSS property.

Example
Inline styles are defined within the "style" attribute of the relevant element:
<!DOCTYPE html>
<html>
<body>
<h1 style="color:blue;text-align:center;">This is a heading</h1>
<p style="color:red;">This is a paragraph.</p>
</body>
</html>
3.3 Using CSS: background images, colors and properties
The CSS background properties are used to define the background effects for elements.
The background-color property is used to set the background color of an element.
The background-image property is used to set the background image of an element.
The background-repeat property is used to control the repetition of an image in the
background.
The background-position property is used to control the position of an image in the
background.
The background-attachment property is used to control the scrolling of an image in the
background.
The background property is used as shorthand to specify a number of other background
properties.
CSS background-color
The background-color property specifies the background color of an element.
Example
Here, the <h1>, <p>, and <div> elements will have different background colors:
<!DOCTYPE html>
<html>

<head>
<style>
h1 {
background-color: green;
}
div {
background-color: lightblue;
}
p {
background-color: yellow;
}
</style>
</head>
<body>
<h1>CSS background-color example!</h1>
<div>
This is a text inside a div element.
<p>This paragraph has its own background color.</p>
We are still in the div element.
</div>
</body>
</html>
CSS background-image
The background-image property specifies an image to use as the background of an element.

Example:
<html>
<head>
<style>
body {
background-image: url("/css/images/css.jpg");
background-color: #cccccc;
}
</style>
</head>
<body>
<h1>Hello World!</h1>
</body>
<html>
Repeat the Background Image
The following example demonstrates how to repeat the background image if an image is small. You
can use no-repeat value for background-repeat property if you don't want to repeat an image, in this case image will display only once.
Example:
<html>
<head>
<style>
body {
background-image: url("/css/images/css.jpg");
background- repeat: repeat;

}
</style>
</head>
<body>
<h1>Hello World!</h1>
</body>
<html>
to repeat the background image vertically use:
background- repeat: repeat-y;
to repeat the background image vertically use:
background- repeat: repeat-x;
CSS background-position
The background-position property is used to specify the position of the background image.
Position the background image in the top-right corner:
body {
background-image: url("img_tree.png");
background-repeat: no-repeat;
background-position: right top;
}
Example:
<!DOCTYPE html>
<html>
<head>

<style>
body {
background-image: url("img_tree.png");
background-repeat: no-repeat;
background-position: right top;
margin-right: 200px;
}
</style>
</head>
<body>
<h1>Hello World!</h1>
<p>W3Schools background no-repeat, set position example.</p>
<p>Now the background image is only shown once, and positioned away from the text.</p>
<p>In this example we have also added a margin on the right side, so the background image will
never disturb the text.</p>
</body>
</html>
Set the Background Attachment
Background attachment determines whether a background image is fixed or scrolls with the rest
of the page.
Specify that the background image should be fixed:
body {
background-image: url("img_tree.png");
background-repeat: no-repeat;
background-position: right top;
background-attachment: fixed;
}

Example:
<!DOCTYPE html>
<html>
<head>
<style>
body {
background-image: url("img_tree.png");
background-repeat: no-repeat;
background-position: right top;
margin-right: 200px;
background-attachment: fixed;
}
</style>
</head>
<body>
<h1>The background-attachment Property</h1>
<p>The background-attachment property specifies whether the background image should scroll
or be fixed (will not scroll with the rest of the page).</p>
<p><strong>Tip:</strong> If you do not see any scrollbars, try to resize the browser
window.</p>
<p>The background-image is fixed. Try to scroll down the page.</p>
<p>The background-image is fixed. Try to scroll down the page.</p>
<p>The background-image is fixed. Try to scroll down the page.</p>

<p>The background-image is fixed. Try to scroll down the page.</p>
<p>The background-image is fixed. Try to scroll down the page.</p>
<p>The background-image is fixed. Try to scroll down the page.</p>
<p>The background-image is fixed. Try to scroll down the page.</p>
<p>The background-image is fixed. Try to scroll down the page.</p>
<p>The background-image is fixed. Try to scroll down the page.</p>
<p>The background-image is fixed. Try to scroll down the page.</p>
<p>The background-image is fixed. Try to scroll down the page.</p>
<p>The background-image is fixed. Try to scroll down the page.</p>
<p>The background-image is fixed. Try to scroll down the page.</p>
<p>The background-image is fixed. Try to scroll down the page.</p>
</body>
</html>
CSS background - Shorthand property
To shorten the code, it is also possible to specify all the background properties in one single
property. This is called a shorthand property.
Instead of writing:
body {
background-color: #ffffff;
background-image: url("img_tree.png");
background-repeat: no-repeat;
background-position: right top;
}
You can use the shorthand property background:

Use the shorthand property to set the background properties in one declaration:
body {
background: #ffffff url("img_tree.png") no-repeat right top;
}
Example:
<!DOCTYPE html>
<html>
<head>
<style>
body {
background: #ffffff url("img_tree.png") no-repeat right top;
margin-right: 200px;
}
</style>
</head>
<body>
<h1>The background Property</h1>
<p>The background property is a shorthand property for specifying all the background
properties in one declaration.</p>
<p>Here, the background image is only shown once, and it is also positioned in the top-right
corner.</p>
<p>We have also added a right margin, so that the text will not write over the background
image.</p>
</body>
</html>
3.4 Using CSS: manipulating texts, using fonts

Manipulate text using CSS properties. You can set following text properties of an element −
The color property is used to set the color of a text.
The direction property is used to set the text direction.
The letter-spacing property is used to add or subtract space between the letters that
make up a word.
The word-spacing property is used to add or subtract space between the words of a
sentence.
The text-indent property is used to indent the text of a paragraph.
The text-align property is used to align the text of a document.
The text-decoration property is used to underline, overline, and strikethrough text.
The text-transform property is used to capitalize text or convert text to uppercase or
lowercase letters.
The text-shadow property is used to set the text shadow around a text.
Text Color
The color property is used to set the color of the text. The color is specified by:
a color name - like "red"
a HEX value - like "#ff0000"
an RGB value - like "rgb(255,0,0)"
Example:
<!DOCTYPE html>
<html>
<head>
<style>
body {
color: blue;
}
h1 {
color: green;

}
</style>
</head>
<body>
<h1>This is heading 1</h1>
<p>This is an ordinary paragraph. Notice that this text is blue. The default text color for a
page is defined in the body selector.</p>
<p>Another paragraph.</p>
</body>
</html>
Text Color and Background Color
In this example, we define both the background-color property and the color property:
Example
body {
background-color: lightgrey;
color: blue;
}
h1 {
background-color: black;
color: white;
}
Text Direction

The direction properties can be used to change the text direction of an element. Possible values
are ltr or rtl.
p {
direction: rtl;
}
Example:
<html>
<head>
</head>
<body>
<p style = "direction:rtl;">
This text will be rendered from right to left
</p>
</body>
</html>
Space between Characters
Set the space between characters. Possible values are normal or a number specifying space.
Example:
<html>
<head>
</head>
<body>
<p style = "letter-spacing:5px;">
This text is having space between letters.
</p>
</body>
</html>
Space between Words
Set the space between words. Possible values are normal or a number specifying space.
Example:
<html>
<head>
</head>
<body>
<p style = "word-spacing:5px;">
This text is having space between words.
</p>
</body>
</html>
Text Indent
The following example demonstrates how to indent the first line of a paragraph. Possible values
are % or a number specifying indent space.
Example:
<html>
<head>
</head>
<body>
<p style = "text-indent:1cm;">
This text will have first line indented by 1cm and this line will remain at
its actual position this is done by CSS text-indent property.
</p>

</body>
</html>
Text Alignment
The following example demonstrates how to align a text. Possible values are left, right, center,
justify.
Example:
<html>
<head>
</head>
<body>
<p style = "text-align:right;">
This will be right aligned.
</p>
<p style = "text-align:center;">
This will be center aligned.
</p>
<p style = "text-align:left;">
This will be left aligned.
</p>
</body>
</html>
Decorating the Text
The following example demonstrates how to decorate a text. Possible values are none, underline,
overline, line-through, blink.
Example:

<html>
<head>
</head>
<body>
<p style = "text-decoration:underline;">
This will be underlined
</p>
<p style = "text-decoration:line-through;">
This will be striked through.
</p>
<p style = "text-decoration:overline;">
This will have a over line.
</p>
<p style = "text-decoration:blink;">
This text will have blinking effect
</p>
</body>
</html>
Text Cases
The following example demonstrates how to set the cases for a text. Possible values are none,
capitalize, uppercase, lowercase.
<html>
<head>
</head>

<body>
<p style = "text-transform:capitalize;">
This will be capitalized
</p>
<p style = "text-transform:uppercase;">
This will be in uppercase
</p>
<p style = "text-transform:lowercase;">
This will be in lowercase
</p>
</body>
</html>
Text Shadow
The following example demonstrates how to set the shadow around a text. This may not be
supported by all the browsers.
Example:
<html>
<head>
</head>
<body>
<p style = "text-shadow:4px 4px 8px blue;">
If your browser supports the CSS text-shadow property,
this text will have a blue shadow.
</p>
</body>

</html>
CSS font
The CSS font properties define the font family, boldness, size, and the style of a text.
We can set following font properties of an element −
The font-family property is used to change the face of a font.
The font-style property is used to make a font italic or oblique.
The font-variant property is used to create a small-caps effect.
The font-weight property is used to increase or decrease how bold or light a font
appears.
The font-size property is used to increase or decrease the size of a font.
The font property is used as shorthand to specify a number of other font properties.
Font-family
CSS Font Families
In CSS, there are two types of font family names:
generic family - a group of font families with a similar look (like "Serif" or
"Monospace")
font family - a specific font family (like "Times New Roman" or "Arial")
Generic family Font family Description
Serif Times New Roman
Georgia
Serif fonts have small lines at the ends on some
characters
Sans-serif Arial
Verdana
"Sans" means without - these fonts do not have the
lines at the ends of characters

Monospace Courier New
Lucida Console
All monospace characters have the same width
Set the font family of an element. Possible value could be any font family name.
Example:
<html>
<head>
</head>
<body>
<p style = "font-family: "Times New Roman", Times, serif;">
This text is rendered in either georgia, garamond, or the
default serif font depending on which font you have at your system.
</p>
</body>
</html>
The Font Style
Set the font style of an element. Possible values are normal, italic and oblique.
Example:
<html>
<head>
</head>
<body>
<p style = "font-style:italic;">
This text will be rendered in italic style
</p>
</body>
</html>
The Font Variant
Set the font variant of an element. Possible values are normal and small-caps.
Example:
<html>
<head>
</head>
<body>
<p style = "font-variant:small-caps;">
This text will be rendered as small caps
</p>
</body>
</html>
The Font Weight
Set the font weight of an element. The font-weight property provides the functionality to specify
how bold a font is. Possible values could be normal, bold, bolder, lighter, 100, 200, 300, 400,
500, 600, 700, 800, 900.
Example:
<html>
<head>
</head>
<body>
<p style = "font-weight:bold;">

This font is bold.
</p>
<p style = "font-weight:bolder;">
This font is bolder.
</p>
<p style = "font-weight:500;">
This font is 500 weight.
</p>
</body>
</html>
The Font Size
Set the font size of an element. The font-size property is used to control the size of fonts.
Possible values could be xx-small, x-small, small, medium, large, x-large, xx-large, smaller,
larger, size in pixels or in %.
Example:
<html>
<head>
</head>
<body>
<p style = "font-size:20px;">
This font size is 20 pixels
</p>
<p style = "font-size:small;">
This font size is small
</p>

<p style = "font-size:large;">
This font size is large
</p>
</body>
</html>
Shorthand Property
You can use the font property to set all the font properties at once. For example −
Example:
<html>
<head>
</head>
<body>
<p style = "font:italic small-caps bold 15px georgia;">
Applying all the properties on the text at once.
</p>
</body>
</html>
3.5 Borders and boxes, margins
The border properties allow you to specify how the border of the box representing an element
should look. There are three properties of a border you can change −
The border-color specifies the color of a border.
The border-style specifies whether a border should be solid, dashed line, double line, or
one of the other possible values.
The border-width specifies the width of a border.
The border-color Property

The border-color property allows you to change the color of the border surrounding an element.
You can individually change the color of the bottom, left, top and right sides of an element's
border using the properties −
border-bottom-color changes the color of bottom border.
border-top-color changes the color of top border.
border-left-color changes the color of left border.
border-right-color changes the color of right border.
The following example shows the effect of all these properties −
Example:
<html>
<head>
<style type = "text/css">
p.example1 {
border:1px solid;
border-bottom-color:#009900; /* Green */
border-top-color:#FF0000; /* Red */
border-left-color:#330000; /* Black */
border-right-color:#0000CC; /* Blue */
}
p.example2 {
border:1px solid;
border-color:#009900; /* Green */
}
</style>
</head>
<body>
<p class = "example1">
This example is showing all borders in different colors.
</p>
<p class = "example2">
This example is showing all borders in green color only.
</p>
</body>
</html>
CSS Border Style
The border-style property specifies what kind of border to display.

The following values are allowed:
dotted - Defines a dotted border
dashed - Defines a dashed border
solid - Defines a solid border
double - Defines a double border
groove - Defines a 3D grooved border. The effect depends on the border-color value
ridge - Defines a 3D ridged border. The effect depends on the border-color value
inset - Defines a 3D inset border. The effect depends on the border-color value
outset - Defines a 3D outset border. The effect depends on the border-color value
none - Defines no border
hidden - Defines a hidden border
The border-style property can have from one to four values (for the top border, right border,
bottom border, and the left border).
Example:
<!DOCTYPE html>
<html>
<head>
<style>
p.dotted {border-style: dotted;}
p.dashed {border-style: dashed;}
p.solid {border-style: solid;}
p.double {border-style: double;}
p.groove {border-style: groove;}
p.ridge {border-style: ridge;}
p.inset {border-style: inset;}
p.outset {border-style: outset;}
p.none {border-style: none;}
p.hidden {border-style: hidden;}
p.mix {border-style: dotted dashed solid double;}
</style>
</head>
<body>
<h2>The border-style Property</h2>
<p>This property specifies what kind of border to display:</p>
<p class="dotted">A dotted border.</p>
<p class="dashed">A dashed border.</p>
<p class="solid">A solid border.</p>
<p class="double">A double border.</p>
<p class="groove">A groove border.</p>
<p class="ridge">A ridge border.</p>
<p class="inset">An inset border.</p>

<p class="outset">An outset border.</p>
<p class="none">No border.</p>
<p class="hidden">A hidden border.</p>
<p class="mix">A mixed border.</p>
</body>
</html>
The border-width Property
The border-width property allows you to set the width of an element borders. The value of this
property could be either a length in px, pt or cm or it should be set to thin, medium or thick.
You can individually change the width of the bottom, top, left, and right borders of an element
using the following properties −
border-bottom-width changes the width of bottom border.
border-top-width changes the width of top border.
border-left-width changes the width of left border.
border-right-width changes the width of right border.
The following example shows all these border width –
Example:
<html>
<head>
</head>
<body>
<p style = "border-width:4px; border-style:solid;">
This is a solid border whose width is 4px.
</p>
<p style = "border-width:4pt; border-style:solid;">
This is a solid border whose width is 4pt.
</p>

<p style = "border-width:thin; border-style:solid;">
This is a solid border whose width is thin.
</p>
<p style = "border-width:medium; border-style:solid;">
This is a solid border whose width is medium;
</p>
<p style = "border-width:thick; border-style:solid;">
This is a solid border whose width is thick.
</p>
<p style = "border-bottom-width:4px;border-top-width:10px;
border-left-width: 2px;border-right-width:15px;border-style:solid;">
This is a a border with four different width.
</p>
</body>
</html>
Border Properties Using Shorthand
The border property allows you to specify color, style, and width of lines in one property. The
following example shows how to use all the three properties into a single property. This is the
most frequently used property to set border around any element.
Example:
<html>
<head>
</head>
<body>

<p style = "border:4px solid red;">
This example is showing shorthand property for border.
</p>
</body>
</html>
CSS margins
CSS margins are used to create space around the element. We can set the different size of
margins for individual sides(top, right, bottom, left).
Margin properties can have following values:
1. Length in cm, px, pt, etc.
2. Width % of the element.
3. Margin calculated by the browser: auto.
Tip: Negative values are allowed.
Syntax:
body
{
margin: size;
}
Example:
<!DOCTYPE html>
<html>
<head>
<style>
div {
border: 1px solid black;
margin-top: 100px;
margin-bottom: 100px;
margin-right: 150px;
margin-left: 80px;
background-color: lightblue;
}
</style>
</head>
<body>
<h2>Using individual margin properties</h2>
<div>This div element has a top margin of 100px, a right margin of 150px, a bottom margin of
100px, and a left margin of 80px.</div>

</body>
</html>
We have the following properties to set an element margin.
The margin specifies a shorthand property for setting the margin properties in one
declaration.
The margin-bottom specifies the bottom margin of an element.
The margin-top specifies the top margin of an element.
The margin-left specifies the left margin of an element.
The margin-right specifies the right margin of an element.
Margin - Shorthand Property
To shorten the code, it is possible to specify all the margin properties in one property.
The margin property is a shorthand property for the following individual margin properties:
margin-top
margin-right
margin-bottom
margin-left
So, here is how it works:
If the margin property has four values:
margin: 25px 50px 75px 100px;
top margin is 25px
right margin is 50px
bottom margin is 75px
left margin is 100px
Example:
<!DOCTYPE html>
<html>
<head>
<style>
div {
border: 1px solid black;
margin: 25px 50px 75px 100px;
background-color: lightblue;

}
</style>
</head>
<body>
<h2>The margin shorthand property - 4 values</h2>
<div>This div element has a top margin of 25px, a right margin of 50px, a bottom margin of
75px, and a left margin of 100px.</div>
<hr>
</body>
</html>
3.6 padding, lists, positioning using CSS
The padding property allows you to specify how much space should appear between the content
of an element and its border −
The value of this attribute should be either a length, a percentage, or the word inherits. If the
value is inherit, it will have the same padding as its parent element. If a percentage is used, the
percentage is of the containing box.
The following CSS properties can be used to control lists. You can also set different values for
the padding on each side of the box using the following properties −
The padding-bottom specifies the bottom padding of an element.
The padding-top specifies the top padding of an element.
The padding-left specifies the left padding of an element.
The padding-right specifies the right padding of an element.
The padding serves as shorthand for the preceding properties.
The padding-bottom Property
The padding-bottom property sets the bottom padding (space) of an element. This can take a
value in terms of length of %.
Here is an example −
<html>
<head>
</head>
<body>
<p style = "padding-bottom: 15px; border:1px solid black;">
This is a paragraph with a specified bottom padding
</p>

<p style = "padding-bottom: 5%; border:1px solid black;">
This is another paragraph with a specified bottom padding in percent
</p>
</body>
</html>
The padding-top Property
The padding-top property sets the top padding (space) of an element. This can take a value in
terms of length of %.
<html>
<head>
</head>
<body>
<p style = "padding-top: 15px; border:1px solid black;">
This is a paragraph with a specified top padding
</p>
<p style = "padding-top: 5%; border:1px solid black;">
This is another paragraph with a specified top padding in percent
</p>
</body>
</html>
The padding-left Property
The padding-left property sets the left padding (space) of an element. This can take a value in
terms of length of %.
<html>
<head>
</head>
<body>
<p style = "padding-left: 15px; border:1px solid black;">
This is a paragraph with a specified left padding
</p>
<p style = "padding-left: 15%; border:1px solid black;">
This is another paragraph with a specified left padding in percent
</p>

</body>
</html>
The padding-right Property
The padding-right property sets the right padding (space) of an element. This can take a value
in terms of length of %.
<html>
<head>
</head>
<body>
<p style = "padding-right: 15px; border:1px solid black;">
This is a paragraph with a specified right padding
</p>
<p style = "padding-right: 5%; border:1px solid black;">
This is another paragraph with a specified right padding in percent
</p>
</body>
</html>
The Padding Property
The padding property sets the left, right, top and bottom padding (space) of an element. This
can take a value in terms of length of %.
<html>
<head>
</head>
<body>
<p style = "padding: 15px; border:1px solid black;">
all four padding will be 15px
</p>
<p style = "padding:10px 2%; border:1px solid black;">
top and bottom padding will be 10px, left and right
padding will be 2% of the total width of the document.
</p>
<p style = "padding: 10px 2% 10px; border:1px solid black;">
top padding will be 10px, left and right padding will
be 2% of the total width of the document, bottom padding will be 10px
</p>
<p style = "padding: 10px 2% 10px 10px; border:1px solid black;">

top padding will be 10px, right padding will be 2% of
the total width of the document, bottom padding and top padding will be 10px
</p>
</body>
</html>
HTML Lists and CSS List Properties
In HTML, there are two main types of lists:
unordered lists (<ul>) - the list items are marked with bullets
ordered lists (<ol>) - the list items are marked with numbers or letters
The CSS list properties allow you to:
Set different list item markers for ordered lists
Set different list item markers for unordered lists
Set an image as the list item marker
Add background colors to lists and list items
Different List Item Markers
The list-style-type property specifies the type of list item marker.
<!DOCTYPE html>
<html>
<head>
<style>
ul.a {
list-style-type: circle;
}
ul.b {
list-style-type: square;
}
ol.c {
list-style-type: upper-roman;
}
ol.d {
list-style-type: lower-alpha;
}
</style>
</head>
<body>

<h2>Lists</h2>
<p>Example of unordered lists:</p>
<ul class="a">
<li>Coffee</li>
<li>Tea</li>
<li>Coca Cola</li>
</ul>
<ul class="b">
<li>Coffee</li>
<li>Tea</li>
<li>Coca Cola</li>
</ul>
<p>Example of ordered lists:</p>
<ol class="c">
<li>Coffee</li>
<li>Tea</li>
<li>Coca Cola</li>
</ol>
<ol class="d">
<li>Coffee</li>
<li>Tea</li>
<li>Coca Cola</li>
</ol>
</body>
</html>
An Image as The List Item Marker
The list-style-image property specifies an image as the list item marker:
<!DOCTYPE html>
<html>
<head>
<style>
ul {
list-style-image: url('sqpurple.gif');
}
</style>
</head>
<body>
<h2>CSS Lists</h2>

<p>The list-style-image property specifies an image as the list item marker:</p>
<ul>
<li>Coffee</li>
<li>Tea</li>
<li>Coca Cola</li>
</ul>
</body>
</html>
List - Shorthand property
The list-style property is a shorthand property. It is used to set all the list properties in one
declaration:
<!DOCTYPE html>
<html>
<head>
<style>
ul {
list-style: square inside url("sqpurple.gif");
}
</style>
</head>
<body>
<h2>CSS Lists</h2>
<p>The list-style property is a shorthand property, which is used to set all the list properties in one
declaration.</p>
<ul>
<li>Coffee</li>
<li>Tea</li>
<li>Coca Cola</li>
</ul>
</body>
</html>
Positioning
CSS helps you to position your HTML element. You can put any HTML element at whatever location
you like. You can specify whether you want the element positioned relative to its natural position in the
page or absolute based on its parent element.

Relative Positioning
Relative positioning changes the position of the HTML element relative to where it normally
appears. So "left:20" adds 20 pixels to the element's LEFT position.
You can use two values top and left along with the position property to move an HTML element
anywhere in the HTML document.
Move Left - Use a negative value for left.
Move Right - Use a positive value for left.
Move Up - Use a negative value for top.
Move Down - Use a positive value for top.
Example:
<html>
<head>
</head>
<body>
<div style = "position:relative; left:80px; top:2px; background-color:yellow;">
This div has relative positioning.
</div>
</body>
</html>
Absolute Positioning
An element with position: absolute is positioned at the specified coordinates relative to your
screen top-left corner.
You can use two values top and left along with the position property to move an HTML element
anywhere in the HTML document.
Move Left - Use a negative value for left.
Move Right - Use a positive value for left.
Move Up - Use a negative value for top.
Move Down - Use a positive value for top.
Example:
<html>
<head>

</head>
<body>
<div style = "position:absolute; left:80px; top:20px; background-color:yellow;">
This div has absolute positioning.
</div>
</body>
</html>
Fixed Positioning
Fixed positioning allows you to fix the position of an element to a particular spot on the page,
regardless of scrolling. Specified coordinates will be relative to the browser window.
You can use two values top and left along with the position property to move an HTML element
anywhere in the HTML document.
Move Left - Use a negative value for left.
Move Right - Use a positive value for left.
Move Up - Use a negative value for top.
Move Down - Use a positive value for top.
Example:
<html>
<head>
</head>
<body>
<div style = "position:fixed; left:80px; top:20px; background-color:yellow;">
This div has fixed positioning.
</div>
</body>
</html>
3.7 CSS2, Overview and features of CSS3
CSS2 Overview
Cascading Style Sheets Level 2 (CSS2) is the second version of cascading style sheets developed
by W3C. It's a declarative language used to enhance the hyperextensive text markup language.
CSS2 has the following main features:
Aural Style Sheets: New style properties for defining the aural style sheet for documents.

Paging: Definition of how pages need to be displayed or printed. This made cropping,
registering marks and other layout features possible.
Media Types: Different style rules for different types of media was introduced in CSS2.
International Accessibility Features: More list styles were available for international
documents. This included bidirectional text support as well as language sensitive
quotation marks.
Font: More fonts were defined and available for use.
Positioning: CSS2 introduced the relative, absolute positioning and the placement
determination within a document. This really helped the continuous media.
Cursors: CSS2 defined the manner in which the cursor would respond to various actions.
Overview and features of CSS3
CSS3 is the latest evolution of the Cascading Style Sheets language and aims at extending
CSS2.1. It brings a lot of new features and additions, like rounded corners, shadows, gradients,
transitions or animations, as well as new layouts like multi-columns, flexible box or grid layouts.
CSS3 Features
What CSS gives you is incredible control over the appearance of your page. You can control
properties such as font sizes, bolding, italics, text shadows and color, link color and much more.
And of course you can go far beyond that with page layout tools, boxes, formatting, positioning,
etc. In CSS3, there are many options, a few which we'll look at here. These include animation,
gradients, media queries, shadows, transitions, the font-face rule that allows you to embed fonts
on a web page, and more.
Animations
With this option you can add keyframe animations to HTML content. This CSS control gives
you minute control over how HTML elments can be animated within a web page. With this
approch you can move from one CSS style to another. There are two main components in a CSS
animation: A style that describes the and the keyframes that control the animation.
There are three reasons for using CSS animations instead of animations run by scripts. These are:
1. These are easy to use and can be done without a knowledge of JavaScript.
2. They run well under a moderate system load.
3. By letting the browser control the animation, the browser can optimize the performance.
Gradients

In CSS3, there's more support for gradients with the <image> tag. This property allow you to
disply smooth transitions between two or more colors using the browser instead of images. This
reduces download times. The browser supports two types of gradients: Linear and Radial. The
linear gradient is defined with teh linear-gradient function, while radial is defined with the radial-
gradient function.
CSS3 Media Queries
Mobile devices have dramatically changed the way that people function. Not only that, but there
are many different types of devices, such as smartphones, tablets and others. All have different
dimensions and web designers are faced with the challenge of making sure that their websites
display properly on each device.
Media queries are designed to handle this issue. Media queries build on the CSS2 property. They
allow for mutltiple rule sets which are based on the capabilities of the browser. These include
height and width controls, screen orientation and resolution. This gives you greater control over
how your content is displayed and allows the designer to optimize the layout and design for
different devices.
CSS3 Shadows
With this property you can add shadows to HTML content. The box-shadow property allows you
to add shadows to both the inner and outer box elements and the text-shadow property gives you
control of text shadows.
Here are some of the options for the box shadow property: Color (of the shadow), Offset
(referring to the position), Blur Radius, Spread Radius (which allows the shadow to scale to the
size of the box object).
Here are the components of each shadow:
• The first length is the horizontal offset (position)
• The second length controls the vertical offset (position)
• The third length controls the blur
• The fourth length controls the spread of the shadow
• The color controls the color of the shadow
• If the inset keyword is used, it changes the outer shadow to an inner shadow.
CSS3 Transitions

Before we get into describing what transitions can do, it's important to realize up-front that this is
an experimental technology (as noted on the Mozilla site - https://developer.mozilla.org/en-
US/docs/CSS/Using_CSS_transitions?redirectlocale=en-
US&redirectslug=CSS%2FCSS_transitions) and that the specification isn't stable. Note also that
the syntax and behavior is subject to change.
With CSS3 Transitions you can animate CSS properties HTML elements. Some applications of
this are: animated rollovers, fades, changing color from white to black, and more. Most
importantly, JavaScript isn't necessary. One caveat is that while it's easier to use CSS3
Transitions, you don't have as much control as you would with CSS3 animations.
CSS3 Transforms
With CSS3 Transforms, you can use rotations, scales and skews to DOM elements. CSS3
Transforms can be sued with CSS3 Transitions, allowing you to create time controlled
animations.
Two main properties control CSS3 Transforms. Thesee are: transform and transform-origin.
transform covers the changes applied to the element, which happen one after the other.
transform-orgin covers the origin position, usually the top left corner of the element, though this
can be moved.
3.8 JavaScript: Client side scripting with JavaScript
What is JavaScript ?
JavaScript is a dynamic computer programming language. It is lightweight and most commonly
used as a part of web pages, whose implementations allow client-side script to interact with the
user and make dynamic pages. It is an interpreted programming language with object-oriented
capabilities.
JavaScript was first known as LiveScript, but Netscape changed its name to JavaScript, possibly
because of the excitement being generated by Java. JavaScript made its first appearance in
Netscape 2.0 in 1995 with the name LiveScript. The general-purpose core of the language has
been embedded in Netscape, Internet Explorer, and other web browsers.
Client-Side JavaScript
Client-side JavaScript is the most common form of the language. The script should be included
in or referenced by an HTML document for the code to be interpreted by the browser.
It means that a web page need not be a static HTML, but can include programs that interact with
the user, control the browser, and dynamically create HTML content.

The JavaScript client-side mechanism provides many advantages over traditional CGI server-
side scripts. For example, you might use JavaScript to check if the user has entered a valid e-mail
address in a form field.
The JavaScript code is executed when the user submits the form, and only if all the entries are
valid, they would be submitted to the Web Server.
JavaScript can be used to trap user-initiated events such as button clicks, link navigation, and
other actions that the user initiates explicitly or implicitly.
Advantages of JavaScript
The merits of using JavaScript are −
Less server interaction − You can validate user input before sending the page off to the
server. This saves server traffic, which means less load on your server.
Immediate feedback to the visitors − They don't have to wait for a page reload to see if
they have forgotten to enter something.
Increased interactivity − You can create interfaces that react when the user hovers over
them with a mouse or activates them via the keyboard.
Richer interfaces − You can use JavaScript to include such items as drag-and-drop
components and sliders to give a Rich Interface to your site visitors.
Limitations of JavaScript
We cannot treat JavaScript as a full-fledged programming language. It lacks the following
important features −
Client-side JavaScript does not allow the reading or writing of files. This has been kept
for security reason.
JavaScript cannot be used for networking applications because there is no such support
available.
JavaScript doesn't have any multi-threading or multiprocessor capabilities.
Once again, JavaScript is a lightweight, interpreted programming language that allows you to
build interactivity into otherwise static HTML pages.
A simple syntax of your JavaScript will appear as follows.
JavaScript can be implemented using JavaScript statements that are placed within the <script>...
</script> HTML tags in a web page.

You can place the <script> tags, containing your JavaScript, anywhere within your web page,
but it is normally recommended that you should keep it within the <head> tags.
<script ...>
JavaScript code
</script>
The script tag takes two important attributes −
Language − This attribute specifies what scripting language you are using. Typically, its
value will be javascript. Although recent versions of HTML (and XHTML, its successor)
have phased out the use of this attribute.
Type − This attribute is what is now recommended to indicate the scripting language in
use and its value should be set to "text/javascript".
3.9 variables, functions, Pop up boxes
JavaScript Datatypes
One of the most fundamental characteristics of a programming language is the set of data types
it supports. These are the type of values that can be represented and manipulated in a
programming language.
JavaScript allows you to work with three primitive data types −
Numbers, eg. 123, 120.50 etc.
Strings of text e.g. "This text string" etc.
Boolean e.g. true or false.
JavaScript also defines two trivial data types, null and undefined, each of which defines only a
single value. In addition to these primitive data types, JavaScript supports a composite data type
known as object.
Note − JavaScript does not make a distinction between integer values and floating-point values.
All numbers in JavaScript are represented as floating-point values. JavaScript represents
numbers using the 64-bit floating-point format defined by the IEEE 754 standard.
JavaScript Variables
Like many other programming languages, JavaScript has variables. Variables can be thought of
as named containers. You can place data into these containers and then refer to the data simply
by naming the container.

Before you use a variable in a JavaScript program, you must declare it. Variables are declared
with the var keyword as follows.
<script type = "text/javascript">
<!--
var money;
var name;
//-->
</script>
You can also declare multiple variables with the same var keyword as follows −
<script type = "text/javascript">
<!--
var money, name;
//-->
</script>
Storing a value in a variable is called variable initialization. You can do variable initialization at
the time of variable creation or at a later point in time when you need that variable.
For instance, you might create variable named money and assign the value 2000.50 to it later.
For another variable, you can assign a value at the time of initialization as follows.
<script type = "text/javascript">
<!--
var name = "Ali";
var money;
money = 2000.50;
//-->
</script>
Note − Use the var keyword only for declaration or initialization, once for the life of any variable
name in a document. You should not re-declare same variable twice.
JavaScript Variable Scope
The scope of a variable is the region of your program in which it is defined. JavaScript variables
have only two scopes.
Global Variables − A global variable has global scope which means it can be defined anywhere
in your JavaScript code.
Local Variables − A local variable will be visible only within a function where it is defined.
Function parameters are always local to that function.

JavaScript Variable Names
While naming your variables in JavaScript, keep the following rules in mind.
You should not use any of the JavaScript reserved keywords as a variable name. These
keywords are mentioned in the next section. For example, break or boolean variable
names are not valid.
JavaScript variable names should not start with a numeral (0-9). They must begin with a
letter or an underscore character. For example, 123test is an invalid variable name
but _123test is a valid one.
JavaScript variable names are case-sensitive. For example, Name and name are two
different variables.
JavaScript Reserved Words
A list of all the reserved words in JavaScript is given in the following table. They cannot be
used as JavaScript variables, functions, methods, loop labels, or any object names.
abstract else instanceof switch
boolean enum int synchronized
break export interface this
byte extends long throw
case false native throws
catch final new transient
char finally null true
class float package try

const for private typeof
continue function protected var
debugger goto public void
default if return volatile
delete implements short while
do import static with
double in super
Function
A function is a group of reusable code which can be called anywhere in your program. This
eliminates the need of writing the same code again and again. It helps programmers in writing
modular codes. Functions allow a programmer to divide a big program into a number of small
and manageable functions.
Function Definition
The most common way to define a function in JavaScript is by using the function keyword,
followed by a unique function name, a list of parameters (that might be empty), and a statement
block surrounded by curly braces.
Syntax
The basic syntax is shown here.
<script type = "text/javascript">
<!--
function functionname(parameter-list) {
statements
}
//-->

</script>
Example
Try the following example. It defines a function called sayHello that takes no parameters −
<script type = "text/javascript">
<!--
function sayHello() {
alert("Hello there");
}
//-->
</script>
Calling a Function
To invoke a function somewhere later in the script, you would simply need to write the name of
that function as shown in the following code.
<html>
<head>
<script type = "text/javascript">
function sayHello() {
document.write ("Hello there!");
}
</script>
</head>
<body>
<p>Click the following button to call the function</p>
<form>
<input type = "button" onclick = "sayHello()" value = "Say Hello">
</form>
<p>Use different text in write method and then try...</p>
</body>
</html>
Function Parameters
Till now, we have seen functions without parameters. But there is a facility to pass different
parameters while calling a function. These passed parameters can be captured inside the function
and any manipulation can be done over those parameters. A function can take multiple
parameters separated by comma.

Example
Try the following example. We have modified our sayHello function here. Now it takes two
parameters.
<html>
<head>
<script type = "text/javascript">
function sayHello(name, age) {
document.write (name + " is " + age + " years old.");
}
</script>
</head>
<body>
<p>Click the following button to call the function</p>
<form>
<input type = "button" onclick = "sayHello('Zara', 7)" value = "Say Hello">
</form>
<p>Use different parameters inside the function and then try...</p>
</body>
</html>
The return Statement
A JavaScript function can have an optional return statement. This is required if you want to
return a value from a function. This statement should be the last statement in a function.
For example, you can pass two numbers in a function and then you can expect the function to
return their multiplication in your calling program.
Example
Try the following example. It defines a function that takes two parameters and concatenates them
before returning the resultant in the calling program.
<html>
<head>
<script type = "text/javascript">
function concatenate(first, last) {
var full;
full = first + last;
return full;
}
function secondFunction() {
var result;
result = concatenate('Zara', 'Ali');

document.write (result );
}
</script>
</head>
<body>
<p>Click the following button to call the function</p>
<form>
<input type = "button" onclick = "secondFunction()" value = "Call Function">
</form>
<p>Use different parameters inside the function and then try...</p>
</body>
</html>
3.10 Conditions, loops and repetition
Conditional statements are used to perform different actions based on different conditions.
In JavaScript we have the following conditional statements:
Use if to specify a block of code to be executed, if a specified condition is true
Use else to specify a block of code to be executed, if the same condition is false
Use else if to specify a new condition to test, if the first condition is false
Use switch to specify many alternative blocks of code to be executed
The if Statement
Use the if statement to specify a block of JavaScript code to be executed if a condition is true.
Syntax:
if (condition) {
// block of code to be executed if the condition is true
}
Example:
<!DOCTYPE html>
<html>
<body>
<p>Display "Good day!" if the hour is less than 18:00:</p>
<p id="demo">Good Evening!</p>
<script>
if (new Date().getHours() < 18) {
document.getElementById("demo").innerHTML = "Good day!";

}
</script>
</body>
</html>
The else Statement
Use the else statement to specify a block of code to be executed if the condition is false.
if (condition) {
// block of code to be executed if the condition is true
} else {
// block of code to be executed if the condition is false
}
Example:
<!DOCTYPE html>
<html>
<body>
<p>Click the button to display a time-based greeting:</p>
<button onclick="myFunction()">Try it</button>
<p id="demo"></p>
<script>
function myFunction() {
var hour = new Date().getHours();
var greeting;
if (hour < 18) {
greeting = "Good day";
} else {
greeting = "Good evening";
}
document.getElementById("demo").innerHTML = greeting;
}
</script>
</body>
</html>
The else if Statement

Use the else if statement to specify a new condition if the first condition is false.
Syntax:
if (condition1) {
// block of code to be executed if condition1 is true
} else if (condition2) {
// block of code to be executed if the condition1 is false and condition2 is true
} else {
// block of code to be executed if the condition1 is false and condition2 is false
}
JavaScript Switch Statement
The switch statement is used to perform different actions based on different conditions.
Syntax:
switch(expression) {
case x:
// code block
break;
case y:
// code block
break;
default:
// code block
}
The switch expression is evaluated once.
The value of the expression is compared with the values of each case.
If there is a match, the associated block of code is executed.
If there is no match, the default code block is executed.
The default keyword specifies the code to run if there is no case match
When JavaScript reaches a break keyword, it breaks out of the switch block.
Example:
<!DOCTYPE html>
<html>
<body>
<p id="demo"></p>
<script>

var day;
switch (new Date().getDay()) {
case 0:
day = "Sunday";
break;
case 1:
day = "Monday";
break;
case 2:
day = "Tuesday";
break;
case 3:
day = "Wednesday";
break;
case 4:
day = "Thursday";
break;
case 5:
day = "Friday";
break;
case 6:
day = "Saturday";
}
document.getElementById("demo").innerHTML = "Today is " + day;
</script>
</body>
</html>
JavaScript Loops
Loops can execute a block of code a number of times. if you want to run the same code over and
over again, each time with a different value.
Different Kinds of Loops
JavaScript supports different kinds of loops:
for - loops through a block of code a number of times
for/in - loops through the properties of an object
for/of - loops through the values of an iterable object
while - loops through a block of code while a specified condition is true
do/while - also loops through a block of code while a specified condition is true
The For Loop

The for loop has the following syntax:
for (statement 1; statement 2; statement 3) {
// code block to be executed
}
Statement 1 is executed (one time) before the execution of the code block.
Statement 2 defines the condition for executing the code block.
Statement 3 is executed (every time) after the code block has been executed.
Example:
<!DOCTYPE html>
<html>
<body>
<h2>JavaScript For Loop</h2>
<p id="demo"></p>
<script>
var text = "";
var i;
for (i = 0; i < 5; i++) {
text += "The number is " + i + "<br>";
}
document.getElementById("demo").innerHTML = text;
</script>
</body>
</html>
The For/In Loop
The JavaScript for/in statement loops through the properties of an object.
Syntax:
The syntax of ‘for..in’ loop is –
for (variablename in object) {
statement or block to execute
}

In each iteration, one property from object is assigned to variablename and this loop continues
till all the properties of the object are exhausted.
<!DOCTYPE html>
<html>
<body>
<h2>JavaScript For/In Loop</h2>
<p>The for/in statement loops through the properties of an object.</p>
<p id="demo"></p>
<script>
var txt = "";
var person = {fname:"John", lname:"Doe", age:25};
var x;
for (x in person) {
txt += person[x] + " ";
}
document.getElementById("demo").innerHTML = txt;
</script>
</body>
</html>
Output:
JavaScript For/In Loop
The for/in statement loops through the properties of an object.
John Doe 25
The For/Of Loop
The JavaScript for/of statement loops through the values of an iterable objects.
for/of lets you loop over data structures that are iterable such as Arrays, Strings, Maps,
NodeLists, and more.
The for/of loop has the following syntax:
for (variable of iterable) {

// code block to be executed
}
variable - For every iteration the value of the next property is assigned to the variable. Variable
can be declared with const, let, or var.
iterable - An object that has iterable properties.
Example:
<!DOCTYPE html>
<html>
<body>
<h2>JavaScript For/Of Loop</h2>
<p>The for/of statement loops through the values of an iterable object.</p>
<script>
var cars = ["BMW", "Volvo", "Mini"];
var x;
for (x of cars) {
document.write(x + "<br >");
}
</script>
</body>
</html>
Output:
JavaScript For/Of Loop
The for/of statement loops through the values of an iterable object.
BMW
Volvo
Mini
The While Loop
The while loop loops through a block of code as long as a specified condition is true.
Syntax
while (condition) {
// code block to be executed
}
Example:
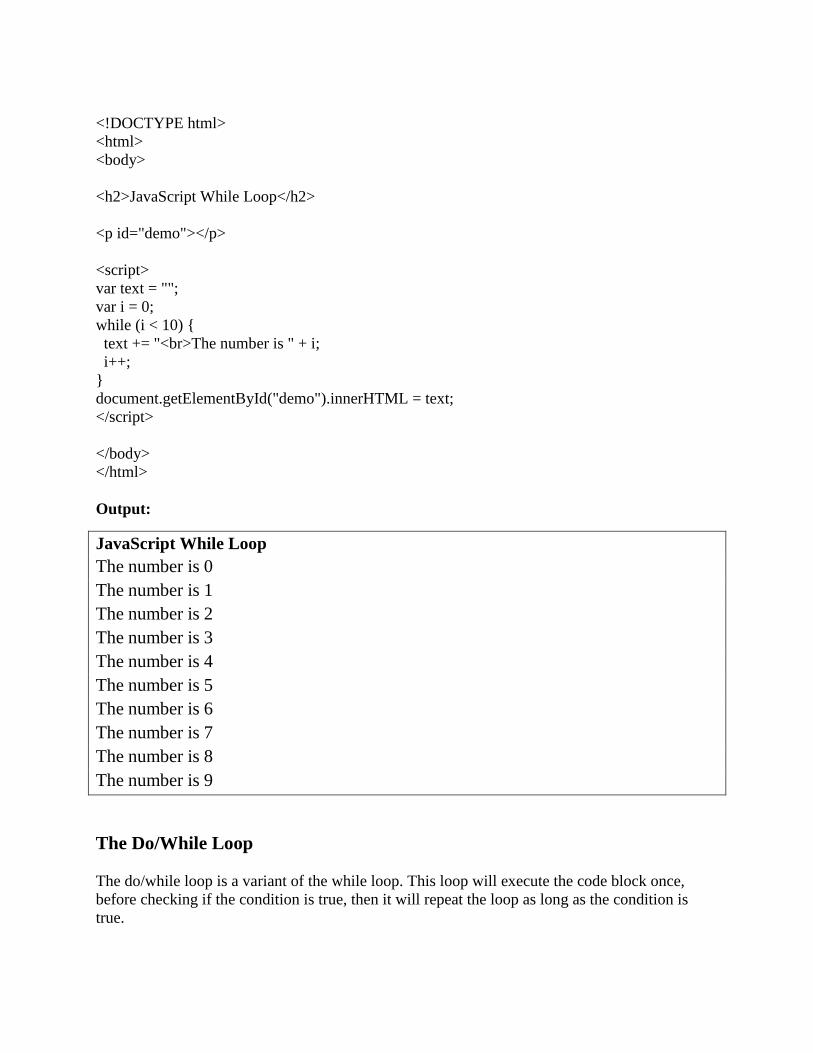
<!DOCTYPE html>
<html>
<body>
<h2>JavaScript While Loop</h2>
<p id="demo"></p>
<script>
var text = "";
var i = 0;
while (i < 10) {
text += "<br>The number is " + i;
i++;
}
document.getElementById("demo").innerHTML = text;
</script>
</body>
</html>
Output:
JavaScript While Loop
The number is 0
The number is 1
The number is 2
The number is 3
The number is 4
The number is 5
The number is 6
The number is 7
The number is 8
The number is 9
The Do/While Loop
The do/while loop is a variant of the while loop. This loop will execute the code block once,
before checking if the condition is true, then it will repeat the loop as long as the condition is
true.

Syntax
do {
// code block to be executed
}
while (condition);
Example:
<!DOCTYPE html>
<html>
<body>
<h2>JavaScript Do/While Loop</h2>
<p id="demo"></p>
<script>
var text = ""
var i = 0;
do {
text += "<br>The number is " + i;
i++;
}
while (i < 10);
document.getElementById("demo").innerHTML = text;
</script>
</body>
</html>
Pop up boxes:
JavaScript has three kind of popup boxes: Alert box, Confirm box, and Prompt box.
Alert Box
An alert box is often used if you want to make sure information comes through to the user. When
an alert box pops up, the user will have to click "OK" to proceed.
Syntax:
window.alert("sometext");
The window.alert() method can be written without the window prefix.
Example
<!DOCTYPE html>
<html>
<body>

<h2>JavaScript Alert</h2>
<button onclick="myFunction()">Try it</button>
<script>
function myFunction() {
alert("I am an alert box!");
}
</script>
</body>
</html>
Confirm Box
A confirm box is often used if you want the user to verify or accept something. When a confirm
box pops up, the user will have to click either "OK" or "Cancel" to proceed.
If the user clicks "OK", the box returns true. If the user clicks "Cancel", the box returns false.
Syntax
window.confirm("sometext");
The window.confirm() method can be written without the window prefix.
Example:
<!DOCTYPE html>
<html>
<body>
<h2>JavaScript Confirm Box</h2>
<button onclick="myFunction()">Try it</button>
<p id="demo"></p>
<script>
function myFunction() {
var txt;
if (confirm("Press a button!")) {
txt = "You pressed OK!";
} else {
txt = "You pressed Cancel!";
}
document.getElementById("demo").innerHTML = txt;

}
</script>
</body>
</html>
Prompt Box
A prompt box is often used if you want the user to input a value before entering a page. When a
prompt box pops up, the user will have to click either "OK" or "Cancel" to proceed after entering
an input value.
If the user clicks "OK" the box returns the input value. If the user clicks "Cancel" the box returns
null.
Syntax
window.prompt("sometext","defaultText");
The window.prompt() method can be written without the window prefix.
Example:
<!DOCTYPE html>
<html>
<body>
<h2>JavaScript Prompt</h2>
<button onclick="myFunction()">Try it</button>
<p id="demo"></p>
<script>
function myFunction() {
var txt;
var person = prompt("Please enter your name:", "Harry Potter");
if (person == null || person == "") {
txt = "User cancelled the prompt.";
} else {
txt = "Hello " + person + "! How are you today?";
}
document.getElementById("demo").innerHTML = txt;
}
</script>
</body>

</html>
3.10 Advance JavaScript: Javascript and objects, JavaScript own objects
Objects, in JavaScript, is it’s most important data-type and forms the building blocks for modern
JavaScript. These objects are quite different from JavaScript’s primitive data-types(Number,
String, Boolean, null, undefined and symbol) in the sense that while these primitive data-types all
store a single value each (depending on their types).
Objects are more complex and each object may contain any combination of these primitive
data-types as well as reference data-types.
An object, is a reference data type. Variables that are assigned a reference value are given a
reference or a pointer to that value. That reference or pointer points to the location in
memory where the object is stored. The variables don’t actually store the value.
An object can be created with figure brackets {…} with an optional list of properties. A property is
a “key: value” pair, where a key is a string (also called a “property name”), and value can be
anything.
An example of a JavaScript Object :
let school = {
name : "Vivekananda School",
location : "Delhi",
established : "1971"
}
In the above example “name”, “location”, “established” are all “keys” and “Vivekananda
School”, “Delhi” and 1971 are values of these keys respectively.
Each of these keys is referred to as properties of the object. An object in JavaScript may also
have a function as a member, in which case it will be known as a method of that object.
Object Properties
Object properties can be any of the three primitive data types, or any of the abstract data types,
such as another object. Object properties are usually variables that are used internally in the
object's methods, but can also be globally visible variables that are used throughout the page.
The syntax for adding a property to an object is −
objectName.objectProperty = propertyValue;
For example − The following code gets the document title using the "title" property of
the document object.
var str = document.title;

Object Methods
Methods are the functions that let the object do something or let something be done to it. There
is a small difference between a function and a method – at a function is a standalone unit of
statements and a method is attached to an object and can be referenced by the this keyword.
Methods are useful for everything from displaying the contents of the object to the screen to
performing complex mathematical operations on a group of local properties and parameters.
For example − Following is a simple example to show how to use the write() method of
document object to write any content on the document.
document.write("This is test");
User-Defined Objects
All user-defined objects and built-in objects are descendants of an object called Object.
The new Operator
The new operator is used to create an instance of an object. To create an object,
the new operator is followed by the constructor method.
In the following example, the constructor methods are Object(), Array(), and Date(). These
constructors are built-in JavaScript functions.
var employee = new Object();
var books = new Array("C++", "Perl", "Java");
var day = new Date("August 15, 1947");
The Object() Constructor
A constructor is a function that creates and initializes an object. JavaScript provides a special
constructor function called Object() to build the object. The return value of
the Object() constructor is assigned to a variable.
The variable contains a reference to the new object. The properties assigned to the object are not
variables and are not defined with the var keyword.
Example 1
<html>
<head>
<title>User-defined objects</title>
<script type = "text/javascript">
var book = new Object(); // Create the object
book.subject = "Perl"; // Assign properties to the object
book.author = "Mohtashim";
</script>
</head>

<body>
<script type = "text/javascript">
document.write("Book name is : " + book.subject + "<br>");
document.write("Book author is : " + book.author + "<br>");
</script>
</body>
</html>
Output
Book name is : Perl
Book author is : Mohtashim
Example 2
<html>
<head>
<title>User-defined objects</title>
<script type = "text/javascript">
function book(title, author) {
this.title = title;
this.author = author;
}
</script>
</head>
<body>
<script type = "text/javascript">
var myBook = new book("Perl", "Mohtashim");
document.write("Book title is : " + myBook.title + "<br>");
document.write("Book author is : " + myBook.author + "<br>");
</script>
</body>
</html>
Output
Book title is : Perl
Book author is : Mohtashim
Defining Methods for an Object
The previous examples demonstrate how the constructor creates the object and assigns
properties. But we need to complete the definition of an object by assigning methods to it.

Example
<html>
<head>
<title>User-defined objects</title>
<script type = "text/javascript">
// Define a function which will work as a method
function addPrice(amount) {
this.price = amount;
}
function book(title, author) {
this.title = title;
this.author = author;
this.addPrice = addPrice; // Assign that method as property.
}
</script>
</head>
<body>
<script type = "text/javascript">
var myBook = new book("Perl", "Mohtashim");
myBook.addPrice(100);
document.write("Book title is : " + myBook.title + "<br>");
document.write("Book author is : " + myBook.author + "<br>");
document.write("Book price is : " + myBook.price + "<br>");
</script>
</body>
</html>
Output
Book title is : Perl
Book author is : Mohtashim
Book price is : 100
The 'with' Keyword
The ‘with’ keyword is used as a kind of shorthand for referencing an object's properties or
methods.
The object specified as an argument to with becomes the default object for the duration of the
block that follows. The properties and methods for the object can be used without naming the
object.

Syntax
The syntax for with object is as follows −
with (object) {
properties used without the object name and dot
}
Example
<html>
<head>
<title>User-defined objects</title>
<script type = "text/javascript">
// Define a function which will work as a method
function addPrice(amount) {
with(this) {
price = amount;
}
}
function book(title, author) {
this.title = title;
this.author = author;
this.price = 0;
this.addPrice = addPrice; // Assign that method as property.
}
</script>
</head>
<body>
<script type = "text/javascript">
var myBook = new book("Perl", "Mohtashim");
myBook.addPrice(100);
document.write("Book title is : " + myBook.title + "<br>");
document.write("Book author is : " + myBook.author + "<br>");
document.write("Book price is : " + myBook.price + "<br>");
</script>
</body>
</html>
Output
Book title is : Perl
Book author is : Mohtashim
Book price is : 100

JavaScript Object Methods
The various methods of Object are as follows:
S.N
o
Methods Description
1 Object.assign() This method is used to copy enumerable and own properties from a source object
to a target object
2 Object.create() This method is used to create a new object with the specified prototype object and
properties.
3 Object.defineProperty() This method is used to describe some behavioral attributes of the property.
4 Object.defineProperties() This method is used to create or configure multiple object properties.
5 Object.entries() This method returns an array with arrays of the key, value pairs.
6 Object.freeze() This method prevents existing properties from being removed.
7 Object.getOwnPropertyD
escriptor()
This method returns a property descriptor for the specified property of the
specified object.
8 Object.getOwnPropertyD
escriptors()
This method returns all own property descriptors of a given object.
9 Object.getOwnPropertyN
ames()
This method returns an array of all properties (enumerable or not) found.
10 Object.getOwnPropertyS This method returns an array of all own symbol key properties.

ymbols()
11 Object.getPrototypeOf() This method returns the prototype of the specified object.
12 Object.is() This method determines whether two values are the same value.
13 Object.isExtensible() This method determines if an object is extensible
14 Object.isFrozen() This method determines if an object was frozen.
15 Object.isSealed() This method determines if an object is sealed.
16 Object.keys() This method returns an array of a given object's own property names.
17 Object.preventExtensions
()
This method is used to prevent any extensions of an object.
18 Object.seal() This method prevents new properties from being added and marks all existing
properties as non-configurable.
19 Object.setPrototypeOf() This method sets the prototype of a specified object to another object.
20 Object.values() This method returns an array of values.
3.11 The DOM and web browser environments The Document Object Model (DOM) is an application programming interface (API)
for HTML and XML documents. The HTML DOM model is constructed as a tree of Objects:

What is the DOM?
The DOM is a W3C (World Wide Web Consortium) standard.
The DOM defines a standard for accessing documents:
"The W3C Document Object Model (DOM) is a platform and language-neutral interface that allows
programs and scripts to dynamically access and update the content, structure, and style of a
document."
What is the HTML DOM?
The HTML DOM is a standard object model and programming interface for HTML. It defines:
The HTML elements as objects
The properties of all HTML elements
The methods to access all HTML elements The events for all HTML elements
The Objects are organized in a hierarchy. This hierarchical structure applies to the organization
of objects in a Web document.
Window object − Top of the hierarchy. It is the outmost element of the object hierarchy.
Document object − Each HTML document that gets loaded into a window becomes a
document object. The document contains the contents of the page.

Form object − Everything enclosed in the <form>...</form> tags sets the form object.
Form control elements − The form object contains all the elements defined for that
object such as text fields, buttons, radio buttons, and checkboxes.
3.12Manipulation using DOM, forms and validations
When writing web pages and apps, one of the most common things you'll want to do is
manipulate the document structure in some way. This is usually done by using the Document
Object Model (DOM), a set of APIs for controlling HTML and styling information that makes
heavy use of the Document object.
Manipulating DOM Elements in JavaScript
Below are some examples of how you can use the document object to access and manipulate HTML.
Finding HTML Elements
Method Description
document.getElementById(id) Find an element by element id
document.getElementsByTagName(name) Find elements by tag name
document.getElementsByClassName(name) Find elements by class name

Changing HTML Elements
Property Description
element.innerHTML = new html content Change the inner HTML of an element
element.attribute = new value Change the attribute value of an HTML element
element.style.property = new style Change the style of an HTML element
Method Description
element.setAttribute(attribute, value) Change the attribute value of an HTML element
Adding and Deleting Elements
Method Description
document.createElement(element) Create an HTML element

document.removeChild(element) Remove an HTML element
document.appendChild(element) Add an HTML element
document.replaceChild(new, old) Replace an HTML element
document.write(text) Write into the HTML output stream
Adding Events Handlers
Method Description
document.getElementById(id).onclick = function(){code} Adding event handler code to an onclick event
Finding HTML Objects
The first HTML DOM Level 1 (1998), defined 11 HTML objects, object collections, and properties.
These are still valid in HTML5.
Later, in HTML DOM Level 3, more objects, collections, and properties were added.

Property Description DOM
document.anchors Returns all <a> elements that have a name attribute 1
document.applets Returns all <applet> elements (Deprecated in HTML5) 1
document.baseURI Returns the absolute base URI of the document 3
document.body Returns the <body> element 1
document.cookie Returns the document's cookie 1
document.doctype Returns the document's doctype 3
document.documentElement Returns the <html> element 3
document.documentMode Returns the mode used by the browser 3
document.documentURI Returns the URI of the document 3
document.domain Returns the domain name of the document server 1

document.domConfig Obsolete. Returns the DOM configuration 3
document.embeds Returns all <embed> elements 3
document.forms Returns all <form> elements 1
document.head Returns the <head> element 3
document.images Returns all <img> elements 1
document.implementation Returns the DOM implementation 3
document.inputEncoding Returns the document's encoding (character set) 3
document.lastModified Returns the date and time the document was updated 3
document.links Returns all <area> and <a> elements that have a href attribute 1
document.readyState Returns the (loading) status of the document 3
document.referrer Returns the URI of the referrer (the linking document) 1

document.scripts Returns all <script> elements 3
document.strictErrorChecking Returns if error checking is enforced 3
document.title Returns the <title> element 1
document.URL Returns the complete URL of the document 1
JavaScript Form Validation
it is important to validate the form submitted by the user because it can have inappropriate values. So, validation is
must to authenticate user. JavaScript provides facility to validate the form on the client-side so data processing will
be faster than server-side validation. Most of the web developers prefer JavaScript form validation.
Through JavaScript, we can validate name, password, email, date, mobile numbers and more fields.
JavaScript Form Validation Example
In this example, we are going to validate the name and password. The name can’t be empty and password can’t be
less than 6 characters long.
Here, we are validating the form on form submit. The user will not be forwarded to the next page until given values
are correct.
<html>
<body>
<script>
function validateform(){
var name=document.myform.name.value;
var password=document.myform.password.value;
if (name==null || name==""){
alert("Name can't be blank");
return false;
}else if(password.length<6){
alert("Password must be at least 6 characters long.");

return false;
}
}
</script>
<body>
<form name="myform" method="post"
action="http://www.javatpoint.com/javascriptpages/valid.jsp" onsubmit="return validateform()"
>
Name: <input type="text" name="name"><br/>
Password: <input type="password" name="password"><br/>
<input type="submit" value="register">
</form>
</body>
</html>
3.13 DHTML: Combining HTML, CSS and Javascript, Events and
buttons
DHTML stands for Dynamic Hypertext Markup language i.e., Dynamic HTML.
Dynamic HTML is not a markup or programming language but it is a term that combines the features of various web
development technologies for creating the web pages dynamic and interactive.
Components of Dynamic HTML
DHTML consists of the following four components or languages:
o HTML 4.0
o CSS
o JavaScript
o DOM.
HTML 4.0
HTML is a client-side markup language, which is a core component of the DHTML. It defines the structure of a web
page with various defined basic elements or tags.
CSS
CSS stands for Cascading Style Sheet, which allows the web users or developers for controlling the style and layout
of the HTML elements on the web pages.

JavaScript
JavaScript is a scripting language which is done on a client-side. The various browser supports JavaScript
technology. DHTML uses the JavaScript technology for accessing, controlling, and manipulating the HTML
elements. The statements in JavaScript are the commands which tell the browser for performing an action.
DOM
DOM is the document object model. It is a w3c standard, which is a standard interface of programming for HTML.
It is mainly used for defining the objects and properties of all elements in HTML.
Uses of DHTML
Following are the uses of DHTML (Dynamic HTML):
o It is used for designing the animated and interactive web pages that are developed in real-time.
o DHTML helps users by animating the text and images in their documents.
o It allows the authors for adding the effects on their pages.
o It also allows the page authors for including the drop-down menus or rollover buttons.
o This term is also used to create various browser-based action games.
o It is also used to add the ticker on various websites, which needs to refresh their content automatically.
Features of DHTML
Following are the various characteristics or features of DHTML (Dynamic HTML):
o Its simplest and main feature is that we can create the web page dynamically.
o Dynamic Style is a feature, that allows the users to alter the font, size, color, and content of a web page.
o It provides the facility for using the events, methods, and properties. And, also provides the feature of code
reusability.
o It also provides the feature in browsers for data binding.
o Using DHTML, users can easily create dynamic fonts for their web sites or web pages.
o With the help of DHTML, users can easily change the tags and their properties.
o The web page functionality is enhanced because the DHTML uses low-bandwidth effect.
Difference between HTML and DHTML
Following table describes the differences between HTML and DHTML:

HTML (Hypertext Markup language) DHTML (Dynamic Hypertext Markup
language)
1. HTML is simply a markup language. 1. DHTML is not a language, but it is a set of technologies of
web development.
2. It is used for developing and creating web pages. 2. It is used for creating and designing the animated and
interactive web sites or pages.
3. This markup language creates static web pages. 3. This concept creates dynamic web pages.
4. It does not contain any server-side scripting code. 4. It may contain the code of server-side scripting.
5. The files of HTML are stored with the .html or .htm
extension in a system.
5. The files of DHTML are stored with the .dhtm extension in a
system.
6. A simple page which is created by a user without
using the scripts or styles called as an HTML page.
6. A page which is created by a user using the HTML, CSS,
DOM, and JavaScript technologies called a DHTML page.
7. This markup language does not need database
connectivity.
7. This concept needs database connectivity because it interacts
with users.
DHTML JavaScript
JavaScript can be included in HTML pages, which creates the content of the page as dynamic. We can easily type
the JavaScript code within the <head> or <body> tag of a HTML page. If we want to add the external source file of
JavaScript, we can easily add using the <src> attribute.
Following are the various examples, which describes how to use the JavaScript technology with the DHTML:
Document.write() Method
The document.write() method of JavaScript, writes the output to a web page.
Example 1: The following example simply uses the document.write() method of JavaScript in the DHTML. In this
example, we type the JavaScript code in the <body> tag.

<HTML>
<head>
<title>
Method of a JavaScript
</title>
</head>
<body>
<script type="text/javascript">
document.write("JavaTpoint");
</script>
</body>
</html>
JavaScript and HTML event
A JavaScript code can also be executed when some event occurs. Suppose, a user clicks an HTML element on a
webpage, and after clicking, the JavaScript function associated with that HTML element is automatically invoked.
And, then the statements in the function are performed.
Example 1: The following example shows the current date and time with the JavaScript and HTML event
(Onclick). In this example, we type the JavaScript code in the <head> tag.
<html>
<head>
<title>
DHTML with JavaScript
</title>
<script type="text/javascript">
function dateandtime()
{
alert(Date());

}
</script>
</head>
<body bgcolor="orange">
<font size="4" color="blue">
<center> <p>
Click here # <a href="#" onClick="dateandtime();"> Date and Time </a>
# to check the today's date and time.
</p> </center>
</font>
</body>
</html>
Output:
JavaScript and HTML DOM
Example 1: This example checks the Grade of a student according to the percentage criteria with the JavaScript and
HTML DOM. In this example, we type the code of a JavaScript in the <body> tag.
<html>
<head>
<title> Check Student Grade
</title>
</head>
<body>

<p>Enter the percentage of a Student:</p>
<input type="text" id="percentage">
<button type="button" onclick="checkGrade()">
Find Grade
</button>
<p id="demo"></p>
<script type="text/javascript">
function checkGrade() {
var x,p, text;
p = document.getElementById("percentage").value;
x=parseInt(p);
if (x>90 && x <= 100) {
document.getElementById("demo").innerHTML = "A1";
} else if (x>80 && x <= 90) {
document.getElementById("demo").innerHTML = "A2";
} else if (x>70 && x <= 80) {
document.getElementById("demo").innerHTML = "A3";
}
}
</script>
</body>
</html>
Output:

CSS with JavaScript in DHTML
Example 1: The following example changes the color of a text.
<html>
<head>
<title>
getElementById.style.property example
</title>
</head>
<body>
<p id="demo"> This text changes color when click on the following different
buttons. </p>
<button onclick="change_Color('green');"> Green </button>
<button onclick="change_Color('blue');"> Blue </button>
<script type="text/javascript">
function change_Color(newColor) {
var element = document.getElementById('demo').style.color = newColor;
}
</script>
</body>
</html>

Output:
Advantages of DHTML
Following are the various benefits or the advantages of DHTML (Dynamic HTML):
o Those web sites and web pages which are created using this concept are fast.
o There is no plug-in required for creating the web page dynamically.
o Due to the low-bandwidth effect by the dynamic HTML, the web page functionality is enhanced.
o This concept provides advanced functionalities than the static HTML.
o It is highly flexible, and the user can make changes easily in the web pages.
Disadvantages of DHTML
Following are the various disadvantages or limitations of DHTML (Dynamic HTML):
o The scripts of DHTML does not run properly in various web browsers. Or in simple words, we can say that
various web browsers do not support the DHTML. It is only supported by the latest browsers.
o The coding of those websites that are created using DHTML is long and complex.
o For understanding the DHTML, users must know about HTML, CSS, and JavaScript. If any user does not
know these languages, then it is a time-consuming and long process in itself.

Definition of Internet:
The Internet is the combination of various networks. We can access the internet through any device
with a network connection like mobile phones and computers. It allows exchange of information
between two or more computers on a network. Thus internet helps in transfer of messages through
mail, chat, video & audio conference, etc.
It can be defined in many ways as follows:
• Internet is a world-wide global system of interconnected computer networks.
• Internet uses the standard Internet Protocol (TCP/IP).
• Every computer in internet is identified by a unique IP address.
• IP Address is a unique set of numbers (such as 110.22.33.114) which identifies a computer
location.
• A special computer DNS (Domain Name Server) is used to give name to the IP Address so
that user can locate a computer by a name.
• Internet is accessible to every user all over the world.
Internet was evolved in 1969, under the project called ARPANET (Advanced Research Projects
Agency Network) to connect computers at different universities and U.S. defence. Soon after the
people from different backgrounds such as engineers, scientists, students and researchers started
using the network for exchanging information and messages.
In 1990s the internetworking of ARPANET, NSFnet and other private networks resulted into
Internet. Therefore, Internet is a global network of computer networks’. It comprises of millions
of computing devices that carry and transfer volumes of information from one device to the other.
Desktop computers, mainframes, GPS units, cell phones, car alarms, video game consoles, are
connected to the Net.
Evolution
The concept of Internet was originated in 1969 and has undergone several technological &
Infrastructural changes as discussed below:
• The origin of Internet devised from the concept of Advanced Research Project Agency
Network (ARPANET).
• ARPANET was developed by United States Department of Defense.
• Basic purpose of ARPANET was to provide communication among the various bodies of
government.
• Initially, there were only four nodes, formally called Hosts.
• In 1972, the ARPANET spread over the globe with 23 nodes located at different countries
and thus became known as Internet.

• By the time, with invention of new technologies such as TCP/IP protocols, DNS, WWW,
browsers, scripting languages etc.,Internet provided a medium to publish and access
information over the web.
Three principal uses of the Internet are:
• Electronic mail. Electronic mail, or e-mail, lets you electronically "mail" messages to users
who have Internet E-mail addresses. Delivery time varies, but it's possible to send mail
across the globe and get a response in minutes. LISTSERVs are special interest mailing
lists which allow for the exchange of information between large numbers of people.
• USENET newsgroups. USENET is a system of special interest discussion groups, called
newsgroups, to which readers can send, or "post" messages which are then distributed to
other computers in the network. (Think of it as a giant set of electronic bulletin boards.)
Newsgroups are organized around specific topics, for example, alt.education.research,
alt.education.distance, and misc.education.science.
• Information files. Government agencies, schools, and universities, commercial firms,
interest groups, and private individuals place a variety of information on-line. The files
were originally text only, but increasingly contain pictures and sound.

Difference between Internet and WWW:
The Internet is known as “interconnection of computer networks”. The Internet is a massive
network of networks. It connects millions of computers together globally, forming a network in
which any computer can communicate with any other computer as long as they are both connected
to the Internet. Information that travels over the Internet does so via a variety of languages known
as protocols.
The World Wide Web, or “Web” for short, or simply Web, is a massive collection of digital pages
to access information over the Internet. The Web uses the HTTP protocol, to transmit data and
allows applications to communicate in order to exchange business logic. The Web also uses
browsers, such as Internet Explorer or Firefox. To access web documents called Web pages that
are linked to each other via hyperlinks. Web documents also contain graphics, sounds, text and
video.
IP as a Routed Protocol:
IP is a connectionless, unreliable, best-effort delivery protocol. IP accepts whatever data is passed
down to it from the upper layers and forwards the data in the form of IP Packets. All the nodes are
identified using an IP address. Packets are delivered from the source to the destination using IP
address. The maximum length of an IP header is 24 bytes, or 32-bit. A Network header contains
the information required to route data on the Internet. Frame Header: It contains the source and the
destination addresses. It contains the error detection and error correction bits. The minimum frame
size for IPv4 is 64 bytes and Maximum is 1500 bytes.

Packet Propagation:
The transmission delay is the amount of time required for the router to push out the packet.
The propagation delay, is the time it takes a bit to propagate from one router to the next. It
denote the distance between two routers d and denote the propagation speed s,
the propagation delay will be d/s.
IP-Address:
An Internet Protocol address (IP address) is a numerical label assigned to each device
connected to a computer network that uses the Internet Protocol for communication. An
IP address serves two main functions: host or network interface identification and
location addressing. IP address is for the INTERFACE of a host. Multiple interfaces
mean multiple IP addresses, i.e., routers. 32 bit IP address in dotted-decimal notation for
ease of reading, i.e., 193.140.195.66. Address 0.0.0.0, 127.0.0.1 and 255.255.255.255
carries special meaning. IP address is divided into a network number and a host number.
Also bits in Network or Host Address cannot be all 0 or 1.


IP Address Classes:
• Class A : Address begins with bit 0. It has 8 bit network number (range 0.0.0.0-to-
127.255.255.255), 24 bit host number.
• Class B : Address begins with bits 10. It has 16 bit network number (range 128.0.0.0-to-
191.255.255.255), 16 bit host number. Used for govt. Sector /Bank
• Class C : Address begins with bits 110. It has 24 bit network number (range 192.0.0.0-to-
223.255.255.255), 8 bit host number. Public use/Engineering.
• Class D : Begins with 1110, multicast addresses (224.0.0.0-to-239.255.255.255). Used
for multicast
• Class E : Begins with 11110, unused or future research
The Gateway Address is the Address of the router where the packet should be sent in case
the destination host does not belong to the same subnet.
Dynamic Host Configuration Protocol (DHCP):
DHCP Server is a network server that automatically provides and assigns IP addresses,
default gateways and other network parameters to client devices.

Static Configuration:
Address Resolution Protocol (ARP):
ARP (Address Resolution Protocol) is used in Ethernet Networks to find the MAC (Media access
control) address of a node given its IP address. Source node (say 192.168.2.32) sends broadcast
message (ARP Request) on its subnet asking ``Who is 192.168.2.33’’. All computers on subnet
receive this request. Destination responds (ARP Reply) since it has 192.168.2.3. It Provides
MAC address in response to media access control address (MAC address). It is a unique
identifier assigned to a network interface controller (NIC) for use as a network address in
communications within a network segment.

Difference between Internet and WWW:
• The Internet is known as “interconnection of computer networks”.
• The Internet is a massive network of networks.
• It connects millions of computers together globally, forming a network in which any
computer can communicate with any other computer as long as they are both connected
to the Internet.
• Information that travels over the Internet does so via a variety of languages known as
protocols.
• The World Wide Web, or “Web” for short, or simply Web, is a massive collection of
digital pages to access information over the Internet.
• The Web uses the HTTP protocol, to transmit data and allows applications to
communicate in order to exchange business logic.
• The Web also uses browsers, such as Internet Explorer or Firefox.
• To access web documents called Web pages that are linked to each other via hyperlinks.
• Web documents also contain graphics, sounds, text and video.
Internet Application:
There are various applications given below:
1. Electronic mail. At least 85% of the inhabitants of cyberspace send and receive e-mail.
Some 20 million e-mail messages cross the Internet every week.
2. Research.
3. Downloading files.
4. Discussion groups. These include public groups, such as those on Usenet, and the private
mailing lists .
5. Interactive games. Who hasn’t tried to hunt down at least one game?
6. Education and self-improvement. On-line courses and workshops have found yet
another outlet.

7. Friendship and Chating. You may be surprised at the number of electronic “personals”
that you can find on the World Wide Web.
8. Electronic newspapers and magazines. This category includes late-breaking news,
weather, and sports. We’re likely to see this category leap to the top five in the next
several years.
9. Job-hunting. Classified ads are in abundance, but most are for technical positions.
10. Shopping. It’s difficult to believe that this category even ranks. It appears that
“cybermalls” are more for curious than serious shoppers.

Web Design
Web browser and Web servers, Features of Web 2.0
For Network communication (Internet), we require a web browser and web servers. Web
browser and servers play an important role to establish the connection. The client sends requests
for web document or service. The message goes from the web browser to the web server is
known as an HTTP request. When the web server receives the request, it searches its stores to
find the appropriate page. If the web server is able to locate the page, it parcels up to the HTML
contained within (using some transport layer protocol), addresses these parcels to the browser
(using HTTP), and transmit them back across the network.
If the web server is unable to find the requested page, it sends a page containing an error
message (i.e. Error 404 – page not found) and it parcels up to the dispatches that page to the
browser. This message received by the web browser by the server is called the HTTP response.
The main differences between the Web browser and web servers are:
WEB BROWSER WEB SERVER
Web Browser is an Application program
that displays a World wide web
document. It usually uses the internet
service to access the document.
Web server is a program or the computer that
provides services to other programs called client.
The Web browser requests the server for
the web documents and services.
The Web server accepts, approve and respond to
the request made by the web browser for a web
document or services.
The web browser acts as an interface
between the server and the client and
displays a web document to the client.
The web server is software or a system which
maintains the web applications, generate
response and accept clients data.
The web browser sends an HTTP request
and gets an HTTP response.
The web server gets HTTP requests and sends
HTTP responses.
Doesn’t exist any processing model for
the web browser.
There exist three types of processing models for
web server i.e Process-based, Thread based and
Hybrid.
Web browser stores the cookies for
different websites.
Web servers provide an area to store and
organize the pages of the website.

WEB BROWSER WEB SERVER
The web browser is installed on the client
computer.
The web server can be a remote machine placed
at the other side of your network or even on the
other end of the globe, or it is your very own
personal computer at home.
Web 1.0:
Web 1.0 refers to the first stage of the World Wide Web evolution. Earlier, there were only few
content creators in Web 1.0 with the huge majority of users who are consumers of content.
Personal web pages were common, consisting mainly of static pages hosted on ISP-run web
servers, or on free web hosting services. Web 1.0 is a content delivery network (CDN) which
enables to showcase the piece of information on the websites. It can be used as personal
websites. It costs to user as per pages viewed. It has directories which enable user to retrieve a
particular piece of information.
Four design essentials of a Web 1.0 site include:
1. Static pages.
2. Content is served from the server’s file-system.
3. Pages built using Server Side Includes or Common Gateway Interface (CGI).
4. Frames and Tables used to position and align the elements on a page.
Web 2.0:
Web 2.0 refers to world wide website which highlights user-generated content, usability and
interoperability for end users. Web 2.0 is also called participative social web. It does not refer to
a modification to any technical specification, but to modify in the way Web pages are designed
and used. The transition is beneficial but it does not seem that when the changes are occurred.
An interaction and collaboration with each other is allowed by Web 2.0 in a social media
dialogue as creator of user-generated content in a virtual community. Web 2.0 is enhanced
version of Web 1.0.
The web browser technologies are used in Web 2.0 development and it includes AJAX and
JavaScript frameworks. Recently, AJAX and JavaScript frameworks have become a very popular
means of creating web 2.0 sites.
Five major features of Web 2.0:
1. Free sorting of information, permits users to retrieve and classify the information
collectively.
2. Dynamic content that is responsive to user input.
3. Information flows between site owner and site users by means of evaluation & online
commenting.

4. Developed APIs to allow self-usage, such as by a software application.
5. Web access leads to concern different, from the traditional Internet user base to a wider
variety of users.
Usage of Web 2.0:
The social Web contains a number of online tools and platforms where people share their
perspectives, opinions, thoughts and experiences. Web 2.0 applications tend to interact much
more with the end user. As such, the end user is not only a user of the application but also a
participant by these 8 tools mentioned below:
1. Podcasting
2. Blogging
3. Tagging
4. Curating with RSS
5. Social bookmarking
6. Social networking
7. Social media
8. Web content voting
Web 3.0 :
It refers the evolution of web utilization and interaction which includes altering the Web into a
database. In enables the up gradation of back-end of the web, after a long time of focus on the
front-end (Web 2.0 has mainly been about AJAX, tagging, and another front-end user-experience
innovation). Web 3.0 is a term which is used to describe many evolutions of web usage and
interaction among several paths. In this, data isn’t owned but instead shared, where services
show different views for the same web / the same data.
The Semantic Web (3.0) promises to establish “the world’s information” in more reasonable way
than Google can ever attain with their existing engine schema. This is particularly true from the
perspective of machine conception as opposed to human understanding. The Semantic Web
necessitates the use of a declarative ontological language like OWL to produce domain-specific
ontologies that machines can use to reason about information and make new conclusions, not
simply match keywords.
Below are 5 main features that can help us define Web 3.0:
1. Semantic Web
The succeeding evolution of the Web involves the Semantic Web. The semantic web
improves web technologies in demand to create, share and connect content through search
and analysis based on the capability to comprehend the meaning of words, rather than on
keywords or numbers.
2. Artificial Intelligence
combining this capability with natural language processing, in Web 3.0, computers can

distinguish information like humans in order to provide faster and more relevant results.
They become more intelligent to fulfil the requirements of users.
3. 3D Graphics
The three-dimensional design is being used widely in websites and services in Web 3.0.
Museum guides, computer games, ecommerce, geospatial contexts, etc. are all examples
that use 3D graphics.
4. Connectivity
With Web 3.0, information is more connected thanks to semantic metadata. As a result, the
user experience evolves to another level of connectivity that leverages all the available
information.
5. Ubiquity
Content is accessible by multiple applications, every device is connected to the web, the
services can be used everywhere.
Difference between Web 1.0, Web 2.0 and Web 3.0 –
WEB 1.0 WEB 2.0 WEB 3.0
Mostly Read-Only Wildly Read-Write Portable and Personal
Company Focus Community Focus Individual Focus
Home Pages Blogs / Wikis Live-streams / Waves
Owning Content Sharing Content Consolidating Content
Web Forms Web Applications Smart Applications
Directories Tagging User Behaviour
Page Views Cost Per Click User Engagement
HTML/Portals XML / RSS RDF / RDFS / OWL

1.4 Web Design: Concepts of effective web design
Web Designing:
Web designing is a process that can be done by anyone who has the right knowledge of the
various disciplines involved but is usually best handled by professionals known as web
designers. The term ‘web design’ may also point to the visual aspect of a website but in truth it
also overlaps with the process of web development in a more broad sense. The process not only
includes front end designing but also the process of writing the markup.
Web design is a concept of planning, creating, and maintaining websites. The very process of
using creativity to design and construct a website and updating it regularly to incorporate
changes is also referred to as web designing. Besides the creation and updating, this concept also
involves taking care of the user interface, the architecture of information present, the layout, the
colors, content, navigation ergonomics, as well as the designs of the various icons.
Concepts of effective web design principles
1. Purpose
Good web design always caters to the needs of the user. Are your web visitors looking for
information, entertainment, some type of interaction, or to transact with your business? Each
page of your website needs to have a clear purpose, and to fulfill a specific need for your website
users in the most effective way possible.
2. Communication
People on the web tend to want information quickly, so it is important to communicate clearly,
and make your information easy to read and digest. Some effective tactics to include in your web
design include: organizing information using headlines and sub headlines, using bullet points
instead of long windy sentences, and cutting the waffle.
3. Typefaces
In general, Sans Serif fonts such as Arial and Verdana are easier to read online (Sans Serif fonts
are contemporary looking fonts without decorative finishes). The ideal font size for reading
easily online is 16px and stick to a maximum of 3 typefaces in a maximum of 3 point sizes to
keep your design streamlined.
4. Colours
A well thought out colour palette can go a long way to enhance the user experience.
Complementary colours create balance and harmony. Using contrasting colours for the text and
background will make reading easier on the eye. Vibrant colours create emotion and should be
used sparingly (e.g. for buttons and call to actions). Last but not least, white space/ negative
space is very effective at giving your website a modern and uncluttered look.

5. Images
A picture can speak a thousand words, and choosing the right images for your website can help
with brand positioning and connecting with your target audience. If you don’t have high quality
professional photos on hand, consider purchasing stock photos to lift the look of your website.
Also consider using infographics, videos and graphics as these can be much more effective at
communicating than even the most well written piece of text.
6. Navigation
Navigation is about how easy it is for people to take action and move around your website. Some
tactics for effective navigation include a logical page hierarchy, using bread crumbs, designing
clickable buttons, and following the ‘three click rule’ which means users will be able to find the
information they are looking for within three clicks.
7. Grid based layouts
Placing content randomly on your web page can end up with a haphazard appearance that is
messy. Grid based layouts arrange content into sections, columns and boxes that line up and feel
balanced, which leads to a better looking website design.
8. “F” Pattern design
Eye tracking studies have identified that people scan computer screens in an “F” pattern. Most of
what people see is in the top and left of the screen and the right side of the screen is rarely seen.
Rather than trying to force the viewer’s visual flow, effectively designed websites will work with
a reader’s natural behaviour and display information in order of importance (left to right, and top
to bottom).
1.5 Web design issues including Browser, Bandwidth and Cache, Display resolution
Main technical issues in web design
Before you create a website, you should consider the technical issues relating to web design,
specifically:
• Browser compatibility
• Screen resolutions
• Web technologies
• Internet speed
Browser issues
Web pages should be able to display across different browsers, including Internet Explorer,
Firefox, Safari and Chrome. When building your site, test your web pages for browser
compatibility issues in as many browsers and operating systems as you can. Remember to test on

most recent browser versions, as well as the older ones - not all of your visitors may be using up-
to-date software.
If you are updating an existing site, use web analytics tools to see what browsers your customers
are currently using to access your website.
Screen resolutions
The most common screen resolution size in recent years has been:
• 1366x768 pixels for desktops
• 360x640 pixels for mobile screens
• 768x1024 pixels for tablets
Higher resolutions, such as 1920x1080 pixels for desktops and 375x667 for mobiles, are gaining
in popularity. It's important to consider these sizes carefully. If you design your website for
higher resolutions, some low-resolution screens and older devices may not be able to display all
of your content. Read about mobile web design best practices.
Download speeds
Not all internet users have high-speed access, so connection speed should also influence your
webpage design. Research suggests that:
• nearly half of web users expect a webpage to load in 2 seconds or less
• 40 per cent of people abandon a website that takes more than 3 seconds to load
Too many images or rich media - such as animations or video - will slow down the speed at
which your webpage loads. This can result in your customers leaving the site. Since page speed
is a ranking factor, slow speeds can also hurt your search ranking.
Try to keep file and image sizes to a minimum. The total size of a webpage should be no more
than 40 to 60 kilobytes.
Technology
Some web technologies can prevent users from viewing your site or affect indexing of your
website by search engines. These include:
• HTML frames
• Javascript
• Flash
• AJAX

If using any of these technologies, consider the potential risks to the usability and accessibility of
your website. See more on web accessibility issues and learn how to design a user-friendly
website.

e-PG PATHSHALA- Computer Science
Web Technology
Module 5
Component-I (B) Description of Module
Items Description of Module
Subject Name Computer Science
Paper Name Web Technology
Module Name/Title HTML
Module Id CS/WT/5
Pre-requisites None
Objectives
• To discuss about Tables and its attributes in HTML.
• To know about HTML Forms.
Keywords HTML, Tables, Forms

e-PG Pathshala
Subject : Computer Science
Paper: Web Technology
Module: HTML
Module No: CS/WT/5
Quadrant 1 – e-text
Learning Objectives
The last module provides an introduction about the different Markup languages and discusses about
the basic tags in HTML such as Formatting, Headings, Paragraphs and Lists in HTML. This module
explains about Tables and its attributes in HTML. Moreover, this module also explains about HTML
Forms .
Introduction
Tables provide a means of organizing the layout of data. A table is divided into rows and columns
and these specify the cells of the table. Cells can contain text, images, links, other tables etc. The HTML
tables allow web developers to arrange data like text, images, links, other tables, etc. into rows and
columns of cells. Tables can also be used for organizing the layout of the web page itself. These HTML
tables can be created using the <table> tag in which the <tr> tag is used to create table rows and <td>
tag is used to create data cells. In simple, we can understand that the HTML Table Element <table>
represents data in two dimensions or more.
HTML Tables
The <TABLE></TABLE> element has four sub-elements:
1. Table Row<TR></TR>.
2. Table Header <THEAD></THEAD> and Table Footer <TFOOT></TFOOT>.
3. Table Data <TD></TD>.
4. Caption <CAPTION></CAPTION>.

The Table rows can be grouped into a head, foot, and body sections using the THEAD, TFOOT and
TBODY elements, respectively. Head section also called the header cell is defined with a <thead>
element that contains the header information such as column names.
The <thead> tag must be used as a child of a <table> element, after any <caption>, and <colgroup>
elements, and before any <tbody>, <tfoot>, and <tr> elements.
The Foot section is defined with a <tfoot> element are the footer rows that appears at the bottom of the
table. The purpose of this <thead> and <tfoot> elements are that when long tables are printed, the head
and foot information may be repeated on each page that contains table data.
The Table body is defined with a <tbody> element. Otherwise they are called as data cells defined with
<td> element.
We can use at most one <thead> or <tfoot> but we can use multiple <tbody> elements in a table.
The caption tag is the descriptive title and used to provide a short description about the table's purpose
or it can be used to name the table.
Example:
The anatomy of how a table can be created in HTML is shown in the below code.
<table border=“1”>
<tr>
<th> Column 1 header </th> <th> Column 2 header </th>
</tr>
<tr>
<td> Row1, Col1 </td>
<td> Row1, Col2 </td> </tr>
<tr>
<td> Row2, Col1 </td>
<td> Row2, Col2 </td>
</tr>
</table>
In the above example the table is defined with the <table> tag. Tables are divided into table rows with
the <tr> tag. Table rows are divided into table data with the <td> tag. A table row can also be divided

into table headings with the <th> tag. By default, all major browsers display table headings as bold and
centered:
We can also use <th></th> as row headings as well as column headings. One of the basic differences
between <thead> and <th> is that <thead> is a block level element, whereas <th> is an inline-block.
<th> also has a special attribute, scope so we can designate what it is a heading of, the column or the
row.
Tables Attributes
Some of the table attributes that can be used with the <table> element is given below.
BGColor: Some browsers support background colors in a table.
Width: We can specify the table width as an absolute number of pixels or a percentage of the
document width. We can set the width for the table cells as well.
Border: We can choose a numerical value for the border width, which specifies the border in
pixels.
CellSpacing: Cell Spacing represents the space between cells and is specified in pixels.
CellPadding: Cell Padding is the space between the cell border and the cell contents and is
specified in pixels.
Align: Tables can have left, right, or center alignment.
Background: Background Image, will be titled in IE3.0 and above. BorderColor, BorderColorDark.
Example1: HTML Table: table1.html
<table border = "1" width = "40%" summary = "This table provides information about the price of fruit">
<caption><strong>Price of Fruit</strong></caption>
<thead>
<tr>
<th>Fruit</th> <th>Price</th>
</tr>
</thead>
<tfoot>
<tr>
<th>Total</th> <th>$3.75</th>
</tr>
</tfoot>

<tbody>
<tr>
<td>Apple</td>
<td>$0.25</td>
</tr> <tr>
<td>Orange</td>
<td>$0.50</td>
</tr>
<tr> <td>Banana</td>
<td>$1.00</td>
</tr>
<tr>
<td>Pineapple</td>
<td>$2.00</td> </tr>
</tbody>
</table>
The above code displays the table with a caption as "Price of Fruit". The table has a <thead> element
and a <tfoot> element. The table body starts with a <tbody> element which holds the content or data of
the table. The table body has four rows. Table attributes such as <border>, <width> and <summary> has
been used in the example. The attribute <summary> is new in HTML5. The output of the above code is
shown in the below Figure 5.1.
Figure 5.1
Example 2: HTML Table: table2.html
<html>

<head><title>Table Cells</title></head>
<body>
<table cellspacing="15" cellpadding="0">
<tr><td>First</td>
<td>Second</td></tr>
</table>
<br/>
<table cellspacing="0" cellpadding="10">
<tr><td>First</td><td>Second</td></tr>
</table> </body>
</html>
Example 2 explains about the table attributes cellspacing and cellpadding. The example specifies that
there are two tables to differentiate and understand about cell spacing and cell padding. The first table
has a cell spacing of 15 pixels that represents the space between cells. The second table has a
cellpadding of 10 pixels which is the space between the cell border and the cell contents. The output of
this HTML table is shown in the below Figure 5.2.
Figure 5.2
Rows and Columns
Cells can span multiple columns and multiple rows with the colspan and rowspan attributes. In order to
make a cell span more than one column we can use the colspan attribute and to make a cell span more
than one row we can use the rowspan attribute.

An example to show that how we use the colspan and rowspan attributes. The table is defined with
three rows. The first row specifies the heading where the heading cell 'name' spans over two columns.
In the second row, the data cell 'Fishing' spans over two rows. The output of the below code is shown in
FIgure 5.3.
Example 3:
<table border="1">
<tr> <th colspan="2">Name</th>
<th>Course</th>
<th>Year</th>
</tr>
<tr>
<td>A B</td> <td>Morgan</td>
<td rowspan="2">Fishing</td>
<td>5</td>
</tr>
<tr>
<td>D J</td> <td>Jones</td>
<td>Sailing</td>
<td>8</td> </tr> <tr> </table>
Figure 5.3
Example 4: The table is defined with four rows. In the first row, the heading cell 'name' spans over two columns and
the heading cell 'course' and 'year' spans over two rows. The second row has the data cell 'last' and 'init'.

The next two rows doesn't span over columns or rows. The output of the below code is shown in FIgure
5.4.
<table border="1" align="center"> <tr>
<th colspan="2" width="60%">Name</th>
<th rowspan="2">Course</th>
<th rowspan="2">Year</th>
</tr> <tr>
<th>Last</th>
<th>Init.</th>
</tr>
<tr>
<td>Morgan</td> <td>AB</td>
<td>Fishing</td>
<td align="center">5</td>
</tr>
<!– etc -->
Figure 5.4
Introduction to Forms
An HTML form is an area of a document that contains normal content, markup, special elements called
form elements or controls such as checkboxes, radio buttons, menus, text fields etc., and labels on those
controls. Forms are used to create (rather primitive) GUIs on Web pages. Users generally use a form in a
web page to send information to a web server or a mail server by entering text, selecting menu items,
etc., for processing.
<form> is just another kind of HTML tag.The syntax to create a form is
<form parameters> ...form elements... </form>

Form elements include: buttons, checkboxes, text fields, radio buttons, drop-down menus, etc. Other
kinds of tags can be mixed in with the form elements.
A form usually contains a Submit button to send the information in the form elements to the server
The form’s parameters tell JavaScript how to send the information to the server. There are two different
ways it could be sent to the server.
Forms can also be used for other things, such as a GUI for simple programs
The <form> tag
The <form arguments> ... </form> tag encloses form elements and probably other elements as well.
The arguments to form tell what to do with the user input. Below is the list of arguments that can be
used with the <form> tag.
– action="url" (required)
• Specifies where to send the data when the Submit button is clicked
– method="get" (default)
• Form data is sent as a URL with ?form_data information appended to the end of
the URL. This method can be used only if data is all ASCII and not more than 100
characters
– method="post"
• Form data is sent in the body of the URL request and cannot be bookmarked by
most browsers
– target="target"
• Specifies where to open the page sent as a result of the request. If
'target=_blank' means the page has to be opened in a new window. If 'target=
_top' means use the same window when the page is opened.
The <input> tag
Most, but not all, form elements use the input tag, with a type="..." argument to tell which kind of
element it is. The type can be text, checkbox, radio, password, hidden, submit, reset, button, file, or
image.
Other common input tag arguments include:
name: the name of the element.

id: a unique identifier for the element.
value: the “value” of the element; used in different ways for different values of type.
readonly: the value cannot be changed.
disabled: the user can’t do anything with this element.
Other arguments are defined for the input tag but have meaning only for certain values of type
Text input
A text field can be created in a form using the following syntax.
<input type="text" name="textfield" value="with an initial value" />
The output of the above code is displayed in Figure 5.5.
Figure 5.5
A multi-line text field can be created in a form using the below syntax.
<textarea name="textarea" cols="24" rows="2">Hello</textarea>
The output of the above code is displayed in Figure 5.6.
Figure 5.6
Note that two of these use the input tag, but one uses textarea.
Password field
<input type="password" name="textfield3" value="secret" />
The output of the above code is displayed in Figure 5.7.

Figure 5.7
Buttons
A submit button can be created using the below syntax
<input type="submit" name="Submit" value="Submit" />
A reset button can be created using the below syntax
<input type="reset" name="Submit2" value="Reset" />
A plain button can be created using the below syntax
<input type="button" name="Submit3" value="Push Me" />
The output of the above code is displayed in Figure 5.8.
Figure 5.8
Radio buttons
Radio buttons are used when it is required to select one option from a set of alternatives. Radio buttons
can be created using the below syntax,
Radio buttons can be created using the below syntax,
Radio buttons:<br>
<input type="radio" name="radiobutton" value="myValue1" />male<br>
<input type="radio" name="radiobutton" value="myValue2”
checked="checked" />female
The output of the above code is displayed in Figure 5.9.

Figure 5.9
When a user clicks on a radio-button, it becomes checked, and all other radio-buttons with equal name
become unchecked.
Labels
In many cases, the labels for controls are not part of the control. For example,
<input type="radio" name="gender" value="m" />male
In this case, clicking on the word “male” has no effect.
A label tag will bind the text to the control
<label><input type="radio" name="gender" value="m" />male</label>
With the above syntax, clicking on the word “male” now clicks the radio button.
Checkboxes
Checkboxes are used when more options are to be allowed at the same time. A checkbox can be created
using the below syntax,
<input type="checkbox" name="checkbox" value="checkbox" checked="checked">
The output of the above code is displayed in Figure 5.10.
Figure 5.10
The attributes of this control are,
– type: "checkbox"
– name: used to reference this form element from JavaScript
– value: value to be returned when element is checked
Note that there is no text associated with the checkbox Unless we use a label tag, only clicking on the box
itself has any effect.
Drop-down menu or list
A menu or list can be created using the following syntax,
<select name="select">

<option value="red">red</option>
<option value="green">green</option>
<option value="BLUE">blue</option>
</select>
The <select> element is used to create a drop-down list and the <option> tags inside the <select>
element define the available options in the list.
The output of the above code is displayed in Figure 5.11.
Figure 5.11
The additional attributes of this control are,
– size: the number of items visible in the list (default is "1")
– multiple
• If set to "true" (or just about anything else), any number of items may be
selected.
• If omitted, only one item may be selected.
• If set to "false", behavior depends on the particular browser.
Hidden fields
Hidden fields are similar to text fields that does not show on the page.
A hidden field: <input type="hidden" name="hiddenField" value="nyah">
<-- right there, don't you see it?
The output of the above code is displayed in Figure 5.12.
Figure 5.12

The purpose of this hidden field is that all input fields are sent back to the server, including hidden fields.
This is a way to include information that the user doens’t need to see or that we don’t want others to
see.The value of a hidden field can be set programmatically (by JavaScript) before the form is submitted
Now let us look at an example that includes the controls what we have seen earlier.
Example
In this example, a form is created with a text field and radio buttons.
<html>
<head>
<title>Get Identity</title>
</head>
<body>
<p><b>Who are you?</b></p>
<form method="post" action="">
<p>Name:
<input type="text" name="textfield">
</p>
<p>Gender:
<label><input type="radio" name="gender" value="m“ />Male<label>
<label><input type="radio" name="gender" value="f" />Female</label>
</p>
</form>
</body>
</html>
The output of the above code is displayed in Figure 5.13.
Figure 5.13
Let us now look at a complete example that includes all the controls. The form that is displayed in the
web page is shown in Figure 5.14.
The list of all controls has been summarized as below,
• text • checkbox • radio (buttons)

• select (options) • textarea • password • button • submit • reset • hidden • file • image
Figure 5.14
Summary
In this module we looked at HTML in detail and explored about the Tables in HTML. This module also
explains about the HTML Forms with syntax and examples in detail.