IGHTING.BUjUTSU II - Arcade Museum
45
• I(ONAMt. . , , ., IGHTING .BUjUTSU II .. ', ,. . '. ,. . ',' . 1, • Failure to o perate ' the corre c tly could r es ult in ma lf uncti' on or accidents,so ple ase r ea d this manual carefully before comme ncing operation. Be su re to ' operate the machine I ' -' • as desc ribed in ... t . -\ Keep this manual carefully i" _q as to (be for us 7 PN.0000036324
-
Upload
khangminh22 -
Category
Documents
-
view
1 -
download
0
Transcript of IGHTING.BUjUTSU II - Arcade Museum

•
I(ONAMt. . , , .,
IGHTING.BUjUTSU II .. ', ,'~ .)~ ,.
. '. ,. ,,~.J . ~ ',' . 1,
• Failure to operate ' the machin~ correc tly could result in malfuncti'on or accidents,so please read this manual carefully before commencing operation. Be su re to 'operate the machine
~ I ' -' • ~
as described in ~tai.~ .man~a!. ;i ... t . .~ - \ Keep this manual carefully i"_q as to(be for u s7 ~hen ncces~ary.
PN.0000036324

•
•
About this product
Thank you for purchasing this Konami product. This manual explains how to operate your game machine correctly and safely.
. )':";;"c~:
-Failure to operate the machinecorrectiy could result in m.alfW1Cjio.n or . . '" .- '.-. ' . ' . • • ,- f
":apcidents,' so. pleasEj ' read th.is ,.mlln ual ~\lEElf,!l",y:;: be!ore " ~Qin!J1en~i ng . , 'r . ...... .. ,.- ' . , ,.! . • -',' ', . " . ' ,"'. _: . .. >,' • ·".c.,".. .t-".. . . • " '" . . ~' I<!pe~atlon··;7B~~l!re 'tCl;·c5p~rate~1!1~ ·.ma,chlnEj~s,fde,l%~rlb~d:lr :~~,,*:'!J1,an.lIal . . j)' ·",~K¢epth is' man'ual~cafef(jIIYfjso .af;\~"'1Pe .readYitqtilJ*f·wlie,n" I\~9,~.~sllry;, ··· 'i,' ·' ~Ifthe machinestiU.~all~{~9idispl\ly,or)0 get .iit~tt:Elq~lmri1e(;Hl\t,ely turn.cOFf' '
I" . the power switch ~nd coritactyO~r' hearest ~ilJler;~:i:i .. .";-.} . • ,' . " . i
This manual covers the following models: -----------------
eGN645-TB
eGN645-UC
eGN645-HD
The specifications of GN645·TB may be somewhat different from GN645·HD and GN645-UC.
In such a case, read the descriptions of the model which applies to the game machine you
are operating.
-The specifications of thi s product are subject to ch ange wi thout notice for reasons such as improving the performance.
-The contents of this game, its main data and design are protected by copyright law and industrial property law.
-Unauthorized reproduction of this document or any of its contents is strictly forbidden.
© 1997 KONAMI ALL RIGHTS RESERVED.
This equipment has been tested and found to comply with the limits for a Class A digital device, pursuant to Part 15 of the FCC Rules.
These limits are designed to provide reasonable protection against harmfui interference when the equipment is
operated in a commercial environment. This equipment generates , uses, and can radiate radio frequency
energy and, if not installed and used in accordance with the instruction ma nual, may cause harmful
interference to radio communications. Operation of this equipment in a residential area is likely to cause
harmful interference in which case the user wi ll be required to correct the interlerence at his own expense.

•
•
Contents
About this Product..................................................... (i)
Precautions for use.......... ....................................... ... .2
Locations of Warning and Safety Labels.................. 7
1. Specifications.............................................................. 8
2. Identification of Major Parts...................................... 9
3. How to Play .................................................................. 11
4. Opening the Control Pane!.......................................... 13
S. PCB Settings................................................................ 14
5.1 PCB Start Up Check (SELF TEST)............................ 14 5.2 Adjusting the Game Environment (Manual Test)...... 15 5.3 Mode Descriptions...................................................... 16
6. Setting up the Game Machine..................................... 20
6.1 6.2 6.3 6.4 6.S 6.6
Connecting the Units.................................................... 20 Fastening the Adjusters............................................... 21 Service Pane!................................................................ 22 Power Unit.................................................................... 22 Adjusting the Sound Volume....................................... 22 DIP Switch and Coin Credits (price of Play).............. 23
7 Maintenance................................................................. 29
7.1 Circuit Breakers and Fuse Replacement................... 29 7.2 Ajusting the Projector.................................................. 30 7.3 Adjusting the PSU Voltage Levels.............................. 33 7.4 Wiring Schematic.......................................................... 34

' . • t -
, ~- .. . , , . \
• precal,Jtions for use
In this manual, the precautions to be followed without ·fail in order to .·pr.event damage to persons to install , use or maintain "FIGHTING WU-SHU·n.o(FIGHTING BUJUTSUn.o)" or other persons or to properties are shown as follows.
Be, sure to read the following
-The following suggestions show the degree of danger and damage caused when the product is used improperly with the suggestions disregarded. •
A WARNING
A CAUTION
Indicates a situation where disregarding the
suggestions could result in death or serious
injury.
Indicates a situation where disregarding the
suggestions could result in injury or product
damage.
'.
Indicates a matter which should be performed
without fail.

•
•
Precautions for use
Setting Up _ . . - '. . ..
1 A WARNING )
-Be sure to consult your nearest dealer when setting up, moving or transporting this product . . This product should not be set up, moved or transported by anyone other than industry specialists. Doing so could result in injury or product damage.
·When installing the machine, be sure to place 12 level adjusters on the floor and make sure that the machine is stable at a level. If the machine is unstable, it cou ld result in injury or accidents.
-When setting up this product, take care that no undue force is applied to the opening/closing sections or moving sections of the game machine. Failure to do so' could cause injury, accidents or product damage .
-This product is an indoor game machine. Never set up the game machine outside. t<::"\ ·Setting up this product outside could result in accidents or equipment fallu re. \.y
-Do not set up the game machine near emergency exits. t<:\ ·Doing so could block exits in time of emergency and could result in death or serious \.Y injury.
-Do not set up the game machine. f\:\ ·In a place exposed to rain or moisture. \..Y ·In a place exposed to direct sunlight. ·In a place exposed to direct heat from air·conditioning and heating equipment, etc. ·near hazardous flammable substance such as thinner and kerosene. ·on an inclined or uneven floor. ·near fire extinguishing equipment. ·in a place exposed to strong vibration. ·in a place exposed to excessive dust. ·near equipment generating strong magnetism or electric waves .
-Do not place containers holding chemicals or water on or near the game machine. t':\ ·Electrical shock or damage could be caused by water or foreign matter entering the \.Y inside of the machine.
-Do not place objects near the ventilating holes. t<::\ ·Doing so could cause the internal temperature to rise excessively, resulting in fire or \..Y equipment failure .
-Do not bend the power cord by force or place heavy objects on it. ·Doing so could result in electric leakage or fire.
-Never plug or unplug the power cord with wet hands. ·Doing so could result in electrical shock.
-Never unplug by pulling the power cord . . Doing so could damage the cord, resulting in electric leakage or fire.
:"' .: .... • < • . ' '. ~. ," .

!' j !
I i
, I
"
"
, ,
·1 . , "
j
. ,". ' "
': . ',' .' . ~( ':": .,' , , .
Precautions tor use
Setting Up
-Se sure to use indoor wiring for within the specified voltage range. For extension cord, use indoor wiring of the specified rating or more . ·Failure to do so could result in fire or equipment failure.
·Se sure to use the attached power cord.
-Never plug more than one cord at a t ime in the electrical receptacle.
·Doing so CQuld result in fire or electrica l shock.
-Do not lay the power cord where people walk through. You may tread on or stumble t<::\ over them. \y . You may fall down and get injured or the cord may get damaged.
·00 not place hea vy objects on or pull by force the unit connecting pipe the t':\ projector unit and control unit. \..Y
·Doing so could result in equipment failure, electrical shock or fire .
-Se sure to ground this product. ·Otherwise an electric shock or machine trouble may be caused.
-Clearances of 100 mm (3.94in) or more should be created betwee n the game machine and walls.
Operation ' .
( A WARNING )
-If there is any abnormality such as smoke, bad smell or abnormal noise being 4!!1: emitted from the machine, immediately turn OFF the main power switch and unplug ~ the power cord from the receptacle to stop operating it. ·Using the machine in abnormal conditions could result in fire or accidents. ,------- In case of abnormality ---------,
1 Tum OFF the main power switch. 2 Unplug the power cord from the receptacle.
3 Contact your nearest dealer. '---
-Do not leave the power cord plugged Improperly or covered with dust.
.Doing so could result in electrical shock or fire , so inspect the power cord periodically.
-Never disassemble, repair or modify any section other than those specified in this t<5'\ manual. \.£>I ·Doing so could result in fire, mal function or equipment fa ilure. ·Ask your nearest dealer to perform repairing, etc .. ·We do not assume any responsibi l i ty fo r any damages that would be caused by tampering with the machine.
•
•

•
•
Precautions for use
Operation ' . . '. .' . '., ' .. "'. _ ' .
. ( A CAUTION )
-Do not use this product anywhere other than industrial areas. r:::\ ·Using in a residential area or an area next to a residential area could affect signal \.Y reception of radios, television sets, telephones, etc.
-The following users should not play the game. r:::'\ r::.D:;-o_i_n9"-s_o-,C,-o_u,,ld_ca,-u,::s_e_a_C_ci_d-;e_n-;-ts--;o_, -;ill_n_e_s"s.:;-__ -::--c:--: __ --;-:-_:;-..,,--;-:;-__ , 'VI ·Those under the influence of alcohol. ·Those suffering from or being treated for arm
or wrist ailments .
-Do not plug or unplug the power cord with wet hands. ·Doing so could result in electrical shock.
-When handling the power cord, take care of the following: ·Improper handling could result in fire or electrical shock.
·00 not damage the power cord. ·00 not bend the power cord excessively. ·00 not heat the power cord. ·00 not bind the power cord. ·00 not sandwich the power cord.
·00 not modify the power cord. -Do not twist the power cord. ·00 not pull the power cord. ·00 not tread on the power cord. ·00 not drive a nail into the power cord.
-If the power cord or power plug becomes damaged, stop using the machine immediately and ask your nearest dealer to replace the parts. ·Using a damaged power cord or power plug could result in fire or electrical shock.
Inspection and cleaning .' - -".' '-. '. ... .-
[ AWARNING)
-Be sure to turn OFF the main power switch and unplug the power cord from the ~ receptacle before inspecting or cleaning the machine. ~
·Failure to do so could result in electrical shock.
-When replacing parts, be sure to use parts of the co~rect specifications. Never use t<::\ parts other than the specified ones. 'VI ·Using improper parts CQuld result in fire or equipment failure.
-Allow only a qualified engineer. to open the Front door and back door of the f:::'\ projector unit. \.Y ·Otherwise an accident or electric shock may result. t\f'\
-Never disassemble, repair or modify any section other than those specified in this \.£:I manual. ·Doing so could result in fire, malfunction or equipment failure. ·Ask your nearest dealer to periorm repairing, etc. ·We do not assume any responsibility for any damages that would be caused by tampering with the machine.
-To clean the game machine, wipe it with a soft cloth dampened in a neutral detergent and wrung out. ·Using organic solvents such as thinner may decompose the material. ·Electrical shock or equipment failure could be caused by water entering the inside of the machine.
.:.
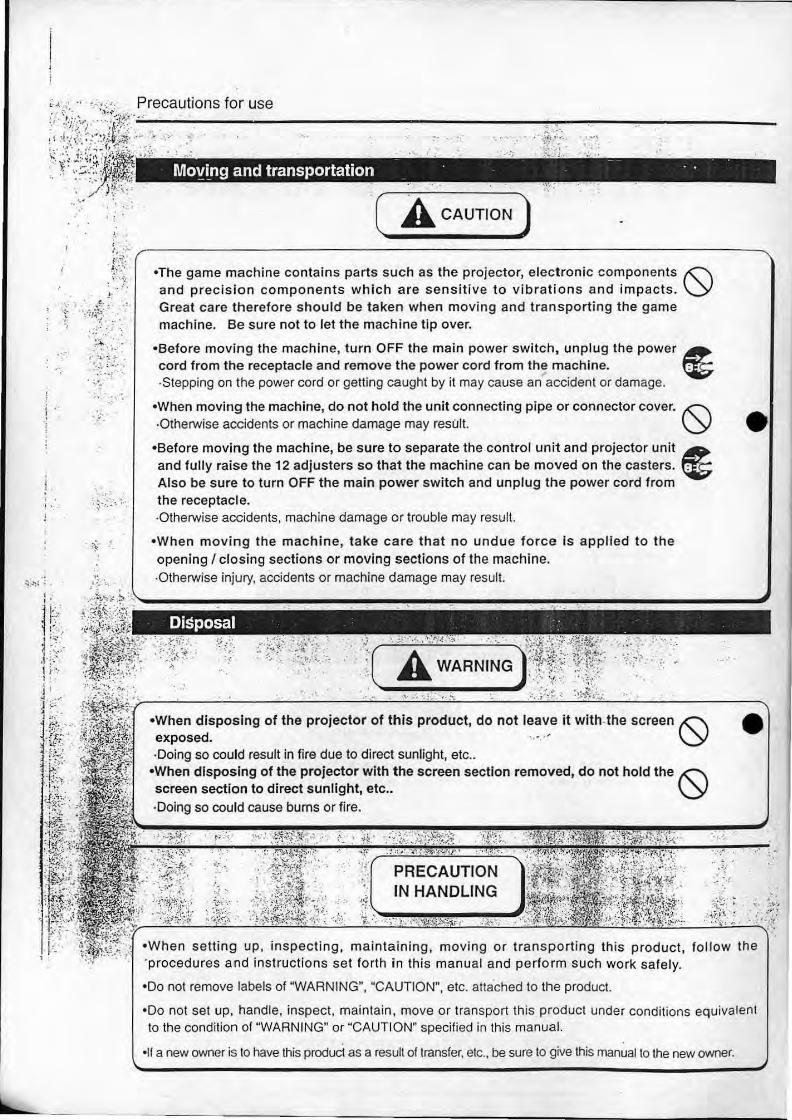
Moving and transportation ..
( A CAUTION )
·The game machine contains parts such as the projector, electronic components t<::\ and precision components which are sensitive to vibrations and impacts. \.y Great care therefore should be taken when moving and transporting the game machine. Be sure not to let the machine tip over.
-Before moving the machine, turn OFF the main power switch, unplug the power tt cord from the receptacle and remove the power cord from the machine. : , ·Stepping on the power cord or getting caught by it may cause an acddent or damage.
-When moving the machine, do not hold the unit connecting pipe or connector cover. t<::\ ·Otherwise accidents or machine damage may result . \.Y
-Before moving the machine, be sure to separate the control unit and projector unit ~ and fully raise the 12 adjusters so that the machine can be moved on the casters. ~ Also be sure to turn OFF the main power switch and unplug the power cord from the receptacle. ·Otherwise accidents, machine damage or trouble may result.
-When moving the machine, take care that no undue force is applied to the opening I closing sect ions or moving sections of the machine. ·Otherwise injury, accidents or machine damage may result.
DiSposal
, :-:.
•
-When disposing of the projector of this product, do not leave it with. the screen t<:\ • exposed. . .. 0 •• ' \.y ·Ooing so could result in fire due to direct sunlight, etc ..
-When disposing of the projector with the screen section removed, do not hold the t<:\ screen section to direct sunlight, etc.. \.Y ·Ooing so could cause burns or fire .
PRECAUTION IN HANDLING
·When setting up , inspecting, maintaining, moving or transporting this product, follow the ·procedures and instructions set forth in this manual and perform such work safely.
000 nol remove labels of "WARNING", "CAUTION", etc. attached to the product.
·00 not set up, handle, inspect, mainta in, move or transport th is product under condilions equivalent to the condi tion of "WARNING" or "CAUTION" specified in this manual.
. . · If a new owner is to have this product as a result of transfer, etc., be sure 10 give this manual 10 the new owner.

•
•
• Locations of warning and other safety labels
1 3 1 2
• Types of warning and other safety labels
1
2
Ensure all leg levelers are securely set and game cabinet Is level.
ELECTRICAL SHOCK HAZARD. DO NOT OPEN EXCEPT FOR SERVICE.
3 ' we,gh,168kg(370Ib); .-4 . I we,gh,100kg(220Ib) ,
'. _____ ~3~ .
5 I We,gh,45kg(99Ib) 0<"""""'.3 .. .
6
7
- ,,~,
flGIfTlHG WlJ.SHU
• ~ . ~
50 • _. _co..LTD, _.- WTtIlIU ""
~ . ~ , . ,
-~
KONAMI. _.-- '-1ISl1
-The above is an example.
The entries are different from
destination to destination.
-""""'" """"" 1IIIJH lI-IE RID_SITS N _1$ OF I'CIC AI.US fOR A CUSSA~DEW1 CftRAlOf 0# THS EJ:ll.IP. _N"~NEJ. ..... ., CAUSIE \.tWXEPTAIlLE NIBY'EREtCE 10 AotDO IN) lVl'IEI:::EPTOf~1l£ Cf'ERo\~ 10 TNa! _T· ns !mJ'S NE IECESSARY to IX:IRRI;J;:f '!HI! HfER. ~'M9Df'1oOC1! IoU5T NXB'f IHI hie ICE
"""'" ~ -~ n\O,T 1M ... c.r.usE
~-~
KONAMI. ,--" ... - - ----
GN645-UC only
o z
4
8
9
10
6 7 5
When you open the speaker panel, be careful not to hH the projector .
Do not put any weight on the open control door.

1 Specifications
1190(469) 747(294)
N ~II III
m ~
to m N ." ~
l • \ s ICJ [CO)
~ ,,;
'\ !2-
~ '\ M
0 jd <> )\ 0 m
~ [ ~ N ~ . .
I 1050(4 1.3) I 525(20.7) I 780(30.7) 601 (23.7) I 11 46(45.1) 1920 to 2400(75.6 to 94 .5) I
Dimensions Refer to the Figures above (mm)
Wei~ht Total Weight 313 Kg (688Ib)
Power Consumption 350 Watts at 230V ac 50 Hz
Monitor 50 icnh Colour Projector
Service Condition Temp. 0 to 30 C (32 to 86 F) Humidity 20 to 80% (No dewing allowed)
Allocated Spares -Instruction Manual -Coin Door Keys -Alarm Instruction Manual -Allen Key 2.5rnrn -IEC Power lead 2Metres -Connecting Plates -M8x20 button head Bolts black -Allen Key 5mm -Remote Control (projector)
, -Battery Size AA -Fuse5Amp
...... -M4xlO Mushroom Hd -Bulb 12v 2.2w
·If any part is defective or not found, contact your nearest dealer. . 'The specifications of this product are subject to change without notice for reasons such as improving the performance.
•
•
•

i I' 'I I,
il :I 'I " " I! , 'i' •
I " 'i
i II II
2 Names of parts and list of main parts
37-L··, I I "", I
•......•• .. . .. .,...,...-36 35T"""""; ,,," I
16
8 14
33 32
o
11 1
o o
1 30
22
0
9
13
10
25
(~ ' o 0
11
23 , ,
0
0 I
o o
20
4
26
3
38
0
0

2.N.mes of Parts and list of Main Parts
•
•
10

•
•
3 How to play
The "FIGHTING WU-SHU", (FIGHTING BUJUTSU",)" is a evolving 3-D fighting game with an Artificial Intelligence function. The motion-capture program realizes movements of hyper-reality of each fighter and the state-of-the-art used for this game brings you to a marvelous image world. Please enjoy this unprecedented fighting game, fully utilizing each character's own military arts .
• How to play - - - - - - - - - - - - - - - - - - - - - - - - - - - - ---Character manipulating method One joy stick and three buttons are used for manipulating the character. The joy stick is operated to move the character. The three buttons are for "GUARD", "PUNCH" and "KICK", respectively. The combined operation of the joy stick and buttons enables various military arts. (When the AUTOMATIC mode is selected, "PUNCH" and "KICK" cannot be used separately and "GUARD" is performed automatically.)
·Joy stick ...... ............... Used to move the character.' ·Guard button (button 1) ... Pressing and holding this button will make the character
guard itself against the opponent's attack. (The character cannot be moved during "GUARD".)
·Punch button (button 2) ... Pressing this button will make the character make attacks with hands such as a punch.
·Kick button (button 3) .. .... Pressing this button will make the character make attacks with legs such as a kick .
Move character TAP <> CHARGE ..
(DUCK):~J [~WALK)="J lOW .lIMP HIGH .AJMP
tm:AJUMP p:a:::J ~DASH~ ~"'r5:(EVADE):N::""", ,, ,,,{ RUN ~J
~ @~:~G~D
AVOidattac~ ~~ til, possible 10 avoid lhe Upperposl!lon..A--.@+® opponent', attac k and -..r cOIInlerltlack 1he Opponet'lL Middle position tZ @+® To avert a down, press the@buttontimely.
1 Put a coin into the coin input port. Press the start button to start the game. 2 Select a character with the joy stick and set it by pressing the button. 3 Select the MANUAL mode or AUTOMATIC mode with the joy stick and set it by pressing
the button. ·MANUAL mode .............. . ·AUTOMATIC mode ........ .
The joy stick and three buttons are used to play the game. It is a mode for beginners. The joy stick and one button are used to play the game.
4 A three-round bout with the opponent character is started. 5 The character loses a battle if the strength gauge displayed on the screen becomes "0" or
in case of ring-out or time-out. '
.Jolning the game halfway - - - - - - - - - - - - - - - - - - - - - ~ -·You can join the game any1ime during the 1 P play. In this case, switching from "CPU Play" to "vs Play" is performed automatically .
• Continuing the game - - - - - - - - - - - - - - - - - - - - - - - - - -·You can continue the game if you take the procedure within about 10 seconds before the game is over.
II

3 How to play
.Command table Each character .has its own military arts .
• Artificiallntelligence function The Artificial Intelligence function is individually set in each character. The CPU character will learn from each fight and fight with the player using its various attacking combinations learned. The Artificial Intelligence function is also applied to "AUTOMATIC mode" and "CPU Play".
• Best player's score battle mode This mode makes it possible to virtually fight with an opponent registered as the best player when "CPU Play" is selected. Because the Artificial .lntelligence function stores the fighting patterns of the best player, you can make a virtual fight with the best player who is not present at the game machine. • The best player can register his or her initials using three characters. The in itials are displayed on the lower right portion of the screen in "Artificial Intelligence VS Mode" .
• AUTOMATIC mode It is a mode for beginners in which various attacks can be made by using only the joy stick and one button. By operating one button, splendid military arts can be used as if commands were entered. Pressing the button repeatedly will make it possible to exert a series of military arts. "GUARD" is automatically performed by the CPU as much as possible. The past fighting patterns learned by the CPU through the Artificial Intelligence function are reflected in attacks automatically made when the button is pressed. (In the AUTOMATIC mode, no name can be entered.)
• Strength gauge The present strength is indicated by the blue gauge. When the character sustains damage, the red gauge appears and the strength decreases gradually. At this time, the character is susceptible to additional damage .
• WU-SHU (BUJUTSU) gauge The WU-SHU (BUJUTSU) gauge is a globe located beside the strength gauge. "ONE HIT KNOCKOI.JT" can be used only when the WU-SHU (BUJUTSU) gauge becomes large and brilliant. "ONE HIT KNOCKOUT' is a secret military art with which you can knock out the opponent with a single attack . .
• Free movement system Commands concerning movements such as a dash and axial movement can be entered with one action in most cases. .
• Hidden characters After the machine is operated for a certain time, you can make a hidden character appear and exert military arts at a higher speed. To do so, select "GAME OPTIONS" in the manual test mode and make setting. (See Page 18)
•
•
•
5 PCB settings
5-1 PCB start-up check (self test) . When the power switch is turned ON after installation of machine, the performance of game Printed Circuit Boards (PCB) is checked automatically and the result is displayed on the screen .
• Result of test - - - - - - - - - - - - - - - - - - - - - - - - - --
If test is OK------- - --------------,
·The machine goes to the game mode and the demonstration game gets started.
If any abnormality is detected -------------------..
. An error message appears on the screen and the checking is repeated.
Turn ON the power switch and wait for 2 minutes to see if the machine functions again. If not, immediately turn OFF the main power switch, unplug the power cord from the receptacle and contact your nearest dealer .

4. Opening and closing the Control Pallel
4 Opening and closing the control panel .Howto open the control panel ----- - - -- ----------
-'.-~:~ :.... ... .. " . :. ;"€:';;;,,:;:.(- . ". '-_:~:.:,., .-. •. ,::. _;': ) ,r ,':t;' •.. . ,', ,~ :. ".;,,~ . .\, ,, ; ~. ". ~ !., ,;)e ~, ...... ~ ."":,,,:~. ~-.,s:;:.itf:·: " .:,' :"
:~~~~:~t;~~i:i:;~~::~:~~":;~)~:~;~,:J::::;:~~~i~g';, ~', .>,:;~ .. " '". ". ':'~'''': . "":;'~'\'.'~:':';:': ,".f,. c- ',' • '.' ""1, .: . ' . ~~. !.. .. ;,' ',' _'-,' . . "· .. "..;' , ·/:·;(li¥:-~~b~~~;: .. ~ '.;'~ : \':;':' :; Il!lrlya~y;I~,%'\~t~!~lmpll~t to .m$ m.,:p ,.... .:" .',' .' :;'; ;·i· .';~\;1J!&;i\':l{';" >
1
2
3
4
-When oPEl!1lflg:~~e.speaker p,anel, take care not toletthe: ~J)ll.1!Mrpanel' : 'i;tri~e·!he)'l~pl~qtslqJni,t. .: :,;+, .: . . . .. , ·:·' ?;:'i'~r? .'." -Beforeclq,sm'g 'the,control pa;nel, clbse the speaker panel. flrs~;1i;· ;;'· . . -When closin9 'ttie~ontrol p'a~el , be sure t9 do so whHe'fioTdi'n'g it ~ith ' hands. ' Never 'utilize its dead-weight to close it.
-When closing the control panel and speaker panel, takegreat.care that your fingers, etc. are not pinched.
I Open the coin door
I Release control panel latches by pulling on handle sbown.
I Lift up the control panel whil e holding the joy stick.
I When opening the speaker panel , 1~-----l(~p:;;:;;~:::;;;~~ open it until it stops .
• How to close the control panel- -- - - _ .. - - .. .;. _____ - --
1 I Gently close the speaker panel.
2 I Gently close the control panel.
11

•
•
5 PCB settings
5-2 Adjusting the game environment (manual test) Manually check and change the settings for the screen display and game contents .
• Starting the manual test mode -------------------
1 Turn ON the power switch. 2 While the demonstration game is playing, press the test switch on the service
panel. ·The unit is set in the manual test mode and the main menu is displayed on the screen .
• Quit the manual test mode - - - - - - - - - -;.. - - - - - - - - --
1. Tum up / down the 1 P joy stick to select "GAME MODE" on the main menu screen. 2. Press the 1 P button 1 (guard button).
·The screen goes back to the game mode .
• Main menu screen (basic items) -------------------
MAIN MENU
SCREEN CHECK
oChecking the controls. -> Page 16
·Adjusting the screen alStortlon. ->Page 16
-Adjusting the display color.
J/OCHECK~~~~~~~~~~~ COLOR CHECK HOD SECTOR CHECK SOUND DRAM CHECK SOUND OPTIONS GAME OPTIONS
-> Page 16
~~~= -a-.ecking \he contents cA the hard dis\(. -> Page .17 oChed<ing the sound memory. -> Pag6 17 -Adjusting the sound volume.
- '.
COIN OPTIONS ;.~~==:===== • BOOKKEEPING . ALL FACTORVSETTING GAMEMODE~----~------------
. "
PUSH lP SHOT 1 TO EXECUTE
-> Page 17 -Setting the parne opUons. -> Page ,8
-Setting the coin options . -> Page 18 :
-Displaying \tie COin data.
- > Pa98 19 <:hanging the CUlTeot settings to the tactOf'y settings.
19 '----Rot'om lO, .... .-e .
• Selecting each mode - - - - - - - - - - - - - - - - - - - - - --
How to select each mode from the main menu
·SELECT -> Turn up / down the 1 P joy stick.
·SET --> Press the 1 P button 1 (guard button).
After selecting a mode, refer to the page on which that mode is described in details.
15

5 PCB settings
5-3 Mode descriptions • The original factory setlings are displayed in green; the changed settings are
displayed in red. ·To modify some settings, select them by moving up and down the 1 P joy stick and change them by moving the joy stick right and left. ·After the settings have been changed, select "SAVE AND EXIT" and press the 1 P butlon 1. The new settings are saved automatically and the screen returns to the main menu.
·I f "EXIT" is selected after the modification of the setlings, the following message wi ll appear: "YOU DID NOT SAVE, DO YOU WANT TO SAVE? YES! NO" Select "YES" or "NO" by turning right / left the 1 P joy stick and set it by pressing the 1 P button 1. If "YES" is selected, the new settings will be saved with "NOW SAVING" displayed and the screen will return to the main menu. If "NO" is selected, the new settings will not be saved with "NO MODIFICATION" • displayed.
'If "FACTORY SETTINGS" is selected .. and the 1 P butlon 1 is pressed, all the settings wil l be back to the factory ones.
~-------------------------------MEMO
1/0 CHECK ' . . . ' Checking the controls
• Mode for checking the performance of the joy sticks and buttons. To return to the main menu screen, press the 1 P buttons at a time. (Including three buttons and the 1 P start button.)
,-'T_h_e_c_o_in_co_u_n_t_e~r i_s_in_t_e_rlo_c_k_e_d_w_i_th_th_e_c_o_in_sl_o_ts_1_an_d_2_. ___ MEMO J • . .
SCREEN CHECK '. . Adjusting the screen distortion
• Mode for checking the screen display. Adjust the display width, color tone, etc. while watching the crosshatch pattern. Use the projector adjusting remote controller (See page 30) to make the adjustment. To return to the main menu screen, press the 1 P button 1 .
. . CQLOR CHECK . . . .. Adjusting the display color
• Mode for checking the display color. Make the adjustment using the projector adjusting remote controller (See page 30) so that the colors of the color bars shou ld appear properly graduated and the background should become black sufficiently. To return to the main menu screen, press the 1 P button 1.
or.

. , , " I' ,
I ~ ! 1 , , i
•
5 PCB settings
. - HOD SECTOR CHECK . . . Checking the contents of the hard disk
• The contents of the hard disk are checked automatically. If they are normal, "OK" is displayed. If any abnormality is found, "BAD" appears with the No. of the defective sector displayed. After going into the menu, the progress is displayed as a percentage. To cancel the checking halfway, press the 1 P button 3. To return to the main menu screen, press the 1 P button 1. If "BAD" is displayed, immediately turn OFF the main power switch, unplug the power cord from the receptacle and contact your nearest dealer .
:; ' .• SOUND DRAM CHECK . '.'. '. . . .
Checking the sound memory
II The sound memory is checked a~tomatically. By RAM part, "OK" is displayed if it is normal; "BAD" is displayed if abnormal.
' . SOUND OPTIONS " .. '. ". . . '. . . .
Adjusting the sound volume
• In this mode, the following appears on the screen. Select an item by turning up / down the 1 P joy stick. To return to the main menu screen, select "SAVE AND EXIT" or "EXIT" and press the 1 P button 1.
17
-Turns on and 011 the demo play sound. ·ALl THE TIME ... Soond al ..... ays 011 . -ONCE EVERY 4 CYCLES •.. Sound on every 4 """,. -COMPLETE OFF .,' Sound always 011.
'Adjust the volume from the level 0 (no soond) 1030 (max). Make adjustments by turning righll\efllhe iOYstlck.
-Gives the balance sound 1. The sound Is s topped by deselecting the hem.
-Gives the balance sound 2. The sound is stopped by deselecting the ilem.
.Returns all the senings to me factory seninys.

5 PCB settings
GAME OPTIONS' " '.. ' . - " .
Setting the game options II In this mode, the following appears on the screen.
Select a item by turning up / down the 1 P joy stick and set it by tuming right / left the 1 P joy stick. To return to the main menu screen, select "SAVE AND EXIT" or "EXIT" and press the 1 P button 1. 'SeOd""' __
. ON ... II one Olll'le two players ceals the Oiller (h'et! limes, the game is over 101' both the players
'Sets a d'lficulty level (Irom the 8 levels) .
l/EASIEST Easier 2NERY EASY .L>. >'EASY II 4!1vIEDIUM • _ ••••• Medium Shv\EOIUM HARD &HARD 7NERYHARO M-\J.ROEST "''''',
·sets lhe IOlU1IO win lor 'CPU Play' , II to 5)
·Sets!he 1OUld1O""" lot"VS Play". (1 to s) e
'The above-shown "GAME VERSION" is displayed alief the ma~oc Is operated IOf a certain time.
·n is displayed \0 be seleclaDie alter It!e m3Chir'.e IS opefated kit a certain time ·NORMAL ........... Nonnal speed ·HIGH SPEED ," Milliary arts are exerted al a ~I .-.
-Erases the ranking data.
·Returns an Iha sailings to the factory settings
: COIN OPTIONS ' · . .',' '.' Setting the coin options
• In this mode, the following appears on the screen, Select a item by turning up / down the 1 P joy stick and set it by turning right / left the 1 P joy stick. To return to the main menu screen, select "SAVE AND EXIT" or "EXIT" and press the 1 P button 1,
1&
'PFflEE PLAY" Is
.sets the crecitS 10 "COMMON" 01' "INDePENDENT" lot 1he IP &rod 2P players . .(X)MMON •••••••••••• CrOOts oo.1'YT1On lor 1 P and 2F' players ·INDEPENDENT _, Crecits different lor 1 P end 2P playef$ .
.sets the I'IUTberof credits /of !he coin.. (16COCNS 1 CREDIT 10 1 COIN 16 CREDITS)
-sets the ~d cretiIs (1 10 16) required 10 start the
"""" -sets tho ruTOer 01 credts (I 10 16) required 10 00flIinue lhegame.
-Returns allhe senngs 10 Ihe IocIory ~.
•

•
•
5 PCB settings
BOOKKEEPING " '.. .. .. :" , ..' . Displaying the coin data
• Mode for displaying the number of coins put into the machine . . If the time is preset in this mode, the following data on thE number of coins put into the machine can be viewed by coin slot. To retum to the main menu screen, press the 1 P start button. To clear the data, press the 1 P buttons at a time (Including three buttons and the 1 P start button) When the date has been cleared, the time is reset to the Greenwich Mean Time. When "BOOKKEEPING" is selected next time, the Ume setting screen comes up.
/ Time setting ·When this item is selected after setting up the game machine, the time setting screen will appear . Pressing the 1 P button 1 after setting the time will save the setting . To cancel the setting, press the start button.
• Once the time is set, this screen will not appear until the data is cleared. If the time setting is canceled, the data will not be collected.
MEMO ~
BOOKKEEPING ·TOTAL COINS Tota l number of coins after the time
being set COIN DATA OF LAST 7DAYS ·TODAY Number of coins of today ·YESTERDAY Number of coins of yesterday ·,2DAY Number of coins of 2 days ago
, ·,3DAY Number of coins of 3 days ago ·,4DAY Number of coins of 4 days ago ·,5DAY Number of coins of 5 days ago ·,6DAY Number of coins of 6 days ago
LAST 7DAYS AVERAGE Average number of coins of last 7 days
The data of the last 51 weeks are displayed by week average by turning right / left the 1 P joy stick.
,. ALl FACTOR'rS'ETTiNG' : '.: '. :', : ........ : .'~ '. Factory settings
• Mode for Returning all the settings to the factory settings. Wh en thi s item is se lected , all the settings other than th e se tti ng for "BOOKKEEPING" will be returned to the factory settings. Note that the ranking data is not initialized. To initialize this data, select "CLEAR RANKING DATA" on the "GAME OPTIONS" screen. (See page 18) The sound volume will be effective again when the power switch is turned on next time. To make the volume setting effective right now, select "VOLUME SETTING" on the "SOUND OPTIONS" screen and change the setting, (See page 17)
19

6 Setting up the game machine
6-1 Connecting the unit .How to connect the unit - - - - - - - - - - - - - - - - .- - - - --
-:~~.; '-;":.;>.~/ ' . . , >:~::.:;:· ~(t~~\.~ .'. ' . ,'-", :'" . .... ;;;\ih,s ',".' ... - .,' !Do tlPtpuH th.e wjrrn~{ilnd connectors of the 'coritroHJnit and projector : .;; o.hitl~- 'rr'oV.~. the~~f·::f~~t+· ' -" '\>'~' .. ' ;..:'~>:: " ." ",-', . , ~WhepJnstallingthe' cor:i,nector cover,' take care' not to catch ,the wiring .
. -". "_ · ·. · .1~ ':" , , · >.",:'; - . '_;.;~~ .~. ," '"
1
2
3
Connect th e connectors of the control unit to the counterparts of the projector unit Tighten the connector fixing screws,
I Install the connector cover with the attached screws,
I Align the control unit with the seat unit and install the attached machine connecting plate.
20
I ,.,..,.,./iwY'
Screw M4x:10
Machine connecting plate
7 Seat unit
Screw --_ M8X20L
Connecting plate fitted inside the frame tube.
•
•

•
•
6 Setting up the game machine
6-2 Fastening the adjusters • How to fasten the adjusters - - - - - - - - - - - - - - - - - - - --
Take care
!>telrsso.tm~:t~i:~:~,~~;~~ fllis.lh,\lliti] th,;.;,rrin'r and ~ake sure
Maximum adjusting height:90mm (Min.75mm) (3.54in) (Min.2.95in)
21
,Then tighten
Maximum adjusting heigbt:S5mm (Min 47nun) (2.16in) l (Min 1.85in)
Hexagon nut

6 Setting up the game machine
6.3 Service panel • Service panel - - - - - - - - - - - - - - - - - - - - - - - - - -
You will find the service panel by opening the coin door with the attached maintenance key
-=';:;;;;;:~I
/
6.4 Power unit
Service panel
Service switch1 -----j---''F'----::cr
SeNiee switch2 ----==l======='"-----' Test switch----------'
.Power unit - - - - - - - - - - - - - - - - - - - - - - - - - - --The power unit is contained in the yellow box under the control panel
Speaker panel panel
6.5 Adjusting the sound volume .How to adjust the sound volume - - - - - - - - - - - - - - - - --
The volume knob is located on the unit.
00000 00000
"""'----- 0 0 0 0 0 000 00
Volume adjustment knob
22
Volume adjustment knob
. Turning it clockwi$e will increase the sound volume.
'Turning it counterclockwise will decrease the sound volume.
•

6 Setting up the game machine
6.6 DIP SWITCH SETTINGS
110 PCB - This bank of switches are set at the factory and should not be altered. The correct settings are as follo.ws:-
I SWI I SW2 1 SW3 SW4 SW5 SW6 SW7 SW8 I I ON I OFF I ON ON OFF OFF OFF OFF I
GAME PCB .... - These are set by the factory and should not be altered.
KLINGONPCB
• Dil Switch 2 (Under Ie Socket)
SW SW SW SW OPTIONS COIN COIN COIN COIN 1 2 3 4 (COIN SETS) 1 (F) 2 IE) 3 (D) 4 (C) OFF OFF OFF - UK&GREECE 100 50 20 10 OFF OFF OFF -- ISRAEL,FlNLAND, 10 5 2 I
& SWEDEN ON OFF OFF - BELGIUM 50 20
OFF .ON ON - FRANCE,AUSTRIA 20 10 5 I NORWAY ,CZECH & DENMARK
OFF ON ON - HUNGARY 20 10 OFF ON OFF - MALTA I 50c 25c OFF OFF ON - HOLLAND 5G 2.5G !G OFF ON ON PORTUGAL 200 100 50 ON ON ON - GERMANY& 5 2 I
• SWITZERLAND ON ON ON - SOUTH AFRICA 5 2 I ON ON ON - SPAlN&ITALY 500 200 100
OFF DIRECT MODE ON 2 CHANNEL
MODE
23

6 Setting up the game machine
Price of Play Settings: Greece(Dr) Portugal(Esc) &UK(pence)
DIP SWITCH 1
Price of Play 1 2 10 No Bonus OFF OFF 10 50-5 I 100-1! ON OFF 10 50=6 I 100-12 OFF ON 20 No Bonus ON ON 20 5<F3 I 100=6 OFF OFF 20 50 3 100 7 ON OFF 30 No Bonus OFF ON 30 50-2 I 100=4 ON ON 30 50-2 I . 100-5 OFF OFF 40 No Bonus ON OFF 40 50-1.25 10<F3 OFF ON 50 No Bonus ON ON 50 50-1 I 100-3 OFF OFF 60 No Bonus ON OFF 60 50=0.8 I 100~ OFF ON 80 No Bonus ON ON 100 No Bonus OFF OFF 100 100-1 I 200-3 ON OFF 200 No Bonus OFF ON 200 200-1 I 5O<F3 ON ON 300 No Bonus OFF OFF 300 I 50<F3 ON OFF 500 No Bonus OFF ON 500 5O<F1 1000 3 ON ON
OFF OFF ON OFF OFF ON ON ON OFF OFF ON OFF
OFF ON FREE PLAY OPTION ON ON
Meter Pulses:- Portugal 1 OEsc ~ 1 Pulse Greece 1 ODrc ~ 1 Pulse UK 1 Opence ~ 1 Pulse
24
3 4
OFF OFF OFF OFF OFF OFF OFF OFF ON OFF ON . OFF ON ' OFF ON OFF
OFF ON OFF ON OFF ON OFF ON ON ON ON ON ON ON ON ON
OFF OFF OFF OFF OFF OFF OFF OFF ON OFF ON OFF ON OFF ON OFF OFF ON OFF ON OFF ON OFF ON ON ON ON ON ON ON ON ON
-
5 OFF OFF OFF OFF OFF OFF OFF OFF OFF OFF OFF OFF OFF OFF OFF OFF ON ON ON ON ON ON ON ON ON ON ON ' ON ON ON ON ON
•
•
•
•
6 Setting up the game machine
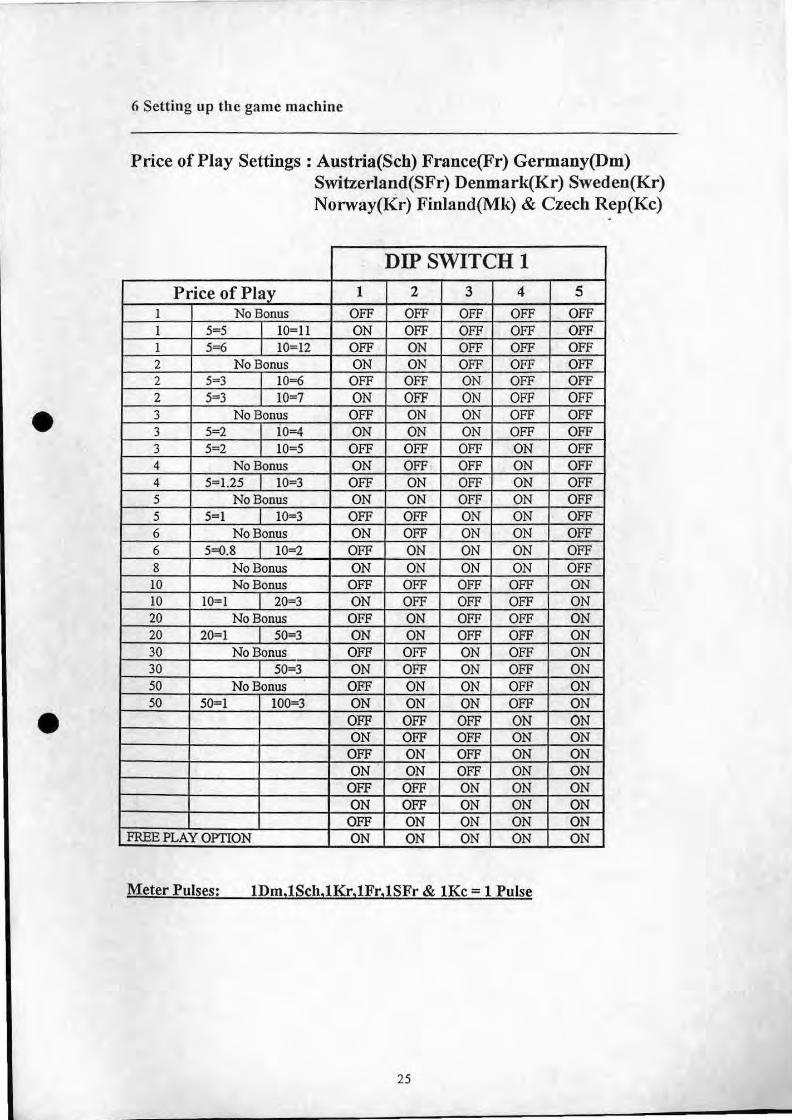
Price of Play Settings: Austria(Sch) France(Fr) Germany(Dm) Switzerland(SFr) Denmark(Kr) Sweden(Kr) Norway(Kr) Finland(Mk) & Czech Rep(Kc)
DIP SWITCH 1 Price of Play 1 2 3 4 5
I No Bonus OFF OFF OFF OFF OFF I 5-5 10-11 ON OFF OFF OFF OFF I 5=<> 1 10- 12 OFF ON OFF OFF OFF 2 No Bonus ON ON OFF OFF OFF 2 5-3 1 10=<> OFF OFF ON OFF OFF 2 5-3 10-7 ON OFF ON OFF OFF 3 No Bonus OFF ON ON OFF OFF 3 5=2 1 10=4 ON ON ON OFF OFF 3 5- 2 I 10-5 OFF OFF OFF ON OFF 4 No Bonus ON OFF OFF ON OFF 4 5 1.251103 OFF ON OFF ON OFF 5 No Bonus ON ON OFF ON OFF 5 5-1 1 10-3 OFF OFF ON ON OFF 6 No Bonus ON OFF ON ON OFF 6 5=0.8 1 10=2 OFF ON ON ON OFF 8 No Bonus ON ON ON ON OFF 10 No Bonus OFF OFF OFF OFF ON 10 10=1 1 20-3 ON OFF OFF OFF ON 20 No Bonus OFF ON OFF OFF ON 20 20-1 1 50-3 ON ON OFF OFF ON 30 No Bonus OFF OFF ON OFF ON 30 50-3 ON OFF ON OFF ON 50 No Bonus OFF ON ON OFF ON 50 50-1 100-3 ON ON ON OFF ON
OFF OFF OFF ON ON ON OFF OFF ON ON OFF ON OFF ON ON ON · ON OFF ON ON
OFF OFF ON ON ON ON OFF ON ON ON
OFF ON ON ON ON FREE PLAY OPTION ON ON ON ON ON
Meter Pulses: IDm,lSch,lKr,lFr,ISFr & IKc - I Pulse
25

6 Setting up the game machine
Price of Play Settings :Spain(ptas) & Jtaly(Lira)
DIP SWITCH 1
Price of Play 1 2 3 4 5 100 No Bonus OFF OFF OFF OFF OFF 100 500-5 I 1000-11 ON OFF OFF OFF OFF 100 500~ 1000-12 OFF ON OFF OFF OFF 200 No Bonus ON ON OFF OFF OFF 200 500 3 1000~ OFF OFF ON OFF OFF 200 500-3 I 1000-7 ON OFF ON : OFF OFF 300 No Bonus OFF ON ON OFF OFF 300 500-2 I .1000=1 ON ON ON OFF OFF • 300 500- 2 I 1000-5 OFF OFF OFF ON OFF 400 No Bonus ON OFF OFF ON OFF 400 50~1.25 I 1000-3 OFF ON OFF ON OFF 500 No Bonus ON ON OFF ON OFF 500 500-1 I 1000-3 OFF OFF ON ON OFF 600 No Bonus ON OFF ON ON OFF 600 500=\).8 I 1000=2 OFF ON ON ON OFF 800 No Bonus ON ON ON ON OFF 1000 No Bonus OFF OFF OFF OFF ON 1000 1000-1 I 2000-3 ON OFF OFF OFF ON 2000 No Bonus OFF ON OFF OFF ON 2000 1000=\).5 I 500~3 ON ON OFF OFF ON 3000 No Bonus OFF OFF ON OFF ON 3000 I 5000-3 ON OFF ON OFF ON 5000 No Bonus OFF ON ON OFF ON 5000 5000-1 10000-3 . ON ON ON OFF ON
OFF OFF OFF ON ON ON OFF OFF ON ON • OFF ON OFF ON ON ON ON OFF ON ON OFF OFF ON ON ON ON OFF ON ON ON
OFF ON ON ON ON FREE PLAY OPTION ON ON ON ON ON
Meter Pulses: 100 LiraiPtas = 1 Pulse
26

6 Setting up the game machine
Price of Play Settings :Holland
DIP SWITCH 1
Price of Play 1 2 3 4 5
lG No Bonus OFF OFF OFF OFF OFF lG 2.5G 3 I 5G~ ON OFF OFF OFF OFF IG 2.5G-3 I 5G=7 OFF ON OFF OFF OFF 2G No Bonus ON ON OFF OFF OFF 2G I 5G-3 OFF OFF ON OFF OFF 2G 5G-3 I IOG-7 ON OFF ON OFF OFF
• 3G No Bonus OFF ON ON OFF OFF 3G 5G-2 I ON ON ON OFF OFF 3G 5G-2 I IOG-5 OFF OFF OFF ON OFF 4G No Bonus ON OFF OFF ON OFF 4G IOG-3 I OFF ON · OFF ON OFF 5G No Bonus ON ON· OFF ON OFF 5G IOG-3 I OFF OFF ON ON OFF 6G No Bonus ON OFF ON ON OFF 6G 15G-3 I OFF ON ON ON OFF 8G No Bonus ON ON ON ON OFF 8G 20G-3 I OFF OFF OFF OFF ON lOG No Bonus ON OFF OFF OFF ON lOG 20G-3 OFF ON OFF OFF ON
ON ON OFF OFF ON OFF OFF ON OFF ON ON OFF ON OFF ON
OFF ON ON OFF ON ON ON ON OFF ON OFF OFF OFF ON ON ON OFF OFF ON ON • OFF ON OFF ON ON ON ON OFF ON ON
OFF OFF ON ON ON ON OFF ON ON ON OFF ON ON ON ON
FREB PLAY OPTION ON ON .ON ON ON
Meter Pulses:- O.SG = 1 Pulse
27
6 Setting up the game machine
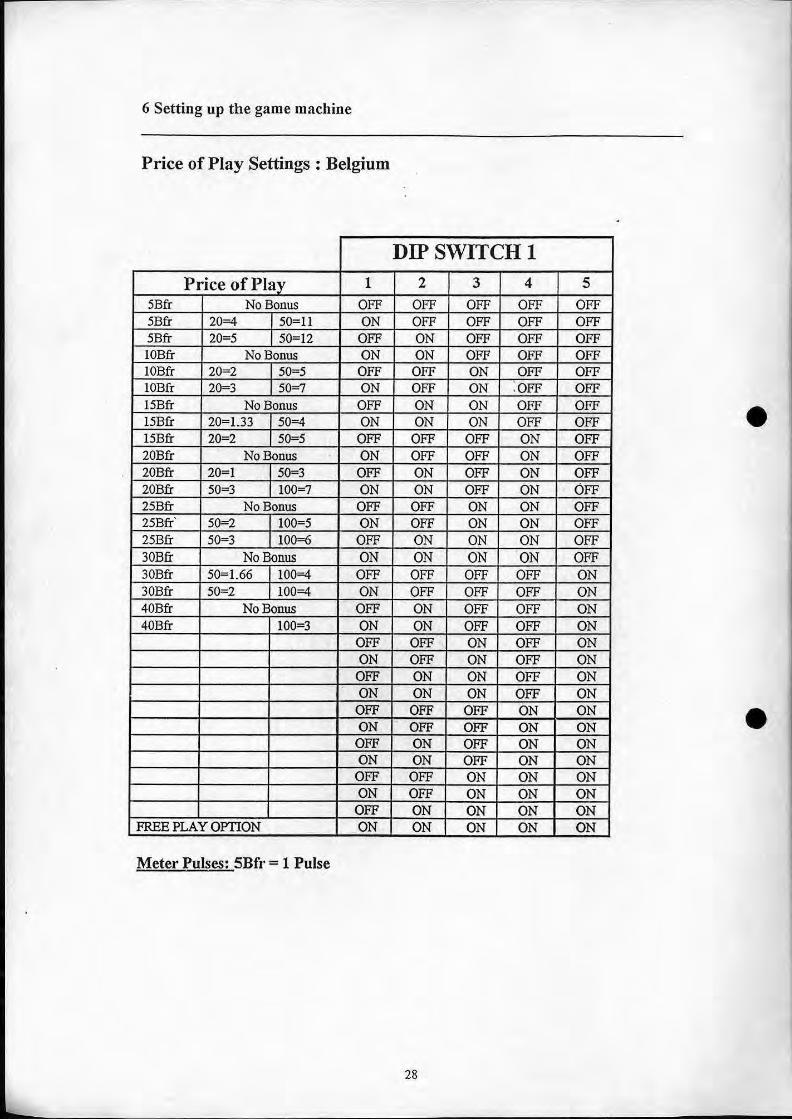
Price of Play Settings: Belgium
DIP SWITCH 1
Price 01 t'lay 1 2 3 4 5
5Bff No Bonus OFF OFF ~
OFF OFF 5Bfr 20=1 50~11 ON OFF OFF OFF
~ 20~5 50~12 OFF ON OFF OFF OFF
No lonus ON ON OFF OFF OFF IOBft 20~2 I 50~5 OFF OFF ON OFF OFF IOBfr 20~3 I 50~7 ON OFF ON ,OFF OFF
~ No 90nus OFF §B- ON OFF OFF
50=1 ON ON OFF OFF • 15Bft ' 20~2 50~5 OFF OFF OFF ON OFF 20Bfr No Bonus ON OFF OFF ON OFF 20Bfr 20~1 50~3 OFF ON OFF ON OFF
~ 50~3 100~7 ON
~ OFF ON OFF
No Bonus OFF ON ON OFF
~ 5~2 I 100~5 ON OFF ON ON OFF 50~3 I 10095 OFF ON ON ON OFF
30Bfr No Bonus ON ON ON ON OFF
~ 50~1.66 I 100=1 OFF OFF OFF OFF ON 5~2 I 100=1 ON OFF
~ OFF ~ 40Bfr OFF ON OFF
40Bfr 100~3 ON 9N OFF OFF ON OFF OFF ON OFF ON ON OFF ON OFF ON OFF ~
ON OFF ~ ON ON OFF
OFF OFF OFF ON ON ON OFF OFF ON ON • ~ §B- OFF ON ON
OFF ON ON OFF OFF ON ON ON ON OFF ON ON ON
~ §B- ON ON_ ON FREEPLA' ON ON ON
Meter Pulses: SBfr = 1 Pulse
28

•
•
7.Maintenance 7 Maintenance and annex
7.1 Resetting the circuit protector and replacing the fuse If an overcurrent or short circuit occurs, the circuit protector will be automatica lly actuated to protect the elect ric circuits of the game machine. When resetting the circuit protector, turn OFF the rnain power switch, unplug the power cord from the receptacle, eliminate the cause, and then press the button of the circuit protector. When replacing the fuse , the same procedure should be followed .
.. , .... . '. ' ',.". , ... ,.... -
'Bef9relesetting the circuit protector, be sure to turn OFF the main power .. swi~cf\'<i.Qp-,unplug the power cord from the receptacle. ·If. the" '.c'i.ti:lJit protector breaks the circuits soon after it is reset , inimedi.ately turn OFF the main power switch, unplug the power cord from the"receptacle and contact your nearest dealer .
'Before"replacing the fuse, be sure to turn OFF the main power switch and unplug the power cord from the receptacle.
'Be sUre to replace the fuse with a new one of the same type. 'If the machine is in abnormal conditions and does not operate normally, immediately turn OFF the main power switch, unplug the power cord from the :rec~ptacle and contact your nearest dealer .
• Resetting the circut protector
I Press the button of the circuit protector. There are 2 liitcd to the power supply and 3 on the game PCB.
.Replacing the fuse
1 I Open the control panel and speaker panel (See page 13)
2 I 3 I
Remove the cap of the fuse holder in the game PC board unit by ~~.;;; turning it counterclockwise.
Take out the fuse and set a new fu se . Screw in the cap while pushing it in.
29
Circuit Protector
o Game PC board unit

7 Maintenance and annex
7.2 Adjusting the projector The projector has already been adjusted at the time 01 shipment. but it may be readjusted with the attached remote controlle r as desired.
-The projector contains high·voltage components inside it. Exercise due care not to touch them .
• Appearance of the remote controller - - - - - - - - - - - - - - - --
Ir eow;;]
_ -;---,8111
1 3 r 8 I 2
4 111I8~ III 6
1111 ' ~"""III 5 111'TEST 8 eNTER c:> 7~ 8 8
I 8 9 10
0000
- PICTURE +
9 ~ y.:::> 8c-----+1+- 1 0 11 III /MITSUBISHI
'-------~
"-----Projector adjusting remole controller
-Only the keys 1 to 11 shown above are allowed to be used. Never press the other keys.
'--MEMO~
POWER key
2 RIB key
3 .... (UP) key
4 ,,(LEFT) key
Used 10 turn ONlOfF tile pOwer. The POWER key is used ooly at Ult lime 01 saMea mIIirlten.aneG. Do I'\Ol use H in !'IO~llrmes .
Used 10 SllacI lIle red adjustmellt mode (AJ 0< blue adjustment mode
(8) in It>e stlliC convergence 'djustrTlent mode.
user;!!o smll "TUt Cross' up in Ihe Sialic COIlvergill\Ce adjuSHnefll frlQde.
5 .... (OOWN) key Used 10 shilt 'Tesl CrO$S' down in lhO static conv/l rQel'l(;e adjustment -.
6 .. (RIGHT) key
7 TeST key
8 ENTER key
9 - key
10 + key
11 PI<?:rURE key
Used 10 Shill "TeSI C ross ' right In Ihe Slillic conve,~nce edrus 1<T1e n1 -. II is II ONIOFF key for the Slatieeonve'g(!nce ad;USlme ~1 mode. When it is rurned ON. rhe 'Test Cross' i»llem appears in the center 01 the ween.
Thi$ key is used at \he lime 01 gMpment. h dOeS I'IOIlunclion in nonnaI times,
Used to (le(:rease the adjuslmEl!ll data value in the CONTRAST, BRIGHT, H·PQS, V-POS, !-I·WIDTH and V-WIDTH adjustmetll modeS,
Used 10 incte~ the adjustmenl data value in the CONTRAST, BRIGHT. H-POS. V-PaS, H·WIOTH and V.WIOTH adJustment mode$,
Used to sel&Cllhe CONTRAST, BRIGHT. H·POS, V·POS, H·WIDTH and V-WIDTH adjustment mode'l. The adjustment mOdn are s.elected
In the loGowYIg OtOer by pcasslng tile ker.r~. =,..., +_~ CONTRAST BRIGHT
~"""" ~-
Y·WlDlfi --'Adjustment mode CO~iRA~T , 8dJu,s.~ment mode
BR~f·~· ,~~~ adJ.~:t~~~ r'!1.ode
,".' . . , ....
. H~POS ' ,", ~~~ 8dJ~'Stmeht mode
". ,c
H-WIDTH adjuslment mode
V·POS adjustment mode
V·WIDTH adius1menl mode
. Used \0 change the brigt1\1'UISS the picture. Make adjustments wilh the .... Of •• ' key.
used 10 change the b lack level ollhe pidure. Make adjustments with Ihe .... Of ". ' key.
Used to sI'llftlhe pos.ition or the picture In the IIoriZon\.ill direction. Make adjustments will'! the '+ ' I)( ',' key,
Used to cf\ange !he horizontat widlh of the plctu .. , Make adjustments with the • +' Of ' , ' key,
Used 10 Shill 1110 posilion ollhe plc1ufe Inlhtl ver1ic/1l di,etlion M~~c Mli"~lonenl& wiln lhe '.' Of ' , ' keV
U5"11 LO CI':IIIII" Ill" ~rlicat ~h oIltle picture "":01 .. , '''~'''''''M''''': _ III lt w, ',' 1)0 ' , ' ~I)y
•
•

7 Maintenance and annex
When the game machine is moved to another location or reoriented, screen color distortion can occur due to magnetism from objects near the game machine or from the earth 's magnetic field. If screen color distortion occurs uniformly across the whole screen, adjust convergence in the following way .
• How to adjust the static convergence - - - - - - - - - - - - - - - -
';":.':.', ';'. -, ';Oirectthe remote 'control tathe screen.
';:~:Wheri~ti;ing;:the remote control, keep it within a 30· angle to the top, ' ¥t>ttojl:l;"left and.'rightof the center of the screen and stand no further than >,3,:ri:letEirs(tl8inches) away from the screen.
' ~When ,Ihescreen is disturbed by static electricity etc, during the adjustment . of the ~nit; turn OFF the power switch and on again, and readjust the unit.
• -If the remote control does not work properly, replace the batteries with new ones.lf'the remote control is not to be used for a long time, remove the batteries from the remote control. Failure to do so could cause liquid leakag,e; ,; .
•
1 I Press the TEST key of the remote control. (The red line adjustment screen will appear.)
2 Superimpose the red line on the green test cross. Using the "~ ", U .. tlll, II ... " and I'yll keys on the remote control, align the center of the red line with the center of the green test cross.
(
When the red line is) superimposed on the green test cross, the green test cross turns yellow or white.
Green lest cross
A
R ~ , ~ , , , , ,
Red lina , G7 test "oss ,
-----.: , , ,
~t--------+-- ----------------, , , ,

7 Maintenance and annex
3 Press the R / B key.
(
Th e blue lin e adjustment) screen will appear. Each time the key is pressed, switching between the red and blue is made.
4 Superimpose the blue line on the green test cross. Using the "," , "..," , " ..... " and " ..... " keys on the remote control, align the center of the blue line with the center of the green test cross.
5
(
When the b l ue lin e is) superimposed on the green test cross, the green test cross turns white.
I When the adjustment is completed, press the TEST key .
'/
-" C)
• C)
. ''',c ~ .. ". ~ :.~': ~o 0 ·"· -
~ as' . ~,
C)
V B ~
, ~ , , , , ,
Blue line I
~ , , ,
io
r
' -- ----- -- - ~- -- -T ' , , , ,
. Grej test cross
B V
. ~ Grite51 era,.
-- --- -- - ---- -- --
• Ending and automatic canceling of the adjustment mode - - - - - - - -If no valid key entry (changing the value or picture) is made in each adjustment mode within the time specified below, the mode is automatically canceled and end~ and then the normal picture is displayed. •
·CONTRAST adjustment mode
·BRIGHT adjustment mode
About 6 seconds ·H·POS adjustment mode
·H·WIDTH adjustment mode
-V·POS adjustment mode
·V·WIDTH adjusiment mode
About 5 minutes ·Static convergence adjustment mode
32

•
•
7 Maintenance and annex
7.3 Adjusting the voltage .How to adjust the voltage -- -------- - ----.------
1
2
I Open the control panel and speaker panel .
The adjustment variable resister
holes are located on the top ~~~~~~ surface of the power unit. Adjust the voltage carefully with an adjustment screwdriver (commercially-available) while measuring the voltage with a tester.
'-------'--'---"--"--
o Game PC board unit
.How to measure the voltage - - - - - - - - - - - - - - - - - - -Measure the voltage on the connector in the game PC board unit as shown in the figure below .
Game PC board unit
lester
• Adjust the 5V system so that it is with in the range of 4.9 to 5.1 V.
• Adjust the 3.3V system so that it is with in the range of 3.35 to 3.40 V.
3.3V veC( + ) SV VCC( + )
~ro=v~ Jl~
3.3V GND( - ) SV GNO( - )

Wiring
[I JOY STICK
[I JOy STiU
diagram
PLAYER PUNCH(I) ~ IC((2) ~ ~
.~
PLAYER f'VNCH(1) ( 1(((2) ~ ,
IV\AINs INl"vT
RG8-111
"" GREEN BLUE
'"' '" '"' '" "" tl:
H(C)-S"fHe HV- SYNC tt
i:l:: 50/roc" 110'" lo r ~OP-GK51
~
I CO NTRO L GUAAO(4) ~
2 CONTROL GUJJlO( 4) ~
EEl .i
I
START
--'-;,
START ~
I
-
foo ... f'lS£.
• s.: I
r-I
KJISE .F'LTfR
i
.''''S I/O CONTII!t
'" lP~STAIIT lP-IIlG!lT 1 ' - LEFT 1 P-UP 1 P-OO.~ 1 P-PIlSH! "_PUSH? 1 '.PUS)!3 lP-P\.ISIU lP_P\J$1I5 oc.sv '"
I I
~C" 2P_ST.IJlT 2P_ T " I 2P. 1p.00'/I 2P-P\JSHl 2p·P\JSIl2 2P-PUSH3 2P-PlJSIII 2P-I'USHS Of OC.5V
'" "
COlli COUMTE!t2 ;" OC.'2V OC. 12V COIN COU~TElll
•
"' "
. ~,
"

R I Gil 9"E.IJ(SI
ILl
(XlINI
RESERVE DC .. 3. lV
OC~5·~ G" G" OND
G" DC+12V G'"
7
45
GAMEPC8 COBRA
•

•
•
Price of Play Settings: Austria,Sweden,Finland,France,Czech Rep,Nonvay,Denmark and Hungary
Price of Play Options DIP SWITCH 1
Price Bonus 1 2 3 4
I I - I OFF OFF OFF OFF I I = I 5=6 ON OFF OFF OFF 2 2 = 1 OFF ON OFF OFF
2 2 - 1 5=3 ON ON OFF OFF 3 3 - 1 OFF OFF ON OFF 3 3 - 1 5-3 ON OFF ON OFF 4 4 - 1 OFF ON ON OFF 4 4=1 10=3 ON ON ON OFF 5 5 = 1 OFF OFF OFF ON 5 5 - 1 10 = 2 20 = 5 ON OFF OFF ON 6 6 - 1 OFF ON OFF ON 6 6 - 1 10-2 ON ON OFF ON 8 8 - 1 OFF OFF ON ON 8 8 - 1 20- 3 ON OFF ON ON 10 10 = 1 OFF ON ON ON 10 10 = 1 20 = 3 ON ON ON ON
12 12 = 1 OFF OFF OFF OFF 15 15 = 1 ON OFF OFF OFF 20 20 = 1 OFF ON OFF OFF 25 25 - 1 ON ON OFF OFF 30 30 - I OFF OFF ON OFF 35 35 - I ON OFF ON OFF 40 40 -1 OFF ON ON OFF 45 45 -1 ON ON ON OFF 50 50-I OFF OFF OFF ON
ON OFF OFF ON OFF ON OFF ON ON ON OFF ON
OFF OFF ON ON ON OFF ON ON
OFF ON ON ON FREE PLAY OPTION ON ON ON ON
Monetary Units : Austria Schilling Sweden Kronor Norway Kroner
Finland Markka Czech Rep Krona France Franc Denmark Kroner Hungary Forint
5 OFF OFF OFF OFF OFF OFF OFF OFF OFF OFF OFF OFF OFF OFF OFF OFF ON ON ON ON ON ON ON ON ON ON ON ON ON ON ON ON

Addendum T he tables below are price of play and bonus awards for the Klingon Plus credit PCB
Price of Play Settings: UK and Greece
Price of Play Options DIP SWITCH 1
Price Bonus 1 2 3 4 5 10 !O - I OFF OFF OFF OFF OFF 10 !O - I 50- 6 ON OFF OFF OFF OFF 20 20= I OFF ON OFF OFF OFF 20 20= I 50=3 ON ON OFF OFF OFF 30 30 = I OFF OFF ON OFF OFF • 30 30 = I 50=2 ON OFF ON OFF OFF 40 40-1 OFF ON ON OFF OFF 40 40 -I 100 - 3 ON ON ON OFF OFF 50 50 - I OFF OFF OFF ON OFF 50 50 = I 200=5 ON OFF OFF ON OFF 60 60= 1 OFF ON OFF ON OFF 60 60 = I 100 =2 ON ON OFF ON OFF 80 80 = 1 OFF OFF ON ON OFF 80 80= I 200 =3 ON OFF ON ON OFF 100 100 = 1 OFF ON ON ON. OFF 100 100 = 1 200 =3 ON ON ON ON OFF 120 120= 1 OFF OFF OFF OFF ON 150 150 -1 ON OFF OFF OFF ON 200 200 -1 OFF ON OFF OFF ON 250 250 -1 ON ON OFF' OFF ON • 300 300= 1 OFF OFF ON OFF ON 350 350 = 1 ON OFF ON OFF ON 400 400-1 OFF ON ON OFF ON 450 450-1 ON ON ON OFF ON 500 500-1 OFF OFF OFF ON ON
ON OFF OFF ON ON OFF ON OFF ON ON ON ON OFF ON ON OFF OFF ON ON ON ON OFF ON ON ON
OFF ON ON ON ON ·FREE PLAY OPTION ON ON ON ON ON
Monetary Units: UK Pence Greece Drachma

Price of Play Settings: Switzerland
Price of Play Options DIP SWITCH 1
Price Bonus 1 2 3 4 5 1 1 - 1 OFF OFF OFF OFF OFF 1 1 - 1 5-6 ON OFF OFF OFF OFF 2 2 - 1 OFF ON OFF OFF OFF 2 2 - 1 5-3 ON ON OFF OFF OFF 3 3 = 1 OFF OFF ON OFF OFF 3 3 = 1 5=2 ON OFF ON OFF OFF 4 4-1 OFF ON ON OFF OFF 4 4 - 1 10 - 3 ON ON ON OFF OFF 5 5 = 1 OFF OFF OFF ON OFF • 5 5 - 1 10 -2 20 - 5 ON OFF OFF ON OFF 6 6=1 OFF ON OFF ON OFF 6 6 = 1 10=2 20=4 ON ON OFF ON OFF 8 8 = 1 OFF OFF ON ON OFF 8 8=1 20 =3 ON OFF ON ON OFF 10 10 - 1 OFF ON ON ON OFF 10 10 - 1 20 - 3 ON ON ON ON OFF 12 12 - 1 OFF OFF OFF OFF ON 15 15 - 1 ON OFF OFF OFF ON 20 20 - 1 OFF ON OFF OFF ON 25 25 -1 ON ON OFF OFF ON 30 30 - 1 OFF OFF ON OFF ON 35 35 - 1 ON OFF ON OFF ON 40 40 -1 OFF ON ON OFF ON 45 45 -1 ON ON ON OFF ON
• 50 50 =1 OFF OFF OFF ON ON ON OFF OFF ON ON
OFF ON OFF ON ON ON ON OFF ON ON
OFF OFF ON ON ON ON OFF ON ON ON
OFF ON ON ON ON FREE PLAY OPTION ON ON ON ON ON
Monetary Units : Switzerland Swiss Franc

Price of Play Settings: Germany
Price of Play Options DIP SWITCH 1
Price Bonus 1 2 3 4 5
1 1 - 1 OFF OFF OFF OFF OFF
1 1 - 1 5-6 ON OFF OFF OFF OFF 2 2 = 1 OFF ON OFF OFF OFF 2 2 = 1 5=3 ON ON OFF OFF OFF 3 3 = I OFF OFF ON OFF OFF 3 3 - I 5=2 ON OFF ON OFF OFF 4 4-1 OFF ON ON OFF OFF 4 4=1 10 = 3 ON ON ON OFF OFF
5 5 = 1 OFF OFF OFF ON OFF
5 5=1 10 = 2 20= 5 ON OFF OFF ON OFF 6 6 = 1 OFF ON OFF ON OFF • 6 6= 1 10 =2 ON ON OFF ON OFF 8 8 - 1 OFF OFF ON ON OFF 8 8 - I 20 - 3 ON OFF ON ON OFF 10 10 - 1 OFF ON ON ON OFF 10 10 - 1 20 - 3 ON ON ON ON OFF
12 12 = 1 OFF OFF OFF OFF ON
15 15 = I ON OFF OFF OFF ON 20 20 = I OFF ON OFF OFF ON 25 25 - 1 ON ON OFF OFF ON 30 30 - I OFF OFF ON OFF ON 35 35 - I ON OFF ON OFF ON
40 40 -I OFF ON ON OFF ON 45 45 = I ON ON ON OFF ON 50 50 =1 OFF OFF OFF ON ON
ON OFF OFF ON ON • OFF ON OFF ON ON ON ON OFF ON ON
OFF OFF ON ON ON ON OFF ON ON ON OFF ON ON ON ON
FREE PLAY OPTION ON ON ON ON ON
Monetary Units: Germany Deutche Mark

----- _ .
Price of Play Settings: Portugal
Price of Play Options DIP SWITCH 1
Price Bonus 1 2 3 4 5 OFF OFF OFF OFF OFF ON OFF OFF OFF OFF
OFF ON OFF OFF OFF ON ON OFF OFF OFF
OFF OFF ON OFF OFF ON OFF ON OFF OFF
OFF ON ON OFF OFF ON ON ON OFF OFF
SO SO = I OFF OFF OFF ON OFF SO SO= I 100=2 200 =S ON OFF OFF ON OFF •
OFF ON OFF ON OFF ON ON OFF ON OFF
OFF OFF ON ON OFF ON OFF ON ON OFF
100 100 - I OFF ON ON ON OFF 100 100 = 1 200 =3 ON ON ON ON OFF
OFF OFF OFF OFF ON ISO ISO = I ON OFF OFF OFF ON 200 200 - I OFF ON OFF OFF ON 2S0 2S0 -I ON ON OFF OFF ON 300 300 - I OFF OFF ON OFF ON 3S0 3S0 -1 ON OFF ON OFF ON 400 400 - 1 OFF ON ON OFF ON 4S0 4S0-1 ON ON ON OFF ON . ' SOO 500-1 OFF OFF OFF ON ON
ON OFF OFF ON ON OFF ON OFF ON ON ON ON OFF ON ON OFF OFF ON ON ON ON OFF ON ON ON OFF ON ON ON ON
FREE PLAY OPTION ON ON ON ON ON
Monetary Units: Portugal Escudos

Price of Play Settings: Belgium
Price of Play Options DIP SWITCH 1
Price Bonus 1 2 3 4 5 5 20 - 4 50 - 10 OFF OFF OFF OFF OFF
5 20 -4 50 - 12 ON OFF OFF OFF OFF 10 20 -2 50 - 5 OFF ON OFF OFF OFF
10 20-2 50-6 ON ON OFF OFF OFF 15 15 = 1 OFF OFF ON OFF OFF 15 25 - 2 50 - 4 ON OFF ON OFF OFF
20 20 = 1 OFF ON ON OFF OFF 20 50 = 3 100 = 6 ON ON ON OFF OFF • 25 50 - 2 OFF OFF OFF ON OFF 25 50- 2 100 - 5 ON OFF OFF ON OFF 30 30 - 1 OFF ON OFF ON OFF 30 50 -2 100-4 ON ON OFF ON OFF
40 40 - 1 OFF OFF ON ON OFF 40 40 - 1 100 - 3 ON OFF ON ON OFF
50 50 = 1 100 - 2 OFF ON ON ON OFF 50 50 = I 100 = 3 ON ON ON ON OFF 60 60 = I OFF OFF OFF OFF ON 75 75 - I ON OFF OFF OFF ON 100 100 - 1 OFF ON OFF OFF ON 140 140 -1 ON ON OFF OFF ON 150 ISO - I OFF OFF ON OFF ON 200 200 -I 350-2 ON OFF ON OFF ON 200 OFF ON ON OFF ON 250 450-2 ON ON ON OFF ON • OFF OFF OFF ON ON
ON OFF OFF ON ON OFF ON OFF ON ON ON ON OFF ON ON OFF OFF ON ON ON ON OFF ON ON ON OFF ON ON ON ON
FREE PLAY OPTION ON ON ON ON ON
Monetary Unit: Belgian Franc

Price of Play Settings :Holland
Price of Play Options DIP SWITCH 1
Price Bonus 1 2 3 4 5 OFF OFF OFF OFF OFF ON OFF OFF OFF OFF
1 1 - 1 OFF ON OFF OFF OFF
1 1 - 1 5-6 ON ON OFF OFF OFF OFF OFF ON OFF OFF ON OFF ON OFF OFF
2 10 = 5 OFF ON ON OFF OFF
2 5=3 ON ON ON OFF OFF 2.5 OFF OFF OFF ON OFF • 2.5 2.5 = 1 10 - 5 ON OFF OFF ON OFF
3 3 - 1 OFF ON OFF ON OFF
3 5-2 10-4 ON ON OFF ON OFF 4 4-1 OFF OFF ON ON OFF
4 4-1 10 - 3 ON OFF ON ON OFF
5 5-1 OFF ON ON ON OFF
5 5 = 1 10 = 3 ON ON ON ON OFF
6 6 = 1 OFF OFF OFF OFF ON
7.5 7.5 =1 ON OFF OFF OFF ON
10 10 - 1 OFF ON OFF OFF ON 15 15 - 1 25 -2 ON ON OFF OFF ON
15 15 - 1 OFF OFF ON OFF ON 20 20 -1 35 - 2 ON OFF ON OFF ON 20 20-1 OFF ON ON OFF ON • 25 25 -1 45 -2 ON ON ON OFF ON 25 25 -1 OFF OFF OFF ON ON
ON OFF OFF ON ON OFF ON OFF ON ON ON ON OFF ON ON
OFF OFF ON ON ON ON OFF ON ON ON
OFF ON ON ON ON FREE PLAY OPTION ON ON ON ON ON
Monetary Units: Holland Guilder

Price of Play Settings : Spain and Ita ly
Price of Play Options
Price 100 100 - I 100 100 - I 200 200 - 1 200 200 I 300 300 - I 300 300- I 400 400 - I 400 400- I 500 500- 1 500 500 - I 600 600 -I 600 600= I 800 800 = I 800 800 - I 1000 1000 - I 1000 1000 - I 1200 1200 - I 1500 1500 - I 2000 2000 - I 2500 2500 - I 3000 3000 - I 3500 3500 - I 4000 4000 - I
FREE PLAY OPTION
Monetary Units:
Bonus
500 - 6
500-3
500 - 2
1000 - 3
1000 - 2
1000 = 2
Spain Italy
2000 - 5
2000 = 4
2000 = 3
2000 - 3
Pesetas Lire
1 OFF ON OFF ON
OFF ON
OFF ON
OFF ON OFF ON OFF ON OFF ON OFF ON OFF ON OFF ON OFF ON OFF ON OFF ON OFF ON OFF ON
DIP SWITCH 1
2 3 4 5 OFF OFF OFF OFF OFF OFF OFF OFF ON OFF OFF OFF ON OFF OFF OFF
OFF ON OFF OFF OFF ON OFF OFF ON ON OFF OFF ON ON OFF OFF
OFF OFF ON OFF • OFF OFF ON OFF ON OFF ON OFF ON OFF ON OFF
OFF ON ON OFF OFF ON ON OFF ON ON ON OFF ON ON ON OFF
OFF OFF OFF ON OFF OFF OFF ON ON OFF OFF ON ON OFF OFF ON
OFF ON OFF ON OFF ON OFF ON ON ON OFF ON ON ON OFF ON • OFF OFF ON ON
OFF OFF ON ON ON OFF ON ON ON OFF ON ON OFF ON ON ON OFF ON ON ON ON ON ON ON ON ON ON ON