HOW DO PLANTS GET THEIR FOOD?
16
Learning objectives By the end of this unit, your pupils will have achieved a greater understanding of the following concepts: • the parts of a plant and how to classify plants by stems and reproduction • how plants make their own food through the process of photosynthesis • how flowering and non-flowering plants reproduce • the life cycle of a plant, through a controlled observation • how to carry out a practical investigation into plant structure. Competences This unit covers the following competences: • Linguistic competence • Mathematical competence and basic competences in science and technology • Digital competence • Learning to learn • Social and civic competences Key vocabulary Plants: leaves, minerals, moss, roots, season, stem, sunlight, survive, transport, tree, water Trees, bushes and grasses: bend, branch, herbaceous, ring, stem, trunk Plant reproduction: angiosperm, cone, evergreen, fern, flowering plant, germinate, gymnosperm, moss, non-flowering plant, reproduce, seed, spore Flowers: carpel, fruit, ovary, petal, pollen, pollination, sepal, stamen, stigma Photosynthesis: absorb, air, carbon dioxide, energy, ingredient, light, mineral, oxygen, react, recipe, release, soil, sun, transport Cambridge English Qualifications practice You will find A2 Flyers activity types in the following exercises: Pupil’s Book, Page 52, Activity 3 – Reading and Writing Part 2 Activity Book, Page 25, Activity 13 – Reading and Writing Part 4 Throughout this unit, you will find the following A2 Flyers vocabulary: air, begin, card, cut, dark, desert, each, end, explain, a few, forget, glass, glue, group, happen, hard, high, important, information, insect, keep, language, large, low, next, other, planet, project, ring, strange, study, sugar, taste, way 54 HOW DO PLANTS GET THEIR FOOD? 4
-
Upload
khangminh22 -
Category
Documents
-
view
3 -
download
0
Transcript of HOW DO PLANTS GET THEIR FOOD?
Learning objectivesBy the end of this unit, your pupils will have achieved a greater understanding of the following concepts:
• the parts of a plant and how to classify plants by stems and reproduction
• how plants make their own food through the process of photosynthesis
• how flowering and non-flowering plants reproduce
• the life cycle of a plant, through a controlled observation
• how to carry out a practical investigation into plant structure.
CompetencesThis unit covers the following competences:
• Linguistic competence
• Mathematical competence and basic competences in science and technology
• Digital competence
• Learning to learn
• Social and civic competences
Key vocabularyPlants: leaves, minerals, moss, roots, season, stem, sunlight, survive, transport, tree, water
Trees, bushes and grasses: bend, branch, herbaceous, ring, stem, trunk
Plant reproduction: angiosperm, cone, evergreen, fern, flowering plant, germinate, gymnosperm, moss, non-flowering plant, reproduce, seed, spore
Flowers: carpel, fruit, ovary, petal, pollen, pollination, sepal, stamen, stigma
Photosynthesis: absorb, air, carbon dioxide, energy, ingredient, light, mineral, oxygen, react, recipe, release, soil, sun, transport
Cambridge English Qualifications practiceYou will find A2 Flyers activity types in the following exercises:
Pupil’s Book, Page 52, Activity 3 – Reading and Writing Part 2
Activity Book, Page 25, Activity 13 – Reading and Writing Part 4
Throughout this unit, you will find the following A2 Flyers vocabulary:
air, begin, card, cut, dark, desert, each, end, explain, a few, forget, glass, glue, group, happen, hard, high, important, information, insect, keep, language, large, low, next, other, planet, project, ring, strange, study, sugar, taste, way
54
HOW DO PLANTS GET THEIR FOOD?4
Materials needed for Hands on• four seeds (beans, lentils,
chickpeas, etc.)
• four small cups
• soil
• stickers
• water
Materials needed for other activities• carrots
• celery
• cloth
• plate
• sugar
• tall glass
• time-lapse videos of ferns and mosses releasing spores
• two glasses of water
• two green leaves
• water
InvestigateThe Investigate project that runs through this unit encourages pupils to prepare a field journal about plants in their neighbourhood. The diff erent Investigate stages practise the following skills:
• giving descriptions through writing and speaking
• autonomous research
• observing plants with a magnifying glass
• drawing diagrams
• preparing a field journal
• giving a presentation
Digital Lab• Interactive activities
• Flashcards: Plants
• Song: Parts of a plant
• Video documentary: The kingdom of plants
55
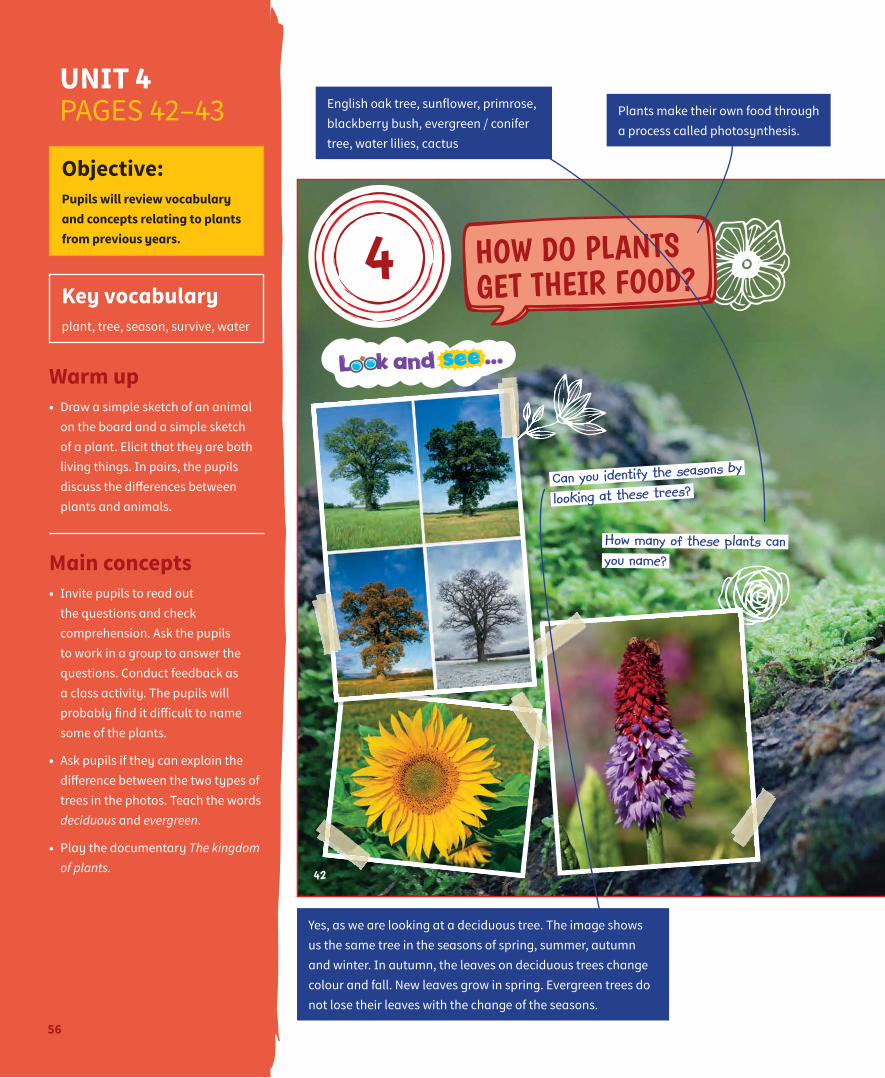
Can you identify the seasons by
looking at these trees?
How many of these plants can you name?
42
4 HOW DO PLANTS GET THEIR FOOD?
Objective: Pupils will review vocabulary and concepts relating to plants from previous years.
Key vocabulary plant, tree, season, survive, water
Warm up• Draw a simple sketch of an animal
on the board and a simple sketch of a plant. Elicit that they are both living things. In pairs, the pupils discuss the differences between plants and animals.
Main concepts• Invite pupils to read out
the questions and check comprehension. Ask the pupils to work in a group to answer the questions. Conduct feedback as a class activity. The pupils will probably find it difficult to name some of the plants.
• Ask pupils if they can explain the difference between the two types of trees in the photos. Teach the words deciduous and evergreen.
• Play the documentary The kingdom of plants.
English oak tree, sunflower, primrose, blackberry bush, evergreen / conifer tree, water lilies, cactus
Plants make their own food through a process called photosynthesis.
Yes, as we are looking at a deciduous tree. The image shows us the same tree in the seasons of spring, summer, autumn and winter. In autumn, the leaves on deciduous trees change colour and fall. New leaves grow in spring. Evergreen trees do not lose their leaves with the change of the seasons.
56
UNIT 4 PAGES 42–43
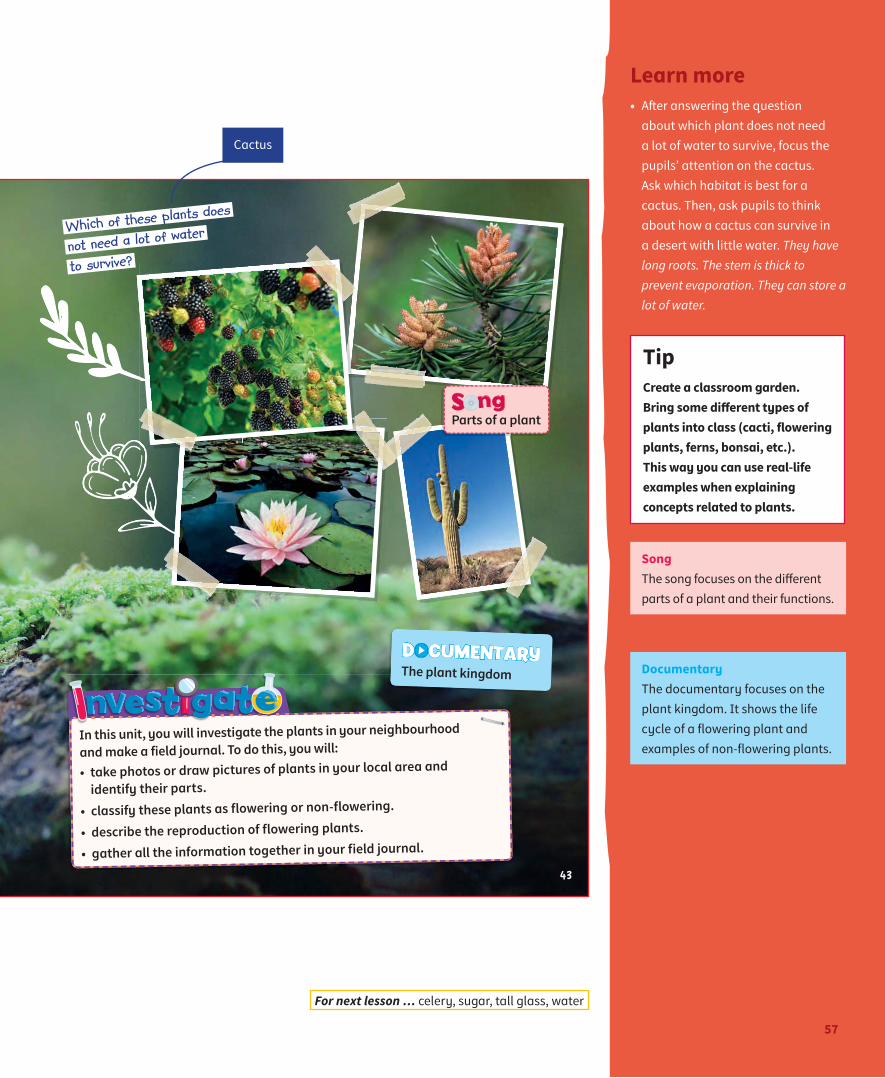
In this unit, you will investigate the plants in your neighbourhood
and make a field journal. To do this, you will:
• take photos or draw pictures of plants in your local area and
identify their parts.
• classify these plants as flowering or non-flowering.
• describe the reproduction of flowering plants.
• gather all the information together in your field journal.
Which of these plants does
not need a lot of water
to survive?
Parts of a plant
D CUMENTARYThe plant kingdom
43
Learn more• After answering the question
about which plant does not need a lot of water to survive, focus the pupils’ attention on the cactus. Ask which habitat is best for a cactus. Then, ask pupils to think about how a cactus can survive in a desert with little water. They have long roots. The stem is thick to prevent evaporation. They can store a lot of water.
TipCreate a classroom garden. Bring some different types of plants into class (cacti, flowering plants, ferns, bonsai, etc.). This way you can use real-life examples when explaining concepts related to plants.
Song The song focuses on the different parts of a plant and their functions.
DocumentaryThe documentary focuses on the plant kingdom. It shows the life cycle of a flowering plant and examples of non-flowering plants.
Cactus
For next lesson … celery, sugar, tall glass, water
57
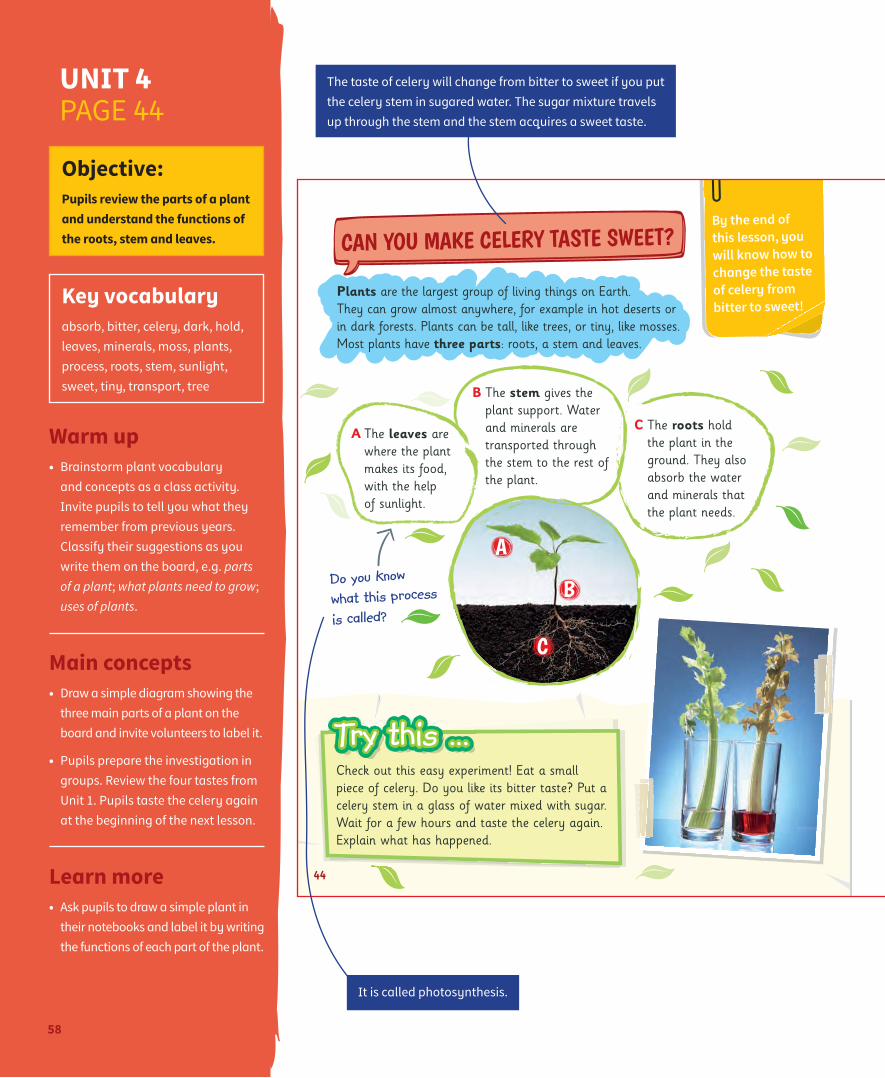
Plants are the largest group of living things on Earth. They can grow almost anywhere, for example in hot deserts or in dark forests. Plants can be tall, like trees, or tiny, like mosses. Most plants have three parts: roots, a stem and leaves.
A The leaves are where the plant makes its food, with the help of sunlight.
B The stem gives the plant support. Water and minerals are transported through the stem to the rest of the plant.
C The roots hold the plant in the ground. They also absorb the water and minerals that the plant needs.
Do you know
what this process
is called?
A
B
C
Check out this easy experiment! Eat a small piece of celery. Do you like its bitter taste? Put a celery stem in a glass of water mixed with sugar. Wait for a few hours and taste the celery again. Explain what has happened.
Try this …
44
CAN YOU MAKE CELERY TASTE SWEET?By the end of this lesson, you will know how to change the taste of celery from bitter to sweet!
Objective: Pupils review the parts of a plant and understand the functions of the roots, stem and leaves.
Key vocabulary absorb, bitter, celery, dark, hold, leaves, minerals, moss, plants, process, roots, stem, sunlight, sweet, tiny, transport, tree
Warm up • Brainstorm plant vocabulary
and concepts as a class activity. Invite pupils to tell you what they remember from previous years. Classify their suggestions as you write them on the board, e.g. parts of a plant; what plants need to grow; uses of plants.
Main concepts• Draw a simple diagram showing the
three main parts of a plant on the board and invite volunteers to label it.
• Pupils prepare the investigation in groups. Review the four tastes from Unit 1. Pupils taste the celery again at the beginning of the next lesson.
Learn more• Ask pupils to draw a simple plant in
their notebooks and label it by writing the functions of each part of the plant.
It is called photosynthesis.
The taste of celery will change from bitter to sweet if you put the celery stem in sugared water. The sugar mixture travels up through the stem and the stem acquires a sweet taste.
58
UNIT 4 PAGE 44
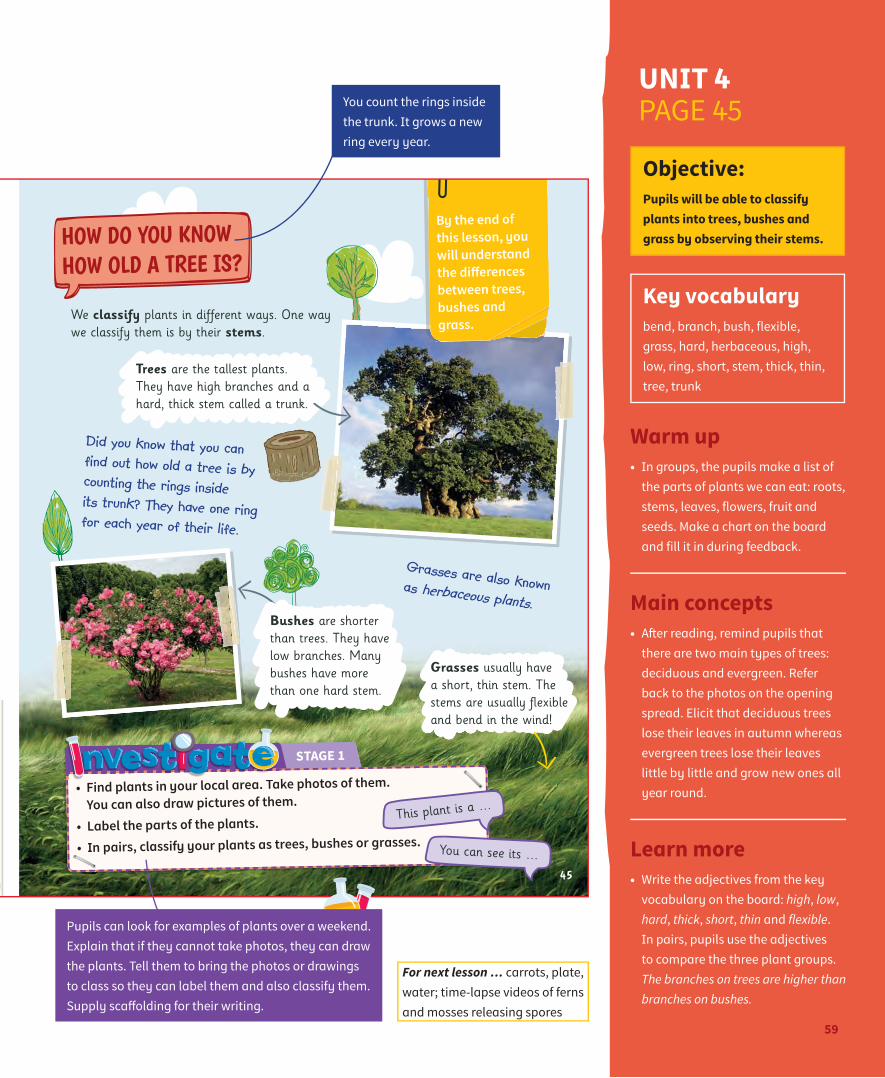
Did you know that you can
counting the rings inside its trunk? They have one ring for each year of their life.
Grasses are also known as herbaceous plants.
Grasses usually have a short, thin stem. The stems are usually fl exible and bend in the wind!
We classify plants in different ways. One way we classify them is by their stems.
STAGE 1
• Find plants in your local area. Take photos of them.
You can also draw pictures of them.
• Label the parts of the plants.
• In pairs, classify your plants as trees, bushes or grasses.
This plant is a …
You can see its …
Trees are the tallest plants. They have high branches and a hard, thick stem called a trunk.
Bushes are shorter than trees. They have low branches. Many bushes have more than one hard stem.
45
HOW DO YOU KNOW HOW OLD A TREE IS?
By the end of this lesson, you will understand the diff erences between trees, bushes and grass.
Objective: Pupils will be able to classify plants into trees, bushes and grass by observing their stems.
Key vocabulary bend, branch, bush, flexible, grass, hard, herbaceous, high, low, ring, short, stem, thick, thin, tree, trunk
Warm up• In groups, the pupils make a list of
the parts of plants we can eat: roots, stems, leaves, flowers, fruit and seeds. Make a chart on the board and fill it in during feedback.
Main concepts• Aft er reading, remind pupils that
there are two main types of trees: deciduous and evergreen. Refer back to the photos on the opening spread. Elicit that deciduous trees lose their leaves in autumn whereas evergreen trees lose their leaves little by little and grow new ones all year round.
Learn more• Write the adjectives from the key
vocabulary on the board: high, low, hard, thick, short, thin and flexible. In pairs, pupils use the adjectives to compare the three plant groups. The branches on trees are higher than branches on bushes.
You count the rings inside the trunk. It grows a new ring every year.
Pupils can look for examples of plants over a weekend. Explain that if they cannot take photos, they can draw the plants. Tell them to bring the photos or drawings to class so they can label them and also classify them. Supply scaff olding for their writing.
For next lesson … carrots, plate, water; time-lapse videos of ferns and mosses releasing spores
59
UNIT 4 PAGE 45
Use the internet
examples of
angiosperms and
gymnosperms.Focus on the correct pronunciation of angiosperm and gymnosperm. How many syllables does each word have?
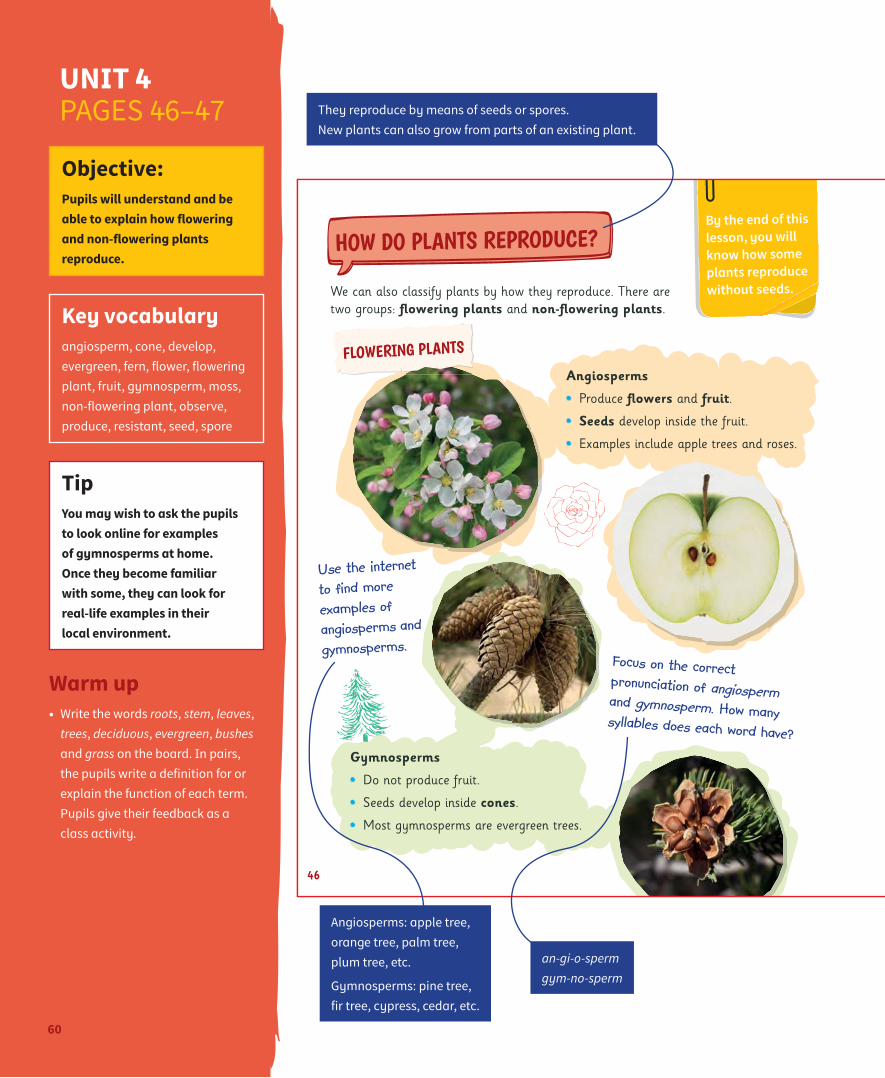
We can also classify plants by how they reproduce. There are two groups: fl owering plants and non-fl owering plants.
Angiosperms
Produce fl owers and fruit.
Seeds develop inside the fruit.
Examples include apple trees and roses.
Gymnosperms
Do not produce fruit.
Seeds develop inside cones.
Most gymnosperms are evergreen trees.
46
By the end of this lesson, you will know how some plants reproduce without seeds.
HOW DO PLANTS REPRODUCE?
FLOWERING PLANTS
Objective: Pupils will understand and be able to explain how flowering and non-flowering plants reproduce.
Key vocabulary angiosperm, cone, develop, evergreen, fern, flower, flowering plant, fruit, gymnosperm, moss, non-flowering plant, observe, produce, resistant, seed, spore
TipYou may wish to ask the pupils to look online for examples of gymnosperms at home. Once they become familiar with some, they can look for real-life examples in their local environment.
Warm up • Write the words roots, stem, leaves,
trees, deciduous, evergreen, bushes and grass on the board. In pairs, the pupils write a definition for or explain the function of each term. Pupils give their feedback as a class activity.
They reproduce by means of seeds or spores. New plants can also grow from parts of an existing plant.
Angiosperms: apple tree, orange tree, palm tree, plum tree, etc.
Gymnosperms: pine tree, fir tree, cypress, cedar, etc.
an-gi-o-sperm gym-no-sperm
60
UNIT 4 PAGES 46–47
Find the cone hidden in the unit.
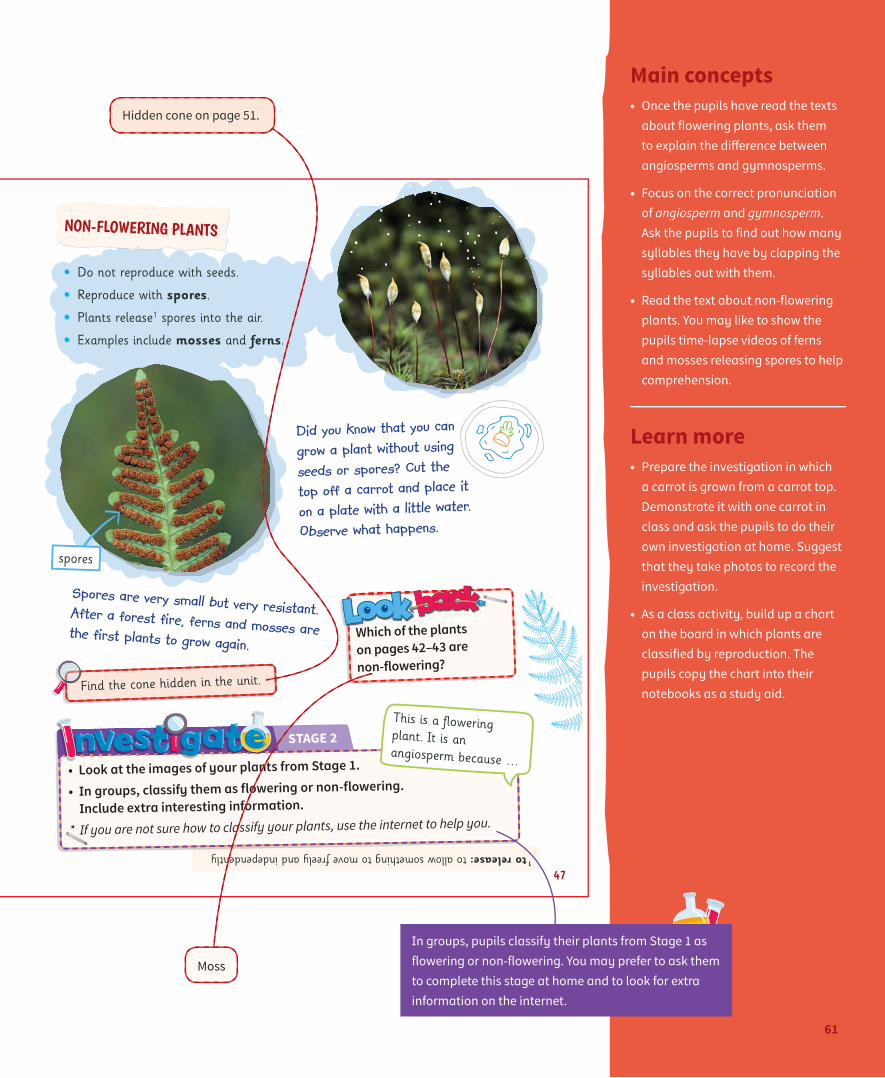
Did you know that you can
grow a plant without using
seeds or spores? Cut the
top off a carrot and place it
on a plate with a little water.
Observe what happens.
Spores are very small but very resistant.
1 to release: to allow something to move freely and independently
STAGE 2
• Look at the images of your plants from Stage 1.
• In groups, classify them as flowering or non-flowering.
Include extra interesting information.
* If you are not sure how to classify your plants, use the internet to help you.
Which of the plants on pages 42–43 are non-flowering?
This is a fl owering plant. It is an angiosperm because …
Do not reproduce with seeds.
Reproduce with spores.
Plants release1 spores into the air.
Examples include mosses and ferns.
47
spores
NON-FLOWERING PLANTS
Main concepts • Once the pupils have read the texts
about flowering plants, ask them to explain the diff erence between angiosperms and gymnosperms.
• Focus on the correct pronunciation of angiosperm and gymnosperm. Ask the pupils to find out how many syllables they have by clapping the syllables out with them.
• Read the text about non-flowering plants. You may like to show the pupils time-lapse videos of ferns and mosses releasing spores to help comprehension.
Learn more • Prepare the investigation in which
a carrot is grown from a carrot top. Demonstrate it with one carrot in class and ask the pupils to do their own investigation at home. Suggest that they take photos to record the investigation.
• As a class activity, build up a chart on the board in which plants are classified by reproduction. The pupils copy the chart into their notebooks as a study aid.
Hidden cone on page 51.
In groups, pupils classify their plants from Stage 1 as flowering or non-flowering. You may prefer to ask them to complete this stage at home and to look for extra information on the internet.
Moss
61
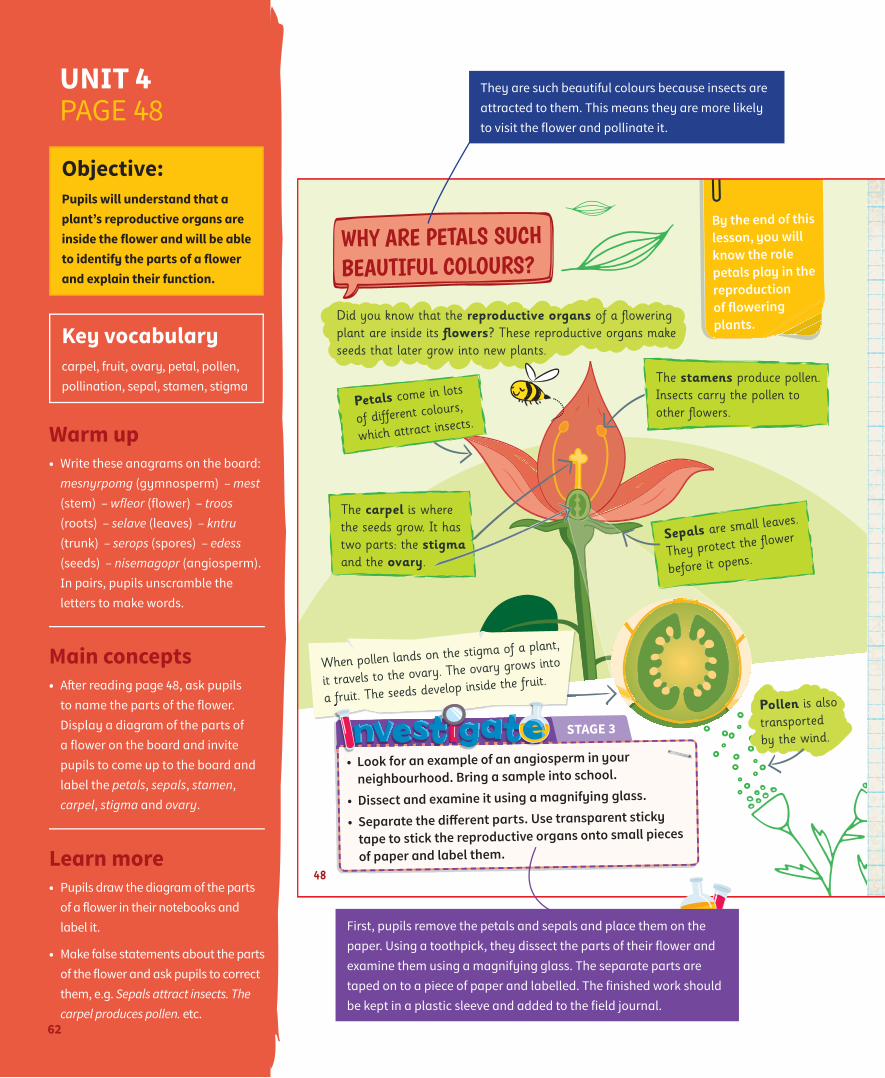
Did you know that the reproductive organs of a fl owering plant are inside its fl owers? These reproductive organs make seeds that later grow into new plants.
Sepals are small leaves.
They protect the fl ower
before it opens.
The stamens produce pollen. Insects carry the pollen to other fl owers.
The carpel is where the seeds grow. It has two parts: the stigma and the ovary.
When pollen lands on the stigma of a plant,
it travels to the ovary. The ovary grows into
a fruit. The seeds develop inside the fruit.
STAGE 3
• Look for an example of an angiosperm in your neighbourhood. Bring a sample into school.
• Dissect and examine it using a magnifying glass.
• Separate the diff erent parts. Use transparent sticky
tape to stick the reproductive organs onto small pieces
of paper and label them.
Petals come in lots
of different colours,
which attract insects.
Pollen is also
transported by the wind.
48
By the end of this lesson, you will know the role petals play in the reproduction of flowering plants.
WHY ARE PETALS SUCH BEAUTIFUL COLOURS?
Objective: Pupils will understand that a plant’s reproductive organs are inside the flower and will be able to identify the parts of a flower and explain their function.
Key vocabulary carpel, fruit, ovary, petal, pollen, pollination, sepal, stamen, stigma
Warm up • Write these anagrams on the board:
mesnyrpomg (gymnosperm) – mest (stem) – wfleor (flower) – troos (roots) – selave (leaves) – kntru (trunk) – serops (spores) – edess (seeds) – nisemagopr (angiosperm). In pairs, pupils unscramble the letters to make words.
Main concepts • Aft er reading page 48, ask pupils
to name the parts of the flower. Display a diagram of the parts of a flower on the board and invite pupils to come up to the board and label the petals, sepals, stamen, carpel, stigma and ovary.
Learn more• Pupils draw the diagram of the parts
of a flower in their notebooks and label it.
• Make false statements about the parts of the flower and ask pupils to correct them, e.g. Sepals attract insects. The carpel produces pollen. etc.
They are such beautiful colours because insects are attracted to them. This means they are more likely to visit the flower and pollinate it.
First, pupils remove the petals and sepals and place them on the paper. Using a toothpick, they dissect the parts of their flower and examine them using a magnifying glass. The separate parts are taped on to a piece of paper and labelled. The finished work should be kept in a plastic sleeve and added to the field journal.
62
UNIT 4 PAGE 48
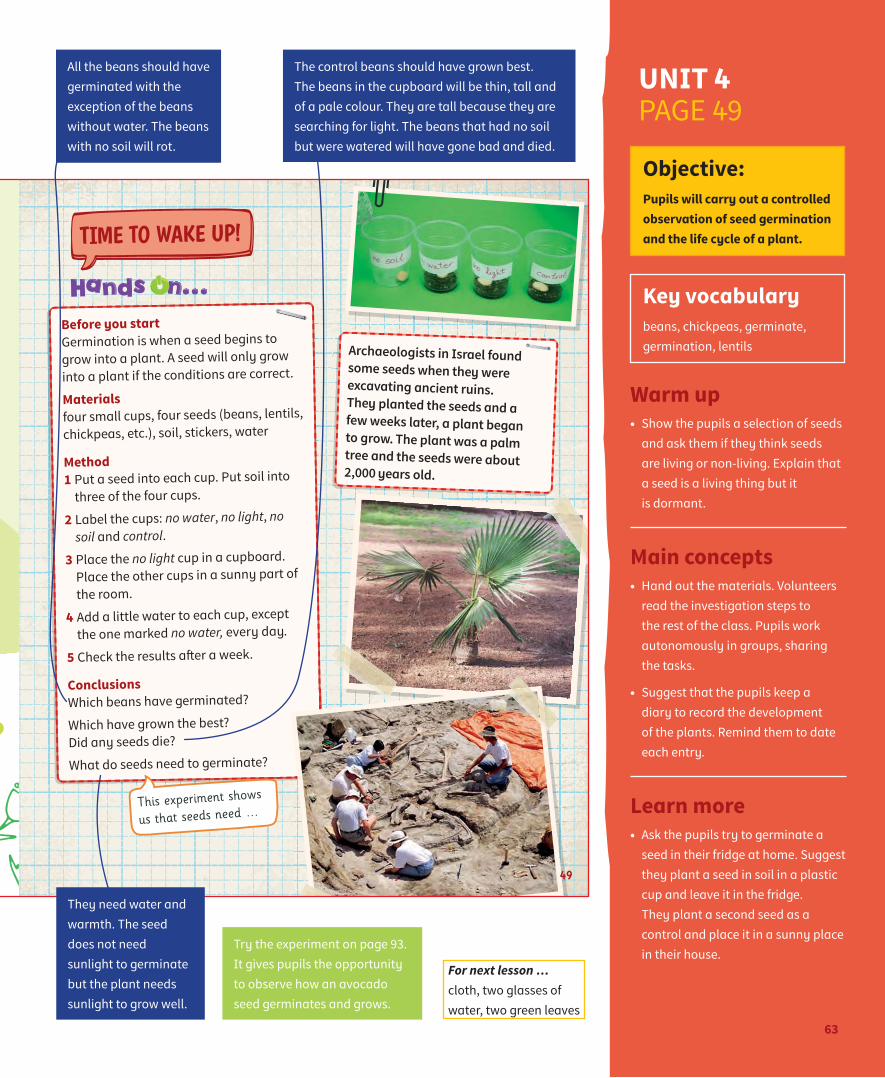
Before you startGermination is when a seed begins to grow into a plant. A seed will only grow into a plant if the conditions are correct.
Materialsfour small cups, four seeds (beans, lentils, chickpeas, etc.), soil, stickers, water
Method1 Put a seed into each cup. Put soil into
three of the four cups.
2 Label the cups: no water, no light, no soil and control.
3 Place the no light cup in a cupboard. Place the other cups in a sunny part of the room.
4 Add a little water to each cup, except the one marked no water, every day.
5 Check the results aft er a week.
ConclusionsWhich beans have germinated?
Which have grown the best? Did any seeds die?
What do seeds need to germinate?
Archaeologists in Israel found some seeds when they were excavating ancient ruins. They planted the seeds and a few weeks later, a plant began to grow. The plant was a palm tree and the seeds were about 2,000 years old.
This experiment shows
us that seeds need …
49
TIME TO WAKE UP!
Objective: Pupils will carry out a controlled observation of seed germination and the life cycle of a plant.
Key vocabulary beans, chickpeas, germinate, germination, lentils
Warm up • Show the pupils a selection of seeds
and ask them if they think seeds are living or non-living. Explain that a seed is a living thing but it is dormant.
Main concepts• Hand out the materials. Volunteers
read the investigation steps to the rest of the class. Pupils work autonomously in groups, sharing the tasks.
• Suggest that the pupils keep a diary to record the development of the plants. Remind them to date each entry.
Learn more• Ask the pupils try to germinate a
seed in their fridge at home. Suggest they plant a seed in soil in a plastic cup and leave it in the fridge. They plant a second seed as a control and place it in a sunny place in their house.
Try the experiment on page 93. It gives pupils the opportunity to observe how an avocado seed germinates and grows.
For next lesson … cloth, two glasses of water, two green leaves
All the beans should have germinated with the exception of the beans without water. The beans with no soil will rot.
The control beans should have grown best. The beans in the cupboard will be thin, tall and of a pale colour. They are tall because they are searching for light. The beans that had no soil but were watered will have gone bad and died.
They need water and warmth. The seed does not need sunlight to germinate but the plant needs sunlight to grow well.
63
UNIT 4 PAGE 49
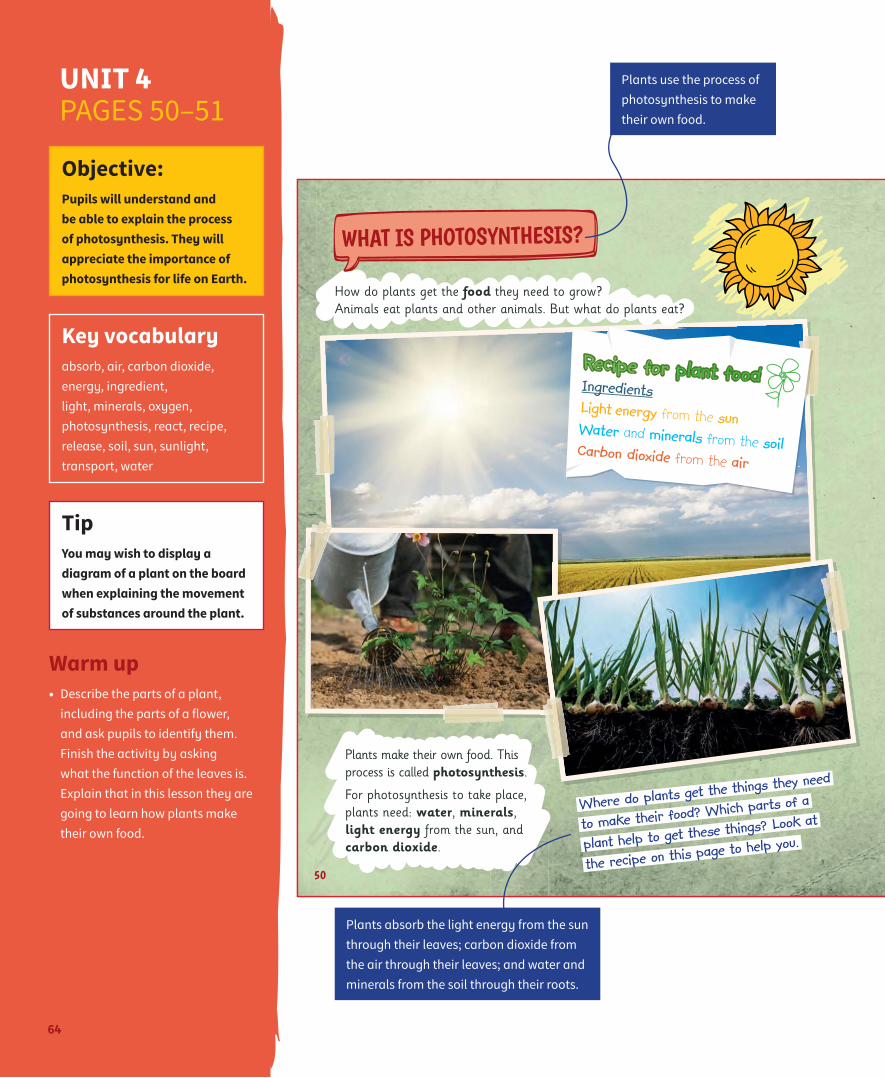
Where do plants get the things they need
to make their food? Which parts of a
plant help to get these things? Look at
the recipe on this page to help you.
How do plants get the food they need to grow? Animals eat plants and other animals. But what do plants eat?
IngredientsLight energy from the sunWater and minerals from the soilCarbon dioxide from the air
Recipe for plant food
50
WHAT IS PHOTOSYNTHESIS?
Plants make their own food. This process is called photosynthesis.
For photosynthesis to take place, plants need: water, minerals, light energy from the sun, and carbon dioxide.
Objective: Pupils will understand and be able to explain the process of photosynthesis. They will appreciate the importance of photosynthesis for life on Earth.
Key vocabulary absorb, air, carbon dioxide, energy, ingredient, light, minerals, oxygen, photosynthesis, react, recipe, release, soil, sun, sunlight, transport, water
TipYou may wish to display a diagram of a plant on the board when explaining the movement of substances around the plant.
Warm up • Describe the parts of a plant,
including the parts of a flower, and ask pupils to identify them. Finish the activity by asking what the function of the leaves is. Explain that in this lesson they are going to learn how plants make their own food.
Plants use the process of photosynthesis to make their own food.
Plants absorb the light energy from the sun through their leaves; carbon dioxide from the air through their leaves; and water and minerals from the soil through their roots.
64
UNIT 4 PAGES 50–51
1to take in something: to absorb something
STAGE 4
• Bring in an angiosperm from your neighbourhood. Try to include the roots.
• Examine the leaves, stem and roots with a magnifying glass.
• In your notebook, write a paragraph explaining how these parts help the plant make its own food.
3
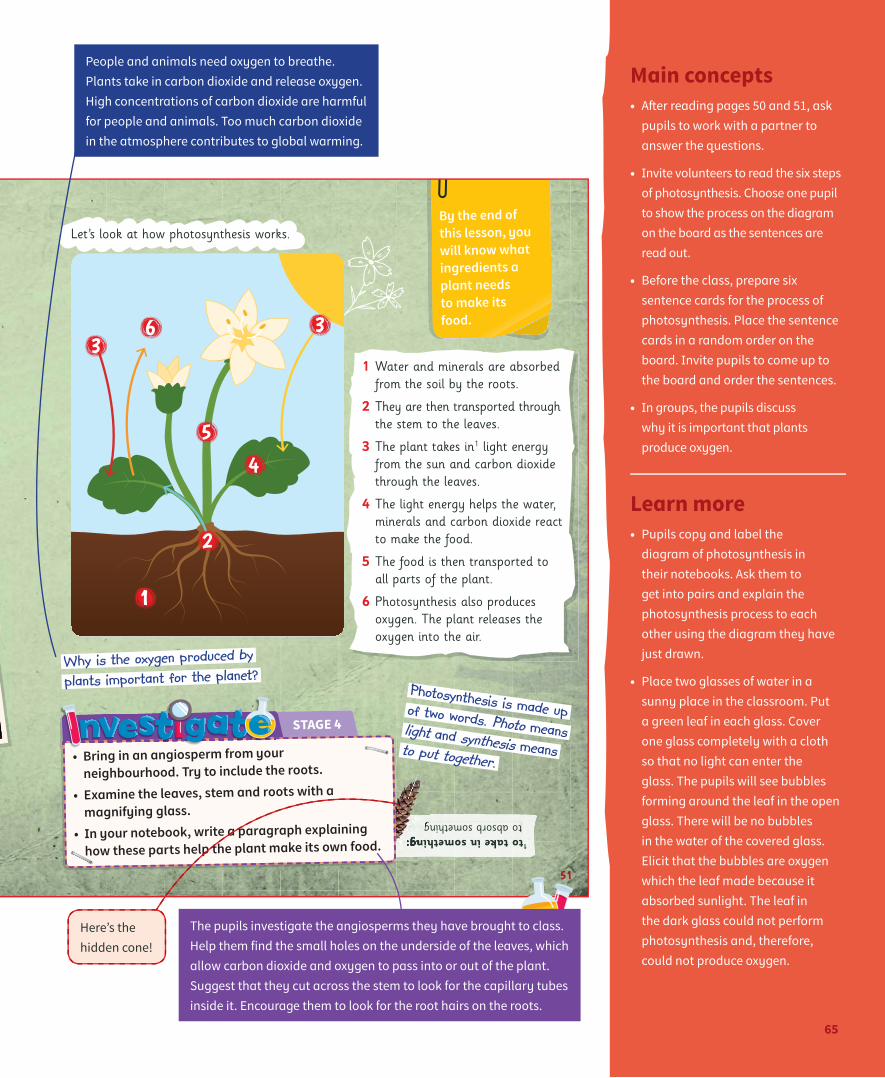
Let’s look at how photosynthesis works.
Why is the oxygen produced by
plants important for the planet?Photosynthesis is made up of two words. Photo meanslight and synthesis means to put together.
1 Water and minerals are absorbed from the soil by the roots.
2 They are then transported through the stem to the leaves.
3 The plant takes in1 light energy from the sun and carbon dioxide through the leaves.
4 The light energy helps the water, minerals and carbon dioxide react to make the food.
5 The food is then transported to all parts of the plant.
6 Photosynthesis also produces oxygen. The plant releases the oxygen into the air.
1
2
45
33
6
51
By the end of this lesson, you will know what ingredients a plant needs to make its food.
Main concepts• Aft er reading pages 50 and 51, ask
pupils to work with a partner to answer the questions.
• Invite volunteers to read the six steps of photosynthesis. Choose one pupil to show the process on the diagram on the board as the sentences are read out.
• Before the class, prepare six sentence cards for the process of photosynthesis. Place the sentence cards in a random order on the board. Invite pupils to come up to the board and order the sentences.
• In groups, the pupils discuss why it is important that plants produce oxygen.
Learn more• Pupils copy and label the
diagram of photosynthesis in their notebooks. Ask them to get into pairs and explain the photosynthesis process to each other using the diagram they have just drawn.
• Place two glasses of water in a sunny place in the classroom. Put a green leaf in each glass. Cover one glass completely with a cloth so that no light can enter the glass. The pupils will see bubbles forming around the leaf in the open glass. There will be no bubbles in the water of the covered glass. Elicit that the bubbles are oxygen which the leaf made because it absorbed sunlight. The leaf in the dark glass could not perform photosynthesis and, therefore, could not produce oxygen.
The pupils investigate the angiosperms they have brought to class. Help them find the small holes on the underside of the leaves, which allow carbon dioxide and oxygen to pass into or out of the plant. Suggest that they cut across the stem to look for the capillary tubes inside it. Encourage them to look for the root hairs on the roots.
People and animals need oxygen to breathe. Plants take in carbon dioxide and release oxygen. High concentrations of carbon dioxide are harmful for people and animals. Too much carbon dioxide in the atmosphere contributes to global warming.
Here’s the hidden cone!
65
Language skills answers1 a Is a rose prettier than a cactus?
Yes, it is. / No, it isn’t.
b Is a tree shorter than a bush? No, it isn’t.
c Are grasses thinner than trees? Yes, they are.
d Are trees taller than daisies? Yes, they are.
e Are grasses stronger than trees? No, they aren’t.
2 a It is made of cotton.
b It is made of wood.
3 1–c; 2–a; 3–d; 4–b
This activity gives pupils practice of A2 Flyers Reading and Writing Part 2.
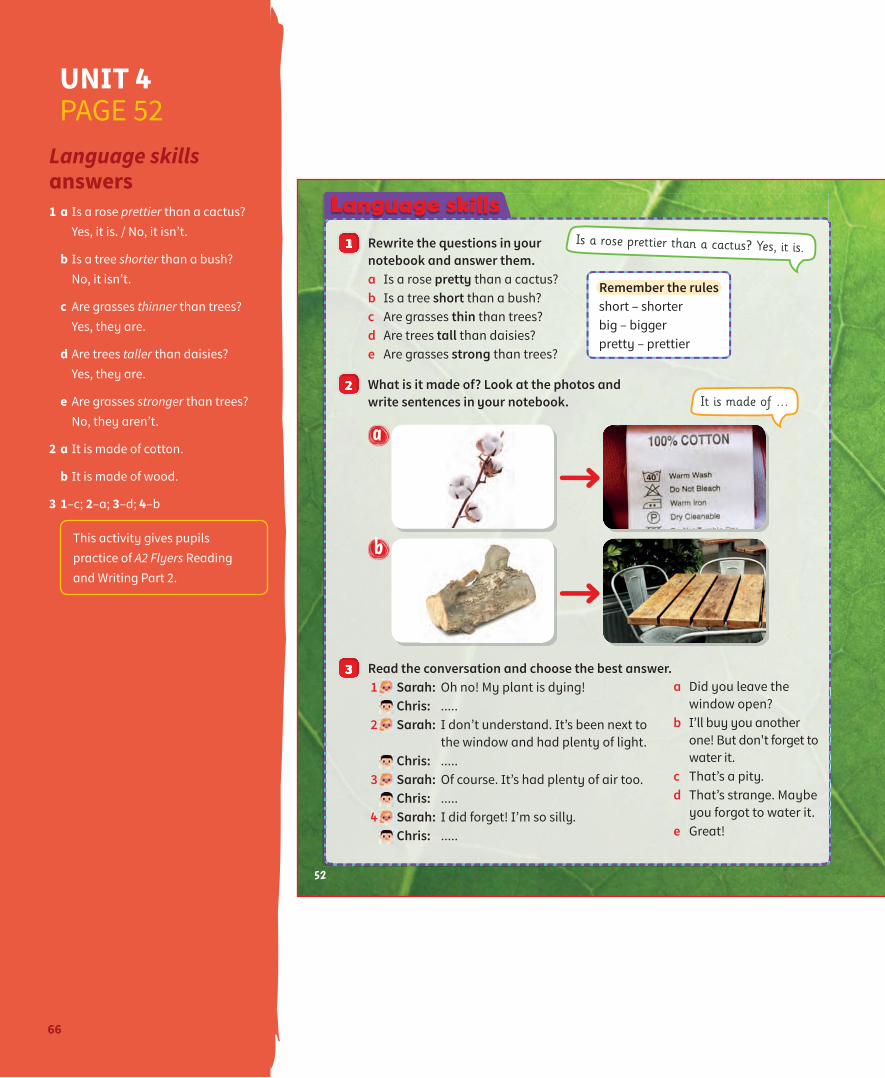
Rewrite the questions in your notebook and answer them.a Is a rose pretty than a cactus?b Is a tree short than a bush?c Are grasses thin than trees?d Are trees tall than daisies?e Are grasses strong than trees?
What is it made of? Look at the photos and write sentences in your notebook.
a
b
Read the conversation and choose the best answer.1 Sarah: Oh no! My plant is dying! Chris: .....2 Sarah: I don’t understand. It’s been next to
the window and had plenty of light. Chris: .....3 Sarah: Of course. It’s had plenty of air too. Chris: .....4 Sarah: I did forget! I’m so silly. Chris: .....
Remember the rules short – shorterbig – biggerpretty – prettier
Is a rose prettier than a cactus? Yes, it is.
a Did you leave the window open?
b I’ll buy you another one! But don't forget to water it.
c That’s a pity.d That’s strange. Maybe
you forgot to water it.e Great!
It is made of …
Language skills
52
66
UNIT 4 PAGE 52
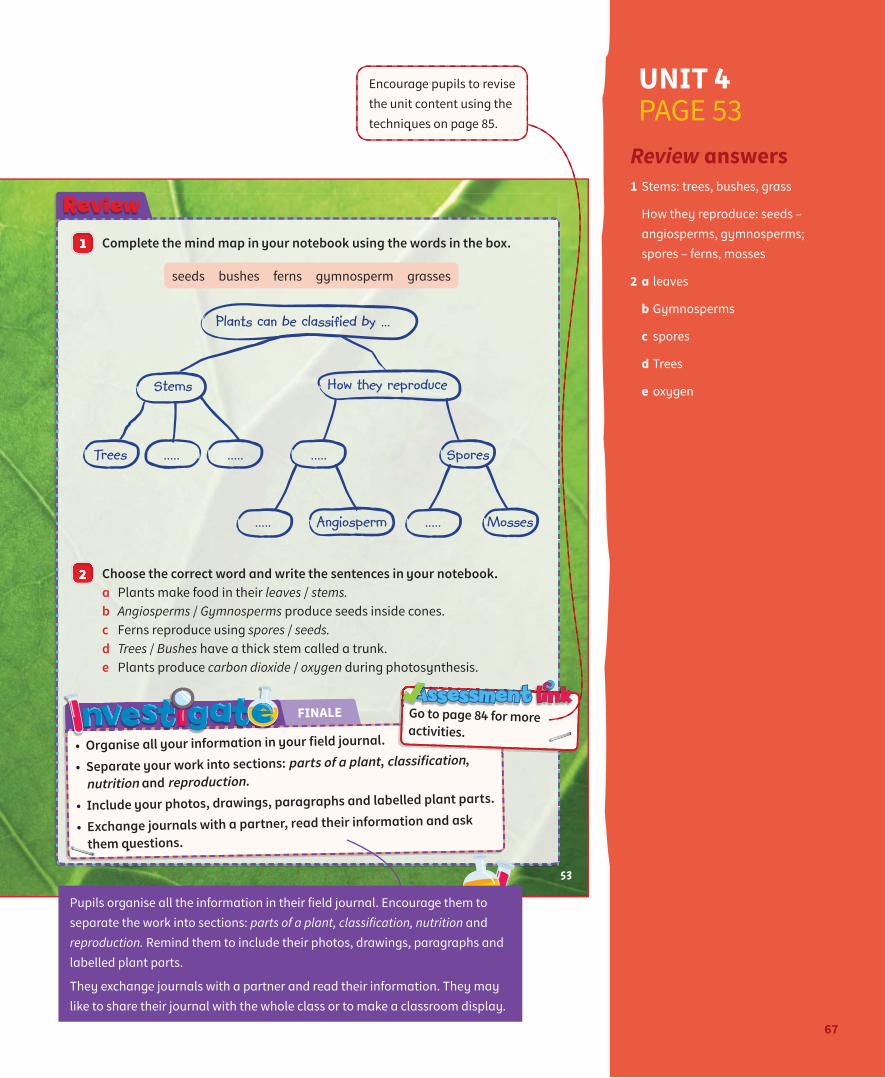
Complete the mind map in your notebook using the words in the box.
seeds bushes ferns gymnosperm grasses
FINALE
• Organise all your information in your field journal.
• Separate your work into sections: parts of a plant, classification,
nutrition and reproduction.
• Include your photos, drawings, paragraphs and labelled plant parts.
• Exchange journals with a partner, read their information and ask
them questions.
Choose the correct word and write the sentences in your notebook.a Plants make food in their leaves / stems.b Angiosperms / Gymnosperms produce seeds inside cones.c Ferns reproduce using spores / seeds.d Trees / Bushes have a thick stem called a trunk.e Plants produce carbon dioxide / oxygen during photosynthesis.
Go to page 84 for more activities.
Stems How they reproduce
Trees ..... ..... .....
..... .....
Spores
Angiosperm Mosses
Review
53
Review answers1 Stems: trees, bushes, grass
How they reproduce: seeds – angiosperms, gymnosperms; spores – ferns, mosses
2 a leaves
b Gymnosperms
c spores
d Trees
e oxygen
Pupils organise all the information in their field journal. Encourage them to separate the work into sections: parts of a plant, classification, nutrition and reproduction. Remind them to include their photos, drawings, paragraphs and labelled plant parts.
They exchange journals with a partner and read their information. They may like to share their journal with the whole class or to make a classroom display.
Encourage pupils to revise the unit content using the techniques on page 85.
67
UNIT 4 PAGE 53
Think about it answers1 Roots, stem, leaves
2 Trees, bushes and grasses
3 False
4 Inside the fruit
5 Moss, fern
6 Photosynthesis
7 Oxygen
8 Flower
9 Colourful petals, scent, sweet nectar
10 Water and warmth
Think harder answers1 The roots hold the plant in the ground and absorb water
and minerals from the soil.
The stem supports the other parts of the plant. Water and minerals are transported through the stem to the leaves, and from there food to all parts of the plant.
The leaves are where the plant’s food is produced, using light energy from the sun to combine water, minerals and carbon dioxide.
2 By their stems and by how they reproduce.
3 Trees are the tallest plants. They have a strong, thick stem called a trunk and high branches. Bushes are shorter than trees and the branches are lower. They have more than one hard stem. Grasses have short, thin, flexible stems.
4 Seeds develop inside a fruit in angiosperms. Seeds develop inside cones in gymnosperms.
5 They reproduce by means of spores.
6 Water and minerals are absorbed from the soil by the roots and are transported through the stem to the leaves. The plant takes in light-energy from the sun and carbon dioxide through the leaves. The light and energy from the sun helps the water, minerals and carbon dioxide react to make the food. The food is then transported to all parts of the plant. Photosynthesis also produces oxygen. The plant releases the oxygen into the air.
7 The process of photosynthesis produces oxygen, which animals and people need to be able to breathe. Plants need carbon dioxide to perform photosynthesis. High concentrations of carbon dioxide are harmful for animals and people.
8 The petals attract insects to the flower. The sepals protect the flower before it opens. The stamens produce pollen. The seeds develop inside the carpel, which is made up of the stigma and the ovary. Pollen has to pass from the stamens to the stigma if a seed is to develop.
9 When insects visit plants to eat the nectar inside the flower, pollen often gets stuck to their bodies. When they travel to a different plant, the pollen sticks to the stigma, which is at the top of the carpel. The pollen passes down through the inside of the carpel and arrives at the ovary. This is where the seed develops and grows. As the seed grows, the ovary grows too and becomes a fruit.
10 A seed germinates and begins to grow. The roots grow first and then the stem and leaves. The new plant produces flowers. Pollen from the stamens land on the stigma and pass down into the ovary. A seed develops inside the ovary. The ovary gets bigger as the seed grows and becomes a fruit. The petals fall. The fruit falls from the plant and opens. It releases the seeds. If the conditions are correct and the seeds have water and warmth, the seeds will germinate.
68
UNIT 4 ASSESSMENT, PAGE 84

Track 26 Page 42, Song: Parts of a plant
Track 27 Page 44, Can you make celery taste sweet?
Track 28 Page 45, How do you know how old a tree is?
Track 29 Page 46, How do plants reproduce?
Track 30 Page 48, Why are petals such beautiful colours?
Track 31 Page 50, What is photosynthesis?
69
UNIT 4 TRACKLIST