HCX 1080 BT Guida d'uso User guide - Market Quest
40
SISTEMA HIFI STEREO CON CD/MP3/USB/BT Manuale d'uso e collegamento HIFI STEREO SYSTEM WITH CD/MP3/USB/BT User manual and connection SYSTEME STEREO HIFI AVEC CD/MP3/USB/BT Mode d'emploi et connexion HIFI STERO ANLAGE MIT CD/MP3/USB/BT Bedienungsanleitung und Anschluss ESTEREO CON CD/MP3/USB/BT Manual de usuario y la conexión RADIO PLL FM LINE IN HCX 1080 BT Guida d’uso User guide CD MP3 USB IN BT NFC
-
Upload
khangminh22 -
Category
Documents
-
view
3 -
download
0
Transcript of HCX 1080 BT Guida d'uso User guide - Market Quest

SISTEMA HIFI STEREO CON CD/MP3/USB/BTManuale d'uso e collegamento
HIFI STEREO SYSTEM WITH CD/MP3/USB/BT User manual and connection
SYSTEME STEREO HIFI AVEC CD/MP3/USB/BT Mode d'emploi et connexion
HIFI STERO ANLAGE MIT CD/MP3/USB/BT Bedienungsanleitung und Anschluss
ESTEREO CON CD/MP3/USB/BT Manual de usuario y la conexión
RADIO PLL FM
LINE IN
HCX 1080 BTGuida d’usoUser guide
CD MP3USB IN
BT NFC

2
HCX 1080 BT
WARNING!
WARNING: DO NOT OPEN THE SET. NEITHER CONTROLS OR SPARE PARTS TO BE USED BY THE USER ARE TO BE FOUND INSIDE IT. APPLY TO AUTHORISED TREVI CENTERS FOR SERVICE OPERATIONS.
ATTENZIONERISCHIO DI SCOSSE ELET-
TRICHE!NON ESPORRE A PIOGGIA E
UMIDITÀ
ATTENZIONE: NON APRITE L'APPARECCHIO. ALL'INTERNO NON VI SONO COMANDI MANIPOLABILI DALL'UTENTE NE PARTI DI RICAMBIO. PER TUTTE LE OPERAZIONI DI SERVIZIO RIVOLGERSI AD UN CENTRO DI ASSISTENZA AUTORIZZATO TREVI
DANGER OF ELECTRIC SHOCK!DO NOT EXPOSE TORAIN OR HUMIDITY
ATTENTION
ATTENTION: NE PAS OUVRIR L’APPAREIL, A L’INTERIEUR IL N’Y A PAS DE COMMANDES A MANIPULER PAR L’UTILISATEUR OU DE PIECES DE RECHANGE. POUR TOUTES LES OPERATIONS DE SERVICE IL FAUT S’ADRESSER A UN SERVICE D’ASSISTANCE AUTORISE TREVI.
RISQUE DE DECHARGES ELEC-TRIQUES
NE PAS EXPOSER A LA PLUIE ET A L’HUMIDITE
ACHTUNG
ACHTUNG: DAS GERÄT NICHT ÖFFNEN. IM INNERN BEFINDEN SICH KEINE VOM BENUTZER SELBST INSTANDSETZBAREN TEILE UND AUCH KEINE ERSATZTEILE. FÜR JEGLICHE SERVICEARBEITEN, WENDEN SIE SICH BITTE AN EINE TREVI AUTORISIERTEN KUNDENDIENSTSTELLE.
GEFAHR ELEKTRISCHER SCHLÄGENICHT DER FEUCHTIGKEIT UND
DEM REGEN AUSSETZEN
ATENCION
ATENCION: NO ABRIR EL APARATO, EN SU INTERIOR NO HAY MANDOS QUE PUEDAN SER MANIPULADOS POR EL USUARIO NI PARTES DE REPUESTO. PARA TODAS LAS OPERACIONES DE SERVICIO DIRIGIRSE A UN CENTRO DE ASISTENCIA AUTORIZADO TREVI.
PELIGRO DE CHOQUES ELECTRICOS
NO EXPONER A LLUVIA Y HUMEDAD
ATENÇÃO
PERIGO DE CHOQUES ELÉTRICOSNÃO EXPOR A CHUVA E UMIDADE
ATENÇÃO: NÃO ABRIR O APARELHO. NO INTERIOR DO MESMO NÃO EXISTEM COMANDOS OU PEÇAS DE SUBSTITUIÇÃO QUE POSSAM SER MANIPULADOS PELO USUÁRIO. EM CASO DE EVENTUAL OPERAÇÃO DE SERVIÇO, DIRIGIR-SE A UM CENTRO DE ASSISTÊNCIA AUTORIZADO TREVI
PROSOCH
PROSOCH. MHN ANOIGETE THN SUSKEUH. DEN UPARCOUN STO ESWTERIKO THS ENTOLES POU NA MPOREI NA CEIRISTEI O KATANALWTHS OUTE ANTALLAKTIKA TMHMATA. GIA OPO-IADHPOTE EPISKEUH H¢ SUNTHRHSH APEUQUNQEITE SE ENA APO TA EXOUSIODOTHMENA KENTRA ANTIPROSWPEIAS TREVI.
KINDUNOS HLEKTROPLHXIASMHN EKQETETE
SE BROCH KAI UGRASIA
WARNINGS

3
HCX 1080 BT
INFORMAZIONI AGLI UTENTIai sensi del Decreto Legislativo N° 49 del 14 Marzo 2014“Attuazione della Direttiva 2012/19/UE sui rifiuti di apparecchiature elettriche ed elettroniche (RAEE)”Il simbolo del cassonetto barrato riportato sull’apparecchiatura indica che il pro-dotto alla fine della propria vita utile deve essere raccolto separatamente dagli altri rifiuti. L’utente dovrà, pertanto, conferire l’apparecchiatura integra dei componenti essenziali giunta a fine vita agli idonei centri di raccolta differenziata dei rifiuti elet-tronici ed elettrotecnici, oppure riconsegnarla al rivenditore al momento dell’acqui-sto di nuova apparecchiatura di tipo equivalente, in ragione di uno a uno, oppure 1 a zero per le apparecchiature aventi lato maggiore inferiore a 25 cm. L’adeguata raccolta differenziata per l’avvio successivo dell’apparecchiatura dimessa al rici-claggio, al trattamento e allo smaltimento ambientale compatibile contribuisce ad evitare possibili effetti negativi sull’ambiente e sulla salute e favorisce il riciclo dei materiali di cui è composta l’apparecchiatura. Lo smaltimento abusivo del prodotto da parte dell’utente comporta l’applicazione delle sanzioni amministrative di cui al D.Lgs n. Decreto Legislativo N° 49 del 14 Marzo 2014.
INFORMATION TO USERSpursuant to Legislative Decree No. 49 of March 14, 2014“Implementation of Directive 2012/19 / EU on Waste Electrical and Electronic Equipment (WEEE)”This wheeled bin symbol on the product indicates that at the end of its life must be collected separately from other waste. The user must, therefore, take the remote control integrates the essential components that got to its life to the appropriate differentiated collection centers for electronic and electro-technical waste, or return it to the dealer when purchasing a new appliance of equivalent type, in termsof one to one, or one to zero for equipment having longer side of less than 25 cm. Appropriate separate collection for the decommissioned equipment for recycling, processing and environmentally compatible disposal helps prevent negative impact on the environment and human health and promotes recycling of the materials making up the product. Illegal dumping of the product by the user entailsthe application of administrative sanctions stated in Legislative Decree n. Legislati-ve Decree No. 49 of March 14, 2014.
INFORMATIONS AUX UTILISATEURSconformément au décret législatif n ° 49 du 14 Mars, 2014“La mise en œuvre de la directive 2012/19 / UE relative aux déchets d’équipements électriques et électroniques (RAEE)”Ce symbole de poubelle sur roues sur le produit indique que, à la fin de sa durée de vie doit être collecté séparément des autres déchets. L’utilisateur doit donc prendre le contrôle à distance intègre les éléments essentiels qui ont obtenu à sa vie dans les centres de collecte différenciés appropriés pour les déchets électroni-ques et électro-technique, ou le retourner chez le concessionnaire lors de l’achat d’un nouvel appareil de type équivalent, en termes de un à un, ou une à zéro pour un équipement ayant le côté plus long de moins de 25 cm. collecte séparée appropriée pour l’équipement mis hors service pour le recyclage, le traitement et l’élimination respectueuse de l’environnement contribue à éviter les effets négatifs sur l’environnement et la santé humaine et favorise le recyclage des matériaux qui composent le produit. le dumping illégal du produit par l’utilisateur substitutions l’application des sanctions administratives prévues par le décret législatif n. Décret législatif N° 49 du 14 Mars 2014.
Informationen für die Nutzergemäß Gesetzesdekret Nr 49 von 14, März 2014“Die Umsetzung der Richtlinie 2012/19 / EU über die Entsorgung von Elektro- und Elektronik-Altgeräte (RAEE)”Dieses Mülleimers Symbol auf dem Produkt zeigt an, dass muss am Ende seines Lebens von anderen Abfällen getrennt gesammelt werden. Der Benutzer muss daher nehmen die Fernbedienung die wesentlichen Komponenten integriert, die für elektronische und elektrotechnische Abfälle in die entsprechenden differenzierten
Sammelstellen zu seinem Leben bekam, oder es an den Händler zurückgeben, wenn ein neues Gerät gleichwertiger Art Kauf in Bezug auf von 12.59 oder eine für Geräte mit längeren Seite von weniger als 25 cm auf Null. Die angemessene, getrennte Sammlung für die stillgelegte Anlagen für Recycling, Aufbereitung und umweltgerechte Entsorgung trägt dazu bei, die Umwelt und die menschliche Gesundheit negative Auswirkungen zu vermeiden und begünstigt das Recycling der Materialien das Produkt zusammengesetzt. Illegal Dumping des Produkts durch den Benutzer Entails die Anwendung von Verwaltungssanktionen erklärte in Gesetzesverordnung Nr. Dekr 49 von 14. März 2014.
Información a los usuariosel marco del Decreto Legislativo N ° 49 del 14 de marzo 2014“Aplicación de la Directiva 2012/19 / UE sobre residuos de aparatos eléctricos y electrónicos (RAEE)”Este símbolo de contenedor de ruedas en el producto indica que al final de su vida útil debe ser recogido separadamente de los demás residuos. El usuario debe, por lo tanto, tomar el control remoto integra los componentes esenciales que llegaron a su vida útil a los centros adecuados de recogida de residuos electrónicos y electrotécnicos, o devolverlo al distribuidor al comprar un nuevo aparato de tipo equivalente, en términos de uno a uno, o uno a cero para el equipo que tiene lado más largo de menos de 25 cm. la recogida selectiva apropiado para el equipo fuera de servicio para su reciclaje, tratamiento y eliminación ambientalmente compatible ayuda a prevenir el impacto negativo sobre el medio ambiente y la salud, favoreciendo el reciclaje de los materiales que componen el producto. El vertido ilegal del producto por los usuarios conlleva la aplicación de las sanciones administrativas establecidas en el Decreto Legislativo n. Decreto Legislativo N° 49 de 14 de marzo de 2014.
A informação dos utilizadoresnos termos do Decreto Legislativo nº 49 de 14 de março de 2014“A aplicação da Directiva 2012/19 / UE relativa aos resíduos de equipamentos eléctricos e electrónicos (REEE)”Este símbolo de latão no produto indica que, no final da sua vida útil deve ser recolhido separadamente dos outros resíduos. O usuário deve, portanto, assumir o controlo remoto integra os componentes essenciais que chegou a sua vida para os centros de recolha diferenciada apropriados para os resíduos eletrônicos e eletro-técnica, ou devolvê-lo ao revendedor aquando da compra de um novo aparelho de tipo equi-valente, em termos de um para um, ou um a zero para o equipamento com o lado mais longo de menos de 25 cm. A adequada recolha diferenciada para o equipamento desmantelada para reciclagem, tratamento e eliminação ambientalmente compatível, contribui para evitar possíveis efeitos negativos sobre o ambiente ea saúde e favorece a reciclagem dos materiais que compõem o produto. Despejo ilegal do produto pelos vínculos de usuários a aplicação de sanções administrativas indicado no Decreto Legislativo n. Decreto Legislativo Nº 49 de 14 de Março de 2014.
Προειδοποιήσεις για τη σωστή διάθεση του προϊόντος.Το σύμβολο που απεικονίζεται επάνω στη συσκευή υποδεικνύει ότι το απόβλητο πρέπει να αποτελέσει αντικείμενο “χωριστής συλλογής” ως εκ τούτου το προϊόν δεν πρέπει να διατίθεται μαζί με τα αστικά απόβλητα.Ο χρήστης θα πρέπει να παραδώσει το προϊόν στα ειδικά “κέντρα διαφοροποιημένης συλλογής” που έχουν διευθετηθεί από τις δημοτικές διοικήσεις, ή να το παραδώσει στο κατάστημα πώλησης με την αγορά ενός νέου προϊόντος.Η διαφοροποιημένη συλλογή του αποβλήτου και οι ακόλουθες επεμβάσεις επεξεργασίας, ανάκτησης και διάθεσης βοηθούν την παραγωγή συσκευών με ανακυκλωμένα υλικά και περιορίζουν τις αρνητικές επιπτώσεις για το περιβάλλον και την υγεία που προκαλούνται από την ακατάλληλη διαχείριση του αποβλήτου.Η αυθαίρετη διάθεση του προϊόντος συνεπάγεται την εφαρμογή διοικητικών κυρώσεων.
CORRECT DISPOSAL WARNINGS

4
HCX 1080 BT
DESCRIZIONE COMANDI01 Standby02 Display03 Precedente04 Successivo05 Sorgente06 Play/Pause07 Stop08 Volume
09 Tasto apertura CD10 Presa Cuffie11 Vano CD12 Ingresso USB13 Altoparlanti14 Uscite Altoparlanti15 Uscita Audio16 Ingresso Audio17 Antenna FM
ITALIANO
02
10 1211
01 08
03 04 05 06 07
09
14 15 16 17
13 13

5
HCX 1080 BT
DESCRIZIONE COMANDI01 Standby02 Tastierino Numerico03 FF+04 FF-05|<</>>|/<</>>06 Pausa07 A-B08 CD/USB09 Sorgente10 Random11 Cerca12 EQ13 INTRO14 Mute15 Loudness16 Volume+17 Volume-18 Bass+19 Bass-20 Treble +21 Treble -22 Ripeti23 Stop24 Play25 Memoria26 CH - 27 CH+28 Programma29 Vai a30 Espelli31 Reset
ITALIANO
01
02
03
30
2928
27
26
25
24
04
05
0607080910111213
14
2322212019183116
1715

6
HCX 1080 BTAVVERTENZE SUL LASERQuesto apparecchio è dotato di un sistema di lettura con raggio laser. Benché il laser sia di bassa potenza e con dispositivo di sicurezza che ne impedisce il funzionamento a sportello aperto attenetevi scrupolosamente alle seguenti avvertenze:Non avvicinate l'occhio alla lente del laser con l'apparecchio aperto, pericolo di lesione della retina.Non tentate di smontare o manomettere l'unità laser, pericolo di assorbimento di radiazioni.
NOTE D'USOAscoltare a volume alto per lungo tempo, potrebbe danneggiare il vostro udito. Questo apparecchio è uno strumento elettronico di alta precisione, evitate quindi di utilizzarlo nei seguenti casi:• Vicino a campi magnetici.• Vicino a fonti di calore come caloriferi e stufe.• In luoghi molto umidi come stanze da bagno, piscine, ecc...• In luoghi molto polverosi.• In luoghi soggetti a forti vibrazioni.• Non avvicinare l’orecchio all’altoparlante durante le fasi di messa punto e regolazioni del volume, e in particolare di tenere il volume al minimo nella fase di accensione.• Posizionare l’apparecchio in modo che ai suoi lati ci sia sempre abbastanza spazio per la libera circolazione di aria (almeno 5 cm).• Se dei liquidi penetrano all’interno dell’apparecchio scollegare immediatamente la spina dalla presa e portare l’apparecchio al più vicino centro assistenza autorizato TREVI.• Controllare sempre prima di ricaricare l’apparecchio, che i cavi di alimentazione e di collegamento siano installati correttamente. • Nessuna sorgente di fiamma nuda, quali candele accese, dovrebbe essere posta sull’apparecchio.• L’apparecchio non deve essere esposto a stillicidio o a spruzzi d’acqua e nessun oggetto pieno di liquido, quali vasi, deve essere posto sull’apparecchio.• Conservare il presente manuale per futuri riferimenti.CURA E MANUTENZIONEPer la pulizia si consiglia l’ uso di un panno morbido, leggermente inumidito. Evitate solventi o sostanze abrasive.IMPORTANTEQuesto dispositivo e' progettato per uso domestico non professionale. La buona costruzione di questo apparecchio ne garantisce per lungo tempo il perfetto funzionamento. Se tuttavia dovesse presentarsi qualche inconveniente, sarà opportuno consultare il più vicino Centro Assistenza autorizzato TREVI.TREVI persegue una politica di continua ricerca e sviluppo. Pertanto i prodotti possono presentare caratteristiche diverse da quelle descritte.
ALIMENTAZIONERETEInserire la spina in una presa di corrente 230V~50Hz. Non collegare l'apparecchio a prese con tensione diversa da quella indicata.Se non diversamente specificato, le descrizioni dei comandi valgono sia per l'apparecchio che per il telecomando
ACCENSIONE/SPEGNIMENTO1. Premere sul tasto di STANDBY (1).- L'apparecchio si avvierà a seconda della funzione scelta.2. Agire nuovamente sul tasto di standby per spegnere l'apparecchio.
FUNZIONAMENTO RADIO1. Accendere l'apparecchio portando il selettore SORGENTE (5) sulla posizione TUNER.2. Premere una volta i tasti FF+ (3) o FF- (4) del telecomando per aumentare o diminuire la frequenza di 0,05MHz.3. Tenere premuto a lungo i tasti FF+ (3) o FF- (4) del telecomando per sintonizzarsi sulla stazione radio successiva o precedente.4. Premere il tasto Play/Pause (06) per avviare la ricerca automatica delle stazioni radio. L'apparecchio può memorizzare fino a 40 stazioni radio.5. Premere una volta i tasti Precedente (3) o Successivo (4) sull'unità o i tasti CH- (26) o CH+ (27) del telecomando per posizionarsi sulla stazione memorizzata precedente o successiva.
ITALIANO
AVVERTENZA ASCOLTO CON CUFFIE/AURICOLARIPer evitare possibili danni all'udito, limitare il tempo di ascolto a volumi elevati.

7
HCX 1080 BTITALIANO
FUNZIONAMENTO LETTORE CD-MP3RIPRODUZIONE1. Accendere l'apparecchio portando il selettore funzioni (5) sulla posizione CD-MP32. Aprire il vano CD premendo il tasto (9) e inserire il disco con il lato scritto rivolto verso l'alto. Richiudere lo sportello premendo dolcemente.3. Dopo qualche secondo il display mostra il numero delle tracce (brani) presenti sul disco e si avviera' la riproduzione.4. Premere il tasto PLAY/PAUSE >II (6) per attivare la pausa, il display mostrerà il simbolo PAUSA5. Per disinserire la pausa premere ancora una volta il tasto PLAY/PAUSE >II (6).6. Premere per qualche minuto il tasto STOP (7) per fermare definitivamente la riproduzione.SALTO TRACCIA1. Premere una volta i tasti Precedente (3) o Successivo (4) sull'unità o i tasti I<< o >>I (5) del telecomando per posizionarsi sulla traccia precedente o successiva.2. Premere e tenere premuto il tasto FF+ (3) o FF- (4) del telecomando durante l'ascolto per ricercare velocemente un particolare passaggio musicale. Rilasciare il tasto per tornare alla normale riproduzione.RIPETIZIONE DI UN SINGOLO BRANOPremere una volta il tasto Ripeti(22) sul telecomando, l'icona compare sul display e l’apparecchio riproduce continuamente la stessa traccia.
RIPETIZIONE DELL'INTERO DISCOPremere due volte il tasto Ripeti (22) sul telecomando, le icone ALL compaiono sul display e l’apparecchio riproduce conti-nuamente l'intero disco.Per ripristinare il funzionamento normale di riproduzione dell’apparecchio, premere il tasto Ripeti (22) sul telecomando, fino a quando i simboli scompaiono dal display.
FUNZIONE RANDOMNota: La funzione RANDOM funziona solo con i CD audio.Riproduzione secondo una sequenza casuale del CD.1. Se il CD è in riproduzione, fermare la lettura premendo il tasto STOP (23).2. Su riproduzione da CD Audio, premere tre volte il tasto Random (10) sul telecomando, sul display compare la scritta RAN ON.3. Premere il tasto PLAY/PAUSE >II (24) per iniziare la riproduzione casuale.4. Per disattivare la funzione premere il tasto Random (10) sul telecomando, la scritta RAN OFF scompare dal display.FUNZIONE PROGRAMNota: La funzione PROGRAM funziona solo con i CD audio.Riproduzione secondo una programmazione impostata dall'utente.1. Se il CD è in riproduzione, fermare la lettura premendo il tasto STOP (23).2. Premere il tasto PROG (28) sul telecomando, sul display compare la scritta P__C__.3. Premere i tasti Successivo (4) Precedente (3) per selezionare la traccia da riprodurre per prima.4. Premere il tasto PROG (28) sul telecomando per confermare la scelta.5. Procedere seguendo i punti 3-4 per impostare il resto delle tracce fino ad un massimo di 20 tracce audio o 99 tracce MP3.6. Premere il tasto PLAY/PAUSE >II (24) per iniziare la riproduzione programmata.7. Premere due volte il tasto STOP (23) per disattivare la programmazione.
FUNZIONAMENTO INGRESSO USBRIPRODUZIONE1. Assicurarsi che non sia presente nessun CD.2. Posizionare il selettore Sorgente (5) sulla posizione CD-MP3.3. Collegare all'ingresso USB (12) un dispositivo di memoria usb.Attendere qualche secondo affinchè vengano letti tutti i brani presenti nel dispositivo usb, la riproduzione si avviera' automaticamenteNota: Il lettore potrebbe non supportare alcuni dispositivi dotati di presa USB, questo è dovuto all'incompatibilità di alcuni processori.4. Premere il tasto PLAY/PAUSE (6) per attivare la PAUSA, il simbolo di PAUSA verrà visualizzato sul display.5. Per disinserire la PAUSA, premere ancora una volta il tasto PLAY/PAUSE (6).6. Premere il tasto STOP (7) per fermare definitivamente la riproduzione.7. Fare riferimento al paragrafo "funzionamento lettore cd-mp3" per il resto delle funzioni.
6. Regolare il volume come desiderate con il controllo VOLUME (8).NOTE: Per ottenere la migliore ricezione in FM estendete e orientate l’antenna. Se la ricezione non è buona provate a regolare diversamente la lunghezza e l’orientamento dell’antenna, comunque la qualità della ricezione in FM dipende molto dal luogo dove è posto l’apparecchio.
8
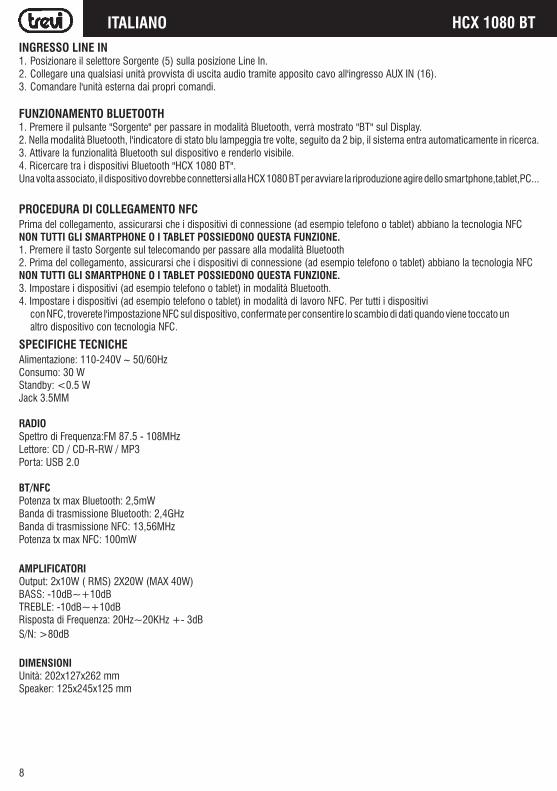
HCX 1080 BTITALIANOINGRESSO LINE IN1. Posizionare il selettore Sorgente (5) sulla posizione Line In.2. Collegare una qualsiasi unità provvista di uscita audio tramite apposito cavo all'ingresso AUX IN (16).3. Comandare l'unità esterna dai propri comandi.
FUNZIONAMENTO BLUETOOTH1. Premere il pulsante "Sorgente" per passare in modalità Bluetooth, verrà mostrato "BT" sul Display. 2. Nella modalità Bluetooth, l'indicatore di stato blu lampeggia tre volte, seguito da 2 bip, il sistema entra automaticamente in ricerca. 3. Attivare la funzionalità Bluetooth sul dispositivo e renderlo visibile. 4. Ricercare tra i dispositivi Bluetooth "HCX 1080 BT".Una volta associato, il dispositivo dovrebbe connettersi alla HCX 1080 BT per avviare la riproduzione agire dello smartphone,tablet,PC...
PROCEDURA DI COLLEGAMENTO NFCPrima del collegamento, assicurarsi che i dispositivi di connessione (ad esempio telefono o tablet) abbiano la tecnologia NFC NON TUTTI GLI SMARTPHONE O I TABLET POSSIEDONO QUESTA FUNZIONE. 1. Premere il tasto Sorgente sul telecomando per passare alla modalità Bluetooth 2. Prima del collegamento, assicurarsi che i dispositivi di connessione (ad esempio telefono o tablet) abbiano la tecnologia NFC NON TUTTI GLI SMARTPHONE O I TABLET POSSIEDONO QUESTA FUNZIONE. 3. Impostare i dispositivi (ad esempio telefono o tablet) in modalità Bluetooth. 4. Impostare i dispositivi (ad esempio telefono o tablet) in modalità di lavoro NFC. Per tutti i dispositivi con NFC, troverete l'impostazione NFC sul dispositivo, confermate per consentire lo scambio di dati quando viene toccato un altro dispositivo con tecnologia NFC.
SPECIFICHE TECNICHEAlimentazione: 110-240V ~ 50/60HzConsumo: 30 WStandby: <0.5 WJack 3.5MM
RADIOSpettro di Frequenza:FM 87.5 - 108MHzLettore: CD / CD-R-RW / MP3Porta: USB 2.0
BT/NFCPotenza tx max Bluetooth: 2,5mWBanda di trasmissione Bluetooth: 2,4GHzBanda di trasmissione NFC: 13,56MHzPotenza tx max NFC: 100mW
AMPLIFICATORIOutput: 2x10W ( RMS) 2X20W (MAX 40W)BASS: -10dB~+10dBTREBLE: -10dB~+10dBRisposta di Frequenza: 20Hz~20KHz +- 3dBS/N: >80dB
DIMENSIONI Unità: 202x127x262 mm Speaker: 125x245x125 mm

9
HCX 1080 BTENGLISH
BEFORE WE BEGIN Thank you for purchasing the HCX 1080 BT
HCX 1080 BT
: MICRO SYSTEM BLUETOOTH with NFC function Digital FM tuner CD MP3 USB compatible. This is your assurance of quality, performance and value. Our engineers have included many useful and convenient features in this product. Please be sure to read this instruction Manual completely to make sure you are getting the maximum benefit from each feature. This product was manufactured using the highest quality components and standards of workmanship. It was tested by inspectors and found to be in perfect working order before it left our factory. For future reference, record the serial number in the space provided. Model No: : Serial Number: _________________________________________________________
WARNINGS
TO PREVENT FIRE OR SHOCK HAZARD DO NOT EXPOSE THIS APPLIANCE TO RAIN OR MOISTURE.
LIGHTNING FLASH WITH ARROWHEAD SYMBOL - Within an equilateral triangle, is intended to alert the user to the presence of uninsulated dangerous voltage within the products enclosure that may be of sufficient magnitude to constitute a risk of electric shock to persons. EXCLAMATION POINT - within an equilateral triangle is used to indicate that a specific component shall be replaced only by the component specified in that documentation for safety reason.
The following label has been affixed to the unit, listing the proper procedure for working with the laser beam:
CLASS 1 LASER PRODUCT LABEL
This label is attached to the place as illustrated to inform that the apparatus contains a laser component.
WARNING LABEL INFORMING OF RADIATION - This label is placed inside the unit. As shown in the illustration. To warn against further measures on the unit. The equipment contains a laser radiating laser rays according to the limit of laser product of class 1.
This equipment is a Class II or double insulated electrical appliance. It has been designed in such a way that it does not require a safety connection to electrical earth.
1

10
HCX 1080 BTENGLISH
2
SAFETY INTRUCTIONS
1. READ INSTRUCTIONS --- All the safety and operating instructions should be read before the product is operated. 2. RETAIN INSTRUCTIONS --- The safety and operating instructions should be retained for future reference. 3. HEED WARNINGS --- All warnings on the product and in the operating instructions should be adhered to. 4. FOLLOW INSTRUCTIONS --- All operating and use instructions should be followed. 5. CLEANING --- Unplug this product from the wall outlet before cleaning. Do not use liquid cleaners or aerosol cleaners. Use a damp cloth for cleaning. 6. WATER AND MOISTURE --- Do not use this product near water - for example, near a bath tub, wash bowl, kitchen sink, or laundry tub; in a wet basement; or near a swimming pool; and the like. 7. ACCESSORIES --- Do not place this product on an unstable cart, stand, tripod, bracket, or table. The product may fall, causing serious injury to a child or adult and serious damage to the product. Use only with a cart, stand, tripod, bracket, or table recommended by the manufacturer, or sold with the product. Any mounting of the product should follow the manufacturer instructions, and should use a mounting accessory recommended by the manufacturer. A Product and Cart Combination should Be Moved with Care - Quick stops, excessive force and uneven surfaces may cause the product and cart combination to overturn. 8. VENTILATION --- Slots and openings in the cabinet are provided for ventilation and to ensure reliable operation of the product and to protect it from overheating, and these openings must not be blocked or covered. The openings should never be blocked by placing the product on a bed, sofa, rug or other similar surface. This product should not be placed in a built-in installation, such as a bookcase or rack, unless proper ventilation is provided or the manufacturer* instructions have been adhered to. 9. POWER SOURCES --- This product should be operated only from the type of power source indicated on the marking label. If you are not sure of the type of power supply to your home, consult your product dealer or local power company. For products intended to operate from battery power, or other sources, refer to the operating instructions. 10. POWER-CORD PROTECTION --- Power-supply cords should be routed so that they are not likely to be walked on or pinched by items placed upon or against them, paying particular attention to cords at plugs, convenience receptacles, and the point where exit from the product. 11. NON-USE PERIODS --- The power cord of the product should be unplugged from the outlet when left unused for long periods of time. 12. LIGHTNING --- For added protection for this product during a lightning storm, or when it is left unattended and unused for long periods of time, unplug it from the wall outlet and disconnect the antenna or cable system. This will present damage to the product due to lightening and power-line surges. 13. OVERLOADING --- Do not overload wall outlets, extension cords, or integral convenience receptacles as this can result in a risk of fire or electric shock.

11
HCX 1080 BTENGLISH
3
SAFETY INTRUCTIONS 14. OBJECT AND LIQUID ENTRY --- Never push objects of any kind into this product through openings as they may touch dangerous voltage points or short-out parts that could result in a fire or electric shock. Never spill liquid of any kind on the product. 15. SERVICING - Do not attempt to service this product yourself as opening or removing covers may expose you to dangerous voltage or other hazards. Refer to all servicing to qualified service personnel. 16. DAMAGES REQUIRING SERVICE - Unplug this product from the wall outlet and refer servicing to qualified service personnel under the following conditions. a) When the power-supply cord or plug is damaged. c) If the product has been exposed to rain or water. b) If liquid has been spilled, or objects have fallen into the product. d) If the product does not operate normally by following the operating instructions. Adjust only
those controls that are covered by the operating instructions as an improving adjustment of other controls may result in damage and will often require extensive work by a qualified technician to restore the product to its normal operation.
e) When the product exhibits a distinct change in performance - this indicates a need for service. 17. REPLACEMENT PARTS - When replacement parts are required, be sure the service technician has used replacement parts specified by the manufacturer or have the same characteristics as the original part, Unauthorized substitutions may result in fire electric shock and other hazards. 18. HEAT the product should be situated away from sources such as radiators, heat registers, stoves or other products that produce heat

12
HCX 1080 BTENGLISH
PREPARATION FOR USE
CONNECTIONS
4

13
HCX 1080 BTENGLISH
FM ANTENNA CONNECTION Hints for Better FM Reception: The FM lead wire antenna on the back panel should be extended to its full length. You may also have to vary the direction of this antenna until you find the position that provides the best reception.
5
WARNING LISTENING WITH HEADPHONES / AURICOLARSTo avoid possible hearing damage, limit the listening time to high volumes.

14
HCX 1080 BTENGLISH
DESCRIPTION OF UNIT AND CONTROLS
FRONT VIEW
6
02
10 1211
01 08
03 04 05 06 07
09
14 15 16 17
13 13

15
HCX 1080 BTENGLISH
/ / /
- Even if the remote control is operated within the effective range, its operation may be impossible if there are any obstacles between the appliance and the remote control. - If the remote control is operated near other appliances which generate infrared rays, or if other remote control devices using infrared rays are used near the appliance, it may operate incorrectly.
7
01
02
03
30
2928
27
26
25
24
04
05
0607080910111213
14
2322212019183116
1715
16
HCX 1080 BTENGLISH
8
Insert 2 AAA/LR03 TYPE batteries (not included) into the battery compartment. Be sure that the battery is inserted correctly to avoid damage to the remote control. Always remove the battery when the remote control will not be used for a long period of time, as this will cause leakage to the battery and subsequently damage to your set. BATTERY INSTALL ATION Slide out cover and install 2 AAA/ LR03 TYPE batteries (not included) . Notes: - If the distance required between the remote control and the appliance decreases, the batteries are exhausted. In this case replace the batteries with new one. - Power button on main unit must be ‘On’ in order for Remote Control to operate.

17
HCX 1080 BTENGLISH
9
Standby To turn on the micro system, press the button on front panel of the unit or on the remote control. Press the button again to turn off the micro system SOURCE BUTTON
Press the SOURCE button repeatedly to switch among CD/TUNER/LINE IN /BT modes. To select the USB mode please select the CD MODE and press CD/USB button on remote control to switch into USB mode. MUTE Button (On Remote Control Only)
1. You can also press the MUTE button on the remote control to turn off the sound temporarily, for example, when answer the telephone. Press the MUTE button again to cancel the mute function and restore the sound. 2. The mute function will also be cancelled automatically by pressing the VOLUME + or –
buttons.
VOLUME L EVEL Turn the VOLUME knob on front panel or press VOL +/ VOL - buttons on remote control to adjust the volume level. LOUDNESS Press LOUDNESS button to enhance the bass level immediately when bass is not enough. FUNCTION Press successively the FUNCTION button to adjust VOLUME, BASS and TREBLE at your convenience. Press FUNCTION once if you want to adjust the volume, twice to adjust the bass and 3 times to adjust the treble.
CD / MP3 OPERATION You can play in your Micro System your audio CD and MP3, CD -R. Please do not try to play CD-ROM, CD -I, VCD or DVD.
1. Open the disc tray by pressing OPEN/ CLOSE button on the unit or on the remote control. 2. Insert the CD with the printing side facing up and close gently the disc tray by pressing again OPEN/ CLOSE .
3. Press SOURCE button to select the CD MODE. 4. Press to start the CD playback; for AUDIO CD, playback starts automatically.
5. Press stop button on unit or on remote control to stop playback.
Searching for a sect ion wi t hin a CD ( On Remote Control Only) .
During playback, press and hold /on the remote control to find a specific passage within the track and release it at the point you want to listen to.
SETTING & BASIC OPERATION

18
HCX 1080 BTENGLISH
10
CD / MP3 OPERATION
Select another track or file Press or button on the remote control to select a particular track. Listening to your tracks (files) repeatedly (On Remote Control Only) 1. Press REPEAT button repeatedly to activate the REPEAT function in following order: REPEAT 1 -REPEAT ALBUM (*MP3 MODE ONLY) - REPEAT ALL - OFF - Listening to your tracks (files) randomly (On Remote Control Only) 1. Press RANDOM button to play tracks in a random order. A-B function (On Remote Control Only) During CD/MP3 DISC playback, you can press A-B button on remote to start from the point A (time point you pressed), and ended point B when you press A-B button again and music will play repeatedly from A to B. Intro function (On Remote Control Only) This feature allows you to play the 10 first seconds of each track on the disk. Load the disc and wait until the display shows the total playing time and number of tracks. Press INTRO button on remote control to activate the function, press again to cancel the function. PROGRAM
Creating your own playlist You can play up to 20 tracks on a CD in order. 1. Insert a CD and wait for to be read 2. Press PROG button on the remote control in STOP status. 3. Press / on the unit or on the remote control to select the track you want to program. Press PLAY button on remote or on front panel of the unit to confirm your selection. 4. Press on the unit or on the remote control to play the programmed music files.
About MP3 MP3 Disc compatibility with this unit is limited as follows:
Sampling Frequency: 32-48 (MP3) Bit rate: 32-320kbps (MP3) Do not use special letters such as / :*?< > etc Even if the total number of files on the disc has more than 1000, it will only be shown up to 999.

19
HCX 1080 BT
11
RADIO OPERATION 1. Press SOURCE button on remote control to select TUNER MODE. 2. Tune to the desired radio station by using / CH+ , / CH-, / FF, / FF+ for a manual
tuning. 3. For AUTO TUNING , press button on the unit or SEARCH button on remote control to enter in automatic searching radio station mode.
For a best FM reception
• Make sure that you have fully extended the FM antenna wire.
Preset Radio Stations:
You can store up to 40 of your favorite stations in the tuner memory for easy recall at any time.
1) Press SOURCE button on remote to select TUNER, and press GOTO button, the VFD will display “_ _ _: _ _” digital input mode, please input FM frequency of the radio station that what you want to listen. For example : 106.20, after input station frequency by using the number buttons, press PL AY button to confirm. 2) Once the desired radio station is tuned, press MEMORY button on remote control, VFD will display “ CH_ _” ; input the preset number you want to store the radio station. How to recall presets radio stations Press GOTO button on remote control, VFD will display “ CH_ _”, and press the preset number of the radio station to recall it. For example, press 1 to play the radio station you preset in position 1. If the preset number is above 10, press ‘+10 ’ button on remote control and number key to input second digit preset number.
AUXILIAIRY IN PUT OPERATION
The unit can be used to play the music from many types of external device
1. Connect by using a 3.5mm Male-to-Male Stereo cable the external device to the LINE IN connector/jack of the unit. >If your TV has only one output for audio (MONO). Connect it to the left (white) audio jack on the unit. 2. Press SOURCE repeatedly to select the LINE IN MODE. 3. Start playback on the external audio device. Adjust the volume on the audio device (do not set the volume to a high level in order to avoid distortion). You may also adjust the volume on the appliance. To control playback function, use the controls on the external audio device.

20
HCX 1080 BT
12
USB OPERATION
You can enjoy media files saved on an USB device by connecting the USB device to the USB port of the unit.
1. Connect the USB device to the USB port of the unit. 2. Select the USB MODE by pressing CD/USB on your remote control 3. Select a file you want to play using /CH+, /CH-, /FF, / FF+ directly thanks to number keys. 4. Press on remote control or on the unit to start the playback. 5. Turn the VOLUME knob or press VOL+ / VOL-to increase or decrease volume level. 6. Press stop button on unit or on remote control to stop USB playback. 7. Before disconnecting the USB device, change the source by pressing SOURCE button. Compatible USB Device: Mp3 player: Flash type Mp3 player. USB Flash Drive: Devices that support USB2.0 or USB 1.1. The USB function may not be available depending on device. Device which require additional program installation when you have connected it to a computer, are not supported. Do not extract the USB device while in operation. For a large USB capacity, it may take longer than a few minute to be searched. To prevent data loss, back up all data. If you use a USB extension cable or USB hub, the USB device is not recognized. Using NTFS file system is not supported. (Only FAT (16/32) file system is supported) This unit is not supported when the total number of files is 1000 or more. External HDD, locked devices or hard type USB devices are not supported.
PROGRAM MODE The operation of PROGRAM MODE are as the same as that of CD / MP3. Please refer to CD / MP3 OPERATION section paragraph PROGRAM.

21
HCX 1080 BT
NFC FUNCTION Using NFC (Near Field Communication), you can transfer your music from your phone to your Bluetooth device including NFC feature. The maximum reading distance is about 1 cm, which prevents unauthorized communications.
Connection procedure 1. Please press SOURCE button on remote to switch into Bluetooth mode 2. Before connecting, make sure your connecting devices (e.g. phone or Tablet) with NFC technology. 3. Set your connecting devices (e.g. phone or Tablet) into Bluetooth working mode. 4. Set your connecting devices (e.g. phone or Tablet) in to NFC working mode. For all the devices with NFC, you will find NFC setting on your device, confirm Allow data exchange when it touches another device Please refer to below photo from the cell phone.
13
BLUETOOTH OPERATION
Note: Prior to use Bluetooth function, your micro system should be paired firstly with your Bluetooth device. (“Pairing” means establish connection between Bluetooth devices such as MOBILE PHONE, TABLETS, PC, ETC.)
1. Press the “SOURCE ” button to switch into the BLUETOOTH MODE , “BT” displays on the
VFD. 2. In Bluetooth mode, the blue status indicator flashes three times, then 2 beep sounds, the status indicator goes RED & flashes, The micro system enters automatically searches for Bluetooth device. 3. Turn on Bluetooth functionality on your device and make it discoverable (see your device’s instructions to add or setup a Bluetooth device). 4. Search for Bluetooth equipment “HCX 1080 BT” is your micro system identification. Red status indicator switches to blue lighting which means that devices are successfully paired. (During the paring, if the Bluetooth Version is below 3.0, you need to input code “0000”) Your Bluetooth device stores the micro system unique identification at the same time.
NOTE: The effective range of Bluetooth devices is 10 meters.
Once paired, your device should connect to the HCX 1080 BT whenever within the Bluetooth range (10 meters).

22
HCX 1080 BT
14
CARE AND MAINTENANCE *Carrying for Compact Discs
1. Treat the disc carefully. Handle the disc only by its edges. Never allow your fingers to come in contact with the shiny, unprinted side of the disc. 2. Do not attach adhesive tape, stickers, etc. to the disc label. 3. Clean the discs periodically with a soft, lint-free, dry cloth. Never use detergents or abrasive cleaners to clean the disc. If necessary, use a CD cleaning kit. If a disc skips or gets stuck on a section of the disc, it is probably dirty or damaged (scratched). When cleaning the disc, wipe in straight lines from the center of the disc to the outer edge of the disc. Never wipe in circular motions. 4. This unit is designed to play discs bearing the identification logo as shown here or MP3 format Disc. Other discs may not conform to the CD standard and may not play properly. 5. Discs should be stored in their cases after each use to avoid damage. 6. Do not expose discs to direct sunlight, high humidity, high temperatures, or dust, etc. Prolonged exposure or extreme temperatures can warp the disc. 7. Do not stick or write anything on either side of the disc. Sharp writing instruments or the ink may damage the surface. Care of the Cabinet
1. To prevent fire or shock hazard, disconnect your unit from the AC power source when cleaning. 2. The finish on your unit may be cleaned with a dust cloth and cared for as other furniture. Use caution when cleaning and wiping the plastic parts. 3. Mild soap and a damp cloth may be used on the front panel.
To Clean the Lens
If the lens gets dirty, your player may skip or may not play a CD 1. Open the CD door. 2. Use a camera lens blower/brush to blow on the lens once or twice, brush the dust or particles off the lens then blow again. 3. To remove fingerprints, use a dry cotton swab to wipe from the middle to outer edge of the lens.

23
HCX 1080 BT
15
TROUBLE SHOOTING GUIDE If a fault occurs, first check the points listed below before taking the set to repair. Do not open the set as there is a risk of electric shock. If you are unable to remedy a problem by following these hints, consult your dealer or service center. WARNING : under no circumstances should you try to repair the set yourself, as this will invalidate the warranty.

24
HCX 1080 BT
16
TECHNICAL SPECIFICATIONS AUTRES CARACTERISTIQUES MODEL HCX 1080 BT Power supply AC 110 - 230 V, 50/60 Hz Power consumption 20 W Standby mode consumption < 0.5 W RADIO SECTION
Frequency ranges FM 87.5 ~ 108.5 MHz
CD PLAYER CD / CD-R-RW / MP3 FORMAT USB SECTION USB compatible Port 2.0 AUXILIARY 3.5MM AMPLIFIER Output power 2x10W ( RMS) BASS -10dB~+10dB TREBLE -10dB~+10dB Frequency Response 20Hz~20KHz +- 3dB S/N >80dB ACCESSORIES Multifunction Remote Control (Battery: 2X AAA –not included) Audio cable RCA Audio cable LINE IN User manual Dimensions & weight Unit W247XH83xD230mm / 1.8 Kg 1 speaker W115xH163xD157mm / 0.75KG
IMPORTANT: Due to continual revision and improvement on our products design, specifications are
subject to change without further notice.
202x127x262 mm 125x245x125 mm
BT / NFCPower tx max Bluetooth: 2.5 mWBluetooth transmission band: 2.4GHzNFC Transmission Band: 13.56MHzPower tx max NFC: 100mW

25
HCX 1080 BT
DESCRIPTION DES COMMANDES 01 StandBy02 Afficher 03 Précédent 04 Suivant 05 Source 06 Lecture / Pause 07 Arrêt 08 Volume
09 Bouton ouverture CD 10 Prise casque 11 Compartiment de CD 12 Entrée USB 13 Boîtes 14 sorties haut-parleur 15 Sortie audio 16 Entrée audio 17 Antenne FM
FRANÇAIS
02
10 1211
01 08
03 04 05 06 07
09
14 15 16 17
13 13

26
HCX 1080 BT
DESCRIPTION DES COMMANDES
01 StandBy02 Pavé numérique 03 FF + 04 FF -05 | << / >> | / << / >> 06 Pause 07 A-B 08 CD / USB 09 Source 10 Aléatoire 11 Recherche 12 EQ 13 INTRO 14 Mute 15 Loudness 16 Volume +17 Volume-18 Basse + 19 Bass - 20 Treble + 21 Treble - 22 Répétez 23 Arrêt 24 Lecture 25 Mémoire 26 CH - 27 CH + 28 Programme 29 Allez au
30 Eject 31 Réinitialiser
FRANÇAIS
01
02
03
30
2928
27
26
25
24
04
05
0607080910111213
14
2322212019183116
1715

27
HCX 1080 BTAVERTISSEMENT SUR LE LASERCet appareil est pourvu d’un système de lecture à rayon laser. Bien que le laser soit de faible puissance et muni d’un dispositif de sécurité empêchant son fonctionnement lorsque le volet est ouvert, suivez scrupu-leusement les précautions suivantes:n’approchez pas les yeux de la lentille du laser lorsque l’appareil est ouvert; danger de lesion de la retine.n’essayez pas de demonter ou d’alterer l’unite laser; danger d’absorption de radiations.
AVERTISSEMENTNOTES D’EMPLOICet appareil est un instrument électronique de haute précision; évitez donc de l’employer dans les cas suivants:• A proximité de fortes sources de chaleur telles que des radiateurs ou tout appareil de chauffage.• Dans des lieux très humides tels que des salles de bains, des piscines, etc.• Dans des lieux très poussiéreux.• Dans des lieux sujets à des fortes vibrations.• Positionner l’appareil de façon à laisser toujours de l’espace pour la libre circulation de l’air à ses côtés (au moins 5 cm).• N’obstruez pas les fentes d’aération.• L'appareil ne doit pas être exposé à des éclaboussures d'eau. Aucun objet rempli de liquide, comme des vases, devraient être sur le système.• Si des substances liquides pénètrent à l’intérieur de l’appareil, débranchez immédiatement la fiche et apportez l’appareil au centre d’assistance agréé TREVI le plus proche.• Aucune source de flamme nue, telle que des bougies allumées, doivent être placés sur.• Avant de mettre l’appareil en fonction, vérifiez toujours que les câbles d’alimentation et de connexion soient correctement installés.SOIN ET ENTRETIENPour le nettoyage on conseille l’emploi d’un chiffon doux, légèrement imbibé. Evitez les solvants ou les substances abrasives.IMPORTANTLa bonne construction de cet appareil garantit pour longtemps son parfait fonctionnement. Si toutefois des inconvénients devaient se présenter, contactez le Centre d’Assistance agréé le plus proche.TREVI poursuit une politique de recherche et de développement continus. Par conséquent, les produits peuvent présenter des caractéristiques différentes par rapport aux données mentionnées.
FRANÇAIS
ALIMENTATION SECTEURBranchez la fiche d’alimentation sur une prise de courant 230V~50Hz. Ne branchez pas cet appareil sur des prises ayant une tension autre que celle qui a été indiquée.
MARCHE/ARRÊT1. Appuyez sur la touche StandBy(1)2. Appuyez encore une fois sur la touche standby pur arret.
FONCTIONNEMENT DE LA RADIO1. Allumez l'appareil en tournant le bouton SOURCE (5) en position TUNER.2. Appuyez sur le FF+ (3) ou FF- (4) de la télécommande pour augmenter ou diminuer la fréquence de 0,05MHz.3. Tenez le FF+ (3) ou FF- (4) sur la télécommande pour syntoniser la station de radio suivante ou précédente.4. Appuyez sur le bouton Lecture / Pause (06) pour démarrer les stations de recherche automatique de la radio. L'appareil peut mémoriser jusqu'à 40 stations de radio. 5. Appuyez sur les boutons Précédents (03) ou Suivant (04) sur l'appareil ou le CH- (26) ou CH+ (27) de la télécommande pour aller à la station enregistrée précédente ou suivante.6. Réglez le volume souhaité avec la commande VOLUME (8).REMARQUE: Déployez et orientez l’antenne, afin d’obtenir la meilleure réception FM possible. Si la réception n’est pas bonne, essayez de régler de manière différente la longueur et l’orientation de l’antenne ; la qualité de réception FM dépend toutefois énormément de l’endroit où se trouve l’appareil.L’antenne AM se trouvant à l’intérieur de l’appareil, orientez celui-ci de façon à obtenir la meilleure réception possible.
FONCTIONNEMENT DU LECTEUR CD/MP3 LECTURE1. Allumez l'appareil par le sélecteur de fonction (5) sur la position CD-MP3
Pour prévenir d’éventuelles lésions auditives, limiter la quantité de temps d’écoute à volume élevé

28
HCX 1080 BTFRANÇAIS2. Ouvrez le compartiment CD en appuyant sur la (9) et insérez le disque avec l'étiquette vers le haut. Fermez la porte en appuyant légèrement. 3. Après quelques secondes, l'affichage indique le nombre de pistes (chansons) sur le disque et démarrer 'lecture. 4. Appuyez sur la touche PLAY / PAUSE> II (6) pour faire une pause, l'écran affiche le symbole PAUSE 5. Pour désactiver la pause appuyez de nouveau sur le bouton PLAY / PAUSE> II (6). 6. Quelques minutes Appuyez sur la touche STOP (7) pour arrêter complètement la lecture.
SAUT DE PISTE1. Appuyez sur les boutons Précédents (03) ou Suivant (04) sur l'appareil ou le I<< ou >>I (05) de la télécommande pour aller à la morceau de musique précédente ou suivante.2. Appuyez et maintenez la touche FF+ (3) ou FF- (4) de la télécommande pour rechercher rapidement un passage musical spécifique. Relâchez le bouton pour reprendre la lecture.
RÉPÉTITION D’UN SEUL MORCEAU
Appuyez sur le bouton une fois Répétez (22) sur la télécommande, l'icône apparaît sur l'afficheur et l'appareil répète conti-nuellement la piste en cours.
RÉPÉTITION DU DISQUE ENTIER
Appuyez sur la touche deux fois Répétez (22) sur la télécommande, toutes les icônes ALL à l'écran et l'unité joue en perma-nence la totalité du disque. Pour rétablir le fonctionnement normal de la reproduction de l'unité, appuyez sur la touche de répétez (22) sur la télécommande jusqu'à ce que les symboles disparaissent de l'écran.
FONCTION RANDOMRemarque: La fonction RANDOM fonctionne uniquement avec les CD audioLecture selon une séquence aléatoire de la CD. 1. Si le CD est en cours de lecture, arrêtez la lecture en appuyant sur la touche STOP (23). 2. Lors de la lecture de CD audio, appuyez sur la touche trois fois aléatoire (10) sur la télécommande, l'écran affiche le message RAN ON. 3. Appuyez sur la touche PLAY / PAUSE> II (24) pour lancer la lecture aléatoire. 4. Pour désactiver la fonction, appuyez sur la touche aléatoire (10) sur la télécommande, l'écrit RAN OFF disparaît de l'écran.
FONCTION PROGRAMRemarque: La fonction PROGRAM fonctionne uniquement avec les CD audioLire selon un calendrier défini par l'utilisateur. 1. Si le CD est en cours de lecture, arrêtez la lecture en appuyant sur la touche STOP (23). 2. Appuyez sur le bouton PROG (28) sur la télécommande, l'écran affiche le message P__C__. 3. Appuyez sur Suivant (4) Retour (3) pour sélectionner la plage à lire en premier. 4. Appuyez sur le bouton PROG (28) sur la télécommande pour confirmer la sélection. 5. Procéder en suivant les étapes 3-4 pour régler le reste des pistes jusqu'à un maximum de 20 pistes audio ou 99 pistes MP3. 6. Appuyez sur la touche PLAY / PAUSE> II (24) pour démarrer la lecture programmée. 7. Appuyez deux fois sur la touche STOP (23) pour désactiver la programmation.
FONCTIONNEMENT DE L’ENTRÉE USBLECTURE1. Veillez à ce qu'aucun CD ne soit présent.2. Placez le sélecteur Source (5) sur la position CD-MP3.3. Branchez un lecteur mp3 pourvu de connexion USB (12) sur l'entrée USB.- Au bout de quelques secondes, l'Afficheur indique le nombre de pistes (morceaux) présentes sur le disque.4. Appuyez sur la touche PLAY/PAUSE (6) pour commencer la lecture ; appuyez à nouveau sur la même touche pour activer la PAUSE. Le symbole de lecture commence à clignoter.5. Pour désactiver la PAUSE, appuyez encore une fois sur la touche PLAY/PAUSE (6).6. Appuyez sur la touche STOP (7) pour arrêter complètement la lecture.

29
HCX 1080 BT7. Consultez la section " fonctionnement du lecteur cd-mp3 " pour l'utilisation des autres fonctions.
ENTRÉE LINE IN1. Placez le sélecteur Source (5) sur la position CD-MP3.2. Au moyen d'un câble spécial, branchez une unité de n'importe quel type équipée d'une sortie audio sur la prise AUX IN (16).3. Contrôlez l'unité externe à travers ses commandes.
UTILISATION DU BLUETOOTH1. Appuyez sur le bouton "Source" pour passer en mode Bluetooth, il affichera "BT" sur Affichage.2. En mode Bluetooth, le voyant d'état clignote trois fois en bleu, suivie par 2 bips, le système passe automatiquement en recherche.3. Activez la fonction Bluetooth sur votre appareil et le rendre visible.4. Entre appareils Bluetooth Recherche "HCX 1080 BT". Une fois appairé, le terminal doit se connecter à la HCX 1080 BT pour démarrer la lecture de la loi smartphone, tablette, PC...
Procédure de connexion NFCAvant de connecter, assurez-vous que les dispositifs de connexion (par exemple, téléphone ou tablette) ont NFC PAS TOUT smartphone ou tablette cette fonction.
1. Appuyez sur le bouton Source sur la télécommande pour passer en mode Bluetooth2. Avant de connecter, assurez-vous que les dispositifs de connexion (par exemple, téléphone ou tablette) ont NFC PAS TOUT smartphone ou tablette cette fonction.3. Dispositifs (par exemple, téléphone ou tablette) Réglage en mode Bluetooth.4. Dispositifs (par exemple, téléphone ou tablette) Mise en mode de travail NFC. Pour tous les dispositifs NFC, NFC sera de trouver le réglage sur l'appareil confirmé pour permettre l'échange de données lorsque touché par un autre appareil avec la technologie NFC.
CARACTERISTIQUES TECHNIQUES Alimentation: 110-240V~50/60 Hz Consommation: 30W Consommation en veille en mode: <0,5 W
SECTION RADIO Varie la fréquence FM: 87.5 - 108 MHz LECTEUR CD: CD / CD-R-RW / FORMAT MP3 Port compatible USB SECTION: USB 2.0 auxiliaire de 3,5 mm
AMPLIFIER Puissance de sortie 2x10W (RMS) 2X20W (MAX 40W) BASSE-10dB à +10 dB TREBLE-10dB à +10 dB Réponse en fréquence: de 20Hz ~ 20KHz + - 3dB S / N> 80dB
DIMENSIONS unité 202x127x262mm Speaker 125x245x125mm
FRANÇAIS
BT / NFCPower tx max Bluetooth: 2,5 mWBande de transmission Bluetooth: 2,4 GHzBande de transmission NFC: 13,56 MHzPower tx max NFC: 100mW

30
HCX 1080 BT
Beschreibung der Bedienelemente 01 StandBy 02 Anzeigen 03 Vorherige04 Weiter 05 Quelle 06 Wiedergabe / Pause 07 Urteil 08 Band
09 Button-Öffnung CD 10 Kopfhörer 11 CD-Fach 12 USB-Eingang 13 Boxen 14 Lautsprecherausgänge 15 Audio-Ausgang 16 Audio-Eingang 17 Antenne
DEUTSCH
02
10 1211
01 08
03 04 05 06 07
09
14 15 16 17
13 13

31
HCX 1080 BT
Beschreibung der Bedienelemente
01 StandBy 02 Tastatur 03 FF + 04 FF - 05 | << / >> | / << / >> 06 Pause 07 A-B 08 CD / USB 09 Quelle 10 Zufällige 11 Such 12 EQ 13 INTRO 14 Stumm 15 Loudness 16 Volumen + 17 Volumen- 18 Bass + 19 Bass - 20 Treble + 21 Treble - 22 Repeat23 Stop 24 Play/Pause25 Speicher 26 CH - 27 CH + 28 Programm 29 Zum 30 Eject 31 Zurücksetzen
DEUTSCH
01
02
03
30
2928
27
26
25
24
04
05
0607080910111213
14
2322212019183116
1715

32
HCX 1080 BTHINWEISE IN BEZUG AUF DEN LASER
Dieses Gerät ist mit einem Laser-Lesesystem versehen. Der Laser verfügt über eine niedrige Leistung und ist mit einer Sicherheitsvorrichtung versehen, die den Betrieb bei geöffneter Klappe verhindert. Halten Sie sich trotzdem sorgfältig an folgende Hinweise:bei geöffnetem gerät, das auge nicht an die linse des lasers nähern. es besteht die gefahr, dass die netzhaut dabei verletzt wird.versuchen sie nicht, die lasereinheit abzumontieren oder unsachgemäss zu behandeln. es besteht die gefahr, daß strahlen dabei absorbiert werden.
HINWEISE
ANWEISUNGEN ZUM GEBRAUCHDieses Gerät ist ein elektronisches Instrument höchster Präzision; vermeiden Sie deshalb, das Gerät in folgenden Fällen zu benutzen:
• In der Nähe von Wärmequellen, wie z.B. Heizkörpern oder Öfen.• In sehr feuchten Räumen, wie z.B. Badezimmern, Schwimmbädern, usw.• In sehr staubigen Räumen.• An Plätzen, die starken Vibrationen ausgesetzt sind.• Das Gerät muß so aufgestellt werden, daß an den Seiten genügend Raum für den freien Luftumlauf vorhanden ist (mindestens 5 cm.).• Die Ventilationsöffnungen nicht abdecken.• Das Gerät darf nicht mit Wasser oder Spritzwasser ausgesetzt werden. Keine Gegenstände, die mit Flüssigkeit gefüllt sind, wie zB Vasen, sollte auf dem System.• Sollten Flüssigkeiten im Innern des Geräts eindringen, ziehen Sie den Stecker sofort aus der Steckdose und bringen Sie das Gerät in die nächstgelegene TREVI-autorisierte Kundendienststelle.• Keine offenen Flammen, wie brennende Kerzen, platziert werden.• Vor Inbetriebnahme des Gerätes überprüfen Sie stets, daß die Netzkabel und die Verbindungskabel ordnungsgemäß installiert sind.PFLEGE UND WARTUNGZum Reinigen benutzen Sie einen leicht angefeuchteten, weichen Lappen. Verwenden Sie keine Lösungsmittel oder Scheuermittel.
WICHTIGDie gute Bauweise des Geräts gewährleistet den einwandfreien Betrieb auf längere Zeit hin. Sollten trotzdem irgendwelche Störungen auftreten, wenden Sie sich an die nächstgelegene TREVI-autorisierte Kundendienststelle.Die Firma TREVI ist für die ständige Forschung und Entwicklung seiner Produkte engagiert. Auf Grund dieser Tatsache können die Produkte andere Merkmale als die beschriebenen aufweisen.
STROMVERSORGUNGStecken Sie das Kabel in eine Netzsteckdose 230V~50Hz. Dieses Gerät nicht anschließen, um mit einer anderen Spannung als die angegebene fangen.
ON / OFF1. StandBy Drücken Sie die Taste (1)2. Drücken Sie erneut auf reine Standby-Stopp-Taste.
RADIOBETRIEB1. Schalten Sie das Gerät durch Drehen des Knopfes SOURCE (5), um die TUNER positionieren.2. Drücken Sie die FF+ (3) oder FF- (4) auf der Fernbedienung zu erhöhen oder verringern die Häufigkeit von 0,05MHz.3. Halten Sie die FF+ (3) oder FF- (4) auf der Fernbedienung, um den nächsten oder vorherigen Sender einzustellen.4. Drücken Sie die Wiedergabe / Pause-Taste (06), um die automatische Sendersuchlauf zu starten. Das Gerät kann bis zu 40
Radiosender speichern. 5. Vorherige (03) oder Weiter (04) Tasten auf das Gerät oder die CH- (26) oder CH+ (27) auf der Fernbedienung zur vorherigen
oder nächsten gespeicherten Station gehen.
DEUTSCH
Um Hörschäden zu vermeiden, beschränken die Menge an Zeit bei hoher Lautstärke zu hören

33
HCX 1080 BT
OPERATION CD/MP3-Wiedergabe1. Am Gerät durch den Funktionswähler drehen (5) CD-MP3 positionieren 2. Öffnen Sie das CD-Fach, indem Sie die (9) und legen Sie die CD mit der beschrifteten Seite nach oben. Schließen Sie die Tür, indem Sie sanft. 3. Nach ein paar Sekunden zeigt das Display die Anzahl der Titel (Songs) auf der Festplatte und bootet 'Wiedergabe. 4. Drücken Sie die PLAY / PAUSE> II (6) die Anzeige auf Pause wird das Symbol PAUSE zeigen 5. Um Beenden der Pause drücken Sie erneut die Taste PLAY / PAUSE> II (6). 6. Wenige Minuten Drücken Sie die STOP-Taste (7), um die Wiedergabe vollständig zu stoppen.SKIP TRACK1. Vorherige (03) oder Weiter (04) Tasten auf das Gerät oder die <<I oder >>I (05) auf der Fernbedienung gehen Sie zum vorherigen oder nächsten Lied.2. Halten Sie die FF+ (3) oder FF- (4) auf der Fernbedienung, um schnell eine bestimmte Passage suchen. Lassen Sie die Taste um die Wiedergabe fortzusetzen.REPEAT A SONG NUR
Drücken Sie die Taste einmal wiederholen (22) auf der Fernbedienung erscheint das Symbol auf dem Display und das Gerätwird ständig wiederholt den aktuellen Track.REPEAT DISC FULLDrücken Sie die Taste zweimal wiederholen (22) auf der Fernbedienung, spielt alle auf dem Display und das Gerät angezeigten
Symbole ALL kontinuierlich die gesamte CD. Um die normale Funktion der Reproduktion der Einheit wieder herzustellen, drücken Sie die Repeat-Taste (22) auf der Fernbedienung,bis die Symbole verschwinden aus der Anzeige..
ZUFALLSFUNKTION CD-WIEDERGABE IN ZUFÄLLIGER FOLGEHinweis: Die RANDOM-Funktion funktioniert nur mit audio-CDs.Wiedergabe gemäß einer Zufallsfolge von der CD. 1. Wenn die CD abgespielt wird, stoppen Sie die Wiedergabe durch Drücken der STOP-Taste (23). 2. Bei der Wiedergabe von Audio-CD, drücken Sie die Taste drei Mal, Random (10) auf der Fernbedienung, zeigt das Display die Meldung ON RAN. 3. Drücken Sie die PLAY / PAUSE> II (24), um die Zufallswiedergabe zu starten. 4. Um die Funktion zu deaktivieren, drücken Sie die Taste Random (10) auf der Fernbedienung, die schriftliche lief aus dem Display verschwindet.
SERVICE-PROGRAMMHinweis: Die PROGRAM-Funktion funktioniert nur mit audio-CDs.Wiedergabe nach einem Zeitplan durch den Benutzer eingestellt. 1. Wenn die CD abgespielt wird, stoppen Sie die Wiedergabe durch Drücken der STOP-Taste (23). 2. Drücken Sie die Taste PROG (28) auf der Fernbedienung, zeigt das Display die Meldung P__C__. 3. Drücken Sie auf Weiter (4) Zurück (3) auf die Spur, zuerst gespielt werden soll. 4. Drücken Sie die Taste PROG (28) auf der Fernbedienung, um die Auswahl zu bestätigen. 5. Gehen Sie durch folgende Schritte 3-4, um den Rest der Tracks bis zu einem Maximum von 20 Audiospuren oder 99 Titel MP3 eingestellt. 6. Drücken Sie die PLAY / PAUSE> II (24), um die programmierte Wiedergabe zu starten. 7. Zweimal Drücken Sie die STOP-Taste (23), schalten Sie die Programmierung.
OPERATION INPUT USB LESUNG1. Stellen Sie sicher, dass keine CD vorhanden ist.2. Stellen Sie die Quelle (5) auf der CD-MP3-Position.3. Schließen Sie einen MP3-Player mit USB (12) Anschluss an den USB-Eingang. Nach ein paar Sekunden zeigt das Display die Anzahl der Titel (Songs) auf der Festplatte4. Drücken Sie die PLAY / PAUSE-Taste (6), um die Wiedergabe zu starten; drücken Sie erneut dieselbe Taste, um den PAUSE
DEUTSCH6. Stellen Sie die Lautstärke wie bei der Lautstärkeregler (8) gewünscht.HINWEIS: Erweitern und die Position der Antenne, um den besten UKW-Empfang zu erzielen. Wenn der Empfang schlecht ist, versuchen Sie, anders als die Länge und Ausrichtung der Antenne; Die Qualität des FM-Empfang hängt jedoch stark von der Position des Geräts. Die AM-Loop-Antenne ist im Gerät befindet, richten Sie sie, um den bestmöglichen Empfang zu erhalten.

34
HCX 1080 BTDEUTSCH aktivieren. Lesen Symbol beginnt zu blinken. So deaktivieren Sie die PAUSE5. Drücken Sie erneut die PLAY / PAUSE-Taste (6).6. Drücken Sie die STOP-Taste (7), um die Wiedergabe vollständig zu stoppen.7. Siehe "Betriebs CD-MP3-Player" für die Nutzung anderer Funktionen Abschnitt.
LINE IN1. Stellen Sie die Quelle (5) auf der CD-MP3-Position.2. Durch ein spezielles Kabel, um eine Einheit jeder Art mit einem Audio-Ausgang an den AUX-IN-Buchse (16) ausgestattet.3. Überprüfen Sie die Außeneinheit durch ihre Kontrollen.
VERWENDEN VON BLUETOOTH1. Drücken Sie die "Source"-Taste, um den Bluetooth-Modus zu wechseln, es wird "BT" auf dem Display Anzeige.2. Im Bluetooth-Modus, blinkt die Statusanzeige blau dreimal, gefolgt von zwei Signaltöne, wird das System automatisch suchen.3. Aktivieren Sie die Bluetooth-Funktion auf Ihrem Gerät und machen es sichtbar.4. Zwischen Bluetooth-Geräte suchen "HCX 1080 BT".Einmal gekoppelt, sollte das Gerät an BT 1080 HCX verbinden zu lesen beginnen, das Gesetz Smartphone, Tablet, PC ...
VORGEHENSWEISE NFC-VERBINDUNGVor dem Anschließen sicher, dass die Verbindung von Geräten (zB Handy oder Tablet) haben nicht alle NFC-Smartphone oder Tablet diese Funktion.1. Drücken Sie die Source-Taste auf der Fernbedienung, um den Bluetooth-Modus2. Vor Anschließen sicher, dass die Anschlussgeräte (zB Handy oder Tablet) haben nicht alle NFC-Smartphone oder Tablet diese Funktion.3. Geräte (zB Handy oder Tablet) Bluetooth-Modus einstellen.4. Geräte (zB Handy oder Tablet) Einstellung Modus NFC Arbeit. Für alle Geräte NFC, NFC werden die Einstellungen auf dem Gerät bestätigt den Austausch von Daten zu ermöglichen finden, wenn berührt ein anderes Gerät mit NFC-Technologie.
TECHNISCHE DATEN110-230V~50/60 HzVerbrauch: 30 WDer Verbrauch im Standby-Modus: <0,5 W
ABSCHNITT RADIOVariiert UKW-Frequenz: 87,5MHz ~ 108MHzCD-Player: CD / CD-R-RW / MP3-FORMATABSCHNITT USB mit USB-2.0-Anschluss kompatibel3,5-mm
VERSTÄRKER2x10W Ausgangsleistung (RMS) 2x20W (40W MAX)LOW: -10dB bis +10 dBTREBLE: -10dB bis +10 dBFrequenzgang 20Hz ~ 20kHz + - 3dBS/N: >80dB
BT / NFCLeistung tx max Bluetooth: 2,5 mWBluetooth Übertragungsband: 2,4 GHzNFC Übertragungsband: 13.56MHzLeistung tx max NFC: 100mW
GRÖSSEEinheit: 202x127x262mm Lautsprecher: 125x245x125mm

35
HCX 1080 BT
DESCRIPCIÓN DE LOS MANDOS 01 Standy02 Mostrar 03 Anterior 04 Siguiente 05 Fuente 06 Play / Pause 07 Detener 08 Volumen
09 Botón de apertura CD 10 Toma de auriculares 11 del compartimiento del CD 12 Entrada USB 13 Cajas 14 Salidas de altavoz 15 Salida de audio 16 Entrada de Audio 17 Antena FM
ESPAÑOL
02
10 1211
01 08
03 04 05 06 07
09
14 15 16 17
13 13

36
HCX 1080 BT
DESCRIPCIÓN DE LOS MANDOS
01 Standby 02 Teclado Numérico 03 FF + 04 FF - 05 | << / >> | / << / >> 06 Pausa 07 A-B 08 CD / USB 09 Fuente 10 Random 11 Buscar 12 EQ 13 INTRO 14 Mute 15 Loudness16 Volumen +17 Volumen -18 Bass + 19 Bass -20 Agudos + 21 Agudos - 22 Repita los 23 Detener 24 Juego 25 Memoria 26 CH - 27 CH + 28 Programa 29 Ir a 30 Eject 31 Restablecer
ESPAÑOL
01
02
03
30
2928
27
26
25
24
04
05
0607080910111213
14
2322212019183116
1715

37
HCX 1080 BTADVERTENCIAS RELATIVAS AL LASEREste aparato consta de un sistema de lectura con rayo láser. Aunque el láser sea de baja potencia y conste de dispositivo de seguridad que impide el funcionamiento con la tapa abierta, aténgase a las siguientes advertencias:no acerque el ojo a la lente del laser con el aparato abierto, peligro de lesiones en la retina.no intente desmontar ni modificar la unidad laser, peligro de absorcion de radiaciones.
ADVERTENCIAS
NOTAS DE UTILIZACIONEste aparato es un instrumento electrónico de alta precisión, evite utilizarlo en los siguientes casos:• En proximidad de fuentes de calor como caloríferos y estufas.• En lugares donde exista alto grado de humedad como por ejemplo cuartos de baño, piscinas, etc..• En lugares muy polvorientos.• En lugares sujetos a fuertes vibraciones.• Coloque el aparato de modo que por sus lados exista el espacio suficiente para que el aire pueda circular siempre libremente (por lo menos 5 cm).• No obstruya los orificios de ventilación.• El aparato no debe exponerse a goteos o salpicaduras de agua. Los objetos que contengan líquido, como jarrones, deben ser en el sistema.• Si entra líquido en el aparato, desconecte inmediatamente el enchufe de la corriente y lleve el aparato al centro de asistencia TREVI más cercano.• No hay fuente de llamas, como una vela encendida, se deben colocar en.• Controle siempre, antes de poner en funcionamiento el aparato, que los cables de alimentación y de conexión estén instalados correctamente.CUIDADOS Y MANTENIMIENTOPara la limpieza se aconseja utilizar un paño suave, ligeramente humedecido. Evitar disolventes y sustancias abrasivas.IMPORTANTELa buena fabricación de este aparato garantiza durante largo tiempo su perfecto funcionamiento. Si aún así se presenta algún inconveniente, resultará oportuno consultar el Centro Asistencia autorizado.TREVI sigue una política de continua investigación y desarrollo. Por lo tanto los productos pueden presentar características distintas a las descritas.
ESPAÑOL
FUENTE DE ALIMENTACIÓNEnchufe el cable a una toma de 110-240V~50/60Hz. No conecte esta unidad a coger con un voltaje distinto del indicado.
ON / OFF1. Por encender el dispositivo Pulse el botón (1) StandBy2. Presione de nuevo el botón de parada de pura espera.
FUNCIONAMIENTO DE LA RADIO1. Encienda la unidad girando el botón SOURCE (5) en la posición SINTONIZADOR 2. Presione el FF+ (3) o FF- (4) en el control remoto para aumentar o disminuir la frecuencia de 0,05MHz.3. Sujete el FF+ (3) o FF- (4) en el control remoto para sintonizar la emisora siguiente o anterior.4. Pulse el botón Play (06) / Pausa para iniciar las estaciones de radio de búsqueda automática. La unidad puede almacenar hasta 40 emisoras de radio. 5. Pulse los botones Anterior (03) o Siguiente (04) de la unidad o el CH- (26) o CH+ (27) en el control remoto para ir a la estación de guardado anterior o siguiente.6. Ajuste el volumen deseado con el control de volumen (8).NOTA: Extienda y coloque la antena para lograr la mejor recepción de FM. Si la recepción no es buena, intente configurar de manera diferente la longitud y la orientación de la antena; Sin embargo, la calidad de la recepción de FM depende en gran medida de la ubicación del dispositivo.La antena de cuadro de AM se encuentra en el interior del dispositivo, orientarla de modo que se obtenga la mejor recepción posible.
Para evitar los posibles daños a la audición, limitar la cantidad de tiempo que escucha a un volumen alto

38
HCX 1080 BTESPAÑOLOPERACIÓN CD/MP3 REPRODUCCIÓN1. Encienda el aparato por el selector de funciones (5) en la posición CD-MP3 2. Abra el portadiscos con el (9) e inserte el disco con la etiqueta hacia arriba. Cierre la puerta presionando suavemente. 3. Después de unos segundos, la pantalla muestra el número de pistas (canciones) en el disco y va a arrancar "la reproducción. 4. Pulse el botón PLAY / PAUSE> II (6) para hacer una pausa en la pantalla aparecerá el símbolo de pausa 5. Para cancelar la pausa pulse de nuevo el botón PLAY / PAUSE> II (6). 6. Pocos minutos Pulse el botón STOP (7) para detener la reproducción por completo.
SALTAR PISTA1. Pulse los botones Anterior (03) o Siguiente (04) de la unidad o el <<I o >>I (05) en el control remoto para ir a la pista de música anterior o siguiente.2. Mantenga pulsada la tecla FF+ (3) o FF- (4) en el control remoto para buscar rápidamente un pasaje musical específico. Suelte el botó n para reanudar la reproducción normal.
REPETIR UNA CANCIÓN SOLAMENTE
Pulse el botón una vez Repetir (22) en el control remoto, el icono aparece en la pantalla y la unidad se repite continuamente la pista actual.
REPETIR DISCO LLENO
Presione el botón de repetición (22) del mando a distancia, los iconos ALL aparecen en la pantalla y la unidad reproduce de forma continua todo el disco. Para restablecer el funcionamiento normal de la reproducción de la unidad, pulse el botón de repetición (22) en el control remoto hasta que los símbolos desaparecen de la pantalla.
FUNCIÓN ALEATORIA REPRODUCCIÓN DE UN CD EN LA SUCESIÓN ALEATORIANota: La función RANDOM funciona solamente con CDs de audio.Reproducción de acuerdo con una secuencia aleatoria de el CD. 1. Si se reproduce el CD, detenga la reproducción pulsando el botón STOP (23). 2. Tras la reproducción de CD de audio, pulse tres veces el botón Random (10) en el control remoto, la pantalla muestra el mensaje siguió corriendo. 3. Pulse el botón PLAY / PAUSE> II (24) para iniciar la reproducción aleatoria. 4. Para desactivar la función, pulse el botón Random (10) en el control remoto, el escrito fue corriendo desaparezca de la pantalla.
PROGRAMA DE SERVICIONota: La función PROGRAM funciona solamente con CDs de audio.Reproducción de acuerdo con un calendario establecido por el usuario. 1. Si se reproduce el CD, detenga la reproducción pulsando el botón STOP (23). 2. Presione el botón PROG (28) en el control remoto, la pantalla muestra el P__C__ mensaje. 3. Presione Next (4) Volver (3) para seleccionar la pista que desea reproducir primero. 4. Presione el botón PROG (28) del mando a distancia para confirmar la selección. 5. Continúe siguiendo los pasos 3-4 para ajustar el resto de las pistas, hasta un máximo de 20 pistas de audio o 99 pistas MP3. 6. Pulse el botón PLAY / PAUSE> II (24) para iniciar la reproducción programada. 7. Presione dos veces el botón STOP (23) para desactivar la programación.
FUNCIONAMIENTO DE ENTRADA USB LECTURA1. Asegúrese de que no hay ningún CD actual.2. Establezca la Fuente (5) sobre la posición de CD-MP3.3. Conecte un reproductor de mp3 con USB (12) de conexión a la entrada USB. Después de unos segundos, la pantalla muestra el número de pistas (canciones) en el disco.4. Pulse el botón PLAY / PAUSE (6) para iniciar la reproducción; pulse de nuevola misma tecla para activar la pausa. Leer símbolo comienza a parpadear.5. Para desactivar la pausa, Pulse de nuevo el botón PLAY / PAUSE (6).6. Presione el botón STOP (7) para detener la reproducción por completo.7. Consulte "reproductor de funcionamiento cd-mp3" para el uso de la otra sección de funciones.

39
HCX 1080 BTESPAÑOL
LINE IN1. Establezca la Fuente (5) sobre la posición de CD-MP3.2. A través de un cable especial, conectar una unidad de cualquier tipo equipado con una salida de audio a la toma AUX IN (16).3. Compruebe la unidad exterior a través de sus controles.
EL USO DE BLUETOOTH1. Pulse el botón "Fuente" para cambiar al modo de Bluetooth, se mostrará "BT" en la Display.2. En el modo Bluetooth, la luz de estado parpadea en azul tres veces, seguido de dos pitidos, el sistema buscará automáticamente.3. Active la función Bluetooth en su dispositivo y hacerlo visible.4. Entre los dispositivos Bluetooth Buscar "HCX 1080 BT". Una vez emparejado, el dispositivo debe conectarse a BT 1080 HCX para empezar a leer el smartphone ley, tableta, PC ...
PROCEDIMIENTO DE CONEXIÓN NFCAntes de conectar, asegúrese de que los dispositivos de conexión (por ejemplo, teléfono o tableta) no tienen todas teléfono inteligente o tableta NFC esta función.
1. Presione el botón Fuente del mando a distancia en modo Bluetooth2. Antes de conectar, asegúrese de que los dispositivos de conexión (por ejemplo, teléfono o tableta) no tienen todas teléfono inteligente o tableta NFC esta función.3. Dispositivos (por ejemplo, teléfono o tableta) Ajuste del modo Bluetooth.4. Dispositivos (por ejemplo, teléfono o tableta) Ajuste trabajo NFC modo. Para todos los dispositivos NFC, NFC será buscar los ajustes en el dispositivo confirmados para permitir el intercambio de datos cuando tocado a otro dispositivo con tecnología NFC.
ESPECIFICACIONES110-240V~50/60HzConsumo: 30 WEl consumo en modo de espera: <0,5 W
SECCIÓN DE RADIOVaría la frecuencia FM: 87.5 - 108MHzCD REPRODUCTOR DE: CD / CD-R-RW / FORMATO MP3SECCIÓN USB compatible con puerto USB 2.03,5mm auxiliar
AMPLIFICADORPotencia de salida 2x10W (RMS) 2X20W (40W MAX)LOW: -10dB a +10 dBTREBLE: -10dB a +10 dBRespuesta de frecuencia: 20Hz ~ 20KHz + - 3dBS/N: >80dB
BT / NFCPotencia tx máximo Bluetooth: 2.5 mWBanda de transmisión Bluetooth: 2.4GHzBanda de Transmisión NFC: 13.56MHzPotencia tx max NFC: 100mW
DIMENSIONESUnidad 202x127x262mm Altavoz 125x245x125mm

Trevi S.p.A. Strada Consolare Rimini-San Marino, 6247924 Rimini (Rn) Italia
Tel. 0541/756420 Fax 0541/756430
www.trevi.it e-mail: [email protected]
Made in CHINA
DICHIARAZIONE DI CONFORMITÀ UE SEMPLIFICATA
Il fabbricante TREVI dichiara ch eil tipo di apparecchiatura radio HCX 1080 BT è conforme alla direttiva 2014 / 53 / UE.
Il testo completo della dichiarazione di conformità EU è disponibile al seguente indirizzo Internethttps://www.trevi.it/dms/zidi/TREVI/DOCHCX1080BT.pdf
SIMPLIFIED EU DECLARATION OF CONFORMITY
Hereby TREVI Spa declares that the radio equipment typeHCX 1080 BT is in compliance with directive 2014 / 53 / EU.
The full text of the EU declaration of conformity is available at the following internet addresshttps://www.trevi.it/dms/zidi/TREVI/DOCHCX1080BT.pdf