GUIDANCE & SYLLABUS - Cube Training Services
89
NATIONAL POOL LIFEGUARD QUALIFICATION GUIDANCE & SYLLABUS for National Pool Lifeguard Qualification (NPLQ) ® Generation 9 Trainer Assessors V2 December 2018
-
Upload
khangminh22 -
Category
Documents
-
view
1 -
download
0
Transcript of GUIDANCE & SYLLABUS - Cube Training Services

NATIONAL POOL LIFEGUARDQUALIFICATION
GUIDANCE & SYLLABUSfor National Pool LifeguardQualification (NPLQ) ®Generation 9 Trainer Assessors
V2 December 2018


This Guidance Booklet
This booklet has been designed to assist RLSS UK National Pool Lifeguard Qualification (NPLQ) Trainer Assessors (TAs) to plan, deliver and assess candidates for National Pool Lifeguard Qualification. This booklet addresses training, assessing and candidate requirements, course organisation and evaluation, assessment criteria, records and procedures.
This guidance document is designed to be used electronically and with sections printed and used when training/assessing. You should ensure you have the most recent version by downloading from RLSS Direct resource area.
2
Generation 9 Edition 1 V2 December 2018
NPLQ GUIDANCE & SYLLABUS
Contents 1. Introduction
2. Training2.1 Candidate Requirements 2.2 Identification 2.3 Course Length and Considerations 2.4 Course Rules 2.5 Integrating Qualifications 2.6 Training Records 2.7 Training Resources 2.8 Training Equipment
3. Assessment3.1 Introduction 3.2 Selecting an Assessor 3.3 Malpractice and Maladministration 3.4 Recognition of Prior Learning 3.5 Certificate Duration and Re-qualification 3.6 Required Level of Competence 3.7 Simulation 3.8 Assessment Papers and Records 3.9 Assessment Times Allowance 3.10 Assessment Security Considerations - Preparing Assessment Material 3.11 Assessment Security Considerations - Post Assessment Procedure 3.12 Assessment Security Considerations - Security Breach Process 3.13 Presenting Candidates for Assessment 3.14 Assessment Delivery - Preparing for the Assessment 3.15 Assessment Delivery - Commencing the Assessment 3.16 Assessment Delivery - Post Assessment Marking 3.17 Reassessment Opportunities 3.18 Practical Assessments – Guidance for Trainer Assessors (TAs)
4. AppendixA Qualification Content and Assessment Criteria B Course Register C Personal Performance Record D Additional Training Record E Sample Theory Assessment Paperwork F Practical Assessment Record
3

Generation 9 Edition 1 V2 December 2018
1. Introduction
The National Pool Lifeguard Qualification (NPLQ) was first developed by the Royal Life Saving Society UK in 1990 to address the future role of the lifeguard and the needs of swimming pool operators. As the pool industry continues to change, and the legal obligations for operators have continued to increase, the RLSS UK and IQL UK have endeavoured to respond to change through the ongoing development of this qualification. It has been reviewed and updated, with the most recent update being Generation 9 in July 2018.
This qualification is regulated in England by Ofqual, Qualifications Wales and CCEA Regulation (Northern Ireland) and appears on the Regulated Qualifications Framework as:
The IQL Level 2 Award in Pool Lifeguarding, Intervention, Supervision and Rescue Qualification number 603/3309/1
This qualification is often referred to as the National Pool Lifeguarding Qualification (NPLQ) and for the purposes of this document and associated qualification resources will be hereafter be referred to as the NPLQ
All courses must be delivered and assessed through an Approved Training Centre/Provider (ATC/P).
IQL UK review all qualification, policy and procedural documentation annually as part of self-evaluation arrangements, in response to customer and candidate feedback, regulatory requirements and trends in industry standards and best practice.
For more information about the registration and approval process for delivering and assessing the IQL Level 2 Award in Pool Lifeguarding, Intervention, Supervision and Rescue, please contact IQL on 0300 323 0096 or email [email protected].
4
Generation 9 Edition 1 V2 December 2018
NPLQ GUIDANCE & SYLLABUS
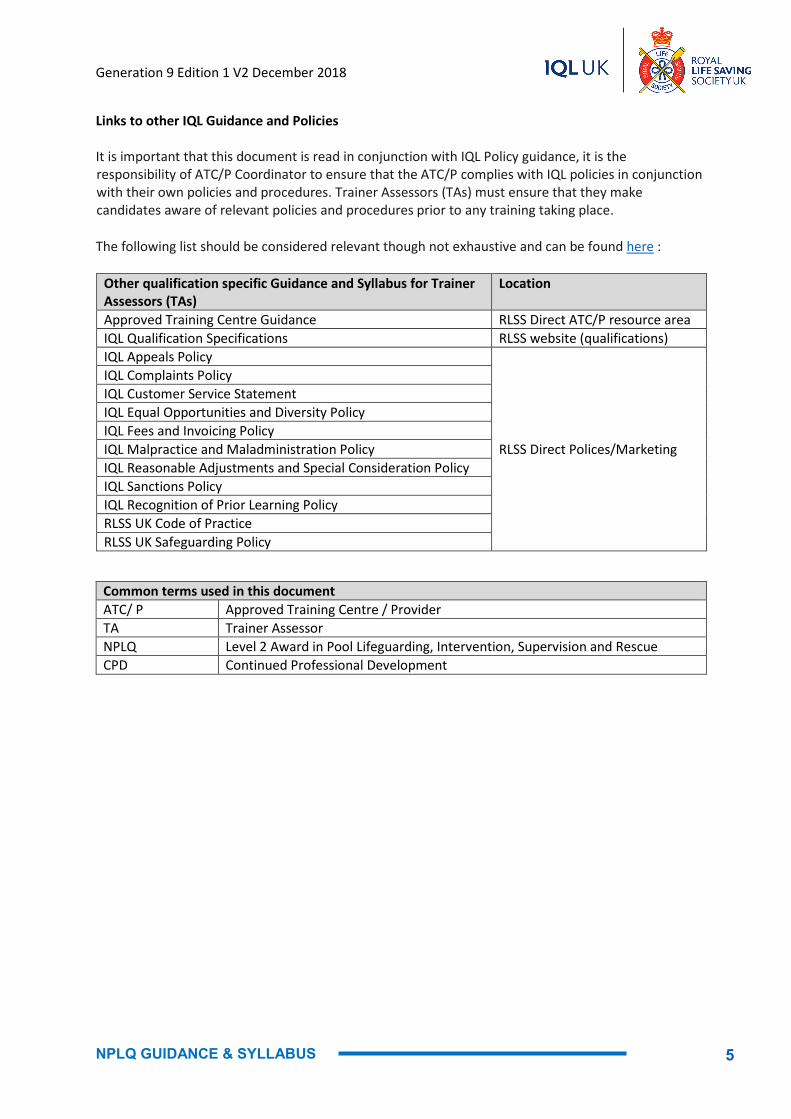
Links to other IQL Guidance and Policies
It is important that this document is read in conjunction with IQL Policy guidance, it is the responsibility of ATC/P Coordinator to ensure that the ATC/P complies with IQL policies in conjunction with their own policies and procedures. Trainer Assessors (TAs) must ensure that they make candidates aware of relevant policies and procedures prior to any training taking place.
The following list should be considered relevant though not exhaustive and can be found here :
Other qualification specific Guidance and Syllabus for Trainer Assessors (TAs)
Location
Approved Training Centre Guidance RLSS Direct ATC/P resource area IQL Qualification Specifications RLSS website (qualifications) IQL Appeals Policy
RLSS Direct Polices/Marketing
IQL Complaints Policy IQL Customer Service Statement IQL Equal Opportunities and Diversity Policy IQL Fees and Invoicing Policy IQL Malpractice and Maladministration Policy IQL Reasonable Adjustments and Special Consideration Policy IQL Sanctions Policy IQL Recognition of Prior Learning Policy RLSS UK Code of Practice RLSS UK Safeguarding Policy
Common terms used in this document ATC/ P Approved Training Centre / Provider TA Trainer Assessor NPLQ Level 2 Award in Pool Lifeguarding, Intervention, Supervision and Rescue CPD Continued Professional Development
5

Generation 9 Edition 1 V2 December 2018
2. Training2.1 Candidate Requirements
Candidates must meet the following criteria: • Must be 16 years of age at the date of assessment• Be able to meet the following criteria:
- Jump/dive into deep water- Swim 50 metres in no more than 60 seconds- Swim 100 metres continuously on front- Swim 100 metres continuously on back- In deep water, tread water for 30 seconds- Surface dive to the floor of the pool- Climb out unaided without ladder/steps and where the pool design permits
• Must complete minimum guided learning hours• Complete all activities and revision questions in the course candidate manual ‘The Lifeguard’• Be assessed against all learning outcomes in the units taken
2.2 Identification
All candidates registering for training and assessment of courses must present suitable identification to the TA who must check and record details of identification prior to candidates being admitted to courses and assessments (copies must not be made or retained).
Identification can be verified using the following: • A passport• A driving licence• Other photographic ID card
Where the candidate does not have access to any of the above forms of identification an ATC/P may accept another form of identification containing a signature such as a debit or credit card or proof of identification provided/confirmed by their current employer, school/college teacher or line manager.
2.3 Course Length and Considerations
The total qualification time (TQT) for this qualification is 46 hours. This is made up of 36 guided learning hours (GL) (excluding breaks) for the delivery of the qualification and 10 hours for candidate self-study (independent learning) for consolidation and preparation for assessments. Self-study includes revision questions within ‘The Lifeguard’, theory practise papers and revision reading. It should be set by the trainer but does not need to be recorded.
Contact time should not exceed 8 hours in any one day (excluding breaks and organisational arrangements)
6
Generation 9 Edition 1 V2 December 2018
NPLQ GUIDANCE & SYLLABUS
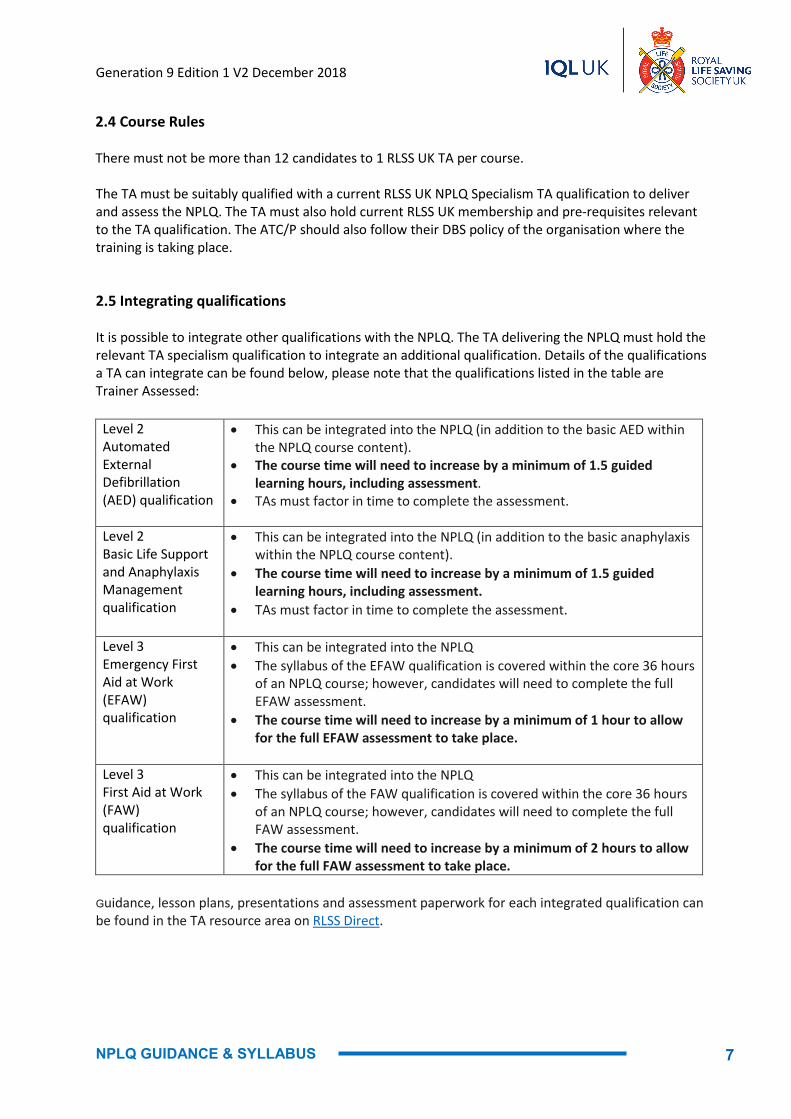
2.4 Course Rules
There must not be more than 12 candidates to 1 RLSS UK TA per course.
The TA must be suitably qualified with a current RLSS UK NPLQ Specialism TA qualification to deliver and assess the NPLQ. The TA must also hold current RLSS UK membership and pre-requisites relevant to the TA qualification. The ATC/P should also follow their DBS policy of the organisation where the training is taking place.
2.5 Integrating qualifications
It is possible to integrate other qualifications with the NPLQ. The TA delivering the NPLQ must hold the relevant TA specialism qualification to integrate an additional qualification. Details of the qualifications a TA can integrate can be found below, please note that the qualifications listed in the table are Trainer Assessed:
Level 2 Automated External Defibrillation (AED) qualification
• This can be integrated into the NPLQ (in addition to the basic AED within the NPLQ course content).
• The course time will need to increase by a minimum of 1.5 guided learning hours, including assessment.
• TAs must factor in time to complete the assessment.
Level 2 Basic Life Support and Anaphylaxis Management qualification
• This can be integrated into the NPLQ (in addition to the basic anaphylaxiswithin the NPLQ course content).
• The course time will need to increase by a minimum of 1.5 guidedlearning hours, including assessment.
• TAs must factor in time to complete the assessment.
Level 3 Emergency First Aid at Work (EFAW) qualification
• This can be integrated into the NPLQ• The syllabus of the EFAW qualification is covered within the core 36 hours
of an NPLQ course; however, candidates will need to complete the fullEFAW assessment.
• The course time will need to increase by a minimum of 1 hour to allowfor the full EFAW assessment to take place.
Level 3 First Aid at Work (FAW) qualification
• This can be integrated into the NPLQ• The syllabus of the FAW qualification is covered within the core 36 hours
of an NPLQ course; however, candidates will need to complete the fullFAW assessment.
• The course time will need to increase by a minimum of 2 hours to allowfor the full FAW assessment to take place.
Guidance, lesson plans, presentations and assessment paperwork for each integrated qualification can be found in the TA resource area on RLSS Direct.
7

Generation 9 Edition 1 V2 December 2018
2.6 Training Records The preparation and completion of training records is compulsory for all TAs when delivering and assessing courses. Training records contain information on the candidate’s progress and provide essential information evidencing their competency and achievement throughout training. It is important that comprehensive records are maintained throughout the training and assessment process. In the event of any investigation, records provide essential evidence to enable investigators to make valid and consistent judgements. To support delivery of the qualifications, IQL have developed training records to be used by Trainer Assessors (TAs). Personal Performance Records (Appendix C) To record candidate competency throughout course Additional Training Record (Appendix D) To record additional training given to a candidate prior to a reassessment Course Register (Appendix B) To record candidate attendance Training records can be found in the Appendices and in the TA resource area on RLSS Direct. It is important that TAs have the most up to date version. 2.7 Training Resources To support delivery of the qualifications, IQL have developed resources to be used by TAs. Master Programme Scheme of work detailing key subjects for individual sessions lasting approximately 1-hour each, lesson plans detailing how to deliver each 1-hour session and example course layouts Day Planner Resource to help you to plan your course using the minimum 36 1-hour sessions, integrated sessions, breaks, changing time and assessment. The day planner allows you to move the sessions around to suit the facility availability. PowerPoint Presentations For each 1-hour session PowerPoint presentations have been created to use to deliver the NPLQ to candidates. The presentations use text, diagrams and photographs from the candidate manual as well as videos to demonstrate practical skills Resources can be found in the TA resource area on RLSS Direct. Trainers should use the resources when delivering the NPLQ courses to ensure consistency and standardisation. Trainers may adapt the resources to suit their own needs provided they meet the requirements of the qualification specification.
8

Generation 9 Edition 1 V2 December 2018
NPLQ GUIDANCE & SYLLABUS
Records IQL have provided standard assessment records to be used for each qualification. Further information on assessment records can be found in the Assessment Section and the Appendices of this guidance document. Records from courses must evidence the following details:
• Training plan (Day planner) • Subject[s] covered at each session (Lesson plan) • Time taken for each subject/session (Lesson plan) • Attendance (Course register) • Areas for further skill and/or knowledge improvement (Additional training record) • A statement confirming candidates have met all training criteria and have met the required
level of competency (Personal Performance Record)
2.8 Training Equipment
Resuscitation manikins
The recommended ratio is 1 manikin per 4 candidates. This is applicable for Adult, Child and Infant manikins. Where manikins are not available to the ideal ratio an increase in the guided learning hours may be required
Manikin wipes Suitable manikin wipes to clean manikins before and after use Learning materials
Candidates should be provided with an up to date ‘The Lifeguard’ manual
AED trainer units The recommended ratio is at least one AED trainer per 4 candidates. Where AED trainers are not available to the ideal ratio an increase in the guided learning hours may be required
Bandages and dressings
Sufficient clean bandages, dressings and other items commonly found in a first aid kit should be available to facilitate training and assessment.
Submersible manikin
Candidates will need to use a submersible manikin to recover from the deepest part of the pool. 1 submersible rescue manikin must be available to facilitate training and assessment
Rescue equipment
Rescue equipment (torpedo buoys/reach poles/throw bags) should be available to facilitate training and assessment. The recommended ratio is 1 piece of rescue equipment per 4 candidates. RLSS UK recommend the use of torpedo buoys
Spinal/extraction equipment
Spinal/extraction equipment (Ferno Aquaboard and/or Ferno Pool Extraction Board) should be available to facilitate training and assessment where appropriate.
Pocket Mask Sufficient pocket masks should be available to facilitate training and assessment. A minimum of 2 pocket masks will be required.
All equipment for can be purchased from RLSS Direct www.rlssdirect.co.uk
9

Generation 9 Edition 1 V2 December 2018
3. Assessment 3.1 Introduction The NPLQ is independently assessed and the assessment should determine a candidate’s ability to act safely, competently and effectively on a day-to-day basis and when an emergency occurs in a swimming pool and leisure environment and to deal with a casualty. All Learning Outcomes in the units must be achieved. An overview of the Learning Outcomes is detailed within the appendix. Assessment will include a mixture of practical and theory-based assessments. All independent assessments will take place following course delivery and when candidates have achieved the required level of competence having met all training criteria. To support ATC/Ps and TAs in the delivery of practical and theory assessments, IQL has created guidance on how assessments must be conducted. It is the responsibility of the ATC/P Coordinator to ensure that these guidelines are followed by TAs and centre staff.
3.2 Selecting an Assessor The following guidelines on Assessment of the NPLQ must be followed in all instances:
Assessor(s) must be suitably qualified and hold:
• A current RLSS UK National Pool Lifeguard Qualification or Life Support 3 • A TA NPLQ specialism qualification • A current RLSS UK membership • Pre-requisites relevant to the TA qualification
The selection of an NPLQ Assessor (TA) is important and must in all instances be undertaken by the ATC/P Coordinator. It is the responsibility of the ATC/P Coordinator to ensure no conflict of interest exists with all those involved in the training and assessing of this qualification
The NPLQ must be assessed:
• By an ‘Independent Assessor’ who was not involved in the ‘Training’ element of the current qualification
An Assessor MUST NOT:
• Undertake candidate assessment at the same centre on more than four consecutive occasions • Undertake more than two assessments within a day • Assess more than six candidates at a time
10
Generation 9 Edition 1 V2 December 2018
NPLQ GUIDANCE & SYLLABUS
It is the responsibility of the ATC/P Coordinator to ensure that a range of Assessors are used so independence, integrity and professionalism is maintained. Where an Assessor regularly undertakes assessment at a centre, the ATC/P Coordinator MUST make arrangements for a different Assessor to undertake assessments on at least every fifth occasion. Where an Assessor regularly undertakes assessment at a centre, Internal Quality Assurance is recommended to ensure professional standards are maintained.
Definitions:
• Independent Assessor: A person who has no personal relationship with the Trainer or candidates e.g., relatives, friends, work colleagues at the same venue
• Training: New or Renewal training for NPLQ candidates during the validity period of their current qualification.
• Approved Training Providers (ATP): ATP operate in a ‘mobile’ capacity and are not tied to a specific ATC venue. The venue an ATP runs a course at will, for the purposes of this document, be the ATC.
Failure to follow the above conditions will result in qualifications not being processed and may be deemed null and void. Any cost incurred for the reassessment of candidates will be borne by the ATC/P, Trainer or Assessor depending on the circumstances involved.
There will be occasions where potential conflict of interest may arise. In such situations, TAs and ATC/P Co-ordinators are advised to consult the IQL UK Conflict of Interest Policy found online at RLSS Direct and/or contact the IQL Head of Compliance for further guidance [email protected].
3.3 Malpractice and Maladministration ATC/Ps and TAs must be aware of and follow IQL UK Malpractice and Maladministration policy. ATC/Ps must ensure that they follow their own policies and procedures in conjunction with the IQL policy which is available online at RLSS Direct . ATC/P’s and TA’s must make candidates aware of their responsibilities about malpractice and maladministration prior to the commencement of the course.
11
Generation 9 Edition 1 V2 December 2018
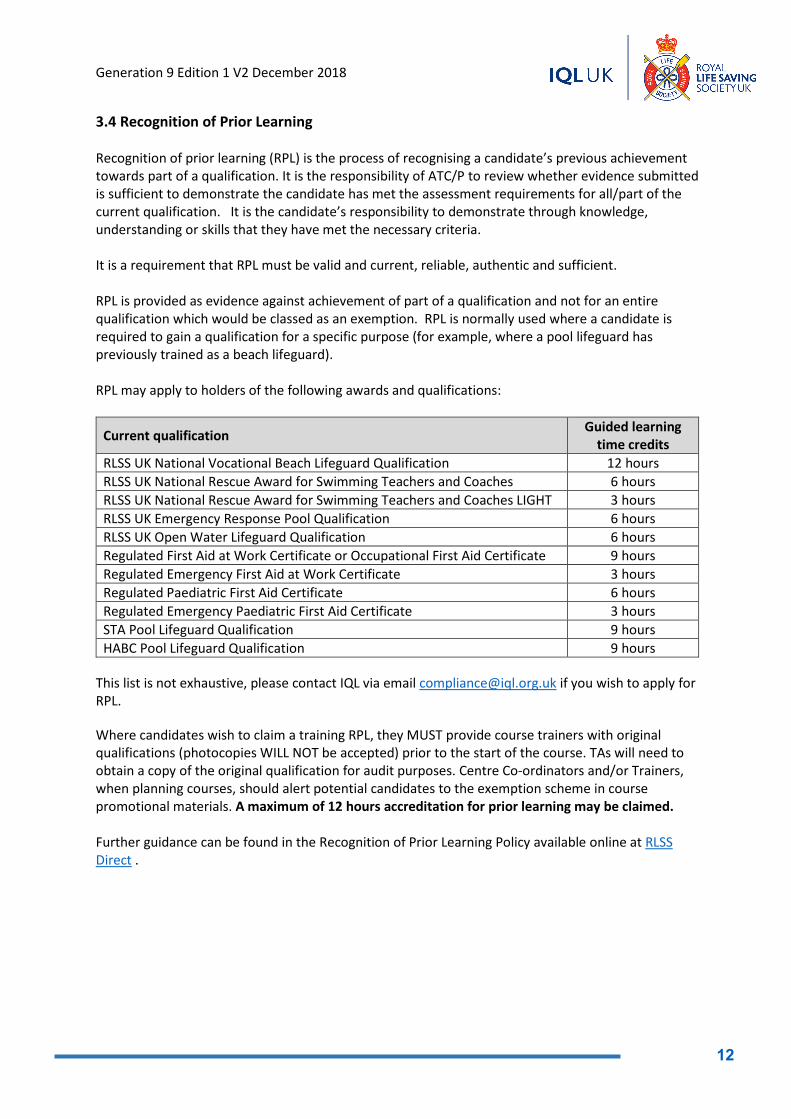
3.4 Recognition of Prior Learning Recognition of prior learning (RPL) is the process of recognising a candidate’s previous achievement towards part of a qualification. It is the responsibility of ATC/P to review whether evidence submitted is sufficient to demonstrate the candidate has met the assessment requirements for all/part of the current qualification. It is the candidate’s responsibility to demonstrate through knowledge, understanding or skills that they have met the necessary criteria. It is a requirement that RPL must be valid and current, reliable, authentic and sufficient. RPL is provided as evidence against achievement of part of a qualification and not for an entire qualification which would be classed as an exemption. RPL is normally used where a candidate is required to gain a qualification for a specific purpose (for example, where a pool lifeguard has previously trained as a beach lifeguard). RPL may apply to holders of the following awards and qualifications:
Current qualification Guided learning time credits
RLSS UK National Vocational Beach Lifeguard Qualification 12 hours RLSS UK National Rescue Award for Swimming Teachers and Coaches 6 hours RLSS UK National Rescue Award for Swimming Teachers and Coaches LIGHT 3 hours RLSS UK Emergency Response Pool Qualification 6 hours RLSS UK Open Water Lifeguard Qualification 6 hours Regulated First Aid at Work Certificate or Occupational First Aid Certificate 9 hours Regulated Emergency First Aid at Work Certificate 3 hours Regulated Paediatric First Aid Certificate 6 hours Regulated Emergency Paediatric First Aid Certificate 3 hours STA Pool Lifeguard Qualification 9 hours HABC Pool Lifeguard Qualification 9 hours
This list is not exhaustive, please contact IQL via email [email protected] if you wish to apply for RPL. Where candidates wish to claim a training RPL, they MUST provide course trainers with original qualifications (photocopies WILL NOT be accepted) prior to the start of the course. TAs will need to obtain a copy of the original qualification for audit purposes. Centre Co-ordinators and/or Trainers, when planning courses, should alert potential candidates to the exemption scheme in course promotional materials. A maximum of 12 hours accreditation for prior learning may be claimed. Further guidance can be found in the Recognition of Prior Learning Policy available online at RLSS Direct .
12

Generation 9 Edition 1 V2 December 2018
NPLQ GUIDANCE & SYLLABUS
3.5 Certificate Duration and Re-qualification For the NPLQ, the date of certification is based on the achievement of the final unit and the validity will be two years from date of achievement. Candidates must re-qualify prior to the expiry date of their existing qualification. NPLQ renewal candidates may renew their qualification within the period of validity of their existing qualification as stated on their certificate. This will include a full assessment of lifeguard knowledge and skills by an independent assessor. Candidates must have access to the most up to date copy of ‘The Lifeguard’ manual prior to assessment.
The following is required to be completed by candidates prior to the renewal assessment of their qualification to demonstrate their ongoing professional competence: 20 hours Continued Professional Development within the last two years from the date of previous assessment covering content from the NPLQ syllabus:
• In-water swimming pool rescue skills (at least 4 hrs) • CPR (at least 4 hrs) • First Aid (at least 4 hrs) • Lifeguard theory (at least 4 hours)
Continued Professional Development (CPD) can be achieved by:
• Attendance at Lifeguard ongoing training and competency assessment* (strongly recommended)
• Attendance at alternative training, face-to-face or online, relating to In-water swimming pool rescue skills, CPR, First Aid and Lifeguard theory
Candidates renewing their qualification must provide accurate records, paper or electronic, of CPD to the Trainer that will present them for assessment. These records must contain:
• The CPD method • An outline of the topics covered • The dates on which the activity was undertaken • The time period of the CPD • The number of hours • Evidence that you undertook the CPD activity (e.g. signature from the Trainer of the CPD,
certificate etc)
If a candidate’s qualification expires they must meet the criteria for, and be assessed as, a new candidate, e.g. provide evidence of 36 hours of training in the full syllabus of the NPLQ, complete all activities and revision questions in the course candidate manual ‘The Lifeguard’. TAs can evidence their required CPD activity by the delivery of a full NPLQ course within the validity of their current NPLQ qualification. *The Lifeguard ongoing training and competency assessment syllabus has been designed to cover most aspects of the NPLQ syllabus.
13
Generation 9 Edition 1 V2 December 2018
3.6 Required Level of Competence Details of the skills required can be found in Assessment Guidance sections of this document. Where a candidate is unable to demonstrate the skill and level of competence required the candidate should be given further training and reassessed accordingly (See Reassessment Opportunities section 3.17). Assessment guidance for each element of assessment can be found in section 3.16. Assessment Guidance, which identifies the requirements to ensure candidate’s meet the required level of competence. Over assessing When assessing candidates, it is important to avoid over assessment of candidates. All NPLQ skills MUST be observed by an independent Assessor. However, when integrating multiple qualifications (see Integrating Qualifications section 2.5) Trainer Assessors can assess the exact assessment skill once, this would be where the practical assessment forms are identical for the skill being assessed. For example, if a TA is integrating EFAW and AED to an NPLQ, adult CPR is contained within both EFAW and AED practical assessments. As the skills are identical, only one adult CPR assessment would need to be completed and the assessment records can be completed for both. If, however there is any variation within the practical assessment, both assessments must be completed. 3.7 Simulation Where candidate skills are being assessed through practical assessment, the TA may use simulation where suitable. For example, back blows for a choking casualty will be simulated to avoid harming the person acting as a casualty. Further information on simulation can be found in the assessment guidance documents. 3.8 Assessment Papers and Records Comprehensive assessment records must be completed detailing where each candidate has met specific criteria set out in the assessment syllabus. Evidence will need to be generated that reflects the candidates own work. Candidates must sign all attendance and assessment records. All assessment results must be recorded on an Assessment Form (digital/ hard copy) and forwarded to IQL, including where a candidate is unsuccessful. ATC/Ps may purchase learning, training and assessment materials via a secure purchasing process from RLSS Direct and details can be obtained online from the TA resource area. The assessment materials will include all of the following:
Practical Assessment Theory Assessment Practical Assessment Record
(RLSS Direct TA resource area) Theory Assessment - Question Sheet
(in candidate pack purchased from RLSS Direct) Theory Assessment - Candidate Answer Sheet
(in candidate pack purchased from RLSS Direct) Theory Assessment - Assessor Mark Sheet
(in candidate pack purchased from RLSS Direct)
14

Generation 9 Edition 1 V2 December 2018
NPLQ GUIDANCE & SYLLABUS
Practical assessment - Practical Assessment Record The Practical Assessment Record for NPLQ can be found at Appendix F and should be used to record candidate’s assessment following the guidance detailed within the Practical Assessment Guidance section for each qualification. The Pass requirement for each practical assessment is detailed on the Practical Assessment Record. The pass criteria is detailed in the yellow box. If a candidate fails any of the grey sections, this is deemed as a fail of that section.
Theory Assessment – Question Sheet The Question Sheet contains questions that the candidate must answer as part of the assessment. There are questions for each of the three sections of the NPLQ theory assessment. Each question on the Question Sheet has four possible answers. The candidate will need to select one answer for each question. Theory Assessment – Candidate Answer Sheet The Candidate Answer Sheet is used by the candidate to record the answers for each of the questions from the Question Sheet. The front of the Candidate Answer Sheet must be completed by the candidates and the assessor. The Candidate Answer Sheet includes instructions on how to use it.
15

Generation 9 Edition 1 V2 December 2018
Theory Assessment - Assessor Mark Sheet The Assessor Mark Sheet is to be used by the Assessor to mark the Candidate Answer Sheet. Pass criteria is shown below
Section Maximum Score Value of Each Question Pass Mark
1 24 1 mark 18 2 10 1 mark 8 3 24 1 mark 18
The Assessor Mark Sheet is a replica of the Candidate Answer Sheet with only the correct answers indicated. The Assessor should check each answer, place a tick if correct or a cross if incorrect and add the total number of correct marks. All questions carry a total of one mark each. The pass marks for the theory assessment are detailed on the Candidate Answer Sheet and Assessor Mark Sheet. The final score should be inserted on the Candidate Answer Sheet. Sample theory assessment documentation for Trainer Assessors (TAs) and candidates to use is provided in Appendix E. Completion of Assessment Paperwork It is important that assessment paperwork is completed in full and correctly. No comments or additional information should be noted on the assessment paperwork. Examples of correctly completed assessment paperwork are available online in the RLSS Direct Trainer resource area
16

Generation 9 Edition 1 V2 December 2018
NPLQ GUIDANCE & SYLLABUS
3.9 Assessment Time Allowance There is a set maximum time allowance for each section of the theory assessment. The Assessor should manage candidates in adhering to these timescales for each section:
Section Number of questions Time allowance 1 24 25 minutes 2 10 12 minutes 3 24 25 minutes
Candidates that have declared specific needs should apply for a reasonable adjustment or a special consideration. Trainers must be made aware of this as early as possible to allow for time to put any necessary arrangements in place prior to the commencement of the assessment. See IQL Reasonable Adjustment and Special Consideration policy, which can be found online on RLSS Direct in the Policies section. Due of the nature of the qualification it is not always possible to seek permission for a reasonable adjustment from IQL. In such circumstances the TA should gain evidence to support any applications made by candidates for a reasonable adjustment or make a professional judgement as to whether to apply a reasonable adjustment for individual candidates which ensures that the candidate is not unduly advantaged over other candidates
It is always difficult to be prescriptive about the total time taken to complete an assessment due to the practical assessment. However, a time of between 3 and 4 hours is felt to be realistic (excluding changing time and breaks). Assessors will be required to note the duration of assessments. 3.10 Assessment Security Considerations - Preparing Assessment Material The ATC/P Coordinator must ensure that these guidelines are followed for assessments. Security of assessment materials is paramount. ATC/Ps must take all reasonable steps to ensure that candidates’ personal details remain confidential and that coursework and attainment levels are not subject to undue bias or influence from external sources. For further information refer to policies and procedures malpractice/maladministration available online at RLSS Direct. On receipt of assessment materials, the ATC/P Coordinator or nominated TA must ensure the materials are stored in a secure location where others have no access until actual assessments take place. To ensure security, it is strongly advised that assessment materials remain unopened in the envelopes they are delivered in.
17
Generation 9 Edition 1 V2 December 2018
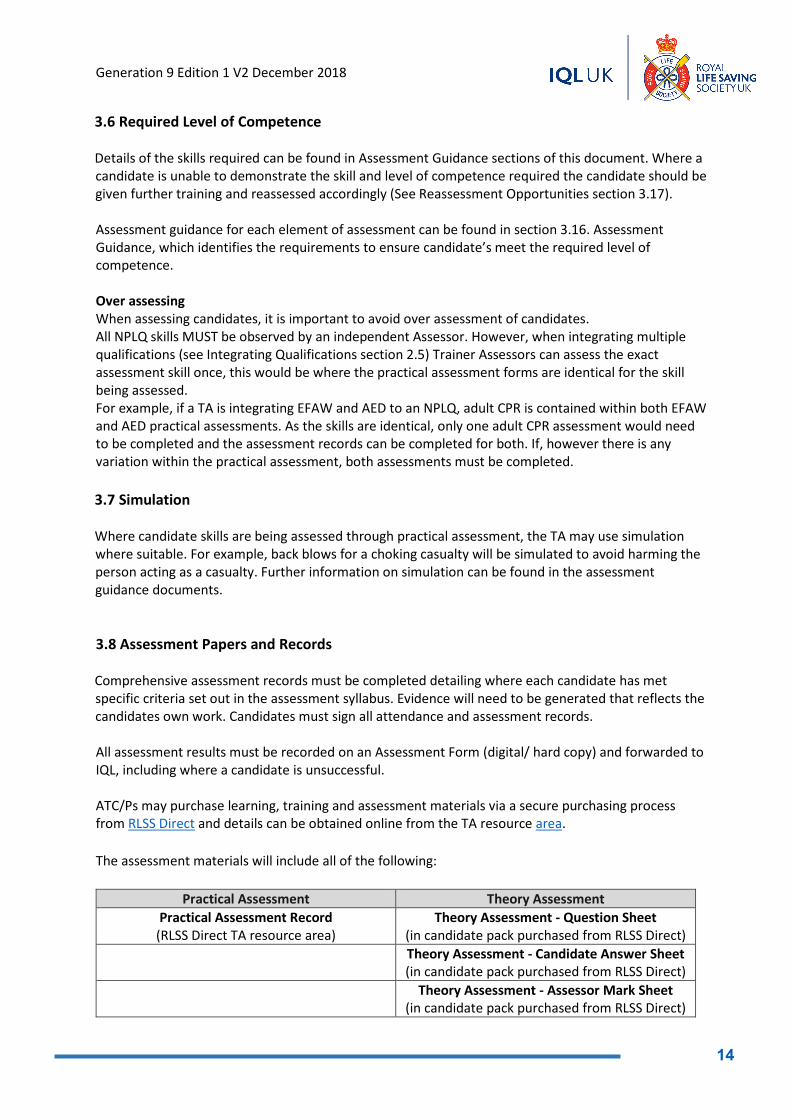
3.11 Assessment Security Considerations - Post Assessment Procedure All assessment materials must be retained by the TA and candidates should not be permitted to copy and/or remove any assessment material from the venue. Once marking has been completed by the Assessor, the nominated TA or ATC/P Coordinator must ensure robust quality assurance measures are adopted: Completed Practical Assessment Records
Stored in a secure location and available for quality assurance purposes when requested
Theory Assessment - Question Sheet
Must not be retained for future revision/training purposes and should be destroyed e.g. shredded
Theory Assessment - Candidate Answer Sheet
Stored in a secure location and available for quality assurance purposes when requested
Theory Assessment - Assessor Mark Sheet
Must not be retained for future revision/training purposes and should be destroyed e.g. shredded
If, after the assessment, there are unused copies of the assessment paperwork due to candidates not completing the course/assessment or due to orders exceeding the number of candidates attending the course, assessment materials must be repackaged, secured in an envelope and stored securely for future use by the ATC/P Coordinator or nominated TA. 3.12 Assessment Security Considerations - Security Breach Process If an ATC/P or TA has reason to believe that security of assessment materials has been breached they may carry out their own investigation and IQL must be informed immediately. ATC/Ps must keep accurate records detailing information on potential breaches that include dates, times and individuals concerned. Details of the security breach and investigation must be sent immediately to IQL at [email protected] IQL will undertake an investigation to determine the reasons for security being compromised and take all necessary steps to resolve the situation.
18
Generation 9 Edition 1 V2 December 2018
NPLQ GUIDANCE & SYLLABUS
3.13 Presenting a Candidate for Assessment IQL strongly recommend that the candidate’s presenting Trainer is available throughout the assessment and communication of results, should the Assessor have any questions or concerns. If the presenting Trainer is not available a point of contact for the candidate should be available. New Candidates Candidates should be presented to the Assessor by the Trainer that has delivered their course. Prior to the assessment the Assessor must check the following:
• Register and scheme of work - evidence that the guided learning hours have been completed and that the full syllabus content has been covered
• Personal Performance Record - evidence that competency, covering the entire syllabus has been achieved in training
• Candidate manuals - evidence that activities and revision questions are completed • Candidate identification • Reasonable Adjustments - have any reasonable adjustments or special considerations been
put in place Renewal Candidates Prior to the assessment the presenting Trainer and Assessor must check the following:
• CPD records - evidence that 20 hours of CPD have been completed • Candidate’s NPLQ certificate - evidence that they hold a current qualification • Candidate identification
19

Generation 9 Edition 1 V2 December 2018
3.14 Assessment Delivery - Preparing for the Assessment
The following should be organised prior to the assessment being undertaken:
Assessment Area • The assessment area should be suitably lit, heated and ventilated• The assessment area should be free from interruption and suitable signage should be placed
on the door to the area to avoid unnecessary interruption• The assessment area should not have any material on view within it that could influence a
candidate’s response to the assessment e.g., candidate resources, notes, flipcharts and othertraining materials should be removed
• The assessment area for practical and theory assessment should be set out in a way so as toavoid collusion for example setting up of first aid equipment in practical assessments andarrangement of tables and chairs for theory assessments
• Arrangements should be put in place to manage candidates that may need to leave the areafor reasons such as toilet breaks. Arrangements must ensure that the candidate does not havethe opportunity to collude with others
Paperwork • All relevant assessment paperwork is ready to enable completion of the assessment• Candidates have all the materials and equipment they need to complete assessment• For theory assessment, candidates are provided with theory assessment Question Sheet and
Candidate Answer Sheet• For practical assessment, the TA should print the Practical Assessment Record and insert the
name of all candidates prior to commencement of the assessment
Other Considerations • Liaise with the course organiser to establish whether any reasonable adjustments or special
considerations have been identified for any candidates• All agreed reasonable adjustments or special considerations have been put in place• All candidate identification checks have been conducted• All candidates have read and understand rules of assessment• All candidate electronic devices such as tablets, mobile phones and smart watches should be
turned off or removed from view by the candidate• All candidates are advised of plagiarism and consequences involved
20

Generation 9 Edition 1 V2 December 2018
NPLQ GUIDANCE & SYLLABUS
3.15 Assessment Delivery - Commencing the Assessment The following should occur when the assessment commences: Briefing A briefing should be read out by the Assessor before assessment commences. It should include information about timings, candidate and casualty briefings, reminders about any special considerations and how the exam will be conducted. It is always important to ask candidates if they have any questions prior to the assessment commencing. An example is detailed below: “We are shortly going to commence the assessment and as your Assessor I will coordinate timings and keep you updated throughout the assessment process. If any candidates have any special considerations to be considered, then this is your final opportunity to raise them. Please can I remind all candidates that the assessment should be completed in exam conditions. At each stage of the assessment I will provide you with briefings about what to expect or what you are required to do. For practical assessment I will brief any casualties as well. Please could you let me know if you have any questions” TAs must remain professional at all times and try to build rapport with the candidates as this will help put the candidates at ease.
Assessment Area/Trainer Assessor • Only the Trainer, Assessor and the candidates should be in the area where the assessment is
being carried out • If other people are in the area for appropriate reasons, e.g. Internal or External Quality
Assurer, Mentor, Probationary Trainer Assessor they must not distract candidates or the Assessor during assessments
• The Assessor must remain vigilant at all times to ensure that candidates are not able to confer with others
The Candidate • If a candidate has been identified as requiring a reasonable adjustment or special
consideration they may be accompanied as necessary, but arrangements should be in place to avoid any collusion or distraction of other candidates
• Candidates must show proof of ID to the Assessor on arrival at assessment, candidates not providing ID will not be admitted to the assessment
• Candidates should be notified when each assessment section is commencing and that exam conditions apply and outline the timing arrangements where appropriate
Paperwork • Assessors (TAs) should open the assessment envelope and remove the assessment paperwork
(Theory Assessment - Question Sheet, Candidate Answer Sheet, - Assessor Mark Sheet) from the envelope
• For theory assessment, Assessors should hand out the Theory Assessment - Question Sheet and Candidate Answer Sheet and ask the candidates to complete the front page by inserting the relevant details and read the rules of assessment
• On completion of assessments, candidates are permitted to leave the area, candidates must ensure they do not disturb others still taking part in the assessment and must be advised they are not permitted re-entry
21

Generation 9 Edition 1 V2 December 2018
Practical assessments: • Candidates are required to follow instructions from the Assessor who will record their
assessment results on the Practical Assessment Record after cross referencing their skill with the corresponding TA Guidance
Theory assessment: • Candidates are required to follow instructions from the Assessor and the candidate will record
their answer on the Theory Assessment - Candidate Answer Sheet
22

Generation 9 Edition 1 V2 December 2018
NPLQ GUIDANCE & SYLLABUS
3.16 Assessment Delivery - Post Assessment Marking The following should occur when marking the assessment:
• For practical assessment, the Assessor should check the Practical Assessment Record to ensure that the record has been completed in full
• For theory assessment, the Assessor should cross reference the Candidate Answer Sheet with the corresponding Assessor Mark Sheet to check that the correct answer has been detailed
• The Assessor should mark the assessment and choose a pass/fail per section • Results should be entered onto the Candidate Answer Sheet along with a final result for the
qualification • The Assessor should check that all candidate names are on the assessment material, that the
candidates have signed the Candidate Answer Sheet and then the Assessor should sign the assessment material and complete any other required information
• The Assessor should give all completed assessment paperwork to the Trainer or the ATC/P Coordinator
The results from practical and theory assessment combine to form the overall candidate assessment result. Assessors are advised to provide verbal feedback for the assessment when both the theory and practical assessments have been completed. Assessors should complete the Assessment Form with the result of the entire assessment once verbal feedback has been given to candidates. Once the Assessment Form has been completed and verbal feedback has been given to the Candidate, the Trainer Assessor should ask the candidate to sign the Assessment Form. One copy of the Assessment Form should be given to:
• The candidate for their retention • The ATC Coordinator for retention at the assessment venue • The ATC to be sent to IQL for processing
If all candidates are unsuccessful then a report, completed by the Assessor, outlining the reasons behind this must be sent to IQL at [email protected] within 5 working days of the assessment.
23
Generation 9 Edition 1 V2 December 2018
3.17 Reassessment Opportunities All candidates must achieve the required pass mark within the qualification to gain the NPLQ. Where a candidate is unable to demonstrate the level of competence required the candidate will fail the section(s) and therefore the qualification. Candidates can complete a reassessment for the section(s) failed. All sections of the NPLQ must be successfully assessed within a 28-day period (including the first day of assessment). For Example, If on the 2nd January, a candidate is presented for assessment and is unsuccessful on any section, the candidate must be reassessed and successfully pass all 3 sections by the end of day on the 29th January. Before a reassessment, candidates should be given further instruction/training, this should be recorded on a Candidate Additional Training Record, found online via the RLSS Direct resource area here Candidates must only be reassessed on the practical and/or theory assessment of the relevant section(s) in which they were unsuccessful (within a 28-day period). Example 1: If candidate Thomas, fails the practical assessment in section 2, Thomas will need to be reassessed on the entire practical assessment for that section only (all skills). Thomas will not be required to complete the theory assessment paper again, providing he was previously successful. Example 2: If candidate Thomas, fails the theory assessment in section 3, Thomas will need to be reassessed on the entire theory assessment for that section only. Thomas will not be required to complete the practical assessment again, providing he was previously successful. The NPLQ should be delivered and assessed, including any reassessment within 2 years. Reassessment Opportunities for Candidates – Practical Assessment Practical reassessments must be conducted using a new Practical Assessment Record (appendix F). This can be found online via the RLSS Direct resource area here Reassessment Opportunities for Candidates – Theory Assessment Theory reassessments must be conducted using a new Theory Assessment - Question Sheet and Candidate Answer Sheet. This can be found in an envelope from RLSS Direct marked REASSESSMENT PAPERWORK, sent with the course assessment paperwork. Where more than one candidate from an assessment requires reassessment the reassessment paperwork can be photocopied for that course only.
24

Generation 9 Edition 1 V2 December 2018
NPLQ GUIDANCE & SYLLABUS
3.18 Practical Assessments – Guidance for Trainer Assessors (TAs)
The information in this section has been designed to be printed by Assessors and used to ensure the delivery of assessment is consistent and all assessment criteria is assessed. Clear and unambiguous pass/fail criteria is detailed per assessment criteria. Guidance for Assessors This section details the full criteria by which an Assessor must assess the practical assessment for each candidate for the NPLQ. Pass Criteria For each assessment the pass criteria are detailed on the Practical Assessment Record. It will indicate what should be passed, for example ‘the candidate must pass all areas in grey and not fail more than the specified number of white rows.’ Further Information The text, photos and videos outlining the correct skills can be found in the RLSS UK The Lifeguard publication and NPLQ TA resources, available on online through RLSS direct in the TA resource area. Collusion Those acting as casualties must not assist or collude with candidates throughout the assessments as this would risk invalidating the assessment activity. All casualties should be reminded of this. Practical skill attempts The candidate should be only given one attempt to demonstrate practical skills within the assessment. An Assessor may ask a candidate to repeat a practical skill where other pool users or the casualty have compromised the candidate’s ability to demonstrate the skill. Practical Assessment Records Practical Assessment Records can be found at Appendix F.
25
Generation 9 Edition 1 V2 December 2018
Practical Assessments Guidance for Assessors IQL Level 2 Award in Pool Lifeguarding, Intervention, Supervision and Rescue Section 2 - Intervention, Rescue and Emergency Action Plan Clothing for Section 2 Practical Assessments The candidate shall be dressed in poolside uniform throughout the water rescue skills section. Minimum poolside uniform is considered to be T-shirt and shorts (no trousers or tracksuit bottoms, tight shorts or vests). Considerations should be given to candidates with religious and cultural beliefs. Each candidate should have a whistle for the assessment, if a whistle is the means of communication. Sequence of Practical Assessment The practical assessment can take place in any order providing the guidance is followed. Please note some skills must be completed in immediate succession e.g. timed swims. Water Depth All swimming pools are not standard in terms of depth. Therefore, where the assessment guidance references ‘Shallow’ or ‘Deep’ water, the assessment should be attempted in these depths of pool. Where these depths are not available, the assessment should be undertaken in the most appropriate water depth available.
26
Generation 9 Edition 1 V2 December 2018
NPLQ GUIDANCE & SYLLABUS
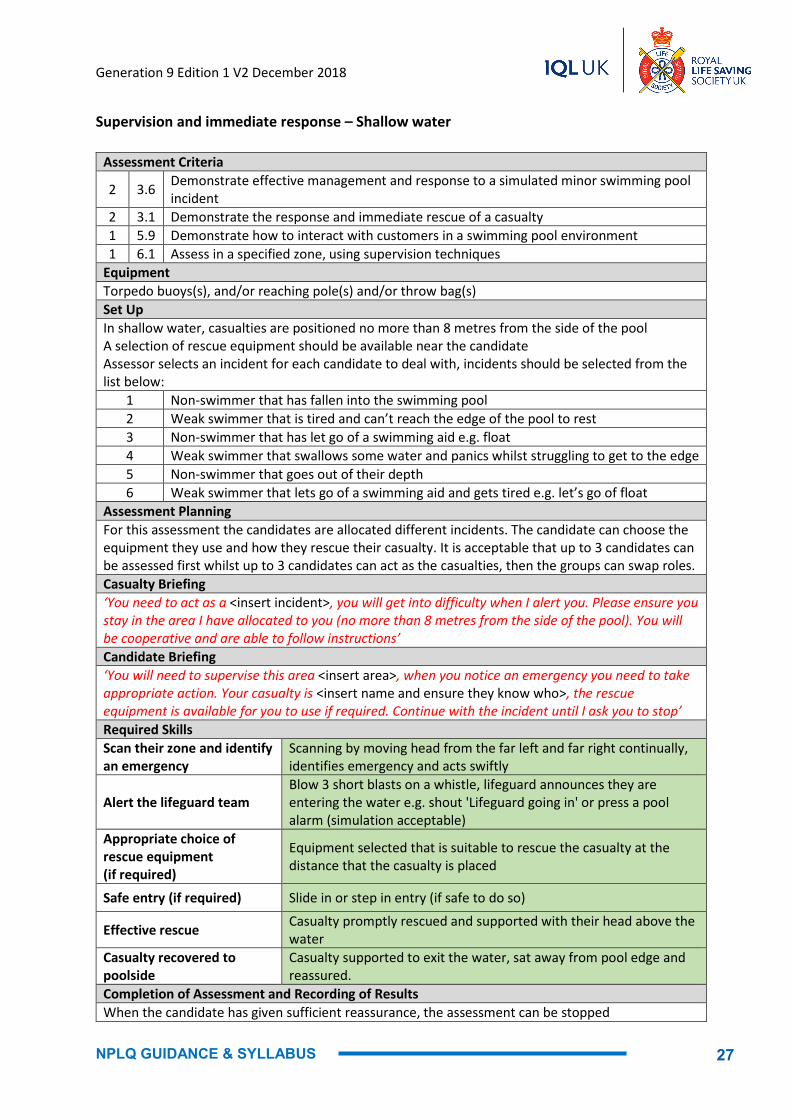
Supervision and immediate response – Shallow water
Assessment Criteria
2 3.6 Demonstrate effective management and response to a simulated minor swimming pool incident
2 3.1 Demonstrate the response and immediate rescue of a casualty 1 5.9 Demonstrate how to interact with customers in a swimming pool environment 1 6.1 Assess in a specified zone, using supervision techniques
Equipment Torpedo buoys(s), and/or reaching pole(s) and/or throw bag(s) Set Up In shallow water, casualties are positioned no more than 8 metres from the side of the pool A selection of rescue equipment should be available near the candidate Assessor selects an incident for each candidate to deal with, incidents should be selected from the list below:
1 Non-swimmer that has fallen into the swimming pool 2 Weak swimmer that is tired and can’t reach the edge of the pool to rest 3 Non-swimmer that has let go of a swimming aid e.g. float 4 Weak swimmer that swallows some water and panics whilst struggling to get to the edge 5 Non-swimmer that goes out of their depth 6 Weak swimmer that lets go of a swimming aid and gets tired e.g. let’s go of float
Assessment Planning For this assessment the candidates are allocated different incidents. The candidate can choose the equipment they use and how they rescue their casualty. It is acceptable that up to 3 candidates can be assessed first whilst up to 3 candidates can act as the casualties, then the groups can swap roles. Casualty Briefing ‘You need to act as a <insert incident>, you will get into difficulty when I alert you. Please ensure you stay in the area I have allocated to you (no more than 8 metres from the side of the pool). You will be cooperative and are able to follow instructions’ Candidate Briefing ‘You will need to supervise this area <insert area>, when you notice an emergency you need to take appropriate action. Your casualty is <insert name and ensure they know who>, the rescue equipment is available for you to use if required. Continue with the incident until I ask you to stop’ Required Skills Scan their zone and identify an emergency
Scanning by moving head from the far left and far right continually, identifies emergency and acts swiftly
Alert the lifeguard team Blow 3 short blasts on a whistle, lifeguard announces they are entering the water e.g. shout 'Lifeguard going in' or press a pool alarm (simulation acceptable)
Appropriate choice of rescue equipment (if required)
Equipment selected that is suitable to rescue the casualty at the distance that the casualty is placed
Safe entry (if required) Slide in or step in entry (if safe to do so)
Effective rescue Casualty promptly rescued and supported with their head above the water
Casualty recovered to poolside
Casualty supported to exit the water, sat away from pool edge and reassured.
Completion of Assessment and Recording of Results When the candidate has given sufficient reassurance, the assessment can be stopped
27

Generation 9 Edition 1 V2 December 2018
Defensive Block
Assessment Criteria 2 3.5 Demonstrate a defensive block Equipment Torpedo buoy(s) where available Set Up In shallow or deep water, casualties no more than 5 metres from the side of the pool Torpedo buoy where available, should be given to the candidate Assessment Planning It is acceptable that up to 3 candidates can be assessed first whilst up to 3 candidates can act as the casualties and then the groups can swap roles Casualty Briefing ‘You need to act as a weak/non- swimmer who is panicking and gets into difficulty. When the lifeguard approaches to rescue you, please panic and attempt to grab them’ Candidate Briefing ‘Your casualty <insert name and ensure they know who>, are in distress, they will panic and attempt to grab you. Please demonstrate a defensive block <insert with torpedo buoy if a torpedo buoy is available >and continue until I ask you to stop’ Required Skills
Alert the lifeguard team Blow 3 short blasts on a whistle, lifeguard announces they are entering the water e.g. shout 'Lifeguard going in' or press a pool alarm (simulation acceptable)
Safe entry Slide in or step in entry (if safe to do so)
Approach casualty and use a defensive block
With a Torpedo buoy- use both hands to push the torpedo buoy into the casualty’s chest to block the casualty from getting hold of them OR Without a Torpedo buoy- Submerge under the water and push the casualty away using their arms or legs.
Give reassurance Move to a safe distance, talk to the casualty and give reassurance Completion of Assessment and Recording of Results When the candidate has given sufficient reassurance, the assessment can be stopped
28

Generation 9 Edition 1 V2 December 2018
NPLQ GUIDANCE & SYLLABUS
Contact rescue – Deep water
Assessment Criteria
2 3.6 Demonstrate effective management and response to a simulated minor swimming pool incident
2 3.2 Demonstrate how to rescue a conscious casualty using a contact tow Equipment None Set Up In deep water, casualties approximately 5 metres to a point of safety Assessor selects an incident for each candidate to deal with, incidents should be selected from the list below:
1 Weak swimmer that has fallen into deep water 2 Weak swimmer that can’t reach the edge of the pool to rest and is panicking 3 Non-swimmer that has let go of equipment that was supporting them in deep water 4 Weak swimmer that goes out of their depth 5 Weak swimmer that lets go of the side of the pool and doesn’t realise the water is deep 6 Non-swimmer that has fallen into deep water
Assessment Planning For this assessment the candidates are allocated different incidents It is acceptable that up to 3 candidates can be assessed first whilst up to 3 candidates can act as the casualties and then the groups can swap roles The candidate can choose the support tow they use to rescue their casualty They do not need to return to the start point with the casualty Casualty Briefing ‘You need to act as a <insert incident> who is panicking and gets into difficulty. When the lifeguard approaches and applies a tow, you will relax and be cooperative’ Candidate Briefing ‘You need to deal with an incident that will evolve, your casualty is <insert name and ensure they know who>, please select an appropriate contact tow and continue with the incident until I ask you to stop’ Required Skills
Alert the lifeguard team Blow 3 short blasts on a whistle, lifeguard announces they are entering the water e.g. shout 'Lifeguard going in' or press a pool alarm (simulation acceptable)
Safe entry Slide in or straddle entry (if safe to do so)
Effective support and tow Casualty swiftly rescued and effective support and tow given over a distance of 5 metres
Casualty secure at poolside
Casualty supported in the water at poolside, reassurance given by candidate
Completion of Assessment and Recording of Results When the candidate has the casualty securely at the edge of the pool, the assessment can be stopped
29
Generation 9 Edition 1 V2 December 2018
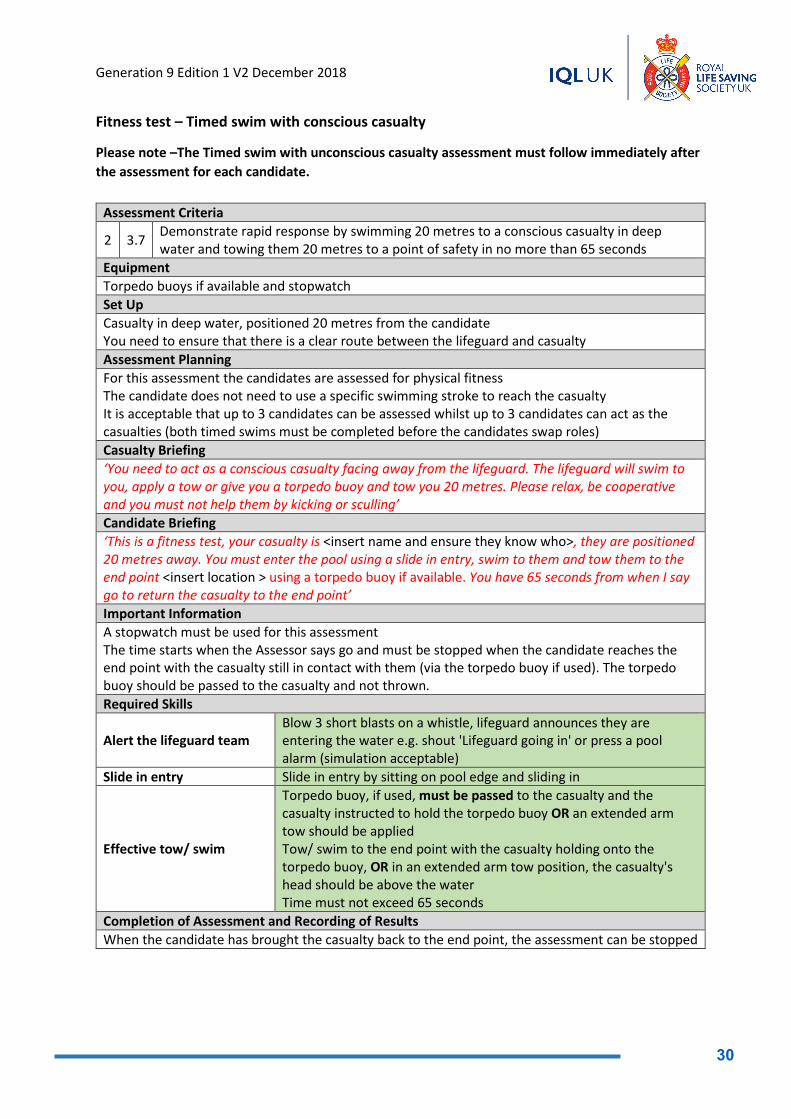
Fitness test – Timed swim with conscious casualty
Please note –The Timed swim with unconscious casualty assessment must follow immediately after the assessment for each candidate.
Assessment Criteria
2 3.7 Demonstrate rapid response by swimming 20 metres to a conscious casualty in deep water and towing them 20 metres to a point of safety in no more than 65 seconds
Equipment Torpedo buoys if available and stopwatch Set Up Casualty in deep water, positioned 20 metres from the candidate You need to ensure that there is a clear route between the lifeguard and casualty Assessment Planning For this assessment the candidates are assessed for physical fitness The candidate does not need to use a specific swimming stroke to reach the casualty It is acceptable that up to 3 candidates can be assessed whilst up to 3 candidates can act as the casualties (both timed swims must be completed before the candidates swap roles) Casualty Briefing ‘You need to act as a conscious casualty facing away from the lifeguard. The lifeguard will swim to you, apply a tow or give you a torpedo buoy and tow you 20 metres. Please relax, be cooperative and you must not help them by kicking or sculling’ Candidate Briefing ‘This is a fitness test, your casualty is <insert name and ensure they know who>, they are positioned 20 metres away. You must enter the pool using a slide in entry, swim to them and tow them to the end point <insert location > using a torpedo buoy if available. You have 65 seconds from when I say go to return the casualty to the end point’ Important Information A stopwatch must be used for this assessment The time starts when the Assessor says go and must be stopped when the candidate reaches the end point with the casualty still in contact with them (via the torpedo buoy if used). The torpedo buoy should be passed to the casualty and not thrown. Required Skills
Alert the lifeguard team Blow 3 short blasts on a whistle, lifeguard announces they are entering the water e.g. shout 'Lifeguard going in' or press a pool alarm (simulation acceptable)
Slide in entry Slide in entry by sitting on pool edge and sliding in
Effective tow/ swim
Torpedo buoy, if used, must be passed to the casualty and the casualty instructed to hold the torpedo buoy OR an extended arm tow should be applied Tow/ swim to the end point with the casualty holding onto the torpedo buoy, OR in an extended arm tow position, the casualty's head should be above the water Time must not exceed 65 seconds
Completion of Assessment and Recording of Results When the candidate has brought the casualty back to the end point, the assessment can be stopped
30

Generation 9 Edition 1 V2 December 2018
NPLQ GUIDANCE & SYLLABUS
Fitness test – Timed swim with unconscious casualty
Assessment Criteria 2 3.8 Demonstrate rapid response by swimming 20 metres to an unconscious casualty and
towing them 10 metres to a point of safety in no more than 45 seconds Equipment Stopwatch Set Up Casualty in deep water, positioned 20 metres from the candidate You need to ensure that there is a clear route between the lifeguard and casualty Assessment Planning For this assessment the candidates are assessed for physical fitness The candidate does not need to use a specific swimming stroke to reach the casualty It is acceptable that up to 3 candidates can be assessed whilst up to 3 candidates can act as the casualties Casualty Briefing ‘You need to act as an unconscious casualty. As the lifeguard approaches you please float face down in the water facing them. The lifeguard will turn you over, apply a tow and tow you 10 metres. Please relax and you must not help them by kicking or sculling’ Candidate Briefing ‘This is a fitness test, your casualty is <insert name and ensure they know who>, they are positioned 20 metres away and will be unconscious. You must enter the pool using a slide in entry, swim to them, turn them over and tow them 10 metres to <insert location>. You have 45 seconds from when I say go to return the casualty to the end point’ Important Information A stopwatch must be used for this assessment The time starts when the Assessor says go and must be stopped when the candidate reaches the end point (10 metre marker) with the casualty still in contact with them The test should immediately follow the timed swim rescue for a conscious casualty. The only rest period allowed is the time required to brief the candidates and casualties Required Skills
Alert the lifeguard team Blow 3 short blasts on a whistle, lifeguard announces they are entering the water e.g. shout 'Lifeguard going in' or press a pool alarm (simulation acceptable)
Slide in entry Slide in entry by sitting on pool edge and sliding in
Safe roll of casualty Casualty turned from face down to face up swiftly without delay, by pushing one shoulder down and raising the other shoulder in one continuous movement.
Effective tow Casualty's head should be above the water and time must not exceed 45 seconds
Completion of Assessment and Recording of Results When the candidate has brought the casualty back to the end point, the assessment can be stopped
31

Generation 9 Edition 1 V2 December 2018
Deep water recovery
Assessment Criteria 2 3.9 Demonstrate retrieving a submersible manikin from the pool floor 2 3.10 Demonstrate rescue breathing in the water
2 3.13
Demonstrate removing an unconscious adult casualty from the pool with the assisted lift technique using safe manual handling techniques
3 3.2 Demonstrate how to turn an unconscious casualty onto their back 3 3.3 Demonstrate action for regurgitation 3 3.1 Justify when to place a casualty into the recovery position 3 3.4 Demonstrate how to put a casualty into the recovery position Equipment Submersible manikin Set Up The submersible manikin should be placed in the bottom of the deepest part of the pool It should be placed away from the sides of the pool Casualty in deep water, positioned at least 5 metres from the side of the pool There should be sufficient space on poolside to allow the casualty to be lifted out, turned around, turned over and placed in the recovery position. Assessment Planning For this assessment the candidates will complete the assessment one at a time. The Assessor should manage the assessment so that other candidates are not unduly influenced Casualty Briefing ‘You need to act as an unconscious casualty. As the lifeguard approaches you please float face down in the water facing them. The lifeguard will turn you over, apply a tow and tow you to the side. You will be supported in the water at the pool edge. 2 lifeguards will lift you out, turn you around and turn you over. Please relax throughout’ Candidate Briefing ‘You must enter the pool using a safe entry, retrieve the manikin and bring it to the surface. The manikin MUST be retrieved to the surface on the first attempt You should be aware that there may be a risk of damage to your hearing by diving to depths greater than 1.5 metres. All dives are undertaken at your own risk Exchange the manikin for the casualty <insert name and ensure they know who> and bring them to the side and take the appropriate action whilst waiting for your team. When the team arrive, the casualty will need to be removed from the pool and you will need to continue with the incident until I ask you to stop’ Important Information The manikin MUST be retrieved from the deepest part of the pool where the assessment is being conducted. If there is a separate diving pit the candidate may undertake the depth assessment in either the diving pit (subject to appropriate training provision) or main pool Single person lifts are NOT permitted
32

Generation 9 Edition 1 V2 December 2018
NPLQ GUIDANCE & SYLLABUS
Deep water recovery cont…
Required Skills
Alert the lifeguard team Blow 3 short blasts on a whistle, lifeguard announces they are entering the water e.g. shout 'Lifeguard going in' or press a pool alarm (simulation acceptable)
Safe entry Slide in for shallow water. Slide in or straddle for deep water. Deep dive is permitted for pools where pool depths and rules permit
Recover manikin on first attempt
Swim down to the bottom of the pool, collect the manikin and bring it to the surface
Safe roll of live casualty
Casualty turned from face down to face up swiftly without delay, by pushing one shoulder down and raising the other shoulder in one continuous movement. Support their back and chin as they move into a towing position
Safe and effective tow to point of support
Casualty towed to poolside and supported, the casualties face must be above the water
Check breathing Look, listen and feel for normal breathing for no more than 10 seconds
Give rescue breaths in the water
Give rescue breaths through the nose holding the mouth shut (this is simulated)
Support casualty to allow lifeguard to get out of the pool
Crouch on poolside in front of the casualty, take hold of their wrist to keep the casualty in place, put one hand under their chin to keep their head above the water
Lift the casualty from the water and lay them on poolside
2 candidates should hold the casualty under the arms, lift casualty until hips/waist are level with top of pool edge, 1 candidate should support head with one hand during the lift Bend the casualty at the waist and gently lower on to poolside, head must be supported Keep the casualty’s arms straight and their head rested on their arms
Move the casualty parallel with the pool
By lifting their legs, carefully move the casualty round to lie parallel to the poolside. Both legs can usually be lifted together, however for heavy casualties, one leg at a time may be safe (this may require a lifeguard to be in the water)
Safe turn of casualty into face up position
Kneel by the casualty’s side, turn head away from you, place arm nearest you above head Grasp the casualty’s far shoulder and far wrist to their hip Roll the casualty against your thighs and then lower onto their back whilst supporting head, place casualty’s arm by their side
Open airway using head tilt - chin lift
Place hand on the forehead and gently tilt the head back; with fingertips under the point of the casualty's chin, lift the chin to open the airway
Check breathing Look, listen and feel for normal breathing for no more than 10 seconds
Ensure an ambulance is called and an AED is requested
Ask someone to call an ambulance (999/112) / or call an ambulance and send someone to get an AED if one is available
Give 5 rescue breaths Hold the nose and simulate 5 rescue breaths
33

Generation 9 Edition 1 V2 December 2018
Deep water recovery cont…
Action for regurgitation Turn the casualty rapidly, supporting the head to ensure that stomach contents run out of the mouth
Casualty's arm out Place the casualty's arm nearest to them out with elbow bent and the hand palm-up
Arm across and support head
Bring the casualty's far arm across the chest, and hold the back of the casualty's hand against the casualty's cheek nearest to them
Grasp the knee and pull up
Use their other hand, grasp the far leg just above the knee and pull it up, keeping the foot on the ground
Roll the casualty over Keep the casualty's hand pressed against the casualty's cheek, pull on the far leg to roll the casualty towards them onto the casualty's side
Adjust the upper leg Move the upper leg so that both the hip and knee are bent at right angles
Open airway Tilt the head back to make sure that the airway remains open, if required adjust the upper body to maintain an airway
Check breathing Look, listen and feel for normal breathing for no more than 10 seconds
Completion of Assessment and Recording of Results When the candidate has been put into the recovery position the assessment can be stopped
34
Generation 9 Edition 1 V2 December 2018
NPLQ GUIDANCE & SYLLABUS
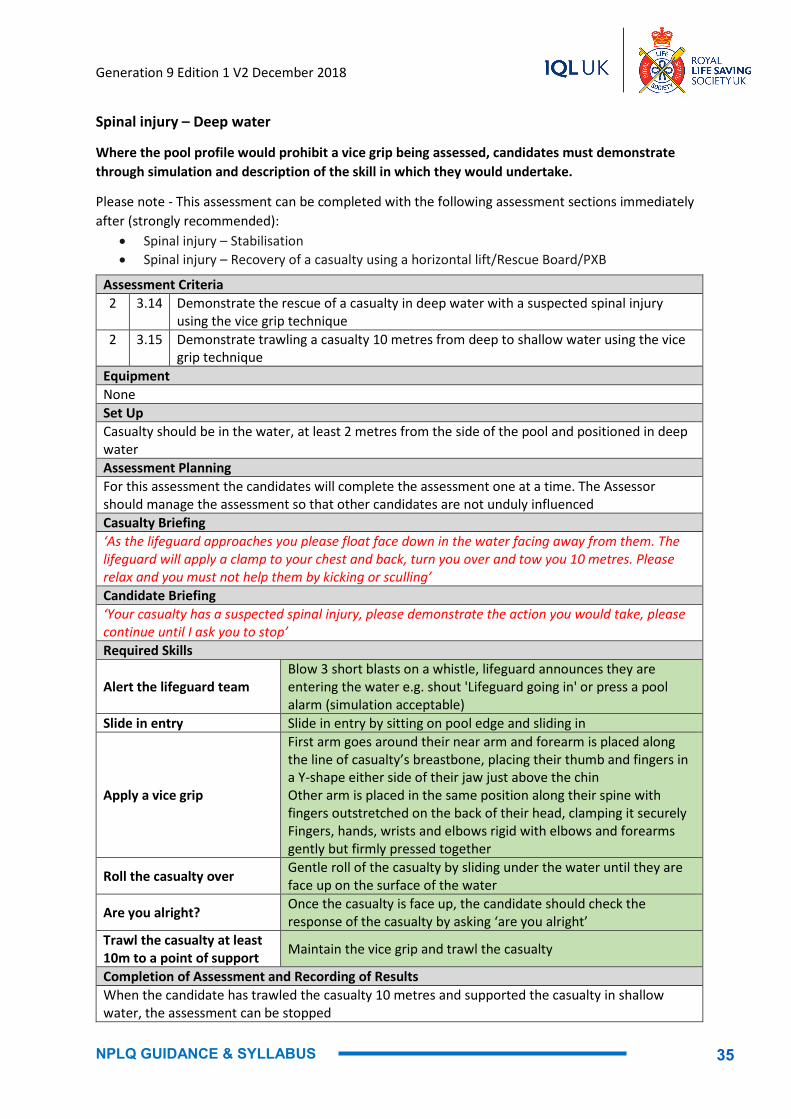
Spinal injury – Deep water
Where the pool profile would prohibit a vice grip being assessed, candidates must demonstrate through simulation and description of the skill in which they would undertake.
Please note - This assessment can be completed with the following assessment sections immediately after (strongly recommended):
• Spinal injury – Stabilisation • Spinal injury – Recovery of a casualty using a horizontal lift/Rescue Board/PXB
Assessment Criteria 2 3.14 Demonstrate the rescue of a casualty in deep water with a suspected spinal injury
using the vice grip technique 2 3.15 Demonstrate trawling a casualty 10 metres from deep to shallow water using the vice
grip technique Equipment None Set Up Casualty should be in the water, at least 2 metres from the side of the pool and positioned in deep water Assessment Planning For this assessment the candidates will complete the assessment one at a time. The Assessor should manage the assessment so that other candidates are not unduly influenced Casualty Briefing ‘As the lifeguard approaches you please float face down in the water facing away from them. The lifeguard will apply a clamp to your chest and back, turn you over and tow you 10 metres. Please relax and you must not help them by kicking or sculling’ Candidate Briefing ‘Your casualty has a suspected spinal injury, please demonstrate the action you would take, please continue until I ask you to stop’ Required Skills
Alert the lifeguard team Blow 3 short blasts on a whistle, lifeguard announces they are entering the water e.g. shout 'Lifeguard going in' or press a pool alarm (simulation acceptable)
Slide in entry Slide in entry by sitting on pool edge and sliding in
Apply a vice grip
First arm goes around their near arm and forearm is placed along the line of casualty’s breastbone, placing their thumb and fingers in a Y-shape either side of their jaw just above the chin Other arm is placed in the same position along their spine with fingers outstretched on the back of their head, clamping it securely Fingers, hands, wrists and elbows rigid with elbows and forearms gently but firmly pressed together
Roll the casualty over Gentle roll of the casualty by sliding under the water until they are face up on the surface of the water
Are you alright? Once the casualty is face up, the candidate should check the response of the casualty by asking ‘are you alright’
Trawl the casualty at least 10m to a point of support Maintain the vice grip and trawl the casualty
Completion of Assessment and Recording of Results When the candidate has trawled the casualty 10 metres and supported the casualty in shallow water, the assessment can be stopped
35

Generation 9 Edition 1 V2 December 2018
Spinal injury – Shallow water
Where the pool profile would prohibit a head splint being assessed, candidates must demonstrate through simulation and description of the skill in which they would undertake.
Please note - This assessment can be completed with one of the following assessment sections immediately after (strongly recommended):
• Spinal injury – Stabilisation • Spinal injury – Recovery of a casualty using a horizontal lift/Rescue Board/ PXB
Assessment Criteria
2 3.16 Demonstrate the rescue of a casualty in shallow water with a suspected spinal injury using the head splint technique
Equipment None Set Up Casualty should be in the water, at least 2 metres from the side of the pool and positioned in shallow water Assessment Planning For this assessment the candidates will complete the assessment one at a time. The Assessor should manage the assessment so that other candidates are not unduly influenced Casualty Briefing ‘As the lifeguard approaches you please float face down in the water facing away from them. The lifeguard will apply a clamp to your arms and head, turn you over and support you in the water. Please relax throughout’ Candidate Briefing ‘Your casualty has a suspected spinal injury, please demonstrate the action you would take, please continue until I ask you to stop’ Required Skills
Alert the lifeguard team Blow 3 short blasts on a whistle, lifeguard announces they are entering the water e.g. shout 'Lifeguard going in' or press a pool alarm (simulation acceptable)
Slide in entry Slide in entry by sitting on pool edge and sliding in
Apply a head splint
Gently grasp the casualty’s arms midway between the casualty’s elbows and shoulders Move their arms in a smooth sweeping action to a position next to the ears, squeeze their arms against their head to splint the head between both arms to prevent movement Position their thumbs on the back of their head, maintaining the pressure on the arms
Roll the casualty over Gently roll the casualty towards them by pushing the arm nearest to them downwards and pulling on the arm furthest away towards them(no twisting of the casualty)
Are you alright? Once the casualty is face up, the candidate should check the response of the casualty by asking ‘are you alright’
Support the casualty Maintain the head splint Completion of Assessment and Recording of Results When the candidate has supported the casualty, the assessment can be stopped
36
Generation 9 Edition 1 V2 December 2018
NPLQ GUIDANCE & SYLLABUS
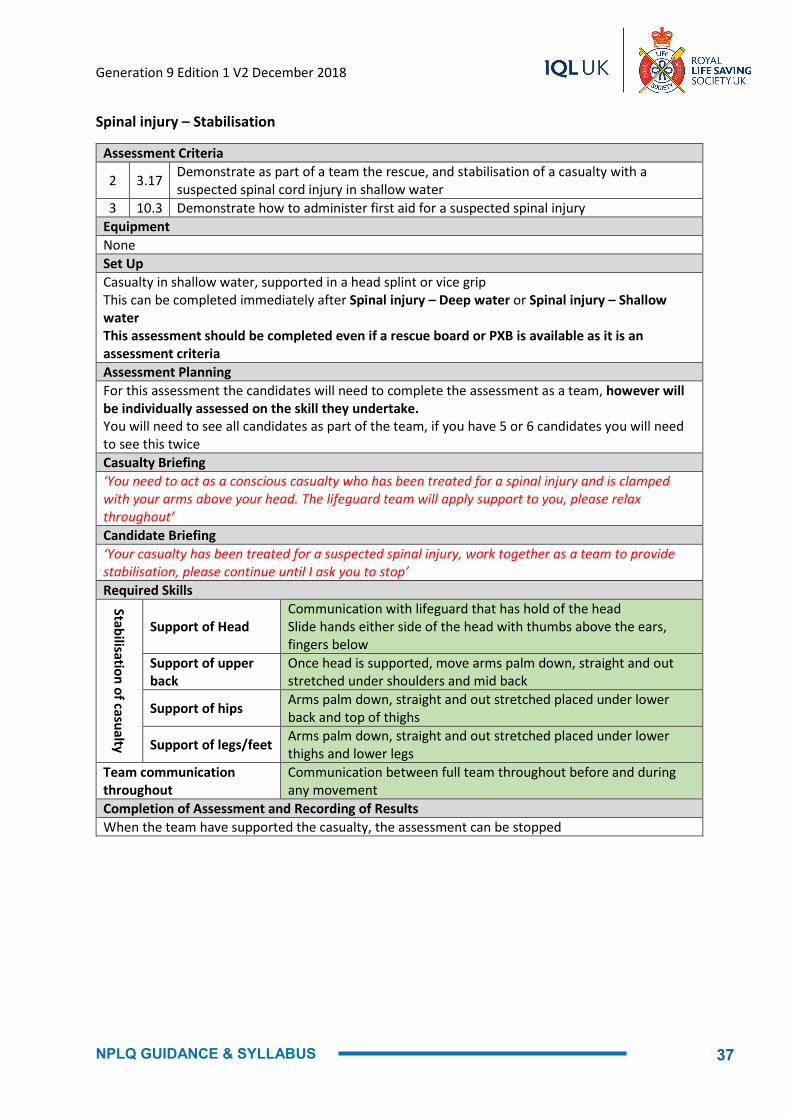
Spinal injury – Stabilisation
Assessment Criteria
2 3.17 Demonstrate as part of a team the rescue, and stabilisation of a casualty with a suspected spinal cord injury in shallow water
3 10.3 Demonstrate how to administer first aid for a suspected spinal injury Equipment None Set Up Casualty in shallow water, supported in a head splint or vice grip This can be completed immediately after Spinal injury – Deep water or Spinal injury – Shallow water This assessment should be completed even if a rescue board or PXB is available as it is an assessment criteria Assessment Planning For this assessment the candidates will need to complete the assessment as a team, however will be individually assessed on the skill they undertake. You will need to see all candidates as part of the team, if you have 5 or 6 candidates you will need to see this twice Casualty Briefing ‘You need to act as a conscious casualty who has been treated for a spinal injury and is clamped with your arms above your head. The lifeguard team will apply support to you, please relax throughout’ Candidate Briefing ‘Your casualty has been treated for a suspected spinal injury, work together as a team to provide stabilisation, please continue until I ask you to stop’ Required Skills
Stabilisation of casualty
Support of Head Communication with lifeguard that has hold of the head Slide hands either side of the head with thumbs above the ears, fingers below
Support of upper back
Once head is supported, move arms palm down, straight and out stretched under shoulders and mid back
Support of hips Arms palm down, straight and out stretched placed under lower back and top of thighs
Support of legs/feet Arms palm down, straight and out stretched placed under lower thighs and lower legs
Team communication throughout
Communication between full team throughout before and during any movement
Completion of Assessment and Recording of Results When the team have supported the casualty, the assessment can be stopped
37
Generation 9 Edition 1 V2 December 2018
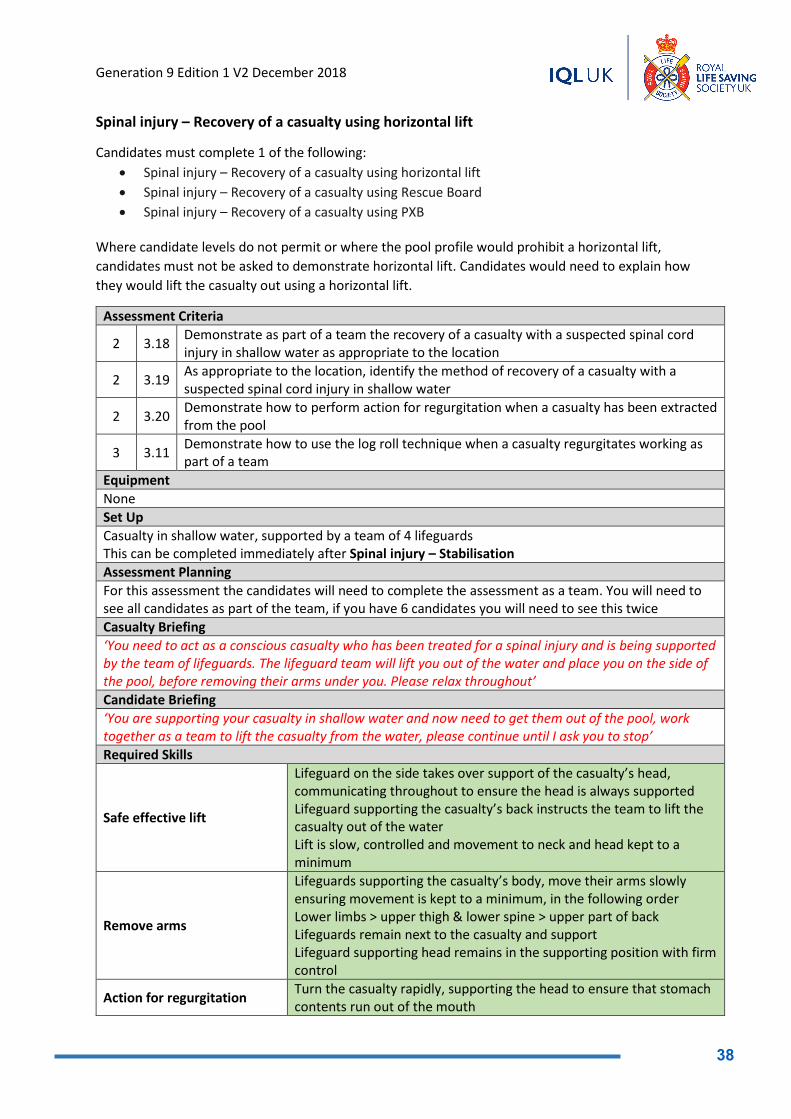
Spinal injury – Recovery of a casualty using horizontal lift
Candidates must complete 1 of the following: • Spinal injury – Recovery of a casualty using horizontal lift • Spinal injury – Recovery of a casualty using Rescue Board • Spinal injury – Recovery of a casualty using PXB
Where candidate levels do not permit or where the pool profile would prohibit a horizontal lift, candidates must not be asked to demonstrate horizontal lift. Candidates would need to explain how they would lift the casualty out using a horizontal lift.
Assessment Criteria
2 3.18 Demonstrate as part of a team the recovery of a casualty with a suspected spinal cord injury in shallow water as appropriate to the location
2 3.19 As appropriate to the location, identify the method of recovery of a casualty with a suspected spinal cord injury in shallow water
2 3.20 Demonstrate how to perform action for regurgitation when a casualty has been extracted from the pool
3 3.11 Demonstrate how to use the log roll technique when a casualty regurgitates working as part of a team
Equipment None Set Up Casualty in shallow water, supported by a team of 4 lifeguards This can be completed immediately after Spinal injury – Stabilisation Assessment Planning For this assessment the candidates will need to complete the assessment as a team. You will need to see all candidates as part of the team, if you have 6 candidates you will need to see this twice Casualty Briefing ‘You need to act as a conscious casualty who has been treated for a spinal injury and is being supported by the team of lifeguards. The lifeguard team will lift you out of the water and place you on the side of the pool, before removing their arms under you. Please relax throughout’ Candidate Briefing ‘You are supporting your casualty in shallow water and now need to get them out of the pool, work together as a team to lift the casualty from the water, please continue until I ask you to stop’ Required Skills
Safe effective lift
Lifeguard on the side takes over support of the casualty’s head, communicating throughout to ensure the head is always supported Lifeguard supporting the casualty’s back instructs the team to lift the casualty out of the water Lift is slow, controlled and movement to neck and head kept to a minimum
Remove arms
Lifeguards supporting the casualty’s body, move their arms slowly ensuring movement is kept to a minimum, in the following order Lower limbs > upper thigh & lower spine > upper part of back Lifeguards remain next to the casualty and support Lifeguard supporting head remains in the supporting position with firm control
Action for regurgitation Turn the casualty rapidly, supporting the head to ensure that stomach contents run out of the mouth
38
Generation 9 Edition 1 V2 December 2018
NPLQ GUIDANCE & SYLLABUS
Spinal injury – Recovery of a casualty using horizontal lift cont……
Team communication throughout
Communication between full team throughout before and during any movement
Completion of Assessment and Recording of Results When the team have performed action for regurgitation, the assessment can be stopped
39
Generation 9 Edition 1 V2 December 2018
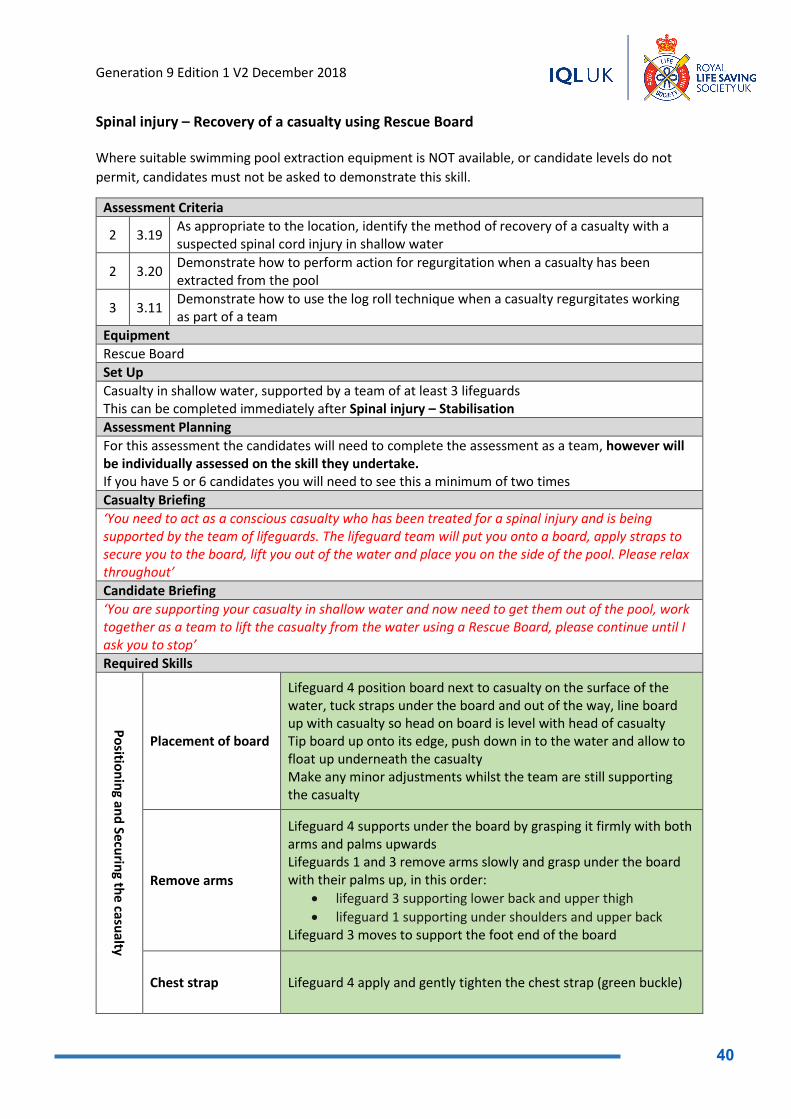
Spinal injury – Recovery of a casualty using Rescue Board
Where suitable swimming pool extraction equipment is NOT available, or candidate levels do not permit, candidates must not be asked to demonstrate this skill.
Assessment Criteria
2 3.19 As appropriate to the location, identify the method of recovery of a casualty with a suspected spinal cord injury in shallow water
2 3.20 Demonstrate how to perform action for regurgitation when a casualty has been extracted from the pool
3 3.11 Demonstrate how to use the log roll technique when a casualty regurgitates working as part of a team
Equipment Rescue Board Set Up Casualty in shallow water, supported by a team of at least 3 lifeguards This can be completed immediately after Spinal injury – Stabilisation Assessment Planning For this assessment the candidates will need to complete the assessment as a team, however will be individually assessed on the skill they undertake. If you have 5 or 6 candidates you will need to see this a minimum of two times Casualty Briefing ‘You need to act as a conscious casualty who has been treated for a spinal injury and is being supported by the team of lifeguards. The lifeguard team will put you onto a board, apply straps to secure you to the board, lift you out of the water and place you on the side of the pool. Please relax throughout’ Candidate Briefing ‘You are supporting your casualty in shallow water and now need to get them out of the pool, work together as a team to lift the casualty from the water using a Rescue Board, please continue until I ask you to stop’ Required Skills
Positioning and Securing the casualty
Placement of board
Lifeguard 4 position board next to casualty on the surface of the water, tuck straps under the board and out of the way, line board up with casualty so head on board is level with head of casualty Tip board up onto its edge, push down in to the water and allow to float up underneath the casualty Make any minor adjustments whilst the team are still supporting the casualty
Remove arms
Lifeguard 4 supports under the board by grasping it firmly with both arms and palms upwards Lifeguards 1 and 3 remove arms slowly and grasp under the board with their palms up, in this order:
• lifeguard 3 supporting lower back and upper thigh • lifeguard 1 supporting under shoulders and upper back
Lifeguard 3 moves to support the foot end of the board
Chest strap Lifeguard 4 apply and gently tighten the chest strap (green buckle)
40

Generation 9 Edition 1 V2 December 2018
NPLQ GUIDANCE & SYLLABUS
Spinal injury – Recovery of a casualty using Rescue Board cont…..
Positioning and Securing the casualty
Head strap
Lifeguard 3 push down gently on the board to bring the board to the casualty’s head (if required) Lifeguard 4 support casualty’s head using hand nearest casualty’s feet on casualty’s head covering eyebrows Lifeguard 2 let go of casualty’s head and hold onto board Lifeguard 4 place head strap onto casualty’s forehead, hold in place and use other hand to tighten straps
Complete strapping
Apply and tighten straps in this order: • Blue • Orange • Black
White (if required)
Safe lift onto poolside
Lifeguards equally spaced around the board (one lifeguard at the foot end) Place the head end of the board at right angles to the poolside Lift the board on poolside and gently slide the board fully onto poolside
Action for regurgitation Turn the casualty rapidly, supporting the head to ensure that stomach contents run out of the mouth
Team communication throughout
Communication between full team throughout before and during any movement
Completion of Assessment and Recording of Results When the team have performed action for regurgitation, the assessment can be stopped
41
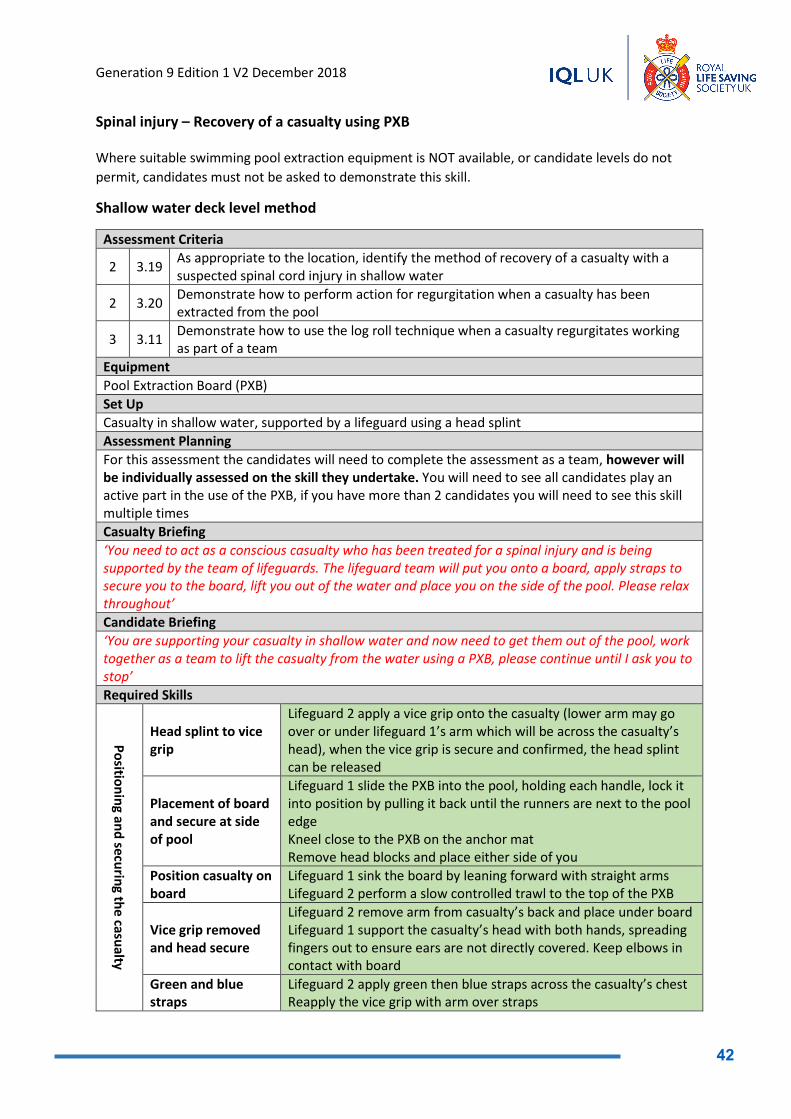
Generation 9 Edition 1 V2 December 2018
Spinal injury – Recovery of a casualty using PXB
Where suitable swimming pool extraction equipment is NOT available, or candidate levels do not permit, candidates must not be asked to demonstrate this skill.
Shallow water deck level method
Assessment Criteria
2 3.19 As appropriate to the location, identify the method of recovery of a casualty with a suspected spinal cord injury in shallow water
2 3.20 Demonstrate how to perform action for regurgitation when a casualty has been extracted from the pool
3 3.11 Demonstrate how to use the log roll technique when a casualty regurgitates working as part of a team
Equipment Pool Extraction Board (PXB) Set Up Casualty in shallow water, supported by a lifeguard using a head splint Assessment Planning For this assessment the candidates will need to complete the assessment as a team, however will be individually assessed on the skill they undertake. You will need to see all candidates play an active part in the use of the PXB, if you have more than 2 candidates you will need to see this skill multiple times Casualty Briefing ‘You need to act as a conscious casualty who has been treated for a spinal injury and is being supported by the team of lifeguards. The lifeguard team will put you onto a board, apply straps to secure you to the board, lift you out of the water and place you on the side of the pool. Please relax throughout’ Candidate Briefing ‘You are supporting your casualty in shallow water and now need to get them out of the pool, work together as a team to lift the casualty from the water using a PXB, please continue until I ask you to stop’ Required Skills
Positioning and securing the casualty
Head splint to vice grip
Lifeguard 2 apply a vice grip onto the casualty (lower arm may go over or under lifeguard 1’s arm which will be across the casualty’s head), when the vice grip is secure and confirmed, the head splint can be released
Placement of board and secure at side of pool
Lifeguard 1 slide the PXB into the pool, holding each handle, lock it into position by pulling it back until the runners are next to the pool edge Kneel close to the PXB on the anchor mat Remove head blocks and place either side of you
Position casualty on board
Lifeguard 1 sink the board by leaning forward with straight arms Lifeguard 2 perform a slow controlled trawl to the top of the PXB
Vice grip removed and head secure
Lifeguard 2 remove arm from casualty’s back and place under board Lifeguard 1 support the casualty’s head with both hands, spreading fingers out to ensure ears are not directly covered. Keep elbows in contact with board
Green and blue straps
Lifeguard 2 apply green then blue straps across the casualty’s chest Reapply the vice grip with arm over straps
42
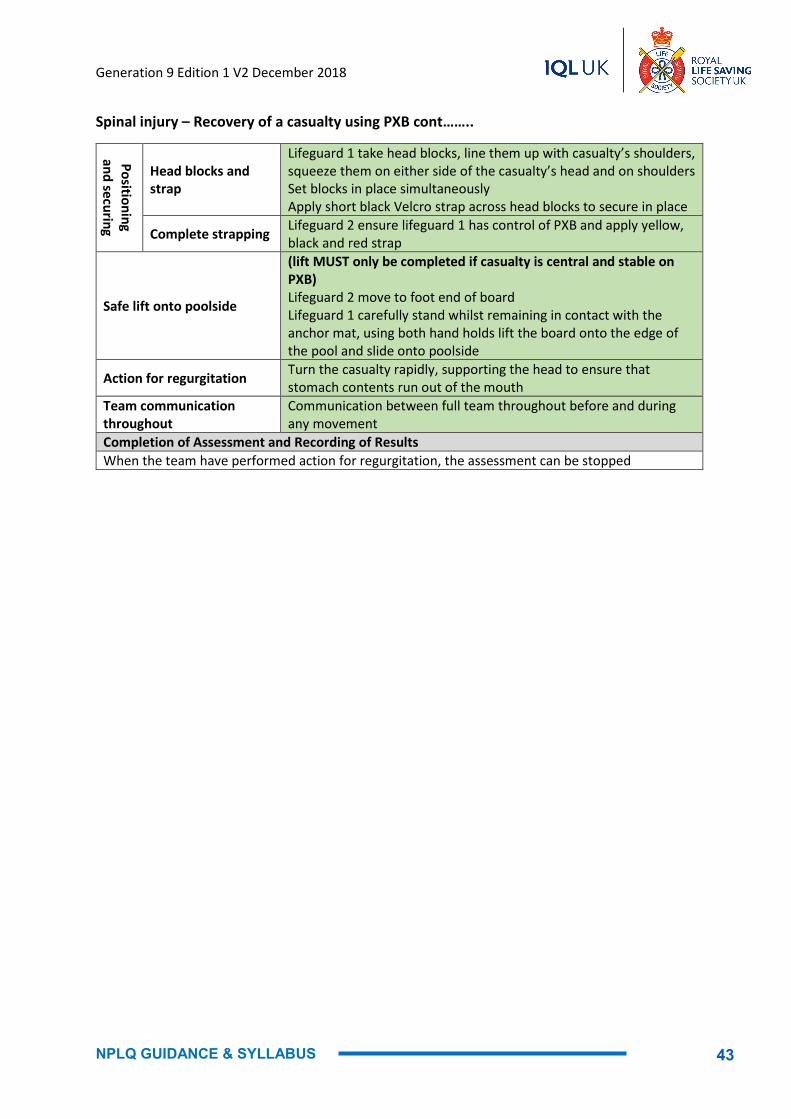
Generation 9 Edition 1 V2 December 2018
NPLQ GUIDANCE & SYLLABUS
Spinal injury – Recovery of a casualty using PXB cont……..
Positioning and securing
Head blocks and strap
Lifeguard 1 take head blocks, line them up with casualty’s shoulders, squeeze them on either side of the casualty’s head and on shoulders Set blocks in place simultaneously Apply short black Velcro strap across head blocks to secure in place
Complete strapping Lifeguard 2 ensure lifeguard 1 has control of PXB and apply yellow, black and red strap
Safe lift onto poolside
(lift MUST only be completed if casualty is central and stable on PXB) Lifeguard 2 move to foot end of board Lifeguard 1 carefully stand whilst remaining in contact with the anchor mat, using both hand holds lift the board onto the edge of the pool and slide onto poolside
Action for regurgitation Turn the casualty rapidly, supporting the head to ensure that stomach contents run out of the mouth
Team communication throughout
Communication between full team throughout before and during any movement
Completion of Assessment and Recording of Results When the team have performed action for regurgitation, the assessment can be stopped
43

Generation 9 Edition 1 V2 December 2018
Spinal injury – Recovery of a casualty using PXB
Where suitable swimming pool extraction equipment is NOT available, or candidate levels do not permit, candidates must not be asked to demonstrate this skill.
Shallow water freeboard method
Assessment Criteria
2 3.19 As appropriate to the location, identify the method of recovery of a casualty with a suspected spinal cord injury in shallow water
2 3.20 Demonstrate how to perform action for regurgitation when a casualty has been extracted from the pool
3 3.11 Demonstrate how to use the log roll technique when a casualty regurgitates working as part of a team
Equipment Pool Extraction Board (PXB) Set Up Casualty in shallow water, supported by a lifeguard using a head splint Assessment Planning For this assessment the candidates will need to complete the assessment as a team, however will be individually assessed on the skill they undertake. You will need to see all candidates play an active part in the use of the PXB, if you have more than 3 candidates you will need to see this skill multiple times. Casualty Briefing ‘You need to act as a conscious casualty who has been treated for a spinal injury and is being supported by the team of lifeguards. The lifeguard team will put you onto a board, apply straps to secure you to the board, lift you out of the water and place you on the side of the pool. Please relax throughout’ Candidate Briefing ‘You are supporting your casualty in shallow water and now need to get them out of the pool, work together as a team to lift the casualty from the water using a PXB, please continue until I ask you to stop’ Required Skills
Positioning and securing the casualty
Head splint to vice grip
Lifeguard 2 apply a vice grip onto the casualty (lower arm may go over or under lifeguard 1’s arm which will be across the casualty’s head), when vice grip is secure and confirmed, the head splint can be released
Placement of board and secure at side of pool
Lifeguard 3 place the PXB on the surface of the water, put the anchor mat over the edge of the pool and lie on the anchor mat Remove head blocks and place either side of you
Position casualty on board
Lifeguard 1 sink the board by pushing it down into the water Lifeguard 2 perform a slow controlled trawl to the top of the PXB so the casualty’s head is over the ‘HEAD’ text
Vice grip removed and head secure
Lifeguard 2 remove arm from casualty’s back and place under board Lifeguard 3 support the casualty’s head with both hands, spreading fingers out to ensure ears are not directly covered. Keep elbows in contact with board
Green and blue straps
Lifeguard 2 apply green then blue straps across the casualty’s chest Reapply the vice grip with arm over straps
44
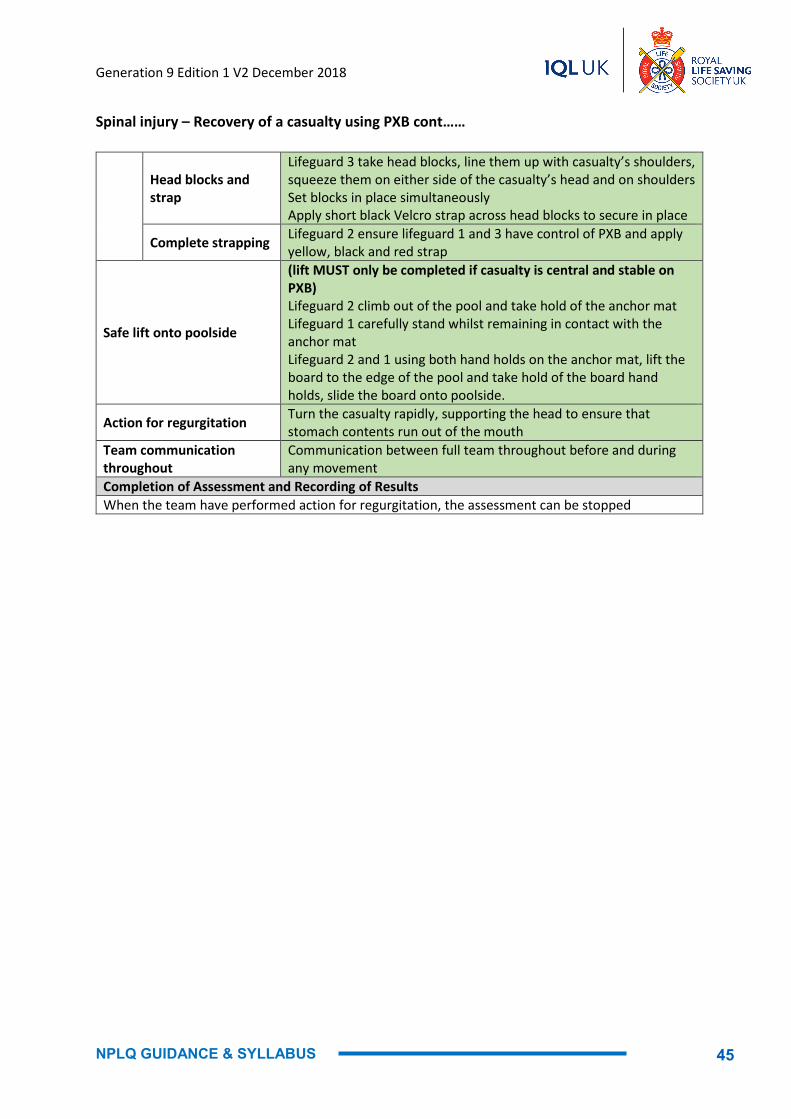
Generation 9 Edition 1 V2 December 2018
NPLQ GUIDANCE & SYLLABUS
Spinal injury – Recovery of a casualty using PXB cont……
Head blocks and strap
Lifeguard 3 take head blocks, line them up with casualty’s shoulders, squeeze them on either side of the casualty’s head and on shoulders Set blocks in place simultaneously Apply short black Velcro strap across head blocks to secure in place
Complete strapping Lifeguard 2 ensure lifeguard 1 and 3 have control of PXB and apply yellow, black and red strap
Safe lift onto poolside
(lift MUST only be completed if casualty is central and stable on PXB) Lifeguard 2 climb out of the pool and take hold of the anchor mat Lifeguard 1 carefully stand whilst remaining in contact with the anchor mat Lifeguard 2 and 1 using both hand holds on the anchor mat, lift the board to the edge of the pool and take hold of the board hand holds, slide the board onto poolside.
Action for regurgitation Turn the casualty rapidly, supporting the head to ensure that stomach contents run out of the mouth
Team communication throughout
Communication between full team throughout before and during any movement
Completion of Assessment and Recording of Results When the team have performed action for regurgitation, the assessment can be stopped
45

Generation 9 Edition 1 V2 December 2018
Section 3 – CPR, AED and First Aid
CPR – Adult
Assessment Criteria 3 2.1 Conduct a scene survey of an incident 3 2.2 Conduct a primary survey of a casualty 3 2.3 Summon appropriate assistance when necessary 3 3.7 Demonstrate CPR using a manikin
Equipment Adult manikin, appropriate manikin wipes (see Code of Practice guidance note 2) and a training AED set up for ‘1 shock’ scenario Set Up The manikin to be placed on the floor with ample space around the manikin for the candidate to kneel next to it. Candidates should clean the manikin themselves before the briefing Assessment Planning It is acceptable that up to 3 candidates can be assessed at once Assessors must ensure they can view all candidates demonstrating skills Candidate Briefing ‘You have found an adult casualty who has suddenly collapsed on the floor, I am here to help; please demonstrate the appropriate action you would take’ Required Skills
Conduct a scene survey Look around the area as they approach the casualty to check for anything that could be classed as dangerous
Check the casualty for response Gently shake the shoulders and ask loudly 'Are you alright'
Open airway using head tilt chin lift
Place their hand on the forehead and gently tilt the head back; with their fingertips under the point of the casualty's chin, lift the chin to open the airway
Check breathing Look, listen and feel for normal breathing for no more than 10 seconds
Ensure an ambulance is called and an AED is requested
Ask someone to call an ambulance (999/112) / or call an ambulance themselves and send someone to get an AED if one is available
Give 30 chest compressions
Put hands on the centre of the casualty's chest; (which is the lower half of the victim’s breastbone (sternum)) pressing down 5-6cm releasing pressure on the chest after each compression at a rate of 100–120 min
Give 2 rescue breaths
Open airway using head tilt, chin lift Hold the nose and blow steadily into the mouth while watching for the chest to rise, taking about 1 second as in normal breathing then move away and watch for the chest to fall as air comes out then repeat for a total of 2 attempts
Continue 30:2 Give 30 chest compression (as above) followed by 2 rescue breaths (as above)
Use AED When the AED arrives switch the AED on, follow instructions, apply pads correctly and administer shock
Continue 30:2 Give 30 chest compression followed by 2 rescue breaths Completion of Assessment and Recording of Results After approximately two minutes, the assessment can be stopped
46
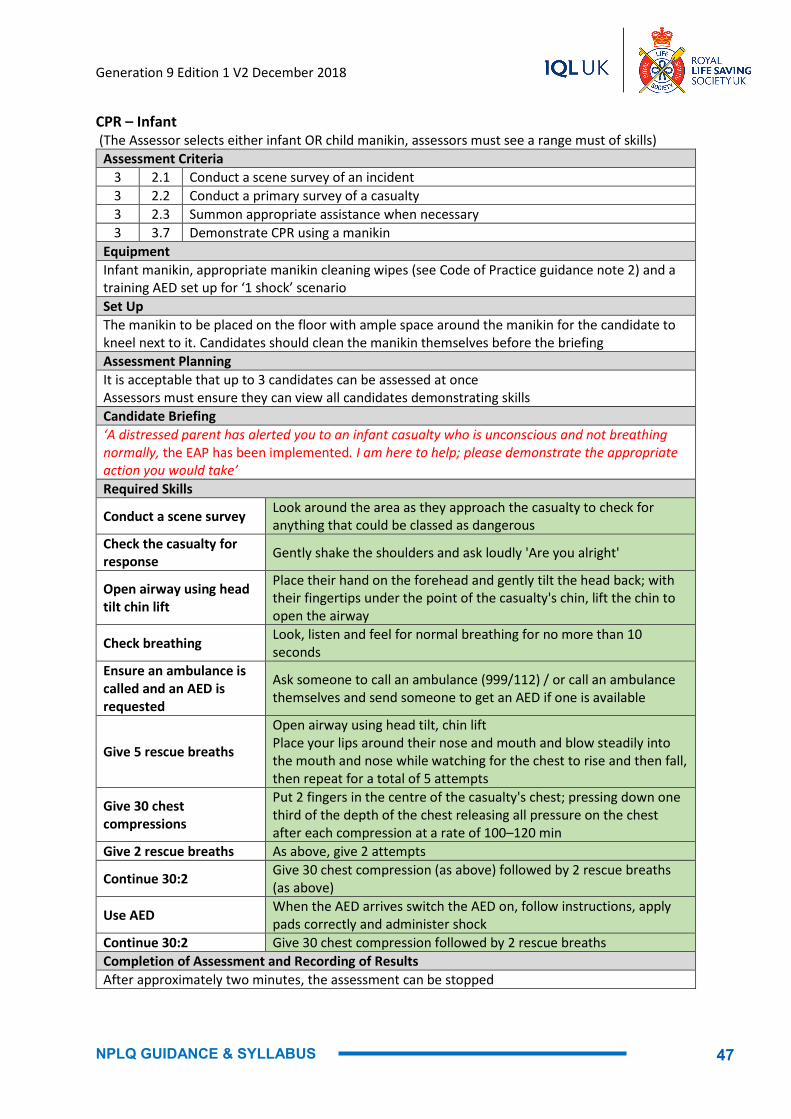
Generation 9 Edition 1 V2 December 2018
NPLQ GUIDANCE & SYLLABUS
CPR – Infant (The Assessor selects either infant OR child manikin, assessors must see a range must of skills)
Assessment Criteria 3 2.1 Conduct a scene survey of an incident 3 2.2 Conduct a primary survey of a casualty 3 2.3 Summon appropriate assistance when necessary 3 3.7 Demonstrate CPR using a manikin
Equipment Infant manikin, appropriate manikin cleaning wipes (see Code of Practice guidance note 2) and a training AED set up for ‘1 shock’ scenario Set Up The manikin to be placed on the floor with ample space around the manikin for the candidate to kneel next to it. Candidates should clean the manikin themselves before the briefing Assessment Planning It is acceptable that up to 3 candidates can be assessed at once Assessors must ensure they can view all candidates demonstrating skills Candidate Briefing ‘A distressed parent has alerted you to an infant casualty who is unconscious and not breathing normally, the EAP has been implemented. I am here to help; please demonstrate the appropriate action you would take’ Required Skills
Conduct a scene survey Look around the area as they approach the casualty to check for anything that could be classed as dangerous
Check the casualty for response Gently shake the shoulders and ask loudly 'Are you alright'
Open airway using head tilt chin lift
Place their hand on the forehead and gently tilt the head back; with their fingertips under the point of the casualty's chin, lift the chin to open the airway
Check breathing Look, listen and feel for normal breathing for no more than 10 seconds
Ensure an ambulance is called and an AED is requested
Ask someone to call an ambulance (999/112) / or call an ambulance themselves and send someone to get an AED if one is available
Give 5 rescue breaths
Open airway using head tilt, chin lift Place your lips around their nose and mouth and blow steadily into the mouth and nose while watching for the chest to rise and then fall, then repeat for a total of 5 attempts
Give 30 chest compressions
Put 2 fingers in the centre of the casualty's chest; pressing down one third of the depth of the chest releasing all pressure on the chest after each compression at a rate of 100–120 min
Give 2 rescue breaths As above, give 2 attempts
Continue 30:2 Give 30 chest compression (as above) followed by 2 rescue breaths (as above)
Use AED When the AED arrives switch the AED on, follow instructions, apply pads correctly and administer shock
Continue 30:2 Give 30 chest compression followed by 2 rescue breaths Completion of Assessment and Recording of Results After approximately two minutes, the assessment can be stopped
47

Generation 9 Edition 1 V2 December 2018
CPR – Child (The Assessor selects either infant OR child manikin, assessors must see a range must of skills)
Assessment Criteria 3 2.1 Conduct a scene survey of an incident 3 2.2 Conduct a primary survey of a casualty 3 2.3 Summon appropriate assistance when necessary 3 3.7 Demonstrate CPR using a manikin
Equipment Child manikin, appropriate manikin cleaning wipes (see Code of Practice guidance note 2) and a training AED set up for ‘1 shock’ scenario Set Up The manikin to be placed on the floor with ample space around the manikin for the candidate to kneel next to it. Candidates should clean the manikin themselves before the briefing Assessment Planning It is acceptable that up to 3 candidates can be assessed at once Assessors must ensure they can view all candidates demonstrating skills Candidate Briefing ‘You have found a child casualty who has suddenly collapsed on the floor, the EAP has been implemented. I am here to help; please demonstrate the appropriate action you would take’ Required Skills
Conduct a scene survey Look around the area as they approach the casualty to check for anything that could be classed as dangerous
Check the casualty for response Gently shake the shoulders and ask loudly 'Are you alright'
Open airway using head tilt chin lift
Place their hand on the forehead and gently tilt the head back; with their fingertips under the point of the casualty's chin, lift the chin to open the airway
Check breathing Look, listen and feel for normal breathing for no more than 10 seconds
Ensure an ambulance is called and an AED is requested
Ask someone to call an ambulance (999/112) / or call an ambulance themselves and send someone to get an AED if one is available
Give 5 rescue breaths Open airway using head tilt, chin lift Hold the nose and blow steadily into the mouth while watching for the chest to rise and then fall, then repeat for a total of 5 attempts
Give 30 chest compressions
Put one hand on the centre of the casualty's chest; pressing down one third of the depth of the chest releasing all pressure on the chest after each compression at a rate of 100–120 min
Give 2 rescue breaths As above, give 2 attempts
Continue 30:2 Give 30 chest compression (as above) followed by 2 rescue breaths (as above)
Use AED When the AED arrives switch the AED on, follow instructions, apply pads correctly and administer shock
Continue 30:2 Give 30 chest compression followed by 2 rescue breaths Completion of Assessment and Recording of Results After approximately two minutes, the assessment can be stopped
48
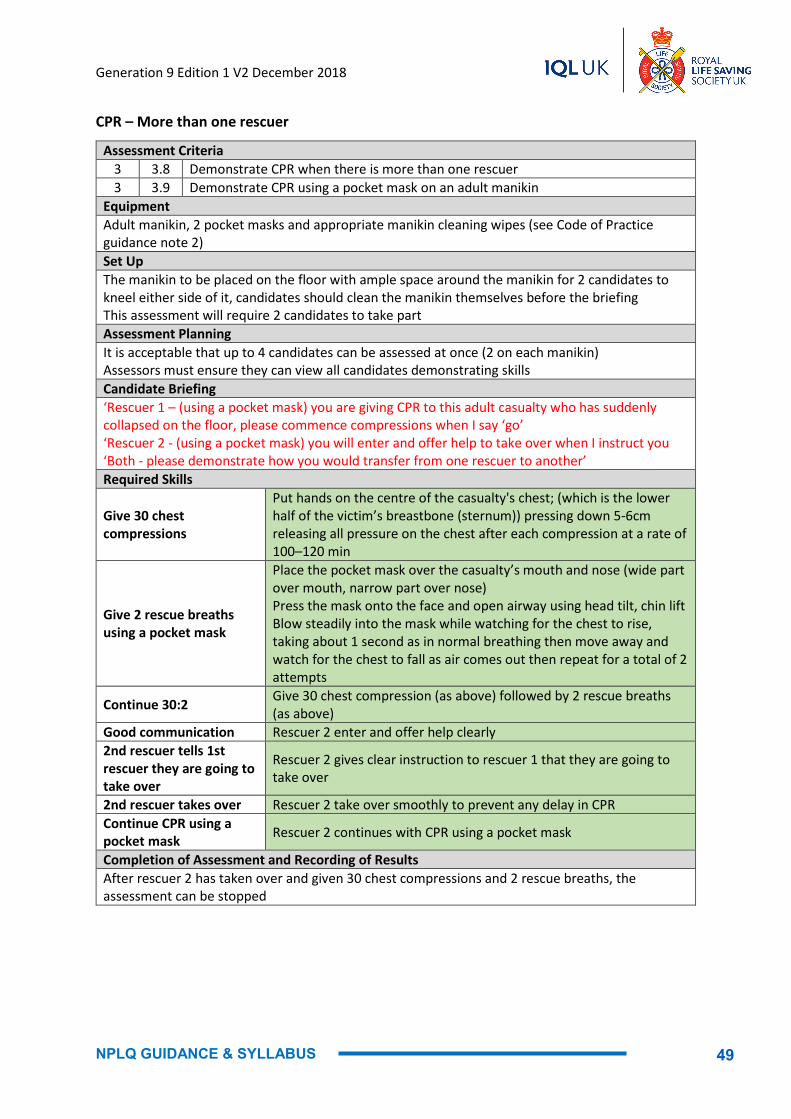
Generation 9 Edition 1 V2 December 2018
NPLQ GUIDANCE & SYLLABUS
CPR – More than one rescuer
Assessment Criteria 3 3.8 Demonstrate CPR when there is more than one rescuer 3 3.9 Demonstrate CPR using a pocket mask on an adult manikin
Equipment Adult manikin, 2 pocket masks and appropriate manikin cleaning wipes (see Code of Practice guidance note 2) Set Up The manikin to be placed on the floor with ample space around the manikin for 2 candidates to kneel either side of it, candidates should clean the manikin themselves before the briefing This assessment will require 2 candidates to take part Assessment Planning It is acceptable that up to 4 candidates can be assessed at once (2 on each manikin) Assessors must ensure they can view all candidates demonstrating skills Candidate Briefing ‘Rescuer 1 – (using a pocket mask) you are giving CPR to this adult casualty who has suddenly collapsed on the floor, please commence compressions when I say ‘go’ ‘Rescuer 2 - (using a pocket mask) you will enter and offer help to take over when I instruct you ‘Both - please demonstrate how you would transfer from one rescuer to another’ Required Skills
Give 30 chest compressions
Put hands on the centre of the casualty's chest; (which is the lower half of the victim’s breastbone (sternum)) pressing down 5-6cm releasing all pressure on the chest after each compression at a rate of 100–120 min
Give 2 rescue breaths using a pocket mask
Place the pocket mask over the casualty’s mouth and nose (wide part over mouth, narrow part over nose) Press the mask onto the face and open airway using head tilt, chin lift Blow steadily into the mask while watching for the chest to rise, taking about 1 second as in normal breathing then move away and watch for the chest to fall as air comes out then repeat for a total of 2 attempts
Continue 30:2 Give 30 chest compression (as above) followed by 2 rescue breaths (as above)
Good communication Rescuer 2 enter and offer help clearly 2nd rescuer tells 1st rescuer they are going to take over
Rescuer 2 gives clear instruction to rescuer 1 that they are going to take over
2nd rescuer takes over Rescuer 2 take over smoothly to prevent any delay in CPR Continue CPR using a pocket mask Rescuer 2 continues with CPR using a pocket mask
Completion of Assessment and Recording of Results After rescuer 2 has taken over and given 30 chest compressions and 2 rescue breaths, the assessment can be stopped
49
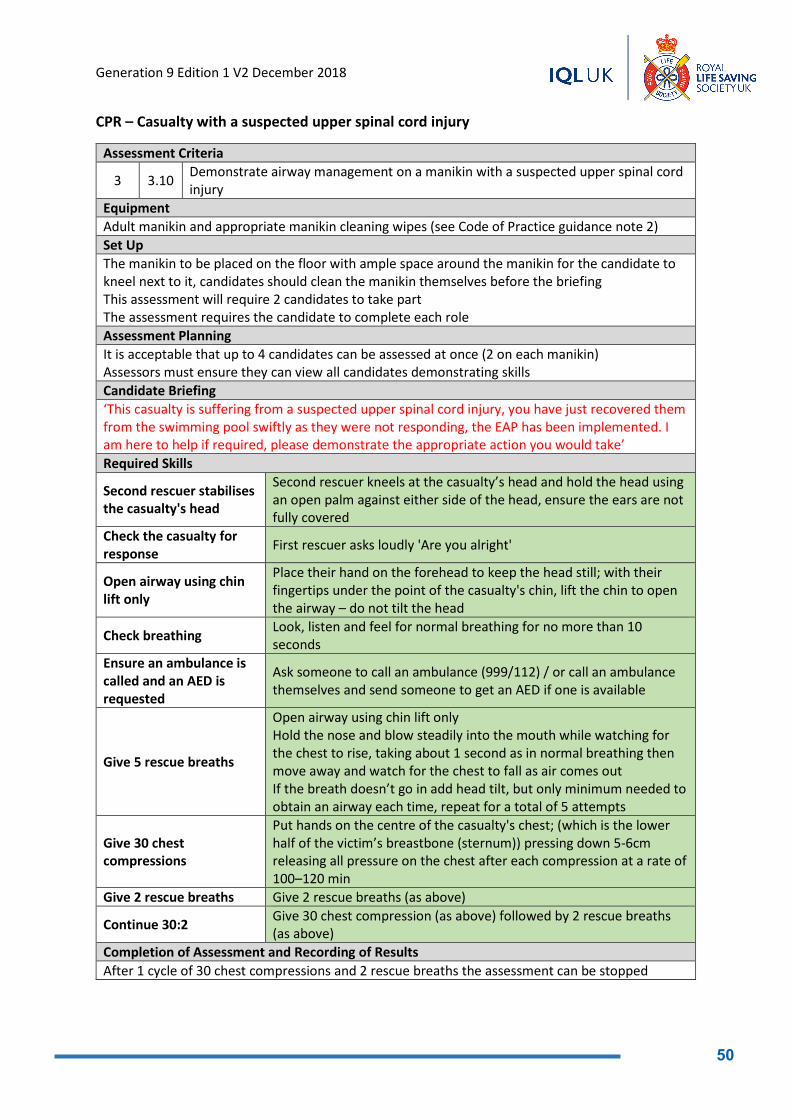
Generation 9 Edition 1 V2 December 2018
CPR – Casualty with a suspected upper spinal cord injury
Assessment Criteria
3 3.10 Demonstrate airway management on a manikin with a suspected upper spinal cord injury
Equipment Adult manikin and appropriate manikin cleaning wipes (see Code of Practice guidance note 2) Set Up The manikin to be placed on the floor with ample space around the manikin for the candidate to kneel next to it, candidates should clean the manikin themselves before the briefing This assessment will require 2 candidates to take part The assessment requires the candidate to complete each role Assessment Planning It is acceptable that up to 4 candidates can be assessed at once (2 on each manikin) Assessors must ensure they can view all candidates demonstrating skills Candidate Briefing ‘This casualty is suffering from a suspected upper spinal cord injury, you have just recovered them from the swimming pool swiftly as they were not responding, the EAP has been implemented. I am here to help if required, please demonstrate the appropriate action you would take’ Required Skills
Second rescuer stabilises the casualty's head
Second rescuer kneels at the casualty’s head and hold the head using an open palm against either side of the head, ensure the ears are not fully covered
Check the casualty for response First rescuer asks loudly 'Are you alright'
Open airway using chin lift only
Place their hand on the forehead to keep the head still; with their fingertips under the point of the casualty's chin, lift the chin to open the airway – do not tilt the head
Check breathing Look, listen and feel for normal breathing for no more than 10 seconds
Ensure an ambulance is called and an AED is requested
Ask someone to call an ambulance (999/112) / or call an ambulance themselves and send someone to get an AED if one is available
Give 5 rescue breaths
Open airway using chin lift only Hold the nose and blow steadily into the mouth while watching for the chest to rise, taking about 1 second as in normal breathing then move away and watch for the chest to fall as air comes out If the breath doesn’t go in add head tilt, but only minimum needed to obtain an airway each time, repeat for a total of 5 attempts
Give 30 chest compressions
Put hands on the centre of the casualty's chest; (which is the lower half of the victim’s breastbone (sternum)) pressing down 5-6cm releasing all pressure on the chest after each compression at a rate of 100–120 min
Give 2 rescue breaths Give 2 rescue breaths (as above)
Continue 30:2 Give 30 chest compression (as above) followed by 2 rescue breaths (as above)
Completion of Assessment and Recording of Results After 1 cycle of 30 chest compressions and 2 rescue breaths the assessment can be stopped
50

Generation 9 Edition 1 V2 December 2018
NPLQ GUIDANCE & SYLLABUS
Choking
Assessment Criteria 3 4.2 Demonstrate how to administer first aid to a casualty who is choking
Equipment An adult manikin, appropriate manikin wipes, a choking vest may be used if available (ensure the choking object has been removed to enable the full assessment to be completed) Set Up Ensure there is ample area around the casualty to ensure the candidate can support the casualty and treat for choking Assessment Planning It is acceptable that up to 3 candidates can be assessed first whilst up to 3 candidates can act as the casualties and then the groups can swap roles Assessors must ensure they can view all candidates demonstrating skills Casualty Briefing ‘You need to act as a casualty who is choking, please hold your throat and cough. The lifeguard will treat you, please relax and follow their instructions’ Candidate Briefing ‘You have been alerted to an adult casualty who is choking, they are able to speak, cough and breathe, however they are holding their throat and they are distressed. Demonstrate appropriate action.’ ‘You MUST use simulation when demonstrating the treatment to a live casualty’ Required Skills Encourage the casualty to cough
Encourage the casualty to cough when the casualty has a mild airway obstruction
Support the casualty Support the casualty's chest with one hand and lean them well forwards
Give 5 back blows Give 5 sharp blows between the shoulder blades with the heel of their hand
Give 5 abdominal thrusts
Stand behind the casualty and put both arms round the upper part of his abdomen and join their hands together between the umbilicus (navel) and the bottom end of the sternum (breastbone) Ensure the casualty is bending well forward and pull sharply inwards and upwards 5 times
Continue 5:5 Continue alternating 5 back blows with 5 abdominal thrusts as detailed above
Start CPR The casualty goes unconscious- start CPR Completion of Assessment and Recording of Results When the candidate has demonstrated how to administer first aid to a choking casualty with a mild airway obstruction and severe airway obstruction the assessment can be stopped
51

Generation 9 Edition 1 V2 December 2018
Secondary survey
Assessment Criteria 3 8.2 Demonstrate how to conduct a secondary survey
Equipment Gloves for the candidate to wear whilst they demonstrate the secondary survey Set Up The casualty should lie on the floor with ample space around them for the candidate to kneel next to them and demonstrate the task Assessment Planning It is acceptable that up to 2 candidates can be assessed first whilst up to 2 candidates can act as the casualties, the groups can then swap roles twice to ensure all candidates are assessed Assessors must ensure they can view all candidates demonstrating skills Casualty Briefing ‘You are lying on the floor on your back, please relax and act as a conscious casualty. The lifeguard will look for injuries by touching you and speaking to you, please relax throughout’ Candidate Briefing ‘This casualty is conscious and requires first aid, carry out a secondary survey to establish their injuries and first aid needs. You must demonstrate the appropriate action until you are informed to stop. They have given you consent to help them’. Required Skills Wear protective gloves Put gloves on to protect casualty and lifeguard
Check breathing As the casualty is conscious, check the rise and fall of the chest and listen for abnormalities
Check head Check scalp, face, ears, nose by looking and feeling Check mouth Ask casualty to open mouth and look inside Check neck Gently check either side of the neck by feeling
Check chest Look for abnormal movement of the chest, gently check upper and lower chest to check for abnormality (do not touch breast area)
Check arms Gently check each arm and check for needle mark/skin lacerations Check abdomen Gently press the abdomen to check for abnormalities
Check pelvis Gently check the pelvis for abnormalities, look for loss of bladder control (do not touch genital area) DO NOT rock or squeeze the pelvis
Check legs & feet Gently check each leg and check for skin lacerations Communication throughout Communication to the casualty throughout
Completion of Assessment and Recording of Results When the candidate has completed the secondary survey, the assessment can be stopped
52
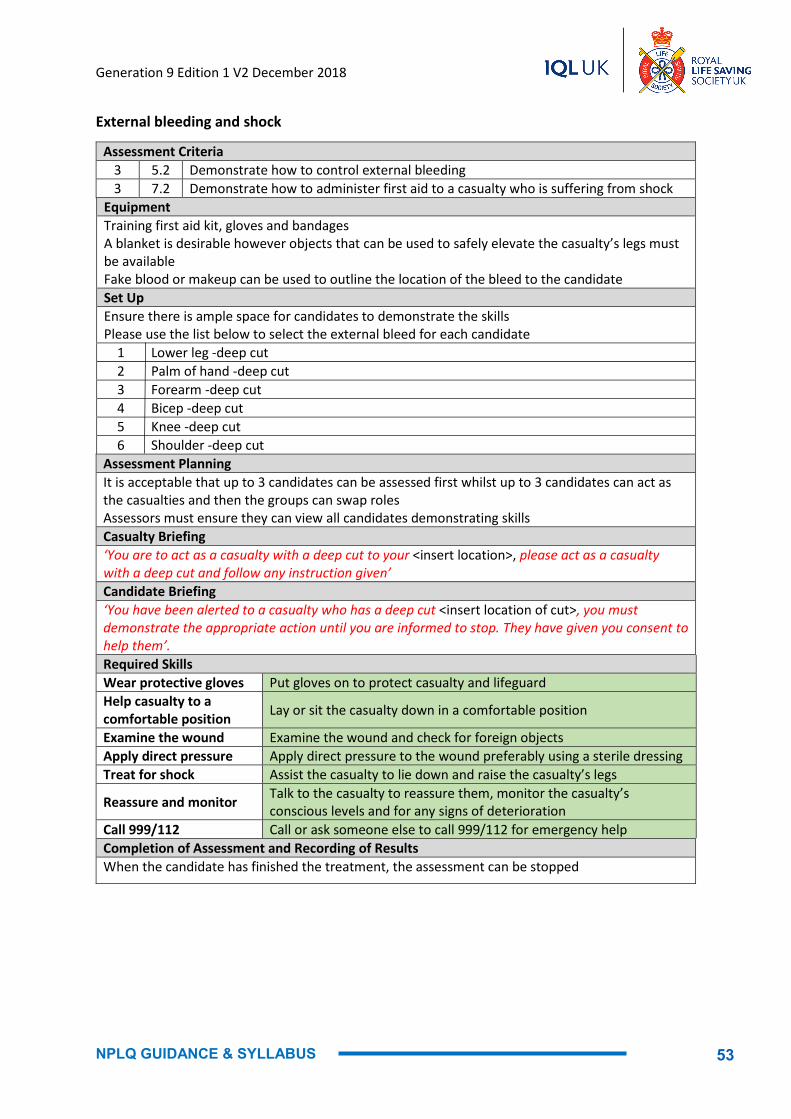
Generation 9 Edition 1 V2 December 2018
NPLQ GUIDANCE & SYLLABUS
External bleeding and shock
Assessment Criteria 3 5.2 Demonstrate how to control external bleeding 3 7.2 Demonstrate how to administer first aid to a casualty who is suffering from shock
Equipment Training first aid kit, gloves and bandages A blanket is desirable however objects that can be used to safely elevate the casualty’s legs must be available Fake blood or makeup can be used to outline the location of the bleed to the candidate Set Up Ensure there is ample space for candidates to demonstrate the skills Please use the list below to select the external bleed for each candidate 1 Lower leg -deep cut 2 Palm of hand -deep cut 3 Forearm -deep cut 4 Bicep -deep cut 5 Knee -deep cut 6 Shoulder -deep cut Assessment Planning It is acceptable that up to 3 candidates can be assessed first whilst up to 3 candidates can act as the casualties and then the groups can swap roles Assessors must ensure they can view all candidates demonstrating skills Casualty Briefing ‘You are to act as a casualty with a deep cut to your <insert location>, please act as a casualty with a deep cut and follow any instruction given’ Candidate Briefing ‘You have been alerted to a casualty who has a deep cut <insert location of cut>, you must demonstrate the appropriate action until you are informed to stop. They have given you consent to help them’. Required Skills Wear protective gloves Put gloves on to protect casualty and lifeguard Help casualty to a comfortable position Lay or sit the casualty down in a comfortable position
Examine the wound Examine the wound and check for foreign objects Apply direct pressure Apply direct pressure to the wound preferably using a sterile dressing Treat for shock Assist the casualty to lie down and raise the casualty’s legs
Reassure and monitor Talk to the casualty to reassure them, monitor the casualty’s conscious levels and for any signs of deterioration
Call 999/112 Call or ask someone else to call 999/112 for emergency help Completion of Assessment and Recording of Results When the candidate has finished the treatment, the assessment can be stopped
53

Generation 9 Edition 1 V2 December 2018
Injury to bones, muscles and joints
Assessment Criteria
3 9.2 Demonstrate how to administer first aid to a casualty with suspected injury to bones, muscles and joints
Equipment Training first aid kit and gloves and a blanket(s) Set Up Ensure there is ample space for candidates to demonstrate the skills within scenarios of injuries below:
1 Fracture lower leg 2 Fracture collar bone 3 Fracture forearm 4 Dislocated knee 5 Dislocated shoulder 6 Sprained ankle
Assessment Planning It is acceptable that up to 3 candidates can be assessed first whilst up to 3 candidates can act as the casualties and then the groups can swap roles Assessors must ensure they can view all candidates demonstrating skills Casualty Briefing ‘You are to act as a casualty with a <insert injury and location>, please act as a casualty with a <insert injury> and follow any instruction given’ Candidate Briefing ‘You have been alerted to a casualty who has a <insert injury and location>, you must demonstrate the appropriate action until you are informed to stop. They have given you consent to help them’. Required Skills Make the casualty comfortable
Keep the casualty in the position in which they were found Make them comfortable
Immobilise or support the limb/area
Immobilise or support to reduce the potential of further damage to the injury by supporting upper limbs by hand or with a sling or supporting lower limbs with pads of blankets, clothing or similar soft materials
Reassure and monitor Talk to the casualty to reassure them, monitor the casualty’s conscious levels and for any signs of deterioration
Call for help Call for help or make provision for the casualty to be safely transported to a medical professional
Completion of Assessment and Recording of Results When the candidate has finished the treatment, the assessment can be stopped
54

Generation 9 Edition 1 V2 December 2018
NPLQ GUIDANCE & SYLLABUS
3 Appendices
A. Qualification Content and Assessment Criteria B. Course Register C. Personal Performance Record D. Addition Training Record E. Sample Theory Assessment Paperwork F. Practical Assessment Record
55
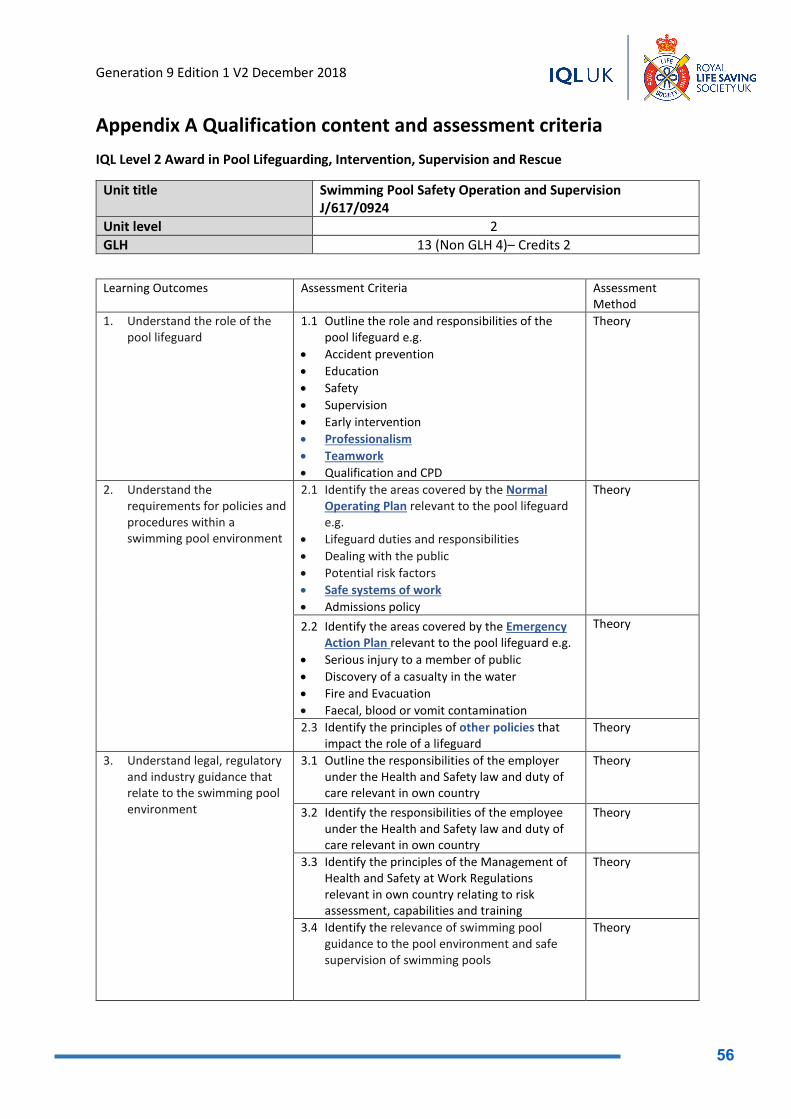
Generation 9 Edition 1 V2 December 2018
Appendix A Qualification content and assessment criteria
IQL Level 2 Award in Pool Lifeguarding, Intervention, Supervision and Rescue
Unit title Swimming Pool Safety Operation and Supervision J/617/0924
Unit level 2 GLH 13 (Non GLH 4)– Credits 2
Learning Outcomes Assessment Criteria Assessment
Method 1. Understand the role of the
pool lifeguard 1.1 Outline the role and responsibilities of the
pool lifeguard e.g. • Accident prevention • Education • Safety • Supervision • Early intervention • Professionalism • Teamwork • Qualification and CPD
Theory
2. Understand the requirements for policies and procedures within a swimming pool environment
2.1 Identify the areas covered by the Normal Operating Plan relevant to the pool lifeguard e.g.
• Lifeguard duties and responsibilities • Dealing with the public • Potential risk factors • Safe systems of work • Admissions policy
Theory
2.2 Identify the areas covered by the Emergency Action Plan relevant to the pool lifeguard e.g.
• Serious injury to a member of public • Discovery of a casualty in the water • Fire and Evacuation • Faecal, blood or vomit contamination
Theory
2.3 Identify the principles of other policies that impact the role of a lifeguard
Theory
3. Understand legal, regulatory and industry guidance that relate to the swimming pool environment
3.1 Outline the responsibilities of the employer under the Health and Safety law and duty of care relevant in own country
Theory
3.2 Identify the responsibilities of the employee under the Health and Safety law and duty of care relevant in own country
Theory
3.3 Identify the principles of the Management of Health and Safety at Work Regulations relevant in own country relating to risk assessment, capabilities and training
Theory
3.4 Identify the relevance of swimming pool guidance to the pool environment and safe supervision of swimming pools
Theory
56

Generation 9 Edition 1 V2 December 2018
NPLQ GUIDANCE & SYLLABUS
4. Know how to prepare and maintain a safe swimming pool environment
4.1 Identify the cleaning arrangements relating to a swimming pool environment
Theory
4.2 Identify hazards that pool equipment and features can create
Theory
4.3 Identify common visual safety checks required prior to opening the pool
Theory
5. Know how to supervise a swimming pool environment
5.1 Explain the methods and techniques of supervision in a swimming pool environment
Theory
5.2 Identify the advantages and disadvantages of drowning detection systems
Theory
5.3 Identify common swimming pool hazards Theory 5.4 Describe the methods of supervising different
activities and features Theory
5.5 Identify how lifeguard numbers may change when supervising different activities and features
Theory
5.6 Identify the factors that could significantly reduce a lifeguard’s field of vision
Theory
5.7 Describe common forms of communication that a lifeguard may use
Theory
5.8 Explain the different types of interaction with customers in a swimming pool environment
Theory
5.9 Demonstrate how to interact with customers in a swimming pool environment
Practical
6. Be able to supervise a swimming pool environment
6.1 Assess in a specified pool zone, using supervision techniques, items such as :
• Depths and gradients • Hazards • Number of adult, children and infants • Pool rules • Areas where intervention would be required
Practical
Unit title Pool Lifeguard Emergency Rescue Skills L/617/0925
Unit level 2 GLH 10 (Non GLH 2)– 1 Credit
Learning Outcomes Assessment Criteria Assessment
Method 1. Know how to respond to
swimming pool emergency situations
1.1 Identify the common factors that indicate why a casualty is in difficulty
Theory
1.2 Identify the common factors that indicate why a casualty with a certain condition is in difficulty
Theory
1.3 Identify the types of swimming pool rescue equipment
Theory
1.4 Outline how swimming pool rescue equipment can be used in an emergency.
Theory
57
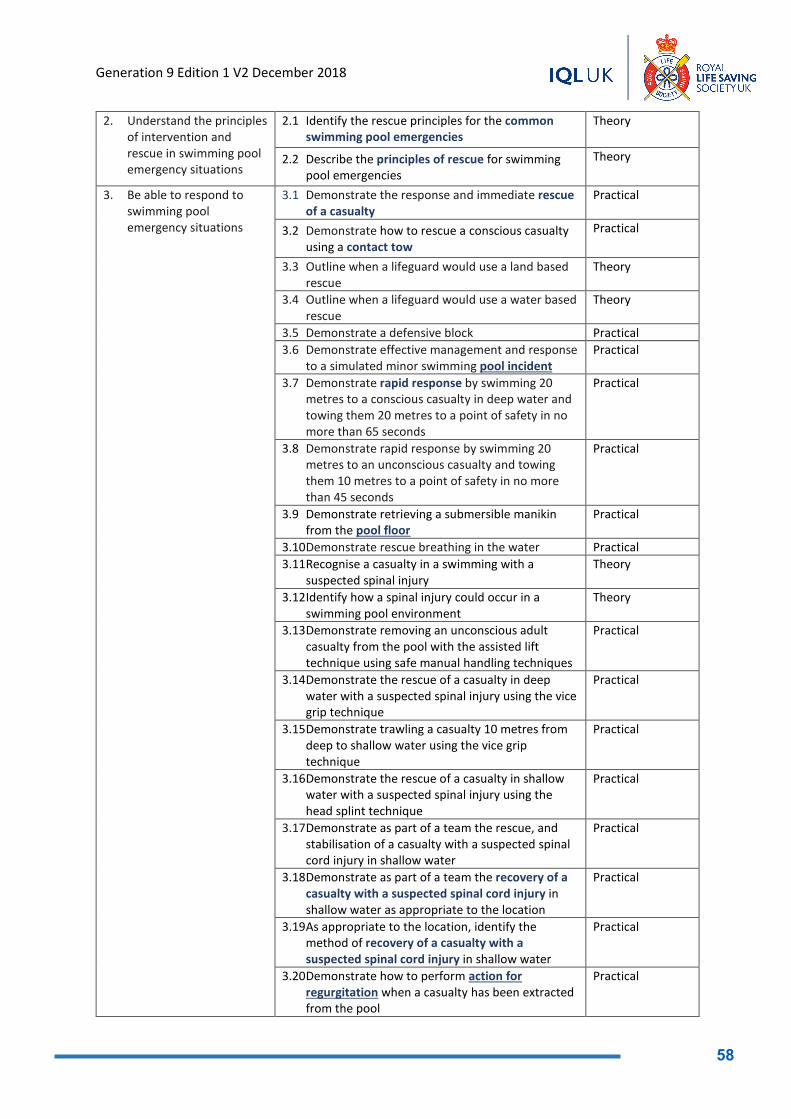
Generation 9 Edition 1 V2 December 2018
2. Understand the principles of intervention and rescue in swimming pool emergency situations
2.1 Identify the rescue principles for the common swimming pool emergencies
Theory
2.2 Describe the principles of rescue for swimming pool emergencies
Theory
3. Be able to respond to swimming pool emergency situations
3.1 Demonstrate the response and immediate rescue of a casualty
Practical
3.2 Demonstrate how to rescue a conscious casualty using a contact tow
Practical
3.3 Outline when a lifeguard would use a land based rescue
Theory
3.4 Outline when a lifeguard would use a water based rescue
Theory
3.5 Demonstrate a defensive block Practical 3.6 Demonstrate effective management and response
to a simulated minor swimming pool incident Practical
3.7 Demonstrate rapid response by swimming 20 metres to a conscious casualty in deep water and towing them 20 metres to a point of safety in no more than 65 seconds
Practical
3.8 Demonstrate rapid response by swimming 20 metres to an unconscious casualty and towing them 10 metres to a point of safety in no more than 45 seconds
Practical
3.9 Demonstrate retrieving a submersible manikin from the pool floor
Practical
3.10 Demonstrate rescue breathing in the water Practical 3.11 Recognise a casualty in a swimming with a
suspected spinal injury Theory
3.12 Identify how a spinal injury could occur in a swimming pool environment
Theory
3.13 Demonstrate removing an unconscious adult casualty from the pool with the assisted lift technique using safe manual handling techniques
Practical
3.14 Demonstrate the rescue of a casualty in deep water with a suspected spinal injury using the vice grip technique
Practical
3.15 Demonstrate trawling a casualty 10 metres from deep to shallow water using the vice grip technique
Practical
3.16 Demonstrate the rescue of a casualty in shallow water with a suspected spinal injury using the head splint technique
Practical
3.17 Demonstrate as part of a team the rescue, and stabilisation of a casualty with a suspected spinal cord injury in shallow water
Practical
3.18 Demonstrate as part of a team the recovery of a casualty with a suspected spinal cord injury in shallow water as appropriate to the location
Practical
3.19 As appropriate to the location, identify the method of recovery of a casualty with a suspected spinal cord injury in shallow water
Practical
3.20 Demonstrate how to perform action for regurgitation when a casualty has been extracted from the pool
Practical
58
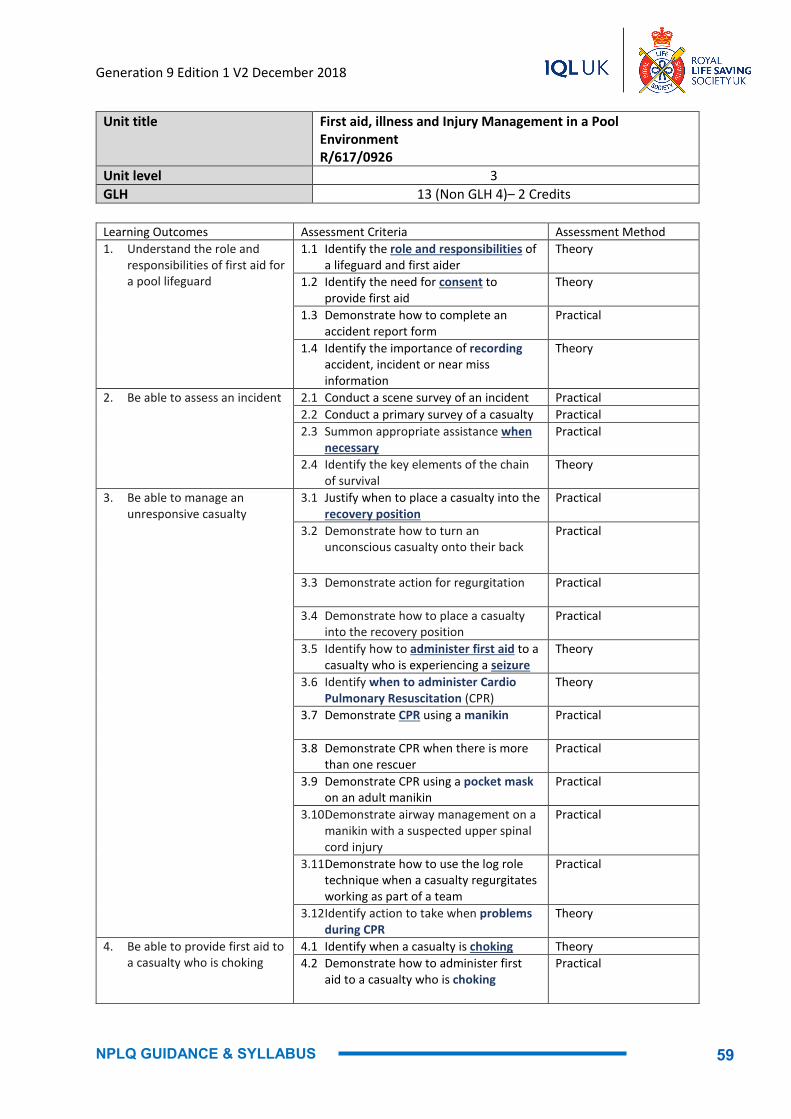
Generation 9 Edition 1 V2 December 2018
NPLQ GUIDANCE & SYLLABUS
Unit title First aid, illness and Injury Management in a Pool Environment R/617/0926
Unit level 3 GLH 13 (Non GLH 4)– 2 Credits
Learning Outcomes Assessment Criteria Assessment Method 1. Understand the role and
responsibilities of first aid for a pool lifeguard
1.1 Identify the role and responsibilities of a lifeguard and first aider
Theory
1.2 Identify the need for consent to provide first aid
Theory
1.3 Demonstrate how to complete an accident report form
Practical
1.4 Identify the importance of recording accident, incident or near miss information
Theory
2. Be able to assess an incident 2.1 Conduct a scene survey of an incident Practical 2.2 Conduct a primary survey of a casualty Practical 2.3 Summon appropriate assistance when
necessary Practical
2.4 Identify the key elements of the chain of survival
Theory
3. Be able to manage an unresponsive casualty
3.1 Justify when to place a casualty into the recovery position
Practical
3.2 Demonstrate how to turn an unconscious casualty onto their back
Practical
3.3 Demonstrate action for regurgitation Practical
3.4 Demonstrate how to place a casualty into the recovery position
Practical
3.5 Identify how to administer first aid to a casualty who is experiencing a seizure
Theory
3.6 Identify when to administer Cardio Pulmonary Resuscitation (CPR)
Theory
3.7 Demonstrate CPR using a manikin Practical
3.8 Demonstrate CPR when there is more than one rescuer
Practical
3.9 Demonstrate CPR using a pocket mask on an adult manikin
Practical
3.10 Demonstrate airway management on a manikin with a suspected upper spinal cord injury
Practical
3.11 Demonstrate how to use the log role technique when a casualty regurgitates working as part of a team
Practical
3.12 Identify action to take when problems during CPR
Theory
4. Be able to provide first aid to a casualty who is choking
4.1 Identify when a casualty is choking Theory 4.2 Demonstrate how to administer first
aid to a casualty who is choking
Practical
59

Generation 9 Edition 1 V2 December 2018
5. Be able to provide first aid to a casualty with external bleeding
5.1 Identify the severity of external bleeding
Theory
5.2 Demonstrate how to control external bleeding
Practical
5.3 Explain how a first aider can protect themselves and the casualty from cross infection
Theory
6. Know how to provide first aid to a casualty with minor injuries
6.1 Identify how to administer first aid to a casualty with a minor injury
Theory
7. Be able to provide first aid to a casualty who is in shock
7.1 Recognise a casualty who is suffering from shock
Theory
7.2 Demonstrate how to administer first aid to a casualty who is suffering from shock
Practical
8. Be able to conduct a secondary survey
8.1 Identify the information to be collected when gathering a casualty history
Theory
8.2 Demonstrate how to conduct a secondary survey
Practical
9. Be able to provide first aid to a casualty with suspected injuries to bones, muscles and joints
9.1 Recognise a casualty with a suspected injury to bones, muscles or joints
Theory
9.2 Demonstrate how to administer first aid for a casualty with suspected injuries to bones, muscles and joints
Practical
10. Be able to provide first aid to a casualty with suspected head and spinal injuries
10.1 Recognise a suspected: • Head injury • Spinal injury
Theory
10.2 Identify how to administer first aid for a suspected head Injury
Theory
10.3 Demonstrate how to administer first aid for a suspected spinal injury
Practical
11. Know how to provide first aid to a casualty with chest injuries
11.1 Recognise a casualty with a suspected chest injury
Theory
11.2 Identify how to administer first aid to a casualty with a suspected chest injury
Theory
12. Know how to provide first aid to a casualty with burns and scalds
12.1 Identify the factors that affect the severity of burns and scalds
Theory
12.2 Identify how to administer first aid to a casualty with burns and scalds
Theory
13. Know how to provide first aid to a casualty with an eye injury
13.1 Identify how to administer first aid for eye injuries involving:
Theory
14. Know how to provide First Aid to a casualty with sudden poisoning
14.1 Identify the routes that poisons can take to enter the body
Theory
14.2 Identify how to administer immediate first aid to a casualty affected by sudden poisoning
Theory
14.3 Identify sources of information for treating those affected by sudden poisoning
Theory
60
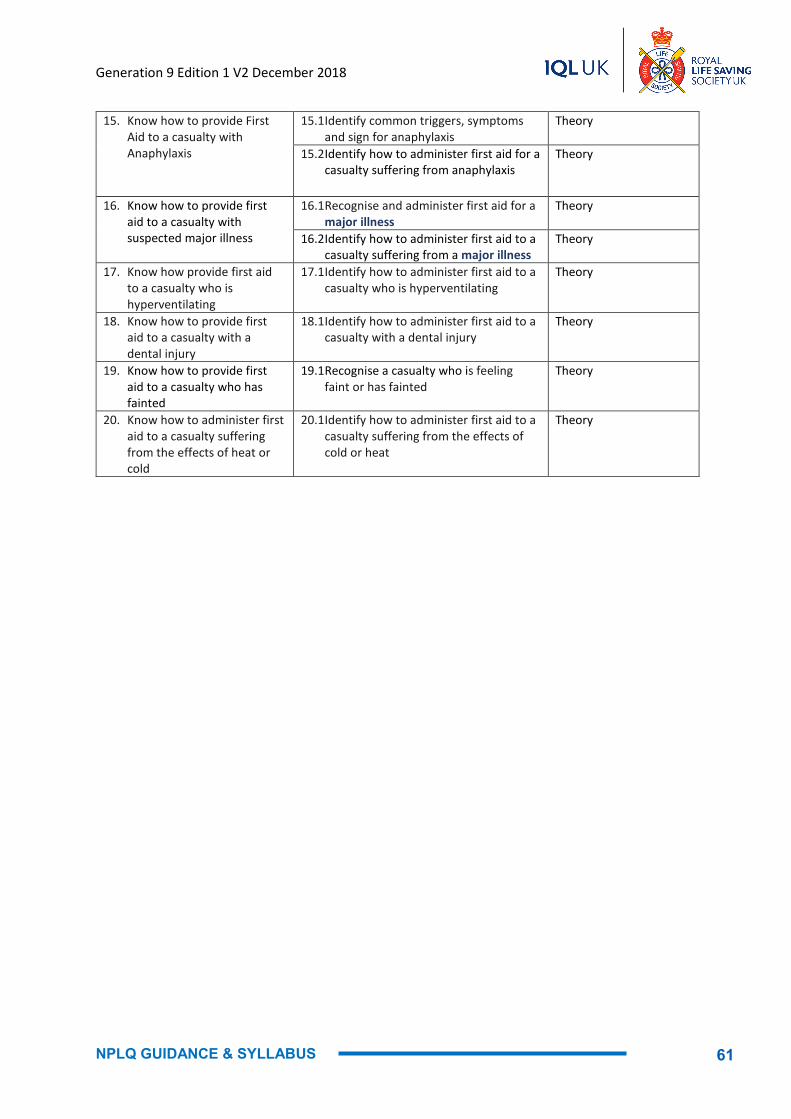
Generation 9 Edition 1 V2 December 2018
NPLQ GUIDANCE & SYLLABUS
15. Know how to provide First Aid to a casualty with Anaphylaxis
15.1 Identify common triggers, symptoms and sign for anaphylaxis
Theory
15.2 Identify how to administer first aid for a casualty suffering from anaphylaxis
Theory
16. Know how to provide first aid to a casualty with suspected major illness
16.1 Recognise and administer first aid for a major illness
Theory
16.2 Identify how to administer first aid to a casualty suffering from a major illness
Theory
17. Know how provide first aid to a casualty who is hyperventilating
17.1 Identify how to administer first aid to a casualty who is hyperventilating
Theory
18. Know how to provide first aid to a casualty with a dental injury
18.1 Identify how to administer first aid to a casualty with a dental injury
Theory
19. Know how to provide first aid to a casualty who has fainted
19.1 Recognise a casualty who is feeling faint or has fainted
Theory
20. Know how to administer first aid to a casualty suffering from the effects of heat or cold
20.1 Identify how to administer first aid to a casualty suffering from the effects of cold or heat
Theory
61

Editi
on 1
July
201
8
NPL
Q G
ENER
ATIO
N 9
CO
UR
SE R
EGIS
TER
Cour
se R
egis
ter
HO
W R
LSS
UK
USE
YO
UR
DA
TA
By
com
plet
ing
this
form
, you
agr
ee to
RLS
S U
K an
d its
two
limite
d co
mpa
nies
RLS
S U
K En
terp
rises
Lim
ited
(trad
ing
as R
LSS
Dire
ct) a
nd IQ
L U
K Li
mite
d pr
oces
sing
and
sto
ring
your
per
sona
l dat
a fo
r the
pur
pose
of f
ulfil
ling
our c
ontra
ct to
pro
vide
you
with
you
r aw
ard
or q
ualif
icat
ion.
We
prom
ise
your
per
sona
l dat
a w
ill on
ly b
e us
ed b
y R
LSS
UK,
RLS
S D
irect
and
IQL
UK
Lim
ited.
We
will
keep
you
r dat
a sa
fe a
nd w
ill ne
ver s
hare
it w
ith o
ther
or
gani
satio
ns w
ithou
t you
r per
mis
sion
. For
full
deta
ils o
f how
we
proc
ess
and
stor
e yo
ur d
ata
plea
se re
fer t
o ou
r Priv
acy
Polic
y th
at c
an b
e fo
und
at rl
ss.o
rg.u
k/pr
ivac
y. T
rain
er/ T
rain
ing
Cen
tre
to a
ttach
info
rmat
ion
rega
rdin
g ho
w th
ey c
ompl
y w
ith G
DPR
ove
rleaf
Cour
se T
ype
Nat
iona
l Poo
l Life
guar
d Q
ualif
icat
ion
Inte
grat
ed Q
ualif
icat
ions
incl
uded
AE
D □
E
FAW
□
FAW
□
AN
APHY
LAXI
S □
(pl
ease
tick
) Co
urse
Dat
es
- Tr
aine
r Nam
e &
Soc
iety
Num
ber
AC
T/P
Num
ber
AT
C/P
Venu
e
Asse
ssor
Nam
e &
Soc
iety
Num
ber
As
sess
or N
ame
& S
ocie
ty N
umbe
r
Cand
idat
e N
ame
ID
chec
k Da
te
……
……
Da
te
……
……
Da
te
……
……
Da
te
……
……
Da
te
……
……
Da
te
……
……
Da
te
……
……
Da
te
……
……
Da
te
……
……
Da
te
……
……
Cont
act
trai
ning
ho
urs
Cand
idat
e sig
natu
re
conf
irmin
g co
ntac
t tr
aini
ng h
ours
1.
2.
3.
4.
5.
6.
7.
8.
9.
10.
11.
12.
Daily
con
tact
trai
ning
hou
rs
62
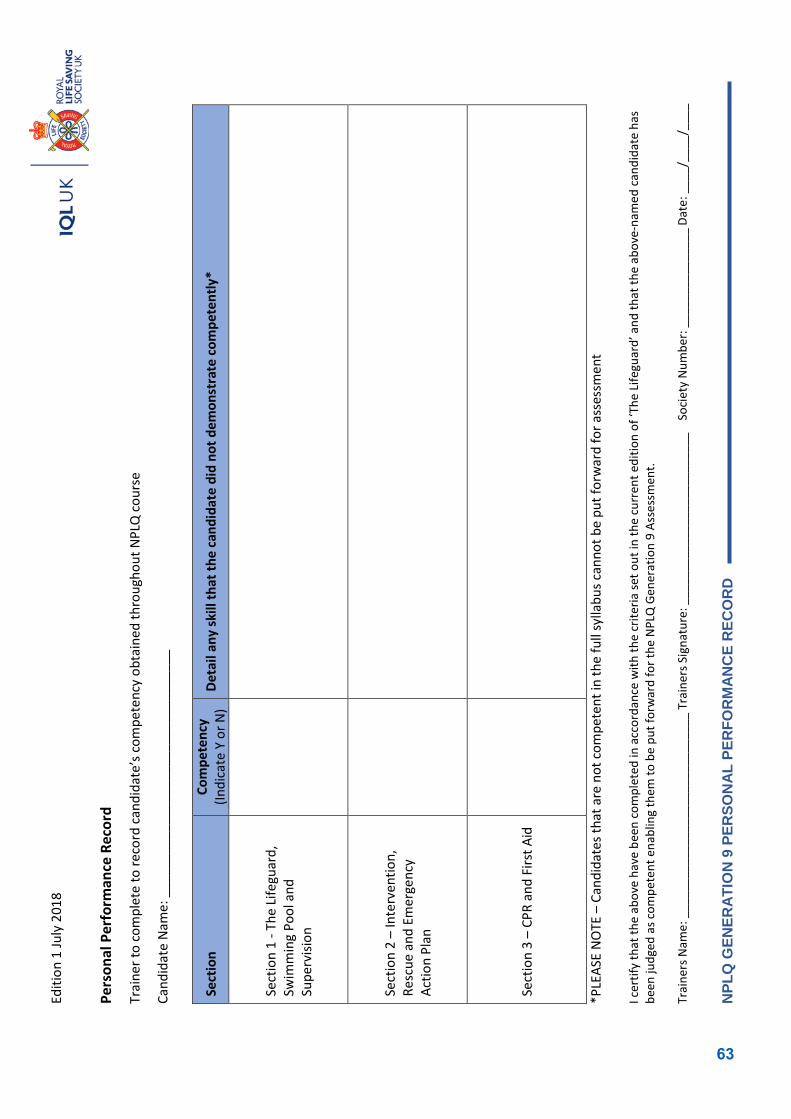
Editi
on 1
July
201
8 N
PLQ
GEN
ERAT
ION
9 P
ERSO
NAL
PER
FOR
MAN
CE
REC
OR
D
Pers
onal
Per
form
ance
Rec
ord
Trai
ner t
o co
mpl
ete
to re
cord
can
dida
te’s
com
pete
ncy
obta
ined
thro
ugho
ut N
PLQ
cou
rse
Cand
idat
e N
ame:
___
____
____
____
____
____
____
____
___
Sect
ion
Com
pete
ncy
(Indi
cate
Y o
r N)
Deta
il an
y sk
ill th
at th
e ca
ndid
ate
did
not d
emon
stra
te c
ompe
tent
ly*
Sect
ion
1 - T
he L
ifegu
ard,
Sw
imm
ing
Pool
and
Su
perv
ision
Sect
ion
2 –
Inte
rven
tion,
Re
scue
and
Em
erge
ncy
Actio
n Pl
an
Sect
ion
3 –
CPR
and
Firs
t Aid
*PLE
ASE
NO
TE –
Can
dida
tes t
hat a
re n
ot c
ompe
tent
in th
e fu
ll sy
llabu
s can
not b
e pu
t for
war
d fo
r ass
essm
ent
I c
ertif
y th
at th
e ab
ove
have
bee
n co
mpl
eted
in a
ccor
danc
e w
ith th
e cr
iteria
set o
ut in
the
curr
ent e
ditio
n of
‘The
Life
guar
d’ a
nd th
at th
e ab
ove-
nam
ed c
andi
date
has
be
en ju
dged
as c
ompe
tent
ena
blin
g th
em to
be
put f
orw
ard
for t
he N
PLQ
Gen
erat
ion
9 As
sess
men
t. Tr
aine
rs N
ame:
___
____
____
____
____
____
____
____
Tra
iner
s Sig
natu
re: _
____
____
____
____
____
____
_
Soci
ety
Num
ber:
____
____
____
___
Date
: ___
_/__
__/_
___
63
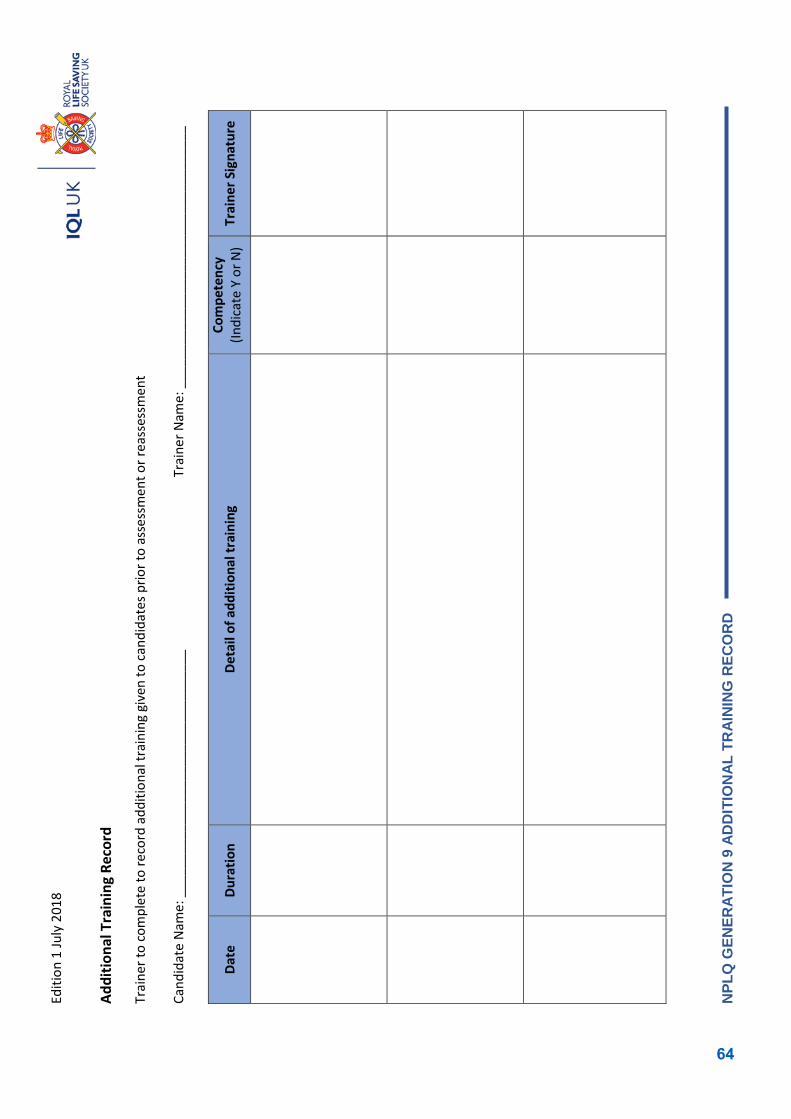
Editi
on 1
July
201
8
NPL
Q G
ENER
ATIO
N 9
AD
DIT
ION
AL T
RAI
NIN
G R
ECO
RD
Addi
tiona
l Tra
inin
g Re
cord
Trai
ner t
o co
mpl
ete
to re
cord
add
ition
al tr
aini
ng g
iven
to c
andi
date
s prio
r to
asse
ssm
ent o
r rea
sses
smen
t
Cand
idat
e N
ame:
___
____
____
____
____
____
____
____
___
Trai
ner N
ame:
___
____
____
____
____
____
____
____
____
_
Date
Du
ratio
n De
tail
of a
dditi
onal
trai
ning
Co
mpe
tenc
y (In
dica
te Y
or N
) Tr
aine
r Sig
natu
re
64
V2 December 2018 PLEASE TURN THE PAGE 1 of 12
PAPER NUMBER XX
National Pool Lifeguard Qualification
Theory Assessment- Question Sheet
_______________
Section 1
Please only open when instructed by your Assessor

V2 December 2018 PLEASE TURN THE PAGE 2 of 12
PAPER NUMBER XX
Please read the questions and record your answers on the candidate answer sheet.
1 Identify why it is important to have a whistle whilst lifeguarding A. To make you louder if you need to ask for a lunch breakB. To attract the attention of colleagues and customersC. To signal to customers if there is a power cutD. To alert receptionists when user load is reaching capacity
2 In addition to maintaining a positive attitude identify which of the following is a responsibility of a lifeguard
A. Selling membershipB. SittingC. Helping with birthday partiesD. Rescue
3 Identify which of the following is an element of the Normal Operating Plan (NOP) A. What is stocked in the vending machineB. How to deal with a lost vulnerable adultC. Codes for the main office safeD. Maximum pool user loads
4 Identify what information about the swimming pool is most likely to be included in the Normal Operating Plan (NOP)
A. DimensionsB. Water colourC. Gym opening timesD. Pool accident history
5 Identify which of the following is an element of the Emergency Action Plan (EAP) A. CleaningB. OvercrowdingC. Customer serviceD. Entertainment policy
6 Identify which of the following could be considered a serious injury to a member of the public and require the Emergency Action Plan to be implemented
A. Bruised legB. Unconscious casualtyC. Deep papercutD. Splinter
7 Identify which user groups are most likely to be identified in a Safeguarding policy A. Children and assistance dogsB. Club swimmers and leadersC. Children and vulnerable adultsD. Young adults and assistance dogs
8 Identify the responsibilities of the employer under the Health and Safety law in your own country A. Make lifeguarding duties funB. Ensure lifeguards feel happy and fitC. Issue and review staff surveys weeklyD. Carry out risk assessments
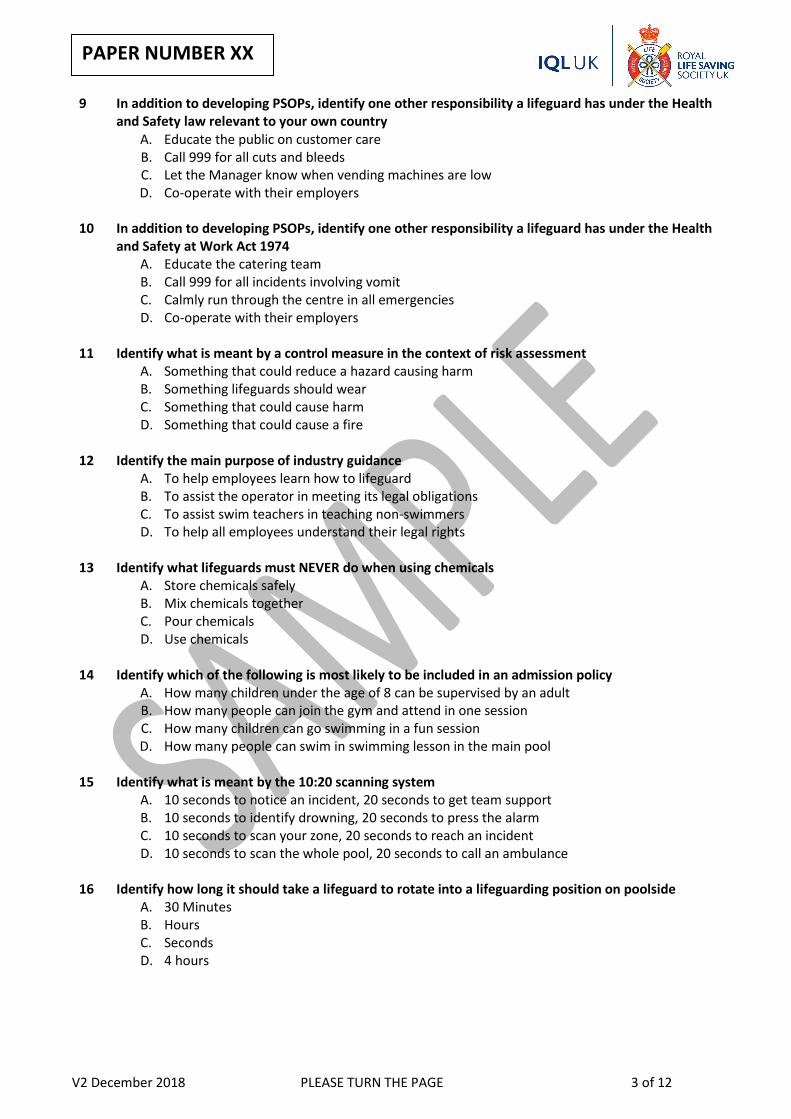
V2 December 2018 PLEASE TURN THE PAGE 3 of 12
PAPER NUMBER XX
9 In addition to developing PSOPs, identify one other responsibility a lifeguard has under the Health and Safety law relevant to your own country
A. Educate the public on customer careB. Call 999 for all cuts and bleedsC. Let the Manager know when vending machines are lowD. Co-operate with their employers
10 In addition to developing PSOPs, identify one other responsibility a lifeguard has under the Health and Safety at Work Act 1974
A. Educate the catering teamB. Call 999 for all incidents involving vomitC. Calmly run through the centre in all emergenciesD. Co-operate with their employers
11 Identify what is meant by a control measure in the context of risk assessment A. Something that could reduce a hazard causing harmB. Something lifeguards should wearC. Something that could cause harmD. Something that could cause a fire
12 Identify the main purpose of industry guidance A. To help employees learn how to lifeguardB. To assist the operator in meeting its legal obligationsC. To assist swim teachers in teaching non-swimmersD. To help all employees understand their legal rights
13 Identify what lifeguards must NEVER do when using chemicals A. Store chemicals safelyB. Mix chemicals togetherC. Pour chemicalsD. Use chemicals
14 Identify which of the following is most likely to be included in an admission policy A. How many children under the age of 8 can be supervised by an adult B. How many people can join the gym and attend in one sessionC. How many children can go swimming in a fun sessionD. How many people can swim in swimming lesson in the main pool
15 Identify what is meant by the 10:20 scanning system A. 10 seconds to notice an incident, 20 seconds to get team supportB. 10 seconds to identify drowning, 20 seconds to press the alarmC. 10 seconds to scan your zone, 20 seconds to reach an incidentD. 10 seconds to scan the whole pool, 20 seconds to call an ambulance
16 Identify how long it should take a lifeguard to rotate into a lifeguarding position on poolside A. 30 MinutesB. HoursC. SecondsD. 4 hours
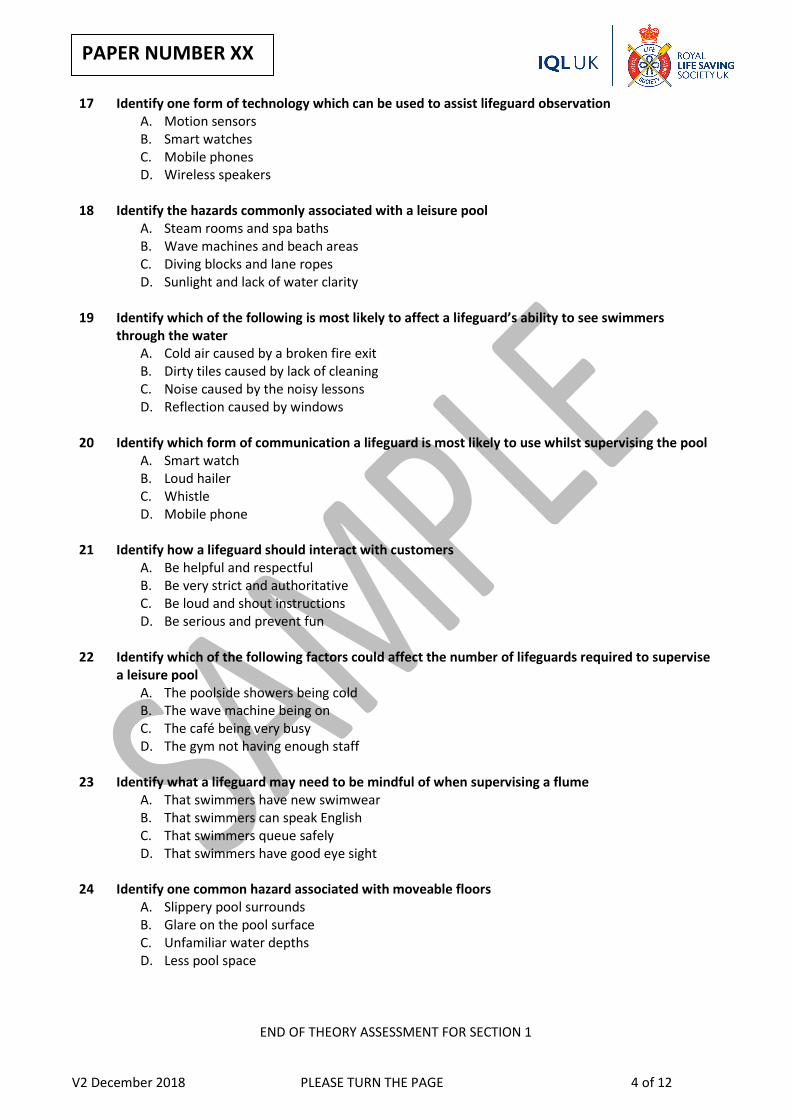
V2 December 2018 PLEASE TURN THE PAGE 4 of 12
PAPER NUMBER XX
17 Identify one form of technology which can be used to assist lifeguard observation A. Motion sensorsB. Smart watchesC. Mobile phonesD. Wireless speakers
18 Identify the hazards commonly associated with a leisure pool A. Steam rooms and spa bathsB. Wave machines and beach areasC. Diving blocks and lane ropesD. Sunlight and lack of water clarity
19 Identify which of the following is most likely to affect a lifeguard’s ability to see swimmers through the water
A. Cold air caused by a broken fire exitB. Dirty tiles caused by lack of cleaningC. Noise caused by the noisy lessonsD. Reflection caused by windows
20 Identify which form of communication a lifeguard is most likely to use whilst supervising the pool A. Smart watchB. Loud hailerC. WhistleD. Mobile phone
21 Identify how a lifeguard should interact with customers A. Be helpful and respectfulB. Be very strict and authoritativeC. Be loud and shout instructionsD. Be serious and prevent fun
22 Identify which of the following factors could affect the number of lifeguards required to supervise a leisure pool
A. The poolside showers being coldB. The wave machine being onC. The café being very busyD. The gym not having enough staff
23 Identify what a lifeguard may need to be mindful of when supervising a flume A. That swimmers have new swimwearB. That swimmers can speak EnglishC. That swimmers queue safelyD. That swimmers have good eye sight
24 Identify one common hazard associated with moveable floors A. Slippery pool surroundsB. Glare on the pool surfaceC. Unfamiliar water depthsD. Less pool space
END OF THEORY ASSESSMENT FOR SECTION 1

V2 December 2018 PLEASE TURN THE PAGE 5 of 12
PAPER NUMBER XX
Section 2
Please only open when instructed by your Assessor
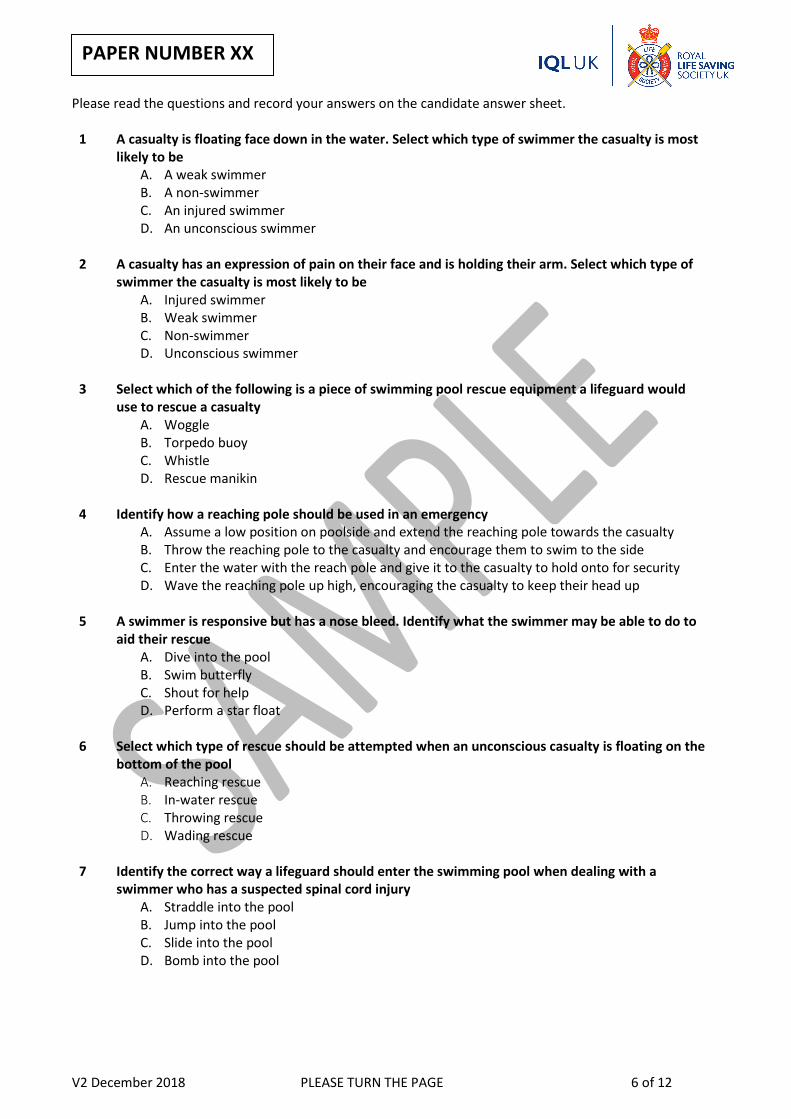
V2 December 2018 PLEASE TURN THE PAGE 6 of 12
PAPER NUMBER XX
Please read the questions and record your answers on the candidate answer sheet.
1 A casualty is floating face down in the water. Select which type of swimmer the casualty is most likely to be
A. A weak swimmerB. A non-swimmerC. An injured swimmerD. An unconscious swimmer
2 A casualty has an expression of pain on their face and is holding their arm. Select which type of swimmer the casualty is most likely to be
A. Injured swimmerB. Weak swimmerC. Non-swimmerD. Unconscious swimmer
3 Select which of the following is a piece of swimming pool rescue equipment a lifeguard would use to rescue a casualty
A. WoggleB. Torpedo buoyC. WhistleD. Rescue manikin
4 Identify how a reaching pole should be used in an emergency A. Assume a low position on poolside and extend the reaching pole towards the casualtyB. Throw the reaching pole to the casualty and encourage them to swim to the sideC. Enter the water with the reach pole and give it to the casualty to hold onto for securityD. Wave the reaching pole up high, encouraging the casualty to keep their head up
5 A swimmer is responsive but has a nose bleed. Identify what the swimmer may be able to do to aid their rescue
A. Dive into the poolB. Swim butterflyC. Shout for helpD. Perform a star float
6 Select which type of rescue should be attempted when an unconscious casualty is floating on the bottom of the pool
A. Reaching rescueB. In-water rescueC. Throwing rescueD. Wading rescue
7 Identify the correct way a lifeguard should enter the swimming pool when dealing with a swimmer who has a suspected spinal cord injury
A. Straddle into the poolB. Jump into the poolC. Slide into the poolD. Bomb into the pool
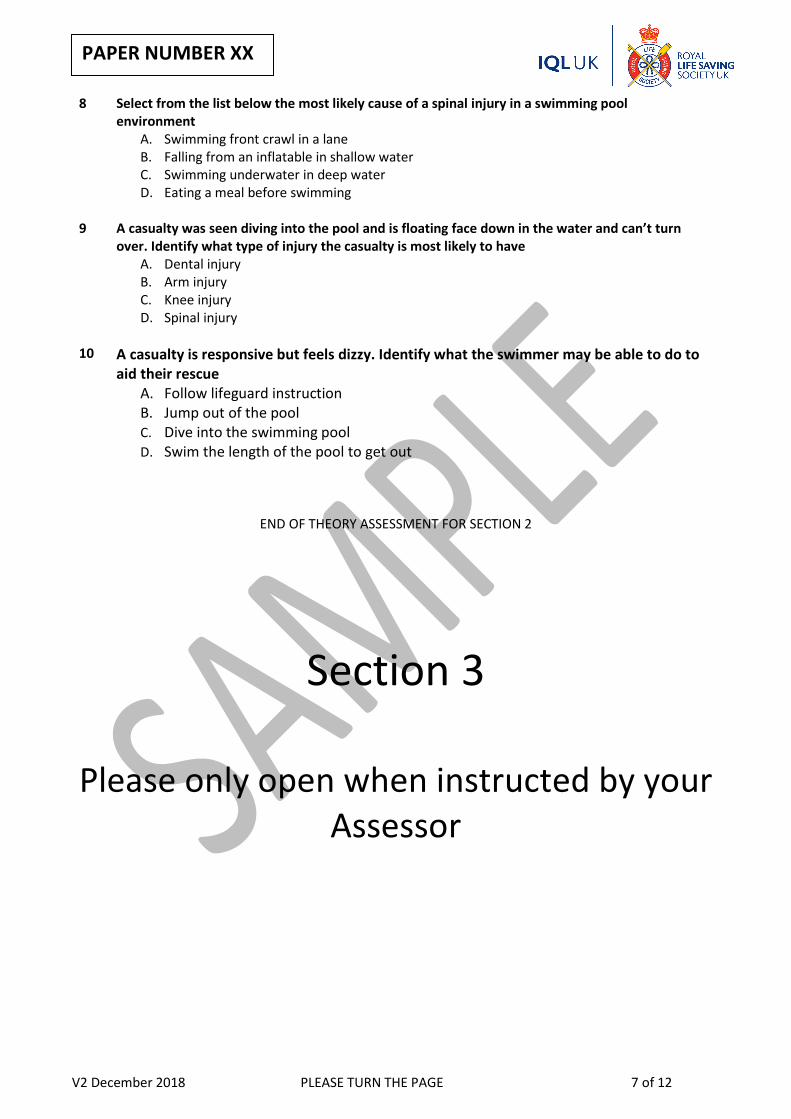
V2 December 2018 PLEASE TURN THE PAGE 7 of 12
PAPER NUMBER XX
8 Select from the list below the most likely cause of a spinal injury in a swimming pool environment
A. Swimming front crawl in a laneB. Falling from an inflatable in shallow waterC. Swimming underwater in deep waterD. Eating a meal before swimming
9 A casualty was seen diving into the pool and is floating face down in the water and can’t turn over. Identify what type of injury the casualty is most likely to have
A. Dental injuryB. Arm injuryC. Knee injuryD. Spinal injury
10 A casualty is responsive but feels dizzy. Identify what the swimmer may be able to do to aid their rescue
A. Follow lifeguard instructionB. Jump out of the poolC. Dive into the swimming poolD. Swim the length of the pool to get out
END OF THEORY ASSESSMENT FOR SECTION 2
Section 3
Please only open when instructed by your Assessor

V2 December 2018 PLEASE TURN THE PAGE 8 of 12
PAPER NUMBER XX
Please read the questions and record your answers on the candidate answer sheet.
1 Identify who from the list below who is most likely to have the responsibility of wearing PPE and providing first aid
A. A customerB. A lifeguardC. A casualtyD. A receptionist
2 A lifeguard is treating a casualty with a minor cut to their arm. Identify how they should minimise the risk of infection to themselves and the casualty
A. Make sure any exposed cuts are covered with a plaster and ask the casualty if they haverecently been ill
B. Wash hands before and after treating the casualty and make sure exposed cuts arecovered with a plaster
C. Make sure any exposed cuts are covered with a plaster and ask the casualty if they haveany infections
D. Wash hands before and after treating the casualty and ask them if they have any infectionsor diseases
3 Identify who should complete an accident report form following an accident A. AnyoneB. A casualtyC. A teacherD. A lifeguard
4 Identify the correct sequence of the chain of survival A. Early resolution, early CPR, early decision, post-traumatic stressB. Early recovery, early care, early defibrillation, post resuscitation careC. Early recognition, early critical care, early discovery, post resuscitation careD. Early recognition, early CPR, early defibrillation, post resuscitation care
5 A casualty is having a seizure in the cafe. Identify what treatment a lifeguard should administer A. Remove objects which could cause injury, hold the casualty’s head still by griping under
the ears, loosen any clothing around the casualty's neck, time the seizureB. Remove objects which could cause injury, protect head by putting something soft under it,
loosen any clothing around the casualty's neck, time the seizureC. Remove objects which could cause injury, put a spoon in the casualty’s mouth to maintain
their airway, loosen any clothing around the casualty's neck, time the seizureD. Remove objects which could cause injury, wrap the casualty in a blanket to keep them
warm, remove any jewellery from around the casualty's neck and time the seizure
6 Identify what treatment needs to be administered when a casualty is displaying Agonal gasps and seizure like episodes
A. Cardio pulmonary resuscitationB. Support slingC. A secondary surveyD. Up to 5 abdominal thrusts
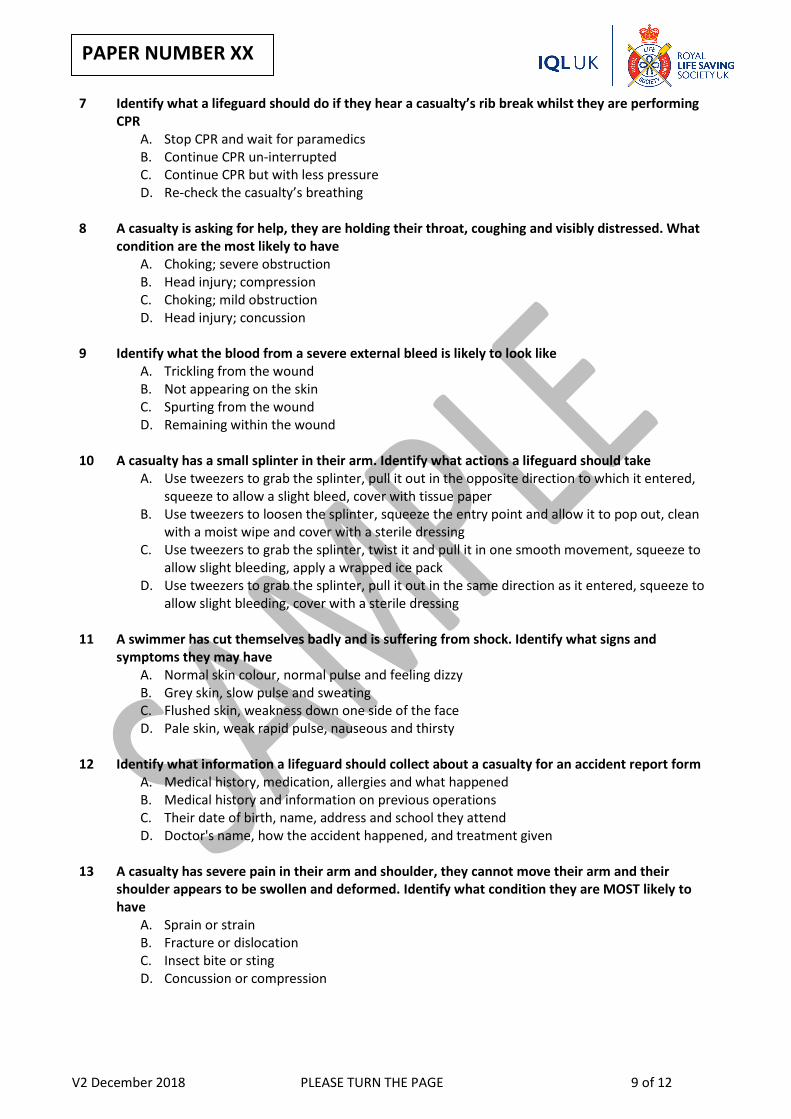
V2 December 2018 PLEASE TURN THE PAGE 9 of 12
PAPER NUMBER XX
7 Identify what a lifeguard should do if they hear a casualty’s rib break whilst they are performing CPR
A. Stop CPR and wait for paramedicsB. Continue CPR un-interruptedC. Continue CPR but with less pressureD. Re-check the casualty’s breathing
8 A casualty is asking for help, they are holding their throat, coughing and visibly distressed. What condition are the most likely to have
A. Choking; severe obstructionB. Head injury; compressionC. Choking; mild obstructionD. Head injury; concussion
9 Identify what the blood from a severe external bleed is likely to look like A. Trickling from the woundB. Not appearing on the skinC. Spurting from the woundD. Remaining within the wound
10 A casualty has a small splinter in their arm. Identify what actions a lifeguard should take A. Use tweezers to grab the splinter, pull it out in the opposite direction to which it entered,
squeeze to allow a slight bleed, cover with tissue paperB. Use tweezers to loosen the splinter, squeeze the entry point and allow it to pop out, clean
with a moist wipe and cover with a sterile dressingC. Use tweezers to grab the splinter, twist it and pull it in one smooth movement, squeeze to
allow slight bleeding, apply a wrapped ice packD. Use tweezers to grab the splinter, pull it out in the same direction as it entered, squeeze to
allow slight bleeding, cover with a sterile dressing
11 A swimmer has cut themselves badly and is suffering from shock. Identify what signs and symptoms they may have
A. Normal skin colour, normal pulse and feeling dizzyB. Grey skin, slow pulse and sweatingC. Flushed skin, weakness down one side of the faceD. Pale skin, weak rapid pulse, nauseous and thirsty
12 Identify what information a lifeguard should collect about a casualty for an accident report form A. Medical history, medication, allergies and what happenedB. Medical history and information on previous operationsC. Their date of birth, name, address and school they attendD. Doctor's name, how the accident happened, and treatment given
13 A casualty has severe pain in their arm and shoulder, they cannot move their arm and their shoulder appears to be swollen and deformed. Identify what condition they are MOST likely to have
A. Sprain or strainB. Fracture or dislocationC. Insect bite or stingD. Concussion or compression
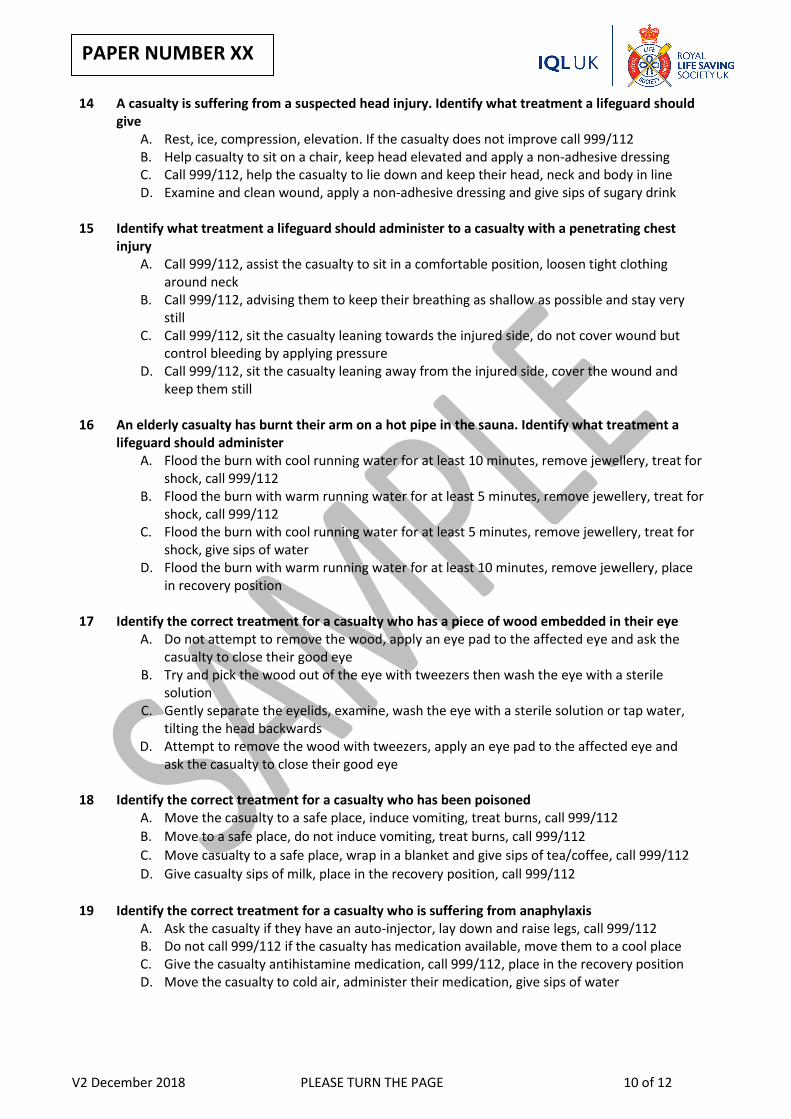
V2 December 2018 PLEASE TURN THE PAGE 10 of 12
PAPER NUMBER XX
14 A casualty is suffering from a suspected head injury. Identify what treatment a lifeguard should give
A. Rest, ice, compression, elevation. If the casualty does not improve call 999/112B. Help casualty to sit on a chair, keep head elevated and apply a non-adhesive dressingC. Call 999/112, help the casualty to lie down and keep their head, neck and body in lineD. Examine and clean wound, apply a non-adhesive dressing and give sips of sugary drink
15 Identify what treatment a lifeguard should administer to a casualty with a penetrating chest injury
A. Call 999/112, assist the casualty to sit in a comfortable position, loosen tight clothingaround neck
B. Call 999/112, advising them to keep their breathing as shallow as possible and stay verystill
C. Call 999/112, sit the casualty leaning towards the injured side, do not cover wound butcontrol bleeding by applying pressure
D. Call 999/112, sit the casualty leaning away from the injured side, cover the wound andkeep them still
16 An elderly casualty has burnt their arm on a hot pipe in the sauna. Identify what treatment a lifeguard should administer
A. Flood the burn with cool running water for at least 10 minutes, remove jewellery, treat forshock, call 999/112
B. Flood the burn with warm running water for at least 5 minutes, remove jewellery, treat forshock, call 999/112
C. Flood the burn with cool running water for at least 5 minutes, remove jewellery, treat forshock, give sips of water
D. Flood the burn with warm running water for at least 10 minutes, remove jewellery, placein recovery position
17 Identify the correct treatment for a casualty who has a piece of wood embedded in their eye A. Do not attempt to remove the wood, apply an eye pad to the affected eye and ask the
casualty to close their good eyeB. Try and pick the wood out of the eye with tweezers then wash the eye with a sterile
solutionC. Gently separate the eyelids, examine, wash the eye with a sterile solution or tap water,
tilting the head backwardsD. Attempt to remove the wood with tweezers, apply an eye pad to the affected eye and
ask the casualty to close their good eye
18 Identify the correct treatment for a casualty who has been poisoned A. Move the casualty to a safe place, induce vomiting, treat burns, call 999/112B. Move to a safe place, do not induce vomiting, treat burns, call 999/112C. Move casualty to a safe place, wrap in a blanket and give sips of tea/coffee, call 999/112D. Give casualty sips of milk, place in the recovery position, call 999/112
19 Identify the correct treatment for a casualty who is suffering from anaphylaxis A. Ask the casualty if they have an auto-injector, lay down and raise legs, call 999/112B. Do not call 999/112 if the casualty has medication available, move them to a cool placeC. Give the casualty antihistamine medication, call 999/112, place in the recovery positionD. Move the casualty to cold air, administer their medication, give sips of water

V2 December 2018 PLEASE TURN THE PAGE 11 of 12
PAPER NUMBER XX
20 Identify how to treat a casualty suffering a diabetic emergency (hypoglycaemia) A. Place the casualty in the recovery position, give them a warm drink and monitor themB. Sit the casualty down, give a sugary drink and call 999/112 if they do not improveC. Call 999/112, lay the casualty down, raise their legs and give them a sugary drinkD. Give the casualty an ice cream, keep them warm, place them in the recovery position
21 A casualty is hyperventilating. Identify what treatment a lifeguard should administer A. Assist the casualty to a cool area, encourage them to cough repeatedlyB. Help them into a half sitting, half laying position and get them to breath in a bagC. Lay the casualty down, elevate their legs and place an ice pack on their foreheadD. Move the casualty to a quiet area, encourage them to breathe through their nose and give
sips of water
22 A casualty has chipped their tooth. Identify what treatment a lifeguard should administer A. Retrieve the broken parts, rinse their mouth with saline solution, give them a warm sugary
drink to sip slowly, seek immediate dental assistanceB. Lay the casualty down and raise their legs, apply an ice pack to the outside of the cheek,
bandage the chipped tooth with a small sterile dressingC. Lay the casualty down and raise their legs, give them a glass of milk to sip slowly and apply
an ice pack to their forehead to cool them downD. Retrieve the broken parts, rinse their mouth with warm water, apply an ice pack to the
outside of the cheek, seek immediate dental assistance
23 A lifeguard has been standing still for a long period of time, has blurred vision and feels nauseous. Identify what condition they may be about to suffer from
A. FaintingB. PoisoningC. ShockD. Seizure
24 A casualty is suffering from heat exhaustion. Identify what treatment a lifeguard should administer
A. Move casualty to a cool place, give them water to sip, lie them down, raise their legsB. Cool the casualty down rapidly, do not move them, place them in the recovery positionC. Move the casualty inside to a cool area. Get medical help if they do not improveD. Move the casualty to a warm area, give them fluids, administer paracetamol
END OF THEORY ASSESSMENT
Please ensure that all paperwork relating to this assessment is collected by your Assessor.
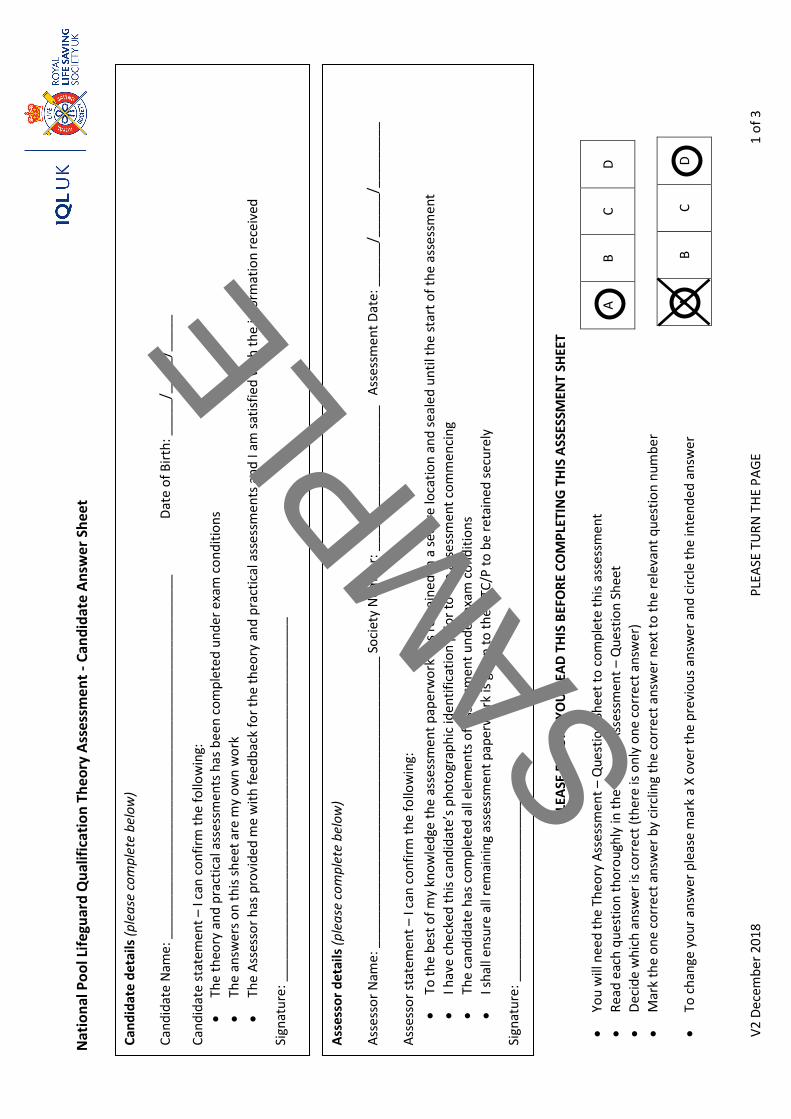
V2
Dece
mbe
r 201
8
P
LEAS
E TU
RN T
HE P
AGE
1 o
f 3
Asse
ssor
det
ails
(ple
ase
com
plet
e be
low
)
Asse
ssor
Nam
e: _
____
____
____
____
____
____
____
____
____
___
Soci
ety
Num
ber:
____
____
____
____
____
As
sess
men
t Dat
e: _
____
_/__
____
/___
____
__
Asse
sso r
stat
emen
t – I
can
conf
irm th
e fo
llow
ing:
•
To th
e be
st o
f my
know
ledg
e th
e as
sess
men
t pap
erw
ork
has r
emai
ned
in a
secu
re lo
catio
n an
d se
aled
unt
il th
e st
art o
f the
ass
essm
ent
•I h
ave
chec
ked
this
cand
idat
e’s p
hoto
grap
hic
iden
tific
atio
n pr
ior t
o th
e as
sess
men
t com
men
cing
•Th
e ca
ndid
ate
has c
ompl
eted
all
elem
ents
of a
sses
smen
t und
er e
xam
con
ditio
ns•
I sha
ll en
sure
all
rem
aini
ng a
sses
smen
t pap
erw
ork
is gi
ven
to th
e AT
C/P
to b
e re
tain
ed se
cure
ly
Sign
atur
e: _
____
____
____
____
____
____
__
Nat
iona
l Poo
l Life
guar
d Q
ualif
icat
ion
Theo
ry A
sses
smen
t - C
andi
date
Ans
wer
She
et
PLEA
SE E
NSU
RE Y
OU
REA
D TH
IS B
EFO
RE C
OM
PLET
ING
THI
S AS
SESS
MEN
T SH
EET
•Yo
u w
ill n
eed
the
Theo
ry A
sses
smen
t – Q
uest
ion
Shee
t to
com
plet
e th
is as
sess
men
t•
Read
eac
h qu
estio
n th
orou
ghly
in th
e Th
eory
Ass
essm
ent –
Que
stio
n Sh
eet
•De
cide
whi
ch a
nsw
er is
cor
rect
(the
re is
onl
y on
e co
rrec
t ans
wer
)•
Mar
k th
e on
e co
rrec
t ans
wer
by
circ
ling
the
corr
ect a
nsw
er n
ext t
o th
e re
leva
nt q
uest
ion
num
ber
•To
cha
nge
your
ans
wer
ple
ase
mar
k a
X ov
er th
e pr
evio
us a
nsw
er a
nd c
ircle
the
inte
nded
ans
wer
A B
C D
A B
C D
Cand
idat
e de
tails
(ple
ase
com
plet
e be
low
)
Cand
idat
e N
ame:
___
____
____
____
____
____
____
____
____
____
____
____
___
Date
of B
irth:
___
__/_
____
/___
__
Cand
idat
e st
atem
ent –
I ca
n co
nfirm
the
follo
win
g:
•Th
e th
eory
and
pra
ctic
al a
sses
smen
ts h
as b
een
com
plet
ed u
nder
exa
m c
ondi
tions
•Th
e an
swer
s on
this
shee
t are
my
own
wor
k•
The
Asse
ssor
has
pro
vide
d m
e w
ith fe
edba
ck fo
r the
theo
ry a
nd p
ract
ical
ass
essm
ents
and
I am
satis
fied
with
the
info
rmat
ion
rece
ived
Sign
atur
e: _
____
____
____
____
____
____
____
____
____
____
____
____
_
SAMPLE

V2
Dece
mbe
r 201
8
P
LEAS
E TU
RN T
HE P
AGE
2 o
f 3
Sect
ion
1
Cand
idat
e pa
ss m
ark
– 18
Ti
me
allo
wan
ce 2
5 m
inut
es
1 m
ark
per q
uest
ion
Sect
ion
2
Cand
idat
e pa
ss m
ark
– 8
Tim
e al
low
ance
12
min
utes
1
mar
k pe
r que
stio
n
Sec
tion
1
Sec
tion
1 S
ectio
n 2
Q
Answ
er o
ptio
ns
Q
Answ
er o
ptio
ns
Q
Answ
er o
ptio
ns
1 A
B C
D 15
A
B C
D 1
A B
C D
2 A
B C
D 16
A
B C
D 2
A B
C D
3 A
B C
D 17
A
B C
D 3
A B
C D
4 A
B C
D 18
A
B C
D 4
A B
C D
5 A
B C
D 19
A
B C
D 5
A B
C D
6 A
B C
D 20
A
B C
D 6
A B
C D
7 A
B C
D 21
A
B C
D 7
A B
C D
8 A
B C
D 22
A
B C
D 8
A B
C D
9 A
B C
D 23
A
B C
D 9
A B
C D
10
A B
C D
24
A B
C D
10
A B
C D
11
A B
C D
12
A B
C D
13
A B
C D
14
A B
C D
SAMPLE

V2
Dece
mbe
r 201
8
P
LEAS
E TU
RN T
HE P
AGE
3 o
f 3
Sect
ion
3
Cand
idat
e pa
ss m
ark
– 18
Ti
me
allo
wan
ce 2
5 m
inut
es
1 m
ark
per q
uest
ion
Sec
tion
3 S
ectio
n 3
R
esul
ts
(To
be c
ompl
eted
by
the
Asse
ssor
onl
y)
Plea
se e
nsur
e th
at a
ll pa
perw
ork
rela
ting
to th
is a
sses
smen
t is c
olle
cted
by
your
Ass
esso
r
Q
Answ
er o
ptio
ns
Q
Answ
er o
ptio
ns
1 A
B C
D 15
A
B C
D
2 A
B C
D 16
A
B C
D
3 A
B C
D 17
A
B C
D
4 A
B C
D 18
A
B C
D
5 A
B C
D 19
A
B C
D
6 A
B C
D 20
A
B C
D
7 A
B C
D 21
A
B C
D
8 A
B C
D 22
A
B C
D
9 A
B C
D 23
A
B C
D
10
A B
C D
24
A B
C D
11
A B
C D
12
A B
C D
13
A B
C D
14
A B
C D
Prac
tical
Ass
essm
ent
Sect
ion
2
P
ass/
Fail
Sect
ion
3
P
ass/
Fail
Theo
ry A
sses
smen
t
Sect
ion
1 __
___/
24
(Can
dida
te m
ust s
core
at l
east
18
to p
ass)
Sect
ion
2 __
___/
10
(Can
dida
te m
ust s
core
at l
east
8 to
pas
s)
Sect
ion
3 _
____
_/24
(C
andi
date
mus
t sco
re a
t lea
st 1
8 to
pas
s)
Fina
l Res
ult (
prac
tical
and
theo
ry)
Sect
ion
1
Pas
s/Fa
il
Sect
ion
2
Pas
s/Fa
il
Sect
ion
3
Pass
/Fai
l
Asse
ssor
Sig
natu
re: _
____
____
____
____
___
Pape
r num
ber-
___
____
__ (
plea
se in
sert
)
SAMPLE

V2 D
ecem
ber 2
018
1 o
f 2
PAPE
R N
UM
BER
XX
Sect
ion
1
Cand
idat
e pa
ss m
ark
18
1 m
ark
per q
uest
ion
Sect
ion
2
Cand
idat
e pa
ss m
ark
8 1
mar
k pe
r que
stio
n
Nat
iona
l Poo
l Life
guar
d Q
ualif
icat
ion
Theo
ry A
sses
smen
t – A
sses
sor M
ark
Shee
t
Sec
tion
1
Sec
tion
1 S
ectio
n 2
Q
Answ
er o
ptio
ns
Q
Answ
er o
ptio
ns
Q
Answ
er o
ptio
ns
1 B
15
C 1
D
2 D
16
C 2
A
3 D
17
A 3
B
4 A
18
B 4
A
5 B
19
D 5
C
6 B
20
C 6
B
7 C
21
A 7
C
8 D
22
B 8
B
9 D
23
C 9
D
10
D 24
C
10
A
11
A
12
B
13
B
14
A
SAMPLE
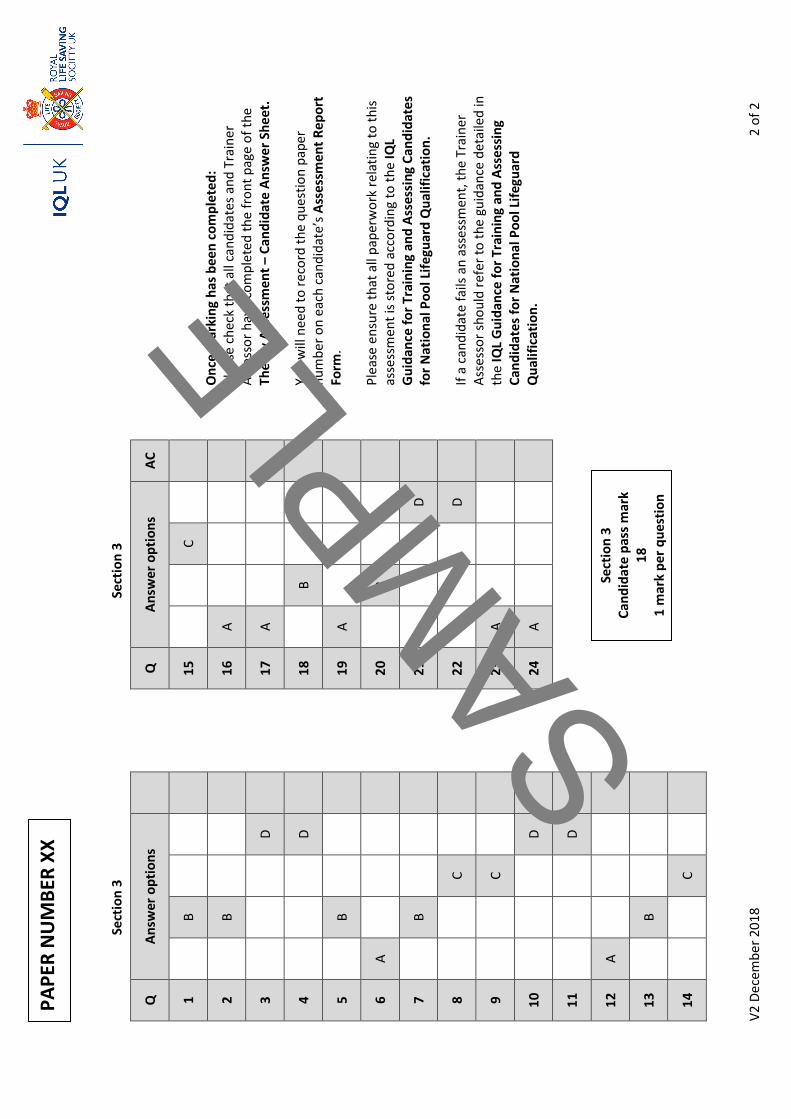
V2 D
ecem
ber 2
018
2 o
f 2
PAPE
R N
UM
BER
XX
Sect
ion
3
Cand
idat
e pa
ss m
ark
18
1 m
ark
per q
uest
ion
Se
ctio
n 3
Sect
ion
3
Onc
e m
arki
ng h
as b
een
com
plet
ed:
Plea
se c
heck
that
all
cand
idat
es a
nd T
rain
er
Asse
ssor
hav
e co
mpl
eted
the
fron
t pag
e of
the
Theo
ry A
sses
smen
t – C
andi
date
Ans
wer
She
et.
You
will
nee
d to
reco
rd th
e qu
estio
n pa
per
num
ber o
n ea
ch c
andi
date
’s As
sess
men
t Rep
ort
Form
.
P lea
se e
nsur
e th
at a
ll pa
perw
ork
rela
ting
to th
is as
sess
men
t is s
tore
d ac
cord
ing
to th
e IQ
L G
uida
nce
for T
rain
ing
and
Asse
ssin
g Ca
ndid
ates
fo
r Nat
iona
l Poo
l Life
guar
d Q
ualif
icat
ion.
I f a
cand
idat
e fa
ils a
n as
sess
men
t, th
e Tr
aine
r As
sess
or sh
ould
refe
r to
the
guid
ance
det
aile
d in
th
e IQ
L G
uida
nce
for T
rain
ing
and
Asse
ssin
g Ca
ndid
ates
for N
atio
nal P
ool L
ifegu
ard
Qua
lific
atio
n.
Q
Answ
er o
ptio
ns
Q
Answ
er o
ptio
ns
AC
1 B
15
C
2 B
16
A
3 D
17
A
4 D
18
B
5 B
19
A
6 A
20
B
7 B
21
D
8 C
22
D
9 C
23
A
10
D 24
A
11
D
12
A
13
B
14
C
SAMPLE

Edition 2 Nov 2018
NPLQ GENERATION 9 PRACTICAL ASSESSMENT RECORD
NPLQ Practical Assessment Record Assessment Venue: ______________________________ Venue Number: ______________ Date: ___/___/_____ Assessor Name: _______________________________ Society Number: ______________ Assessor Signature to confirm they have checked records as detailed in guidance and syllabus: _______________ Section 2 Assessment start time: ________finish time: ________
Section 2- Intervention, Rescue and Emergency Action Plan
Insert Candidates names below (one in each column)
1
2
3
4
5
6
Supervision and immediate response - shallow water
To pass this assessment criteria the candidate must pass all areas in grey and not fail more than 3 white rows
Scan their zone and identify an emergency
Alert the lifeguard team
Appropriate choice of rescue equipment (if required)
Safe entry (if required)
Effective rescue
Insert R- reach, T- throw, W- wade
Casualty recovered to poolside
Defensive block
To pass this assessment criteria the candidate must pass all areas in grey and not fail more than 1 white row
Alert the lifeguard team
Safe entry
Approach casualty and use a defensive block
Give reassurance
Contact Rescue - deep water
To pass this assessment criteria the candidate must pass all areas in grey and not fail more than 1 white row
Alert the lifeguard team
Safe entry
Effective support and tow
Insert H- hip support, S- shoulder support, A- arm support
Casualty secure at poolside
Fitness test - timed swim with conscious casualty
To pass this assessment criteria the candidate must not exceed 65 seconds for the fitness test
Alert the lifeguard team
Slide in entry
Effective tow/ swim
Insert time in seconds (no more than 65 seconds)
1

Edition 2 Nov 2018
NPLQ GENERATION 9 PRACTICAL ASSESSMENT RECORD
1
2
3
4
5
6
Fitness test - timed swim with unconscious casualty
To pass this assessment criteria the candidate must not exceed 45 seconds for the fitness test
Alert the lifeguard team
Slide in entry
Safe roll of casualty
Effective tow Insert time in seconds (no more than 45 seconds)
Deep water recovery To pass this assessment the candidate must retrieve the manikin and bring to the surface on their first attempt, pass all
areas in grey and not fail more than 8 white rows Alert the lifeguard team
Safe entry
Recover manikin on first attempt
Safe roll of live casualty
Safe and effective tow to point of support
Check breathing
PROMPT 'no normal breathing found and no help is available'
Give rescue breaths in the water
PROMPT ask team members to assist and 'your team is now here to help’
Support casualty to allow lifeguard to get out of the pool
Lift the casualty from the water and lay them on poolside
Move the casualty parallel with the pool
Safe turn of casualty into face up position
Open airway using head tilt - chin lift
Check breathing
PROMPT 'the casualty is not breathing normally'
Ensure an ambulance is called and an AED is requested
Give 5 rescue breathes (simulated)
PROMPT 'the casualty is regurgitating their stomach contents'
Action for regurgitation
PROMPT 'the casualty shows clear signs of waking up, moving, opening eyes AND is breathing normally'
Casualty's arm out
Arm across and support head
Grasp the knee and pull up
Roll the casualty over
Adjust the upper leg
Open airway
Check breathing
2
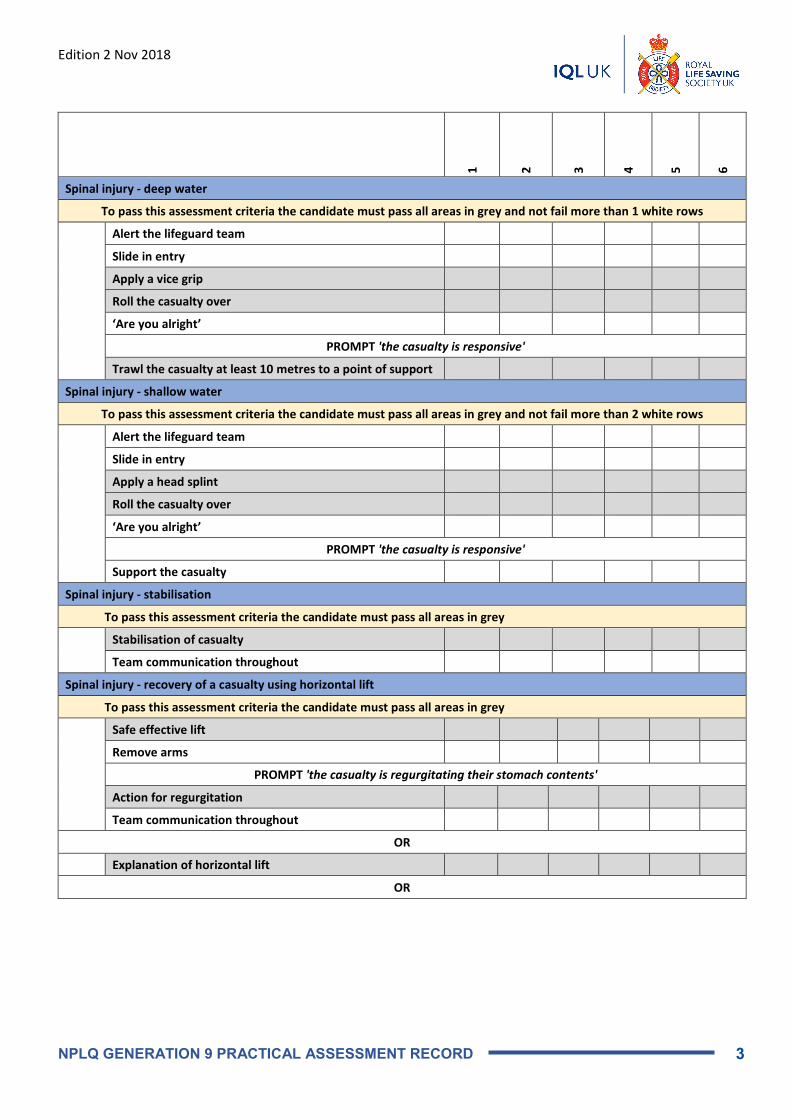
Edition 2 Nov 2018
NPLQ GENERATION 9 PRACTICAL ASSESSMENT RECORD
1
2
3
4
5
6
Spinal injury - deep water
To pass this assessment criteria the candidate must pass all areas in grey and not fail more than 1 white rows
Alert the lifeguard team
Slide in entry
Apply a vice grip
Roll the casualty over
‘Are you alright’
PROMPT 'the casualty is responsive'
Trawl the casualty at least 10 metres to a point of support
Spinal injury - shallow water
To pass this assessment criteria the candidate must pass all areas in grey and not fail more than 2 white rows
Alert the lifeguard team
Slide in entry
Apply a head splint
Roll the casualty over
‘Are you alright’
PROMPT 'the casualty is responsive'
Support the casualty
Spinal injury - stabilisation
To pass this assessment criteria the candidate must pass all areas in grey
Stabilisation of casualty
Team communication throughout
Spinal injury - recovery of a casualty using horizontal lift
To pass this assessment criteria the candidate must pass all areas in grey
Safe effective lift
Remove arms
PROMPT 'the casualty is regurgitating their stomach contents'
Action for regurgitation
Team communication throughout
OR
Explanation of horizontal lift
OR
3
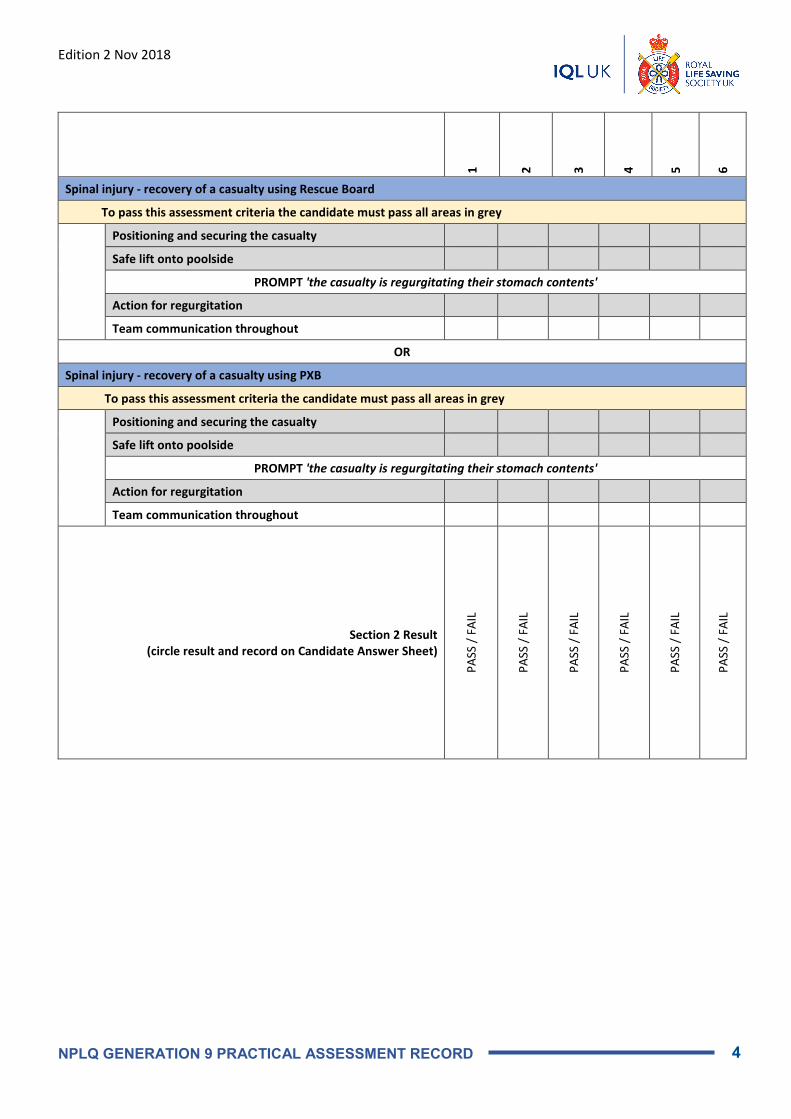
Edition 2 Nov 2018
NPLQ GENERATION 9 PRACTICAL ASSESSMENT RECORD
1
2
3
4
5
6
Spinal injury - recovery of a casualty using Rescue Board
To pass this assessment criteria the candidate must pass all areas in grey
Positioning and securing the casualty
Safe lift onto poolside
PROMPT 'the casualty is regurgitating their stomach contents'
Action for regurgitation
Team communication throughout
OR
Spinal injury - recovery of a casualty using PXB
To pass this assessment criteria the candidate must pass all areas in grey
Positioning and securing the casualty
Safe lift onto poolside
PROMPT 'the casualty is regurgitating their stomach contents'
Action for regurgitation
Team communication throughout
Section 2 Result (circle result and record on Candidate Answer Sheet)
PASS
/ FA
IL
PASS
/ FA
IL
PASS
/ FA
IL
PASS
/ FA
IL
PASS
/ FA
IL
PASS
/ FA
IL
4

Edition 2 Nov 2018
NPLQ GENERATION 9 PRACTICAL ASSESSMENT RECORD
NPLQ Practical Assessment Record Assessment Venue: ______________________________ Venue Number: ______________ Date: ___/___/_____ Assessor Name: _______________________________ Society Number: ______________ Assessor Signature to confirm they have checked records as detailed in guidance and syllabus: _______________ Section 3 Assessment start time: _______ finish time: _______Tick if details above are the same as Section 2
Section 3- CPR, AED and First Aid Insert Candidates names below
(one in each column)
1
2
3
4
5
6
CPR- Adult
To pass this assessment criteria the learner must pass all areas in grey and not fail more than 2 white rows
Conduct a scene survey
Check the casualty for response
Open airway using head tilt chin lift
Check breathing
PROMPT 'No normal breathing found'
Ensure an ambulance is called and an AED is requested
PROMPT ‘Assistance is on its way and an AED will arrive shortly’
Give 30 chest compressions
Give 2 rescue breaths
Continue 30:2
PROMPT hand the AED to the candidate after 2 full cycles of 30:2
Use AED
Continue 30:2
CPR - Child/Infant
To pass this assessment criteria the learner must pass all areas in grey and not fail more than 2 white rows
Insert C (child) or I (infant)
Conduct a scene survey
Check the casualty for response
Open airway using head tilt chin lift
Check breathing
PROMPT 'No normal breathing found'
Ensure an ambulance is called and an AED is requested
PROMPT ‘Assistance is on its way and an AED will arrive shortly’
Give 5 rescue breaths
Give 30 chest compressions
5

Edition 2 Nov 2018
NPLQ GENERATION 9 PRACTICAL ASSESSMENT RECORD
1
2
3
4
5
6
Give 2 rescue breaths
Continue 30:2
PROMPT hand the AED to the candidate after 2 full cycle of 30:2
Use AED
Continue 30:2
CPR - More than one rescuer
To pass this assessment criteria the learner must pass all areas in grey and not fail more than 3 white rows
Give 30 chest compressions
Give 2 rescue breaths using a pocket mask
Continue 30:2
PROMPT instruct 2nd rescuer to enter and offer help
Good communication
2nd rescuer tells 1st rescuer they are going to take over
2nd rescuer takes over
Continue CPR using a pocket mask
CPR - Casualty with a suspected upper spinal cord injury
To pass this assessment criteria the learner must pass all areas in grey and not fail more than 2 white rows
Second rescuer stabilises the casualty's head
Check the casualty for response
Open airway using chin lift only
Check breathing
PROMPT 'No normal breathing found'
Ensure an ambulance is called and an AED is requested
PROMPT ‘Assistance is on its way and an AED will arrive shortly’
Give 5 rescue breaths
Give 30 chest compressions
Give 2 rescue breaths
Continue 30:2
Choking
To pass this assessment criteria the learner must pass all areas in grey
Encourage the casualty to cough
PROMPT 'the casualty is becoming weak and no longer coughing’
Support the casualty
Give 5 back blows
Give 5 abdominal thrusts
Continue 5:5
PROMPT put the adult manikin on the floor 'the casualty has fallen unconscious, an ambulance has been called'
Start CPR
6

Edition 2 Nov 2018
NPLQ GENERATION 9 PRACTICAL ASSESSMENT RECORD
1
2
3
4
5
6
Secondary survey
To pass this assessment criteria the learner must pass all areas in grey and not fail more than 6 white rows
Wear protective gloves
Check breathing
Check head
Check mouth
Check neck
Check chest
Check arms
Check abdomen
Check pelvis
Check legs & feet
Communication throughout
External bleeding & shock
To pass this assessment criteria the learner must pass all areas in grey and not fail more than 1 white row
Wear protective gloves
Help casualty to a comfortable position
Examine the wound
Apply direct pressure
PROMPT 'the casualty has gone very pale, is dizzy and confused'
Treat for shock
Reassure and monitor
Call 999/112
Injury to bones, muscles & joints
To pass this assessment criteria the learner must pass all areas in grey and not fail more than 1 white row
Make the casualty comfortable
Immobilise or support the limb/area
Reassure and monitor
Call for help
Section 3 Result (circle result and record on Candidate Answer Sheet)
PASS
/ FA
IL
PASS
/ FA
IL
PASS
/ FA
IL
PASS
/ FA
IL
PASS
/ FA
IL
PASS
/ FA
IL
7

88