Gig Performer 4.x User Manual - Plugin Alliance
312
Gig Performer® 4 User Guide v. 4.x April 2021 https://www.gigperformer.com/ Version 4 update by Nemanja Pudar & Deskew Technologies, LLC Version 3 update by Larry the O, Toys In the Attic Communications Original manual written by Howard Massey Copyright © 2016-2021 Deskew Technologies, LLC All rights reserved.
-
Upload
khangminh22 -
Category
Documents
-
view
5 -
download
0
Transcript of Gig Performer 4.x User Manual - Plugin Alliance

Gig Performer® 4User Guide
v. 4.xApril 2021
https://www.gigperformer.com/
Version 4 update by Nemanja Pudar & Deskew Technologies, LLC
Version 3 update by Larry the O, Toys In the Attic Communications
Original manual written by Howard Massey
Copyright © 2016-2021 Deskew Technologies, LLCAll rights reserved.


3
Gig Performer 4.x User Manual © 2016 - 2021 Deskew Technologies, LLC
Table of Contents
1. Welcome to Gig Performer 8
1.1 Thank you note ................................................................................................................... 8
1.2 What is Gig Performer? ...................................................................................................... 8
1.3 Who can use Gig Performer? ........................................................................................... 10
1.4 Gig Performer standard features ..................................................................................... 10
2. What is new in Gig Performer 4? 14
2.1 Improved user interface ................................................................................................... 14
2.2 Global Rackspace ............................................................................................................... 15
2.3 New widgets ...................................................................................................................... 17
2.4 New Scaling component ................................................................................................... 20
2.5 New plugins ....................................................................................................................... 21
2.6 MIDI File Player .................................................................................................................. 22
2.7 Improvements to the Wiring view .................................................................................. 22
2.8 Improvements to the Song Lyrics/Chords Editor ........................................................... 24
2.9 MIDI Helper Tool ............................................................................................................... 25
2.10 Tuner improvements ........................................................................................................ 27
2.11 Probabilistic Sound Designer ........................................................................................... 27
2.12 Save one or more plugins as favorites ............................................................................ 28
2.13 Drag and drop support ..................................................................................................... 32
2.14 Other enhancements ........................................................................................................ 33
3. Getting started 36
3.1 Before you start ................................................................................................................ 36
3.2 Basic setup for keyboardists ............................................................................................ 38
3.3 Basic setup for guitarists .................................................................................................. 41
3.4 Basic setup for vocalists, drummers, other musicians and FOH engineers .................. 43
3.5 Built-in templates .............................................................................................................. 44
4. Gig Performer user interface and concepts 46
4.1 The main Gig Performer window ..................................................................................... 46
4.2 Rackspaces and Variations ............................................................................................... 49
Manage Rackspaces/Variations contextual menu ..................................................... 504.2.1
Rackspace Properties .................................................................................................. 524.2.2
Variation Properties .................................................................................................... 544.2.3
4.3 Wiring view ........................................................................................................................ 55

4
Gig Performer 4.x User Manual © 2016 - 2021 Deskew Technologies, LLC
Table of Contents
Wiring view contextual menu ..................................................................................... 564.3.1
4.4 Panels view ........................................................................................................................ 57
4.5 Setlist view ......................................................................................................................... 59
Manage setlists contextual menu ............................................................................... 614.5.1
4.6 Widgets .............................................................................................................................. 64
Widget contextual menu ............................................................................................. 674.6.1
4.7 Plugins ................................................................................................................................ 67
Plugin Manager ........................................................................................................... 714.7.1
Plugin contextual menu ............................................................................................... 734.7.2
Selected blocks contextual menu ................................................................................ 784.7.3
Plugin Editor More menu ............................................................................................. 814.7.4
4.8 Global MIDI Monitor ......................................................................................................... 84
4.9 Rig Manager ....................................................................................................................... 85
4.10 ChordPro ............................................................................................................................ 90
5. Inserting and Wiring your plugins 95
5.1 How to insert a plugin and connect it ............................................................................ 95
5.2 Blue and orange colored connections and pins ........................................................... 100
6. Panels and Widgets 104
6.1 What is a panel? .............................................................................................................. 104
Panel contextual menu .............................................................................................. 1056.1.1
6.2 Widgets ............................................................................................................................ 107
How to add widgets to a panel? ............................................................................... 1076.2.1
Widget alignment and distribution ........................................................................... 1106.2.2
Widget z-ordering ...................................................................................................... 1136.2.3
Widget Properties inspector ..................................................................................... 1146.2.4
How to connect a widget to a plugin parameter? ..................................................... 1236.2.5
How to connect a widget to a MIDI device? ............................................................. 1256.2.6
How to add a widget to a widget group? .................................................................. 1276.2.7
How to scale widget values with curves? ................................................................. 1296.2.8
How to control widgets from the Global rackspace in a regular rackspace? ........... 1356.2.9
7. Songs and Setlists 137
7.1 Rackspaces/variations and Song Parts relationship .................................................... 137
7.2 How to create a song? .................................................................................................... 138
Song Properties ......................................................................................................... 1417.2.1
Song Part Properties .................................................................................................. 1427.2.2
7.3 How to create a setlist? .................................................................................................. 145

5
Gig Performer 4.x User Manual © 2016 - 2021 Deskew Technologies, LLC
Table of Contents
7.4 How to capture variation edits? .................................................................................... 147
8. Rig Manager 150
8.1 How to create an alias for a MIDI device and a MIDI control? ................................... 150
8.2 How to remap MIDI controls for a new MIDI device? .................................................. 155
8.3 How to use aliases? ......................................................................................................... 158
9. The Tuner 160
10. Built-in Plugins 162
10.1 Audio In ............................................................................................................................ 163
10.2 Audio Out ........................................................................................................................ 165
10.3 Gain Controls ................................................................................................................... 167
Gain and Balance Control ......................................................................................... 16710.3.1
Gain Control (mono) .................................................................................................. 16810.3.2
Gain and Balance Control (mono to stereo) ............................................................. 16910.3.3
10.4 Audio Mixers .................................................................................................................... 171
Audio Mixer applications .......................................................................................... 17310.4.1
10.5 Global Processing ............................................................................................................ 179
To Global Rackspace ................................................................................................. 18010.5.1
From Global Rackspace ............................................................................................. 18110.5.2
10.6 MIDI Inputs ...................................................................................................................... 182
10.7 MIDI Outputs ................................................................................................................... 191
10.8 MIDI Processing and Monitoring ................................................................................... 194
MIDI Monitor ............................................................................................................. 19410.8.1
MIDI Filter .................................................................................................................. 19510.8.2
MIDI Channel Constrainer ......................................................................................... 19810.8.3
Scriptlet ..................................................................................................................... 19910.8.4
10.9 Media Players .................................................................................................................. 202
Audio File Player ........................................................................................................ 20210.9.1MIDI metronome ......................................................................................................................................... 20710.9.1.1
MIDI File Player ......................................................................................................... 20810.9.2
10.10 Miscellaneous .................................................................................................................. 213
System Actions .......................................................................................................... 21310.10.1
Comment ................................................................................................................... 21710.10.2
10.11 From Rackspaces ............................................................................................................. 217
10.12 To Rackspaces .................................................................................................................. 218
11. Recording your performance 220

6
Gig Performer 4.x User Manual © 2016 - 2021 Deskew Technologies, LLC
Table of Contents
11.1 Recorder settings ............................................................................................................ 220
11.2 How to use the Recorder? .............................................................................................. 222
12. Time controls 225
12.1 Tempo and Time signature ............................................................................................. 225
12.2 Metronome ...................................................................................................................... 226
Audio metronome ...................................................................................................... 22612.2.1
12.3 Ableton Link support ...................................................................................................... 228
12.4 Rackspace or Song tempo overrides ............................................................................. 228
13. OSC and Gig Performer 230
13.1 How to set up OSC .......................................................................................................... 230
13.2 The Lemur and TouchOSC Templates ............................................................................ 232
13.3 Communication Between Lemur and Gig Performer ................................................... 238
14. Multi-instance support 240
15. Latency measurement tool 242
16. Options and preferences 244
16.1 General ............................................................................................................................. 244
16.2 Display .............................................................................................................................. 247
16.3 Audio I/O ......................................................................................................................... 249
16.4 Global MIDI ...................................................................................................................... 252
16.5 Setlists .............................................................................................................................. 256
16.6 Recording ......................................................................................................................... 259
16.7 MIDI Ports ........................................................................................................................ 259
16.8 OSC ................................................................................................................................... 261
16.9 Scripting ........................................................................................................................... 262
16.10 Extensions ........................................................................................................................ 264
17. Keyboard shortcuts 265
18. GPScript 268
18.1 How to control multiple parameters with a single widget? ....................................... 268
18.2 Local GP Port ................................................................................................................... 274
19. Important workflow tools and tips 276
19.1 Predictive loading ........................................................................................................... 276

7
Gig Performer 4.x User Manual © 2016 - 2021 Deskew Technologies, LLC
Table of Contents
19.2 Quick plugin finder ......................................................................................................... 278
19.3 Quick Rackspace/Variation finder ................................................................................. 279
19.4 MIDI Assignment List window ........................................................................................ 280
19.5 Remap MIDI messages without using the MIDI Filter plugin ....................................... 280
19.6 Additional tips ................................................................................................................. 281
20. Extensions 286
20.1 What are extensions? ..................................................................................................... 286
20.2 Enabling/disabling extensions ....................................................................................... 286
21. Optimizing your computer for a glitch-free audio performance 289
21.1 Latency explained ........................................................................................................... 289
21.2 Optimizing your Windows PC for maximum performance and stability ................... 290
21.3 Optimizing your MacOS .................................................................................................. 291
22. Join our community 292
23. A word from the Gig Performer creators 294
24. Appendix 296
24.1 License agreement .......................................................................................................... 296
24.2 Basic terminology ............................................................................................................ 299
24.3 File extensions used in Gig Performer ........................................................................... 303
24.4 File locations in Gig Performer ....................................................................................... 304
24.5 Cross-Platform Usage ...................................................................................................... 305
24.6 Troubleshooting .............................................................................................................. 305
24.7 OSC messages ................................................................................................................... 307

8
Gig Performer 4.x User Manual © 2016 - 2021 Deskew Technologies, LLC
Welcome to Gig Performer
1 Welcome to Gig Performer
Welcome to Gig Performer! Deskew Technologies developed Gig Performer, the world's most
versatile audio plugin host application for live performance. Take complete control of your
entire rig and access to all of your instrument and effects plugins instantly — no DAW
software necessary.
1.1 Thank you note
Thank you very much for choosing Gig Performer. This software is the result of the finest
blend of programming skills and serious touring experience. Gig Performer allows performing
musicians to be creative and express themselves on stage while using a computer. We put
great effort into making Gig Performer easy to use and ensuring that you enjoy all of its
features. This manual will enable you to better understand Gig Performer's advanced
features, opening up unlimited possibilities.
We are sure that by allowing you to focus on the music and not the technology, you will
enjoy using Gig Performer for all your performance needs.
The Deskew Technologies Team.
1.2 What is Gig Performer?
Gig Performer is an audio plugin host that provides the most flexible experience for your
stage or session performance. As we stated in the previous section, the secret behind its
robustness lies in the very finest blend of programming and musical experience: Gig
Performer was developed by people who are both software developers and serious touring
musicians. Advanced optimization techniques and heavy stress tests address the
requirement for Gig Performer to run reliably on stage and using as few CPU cycles as
possible.
Many well-known music professionals worldwide rely on Gig Performer as their audio plugin
host of choice for live performance.
Gig Performer's innovative approach and focus on usability is paired with an intuitive rack
design, called a Rackspace, and transforms your plugins into the most powerful, yet user-
friendly live music software system.

9
Gig Performer 4.x User Manual © 2016 - 2021 Deskew Technologies, LLC
Welcome to Gig Performer
Connect your plugins together any way you wish without the need to create channel strips,
busses, sends and inserts.
The impressive list of cutting edge features make Gig Performer stand out compared to other
audio plugin hosts. For example, the Predictive loading™ feature enables you to intelligently
load parts of your show, instead of loading your entire show, so you can still switch
instantaneously to the next Rackspace or Song in your setlist. This feature significantly
reduces both your RAM and CPU usage so you can perform confidently even with a very old
laptop.
The extensive OSC implementation in Gig Performer allows you to control your show from a
mobile phone, iPad, Android tablet, or even from a Web browser.
As a software product created by musicians, for musicians, new updates and features are
implemented often in Gig Performer.
You can download a free, fully functional 14 day trial of this plugin host that truly addresses
the needs of live performers.

10
Gig Performer 4.x User Manual © 2016 - 2021 Deskew Technologies, LLC
Welcome to Gig Performer
1.3 Who can use Gig Performer?
Every artist who performs on any instrument live or in the studio, as well as front of house
sound engineers, can benefit from using Gig Performer. For example, whether you are a
keyboard player, a guitarist, a vocalist, a drummer, or a live sound engineer, Gig Performer
has much to offer:
· Keyboardists can control all their software synths, samplers, and sequencers - as well
as effects - directly from the sliders, knobs and switches on their instruments.
· Using their MIDI pedalboards, guitarists can freely switch between multiple
amp/cabinet models and digital effects in real time without any audio glitching.
· Singers can easily add compression, EQ and other desired effects to their vocals.
· Drummers can mix and match their favorite drums and cymbals from different drum
plugins to create their own perfect drum kits. Drum kits can be switched on the fly so
as to have instant access to hundreds of different sounds during your gig.
· Live sound engineers can use Gig Performer to create a standalone mixing system or
to intercept audio coming from the FOH or monitor system, add desired effects
processing, and then send the results directly back to the mixing board. Gig Performer
can simultaneously record multichannel audio from the mixing board for later
processing and mixing in your favorite DAW.
You can even run multiple Gig Performer instances simultaneously, allowing different
members of a band to access different plugin setups independently as long as the computer
is fast enough.
Gig Performer's intuitive interface makes it easy to use and remarkably fast with which to
get started. Beneath the surface, however, are many advanced features, which we will cover
in the pages of this User Guide.
1.4 Gig Performer standard features
This is an incomplete list of standard Gig Performer features. Be sure to check
http://www.gigperformer.com/features-and-benefits.html for a full list of current features.
· Cross-platform audio plugin host - runs on both Mac (OS X) and Windows platforms so
you can create, share, and modify your files on any computer and such files will run on
either platform as long as the needed plugins are available
· Supports VST2 and VST3 (OS X and Windows) and AU (OS X only) plugins

11
Gig Performer 4.x User Manual © 2016 - 2021 Deskew Technologies, LLC
Welcome to Gig Performer
· Includes built-in plugins - MIDI File Player, Audio File Player, Audio Mixers, MIDI Out to
OSC converter plugin, MIDI Channel Constrainer plugin, and many more
· Minimal CPU usage
· Rock solid performance, extremely stable, leading to less stress on stage
· Easily play multiple instruments and controllers, layer sounds, and add effects
· Intuitive user interface - simply connect any plugin to any other plugin in any
configuration; no confusing buses, sends or inserts
· Build fully customizable rackspaces consisting of a collection of interconnected plugins
along with one or more front panels containing knobs, sliders and other widgets
· Instantaneous glitch-free switching between sounds, even while holding notes for
seamless transition from one song to the next or from one part of a song to another
· Use keyboards, MIDI pedals, and control surfaces to alter plugin parameters in real
time by connecting them to knobs, sliders, buttons, labels, meters, and other widgets
· Learn mode for easy assignment of MIDI controls to widgets and widgets to plugin
parameters
· Build setlists that automatically change to the right sound for each part of each song in
the list. Capture on-the-spot tweaks right into song parts. A gig becomes as simple as
stepping through its setlist.
· ChordPro support - create and edit ChordPro song documents, and set each to be
automatically displayed when its song is selected in the setlist.
· Automatic mixing of signals when multiple outputs are connected to a single input
· Deactivate any plugin at any time to remove a sound or bypass an effect
· Widget groups for making cross-faders, grouped level controls, and other ganged
behaviors.
· The Rig Manager simplifies switching a Gig Performer rig to use a different set of
physical controllers - great for backlined touring
· LEDs show input/output levels on each channel as well as audio and MIDI activity
· Built-in full screen chromatic tuner
· Audio metronome using built-in or user-supplied sounds

12
Gig Performer 4.x User Manual © 2016 - 2021 Deskew Technologies, LLC
Welcome to Gig Performer
· Create multiple instances for different members of the band which run independently
or for when you want to control some plugins while leaving others alone
· Audio and MIDI recorder - audio input recorder captures audio from input channels to
WAV files for post-production editing, processing, and mixing in a DAW. MIDI Recorder
captures MIDI input from all devices, placing each on its own track of a Type 1 Standard
MIDI File that can be imported for post-production in a DAW.
· Works with any operating system compliant audio interface
· Predictive Loading reduces RAM and CPU demand in systems with limited resources
· Automatic detection of new MIDI devices—connect and reconnect on the fly
· Full MIDI remapping, transposition, layering, and keyboard splitting
· Send program change and other messages to external MIDI devices automatically
· VST Bus Layout support
· OSC support for remote control via tablets and smartphones
· Compatible (via OSC) with Max/MSP and Bidule for the development of complex
interactive control algorithms
· GPScript proprietary programming language for complex or custom needs
· Gig file Templates
· The Global rackspace
· Zoomable Wiring view
· Non-linear scaling curves that allow advanced widget scaling and keyboard velocity
scaling
· The Probabilistic Sound Designer
· An external API for third-party developers
· Support for Cakewalk style instrument definition files
· Select and copy/paste/duplicate multiple blocks simultaneously
· Export selections to a file and easily drag them in to rackspaces
· Save and load a preset for a plugin

13
Gig Performer 4.x User Manual © 2016 - 2021 Deskew Technologies, LLC
Welcome to Gig Performer
· Large numeric keypad for easier numeric editing on a touchscreen
· Startup hints
Please navigate through this manual to find more information about these bullet items.
Refer to the next chapter to find what's new in Gig Performer 4.

14
Gig Performer 4.x User Manual © 2016 - 2021 Deskew Technologies, LLC
What is new in Gig Performer 4?
2 What is new in Gig Performer 4?
Gig Performer 4 introduces many new useful features as well as numerous improvements to
existing features. The user interface has a better look, new widgets are available, an
optimized input method is provided for touch screens, and much, much more. Read sections
in this chapter to find out more exciting new features.
2.1 Improved user interface
Users interact with their computer through the user interface. We wanted this interaction to
be easier, appealing and more adaptable to modern touch screen devices.
Here is a quick look at a new empty gig in Gig Performer 4, where, if you are familiar with
earlier versions of Gig Performer, you will easily notice the changes in the general look and
feel of various UI elements:
Here are some of the new widgets in Gig Performer 4:

15
Gig Performer 4.x User Manual © 2016 - 2021 Deskew Technologies, LLC
What is new in Gig Performer 4?
If you run Gig Performer on a touchscreen device such as a Microsoft Surface tablet, you
might want to activate the new Touch-friendly number editing feature (in Display Options),
to show a dial pad for easier numeric input:
Refer to this chapter to learn more about entering values in Gig Performer.
2.2 Global Rackspace
The Global rackspace is a special rackspace that allows audio plugins to be shared and used
by normal rackspaces (from now on these will just be called "rackspaces"). The Global
rackspace is always active. For example, you can create global effects - e.g. a common
reverb, delay, or chorus, instead of creating them in individual rackspaces. Audio from the
currently active rackspace can then be sent to the Global rackspace for processing. You can

16
Gig Performer 4.x User Manual © 2016 - 2021 Deskew Technologies, LLC
What is new in Gig Performer 4?
of course also insert regular synth plugins along with MIDI In blocks to the Global rackspace.
This would allow you to, for example, have a piano or organ that is always available.
The Global Rackspace is bidirectional. That means that while audio can be sent from
rackspaces to the Global Rackspace (to support common effects as described above), audio
can also be sent from the Global Rackspace back to whatever rackspace is currently active.
This is particularly valuable for guitarists or singers who may want to always add a certain
amount of "pre-processing" to their input, for example.
While this feature could be accomplished with earlier versions of Gig Performer by using
separate instances of Gig Performer along with virtual audio routing (see this blog article for
more information), the Global Rackspace greatly simplifies the process.
Below is an example of a rackspace and the Global rackspace working together:
The signal flow is easy to understand; note the special block called To Global Rackspace (1)
in the left screenshot, where signals are directed to the Global Rackspace instead of being
sent to the Audio Out block. The Global rackspace can be accessed by clicking on the globe
icon (2).
In the right screenshot, the Global rackspace wiring layout can be seen. Note the special
block From Rackspaces (3), used to receive audio sent from rackspaces to be further
processed serially through the Reverb and EQ blocks before being sent to the Audio out.
When the Clean rackspace is active (in which there are no distortion or compressor plugins
in use), the signal flow is still ultimately directed to the Global rackspace and further

17
Gig Performer 4.x User Manual © 2016 - 2021 Deskew Technologies, LLC
What is new in Gig Performer 4?
processed by Reverb and EQ and so there is no need to include effects such as reverb or
delay in every rackspace.
To conclude, while the Global rackspace can be used for many purposes, the three primary
uses are:
· Master effects processing - allows you to send a signal from any rackspace to the
Global rackspace where you can add effects, EQ, and other plugins for further signal
processing. In previous Gig Performer editions, you must insert and connect all these
effects in every rackspace if you want to use them; in Gig Performer 4 you can insert
these effects into the Global rackspace and send signals from the active rackspace to
the Global rackspace and thereby saving a lot of plugin duplication that was necessary
in earlier versions.
· Input pre-processing - the Global Rackspace receives audio input from your
instrument, does some common pre-processing and sends the result to the active
rackspace for specific effects needed for individual songs.
· Permanent instrument patch - allows you to add an instrument patch (e.g. a standard
piano patch) that is always available from any rackspace. You can also create (say) a
permanent vocal setup in the Global rackspace, and just use rackspaces for your guitar,
piano or other instrument layouts.
2.3 New widgets
Gig Performer 4 contains many new widgets shown in the screenshot below:
1. Sustain Pedal
2. Plastic Green Knob
3. Plastic Red Knob

18
Gig Performer 4.x User Manual © 2016 - 2021 Deskew Technologies, LLC
What is new in Gig Performer 4?
4. Plastic Blue Knob
5. Plastic Purple Knob
6. Pad Button Blue
7. Pad Button Green
8. Pad Button Yellow
9. Pad Button Red
10. Pad Button Orange
11. Blue Slider
12. Red Slider
13. Purple Slider
14. Black Metal Knob
15. Gold Knob
16. Switch Red (Horizontal)
17. Switch Red (Vertical)
In Gig Performer 4, the Panel widget has been renamed to the Shape widget.
The Text label widget has also been improved:
Now it includes new formatting options, as indicated with the red rectangle: Fill Color,
Outline Color, Roundness and Thickness.

19
Gig Performer 4.x User Manual © 2016 - 2021 Deskew Technologies, LLC
What is new in Gig Performer 4?
Note that the old "Invert" check-box (1) for widgets is gone - don't panic, its functionality is
now folded into the new scaling curve system (2):
The scaling curve can be seen in Gig Performer 4 screenshot located on the right, and if you
click on the rectangle indicated with (2), you can select more scaling options:
If the built-in scaling options don't suit your needs, you can simply click to draw your own
curve which can then be smoothed as necessary. For even more control, you can create your
own curve segments by clicking on the EXP button (indicated with the red rectangle) and
entering your own expression in the Gig Performer Curve Designer. This way you can define
advanced curves for your widgets (MIDI velocities can also be adjusted this way). Refer to
this chapter for more information.
Refer to the Widgets chapter for in-depth topics about widgets.

20
Gig Performer 4.x User Manual © 2016 - 2021 Deskew Technologies, LLC
What is new in Gig Performer 4?
2.4 New Scaling component
While Gig Performer 3 included features such as inverting widget values and parameter
scaling, as seen in the previous section, Gig Performer 4 introduces a new scaling
component that allows you create complex relations between actual widget values and their
corresponding scaled values that are sent to plugin parameters by defining curves:
Besides the widget scaling, this scaling component is also used for the velocity scaling in
MIDI In blocks and for defining parameter randomization ranges in the Probabilistic Sound
Designer.
You can select one of the supplied curves, reverse or invert them, create them with your
mouse or open the Curve Designer to design a curve using custom expressions:
This feature enables you to have the full control of your scaling operations.

21
Gig Performer 4.x User Manual © 2016 - 2021 Deskew Technologies, LLC
What is new in Gig Performer 4?
Check this chapter to learn more.
2.5 New plugins
Gig Performer 4 introduces new bundled plugins that allow you to create the most
sophisticated setups for your live performance:
1. Audio Mixer (20ch)
2. Audio Mixer (24ch)
3. To Global Rackspace
4. From Global Rackspace
5. MIDI In (Local GP Port)
6. MIDI Out (OSC)
7. MIDI Channel Constrainer
8. Scriptlet
9. MIDI File Player
10. System Actions
11. Comment
Refer to the Built-in plugins chapter for more information.
There are two additional plugin blocks present only in the Global Rackspace and which
cannot be removed: From Rackspaces and To Rackspaces.
Visit the Inserting and Wiring your plugins chapter to learn how to insert and connect your
plugins.

22
Gig Performer 4.x User Manual © 2016 - 2021 Deskew Technologies, LLC
What is new in Gig Performer 4?
2.6 MIDI File Player
One of the most requested features for Gig Performer was a built-in MIDI file player and Gig
Performer 4 now includes a MIDI File Player plugin:
The MIDI File Player plugin can load up to 128 different songs. For each song you can easily
select which tracks to play and optionally map them to specific channels. A looping feature
is also supported, where you can specify both a start and stop position.
Refer to the MIDI File Player chapter for more information.
2.7 Improvements to the Wiring view
The Wiring view (formerly known as the Layout designer) has some new exciting features.

23
Gig Performer 4.x User Manual © 2016 - 2021 Deskew Technologies, LLC
What is new in Gig Performer 4?
You can now select multiple blocks by dragging over them with your mouse. You can select
all blocks (explicitly excluding the Audio I/O blocks) by pressing Ctrl+A (Cmd+A on Mac). You
can select specific blocks by holding the Shift key and clicking on each individual block (1):
You can now easily drag, copy and reposition multiple blocks together.
The design surface itself is now virtual giving you much more room to layout your plugins
without cluttering or otherwise placing them too close together. You can zoom in or out to
focus on a particular area of the wiring view. Use the arrow keys on your PC keyboard or the
horizontal and vertical scroll bars (2) to move around. When you press and hold the Alt key
(Option key on a Mac) a tooltip appears (3), notifying that you can click on the design
surface and drag it to navigate through it. While doing this, note the minimap in the left
upper corner (4) that provides a quick overview of the whole design surface and the position
of your layout.
You can use your mouse wheel to zoom in or zoom out the design surface in the Wiring view.
If you also hold down the Alt key (Option key on a Mac) then Auto Fit and Auto Zoom
options will appear in the upper-right corner (5); clicking the Auto Fit button places all your
plugins within the current screen and fits them to the current zoom level. Clicking the Auto
Zoom button zooms all your plugins to fit the current screen. Zoom Out and Zoom In
buttons are also available (6) both of which allow you to set the desired amount of zoom
level.

24
Gig Performer 4.x User Manual © 2016 - 2021 Deskew Technologies, LLC
What is new in Gig Performer 4?
You can also save multiple interconnected blocks as favorites for quick reuse; select the
blocks you want, right click on your selection and select Save as Favorite... (refer to the
Selected Block contextual menu section for more information):
Favorites can be dragged in from the file system and doing so will automatically insert the
required plugins. Favorites also show up in the Wiring view contextual menu and and in the
Quick Plugin Finder dialog.
When you select multiple plugins you can Center them or Evenly distribute; refer to the
Selected Block contextual menu section for more information.
2.8 Improvements to the Song Lyrics/Chords Editor
The Song Lyrics/Chords Editor now supports automatic scrolling to song parts:

25
Gig Performer 4.x User Manual © 2016 - 2021 Deskew Technologies, LLC
What is new in Gig Performer 4?
For example, if you have a song with three song parts - Intro, Verse, and Chorus - as in the
screenshot above, you can select the desired song part and the Song Lyrics/Chords Editor
will automatically position your lyrics just on the previously specified place.
Refer to the ChordPro chapter to learn more on how to set this.
2.9 MIDI Helper Tool
The Song Part Properties dialog in Gig Performer 3 included the ability to create a MIDI
message hex string that can be used to help you create special purpose MIDI messages to
be sent out when selecting song parts (as indicated with screenshot A):

26
Gig Performer 4.x User Manual © 2016 - 2021 Deskew Technologies, LLC
What is new in Gig Performer 4?
However, you had to click on the Open helper tool link and be connected to the Internet if
you wanted to use the online MIDI to Hexstring Generator Tool which was hosted on Gig
Performer website. In Gig Performer 4 this mechanism has been replaced by the new MIDI
Helper Tool through which you can easily create the desired messages interactively. To open
this tool, click on the Edit button, as indicated with the red rectangle on the screenshot B.
Below you can see a comparison between the online tool (A) and the MIDI Helper Tool (B)
for which an Internet connection is not needed:

27
Gig Performer 4.x User Manual © 2016 - 2021 Deskew Technologies, LLC
What is new in Gig Performer 4?
For more information about the MIDI Helper Tool, refer to the Song Part Properties chapter.
This tool is also used in MIDI Out blocks to send arbitrary sequences of MIDI messages
(including SysEx) when a rackspace is activated.
2.10 Tuner improvements
Gig Performer 4 features a completely redesigned tuner:
The tuner has been optimized for the stage, it's big and it will be blatantly obvious to you if
the string you are tuning is in or out of tune. All other distractions are kept to a minimum.
The tuner mechanism itself is also enhanced, more sensitive and more accurate.
Refer to The Tuner chapter for more information.
2.11 Probabilistic Sound Designer
The somewhat hidden Random Parameter Generator in Gig Performer 3 has evolved into the
brand new Probabilistic Sound Designer (PSD):

28
Gig Performer 4.x User Manual © 2016 - 2021 Deskew Technologies, LLC
What is new in Gig Performer 4?
The PSD will work with any plugin and allows you to design random but related sounds by
randomizing selected values of plugin parameters and using probabilities to determine how
each parameter can be varied.
Simply move the desired controls (such as buttons or knobs) of your favorite plugin and the
corresponding parameters will be automatically captured by the Probabilistic Sound
Designer. Click on the Randomize button to create a new sound. Discover what amazing
sounds can your plugin produce. Of course you can save your created configuration along
with the plugin preset so that you can later continue from where you left off.
Check this chapter to learn more.
2.12 Save one or more plugins as favorites
Gig Performer enables you to select a plugin block or more plugin blocks and save the
selection as a favorite. Let's take a look at this example below:

29
Gig Performer 4.x User Manual © 2016 - 2021 Deskew Technologies, LLC
What is new in Gig Performer 4?
In this simple guitar layout, the audio signal first goes through the noise gate, then is
converted to a stereo signal which is then forwarded to the guitar effects plugin. Suppose
you want to re-use these three plugin blocks (indicated with the red rectangle) in other
rackspaces or in new gigs.
Simply select these plugins and right mouse click on any selected plugin to open the
Selected blocks contextual menu:

30
Gig Performer 4.x User Manual © 2016 - 2021 Deskew Technologies, LLC
What is new in Gig Performer 4?
Select the Save as Favorite... menu item, type in a name (e.g. GuitarBasic) in the dialog that
appears and click on the Save button.
Now let's create a new empty gig (File -> New Gig and then click on the New Empty Gig
button) to reuse the saved favorite:

31
Gig Performer 4.x User Manual © 2016 - 2021 Deskew Technologies, LLC
What is new in Gig Performer 4?
Right click on the empty surface to open the contextual menu, then expand Favorites and
select your favorite file:

32
Gig Performer 4.x User Manual © 2016 - 2021 Deskew Technologies, LLC
What is new in Gig Performer 4?
Three blocks are automatically inserted, connected to the audio input and interconnected as
you had saved them. Additionally, all parameter values in these blocks are restored, so you
can continue building your setup and connect it to the audio outputs.
Tip: you can also use the Quick Plugin Finder, and filter for favorites:
Simply type in "fav" to show all favorites, and pick the desired from the list.
Favorites are a very valuable workflow tool, particularly useful for musicians who do session
work and need to very quickly create certain sounds on demand. It is now easy for a
musician to create a collection of favorite sounds, made from multiple interconnected blocks
and just recall them when needed.
Note: to delete a favorite, click on the Window menu and then click on the Open Content
Folders menu item; open the Favorites folder and then delete the desired favorite file.
You can insert favorites by using the drag and drop technique; check the Drag and drop
support section to learn more.
2.13 Drag and drop support
Gig Performer now supports inserting files using drag and drop:

33
Gig Performer 4.x User Manual © 2016 - 2021 Deskew Technologies, LLC
What is new in Gig Performer 4?
The following file types are supported:
- Gig files,
- Rackspace files,
- Song files,
- User plugin presets,
- Favorites.
Simply click on a supported file and while holding the mouse drag it into the Gig Performer
window. Depending on the file type, one of the four screens above will appear.
2.14 Other enhancements
Other major new features that were added to Gig Performer 4 are:
· Gig file Templates,
· Many work-flow and usability enhancements,
· External API for controlling Gig Performer with 3rd party hardware.

34
Gig Performer 4.x User Manual © 2016 - 2021 Deskew Technologies, LLC
What is new in Gig Performer 4?
Other notable updates:
· Basic Undo facility
o Works for widget movement, widget resizing and widget caption resizing
o Scaling curve can be undone
o Randomize parameters operation in the Probabilistic Sound Designer can be undone
· Separate controls for input muting and output fading (audio tails)
· Manual MIDI learn editor
· MIDI In block
o Supports transpose range from -127 to 127 (NB this is a breaking change if you had
a widget controlling the MIDI In Transpose parameter in an earlier version of Gig
Performer)
o MIDI In blocks can now ignore the global transpose value (useful for drum parts and
triggering samples)
o MIDI In blocks can now receive MIDI from other plugins that can create MIDI events
(such as 3rd party arpeggiators, chord generators and the new Scriptlet plugin)
o SysEx (System Exclusive) support
· The Quick Plugin Finder now includes manufacturer names and searching works with
multiple substrings
· There is now a Quick Plugin Replacer
· There is also a Quick Plugin Parameter finder
· The metronome now respects the denominator value in a time signature
· The number of input and output pins can now be defined for individual plugins
· Bank switching values are now defined using the more convention MSB and LSB values
instead of a single combined value
· The MIDI Out block now supports Cakewalk Instrument Definition Files
· GPScript language enhancements

35
Gig Performer 4.x User Manual © 2016 - 2021 Deskew Technologies, LLC
What is new in Gig Performer 4?
o Song-level scripts
o Gig-level script
§ Redirect incoming MIDI to other devices
§ Define your own keyboard shortcuts
o Many new system functions

36
Gig Performer 4.x User Manual © 2016 - 2021 Deskew Technologies, LLC
Getting started
3 Getting started
This chapter will provide you with useful information before you start actively using Gig
Performer.
3.1 Before you start
Before launching Gig Performer, make sure that all audio and MIDI interfaces connected
to your system are powered on. If no external audio interface is connected, Gig Performer
will try to use your computer's built-in input and output if available. If you have more than
one interface connected, you'll be able to choose among them after the application
launches. Note that you can use different interfaces for input and output if desired (refer to
the Audio I/O section for more information).
Note: if you are running Gig Performer on Mac OS X 10.14 or above, you will be prompted to
allow access to the "microphone":
You must allow this otherwise Gig Performer will be unable to receive the audio from your
guitar, microphone or other audio device that you plug into any of the inputs of your audio
interface.
When Gig Performer is first launched, the following dialog will appear:

37
Gig Performer 4.x User Manual © 2016 - 2021 Deskew Technologies, LLC
Getting started
If you have purchased a license, enter your email address, and type in or paste the activation
key (your key is emailed to you when you buy a license; make sure your anti-spam blocker
didn't prevent the confirmation email with your license key from being received). Then click
on the Activate button to activate your copy of Gig Performer 4.
Note: you need an Internet connection to activate Gig Performer.
If you have not yet purchased a license, click on the Start Free Trial button to access a fully
operational trial version of Gig Performer for a period of 14 days (the dialog will also show
you how many days you have remaining for this trial).
You can purchase a license key at any time by clicking on the Buy License button.
Note: when Gig Performer is in trial mode, there will be random momentary dropouts in the
audio and the screen will flash red.
Before using Gig Performer, please make sure you agree to the license agreement, a copy of
which is included (see Appendix -> License agreement).
Immediately after launching, Gig Performer will scan your system looking for plugins and the
following dialog will appear:

38
Gig Performer 4.x User Manual © 2016 - 2021 Deskew Technologies, LLC
Getting started
When running Gig Performer on Mac (OS X) systems, it will scan for VST, VST3 (Virtual Studio
Technology) and AU (Audio Unit) plugins; when running on Windows systems, it will look for
all VST and VST3 plugins.
Note: If you are a Windows user, you may have to tell Gig Performer what folders to search,
since there is no single location where all plugins are guaranteed to be installed.
To do so, launch Gig Performer, go to the Windows menu, then select Plugin Manager. In the
resultant window, click on Manage, then choose the Set VST folders for scanning option.
We suggest that you begin by having Gig Performer search in the folder C:\Program
Files\VstPlugins. If you have additional plugins stored in other folder locations (as some
plugin and DAW manufacturers automatically create), the Plugin manager allows you to
easily add other folders to scan.
This scanning process can take some time the first time you use Gig Performer but will be
nearly instantaneous on subsequent launches unless you have installed or updated any
plugins since the last usage (if you like, you can disable the automatic scan completely in
the General options dialog).
Note: Gig Performer may include some 3rd party synth or effects plugins. It also comes with
a number of specialized plugins to handle basic MIDI and audio operations.
3.2 Basic setup for keyboardists
To get started as a keyboardist, first insert the desired synth plugin and connect the existing
MIDI In (OMNI) block to it (check this chapter to learn more):

39
Gig Performer 4.x User Manual © 2016 - 2021 Deskew Technologies, LLC
Getting started
Incoming MIDI messages from any of your keyboards will now be sent to the synth plugin.
Complete the signal chain by connecting the synth plugin block to your audio interface
outputs. This very basic setup is displayed in image (A). At this point you should be able to
play your connected keyboard(s) and hear the result.
If you use more than one keyboard and want each one to control different plugins, you will
need to replace the MIDI In (OMNI) block with MIDI In blocks associated with each keyboard
(MIDI device). To do this you can either insert a new MIDI In block or right click on the MIDI
In (OMNI) block and replace it with the desired one, as indicated with (B).
When you have finished adding your plugins, switch to the Panels view, and enter Edit mode.
Add panels and widgets for the plugin parameters you mostly use or want to control either
from the panel or from your keyboard or other MIDI control surface. Here is an example:
Refer to the Widgets chapter to learn more. Make sure to also check our built-in templates
and Community-driven shared rackspaces (click Help -> Support -> Community Shared Gigs,

40
Gig Performer 4.x User Manual © 2016 - 2021 Deskew Technologies, LLC
Getting started
Rackspaces and More) to access nicely designed, community created rackspace and gig files
that you can use directly or as templates for your setups.
Depending on the features of your plugins (i.e. are they multi-timbral) you can organize your
rackspaces and variations in many different ways, for example:
Gig Performer 4 includes the Global rackspace where you can place your common effects,
such as reverb or delay or other plugins that you might want to be present all the time (i.e.
an Audio File Player or a MIDI File Player). In the screenshot below are shown the Wiring
views of two rackspaces and the Global rackspace. One rackspace contains an acoustic
piano (1) and the other contains an electric piano (2). A delay is added to both of these
sounds in the Global rackspace (3):
So rather than inserting a delay plugin in both rackspaces, you can simply insert it in the
Global Rackspace.

41
Gig Performer 4.x User Manual © 2016 - 2021 Deskew Technologies, LLC
Getting started
Check the Global Rackspace chapter to learn more about the Global rackspace.
As a keyboardist you'll appreciate that each rackspace supports a mechanism that allows
your sounds to stay on until you release all the keys that you were holding down (or the
sustain pedal if it was down), even if you switch to another rackspace with different sounds
for the next part of your set. This mechanism is called Patch Persist (check the MIDI Patch
Persist section in the Rackspace properties).
When this feature is disabled, when you hold a note down and then switch to the other
rackspace, the note you're holding down stops immediately.
3.3 Basic setup for guitarists
To get started as a guitarist, first connect your audio interface inputs to your effect and amp
modelling plugins (check this chapter to learn more):
Complete the signal chain by connecting these plugins to your audio interface outputs. The
very basic setup is displayed in image [1]. At this point you should be able to play your guitar
and hear the result.

42
Gig Performer 4.x User Manual © 2016 - 2021 Deskew Technologies, LLC
Getting started
You can mix and match plugins together just as if they were physical devices. There are no
complicated AUX buses, sends or inserts. Simply connect things together as if you were
using wires.
If you want to parallel process your signal and, for example, run it through two different
amps you can simply connect your input signal to two amp plugins, then sum these together
with our Audio Mixer plugin.
Gig Performer 4 includes the Global rackspace where you can place your common effects,
such as Chorus, Delay and Reverb. Image [2a] displays a rackspace which routes the audio
signal to the Global rackspace, and [2b] is displaying a connection where the audio signal is
coming from the Global rackspace, does some further processing and then completes the
signal chain by sending the singal to your audio interface outputs.
Check the Global Rackspace chapter to learn more about the Global rackspace.
When you finish adding your plugins, switch to the Panels view, and enter Edit mode. Add
panels and widgets for plugin parameters you mostly use or want to control via MIDI or OSC.
Here is an example:
Refer to the Widgets chapter to learn more. Make sure to also check our built-in templates
and Community-driven shared rackspaces (click Help -> Support -> Community Shared Gigs,
Rackspaces and More) to access nicely designed, community created rackspace and gig files
that you can use directly or as templates for your setups.
We recommend that you organize your rackspaces based on the common sounds you use
like Clean, Crunchy, Distorted, etc. This is not a rule, however, and you're free to organize
things the way it works for you and your style of playing.
As a guitarist you'll appreciate that each rackspace has fine-grain control over its "silencing
periods". This means that you control how long each rackspace has to silence its

43
Gig Performer 4.x User Manual © 2016 - 2021 Deskew Technologies, LLC
Getting started
input/output as you switch to another rackspace. This provides an incredibly smooth
transitions between your sounds (check the Tail Length section in the Rackspace properties).
3.4 Basic setup for vocalists, drummers, other musicians and FOHengineers
In the last two chapters are covered basic setups for keyboardists and guitarists, but Gig
Performer can be used by any artist who performs on any instrument live or in the studio
using their specific plugin setups.
For example, vocalists can easily add compression, EQ and other desired effects to their
vocals.
Vocalists might want to take advantage of the Global Rackspace and add their effects there
if they don't change their effects often, like shown in (1). Of course, feel free to make
arrangements any way you like, for example, you can use the Global rackspace for plugins
that you want to be always present in your setup (like shown in 2a) and take advantage of
rackspace variations to apply different amounts of reverb and delay (like shown in 2b).
Similarly, drummers can mix and match their favorite drums and cymbals from different drum
plugins and create drum kits. Drummers can organize drum kits as rackspaces and switch
them instantly.

44
Gig Performer 4.x User Manual © 2016 - 2021 Deskew Technologies, LLC
Getting started
Front of house sound engineers will appreciate Gig Performer's OSC implementation;
sophisticated plugin chains in Gig Performer can be reviewed and adjusted remotely. Your
entire FOH setup can consist of a rackmount mixer and Gig Performer, all of which can be
controlled remotely from a tablet, such as iPad.
Using Gig Performer instances, every band member can use different plugin setups on a
single computer (provided that a computer is powerful enough to host these setups).
Make sure to check out our Community-driven shared rackspaces (click Help -> Support ->
Community Shared Gigs, Rackspaces and More) to access nicely designed, community
created rackspace and gig files that you can use directly or as templates for your setups.
3.5 Built-in templates
A template is simply a predefined gig file that is nicely laid out so users can easily reuse it.
You can use the supplied plugins or replace them by other user-provided plugins and then
reassigning the widgets. A template can contain one or more rackspaces with variations.
When you first start Gig Performer, or want to create a new gig (File -> New gig), the New
Gig dialog will appear:

45
Gig Performer 4.x User Manual © 2016 - 2021 Deskew Technologies, LLC
Getting started
Note: the contents of this dialog may differ from the screenshot above, as new templates
may be included in future 4.x versions of Gig Performer.
This dialog will also appear every time you start Gig Performer if you turn off the Reload the
last gig on startup toggle button in the General Options.
To create a gig from the template, simply select a category, such as Keyboards (as indicated
in the screenshot above) and double-click the desired template (alternatively, select the
desired template and click on the New Gig From Selection button.
Depending on your selection, the fully functional gig file will open with nicely laid out panels
with widgets:
You can use templates to quickly try out features in Gig Performer or to get ideas for your
own gig design.
Note: the screenshot above is used for demonstration purposes only and might be changed
in future as templates might change.
You can also browse the Community-driven compilation of gig files and rackspaces; click
Help -> Support -> Community Shared Gigs, Rackspaces and More to access this section of
our Community.

46
Gig Performer 4.x User Manual © 2016 - 2021 Deskew Technologies, LLC
Gig Performer user interface and concepts
4 Gig Performer user interface and concepts
In this chapter you will learn more about the Gig Performer user interface, different views,
and important concepts such as rackspaces, variations, panels, widgets, the Rig Manager
and other key components.
4.1 The main Gig Performer window
When you start Gig Performer and the New Gig window shows up, you can either create a
new empty gig, or choose a template to use as your starting point. The following screenshot
shows the main Gig Performer window after a new empty gig has been chosen:
1. Panels view - click here to show the Panels view.
2. Edit button - in Panels view, click on this button to enter the Edit mode, where you
can edit panels and widgets.
3. Wiring view - click here to show the Wiring view.
4. Setlists - click here to show the Setlist view.
5. Tuner icon - click here to toggle the Tuner view (the icon turns red).
6. Tempo display - shows the current tempo being used by all connected plugins (for
example, sample/loop/beat-playback plugins, as well as those generating echoes,

47
Gig Performer 4.x User Manual © 2016 - 2021 Deskew Technologies, LLC
Gig Performer user interface and concepts
delays and reverbs). You can of course change the tempo any time. The tempo can also
be set automatically by song and song part tempos. For more information see Tempo
and Time Signature. The maximum tempo value is 640 BPM.
7. Time signature display - shows the current time signature being used by all connected
plugins (for example, sample/loop/beat-playback plugins, as well as those generating
echoes, delays, and reverbs). You can change this value and enter any time signature,
up to 32/16.
8. Transpose - enter a global transposition value that will be applied to all MIDI In blocks
by clicking on the field and entering a number of semitones directly, or by clicking on
TRANSPOSE and using the increment (+) and decrement (-) buttons to set the number
of semitones. Note: individual blocks can optionally ignore the global transpose value,
something that is useful if a MIDI In block is being used for percussion or sound
effects.
9. Link button - click this button to activate or deactivate Ableton Link.
10. Play/Stop button - click to start playback, click again to stop it. When playing, all
plugins that support playback control (for example, sample, loop, or beat playback
plugins) play back. When disengaged ("stop"), they are all put in a stopped state.
11. Audio metronome on/off - click to turn on the audio metronome, click again to turn it
off. See Metronome for more information.
12. Global output volume (Trim) knob - use this to temporarily change the overall
volume of your gig. An increase in volume is highlighted in red and a decrease is
highlighted in blue. Double-click on the knob to reset its value to 0dB. The Trim knob
can be remotely controlled; map it to a MIDI controller in the Global MIDI Assignments
section of the Global MIDI options dialog. The initial value when Gig Performer first
starts can be set in the General options.
13. This section contains:
a. MIDI activity indicator - flickering here indicates the presence of MIDI data. The
top bar lights green when incoming MIDI messages are received, while the bottom
bar flickers when MIDI messages are being transmitted (via a MIDI Out block). If
the "Sync tempo with external MIDI clock" option is selected for the current
rackspace (see Rackspace Properties), a thin yellow bar above the two flickers to
indicate the presence of incoming MIDI Clock data and also serves as a visual
tempo indicator. Open the Global MIDI Monitor window if you want to see detailed
information about the MIDI messages being received.

48
Gig Performer 4.x User Manual © 2016 - 2021 Deskew Technologies, LLC
Gig Performer user interface and concepts
b. CPU usage indicator - shows the percentage amount of CPU overhead currently
being used by Gig Performer for audio processing. Actually, Gig Performer itself is
only responsible for a very small percentage; most of the CPU overhead is taken up
by the plugins currently loaded in memory. It is normal for this value to change in
real time as incoming MIDI data is received and as widgets are moved.
14. Panic button - click this to issue "turn all notes off" messages on all MIDI channels,
along with a Sustain OFF message and a Center PitchBend message, thus stopping
stuck notes. Double-click this button to also reset the audio engine.
15. Globe icon - click on this icon to show or hide the Global Rackspace.
16. New rackspace/variation ("+") and Delete selected rackspace/variation ("-") buttons
- click "+" to add a new rackspace or variation; click "-" to delete the selected
rackspace or variation.
17. More... button - click on the button with the ellipsis (three dots) to drop down a menu
of operations related to rackspaces, variations and widgets.
18. Browser (indicated by the left arrow) - in Panels and Wiring views, the browser shows
a list of all rackspaces and variations that have been created. The current rackspace is
outlined in green. The right arrow indicates the display of the current rackspace and
variation. Click on a rackspace in the list to select it. Double-click on a rackspace in the
list to open the Rackspace Properties dialog. Drag rackspaces up and down in the list
to reorder them. The browser looks different in Setlist view, though the
rackspace/variations list is still displayed. For more details, see Setlist view.
19. Panel surface - in the Panels and Setlist views, the purpose of this surface is to display
widgets that had been previously dragged onto this surface in the Edit mode.
20. GP Hint - the hints database contains various tips and tricks about Gig Performer,
many submitted by Community members. By default, a new hint will appear every time
you start Gig Performer though of course you can turn this off. Show hints at any time
by clicking on the Help menu -> Show a Gig Performer Hint.
21. Global Rackspace toggle - click on this toggle button to show/hide the Global
rackspace controls.
22. Collapse/Expand bottom controls toggle - click on this arrow to collapse or expand
the bottom controls, i.e. faders for all audio input and output channels.
23. Recorder button - click this to open the Recording Options dialog. For more detail,
see Recording your performance.

49
Gig Performer 4.x User Manual © 2016 - 2021 Deskew Technologies, LLC
Gig Performer user interface and concepts
24. Interface input levels - a set of meters and sliders that allow you to view and adjust
the levels of your audio interface's various inputs. Flickering here indicates the
presence of input signal. Double-click a fader to set it to 0 dB.
25. Interface output levels - a set of meters and sliders that allow you to view and adjust
the levels of your audio interface's various outputs. Double-click a fader to set it to 0
dB.
Note: Gig Performer displays up to 16 input or output interface channels at a time. If your
interface has more than 16 I/O connections, the remaining inputs and outputs are accessed
by clicking the Next or Previous button to scroll the display.
4.2 Rackspaces and Variations
A rackspace is a collection of interconnected plugins, along with one or more panels
containing widgets to control plugin parameters in real time. A rackspace can actually be
pretty much anything you like: it can represent a single sound or all the elements you need
for an entire song - or just one part of a song. You can switch from one rackspace to another
instantaneously, either from your laptop, with up/down pedals, or via MIDI program change
messages. Sounds will change without any glitching and sufficiently quickly that you can
switch rackspaces even in the middle of a bar.
A variation is essentially a rackspace preset which contains the same plugins and
interconnections, but with different widget settings. For example, you can create a
rackspace to add phasing to a piano sound, and then add several variations, each with
different degrees of phase intensity. Since variations actually store widget settings, every
parameter you want stored in a variation must be assigned to a widget on a rack panel. As
with rackspaces, you can switch from one variation to another instantaneously and with no
interruption of sound either from your laptop, with up/down pedals, or via MIDI program
change messages.
Variations allow you to leverage the plugins in a single rackspace to create many different
sounds without having to duplicate the rackspace for each sound. It's also a great way to
save on memory. For example, you could have multiple virtual instrument plugins feeding a
mixer plugin, and then mute different plugins, or have a different mix of them, in each
variation. Or you could connect multiple effects (i.e. phasing, flanging, tremolo, reverb, or
echo) and have different ones enabled or disabled in each variation. Rather than creating a
rackspace for an instrument with phasing, and another for the same instrument with echo,
the same thing is accomplished by two variations of a single rackspace containing both
phaser and echo plugins.

50
Gig Performer 4.x User Manual © 2016 - 2021 Deskew Technologies, LLC
Gig Performer user interface and concepts
On the picture below are depicted rackspaces (1) and variations (2):
Note: see also the Global Rackspace, a special rackspace that allows audio plugins to be
shared and used by regular rackspaces. Find out more in the Global Rackspace chapter.
4.2.1 Manage Rackspaces/Variations contextual menu
Right clicking on any item in the rackspace list or clicking on the "three dots" button
(indicated with the red circle) in the rackspace list in Panels or Wiring View opens the
following menu:

51
Gig Performer 4.x User Manual © 2016 - 2021 Deskew Technologies, LLC
Gig Performer user interface and concepts
This menu is split into three sections: Rackspaces, Variations, and Widgets.
Rackspaces
New Rackspace... - creates a new rackspace. Note: the advantage of putting different
sounds into different rackspaces (as opposed to creating one complex rackspace with
multiple signal chains and complicated switching) is that you can go from one to the other,
glitch-free, with the use of simple MIDI program change messages transmitted via a MIDI
controller, such as up-and-down switches on a pedalboard - or even via a smartphone or
tablet running an OSC app. What's more, Gig Performer's Tail length function allows you to
set the maximum time before a sound is cut off, up to 10 seconds when you switch
rackspaces.
Duplicate Selected Rackspace - duplicates the selected rackspace.
Delete Selected Rackspace... - deletes the selected rackspace.
Show Rackspace Properties... - opens the Rackspace Properties dialog.
Export Selected Rackspace... - exports the selected rackspace to the .rackspace file format.

52
Gig Performer 4.x User Manual © 2016 - 2021 Deskew Technologies, LLC
Gig Performer user interface and concepts
Revert Rackspace to Last Saved Version - reverts the current rackspace to the last version
saved. Note: click OK in the confirmation "Are you sure?" dialog only if you are sure that you
want to do this, because all changes made since the file was last saved will be permanently
lost. If you want the opportunity to save your work first, click on the Cancel button, then go
to File -> Save or File -> Save As...
Update (save) Rackspace to Gig File - saves the selected rackspace to the currently open
.gig file; make sure to save a gig first for this feature to work. Note: this option saves only
the currently selected rackspace, and changes made to all other rackspaces will not be
saved; if you want to save/update all rackspaces, click on File -> Save instead.
Quick Jump to Rackspace/Variation - opens the Quick Rackspace/Variation finder.
Variations
New variation... - creates a new variation. Note: creating a new variation always duplicates
the currently selected one.
Delete Selected Variation... - deletes the selected variation.
Show Variation Properties... - opens the Variation Properties dialog.
Reset Song Parts to Variation... - writes the current variation settings to every song part
that use the current variation. Use this command when you update a sound and want to
ensure the newest version is used everywhere the sound occurs.
Widgets
Update Explicit Initial Values - clicking on this menu item updates widget initial values to
the current ones when a gig is loaded. Initial values settings are defined in the Widget
Properties inspector.
4.2.2 Rackspace Properties
Double-clicking on a rackspace name (or choosing the Show Rackspace Properties... menu
item from the contextual menu) opens a dialog that displays rackspace properties:

53
Gig Performer 4.x User Manual © 2016 - 2021 Deskew Technologies, LLC
Gig Performer user interface and concepts
Name - to rename the rackspace, type a new name here.
Override global tempo and time signature - turn on this toggle button if you want the
rackspace to have its own tempo value and time signature, then enter the desired BPM
(beats per minute) and time signature. If this toggle button is turned off, the rackspace will
use the global tempo and time signature information.
Sync tempo with external MIDI clock - turn on this toggle button if you want the rackspace
to adjust its tempo from incoming MIDI clock messages (24 ticks per quarter note) sent from
an external device, thus enabling echo/delay or arpeggiator plugins capable of receiving
MIDI clock to be automatically synchronized with your external device.
Maximum audio tail length - sets the maximum time before a sound is cut off when you
switch rackspaces. The maximum length is 10 seconds. Often known as an audio "tail", this
feature is useful when using effects such as reverb or echo. In Gig Performer 4 you can
select Input muting and Output fading:
Input muting - move this scroll bar to select the desired number of seconds (up to 10s) in
which input to this rackspace will be smoothly silenced.
Output fading - move this scroll bar to select the desired number of seconds (up to 10s)
in which the audio output of this rackspace will be smoothly faded out.

54
Gig Performer 4.x User Manual © 2016 - 2021 Deskew Technologies, LLC
Gig Performer user interface and concepts
MIDI Patch Persist - if this feature is checked, whenever you switch to another rackspace,
notes that you are holding (either directly on your keyboard or via your sustain pedal) will
continue sounding until you release the keys or the pedal. This feature works with any
number of rackspaces, up to the limits of your system's available RAM and CPU resources,
so you could conceivably keep the sound of five or more rackspaces going simultaneously.
If this feature is unchecked, whenever you switch from one rackspace to another, the sound
of the previous rackspace is immediately silenced even if you are holding notes down or
have pressed the sustain pedal.
4.2.3 Variation Properties
Double-clicking on a variation name (or choosing the Show Variation Properties... menu item
from the contextual menu) opens a dialog that displays variation properties:
Name - to rename the variation, type a new name in this text box.
Assign a permanent program change number - when this toggle button is turned on, you
can specify the program change number and, optionally, the bank select numbers (in Gig
Performer 4, you set MSB and LSB values separately) used to switch to this variation. Note:
if a program change number has been assigned, that number will appear to the left of the
variation name. If there is only one variation in the rackspace, the program change number
will also appear to the left of the rackspace name; if there is more than one variation, an
asterisk will appear there instead.
If this toggle button is turned off, Gig Performer will assign program change numbers in
ascending order, i.e. the first variation in the first rackspace will be called up when program
change 0 is received; the first variation in the next rackspace will be called up when program
change 1 is received, etc.

55
Gig Performer 4.x User Manual © 2016 - 2021 Deskew Technologies, LLC
Gig Performer user interface and concepts
Make sure that you also review these options when it comes to assigning variations and
program change numbers:
Auto-assign a permanent PC number to new rackspaces (first variation), in the General tab.
Use zero-based PC numbers, in the Global MIDI tab.
4.3 Wiring view
The Wiring view enables you to insert your plugins and connect them with virtual wires. Look
at this example of a plugins layout in the screenshot below:
1. Wiring view design surface - this large area of the screen is used to display your
plugins and their interconnections. Drag a plugin to move or reposition it. Double-
clicking a plugin opens its plugin editor. Refer to the Improvements to the Wiring view
to learn more about new features in Gig Performer 4 such as zooming, scrolling, and
selecting multiple plugins.
2. Audio interface input block - Gig Performer automatically shows inputs for audio
interface device(s) known to the operating system.

56
Gig Performer 4.x User Manual © 2016 - 2021 Deskew Technologies, LLC
Gig Performer user interface and concepts
3. Plugin port - plugins are interconnected by virtual wires, where an output port (or pin)
of one plugin is connected to an input port of another plugin. Blue ports indicate audio
ports and orange ports indicate MIDI ports. Note that audio ports cannot be connected
to MIDI ports (and vice versa).
4. MIDI In (OMNI) block - Gig Performer inserts the built-in MIDI In (OMNI) plugin by
default. Other MIDI devices can be added in the same fashion as any other plugin. MIDI
plugins are colored orange. Note that you can connect the MIDI output ports to multiple
MIDI plugin input ports (the same applies to audio ports). Refer to the chapter MIDI
Inputs to learn about these built-in plugins.
5. MIDI connections - shown as orange wires between from MIDI Out ports to MIDI In
ports.
6. Audio plugin - virtual instruments are colored green, audio processors are colored
blue, and some of Gig Performer integrated plugins, such as Audio Mixer (8ch) are
colored black. Also note the mini-icon located at the upper-left corner of a plugin, that
visually indicates the plugin type.
7. Audio connections - shown as blue wires from audio output ports to audio input ports.
8. Audio interface output block - Gig Performer automatically shows outputs for audio
interface device(s) known to the operating system.
Hovering cursor over a plugin brings up a tooltip with basic information about that plugin:
Gig Performer 4 introduces a new detail in plugin tooltips - Latency; this way you can easily
check how much latency your plugins introduce to your setup. The tooltip can be disabled by
turning off the Show information on plugin hover option in the Display Options.
4.3.1 Wiring view contextual menu
When you right click anywhere in the background in the Wiring view, the following menu
appears:

57
Gig Performer 4.x User Manual © 2016 - 2021 Deskew Technologies, LLC
Gig Performer user interface and concepts
This menu is split into three main sections:
1. Internal plugins - allows you to insert one of the many built-in plugins such as Gain
Controls or Media Players. Refer to the Built-in plugins chapter for more information.
2. User - allows you to insert plugins with user-saved Presets and Favorites (exported
plugin selections will appear under Favorites). Refer to this chapter for more
information.
3. Installed Plugins - all your installed plugins are available through these menus,
organized alphabetically by the manufacturer of each plugin. Navigate through these
menus to insert the desired plugin.
4.4 Panels view
The Panels view represents the front of the rackspace with their panels and widgets:

58
Gig Performer 4.x User Manual © 2016 - 2021 Deskew Technologies, LLC
Gig Performer user interface and concepts
This view allows you to manage panels, widgets, assign plugin parameters to widgets and
assign hardware MIDI controls to widgets. Check the Panels and Widgets chapter to learn
more. Make sure to also check out The main Gig Performer window section to make yourself
familiar with various elements and their names in Gig Performer.
To see how widgets are connected to plugins and their parameters, click on the Edit button:
The Panels view in the Edit mode (1) enables you to add new widgets (2) by dragging them

59
Gig Performer 4.x User Manual © 2016 - 2021 Deskew Technologies, LLC
Gig Performer user interface and concepts
onto a panel and connect them with your plugins. Look at the example of a widgets layout in
the screenshot above; the metal knob widget is selected (3) and you can see its properties
(4) and mapping (5). Refer to the Widget Properties inspector chapter for more information.
In the Mapping section, you can see that the selected widget is assigned to the Gain
parameter of the Main volume plugin.
4.5 Setlist view
A setlist is a collection of songs. Songs consist of an arrangement of song parts. The Setlist
view is shown on the screenshot below:
1. Previous Song button - click on this button to move to the previous (earlier) song in
the setlist.
2. Song name - displays the name of the current song.
3. Next Song button - click on this button to move to the next (later) song in the setlist.
4. Song part tile bar - click on any of these large, highly visible buttons to instantly
switch between song parts. Tiles can be configured to visually match the layout of a
MIDI foot pedal controller. The Gig Performer Lemur template also contains tiles, to
make it easy to select songs by touch. A song part is linked to a rackspace variation
and can store edits to the variation it uses (refer to the Songs and Setlists chapter for
more information).

60
Gig Performer 4.x User Manual © 2016 - 2021 Deskew Technologies, LLC
Gig Performer user interface and concepts
5. Setlists drop-down menu - select a setlist to play from this menu. The All Songs
setlist is always present in the list.
6. More... button - clicking this opens the contextual menu which contains numerous
commands for managing setlists, songs and song parts.
7. Rackspace/Variation display - displays active rackspace and variation.
8. Capture variation button - click on this button to save edits you have made to a
variation into the currently selected song part only. The changes are not saved to the
underlying variation in the rackspace browser. This is a quick way of customizing a
variation and saving it. Check the How to capture variation edits chapter to learn
more.
9. Setlist editor - allows you to reorder songs and song parts by dragging. Many
important functions for the Setlist editor are found in the More... contextual menu. A
song can be loaded by selecting in a setlist, in the Quick Song Finder or using
Previous/Next buttons that can be mapped to incoming MIDI messages.
10. Rackspace Show/Hide button - click here to show or hide the rackspace list.
11. Lock Song button - this is a safety feature to prevent accidental changes. When this
button is clicked, changes to rackspaces assignments in songs are not allowed.
Attempting to change a rackspace produces an error screen:
12. Rackspace browser - rackspaces and variations can be selected here to map to song
parts on the fly. There is no rackspace management in the Setlists view - for that you
must enter Panels or Wiring view. Note: Panels and Wiring views access only stored
versions of variations; edits performed in the Setlist view are not available in those
views. However, there is a method to push changes made in the Setlists view back to
the underlying variations; see the Push Song Part Changes to Rackspace option in this
chapter.

61
Gig Performer 4.x User Manual © 2016 - 2021 Deskew Technologies, LLC
Gig Performer user interface and concepts
A song can send a MIDI program change message out to an external MIDI device when
selected. A song part can be selected by an incoming MIDI program change message and
can send out a sequence of MIDI messages upon selection. Check the Song Properties and
Song Part Properties chapters to learn more.
Each song can have its own key, transpose value, tempo and time signature; the same also
applies to song parts. A song can be linked to a ChordPro document for lyrics and chords.
4.5.1 Manage setlists contextual menu
Click on the More... button or right click on any song or a song part to open the Manage
setlists contextual menu. This contextual menu contains various commands for managing
setlists, songs and song parts:

62
Gig Performer 4.x User Manual © 2016 - 2021 Deskew Technologies, LLC
Gig Performer user interface and concepts
This menu is split into three organizational units - Setlists, Songs, and Song Parts:
Setlists
· Add New Setlist... - opens a setlist name dialog and adds a new setlist in the browser
(the new setlist becomes the current setlist).
· Remove Selected Setlist... - removes the selected setlist and sets the previous setlist
as the current setlist.

63
Gig Performer 4.x User Manual © 2016 - 2021 Deskew Technologies, LLC
Gig Performer user interface and concepts
· Duplicate Selected Setlist... - opens a setlist name dialog and creates a copy of the
selected setlist in the setlist editor (this duplicate becomes the current setlist). This
menu item is grayed out when the All Songs list is active.
· Rename Selected Setlist... - opens a setlist name dialog and allows renaming of the
selected setlist. The renamed setlist is automatically sorted in alphabetical order.
· Add Song(s) to Setlist... - opens a new dialog with the list of all songs where you can
easily add a song (or songs) to the setlist.
· Export All Setlist Songs... - exports all songs from a setlist to a user defined folder.
· Create Gig From Setlist... - allows you to export a setlist to a stand-alone gig file.
Songs
· Find song... - choose this command to open the Quick song finder window displaying
all of the songs currently in the setlist. To add a song from the list in the window to the
current setlist, select the song you want to add and either press the Enter key or
double-click it. Press the Escape key or click the Close button when you have added all
the songs you want in this setlist.
· Create New Song... - opens the Song Properties dialog and allows you to create a new
song.
· Duplicate Selected Song... - opens a Song name dialog and makes a copy of the
selected song.
· Import Song(s)... - opens a new dialog and allows you to select one or more .gpsong
files to import. Refer to the File extensions used in Gig Performer chapter for more
information on different file types in Gig Performer.
· Export Selected Song... - opens a new dialog and allows you to save a song in the
.gpsong file.
· Remove Selected Song... - removes the selected song from the current setlist.
· Remove Selected Song Permanently... - removes the selected song from all setlists.
· Lock/Unlock Selected Song - choosing this menu item blocks changes to rackspace
assignments in a selected song. This protects the selected song from accidental
modification. Clicking on a rackspace in the browser when the song is locked produces
an error message. Use Shift + click to apply to all songs.

64
Gig Performer 4.x User Manual © 2016 - 2021 Deskew Technologies, LLC
Gig Performer user interface and concepts
· Quick Assign Rackspace/Variation... - opens the Quick Rackspace/Variation Finder
window, allowing you to immediately switch to any rackspace and variation.
· Song Properties... - opens the Song Properties dialog.
· Add This Song To Setlist - adds a song to a setlist; select the song in the browser, then
choose this menu item, picking a target setlist from the drop-down menu.
Song parts
· Add New Song Part - opens a Song part name dialog and creates a new song part in
the song currently selected in the browser.
· Duplicate Selected Song Part - makes a copy of the selected song part.
· Remove Selected Song Part - removes the selected song part from the current song.
· Push Song Part Changes to Rackspace - selecting this menu item overwrites the
current variation with any changes made to widgets and then stored to a song part
using the Capture Variation Edits button. After changes have been written back to the
original variation, the red indicator next to the button goes out, and the Compare and
Revert buttons disappear. Note: If you edit values on the fly and like the changes, this
is how you save those changes. If you want to keep the original variation as well, make
a duplicate of it before clicking the Capture Variation Edits button.
· Bulk Reset to Different Rackspace/Variation... - this menu item enables replacing a
rackspace variation, everywhere it occurs, with a different variation. This makes it fast
and easy to change e.g. all of your piano sounds in one gesture when you get a new,
more glorious piano instrument or sound. Choose the rackspace you want to use as a
replacement and after accepting the change in the confirmation dialog, all instances of
the old variation will be replaced with the new variation.
· Song Part Properties... - opens the Song Part Properties dialog.
4.6 Widgets
A widget is an object (such as a knob, slider, button, or meter) used to control and/or display
plugin parameters. Widgets can be controlled either with your laptop's mouse or trackpad, or
remotely from a MIDI controller. With the use of OSC, widgets can also be controlled from
iOS / Android tablets and smartphones using the appropriate apps, as well as from other
applications such as MaxMSP or Ableton Live that support OSC.

65
Gig Performer 4.x User Manual © 2016 - 2021 Deskew Technologies, LLC
Gig Performer user interface and concepts
The picture below depicts all 50 widgets available in Gig Performer 4:
1-Shape, 2-Text Label, 3-Tape Label (Horizontal), 4-Tape Label (Vertical), 5-Blue Knob, 6-
Green Knob, 7-Grey Knob, 8-Purple Knob, 9-Balance Knob, 10-Metal Knob, 11-Metal Knob
(Dark), 12-Old School Knob, 13-The 11, 14-Metal Angled Knob, 15-Plastic Blue Knob, 16-
Plastic Green Knob, 17-Plastic Red Knob, 18-Plastic Purple Knob, 19-Black Metal Knob, 20-
Gold Knob, 21-Switch (Vertical), 22-Switch Red (Vertical), 23-Meter (Vertical), 24-Expression
Pedal, 25-Sustain Pedal, 26-Meter (Horizontal), 27-Black Slider (Vertical), 28-White Slider
(Vertical), 29-Blue Slider, 30-Red Slider, 31-Purple Slider, 32-White Slider (Horizontal), 33-
Black Slider (Horizontal), 34-Black Drawbar, 35-Brown Drawbar, 36-White Drawbar, 37-Pad
Button Blue, 38-Pad Button Green, 39-Pad Button Red, 40-Pad Button Orange, 41-Pad Button
Yellow, 42-Switch (Horizontal), 43-Switch Red (Horizontal), 44-Toggle Switch, 45-Red LED,
46-Green LED, 47-Blue LED, 48-LED Button Green, 49-LED Button Red, 50-LED Button Blue.
Widgets can be operated independently or in widget groups (refer to the How to add a
widget to a widget group chapter for more information on widget groups). There are 26
widget groups available and they are represented with letters (A-Z). To assign a widget to a
widget group, first make sure that the Edit mode in Panels view is selected; then select a
widget and assign it to a group by selecting a letter, as indicated with the red rectangle:

66
Gig Performer 4.x User Manual © 2016 - 2021 Deskew Technologies, LLC
Gig Performer user interface and concepts
Repeat these steps for other widgets that you want to be a part of the same group. When a
widget is a part of a group, there will be a corresponding letter in the upper-left corner of the
widget as indicated with the red arrows. Widget groups allows you to define complex
relations between widgets, which are further discussed in the Panels and Widgets chapter.
Tip: Pressing a character (A-Z) while holding the Alt key (or Option on Mac) down will assign
all selected widgets to that character's widget group.
Historically, if you wanted to control plugin parameters, you had to use MIDI messages to do
so. Many plugins supported the ability to learn particular MIDI messages for specific
parameters. However, we strongly encourage you to avoid this legacy approach and instead
use Gig Performer's host automation support. Using host automation, you will control plugin
parameters via widgets and optionally control widgets from your MIDI hardware. This may
seem more complicated than it actually is and Gig Performer's ability to learn MIDI
automatically makes the process simple while providing you with much more flexibility than
controlling parameters directly via MIDI (please refer to this chapter for more information).
Visit this blog article to learn what are the benefits of using the host automation. Note:
while some older plugins may not support host automation, plugins that don't support host
automation are very rare.

67
Gig Performer 4.x User Manual © 2016 - 2021 Deskew Technologies, LLC
Gig Performer user interface and concepts
4.6.1 Widget contextual menu
If the Panels view, the Edit mode is active and you right click on a widget, the contextual
menu appears:
Copy - copies the widget into the clipboard.
Paste - pastes the widget from the clipboard.
Duplicate - duplicates the currently selected widget.
Remove - removes the currently selected widget (alternatively, press the Del or the
Backspace key).
Bring to forward - places the currently selected widget one place higher in the order. Refer
to the Widget z-ordering chapter for more information.
Bring to front - places the currently selected widget above all others (the highest priority in
the order).
Send backward - places the currently selected widget one place lower in the order.
Send to back - places the currently selected widget below all others (the lowest priority in
the order).
4.7 Plugins
A plugin is a separate piece of software that can be loaded into a DAW or a live performance
host such as Gig Performer. Some plugins (called "virtual instruments") generate audio, for
example, emulations of musical instruments and synthesizers, while effects plugins alter

68
Gig Performer 4.x User Manual © 2016 - 2021 Deskew Technologies, LLC
Gig Performer user interface and concepts
incoming audio signals, such as from a microphone, electric guitar, or virtual instrument,
offering pro-cesses like equalization, filtering, compression, limiting, reverb, delay, flanging,
chorusing, phasing, and the like. Many thousands of plugins are available in the audio/music
marketplace, both free and commercial. Many free plugins are of extremely high quality.
In Gig Performer, a plugin is also referred to as a plugin block or just "block".
Some of the blocks and their elements in Gig Performer are depicted in the screenshot
below:
Double-clicking a plugin opens its editor (1), e.g. here is a third-party plugin called Nick Crow
Lead 8505, as indicated in (8). When you insert a plugin it opens its editor by default; this
setting can be changed by turning off the Open plugin window when inserted setting in
Display options.
The Audio input block is colored dark orange (2) and audio output block is colored dark
yellow (6); the actual audio inputs and outputs depend on your audio setup. You can review
your settings under Audio I/O Options.
Virtual instruments, such as (3) and (7) are colored green. The third party-plugin called
NeoPiano is bypassed. Learn more about bypassing a plugin in the Plugin contextual menu
section.

69
Gig Performer 4.x User Manual © 2016 - 2021 Deskew Technologies, LLC
Gig Performer user interface and concepts
Audio processors, such as effects plugins (4) and (8) are colored blue. Note the blue line
located at the lower-right corner of plugin (4); hovering a mouse pointer over this line will
show a tooltip that states This plugin has more audio channels. Click to adjust visibility. Refer
to the Plugin contextual menu section to find out more about limiting pins (or plugin ports).
To find out more about wiring your plugins and ports, refer to the Wiring view and Inserting
and wiring your plugins sections.
MIDI plugins such as MIDI Monitor (5) are colored orange.
A plugin may have an OSC/GPScript handle assigned to them. Note the Blue3 plugin (7) and
its handle name "script" located at the upper-left corner of the plugin. Two symbols {S} and
"wireless icon" are located at the upper-right corner of the plugin, indicating that the defined
handle will be used as a GPScript handle and a OSC handle respectively. Refer to the Plugin
contextual menu section for more information on setting up a handle.
As previously mentioned in the chapter Global Rackspace, the gray-colored plugin To Global
Rackspace (9) is used to send audio signals to the Global rackspace.
When you click on a plugin block it becomes selected (11). Many integrated Gig Performer's
plugins are colored black, such as Audio Mixer (10). A plugin is also colored black if it
doesn't report its type or if it represents a utility plugin, such as some mastering plugins
(12). If you hover with your mouse over any plugin, a tooltip pops up, showing the plugin's
name, type, format and latency (13) (note: the tooltip can be disabled by turning off the
Show information on plugin hover toggle box in the Display Options).
An exception to the common rectangular shape of plugins in Gig Performer is the MIDI
Channel Constrainer plugin (14) (to learn more about this plugin and set it to block all MIDI
traffic, refer to the MIDI Channel Constrainer chapter).
If the computer you're using to access the gig file is missing some of the plugins that were
present when the original file was created, Gig Performer will create a "chameleon" plugin
that mimics all the properties of the original plugin except the actual processing. This will
allow you to modify the file, save it and later re-open it on a computer that has all of the
required plugins installed:

70
Gig Performer 4.x User Manual © 2016 - 2021 Deskew Technologies, LLC
Gig Performer user interface and concepts
The chameleon plugin is colored dark red and reports the name of the real plugin followed
by the word "(MISSING)". If you double-click this plugin, its window opens and states that
this plugin is either missing or disabled on this system. This feature is extremely useful if
someone sends you a gig file that includes a reverb plugin (say) which you don't have
currently installed. You simply open that gig file and see which plugin is missing. Afterward,
you can either install the missing plugin or replace it with your own reverb plugin – right
click on the chameleon block, then select Replace plugin and choose the existing alternative
reverb plugin on your machine.
If you disable your plugin through the Plugin Manager, it becomes a chameleon plugin. This
feature is also useful for troubleshooting; check this blog article to find out how you can
identify a plugin that crashed.
To learn more about the plugins that are integrated in Gig Performer, refer to the Built-in
plugins chapter.

71
Gig Performer 4.x User Manual © 2016 - 2021 Deskew Technologies, LLC
Gig Performer user interface and concepts
4.7.1 Plugin Manager
The Plugin Manager lets you view all of the plugins installed in your system, and can be
sorted by name, format (VST, VST3 or AudioUnit), category (Effect, tone Generator, Synth,
Panner, etc.), manufacturer name, description, enabled status or load type:
To access the Plugin Manager, press Ctrl+Shift+P (Cmd+Shift+P on Mac) or choose Plugin
Manager from the Window menu. Click on the column name, such as "Name" or "Format" to
sort the column alphabetically by that category. Click that category a second time to reverse
the alphabetical order of the column.
Note: Windows users can install and use VST and VST3 plugins; examples of those are
indicated with (1). MacOS users can install and use VST, VST3 or AudioUnit plugins.
Do however be aware that a plugin's manufacturer might report the wrong category or even
not report it at all (2).
Right-clicking on any plugin name opens a pop-up menu (3) that allows you to Enable or
Disable any plugin (alternatively, click on the toggle button as indicated with (4)), open its
containing folder, visit plugin developer's website, or to specify its Loading type - "Normal"
or "Delayed" (alternatively, click on the toggle button as indicated with (5)).
If you encounter third-party plugins that regularly fail to reinitialize successfully (i.e. they
don't launch or display with the last saved value when recalling a .gig file), try designating
them here as "Delayed" (they will be overlaid with a dark brown see-through bar). Gig
Performer will then slightly delay their loading time the next time it is launched, which may
help solve the problem.
Note: when you disable a plugin, you will need to reload your gig file for the changes to take
effect.
Plugins labeled as "Disabled" in the Plugin Manager are overlaid with a brown see-through
bar and will not appear in the list of available plugins when you right-click in the Wiring view
surface area. This enables you to reduce clutter if you are sure you won't need to access
particular plugins when creating a rackspace.

72
Gig Performer 4.x User Manual © 2016 - 2021 Deskew Technologies, LLC
Gig Performer user interface and concepts
At the bottom of the Plugin Manager window are two buttons named Manage... and Scan... :
Clicking on the Manage... button allows you to:
· Clear list - clears all plugins from Gig Performer's Plugin Manager. Note: this operation
will not actually erase any plugins from your computer, it simply makes them
unavailable to Gig Performer until you perform a new scan. Click on the Scan -> Scan
for new or updated plugins menu item to begin the scan.
· Remove selected plugin from list - removes the plugin from the Plugin Manager (note:
select a plugin first to make this option operational).
· Show folder containing selected plugin - opens the folder containing the selected
plugin (note: select a plugin first to make this operational - this only works for VST
plugins).
· Remove plugins whose files no longer exist - use this option to update the Plugin
Manager so that it reflects accuracy what plugins are actually available.
· Set VST folders for scanning... - opens the window which allows you to change, add, or
delete the VST plugin folders to be scanned (see the Troubleshooting section for more
information).
· Set VST3 folders for scanning... - opens a window that allows you to change, add, or
delete the folders to be scanned for VST3 plugins (see the Troubleshooting section for
more information).
Clicking on the Scan... button allows you to:
· Scan for new or updated plugins - this causes Gig Performer to immediately scan
your system for any newly installed or updated plugins; any plugins found will be added
to the Plugin Manager list.
· Rescan failed plugins - rescans any failed plugins. Note that Gig Performer supports
only 64-bit plugins; any 32-bit plugin found will fail to initialize.

73
Gig Performer 4.x User Manual © 2016 - 2021 Deskew Technologies, LLC
Gig Performer user interface and concepts
· Rescan all plugins - this option will go through your drive again, looking for all plugins
in specified folders.
For more information on how to download and use plugins in Gig Performer, check this blog
article: Top websites for free audio plugins and how to use them in Gig Performer.
4.7.2 Plugin contextual menu
Right-clicking on any plugin opens a popup menu with many options:
1. Bypass - places the plugin in bypass mode. Plugin blocks that are bypassed are overlaid
with a red transparent rectangle, as shown in the illustration below:

74
Gig Performer 4.x User Manual © 2016 - 2021 Deskew Technologies, LLC
Gig Performer user interface and concepts
Similarly, you can select multiple plugins and bypass them.
Note: There is a difference between bypassing a plugin and muting it.
For virtual instrument plugins, bypassing actually turns off processing for that plugin, thus
stopping the sound from being generated.
Muting, which is accomplished by inserting a Gain Control, Gain and Balance, Gain and
Balance (m->s), or one of the audio mixer plugins and clicking the Mute button or setting its
volume slider to 0, causes an audio signal to continue to be generated, but with the output
silenced.
For example, if you are playing back a loop or click track during live performance but you
don't want the audience to hear it for a period of time, mute the plugin instead of bypassing
it. That way, it will continue to play (in your headphones, if so routed) until you're ready for
the audience to hear it again.
In contrast, bypassing an effects plugin causes incoming signals to pass through the plugin
unchanged.
2. Rename... - renames the displayed name (useful if you are using the same plugin more
than once).
3. Show Plugin Editor - opens the plugin's editor (same as double-clicking on the plugin
block).
4. Copy - copies the plugin into the clipboard.
5. Paste - pastes the plugin from the clipboard.
6. Duplicate - creates a duplicate of the plugin.

75
Gig Performer 4.x User Manual © 2016 - 2021 Deskew Technologies, LLC
Gig Performer user interface and concepts
7. Remove - removes the plugin from the Wiring area surface. You can also select one or
more plugin blocks by dragging over them with your mouse and remove them from the
Wiring area surface by pressing either the Delete or Backspace keys on your keyboard.
8. Disconnect - removes all connections to and from this plugin.
9. Replace Plugin - choose a plugin from the menu that pops up to replace the current plugin
with another.
10. Quick Replace... - opens a new window that allows you find plugins quickly based on
partial names:
Type in a search query, such as "gg" to quickly find all plugins with that name or their
developers name. You can also type in "synth" to display all your synth plugins.
11. Bus Layout... - opens the Channel and Bus Layout dialog:

76
Gig Performer 4.x User Manual © 2016 - 2021 Deskew Technologies, LLC
Gig Performer user interface and concepts
Some plugins support multiple configurations of inputs and outputs, usually mono and
stereo, and sometimes multichannel. In a DAW environment, the DAW deals with
configuring these input and output buses. In Gig Performer, you can access a plugin's bus
options directly in the Channel and Bus Layout dialog.
Many plugins will simply show a stereo input/output bus, but some plugins, such as the
eight-channel Voxengo Overtone GEQ, shown in the screenshot above, offer many more
configurations.
12. Max audio channels... - this feature allows you to set the maximum number of audio
pins for the selected plugin block:

77
Gig Performer 4.x User Manual © 2016 - 2021 Deskew Technologies, LLC
Gig Performer user interface and concepts
The global maximum setting (for all plugins) can be changed in Display Options. This setting
can be overridden for the selected block; default current maximums for the override are 256
input/output pins, and their number can be set up independently if you turn off the Use same
values for inputs and outputs toggle button. This feature is very useful for certain plugins
that expose a large number of channels (64 or even 128), making the plugin block extremely
wide. In such cases, you can use this option to force the plugin to display only the first few
channels.
13. OSC/GPScript Handle - allows you to set a handle to be used by GPScript and OSC, and
to enable OSC and/or GPScript.
Click on the Set Handle... menu item (1); new window appears, where you can type in a
name of the handle (2), and then activate Enable OSC (3) and/or Use in GPScript (4) if you
want to use these advanced features. Refer to OSC and Gig Performer and GPScript chapters
to learn more.

78
Gig Performer 4.x User Manual © 2016 - 2021 Deskew Technologies, LLC
Gig Performer user interface and concepts
14. Save as Favorite... - allows you to save a plugin as favorite. Refer to the Save one or
more plugins as favorites section for more information.
15. User - allows you to load plugin's integrated (factory) presets or custom user presets.
See the Plugin Editor More menu section to learn more.
Note: the MIDI In plugin block right-click menu is the same as other plugins, but with the
addition of:
Change MIDI Input Device - reassigns the MIDI In or MIDI Out block to the MIDI controller
chosen from the popup menu.
4.7.3 Selected blocks contextual menu
If you select multiple plugins (either by using a selection rectangle or Shift + click on the
desired plugin blocks) and right click on any of the selected plugins, the Selected blocks
contextual menu will open and allow you to do the following:
The displayed menu items have the same purpose as described in the Plugin contextual
menu chapter; the new menu items are Center and Evenly Distribute.
When you hover over the Center menu item, two sub-items appear - Vertically and
Horizontally, allowing you to center all selected plugin blocks vertically or horizontally
respectively.
Center -> Vertically:

79
Gig Performer 4.x User Manual © 2016 - 2021 Deskew Technologies, LLC
Gig Performer user interface and concepts
Center -> Horizontally:

80
Gig Performer 4.x User Manual © 2016 - 2021 Deskew Technologies, LLC
Gig Performer user interface and concepts
The Evenly Distribute menu item will be enabled if you select at least three plugin blocks;
when you hover over the Evenly Distribute menu item, two sub-items appear - Vertically and
Horizontally, allowing you to distribute all selected plugin blocks evenly either vertically or
horizontally respectively.
Evenly Distribute -> Vertically:
Evenly Distribute -> Horizontally:

81
Gig Performer 4.x User Manual © 2016 - 2021 Deskew Technologies, LLC
Gig Performer user interface and concepts
4.7.4 Plugin Editor More menu
Double-clicking a plugin opens its plugin editor:
Clicking on the "..." button (indicated with the red arrow) opens the More menu:
Load GP User Preset… - loads a Gig Performer user preset file (gpp_audiounit, gpp_vst or
gpp_vst3).

82
Gig Performer 4.x User Manual © 2016 - 2021 Deskew Technologies, LLC
Gig Performer user interface and concepts
Save GP User Preset… - saves a Gig Performer user preset file (gpp_audiounit or gpp_vst or
gpp_vst3, where the actual extension depends on the plugin type). User presets are saved in
corresponding subfolders under the Presets folder based on their manufacturer name and
the actual plugin name (refer to the File locations in Gig Performer chapter for more
information). The resulting subfolder where user preset files are saved is in the following
folder tree: Presets\Plugin_Manufacturer_Name\Plugin_Name. Tip: to easily access your
Presets folder, click Window -> Open Content Folders; open the Presets folder and browse
its sub-folders (organized by plugin manufacturers' names) to find preset files and to
perform other file operations on them (rename, delete, etc.).
Import FXP/FXB File… - imports a FXP/FXB preset file. FXP is an individual preset, FXB is a
bank of presets. This feature is for legacy support and may disappear in a future version of
Gig Performer. Not all VST plugins are compatible with the FXP/FXB format. Most of those
that are compatible are audio plugins.
GP User Presets - this menu item is disabled if you have not previously saved any user
presets for the current plugin. If it is available, it will list the names of your saved user
presets.
Plugin Presets - some plugins include predefined presets, most commonly factory presets. If
a plugin has any such built-in presets, then they will show up in this sub-menu.
Probabilistic Sound Designer - randomizes selected plugin parameters values to generate
random patches. This feature supersedes the Random Parameter Generator, an experimental
feature in Gig Performer 3:
1. Choose the desired parameters - simply click on a desired control in the plugin editor
window (i.e. Gain, Low, or other) and/or move it and the corresponding parameter will
be automatically recognized and captured (make sure that the Capture Parameters
toggle button is turned on). The knobs positions in the plugin editor and the
Probabilistic Sound Designer will be automatically synchronized.

83
Gig Performer 4.x User Manual © 2016 - 2021 Deskew Technologies, LLC
Gig Performer user interface and concepts
2. Randomize - when you select the desired parameters, click on the Randomize button
to generate random values for the chosen parameters. Every time you click on this
button creates new values for the chosen parameters. Note: if the Hold check box is
ticked, a random value for that parameter will not be generated (e.g. the last
parameter in this list will not be randomized).
3. Capture Parameters - this toggle button is turned on by default; if you turn it off, new
parameters will not be captured.
4. Remove All - removes all listed parameters.
5. Load... - clicking on this button allows you to load a previously saved Probabilistic
Sound Designer configuration (gppsd_audiounit, gppsd_vst or gppsd_vst3).
6. Save... - clicking on this button allows you to save the current Probabilistic Sound
Designer configuration to a file (gppsd_audiounit, gppsd_vst or gpp_vst3, where the
actual extension depends on the plugin type). By default these files are saved in
corresponding subfolders in the PSD folder (refer to the File locations in Gig Performer
chapter for more information).
7. Remove button - clicking on this button will remove the current parameter from the
parameter list.
8. Hold - check this checkbox if you don't want the corresponding parameter to get a
random value. In the screenshot above, all knobs will get the random value except the
output volume.
9. Curve - allows you to control the range of possible values and the probability of
particular values for the parameter. Refer to this chapter for more information on
curves.
For example, if you're randomizing a low-pass filter cutoff and there is no other
modulator (e.g. no ADSR applied), then it's useful to prevent the filter from getting too
low a value as that will just block all audio:

84
Gig Performer 4.x User Manual © 2016 - 2021 Deskew Technologies, LLC
Gig Performer user interface and concepts
So the graph above basically says, produce any value equally likely from within the
range 30.25 to 100. The filter value therefore will never be set lower than about 1/3
from the bottom.
10. Parameter name - displays the name of the captured parameter.
Plugin Developer Website - opens the homepage of a plugin's manufacturer in the default
Web browser.
Cancel - this menu item simply closes the menu.
4.8 Global MIDI Monitor
The global MIDI Monitor displays all incoming MIDI events. Click on the Window menu and
select the Global MIDI Monitor to open it or press keys Ctrl+M (or Cmd+M on Mac):

85
Gig Performer 4.x User Manual © 2016 - 2021 Deskew Technologies, LLC
Gig Performer user interface and concepts
This window displays all incoming MIDI messages received by Gig Performer; you can
optionally turn on the SysEx indices toggle button to see the position of each byte of a SysEx
message.
Double-click an entry in this window to copy it to the clipboard. Hold the Shift key while
double-clicking on any entry to copy all entries to the clipboard. Hold the Alt key (Option key
on a Mac) to include source MIDI device names as well.
Note: also check the supplied MIDI Monitor plugin.
4.9 Rig Manager
In Gig Performer, a "Rig" is a collection of three sets of information: a set of physical MIDI
controllers, a set of virtual controllers that can be attached to widgets, and a map that
relates the two sets, thereby connecting your physical controller, through widgets, to
parameter controls.
A MIDI Input Device is a physical controller, which may include a keyboard, multiple knobs,
sliders, buttons, or other individual controllers. It the device does not include a keyboard, it
is normally referred to as a control surface. In the Rig Manager you define an alias for a
MIDI device.

86
Gig Performer 4.x User Manual © 2016 - 2021 Deskew Technologies, LLC
Gig Performer user interface and concepts
Aliases can also be set to MIDI Controls and they represent the virtual controllers that get
mapped to parameters.
Once the lists of MIDI Device Aliases and MIDI Control Aliases are established, they appear
as drop-down menus in fields where they are used, for example, as MIDI sources in plugins
(see the How to use aliases chapter for more).
The Rig Manager is designed to speed your workflow by eliminating the need to teach
controllers to Gig Performer every time you use a different keyboard or controller setup
(provided that you created aliases and saved your setup). Note: when you use a completely
new MIDI device, you will need to map aliases to the desired controllers, but only once,
since you can save them. Afterward, simply switch between the saved rigs.
The Rig Manager constructs a map of physical input devices like keyboards, and the
controllers they host, like sliders, buttons, faders, and knobs, to aliases (virtual controllers)
that are linked to widgets. Virtual controllers decouple the physical controller from the
control paths in Gig Performer, which makes it easier to swap out different physical
controllers while maintaining your usual controls.
Say, for example, that you're sharing backline instruments with another performer and so
have to use someone else's keyboard controller for your performance. The Rig Manager's
controller mapping means that you only need to map the new physical controllers to the
existing virtual ones and all of your widget controls are reestablished. This can be
accomplished in a few minutes, even when you're at soundcheck. As an aside, this is a
feature that was implemented after one of the developers was on tour and ran into the
problem when he had to use a different controller than normal.
Similarly, if you use one controller for rehearsal and a different one for gigs, the Rig
Manager can make it much easier to switch between them.
Also, if you play multiple identical keyboards, the Rig Manager can be used to let you quickly
designate which keyboard is which. For example, one of the developers who often uses three
identical controllers named them Top, Middle and Bottom in the Rig Manager. When the
key-boards are plugged in, he can quickly visit the Rig Manager, play a note on each of these
key-boards so as to tell the Rig Manager which one is now Top, Middle or Bottom.
The Rig Manager window is displayed in the screenshot below:

87
Gig Performer 4.x User Manual © 2016 - 2021 Deskew Technologies, LLC
Gig Performer user interface and concepts
1. Rig list - clicking this drops down a menu of currently available rigs. Choose one from
the list.
2. Rename this rig - click this to customize the name of the current rig.
3. Add a new rig - click this button to open a menu that allows you to duplicate the rig
(the Duplicate current Rig option) or add a new one (the Add new Rig option). The
difference between creating a new rig and duplicating the current rig can be seen in
the left side of the Rig manager - MIDI Device Aliases; when a new rig is created,
aliases are not associated with MIDI devices and when the current rig is duplicated -
aliases are associated with MIDI devices (the same as in the original rig). Note: MIDI
Control aliases are defined globally and are present in newly created rigs.
4. Remove this rig - click this button to remove the current rig. A confirmation dialog
offers you the chance to cancel, if you change your mind.
5. Add a new MIDI device alias - click this to add a new MIDI device alias in the list.
When you add a new MIDI device alias, it is not associated with a MIDI device (like in
(9)). See the point (11) to see how to associate it. After you successfully associate the
MIDI device alias with the desired MIDI device, it is highlighted green like in (8).

88
Gig Performer 4.x User Manual © 2016 - 2021 Deskew Technologies, LLC
Gig Performer user interface and concepts
6. Add a new MIDI control alias - click this to add a new MIDI control alias to the list.
When you add a new MIDI control alias, it is not associated with a MIDI control (like in
(13)). See the point (15) to see how to associate it. After you successfully associate
the MIDI control alias with the desired MIDI control, it is highlighted green like in (12).
7. MIDI Input Device with no defined alias - indicates that Gig Performer recognized
this MIDI input device, but no MIDI device alias has been defined for it yet. Gig
Performer automatically detects all available MIDI input devices. Note: the Local GP
port is a special MIDI device, check the Local GP port chapter to learn more.
8. Associated MIDI Input Device alias - indicates that the MIDI Input Device alias is
successfully associated with this MIDI device and that this MIDI device is connected to
the computer.
9. Unassociated MIDI Device alias - indicates that the MIDI Device alias is created, but it
is not associated with a MIDI device.
10. Missing MIDI device - indicates that this MIDI device is associated with the
corresponding alias but is disconnected. Connecting the corresponding MIDI device
will change the display green as indicated with (8).
11. Manage this entry button - clicking on this button (or right clicking on any MIDI
device alias) opens this menu:
a. Define alias for this MIDI device... - clicking on this menu item opens the Define
MIDI device alias dialog which allows you to enter a new alias for the
corresponding MIDI device.
b. Rename... - allows you to rename the MIDI device alias.
c. Remove this MIDI device alias... - removes the MIDI device alias. The MIDI device
will display "(no alias)" when connected (as shown in (7)).

89
Gig Performer 4.x User Manual © 2016 - 2021 Deskew Technologies, LLC
Gig Performer user interface and concepts
d. Associate MIDI Device - allows you to manually select a MIDI device from the list
and associate it with the MIDI device alias.
e. Learn MIDI device - allows you to quickly assign a MIDI device by simply moving
the desired control. The MIDI device alias will be automatically mapped to the
detected MIDI device.
f. Remove MIDI device association - clears the MIDI device association for the MIDI
device alias.
g. Associate MIDI output device - allows you to select the desired MIDI output
device from the list.
12. Associated MIDI Control alias - green background indicates that the MIDI control alias
is associated with the physical MIDI control.
13. Unassociated MIDI Control alias - indicates that the MIDI Control alias is created, but
it is not associated with a MIDI control.
14. Missing MIDI device - indicates that this MIDI control is associated with the
corresponding alias but the MIDI device that hosts this control is disconnected.
Connecting the corresponding MIDI device will change the display green as indicated
with (12).
15. Manage this entry button - clicking on this button (or right clicking on any MIDI
control alias) opens this menu:
a. Rename... - allows you to change the name of the MIDI control alias.
b. Remove this MIDI control alias... - removing the MIDI control alias also removes
this entry from the MIDI Control Aliases list.
c. Learn MIDI control - allows you to quickly assign the physical control on a MIDI
device by simply moving the desired control. The MIDI control alias will be
automatically mapped to the detected control.
d. Remove MIDI control association - removes the association with the physical
MIDI control.

90
Gig Performer 4.x User Manual © 2016 - 2021 Deskew Technologies, LLC
Gig Performer user interface and concepts
16. Export... - click on this button to save the state of the rig to a rigsetup file. This file
can be moved and imported to a new computer.
17. Import... - click on this button to load an existing rig file. Note: changes will not take
effect until you click Apply or Save.
18. Apply - click this button to apply changes you have made.
19. Close - clicking on this button closes the Rig Manager window.
20. Save - click this button to save the state of the rig to the current rig file and close the
Rig Manager window.
4.10 ChordPro
ChordPro is a file format that allows you to represent lyrics and chords using text markup
that can then be displayed in a form suitable for performing musicians. Although initially
intended for guitarists, it can be used for all kinds of musical purposes.
Gig Performer supports the ChordPro lead sheet file format and ChordPro files can be
created, edited, saved, and imported in Gig Performer. A ChordPro file can be linked to a
song in the Song Lyrics/Chords Editor. The assigned ChordPro file can be seen in the Song
Properties dialog (it also allows you to clear the association to the ChordPro file).
For more information on ChordPro, please visit www.chordpro.org. For more information on
its file format specification click here.
Note: any text editor can be used to create and maintain ChordPro files. These files may
have arbitrary types (extensions), and common file name extensions for ChordPro files are
.cho, .crd, .chopro, .chord and .pro. Gig Performer will also list and import the most
common .txt file extension, so you don't have to change the extension of your ChordPro files
that you save with your editor.
In Gig Performer, ChordPro files are created and modified in the Song Lyrics/Chords Editor:

91
Gig Performer 4.x User Manual © 2016 - 2021 Deskew Technologies, LLC
Gig Performer user interface and concepts
1. Song list button - click this to show the current setlist (indicated with (11)) and its
songs. When the song list button is clicked, a song browser appears to allow selecting
the song for which you want to work on a ChordPro document. Click the Songs button
again to close the song list.
2. Make the song list narrower button - allows you to reduce the width of the song
browser pane.
3. Make the song list wider button - allows you to widen the song browser pane.
4. Load from a file button - clicking this button brings up an Open dialog for loading
Chord Pro files. Note: files can only be opened if they are in the root folder named Gig
Performer Song Lyrics-Chords by default; you can specify a different root folder in the
Setlist/Song Options. Refer to the File locations in Gig Performer chapter to see the
default location for this folder.
5. Save to a file button - saves the current contents of the editor to a ChordPro file. Files
can be saved anywhere, but can only be opened directly from the root directory.
6. Transpose amount - this display shows the current transposition in semitones. It is
not editable. Transposition only affects the display of chord names in the ChordPro
document.
7. Increase/decrease transposition amount buttons - use these buttons to set the
transposition amount for chord display in the ChordPro document.
8. Save transposition button - clicking this button commits the transposition and makes
it permanent in the ChordPro file.
9. Make all chords sharp/flat buttons - when there are chords whose root contains an
accidental, choosing one of these commands causes those chords to be displayed
enharmonically.

92
Gig Performer 4.x User Manual © 2016 - 2021 Deskew Technologies, LLC
Gig Performer user interface and concepts
10. Font size larger/smaller buttons - these buttons enlarge or shrink the font size on
everything in the View mode. Clicking this button when you are in Edit mode will
switch you to View mode, where you can size the font.
11. Setlist chooser - a drop-down menu for choosing a setlist. Below are included all the
songs in the active setlist. Clicking on a song displays the linked ChordPro file, if one is
assigned.
12. View tab - this tab enters the View mode, which interprets the code from the Edit
mode and displays the result.
13. Edit tab - this tab (indicated with the blue arrow) enters the Edit mode, where
ChordPro coding is done.
14. Keep on top button - when this button is clicked the Song Lyrics-Chords Editor
window is always in the foreground and cannot be obscured by another window. When
engaged, the button turns green.
15. Editing area - a simple text editor for entering lyrics, chords, and ChordPro directives
(read more about ChordPro directives here). The chords representation in the Edit
mode and the View mode is indicated with the green arrow. Tip: to place a chord over
the middle of a word, simply insert the chord in its brackets in the middle of the word,
immediately in front of the letter you want the chord to appear over, with no spaces.
For example, see the word "th[B7]ere" in the first screenshot.
A special directive named songpartname is introduced in Gig Performer 4 and is used
to link a part in the ChordPro file with a corresponding song part. For more information,
refer to the Improvements to the Song Lyrics/Chords Editor chapter.

93
Gig Performer 4.x User Manual © 2016 - 2021 Deskew Technologies, LLC
Gig Performer user interface and concepts
Note: a ChordPro file can be loaded into the song lyrics/chords editor ONLY from the root
directory; to load a ChordPro file not made by Gig Performer, or not stored in the root
directory, use the File -> Import ChordPro files... command.
The Song Lyrics/Chords Editor supports automatic scrolling to song parts:
For example, if you have a song with three song parts - Intro, Verse, and Chorus - as in the
screenshot above, simply open the Song Lyrics/Chords Editor, click on the Edit tab and enter
the corresponding directives:
- for the Intro song part enter {songpartname: Intro}
- for the Verse song part enter {songpartname: Verse}
- for the Chorus song part enter {songpartname: Chorus}
Next, click on the View tab and click on one of the song parts - you will notice that your lyrics
file automatically scrolls to that part.
Note: if you don't have a ChordPro file linked to your song, you have to find it or create your
own ChordPro file.
There are many chord-oriented web sites for musicians that support ChordPro files. Refer to
this blog article How to use ChordPro files in Gig Performer for more information on how to

94
Gig Performer 4.x User Manual © 2016 - 2021 Deskew Technologies, LLC
Gig Performer user interface and concepts
obtain ChordPro files from these web sites or create your own ChordPro files and how to use
them in Gig Performer.

95
Gig Performer 4.x User Manual © 2016 - 2021 Deskew Technologies, LLC
Inserting and Wiring your plugins
5 Inserting and Wiring your plugins
In this chapter find out how to insert and connect your audio inputs to your plugins, how to
connect plugins to each other and how to connect them to audio outputs.
Gig Performer supports 64-bit VST, VST3 and AU (Mac only) audio plugins. Before you
proceed make sure that you have installed the 64-bit version of your audio plugins and that
plugin directories are properly specified in the Plugin Manager.
For more information on how to download and use plugins in Gig Performer, check this blog
article: Top websites for free audio plugins and how to use them in Gig Performer.
Note: make sure that your audio interface is connected. If no audio interface is connected,
Gig Performer will try to use your computer's built-in input and output. If an audio interface
is connected but does not appear, see the Troubleshooting section in this user guide.
5.1 How to insert a plugin and connect it
Easy combining, inserting and tweaking your plugins is essential for any serious musician. In
Gig Performer, plugins are connected easily using virtual wires. First, make sure that Gig
Performer successfully scanned and listed your installed plugins like already advised in the
Inserting and Wiring your plugins chapter.
Let's get started! Create a new empty gig and enter the Wiring view by clicking on the
Wiring button:

96
Gig Performer 4.x User Manual © 2016 - 2021 Deskew Technologies, LLC
Inserting and Wiring your plugins
Various elements in this screenshot are explained in detail in the Wiring view chapter. Note:
your screen may look slightly different from the one shown above, since the audio input and
output blocks will reflect the name of your connected audio interface as well as the number
of inputs and outputs it provides.
Right click (or two-finger tap if you are using a trackpad) on the empty surface to bring up
the contextual menu and select the desired plugin under the Installed plugins section, e.g. a
reverb plugin:
Alternatively, use the keyboard shortcut Ctrl+P (or Cmd+P on Mac) to open the Quick plugin
finder window that allows you to search for a particular plugin by part or all of its name and
insert it.
As soon as you insert the desired plugin block (or double-click on it), Gig Performer by
default opens the editor window for that plugin, allowing you to edit its parameters
immediately (note: you can turn off this default behavior in the Display Options). Make the
desired adjustments or perhaps select a preset and then close the window.
Afterward, simply click on the desired plugin block and drag it to change its position on the
design surface. By default, the name of the plugin is displayed, but you can easily rename it
with something that represents the actual sound - very useful for distinguishing among
multiple copies of the same plugin. Accordingly, right-click on the newly inserted plugin
block and select the Rename... option, then type in the name i.e. "Reverb":

97
Gig Performer 4.x User Manual © 2016 - 2021 Deskew Technologies, LLC
Inserting and Wiring your plugins
To be able to hear the resulting sound, we need to provide an audio source. If you are a
guitarist or vocalist, you might connect an Audio In pin directly to the Reverb input pin and a
Reverb output pin to the Audio Out block. If you are a keyboard player using a synth plugin,
see the next section. To make these connections, simply click on an output pin and, while
holding down the mouse button (or keeping your finger on the trackpad), drag the cursor
over the desired input pin and then release the mouse button (click here for a shortcut
method of making stereo connections):

98
Gig Performer 4.x User Manual © 2016 - 2021 Deskew Technologies, LLC
Inserting and Wiring your plugins
Note: make sure that you connected the right Audio In pin, as your audio interface has
multiple audio inputs where sources i.e. microphones, instruments connected via DI (such as
electric guitars), or other line-level sources can be connected.
Notice that there are blue and orange plugin pins and connections; click here to find out
more.
If you are using a MIDI keyboard or a MIDI controller, you can use it immediately thanks to
the MIDI In (OMNI) block which is available by default when you create a new empty gig
(see the first screenshot). This block receives MIDI messages coming from any MIDI Input
device on your system.
Note that you cannot hear the resulting sound immediately, since this block needs to be
connected to the a sound generating block first, and then to the Audio Out block:

99
Gig Performer 4.x User Manual © 2016 - 2021 Deskew Technologies, LLC
Inserting and Wiring your plugins
At this point, if you play a few notes on your controller (assuming your audio system is
turned up), you should be hearing a sound coming from your connected audio interface.
While the OMNI version of the MIDI In block is convenient when just getting started, if you
have more than one keyboard or multiple surfaces, we recommend that you use MIDI In
blocks specifically associated with those devices rather than the generic OMNI block as this
will give you more control over your MIDI signal flow.
To receive MIDI messages from a specific MIDI device, simply right click on the MIDI In
(OMNI) block, then expand Replace Plugin and from the MIDI Inputs list select the desired
MIDI device. All connected MIDI devices are listed in this menu. Alternatively, select the
MIDI In (OMNI) block and press the Delete key (or the Backspace key) to remove the MIDI In
(OMNI) block; afterward, open the contextual menu, insert the desired MIDI device from the
MIDI Inputs list and connect its output pin to the orange input pin of your sound-generating
plugin:

100
Gig Performer 4.x User Manual © 2016 - 2021 Deskew Technologies, LLC
Inserting and Wiring your plugins
Note: if you previously created an alias for your MIDI device in the Rig Manager, it will show
up in the parenthesis (otherwise, the name of the selected MIDI device will be displayed).
In addition to passing MIDI messages generated by your connected MIDI controller, MIDI In
plugins provide a virtual keyboard, so you can play your plugins even if you are not using an
external MIDI controller. To do so, double-click on the MIDI In block to open its editor, then
play the sound by clicking notes on the virtual keyboard.
To remove (disconnect) a connection, right-click on it and select "Remove this connection" or
simply click and drag the connection until it detaches from a plugin and then let go.
To remove all connections from a plugin block, right-click on the block and select
"Disconnect" (note: removing a plugin block also removes all its connections; right-click on it
and select "Remove" or press either the Delete or Backspace key).
Improvements to the Wiring view such as zooming, scrolling, multi-selection, zoom to fit, etc.
are useful while creating your plugin layout. Learn more about these improvements here.
5.2 Blue and orange colored connections and pins
First, take a brief look at the Wiring view chapter where basic concepts such as pins and
plugin connections are described.
Let's insert two plugins, a reverb and a synth:

101
Gig Performer 4.x User Manual © 2016 - 2021 Deskew Technologies, LLC
Inserting and Wiring your plugins
With (1) are indicated input pins (or input plugin ports) and with (2) are indicated output pins
(or output plugin ports). Note that pins can be blue or orange (indicated with orange and
blue arrows); blue pins indicate audio ports and orange pins indicate MIDI ports.
Plugin blocks are connected by virtual wires, where an output pin of one plugin is connected
to an input pin of another plugin. Note that orange pins cannot be connected to blue pins
(and vice versa). For example, you can connect directly the Audio In block to the Audio Out
block, but cannot connect directly the MIDI In block to the Audio Out block.
Likewise, orange connections (orange virtual wires) represent MIDI connections and blue
connections (blue virtual wires) represent audio connections:

102
Gig Performer 4.x User Manual © 2016 - 2021 Deskew Technologies, LLC
Inserting and Wiring your plugins
The power of Gig Performer lies in the fact that you can connect plugins any way you like,
e.g. you can control multiple synths with one keyboard (you can connect an output pin to
multiple input pins) or you can connect multiple output pins to a single pin:
When you connect multiple output pins to a single pin, signals are mixed automatically (A);
to have more control over your sound, use the built-in Audio Mixer plugin (B).
The number of input and output pins depends on the plugin manufacturer and provided bus
layout settings; in the screenshot below note the difference between mono input and output
buses and 7.1 Surround input and output buses for the same plugin:

103
Gig Performer 4.x User Manual © 2016 - 2021 Deskew Technologies, LLC
Inserting and Wiring your plugins
Gig Performer does let you set a maximum number of pins as a global option (see Display
options -> Maximum number of audio channels to display in blocks) and also to control the
maximum number of pins on each plugin individually.
Refer to the Plugin contextual menu chapter to learn more about bus layout and max pins in
plugin blocks.
Check out also this blog article to find out more on plugin pins: My plugin has so many
output ports - which ones do I use?

104
Gig Performer 4.x User Manual © 2016 - 2021 Deskew Technologies, LLC
Panels and Widgets
6 Panels and Widgets
A widget is an onscreen control associated with a plugin parameter. A panel is simply a
graphic space within which widgets can be placed and labeled. Users typically create
different panels to organize their controls in ways that are simple to identify and deal with in
live performance.
In this chapter find out more about panels and widgets.
6.1 What is a panel?
In Gig Performer, a panel is an area (visually similar to hardware rack-mounted sound
modules and signal processors) containing widgets used to control the plugins in the
rackspace. A rackspace can contain multiple panels, each containing one or more widgets:
On the screenshot above is shown a rackspace ("Blues Keyboard" with the "Delay off"
variation, as indicated with the red rectangle) with two panels (indicated with the letters A
and B).
In normal operation (i.e. when not in edit mode) dragging a widget with your mouse (or by
remote control from your keyboard or control surface) will change the value of that widget,
thereby updating whatever parameter is attached to the widget. If you want to make
changes to panels and widgets, activate the Edit mode. Refer to the Panels view chapter for
more information. In the Edit mode, note the following options as depicted on the screenshot
below:

105
Gig Performer 4.x User Manual © 2016 - 2021 Deskew Technologies, LLC
Panels and Widgets
To create a new panel, either:
· click on the New panel button (1) and then select the desired option from a drop-down
menu (this drop-down menu has the same menu items as the sub menu (4).
· or right click on the empty panel surface (2) to open the panel contextual menu (3),
then expand Add new panel and choose the option from the sub menu (4).
Every time you enter into the Edit mode of the Panels view, tips appear in the Properties
section: you can click on a panel or a widget to show their properties, or you can add new
widgets by dragging them onto a panel surface. When you click on a panel you can see
Panel properties (5). Here you can change the background style of the current panel. To
change a panel's background, click the panel to select it and then either click one of the
textures displayed in this area or choose a custom color.
To find out more about widgets and how to add them to a panel, see the Widgets chapter.
6.1.1 Panel contextual menu
If you are in the Panels view and are in Edit mode, if you right click on a panel, the
contextual menu appears:

106
Gig Performer 4.x User Manual © 2016 - 2021 Deskew Technologies, LLC
Panels and Widgets
This contextual menu allows you to perform the following operations:
Copy - copies the widget into the clipboard (alternatively, click on the Edit menu and select
Copy).
Paste - pastes the widget from the clipboard (alternatively, click on the Edit menu and select
Paste).
Duplicate - duplicates the currently selected widget (alternatively, click on the Edit menu
and select Duplicate).
Remove this panel... - clicking on this menu item allows you to remove the current panel
from the rackspace.
Add new panel - allows you to add a new panel; expand this menu item to see items in the
sub menu:
· New 1U panel - clicking on this menu item allows you to create a new 1U panel; "U" is
an abbreviation for rack unit
· New 2U panel - clicking on this menu item allows you to create a new 2U panel. If you
create a new empty gig in Gig Performer, the default panel size is 2U.
· New 3U panel - clicking on this menu item allows you to create a new 3U panel.
· New 4U panel - clicking on this menu item allows you to create a new 4U panel.

107
Gig Performer 4.x User Manual © 2016 - 2021 Deskew Technologies, LLC
Panels and Widgets
· Load panel... - clicking on this menu item allows you to select a gppanel file and load
the panel.
Extensions - this menu item is hidden by default and shows up if a third-party extension is
enabled and provides one or more custom panels. Refer to the Extensions chapter for more
information.
Save panel... - clicking on this menu item allows you to save a current panel as a gppanel
file, which can be easily reused. Widgets and their MIDI mappings are saved as well.
Move UP - moves the current panel one place higher to the beginning of the rackspace.
Move DOWN - moves the current panel one place lower to the end of the rackspace.
Convert to 1U/2U/3U/4U panel - clicking this option converts the current panel to a
1U/2U/3U/4U panel respectively. Note that converting the unit size (e.g. from 2U to 1U) may
reposition and reduce the size your widgets.
6.2 Widgets
Basic information about widgets is available in the main Widgets chapter. This chapter will
cover widgets in more detail, providing in-depth explanations of various widget operations.
6.2.1 How to add widgets to a panel?
A widget is added to a panel by either dragging the desired widget from the widget list to
that panel, or by copying and pasting (or duplicating) an existing widget:

108
Gig Performer 4.x User Manual © 2016 - 2021 Deskew Technologies, LLC
Panels and Widgets
To add a widget to a panel, first make sure that you are in Edit mode (1). Once you enter
into Edit mode, you can either immediately drag a widget (4) from the widgets list (3) onto a
panel (also note the tip indicated with the red rectangle), or click on the Widget types list (2)
to restrict the list to a particular class of widgets:
For example, if you want to add a label widget, simply select Labels from the drop-down box
and then simply drag the desired label widget from this list to the panel.
To add multiple copies of a widget at once, drag a widget onto the surface, but don't release
the mouse button (1); while holding the mouse button, type the number of copies (up to 9)
you want onto the panel (2). A message will flash at the top of the window (indicated with
the red rectangle) to confirm the number of copies that will be made:

109
Gig Performer 4.x User Manual © 2016 - 2021 Deskew Technologies, LLC
Panels and Widgets
Then release the mouse button. Note: press the desired number again, e.g. 3 while dragging
to drop 3 widgets vertically.
Existing widgets that are already placed onto the panel can be easily duplicated, copied or
pasted by clicking on the Edit menu and selecting the Duplicate, Copy or Paste menu items
respectively. Alternatively, use key combinations Ctrl+D (or Cmd+D), Ctrl+C (or Cmd+C) or
Ctrl+V (or Cmd+V) respectively.
Note: A confirmation message also flashes when you copy a widget or panel. MIDI
associations are preserved whenever you copy and paste a widget or a panel.
You can resize a widget by dragging any of the corner points (the smaller section directly
beneath the white rectangle displays a caption for the widget).
As you may notice, a name of more than a few characters may not display properly within
the default caption space; as mentioned earlier, the white rectangle that appears around the
selected widget (and caption below) in Edit mode allows you resize it (and the
accompanying caption) by dragging any of the corner points.
To replace an existing widget with another one, simply drag the widget over the existing one
and when the REPLACE label appears, release the mouse button:

110
Gig Performer 4.x User Manual © 2016 - 2021 Deskew Technologies, LLC
Panels and Widgets
In the screenshot above the Blue Knob (the existing widget) is being replaced by the Plastic
Blue Knob. Note that you cannot replace knob widgets with buttons, switches etc. If the
replace operation is not supported, the REPLACE label will not appear.
When replacing a widget, all MIDI and Parameter mappings and other widget settings are
saved.
6.2.2 Widget alignment and distribution
When multiple widgets are selected, widget alignment and distribution tools become
available:

111
Gig Performer 4.x User Manual © 2016 - 2021 Deskew Technologies, LLC
Panels and Widgets
Click the associated button or use the displayed key shortcut to apply the alignment or
distribution function to the selected widgets:
Align top (t) - align the tops of the selected widgets.
Align bottom (b) - align the bottoms of the selected widgets.
Align left (l) - align the left sides of the selected widgets.
Align right (r) - Align the right sides of the selected widgets.
Center horizontally - aligns the selected widgets so that they are all lined up on the X axis
at the same value of Y.

112
Gig Performer 4.x User Manual © 2016 - 2021 Deskew Technologies, LLC
Panels and Widgets
Center vertically - aligns the selected widgets so that they are all lined up on the Y axis at
the same value of X.
Distribute horizontally (d) - the selected objects are moved to so as to have even horizontal
spacing between them. Note: the widgets are distributed evenly across the space between
the left side of the left most widget and right side of the right most widget.
Distribute vertically (D) - the selected objects are moved to have even vertical spacing
between them.
Make same size (=) - clicking this button makes all of the selected widgets the same size as
the first selected widget.
Make captions same size - this button changes the size of the caption text areas for all of
the selected widgets to match the size of the first selected widget.
Additional keyboard shortcuts that also apply to selected widgets:
Bigger (+) - grow selected widgets.
Smaller (-) - shrink selected widgets.
Same (=) - make all selected widgets the same size as the first one selected.
H closer (c) - move the selected widgets closer to each other horizontally (along the X axis).
V Closer (C) - move the selected widgets closer to each other vertically (along the Y axis).
H further (f) - move the selected widgets further from each other horizontally (along the X
axis).

113
Gig Performer 4.x User Manual © 2016 - 2021 Deskew Technologies, LLC
Panels and Widgets
V Further (F) - move the selected widgets further from each other vertically (along the Y
axis).
6.2.3 Widget z-ordering
If you insert a widget, e.g. a plastic blue knob, and then insert another one, e.g. a gold knob,
and try to place them at the same position, you'll notice that the gold knob overlaps the
plastic blue knob:
Similarly, if you insert an another widget, e.g. a horizontal black slider and place it at the
same place where are the existing widgets are located, you'll notice that the horizontal black
slider overlaps the existing ones. The most recently inserted widget will be positioned above
earlier widgets at the same location. Note that the hierarchy is preserved here: you can drag
the gold widget away but the horizontal black slider will remain above the plastic knob;
dragging the gold knob back to the same place will place it between the plastic blue knob
and the horizontal black slider.
This order can be controlled by right clicking on a widget and selecting one of the following
contextual menu items:
· Bring forward - places the currently selected widget one place higher in the order.
· Bring to front - places the currently selected widget in front of all other widgets.

114
Gig Performer 4.x User Manual © 2016 - 2021 Deskew Technologies, LLC
Panels and Widgets
· Send backward - places the currently selected widget one place lower in the z-order.
· Send to back - places the currently selected widget behind all other widgets.
6.2.4 Widget Properties inspector
Adding or selecting a widget in Edit mode opens the Widget Properties inspector which is
divided into two sections: Widget Properties and Mapping.
Widget properties

115
Gig Performer 4.x User Manual © 2016 - 2021 Deskew Technologies, LLC
Panels and Widgets
The Widget properties section is further divided into four tabs - General, MIDI, Value and
Advanced.
General tab:
Customize caption - enable this toggle button to have the widget display a custom caption
and then type in a new name. If this toggle button is disabled, the default caption is defined
by the selected parameter name (refer to the Mapping section below for more information).
Normally the caption will be assigned the parameter name only. However, if you hold the
Shift key down while selecting a parameter, the caption will include the plugin name as well
as the parameter name. If you also hold the Alt key (or Option on Mac) down, the caption
will include the plugin name only.
Note: if you add the "[value]" tag (without quotation marks) to your caption, then the
parameter value will also be included in the caption:
If you add the "[variation]" or "[rackspace]" tag (without quotation marks) to your caption,
then the name of the corresponding variation or rackspace respectively will be included in
the caption.
Display range - this option is enabled by default; when disabled, the widget doesn't show
the Min and Max values as a white shadow around the outside of the knob or slider:

116
Gig Performer 4.x User Manual © 2016 - 2021 Deskew Technologies, LLC
Panels and Widgets
Display value in caption - this option is disabled by default; when enabled it overrides the
defined caption and displays only the parameter value.
Show back plate - this option is enabled by default; when disabled, the "back plate"
information such as numbers, Min/Max or an "on/off" legend is not displayed:
Note: this option is displayed only when you are editing a knob, a toggle switch or a LED
button.
Hide temporary value - when this toggle button is turned on, the parameter value is never
displayed when a widget changes.
Group - each widget can only be associated with a single plugin parameter. However, the 26
Widget Groups provided by Gig Performer enable you to control multiple parameters from
any or all of the widgets assigned to that group. Click on the dropdown list (right to the
"Group:") and select a letter ranging from A to Z to assign a widget to that group (e.g. "X").
All widgets with the same letter are grouped together so that moving one widget will cause
all the other widgets in that group to move as well, adjusting various plugin parameters
simultaneously:

117
Gig Performer 4.x User Manual © 2016 - 2021 Deskew Technologies, LLC
Panels and Widgets
Note: each of these widgets can have its own scale curve so that the actual values sent to
the individual plugin parameters do not have to match. Check the How to add a widget to a
widget group chapter for more information on widget groups.
Tip: Pressing a character (A-Z) while holding the Alt key (or Option on Mac) down will assign
all selected widgets to that character's widget group.
Some widgets include the additional properties in the General tab; these are:
1. Shape widget - this widget includes additional properties: Fill Color, Outline Color,
Roundness and Thickness (of the border):
Simply click on the corresponding buttons and then pick fill and outline colors (as well
as their transparency).
2. Label widgets - these widgets (Text Label and Tape Label Horizontal/Vertical) include
additional properties: Font Size (choose between 4 and 128) and Text Position (allows
top, bottom, and center vertical alignment).
3. Sustain pedal, Buttons and Switches - includes the additional property Momentary
touch to control the momentary behavior on mouse clicks or touch. Disabling this
property will keep e.g. the sustain pedal up or down until you click on it again. Enabling
this property will keep the pedal pressed until you release the mouse click.
MIDI tab:

118
Gig Performer 4.x User Manual © 2016 - 2021 Deskew Technologies, LLC
Panels and Widgets
Learn button - click on this button to have Gig Performer learn the physical control you want
to associate with the selected widget. When actively in Learn Mode, the button is lit red; to
exit Learn Mode, click on it again and it will return to its normal gray color. Refer to the How
to connect a widget to a MIDI device chapter to learn more. Note: the only CC messages
that cannot be learned by Gig Performer are CC 0 and CC 32 as these two messages are
reserved for bank selection.
Drop-down menu - clicking on this drop-down button opens a menu that allows you to
select a MIDI control alias. Check the How to use aliases chapter for more information.
Edit button - click on this button to manually associate a MIDI device, MIDI message type
and other parameters (depending on the message type, e.g. Note, Channel, CC number) with
the selected widget.
Clear button - click on this button to clear the current controller assignment.
Invert button - when turned on, the behavior of the widget is reversed; for example, a
switch or a button will cause a parameter to go to minimum when in the ON (lit) position,
and vice versa.
Sync button - pressing this button engages bidirectional communication between Gig
Performer and the controller mapped to the control. This lets physical controls on control
surfaces reflect changes executed in Gig Performer, as well as Gig Performer widgets
showing changes made on the physical control to which it is linked.
Momentary to latching - this toggle button is displayed only when editing switches,
buttons, LEDs or a sustain pedal. When checked, the widget remains in its ON position until
you click on it (or touch the associated physical controller) a second time. This is useful
when you want to have a widget carry out an operation until stopped, i.e. staying at a fast
Leslie speed until you are ready to return to a slow Leslie speed.
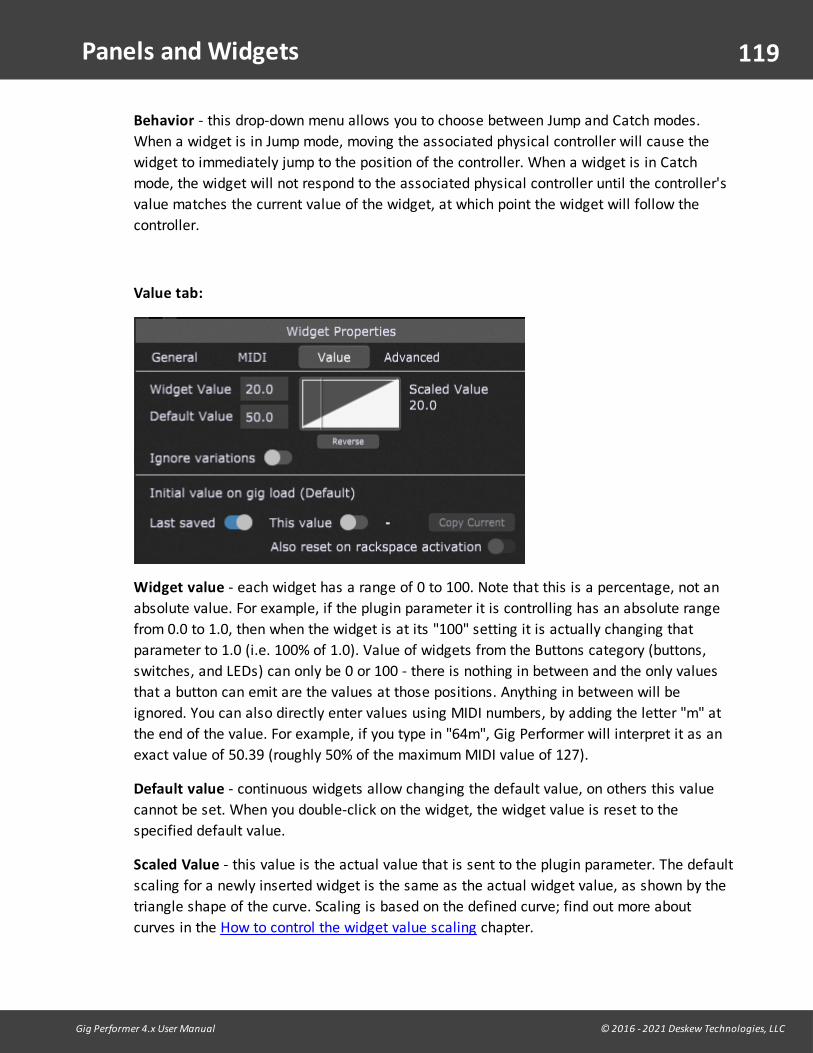
119
Gig Performer 4.x User Manual © 2016 - 2021 Deskew Technologies, LLC
Panels and Widgets
Behavior - this drop-down menu allows you to choose between Jump and Catch modes.
When a widget is in Jump mode, moving the associated physical controller will cause the
widget to immediately jump to the position of the controller. When a widget is in Catch
mode, the widget will not respond to the associated physical controller until the controller's
value matches the current value of the widget, at which point the widget will follow the
controller.
Value tab:
Widget value - each widget has a range of 0 to 100. Note that this is a percentage, not an
absolute value. For example, if the plugin parameter it is controlling has an absolute range
from 0.0 to 1.0, then when the widget is at its "100" setting it is actually changing that
parameter to 1.0 (i.e. 100% of 1.0). Value of widgets from the Buttons category (buttons,
switches, and LEDs) can only be 0 or 100 - there is nothing in between and the only values
that a button can emit are the values at those positions. Anything in between will be
ignored. You can also directly enter values using MIDI numbers, by adding the letter "m" at
the end of the value. For example, if you type in "64m", Gig Performer will interpret it as an
exact value of 50.39 (roughly 50% of the maximum MIDI value of 127).
Default value - continuous widgets allow changing the default value, on others this value
cannot be set. When you double-click on the widget, the widget value is reset to the
specified default value.
Scaled Value - this value is the actual value that is sent to the plugin parameter. The default
scaling for a newly inserted widget is the same as the actual widget value, as shown by the
triangle shape of the curve. Scaling is based on the defined curve; find out more about
curves in the How to control the widget value scaling chapter.

120
Gig Performer 4.x User Manual © 2016 - 2021 Deskew Technologies, LLC
Panels and Widgets
Reverse button - inverts the current curve horizontally. For example, if your curve has a
default linear shape where widget value 20 results in scaled value 20, click on the Reverse
button will scale the widget value 20 to be sent out as the value 80.
Ignore variations - this option is disabled by default; when enabled, the selected widget will
be excluded from variation changes and will instead remain at its current value. This is
useful if you have, for example, several different variations that change the widget settings
controlling effects such as phasing or flanging, but you want the widget controlling overall
volume to remain constant.
Initial value on gig load (variation_name) - Gig Performer by default restores all widgets to
their last positions in variations when a gig file is saved (the Last saved toggle button will
be enabled in this case).
You can, however, click on the This value toggle button to take a snapshot of the current
position of the selected widget so that it is that position that gets recalled and loaded
instead. This can be useful if you are playing, for example, a song where the volume of your
piano always starts softly but gets quite loud by the end. When you come back to that song
again, you don't want the piano to still be loud - you want it to always start soft. The concept
is that, even if you play around with widgets during the course of your live
performance, when you next reload a gig file, your originally stored values will return.
Click on the Copy Current button (it is enabled only when the "This value" toggle button is
enabled) to take another snapshot of the current widget position.
Additionally, clicking on the Also reset on rackspace activation toggle box resets the
widget value to "This value" on the rackspace activation.
Note: Widget values are always automatically saved and reloaded in your gig file, per
variation. By using the explicit load value, the current widget will be reset to a specific value
when your gig loads, even if you later change it and save the gig file.
Advanced tab:

121
Gig Performer 4.x User Manual © 2016 - 2021 Deskew Technologies, LLC
Panels and Widgets
OSC/GPScript Name - allows you to set a name for use in GP Script and/or OSC.
Enable OSC - click on this toggle button to make the OSC/GPScript Name field also be
available to OSC. For more information on OSC, click here.
Invert OSC value button - clicking on this button inverts the OSC value. Click again to
revert.
Direct addressable OSC (this section is only visible when the Enable Widget Direct OSC
option is enabled in OSC Options and is intended for advanced control of remote devices):
· Enable Widget Direct OSC - clicking on this toggle button allows you to send out
widget values as OSC messages for external processing.
· OSC address - type in a valid OSC address of the remote device.
· Target - type in a valid target IP of the remote device.
· Port - type in the listening port of the remote device.
Note: global widgets (widgets in the Global rackspace) have one additional setting - Global
Parameter Assignment:
Refer to this chapter to learn how to use this setting.

122
Gig Performer 4.x User Manual © 2016 - 2021 Deskew Technologies, LLC
Panels and Widgets
Mapping section
The mapping section is used to connect widgets to plugin parameters:
Plugin - click on this drop-down to view the list of plugins in the current rackspace and then
select the plugin you want the widget to control.
Open plugin button - click on this button to open the editor for the selected plugin.
Parameter - parameters are displayed only when a plugin is selected; select the one from
the list of available controllable parameters that you want to have the widget control.
Alternatively, you can search the parameter name by typing a partial parameter name or,
even easier, use the Learn Parameter button.
Learn Parameter button - click on this button to have Gig Performer learn the plugin
parameter you want to associate with the widget. This button is displayed only when a
plugin is selected. When in Learn Mode, the button is lit red; to exit Learn mode, click on it
again and it will return to its normal gray color.
Note: widget assignments to physical controllers in the Widget Properties area override
assignments made in the Global MIDI Options.
Refer to the How to connect a widget to a plugin parameter chapter for more information on
widget mapping and parameter learning.

123
Gig Performer 4.x User Manual © 2016 - 2021 Deskew Technologies, LLC
Panels and Widgets
6.2.5 How to connect a widget to a plugin parameter?
To connect a widget to a plugin parameter, first switch to the Wiring view, right click on the
empty surface to open the contextual menu, and then select and insert the desired plugin
(e.g. a Gain and Balance Control, as indicated with the red arrow):
Alternatively, you can use the Quick plugin finder to add plugins in the Wiring view.
Afterward, switch to the Panels view, Edit mode and drag the desired widget onto a panel
surface (e.g. a Plastic Blue Knob, as indicated with the red arrow):
Click on the plugin drop-down menu in the Mapping section of the Widget Properties
inspector, (as indicated with the red rectangle) and select the desired plugin (in this case,
the Gain and Balance plugin, as indicated with the red rectangle):

124
Gig Performer 4.x User Manual © 2016 - 2021 Deskew Technologies, LLC
Panels and Widgets
To select the actual parameter, do one of the following:
1. Simply navigate through this list using the scroll bar and select the desired parameter
(e.g. Gain),
2. Start typing part of the parameter name into the search box to restrict the visible list of
parameters to those matching what you have typed so far:
3. Click on the Learn Parameter button; a plugin's editor opens automatically and the
background of this button turns red, indicating that you entered into the Learn mode.
Simply click on the desired control (indicated with the red arrow) and the parameter will
automatically be selected in the parameter list:

125
Gig Performer 4.x User Manual © 2016 - 2021 Deskew Technologies, LLC
Panels and Widgets
Click on the Learn Parameter button again to turn off the learning mode.
Note: every when you move the widget control, its parameter number displays, e.g. "Param
#0" (indicated with the blue rectangle); this means that this parameter is the first in the
parameter list (counting starts from 0) and below the common parameters "Bypass Plugin"
and "Open/Close Plugin Editor". This display is specifically intended for advanced users
wishing to control a parameter directly from GPScript or OSC and need to know the actual
parameter number.
Test your configuration by moving the Plastic Blue Knob widget - if you successfully learned
the parameter, the gain control in the plugin window should move accordingly (and vice-
versa).
Tip: you can use a Text label widget to display a transparent note. Leave the "no plugin"
mapping and change the widget value to 0 for the highest transparency; increasing this
value (up to 100) decreases the transparency effect.
6.2.6 How to connect a widget to a MIDI device?
This chapter naturally builds on the previous chapter. When you insert plugins, create
widgets, and connect them to plugins' parameters, the next step is to control those widgets
by your MIDI controller or remotely via OSC commands.
To associate a widget with a MIDI device, first enter into the Panels view, Edit mode, and
click on the desired widget (e.g. a Plastic Blue Knob, if you followed the example from the
previous chapter; if you created a new empty gig, drag the Plastic Blue Knob widget onto a
panel surface and click on it):

126
Gig Performer 4.x User Manual © 2016 - 2021 Deskew Technologies, LLC
Panels and Widgets
Click on the MIDI tab (indicated with the red rectangle) in the Widget Properties inspector
and note that no MIDI assignment has been made yet (2). If you defined MIDI control aliases
in the Rig Manager, you can easily click on the drop-down menu (3) and select the desired
alias:
Note how the "(no MIDI In assignment yet)" message changes to match the name of the
selected alias.
To have Gig Performer learn the physical controller you want to associate with the widget,
click on the Learn button (1); when actively in Learn Mode, the button is lit red. While in
Learn mode, move the physical controller. If you already have an alias defined in the Rig
Manager for that control, that alias will display; if you didn't define an alias (such as
"Slider1" in the screenshot above), then the name of your MIDI device will show up, as well
as the associated MIDI controller and the channel:

127
Gig Performer 4.x User Manual © 2016 - 2021 Deskew Technologies, LLC
Panels and Widgets
Make sure that you exit the Learn Mode by clicking on the Learn button again (1) and it will
return to its normal gray color.
If you already know what MIDI message you need and/or don't have immediate access to
your controller so as to use Learn mode, you can define your message manually by clicking
on the Edit button (4):
Simply select a MIDI device, MIDI message type and other parameters (depending on the
message type, e.g. Note, Channel, CC number) and click on the OK button to confirm.
Clicking the Clear button (5) clears the current controller assignment.
Note: if you assign a MIDI message to a widget in the Global rackspace, and you assign the
same MIDI message to a widget in a local rackspace, the local rackspace will override the
Global rackspace which will not respond to the particular message while the local rackspace
is active. If you then switch to a different rackspace that does not use that MIDI message -
the Global rackspace assignment will work again.
6.2.7 How to add a widget to a widget group?
The concept behind widget groups is simple: any widget assigned to a group can be
controlled by any or all other widgets assigned to the same group. This enables you to

128
Gig Performer 4.x User Manual © 2016 - 2021 Deskew Technologies, LLC
Panels and Widgets
change multiple plugin parameters together. For example, take a look at this simple layout
(refer to this chapter for more information on how to insert and connect plugins):
Chorus volume and Flanger volume are Gain Control (mono) plugins. You can easily create a
widget group to crossfade between the chorus and flanging effects.
First, we insert three widgets: a Plastic Blue Knob, a Plastic Green Knob and a Black Slider
(Horizontal) and then map the Plastic Blue Knob to the Gain parameter in Chorus volume
plugin and map the Plastic Green Knob to the Gain parameter in the Flanger volume plugin.
The Black Slider (Horizontal) will not be mapped to any of the plugins, and serves only to
better display the chorus/flanger ratio (see this chapter for more information on to map a
widget to a plugin parameter). Note: you can assign a widget to a widget group without
mapping it to a plugin parameter; you can add the mapping later.
Customize the caption of the Plastic Blue Knob, the Plastic Green Knob and the Black Slider
(Horizontal) widgets to "Chorus intensity", "Flanger intensity" and "Chorus <-> Flanger"
respectively (see this chapter for more information).
Make sure that you click on the Reverse button in the Value tab in the Widget Properties
inspector for the Plastic Blue Knob widget.

129
Gig Performer 4.x User Manual © 2016 - 2021 Deskew Technologies, LLC
Panels and Widgets
There are 26 different widget groups in Gig Performer (A-Z); to quickly assign all the widgets
to the widget group "N", select all the widgets and then press the keyboard key N while
holding the Alt key (or Option on Mac). Alternatively, you can of course set the widget group
for each widget in the Widget Properties inspector separately. If you move the black slider
(or any other widget in this group) you'll notice how the widgets' values change:
Note: we inverted values for the Plastic Blue Knob but you can select a different curve for
each widget in a group to scale their values (see this chapter for more information).
Because all three widgets are assigned to the same group, they will all move together.
When the green knob widget is turned up, it will, as expected, cause the volume of the
flanging effect to increase, but turning up the blue knob widget will do the opposite because
it is set to reverse value: it will cause the volume of the chorus effect to decrease, and vice
versa.
As a result, when you move the horizontal slider from left to right, you'll hear the chorusing
effect crossfade into the flanging effect, and vice versa.
There are two other ways to control multiple plugin parameters simultaneously:
- one is to assign the same MIDI control to multiple widgets,
- the other is using GPScript to control any number of parameters with a single widget.
6.2.8 How to scale widget values with curves?
The scaling component was mentioned in the Widget Properties inspector chapter and also
other basic terms i.e. the widget value and the scaled value. On the screenshot below you
can see how these values are represented on the Blue Knob widget:

130
Gig Performer 4.x User Manual © 2016 - 2021 Deskew Technologies, LLC
Panels and Widgets
Here it is important to not confuse the widget value with the scaled value. The widget value
is used as the input to the scale component and it is not sent to the plugin parameter. The
scaled value is the output from the scale component and this is the value that is sent to the
plugin parameter.
Clicking on the scale component brings up the following window:

131
Gig Performer 4.x User Manual © 2016 - 2021 Deskew Technologies, LLC
Panels and Widgets
1. Curve - the scaling curve is used to transform the widget values to scaled values. To
define a curve:
a. select one of the supplied basic shapes (3) (you can also reverse or invert them),
b. click and hold a mouse to draw a custom shape (like in (8)),
c. use the Curve Designer (6).
2. Reverse and Invert buttons - click on the Reverse button to reverse the curve (invert it
horizontally), for example:
Click on the Invert button to invert the curve vertically, for example:
3. Basic curve shapes - the provided shapes are linear, sine, Log, and X2:

132
Gig Performer 4.x User Manual © 2016 - 2021 Deskew Technologies, LLC
Panels and Widgets
Simply click on the desired shape to apply it.
4. Indicator and values - if you hover with your mouse over the curve, a vertical indicator
will appear and the corresponding value will be displayed: Widget Value => Scaled
Value (e.g. 27 => 75, as shown in the screenshot). The shape of the curve defines what
value will be output for any particular widget value. The vertical indicator lets you
easily see what values will be used.
5. Max and Min fields - you can set a maximum and a minimum value for your curve by
entering the desired values in the Max and Min fields or by adjusting the sliders
(indicated with the blue arrows). Besides knobs, defining Min and Max values is also
useful for the momentary widgets, i.e. buttons or switches. Although their widget value
can be only 0 or 1, you don't necessarily want the "on" to always set the plugin
parameter to 1.0. For example, you might want the button to cause the plugin
parameter to toggle between 0.4 and 0.8 (you can define a min and max volume
between which you could toggle):

133
Gig Performer 4.x User Manual © 2016 - 2021 Deskew Technologies, LLC
Panels and Widgets
You can also directly enter values using MIDI numbers in the Min and Max fields, by
adding the letter "m" to the end of the value. For example, if you type in "64m", Gig
Performer will interpret it as an exact value of 50.39 (roughly 50% of the maximum
MIDI value of 127).
Note: holding the Alt key (or the Option key on Mac) while moving min or max sliders
allows you to fine change the values. Holding the Shift key while moving min or max
sliders allows you to move both of sliders at the same time.
6. Curve Designer - clicking on the EXP button opens the Curve Designer:
Type in the desired function or click on the one of the provided buttons (sin, log, or
sqrt) to insert a supplied function. You can also use other functions, such as cos, tan or
cot (as shown in the screenshot above). Move the provided knobs (x, y, a, b, or c) to
adjust your curve. If you want to create a curve with multiple points, simply click on the
Add New Point button and enter the desired function. Click on the Trash can button
(indicated with the red arrow) to remove the point. Click on the up/down arrows
(indicated with the red circle) to move the point up or down. When you finish with
adjusting the curve, click on the Save button.

134
Gig Performer 4.x User Manual © 2016 - 2021 Deskew Technologies, LLC
Panels and Widgets
7. Color selector - click on this button to choose the desired color for the scale curve:
8. Smooth button - clicking on this button smooths the curve a little bit:
You can click multiple times to continue smoothing the curve.
9. Load and save buttons - clicking on these buttons allows you to load a previously
saved gpscale file or to save scale values to a gpscale file. This file can be also used in
the scaling component found in the MIDI In block or the Probabilistic Sound Designer.
Tip: holding the Alt key (or the Option key on Mac) while creating a curve with your mouse
constrains the horizontal position thereby producing a flat horizontal line as you move the
mouse.

135
Gig Performer 4.x User Manual © 2016 - 2021 Deskew Technologies, LLC
Panels and Widgets
6.2.9 How to control widgets from the Global rackspace in a regular rackspace?
In this chapter you will learn how to configure global and local widgets so that changing
widgets values in a local rackspace also change widgets values in the Global rackspace (and
vice versa).
First, create a simple layout in the Wiring view in the Global rackspace; for this example we
assume that you will use an Audio Mixer (4ch) in your configuration. While you are still in
the Global rackspace, open the Edit mode in the Panels View and insert two knobs (e.g. a
Green knob and a Blue knob):
Click on the Green knob; note that the Widget Properties inspector includes one additional
setting for the global widgets: Global Parameter Assignment. Select a value from the drop-
down menu (from Param 0 to Param 127), e.g. Param 1 (as indicated with the red rectangle).
In the mapping section choose the Audio Mixer (4ch) plugin (as indicated with the blue
rectangle) and select the Channel 1-2 volume parameter.
Click on the Blue knob; in the Widget Properties inspector select a different Global
Parameter assignment, e.g. Param 127. In the mapping section choose the Audio Mixer
(4ch) plugin and select the Channel 3-4 volume parameter.
Now switch to a local rackspace (click on View -> Show/Hide Global Rackspace) and in the
Wiring view insert the From Global Rackspace block. Then switch to the Panels view, Edit
mode and insert two knobs (e.g. a Plastic Green knob and a Plastic Blue knob):

136
Gig Performer 4.x User Manual © 2016 - 2021 Deskew Technologies, LLC
Panels and Widgets
Global parameters are exposed to a local rackspace as parameters of the From Global
Rackspace plugin (alternatively, you can also use the To Global Rackspace block, provided
that you had inserted it in the Wiring view). Therefore, in the Mapping section for both knobs
select "From Global Rackspace" (as indicated with the blue rectangle).
Select the 1 Channel 1-2 volume parameter for the Plastic Green knob and the 127 Channel
3-4 volume for the Plastic Blue knob.
Note: the actual parameter numbers depend on what you selected in the above-mentioned
Global Parameter Assignment setting. Since Param 1 and Param 127 were selected for the
green and blue knob respectively, these positions become available in the From Global
Rackspace plugin.
Go to the Panels view and move local knobs - the corresponding global knobs will move, as
well (and vice versa).

137
Gig Performer 4.x User Manual © 2016 - 2021 Deskew Technologies, LLC
Songs and Setlists
7 Songs and Setlists
In this chapter you will learn more about creating songs, song parts and setlists in Gig
Performer. Find out how variations are related to song parts and more.
7.1 Rackspaces/variations and Song Parts relationship
Gig Performer allows you to quickly and easily organize all of your rackspaces and variations
to meet the needs of your performances by letting you build setlists of your songs. Each
song consists of one or more song parts, such as verses, choruses, bridges, interludes, and
so forth:
A song part is basically a reference to a specific variation in some rackspace that will be
used when the part is selected, though there are other song part settings, as well:

138
Gig Performer 4.x User Manual © 2016 - 2021 Deskew Technologies, LLC
Songs and Setlists
On the screenshot above you can see how two song parts (Verse and Chorus) refer to two
variations (Basic and Delay+Reverb) respectively.
Note: Gig Performer remembers the variation that is selected when you switch away from a
song part, so if you are trying different variations, be sure that the correct variation for the
song part is selected before you switch away.
In the next chapter you will learn how to create a song.
7.2 How to create a song?
To create a new song, if you do not already have a suitable rackspace to use, first create a
layout in the Wiring view (refer to this chapter for more information on how to insert and

139
Gig Performer 4.x User Manual © 2016 - 2021 Deskew Technologies, LLC
Songs and Setlists
connect your plugins); in this blog article you can see the example layout, or use one from
the built-in templates.
Afterward, switch to the Setlist view and press Ctrl+Shift+N (or Cmd+Shift+N on Mac) or
choose the Create New Song... menu item from the Setlists contextual menu. The Song
Properties dialog appears; enter a name in the dialog that appears (i.e. Forever young) and
click on the OK button. Notice that three song parts are automatically created for your song -
Intro, Verse, and Chorus:
You can easily create new songs/song parts, rename or remove the existing ones, and
perform other operations by clicking on the "More..." button (indicated with the red circle) or
by right clicking on a song/song part; learn more about supported operations in the Manage
setlists contextual menu chapter. Also, rearrange song parts by simply dragging them to
positions you prefer.
Note: you can set the default parts created with a new song by choosing Setlist/Song
Settings from the Options menu:
In the screenshot above, the Solo song part has been added (make sure to separate song
parts with the comma or the semicolon).

140
Gig Performer 4.x User Manual © 2016 - 2021 Deskew Technologies, LLC
Songs and Setlists
The new song is also added to the All Songs list.
Ways to switch to a song part:
- Click on a tile in the part bar at the top of the Setlist/Song view.
- Click on the part name in the Setlist browser.
- Select a song part with a MIDI program change message assigned in the Song Part
Properties dialog.
- Use the up/down arrow keys on your computer keyboard to select the song part
above/below the current one respectively.
Click on the variation you want attached to the song part to select it:
Note: click here to find out more about how song parts and variations are related.
Gig Performer supports the ChordPro lead sheet file format with both an editor/viewer to
enable creating, editing, and viewing ChordPro documents, and the ability to attach a
ChordPro document to a song, so that selecting the song opens the ChordPro document to
put the chords and lyrics right in front of you. Refer to the ChordPro chapter for more
information. Make sure to also check this blog article How to use ChordPro files in Gig
Performer for detailed guidelines.
Make more songs and song parts: create new songs, song parts and assign ChordPro files to
your songs by following guidelines above.

141
Gig Performer 4.x User Manual © 2016 - 2021 Deskew Technologies, LLC
Songs and Setlists
In the next chapter you will learn how to create a setlist from your songs.
7.2.1 Song Properties
When you create a new song or double-click on an existing song (or select Song Properties...
from the contextual menu), the Song Properties dialog appears:
Name - type in the song name.
Artist - type in the name of the artist/band who performed the song.
Key - choose the key center (root note) and quality (major/minor) of the song from the drop-
down menus. These entries are for your information only.
Transpose - click and select a transpose value in semitones.
Tempo - allows you to set a tempo for the song. Turn on the Override toggle button to make
this active tempo when the song is selected.
Time signature - allows you to set the desired time signature for the song; click on the
numerator and select the desired value and then choose a value for the denominator from
the drop-down menu. Turn on the Override toggle button to make this the active time
signature when the song is selected.

142
Gig Performer 4.x User Manual © 2016 - 2021 Deskew Technologies, LLC
Songs and Setlists
Override global tempo - when this toggle button is turned on, the selected song tempo will
override the global tempo. This tempo will be applied to all song parts of the current song, if
they do not have their own overrides - a tempo for a song part (specified in the Song Part
properties dialog), if turned on by its Override toggle button, has higher priority and will
override the song tempo.
Send program change number when song activates - clicking on this toggle button
enables you to send a MIDI program change number when the current song activates; set
the desired program change number and bank (MSB and LSB) values. When the song is
selected, the program change number is sent out using the MIDI Device and Channel
selected in the Setlist tab of the Options dialog.
Lyrics/Chord (ChordPro) File - displays a file in ChordPro format. Use the Song
Lyrics/Chords viewer to load your lyrics/chords file for this song. Gig Performer will
automatically remember and auto-load that file when you switch to this song again. Refer to
the ChordPro chapter for more information. Note: files can be loaded only from the root
directory specified in the Setlist tab of the Options dialog. If the file you want to use is not in
that directory use the File -> Import ChordPro Files... command.
Clear - clicking on this button clears the association to the ChordPro file.
"i": (information) - clicking on this button opens a dialog stating that ChordPro documents
must be opened and assigned in the Song Lyrics/Chords Editor.
7.2.2 Song Part Properties
When you double-click a song part or select Song Properties.. from the contextual menu, the
Song Part Properties dialog appears:

143
Gig Performer 4.x User Manual © 2016 - 2021 Deskew Technologies, LLC
Songs and Setlists
A song part consists of a rackspace variation plus a collection of properties. The variation
may be as stored, or it may have been edited just for that song part.
Name - displays the song part name (type another one if preferred).
Tempo - allows you to set a tempo for the song part. Turn on the Override global tempo
toggle button to make this tempo active when this song part is selected.
Time signature - allows you to set the desired time signature for the song part; click on the
numerator and select the desired value and then choose a value for the denominator from
the drop-down menu. Turn on the Override global tempo toggle button to make this time
signature active when this song part is selected.
Override global tempo - when this toggle button is turned on, the selected song part tempo
will override both the global tempo and the song tempo (see the Song Properties dialog for
more information). Hence, the Song part tempo is the highest priority.
Assign program change number for this part - clicking on this toggle button enables you to
assign a MIDI program change number to the current song part; set the desired program
change number and bank (MSB and LSB) values.
MIDI messages to send when this song part gets activated - allows you to send MIDI
messages to one or more physical MIDI Out devices. Click on the Edit... button to open the
MIDI Helper Tool and click on the Send Now button to send the selected MIDI messages to
the selected physical MIDI out devices.

144
Gig Performer 4.x User Manual © 2016 - 2021 Deskew Technologies, LLC
Songs and Setlists
The MIDI Helper tool allows you to specify an arbitrary sequence of MIDI events to be sent
out to MIDI Out devices:
1. Add New MIDI Event - clicking on this button adds a new MIDI event placeholder.
2. Close - clicking on this button simply closes this window.
3. MIDI Output device - click on this drop-down list to choose a MIDI Out device.
4. MIDI event - click on this drop-down list to choose the desired MIDI event. Check this
chapter for a list of events.
5. Event parameters - depending on the type of the event, there are different parameters
(or no parameters at all) for an event.
6. Navigation arrows - click on up/down arrows to move the current event placeholder
up/down.
7. Placeholder number - simply displays a number for the current MIDI event.
8. Remove event - clicking on this button removes the current MIDI event.
9. Duplicate event - clicking on this button duplicates the current MIDI event.
When you finish adding your MIDI events, click on the close button; selected events can be
seen in the list:

145
Gig Performer 4.x User Manual © 2016 - 2021 Deskew Technologies, LLC
Songs and Setlists
7.3 How to create a setlist?
When you create a song, it is automatically added to the All Songs list. To create a setlist,
choose the Add new setlist... command in the Setlists contextual menu, or New Setlist... from
the Edit menu. Type in a name in the Setlist Name dialog that appears (i.e. Rock setlist) and
press Enter:
The newly created setlist is automatically selected but with no songs. To add songs to the
setlist, open the Add songs to setlist window either by pressing Ctrl+Shift+F (or Cmd+Shift+F
on Mac), by choosing the Add Song(s) to Setlist... command in the Setlists contextual menu
or by choosing the Add Song(s) to Setlist... command in the Edit menu:

146
Gig Performer 4.x User Manual © 2016 - 2021 Deskew Technologies, LLC
Songs and Setlists
This window lists all available songs. To add a song from this window to the setlist, select it
and press the Enter key (or simply double-click it). Songs that are added to a setlist are
automatically grayed out. You can also find a song by entering search terms in this field to
filter the view. When you are finished adding songs, press the Escape key to close the
window:
You can easily re-arrange songs by dragging them and placing on the desired position.
Furthermore, you can sort them by name or by their program change numbers - click on Edit -
> Sort Songs by Name or Edit -> Sort Songs by PC Numbers respectively.

147
Gig Performer 4.x User Manual © 2016 - 2021 Deskew Technologies, LLC
Songs and Setlists
Setlists can be duplicated and modified, for gigs that vary only slightly from a usual song
order, or a custom setlist can be created for a specific gig. For example, if tomorrow’s setlist
is just a little different than this, the quickest thing is to duplicate this setlist and then
modify it. Setlist operations (i.e. rename, duplicate, or remove) are easiest to select in the
setlist contextual menu; to duplicate a setlist, choose the Duplicate Current Setlist... menu
item, type in a name (i.e. Rock Setlist LA) and press Enter:
As can be seen from the screenshot above, the program change assignment for a song part
is specific to the setlist; the same song can have a different program change assignment in
each setlist. This lets you have consistency even when the setlist changes from gig to gig.
Refer to the Song Part Properties chapter for more information on how to assign a program
change number to a song part.
Another way to add a current song to a setlist is to right click on a song, expand Add This
Song To Setlist and choose one of your defined setlists.
7.4 How to capture variation edits?
If you are in a song part and move your widgets (knobs, sliders, etc.) changing their values,
and then switch away from that song part - all the changes in that song part will be lost and
reset to the values of the underlying variation. For example, look at the screenshots below:

148
Gig Performer 4.x User Manual © 2016 - 2021 Deskew Technologies, LLC
Songs and Setlists
Let's assume that A shows widget values when you first select a song part. If you want to
increase a delay a bit more (B), and select another view (i.e. Panels view) the delay value
will be reset to A.
However, Gig Performer provides you with a mechanism to capture these changes and save
them to the currently active song part. So, if you want to retain the amount of delay as
shown in B, click on the Capture variation icon (indicated with the red arrow - refer to the
Setlists view chapter for more information):
Clicking on this button allows you save edits you have made to a variation into the currently
selected song part only. The changes are not saved to the underlying variation in the
rackspace itself.
Notice that additional buttons are available. When the LED is red, it indicates that the song
part has saved values different from the underlying variation. Click and hold the COMPARE
momentary button to display the original widgets values in the corresponding variation;
release to see captured changes in the song part (click and hold will display widget positions

149
Gig Performer 4.x User Manual © 2016 - 2021 Deskew Technologies, LLC
Songs and Setlists
as shown in A, and widget positions indicated with B will be displayed when you release the
mouse).
Click on the Revert to original variation button (indicated with the trash can icon) to
remove captured changes and match the variation values.
If you like how your song part sounds with the increased delay (as shown in B), you can
apply this change to the underlying variation so that all song parts associated with that
variation have this amount of delay. From the Setlist contextual menu choose the Push Song
Part Changes to Rackspace menu item. Notice that the LED indicator is no longer red and
the Compare and Revert buttons disappear. Switching to the Panels view shows that
widget's value (i.e. the amount of delay) has been updated and now has the value as
indicated with B. All song parts that are attached to this variation will have this higher
amount of delay (except for those that have their own captured changes).
Note: If you edit values on the fly and like the changes, this is how you update the original
variation with the changes. If you want to keep the original variation as well, make a
duplicate of it before pushing song part changes.

150
Gig Performer 4.x User Manual © 2016 - 2021 Deskew Technologies, LLC
Rig Manager
8 Rig Manager
Basic Rig Manager concepts are covered in the Gig Performer user interface and concepts
section. In this chapter you will learn more about the Rig Manager, how to create rigs, define
aliases and associate them with your MIDI controllers.
8.1 How to create an alias for a MIDI device and a MIDI control?
Let's assume that you start with a clean slate. Open the Rig Manager and rename the
default rig to a custom name, i.e. Rehearsing (refer to this chapter for more information
about the Rig Manager window):
The main area of the window is divided into two columns. On the left are the MIDI Device
Aliases - the list of aliases for physical control devices like keyboards, pad controllers, and
control surfaces. In the screenshot above, none of the connected MIDI devices shown have
been given aliases.
An alias is simply a name you can designate to represent a physical device (on the left) or a
control (a knob, slider, button, etc.) associated with some device. If you use aliases for your
MIDI In blocks and your widgets in your rackspaces instead of the actual devices, then you
can easily switch your entire gig file to use a different set of physical controllers without
having to update individual rackspaces.

151
Gig Performer 4.x User Manual © 2016 - 2021 Deskew Technologies, LLC
Rig Manager
Note: the Local GP Port is a new feature in Gig Performer 4. Refer to this chapter for more
information.
The column on the right are MIDI Control Aliases - the list of aliases for controls i.e. sliders,
buttons, faders, and knobs. In the screenshot above, there are no MIDI Control aliases
defined yet.
To create an alias for a connected MIDI device, click on the plus button at the top of the
MIDI Device Aliases list. In the dialog that appears, give the desired MIDI device an alias
(i.e. Main Keyboard):
The newly created alias needs to be linked to a physical MIDI device:

152
Gig Performer 4.x User Manual © 2016 - 2021 Deskew Technologies, LLC
Rig Manager
Click on the "three dots" button or right-click on the alias and choose a MIDI device from the
Associate MIDI Device sub-menu; alternatively, you can click on the three dots button, then
click on the Learn MIDI device menu item and use any control on your MIDI device to learn
the desired MIDI device (instead of selecting it from the list). After you successfully
associate an alias with a MIDI device, it will be highlighted green:
Another way to assign an alias to the specific MIDI device is to click on the "three dots"
button for the desired MIDI device and select the Define alias for this MIDI device... menu
item or right click the MIDI device and select the Define alias for this MIDI device... menu
item.
To create an alias for the desired MIDI control, click on the plus button at the top of the MIDI
Control Aliases list. In the dialog that appears, give the desired MIDI control an alias (i.e.
Pitch-Bend):

153
Gig Performer 4.x User Manual © 2016 - 2021 Deskew Technologies, LLC
Rig Manager
When you create a MIDI Control alias, it needs to be associated with a MIDI control:
To map the newly created alias (virtual controller) to a physical control, double-click this
alias to enter the Learn mode, or right-click it and choose Learn MIDI control from the
popup menu. Move a knob, fader, pitch-bend or other physical control and it will be mapped
to the alias:

154
Gig Performer 4.x User Manual © 2016 - 2021 Deskew Technologies, LLC
Rig Manager
Note: you can create a MIDI Control alias before creating a MIDI Device alias; in that case
the full MIDI device name will be displayed in the MIDI control alias entry. When you assign
an alias to that particular MIDI device, the corresponding MIDI Control alias entry will be
updated.
Create other MIDI Control aliases and repeat the Learn MIDI control process for other
controls:

155
Gig Performer 4.x User Manual © 2016 - 2021 Deskew Technologies, LLC
Rig Manager
Don't forget to save your rig by clicking on the Save button. The best practice is also to
export your Rig Manager configuration once you're done with the editing. Click on the
Export... button to export your configuration to a rigsetup file.
8.2 How to remap MIDI controls for a new MIDI device?
If you use different MIDI devices at home and while performing live, it's easy to associate
your aliases to a different MIDI device and its controls. Note: this example builds on the
previous chapter.
Open the Rig Manager, click on the "plus" button and click on the Add new Rig... menu item.
Give it a custom name, i.e. Home:
Note that previously defined aliases are preserved while creating new rigs. You only need to
remap them and you are all set.
First, right click on the Main Keyboard alias, then expand the Associate MIDI Device sub-
menu and select the desired MIDI device:

156
Gig Performer 4.x User Manual © 2016 - 2021 Deskew Technologies, LLC
Rig Manager
Each MIDI Control alias must be trained for a new physical controller. Double-click on the
first MIDI control alias and then move the desired physical control to learn it (note: you can
also enter the Learn mode for a control by clicking the "three dots" button to the right of a
control and choosing Learn MIDI control):
When MIDI events from the physical control are detected, the item lights up in the MIDI
Device Aliases and MIDI Control Aliases lists, and the events that came in will be displayed
at the top of the window.

157
Gig Performer 4.x User Manual © 2016 - 2021 Deskew Technologies, LLC
Rig Manager
Repeat this step for the remaining aliases in the list to associate them to the desired
controls:
You can switch easily between your rigs by clicking on the rig drop-down menu:
You can create new rigs for any environment you like i.e. Performing, Studio, or Local Gig and
easily switch between them.
If you're sharing instruments with another performer and so have to use someone else's
keyboard controller for your performance, simply remap the defined aliases as shown above
and all of your widget controls and MIDI In blocks are reestablished (refer to the How to use
aliases chapter for more information). That can be accomplished in a few minutes even
during the sound-check if necessary.
Save your work when you finish with your rig configuration.

158
Gig Performer 4.x User Manual © 2016 - 2021 Deskew Technologies, LLC
Rig Manager
8.3 How to use aliases?
If you didn't create a MIDI device alias, then your MIDI device (MIDI In block) will be
displayed with the full name in the Wiring View (indicated with A):
When you create an alias for this MIDI device (as shown in this chapter) in the Rig Manager,
then the alias will be displayed instead (as indicated with B).
The benefit of using aliases for your MIDI devices (e.g. Main Keyboard, Controls Left, etc.) is
that you don't need to rewire or replace your MIDI blocks to adapt to different MIDI devices,
provided that you created rigs for them. Simply select the desired rig and you're all set. Rig
Manager will automatically arrange the corresponding alias <--> MIDI device associations.
You can use the Rig Manager to help distinguish among multiple identical MIDI controllers.
For example, if you use three Roland A800 keyboard controllers, they all have the same ID
(as far as USB device names is concerned) and so when you power up, you don't know which
keyboard will be associated with which device in Gig Performer. So if you name them (i.e.
define MIDI device aliases) "Top", "Middle" and "Bottom" (describing where the three
keyboards are located relative to each other) then when you show up at a gig and power up,
you can just quickly re-associate each physical controller with the appropriate aliased name.
As for the MIDI control aliases, you can easily use them with widgets in the Edit Mode;
select a widget in the Edit Mode and click on the MIDI tab in the Widget Properties
inspector:

159
Gig Performer 4.x User Manual © 2016 - 2021 Deskew Technologies, LLC
Rig Manager
Click on the arrow to display the drop-down menu and simply choose one of the aliases (see
the previous two chapters for more information). The benefit here is when you switch your
rigs, this widget remains assigned to the corresponding MIDI control alias (e.g. Button1).
Thus, name your controllers (one per physical MIDI port) and your knobs/sliders, and then
when you create new rackspaces, you can just select a knob or slider from the drop down
menu in the MIDI tab (Learn area) so you don't have to keep relearning widgets, even if
you're just using a single set of controllers - which is a time saver in itself.
It also makes it easier for you to change your associations, even for the same rig setup.

160
Gig Performer 4.x User Manual © 2016 - 2021 Deskew Technologies, LLC
The Tuner
9 The Tuner
Gig Performer includes a built-in tuner:
1. Tuner button - click on this button to show/hide the tuner.
2. Channels list - click here for a drop-down menu if you want to have the Tuner "listen"
to signal coming from a specific input channel of your connected audio interface. The
default is to have it listen to signals coming from all channels and auto detect the input
channel.
3. Show tuned within +/- - allows you to specify a range within which the main display
changes from yellow (out of tune) to green (in tune). Available values are +/- 1 cent to
+/- 5 cents; default is +/- 3 cents.
4. 2 cents columns - these smaller columns represent 2 cents (-2, -4, -6, -8 cents are
pointed out with red arrows).
5. 10 cents columns - larger columns represent 10 cents (-10, -20, -30, -40, -50 cents are
pointed out with red arrows).
6. Tuning indicator - shows the current inaccuracy displayed in cents.
7. Input pitch - a large input pitch value. Yellow color indicates that your current pitch
value is out of tune, and green indicates that it is in tune:

161
Gig Performer 4.x User Manual © 2016 - 2021 Deskew Technologies, LLC
The Tuner
Note: you can change the A4 tuning frequency (indicated with the red rectangle), between
400 Hz and 480 Hz. The default value is 440 Hz.
To exit the tuner, click on the Tuner icon or click (or touch) anywhere on the tuner or press
any key on the keyboard.
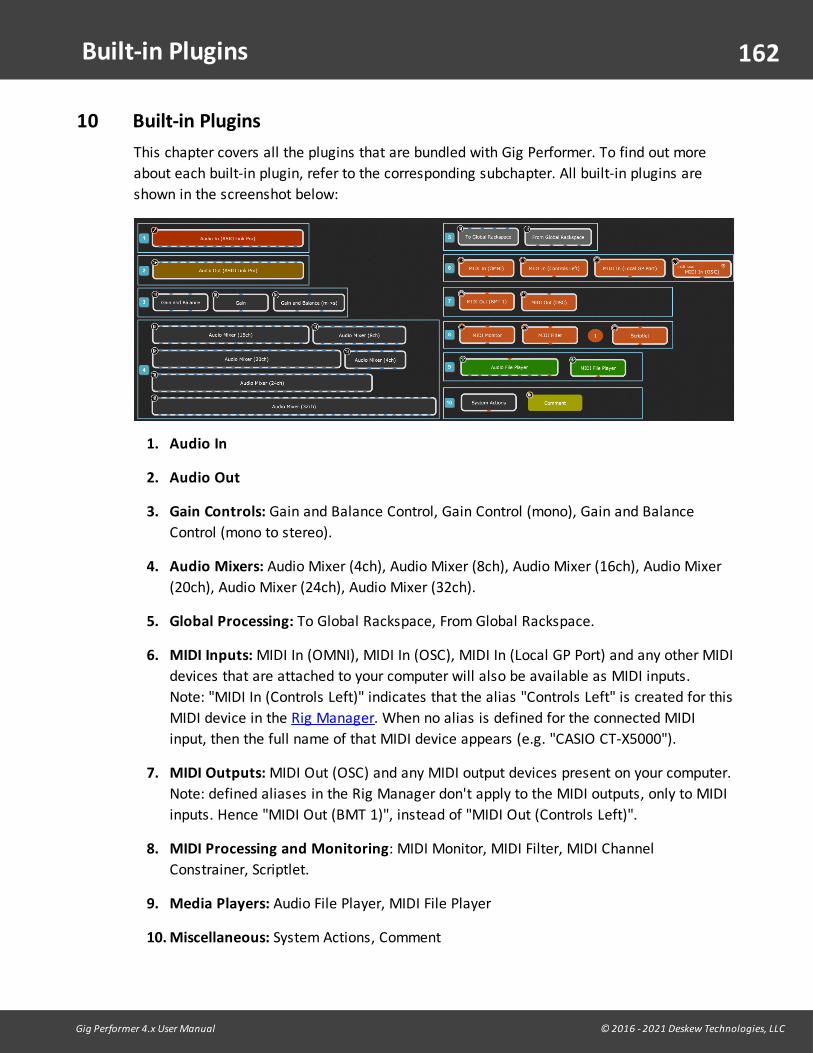
162
Gig Performer 4.x User Manual © 2016 - 2021 Deskew Technologies, LLC
Built-in Plugins
10 Built-in Plugins
This chapter covers all the plugins that are bundled with Gig Performer. To find out more
about each built-in plugin, refer to the corresponding subchapter. All built-in plugins are
shown in the screenshot below:
1. Audio In
2. Audio Out
3. Gain Controls: Gain and Balance Control, Gain Control (mono), Gain and Balance
Control (mono to stereo).
4. Audio Mixers: Audio Mixer (4ch), Audio Mixer (8ch), Audio Mixer (16ch), Audio Mixer
(20ch), Audio Mixer (24ch), Audio Mixer (32ch).
5. Global Processing: To Global Rackspace, From Global Rackspace.
6. MIDI Inputs: MIDI In (OMNI), MIDI In (OSC), MIDI In (Local GP Port) and any other MIDI
devices that are attached to your computer will also be available as MIDI inputs.
Note: "MIDI In (Controls Left)" indicates that the alias "Controls Left" is created for this
MIDI device in the Rig Manager. When no alias is defined for the connected MIDI
input, then the full name of that MIDI device appears (e.g. "CASIO CT-X5000").
7. MIDI Outputs: MIDI Out (OSC) and any MIDI output devices present on your computer.
Note: defined aliases in the Rig Manager don't apply to the MIDI outputs, only to MIDI
inputs. Hence "MIDI Out (BMT 1)", instead of "MIDI Out (Controls Left)".
8. MIDI Processing and Monitoring: MIDI Monitor, MIDI Filter, MIDI Channel
Constrainer, Scriptlet.
9. Media Players: Audio File Player, MIDI File Player
10. Miscellaneous: System Actions, Comment

163
Gig Performer 4.x User Manual © 2016 - 2021 Deskew Technologies, LLC
Built-in Plugins
Additionally, there are two built-in plugins that are available only in the Global rackspace -
From Rackspaces and To Rackspaces:
To add a built-in plugin onto the design surface, first make sure that you are in the Wiring
View, and then either right click to open the contextual menu or press Ctrl + P (or Cmd + P on
Mac) to open the Quick Plugin Finder, and then add the desired plugin onto the Wiring view
surface.
Note: not all built-in plugins can be added to the design surface in the Wiring view. Check
the subchapters to find out more about each plugin. To learn how to insert a plugin, refer to
the Inserting and Wiring your plugins chapter.
The common parameters for most plugins are Bypass Plugin and Open/Close Plugin Editor;
there are plugins that cannot be bypassed (i.e. Audio In plugin). Check corresponding
subchapters to find out more about parameters available for each supplied plugin.
10.1 Audio In
The Audio In plugin represents the current connected physical interface used to receive
audio or a virtual device, aggregating two or more physical interfaces (depending on your
operating system):

164
Gig Performer 4.x User Manual © 2016 - 2021 Deskew Technologies, LLC
Built-in Plugins
Each plugin port represents one audio input. The actual number of these ports is a function
of the capabilities of the interface connected to your system. For example, in the screenshot
above, 16 ports are shown.
Double-clicking on the Audio In plugin opens its edit window, as indicated with the blue
rectangle. You can adjust input levels by moving the corresponding sliders. The number of
sliders matches the number of input ports. Moving any of these sliders will automatically
update the corresponding slider in the bottom toolbar, and vice-versa.
However, as a matter of course, we encourage you to not adjust your levels through these
global controls. It is usually better to insert Gain Controls into the Wiring view. The global
input and output levels are really intended for emergency adjustments should you have a
problem with FoH audio.
Note: when you create a new gig, this plugin is present by default in the Wiring view and
cannot be removed from the design surface. However, you can specify different audio
interfaces for Audio In. Navigate to Options -> Audio Setup to configure your audio
interfaces.
Tip: if you need to change the selected interface or even the buffer size or sample rate, open
or create an empty gig file first and change the audio interface there. This will be much
faster as Gig Performer will not have to reset and possibly reload all your plugins. Further,
some plugins don't "like" having their buffer size or sample rate changed after being loaded
and may consequently crash when receiving such a request.

165
Gig Performer 4.x User Manual © 2016 - 2021 Deskew Technologies, LLC
Built-in Plugins
Audio In parameters
The following parameters are available for the Audio In plugin:
· Number of channels - allows you to get the current number of audio input channels.
· Input Gain (Channel #) - allows you to control the input gain for each input channel
available.
· Input Level (Channel #) - allows you to display the input level for each input channel
available (use with meter widgets).
· Overall Input Level - allows you to display the overall input level for all channels (use
with meter widgets).
· Channel # Muting - mutes the specific channel (# represents the number of the
channel).
Note: not all parameters are suitable for the widget control. Parameters such as Number of
channels are suited for GPScript or OSC applications. Using scripting it can be determined
how many channels the Audio In plugin offers and then the result can be used for other
functions. Using OSC, you can e.g. create the exact number of VU-meters dynamically (if
your OSC application supports this feature).
10.2 Audio Out
The Audio Out plugin represents the current connected physical interface used to send audio
or a virtual device, aggregating two or more physical interfaces:
166
Gig Performer 4.x User Manual © 2016 - 2021 Deskew Technologies, LLC
Built-in Plugins
Each plugin port represents one audio output. The actual number of these ports is a function
of the capabilities of the interface connected to your system. For example, in the screenshot
above, 16 ports are shown.
Double-clicking on the Audio Out plugin opens its edit window, as indicated with the blue
rectangle. You can adjust output levels by moving the corresponding sliders. The number of
sliders matches the number of output ports. Moving any of these sliders will automatically
update the corresponding slider in the bottom toolbar, and vice-versa.
Note: when you create a new gig, this plugin is present by default in the Wiring view and
cannot be removed from the design surface. However, you can specify different audio
interfaces for Audio Out. Navigate to Options -> Audio Setup to configure your audio
interfaces.
Audio Out parameters
The following parameters are available for the Audio Out plugin:
· Number of channels - allows you to get the current number of audio output channels.
· Output Volume (Channel #) - allows you to control the output volume for each output
channel available.
· Output Level (Channel #) - allows you to display the output level for each output
channel available (use with meter widgets).

167
Gig Performer 4.x User Manual © 2016 - 2021 Deskew Technologies, LLC
Built-in Plugins
· Overall Output Level - allows you to display the overall output level for all channels
(use with meter widgets).
· Channel # Muting - mutes the specific channel (# represents the number of the
channel).
Note: not all parameters are suitable for the widget control. Parameters such as Number of
channels are suited for GPScript or OSC applications. Using scripting it can be determined
how many channels the Audio Out plugin offers and then the result can be used for other
functions. Using OSC, you can e.g. create the exact number of VU-meters dynamically (if
your OSC application supports this feature).
10.3 Gain Controls
The gain controls plugins include a Gain and Balance Control, a Gain Control (mono) and a
Gain and Balance Control (mono to stereo).
10.3.1 Gain and Balance Control
This plugin provides stereo audio input pins and stereo audio output pins:

168
Gig Performer 4.x User Manual © 2016 - 2021 Deskew Technologies, LLC
Built-in Plugins
It allows the gain and Left/Right balance of a stereo audio signal to be adjusted. Clicking on
the Mute button or setting the Volume slider to 0 causes the plugin to be muted (not
bypassed). Click here for more information on the difference between muting and bypassing
a plugin.
Gain and Balance Control parameters
Besides the common parameters Bypass Plugin and Open/Close Plugin Editor, the
following parameters are provided for the Gain and Balance Control plugin:
· Gain - allows you to control the gain.
· Balance - allows you to control balance (left-right).
· Channel # Magnitude - magnitude parameters are used for level metering. Metering
can be very helpful to verify proper gain structure and ensure that a signal is not being
overloaded and distorted.
· Muted - mutes or unmutes this plugin block.
10.3.2 Gain Control (mono)
This plugin provides a single audio input pin and a single audio output pin:

169
Gig Performer 4.x User Manual © 2016 - 2021 Deskew Technologies, LLC
Built-in Plugins
It allows the gain of a mono audio signal to be adjusted. Clicking on the Mute button or
setting the Volume slider to 0 causes the plugin to be muted (not bypassed). Click here for
more information about the difference between muting and bypassing a plugin.
Gain Control parameters
Besides the common parameters Bypass Plugin and Open/Close Plugin Editor, the
following parameters for the Gain Control plugin are available:
· Gain - allows you to control the gain.
· Muted - mutes or unmutes this plugin block.
· Magnitude - the magnitude parameter is used for level metering. Metering can be very
helpful to verify proper gain structure and ensure that a signal is not being overloaded
and distorted.
The meter widgets provided by Gig Performer (available in both vertical and horizontal
configurations) give you the ability to visually monitor levels at any point in the signal chain.
10.3.3 Gain and Balance Control (mono to stereo)
This plugin provides a single audio input pin and stereo audio output pins:

170
Gig Performer 4.x User Manual © 2016 - 2021 Deskew Technologies, LLC
Built-in Plugins
It converts a mono audio signal to stereo and allows its gain to be adjusted. Clicking on the
Mute button or setting the Volume slider to 0 causes the plugin to be muted (not bypassed).
Click here for more information about the difference between muting and bypassing a
plugin. A balance control enables the incoming mono source to be panned across Left/Right
channels.
Gain and Balance (m->s) parameters
Besides the common parameters Bypass Plugin and Open/Close Plugin Editor, the
following parameters for the Gain and Balance (m->s) plugin are available:
· Gain - allows you to control the gain.
· Balance - allows you to control balance (left-right).
· Channel # Magnitude - magnitude parameters are used for level metering. Metering
can be very helpful to verify proper gain structure and ensure that a signal is not being
overloaded and distorted.
· Muted - mutes or unmutes this plugin block.
The meter widgets provided by Gig Performer (available in both vertical and horizontal
configurations) give you the ability to visually monitor levels at any point in the signal chain.

171
Gig Performer 4.x User Manual © 2016 - 2021 Deskew Technologies, LLC
Built-in Plugins
10.4 Audio Mixers
The Audio Mixer/Router is a flexible plugin that eliminates the need for a Gain plugin on the
output of each source. Functions like level, mute, and output routing can be controlled from
widgets so you can, for example, mute and unmute different sources, route channels to
various effects devices connected to the outputs, or, of course, mix levels. Each input hosts
a stereo channel pair, or can be switched to mono operation.
There are six versions of the plugin, with 2 inputs (4 channels), 4 inputs (8 channels), 8
inputs (18 channels), 10 inputs (20 channels), 12 inputs (24 channels), and 16 inputs (32
channels):
On the screenshot above are shown different versions of the audio mixer plugin and the
plugin editor of the Audio Mixer (8ch) plugin; it has 4 stereo inputs and 8 channels. Elements
in the plugin window are:
1. Mono/Stereo channel switch - click this icon to toggle the channel strip between
mono (left channel) and stereo input.
2. Channel level meter - displays the post-fader output level from the channel.
3. Channel level fader - adjusts level from the channel to the selected output pair.
Double-click the fader to return it to the0 dB position (alternatively, press Alt + click on
Windows or Option + click on Mac). Press Ctrl (or Cmd) and drag the fader to adjust
level in 0.1 dB steps.
4. Channel label - to edit a channel name, double-click the "tape strip".
5. Channel Solo button - solos the channel, effectively muting all others.
6. Channel Mute button - mutes the channel.

172
Gig Performer 4.x User Manual © 2016 - 2021 Deskew Technologies, LLC
Built-in Plugins
7. Channel Balance/Pan knob - for stereo channels, this is a left/right balance control,
while on mono channels it is a pan control. Double-click on this control to return it to
center (alternatively, press Alt + click on Windows or Option + click on Mac).
8. Output channel select - click this field to choose an output pair for a strip from the
drop-down menu.
Tip: if you connect the audio outputs of multiple plugins to the input of another plugin, the
signals will be mixed automatically. To create custom blends, insert one of the Audio
Mixer/Router plugins and balance as desired. Audio Mixer/Router plugins can also be used
to create reverb sends, where signal is routed to a reverb (or other type of signal processing
plugin) from multiple sources. Simply insert an Audio Mixer/Router plugin and route the
output of each source to its inputs and a pair of outputs to the reverb plugin.
Parameters
The following parameters are available for Audio Mixers:
· Channel # volume - adjusts the channel volume (indicated with (3) on the screenshot
above).
· Channel # balance - adjusts the channel balance (indicated with (7) on the screenshot
above).
· Channel # solo - toggles Soloed/Not soloed modes (indicated with (5) on the
screenshot above).
· Channel # mute - toggles Muted/Not muted modes (indicated with (6) on the
screenshot above).
· Channel # output - changes the output channel (indicated with (8) on the screenshot
above).
· Channel # left meter - displays the left meter (indicated with (2) on the screenshot
above).
· Channel # right meter - displays the right meter (indicated with (2) on the screenshot
above).
Note: names of these parameters may differ depending on the channel label (4); for
example, if you rename the channel label from "Channel 1-2" (default) to "Guitar" (indicated
with the red rectangle) then corresponding parameters will be named like shown in the
screenshot below:

173
Gig Performer 4.x User Manual © 2016 - 2021 Deskew Technologies, LLC
Built-in Plugins
10.4.1 Audio Mixer applications
There are many tasks that can be accomplished with the Audio Mixer plugin. Here are a few
examples to get you going.
Simple Mixer

174
Gig Performer 4.x User Manual © 2016 - 2021 Deskew Technologies, LLC
Built-in Plugins
In this example we have four synths with stereo pair outputs feeding the audio mixer's eight
inputs. Each input has gain and balance controls in the Audio Mixer plugin (so it is
unnecessary to add gain and balance plugins on each individual synth output). All the inputs
feeding the audio mixer are then routed to outputs 1 and 2 of the mixer plugin, which is
connected to the first stereo pair of audio interface outputs.
Each channel pair can be soloed or muted as desired and of course these can be controlled
from front panel widgets (and so from your keyboard controller, once you map them to those
widgets) as needed.
Input router

175
Gig Performer 4.x User Manual © 2016 - 2021 Deskew Technologies, LLC
Built-in Plugins
On the right, in the Wiring view of a rackspace, you can see that we have a single synth (the
KeysOfThe70s) connected to the Audio Mixer (8ch). The four output pairs of the Audio Mixer
are connected to the inputs of four different effects. If you look at the first channel strip in
the Audio Mixer editor window (on the left), the KeysOfThe70s is currently being routed to
Output 3-4, which feeds the Flanger plugin. By changing the output routing, you can quickly
switch from one effect to another. Output routing also can be attached to a slider, knob, or
switch widget, letting you control effects switching from your controller.
Feed multiple effects (aux sends)

176
Gig Performer 4.x User Manual © 2016 - 2021 Deskew Technologies, LLC
Built-in Plugins
Assigning the source synth plugin to all of the inputs turns the mixer into a bank of aux
sends. Each channel sends the source signal to one pair of outputs, with a separate level
control for each. In this case, the outputs of the effects and the original synth source are all
mixed at the end through another eight-channel mixer.
Multiple submixers in one plugin

177
Gig Performer 4.x User Manual © 2016 - 2021 Deskew Technologies, LLC
Built-in Plugins
Since inputs can be independently assigned to outputs, a single 16-channel mixer can be
used as if it were a few small submixers in one package.
The first and third channel strips (channels 1-2 and 5-6) feed one mix; the second and fourth
strips (channels 3-4 and 7-8) feed another mix. The fifth strip (channels 9-10) is routed to
the third output pair that feeds an effect:

178
Gig Performer 4.x User Manual © 2016 - 2021 Deskew Technologies, LLC
Built-in Plugins
Mixer and Router Together

179
Gig Performer 4.x User Manual © 2016 - 2021 Deskew Technologies, LLC
Built-in Plugins
In this example, we can instantly route combinations of inputs to combinations of outputs so
you can route KeysOfThe70s to the phaser and chorus while routing Blue3 to chorus and
echo. By using rackspace variations in Gig Performer you can instantly switch among
arbitrary combinations, using a controller to switch, if you like.
10.5 Global Processing
Global Processing plugins encompass To Global Rackspace and From Global Rackspace
plugins:

180
Gig Performer 4.x User Manual © 2016 - 2021 Deskew Technologies, LLC
Built-in Plugins
To Global Rackspace is used to send audio signals from regular rackspaces to the Global
rackspace. From Global Rackspace is used to receive audio signals from the Global
Rackspace to rackspaces.
Refer to the Global Rackspace chapter for more information.
10.5.1 To Global Rackspace
To Global Rackspace is used to send audio signals from regular rackspaces to the Global
rackspace for additional processing. By default, this plugin provides four input pins:
Double-clicking this plugin opens its edit window where the number of channels can be
selected. You can select up to 64 channels for this plugin.
Important note: changing the number of channels will update all the global plugin blocks in
all rackspaces. Affected plugins are:
- To Global Rackspace
- From Global Rackspace
- From Rackspaces
- To Rackspaces

181
Gig Performer 4.x User Manual © 2016 - 2021 Deskew Technologies, LLC
Built-in Plugins
From Rackspaces and To Rackspaces plugins are present in the Global rackspace only, and
will be addressed separately since they are not the part of the Global Processing plugins'
group.
See more information on how to connect To Global Rackspace plugin in the Global
Rackspace chapter.
Parameters
The To Global Rackspace plugin provides 128 available and initially empty slots; to occupy a
specific slot you have to set the Global Parameter Assignment in the Widget Properties
inspector for a global widget. Refer to this chapter to learn more.
10.5.2 From Global Rackspace
From Global Rackspace is used to receive audio signals from the Global rackspace to
regular rackspaces for additional processing. By default, this plugin provides four output
pins:
Double-clicking this plugin opens its edit window where the number of channels can be
selected. You can select up to 64 channels for this plugin.
Important note: changing the number of channels will update all the global plugin blocks in
all rackspaces. Affected plugins are:
- To Global Rackspace
- From Global Rackspace
- From Rackspaces
- To Rackspaces
From Rackspaces and To Rackspaces plugins are present in the Global rackspace only, and
will be addressed separately since they are not the part of the Global Processing plugins'
group.
Parameters

182
Gig Performer 4.x User Manual © 2016 - 2021 Deskew Technologies, LLC
Built-in Plugins
The From Global Rackspace plugin provides 128 available and initially empty slots; to occupy
a specific slot you have to set the Global Parameter Assignment in the Widget Properties
inspector for a global widget. Refer to this chapter to learn more.
10.6 MIDI Inputs
These plugins are used to receive incoming MIDI messages and pass them on to other
plugins; they provide a single MIDI output pin:
The image above will be different for your setup as it depends on the currently connected
MIDI devices and aliases that you might have configured for your currently connected MIDI
devices.
1. MIDI In (OMNI) - receives MIDI messages coming from any MIDI Input port on your
system. The MIDI In (OMNI) is a generic plugin that "listens" to all incoming MIDI
messages coming from all connected controllers, on all channels and on all ports. It is
the default MIDI input block in any new rackspace. You can delete it if you don't need it
(for example, if you are using plugins to process incoming audio signal only, from a
guitar or a microphone) and add it later if you need it. You can also duplicate this
plugin if needed. This block is designed for simple setups - use this when you're getting
started. Once you start working with multiple keyboards and/or control surfaces, you
should switch to MIDI In blocks associated specifically with each device so that you can
route MIDI appropriately.
Note: if you are using a virtual MIDI Port (such as the built-in IAC port in Mac), then
you must not use OMNI blocks as you will get feedback.
2. MIDI In (Controls left) - "Controls left" is a custom alias that this author defined in the
Rig Manager for the specific MIDI input device. This alias is tied to the specific MIDI
Input port on this author's computer and this block receives MIDI events only from the
that input port. Refer to the Rig Manager chapter to find out more about aliases.
3. MIDI In (CASIO CT-X5000) - for this connected MIDI input device an alias has not been
defined. The text in brackets is the full name of the MIDI device and it depends on the
MIDI device's manufacturer. This block receives MIDI events only from the specific
input port where this MIDI device is connected.

183
Gig Performer 4.x User Manual © 2016 - 2021 Deskew Technologies, LLC
Built-in Plugins
4. MIDI in (OSC) - receives MIDI messages only from OSC sources. For more information
on OSC, click here.
5. Local GP Port - this block is intended for very advanced setups. Check the Local GP
Port chapter to learn more.
If you connect one or more MIDI controllers to your system, Gig Performer automatically
generates additional controller-specific MIDI In blocks; right click on the empty surface in
the Wiring view to open the contextual menu:
Then expand the MIDI Inputs sub-menu to see the list of all connected MIDI In devices. On
the screenshot above note the state before (A) and after (B) connecting your MIDI device.
The actual name of your connected MIDI device (indicated with the red rectangle) depends
on the device's manufacturer.
These can (and, in most cases, should) be substituted for the generic MIDI In (OMNI) plugin.
Because they "listen" to specific MIDI controllers and/or ports, their usage is generally
preferable, especially if your rig contains multiple keyboards or controllers. Using specific
MIDI In blocks makes it easy for you to route incoming MIDI from each device to different
plugins.
Double-clicking a MIDI in plugin opens its editor window:

184
Gig Performer 4.x User Manual © 2016 - 2021 Deskew Technologies, LLC
Built-in Plugins
The MIDI In plugin editors provide the following functionality:
1. Key transposition - transpose incoming note messages over a range of +/- 127
semitones. Each MIDI In block can set its own transpose value. This is particularly useful
when you use keyboard splits where you want to position (say) a piano at the bottom two
octaves of your keyboard but obviously you want the actual notes to be pitched at higher
octaves. Normally the MIDI In block's transpose value is added to the global transpose since
you generally want to transpose all your instruments by the same amount.
2. Ignore global transpose - checking this option ignores the global transpose that is set in
the upper toolbar of the main Gig Performer window (refer to The main Gig Performer
window chapter, bullet item 8 for more information). For example, if you are using a
particular MIDI In block to control percussion or sound effects in a sampler, you generally do
not want the transpose to be changed and so you can configure individual MIDI In blocks to
ignore the global transpose value.

185
Gig Performer 4.x User Manual © 2016 - 2021 Deskew Technologies, LLC
Built-in Plugins
3. Enable MIDI merge - this option lets you feed in MIDI events from other plugins that
produce MIDI (arpeggiators, MIDI File players, etc.) after which point they can be processed
by other parameters available here as well as by GPScript, for example.
4. Channel blocking - specified MIDI channels can be blocked by simply unchecking the box
above the desired source channel. Hold the Shift key and click on a channel to
disable/enable all other channels.
5. Channel mapping - a source channel (indicated with the red arrow) can be mapped to a
different destination channel (indicated with the blue arrow); click on the destination
channel and type in a number to map to the different destination channel. The Reset on
change checkbox (indicated with the red rectangle) is checked by default and allows you to
stop all pending notes after any channel change.
6. Keyboard split - enables you to create keyboard splits by specifying lower and upper note
of the split. Notes below the Lower value and/or above the Upper value are blocked; only
notes between those values are allowed through. The Lower and Upper values can be
entered in one of these ways:
a) click on the Lower note or Upper note field and choose the desired note from the
corresponding drop-down menu (indicated with the blue arrow).
b) click on the Learn button (indicated with the green arrow) above the Lower note or
Upper note field and play the desired note on your MIDI controller. Click the Learn button
again to complete the setting.
c) click on the Learn button above the Lower note field and click on the desired low note on
the plugin's virtual keyboard (indicated with the red arrow); then click the Learn button
above the Upper note field and click the desired high note on the plugin's virtual keyboard.
Remember to click the Learn button again after the note is learned to exit Learn mode.
It is easy to see the valid split range because notes below the Lower note and above the
Upper note are grayed out.
Note: the keyboard in the MIDI In block plugin shows the physical key being pressed when
you play your controller, rather than the output value, which might be transposed.
Ticking the Invert keyboard checkbox (indicated with the blue rectangle) allows you to
produce lower notes when playing higher up the keyboard (and vice-versa). This is a nod to
Joe Zawinul who famously inverted the ARP 2600 keyboard when he performed Black
Market. It makes it easy to do certain counterpoint as you can use the same fingering on
both hands.

186
Gig Performer 4.x User Manual © 2016 - 2021 Deskew Technologies, LLC
Built-in Plugins
7. Velocity - the old Velocity Layering and Scaling options have been replaced by the
Velocity Curve which gives you much more flexibility to map your input velocities. You can
implement the following features:
a) Velocity layering - velocities below the MIN value and/or above the MAX value are
blocked; only velocities between those values are allowed through. If the same value is
entered for MIN and MAX, all incoming notes will have their velocity changed to that
value. This allows you to create velocity layers by specifying whether notes are heard
depending on how hard (or soft) you press a key.
b) Velocity scaling - by selecting "Scale" in the drop-down box and entering "From" and
"To" values, the velocity of all incoming note messages is adjusted so as to reduce their
dynamic range (i.e. softer notes will be heard louder, or louder notes will be heard more
softly).
c) Velocity constraining - by selecting "Constrain" in the drop-down box, any incoming
note messages with a velocity below the "From" value are given that value exactly; at the
same time, any incoming note messages with a velocity above the "To" value are given
that value exactly. For example, if you enter a "From" value of 60, and a "To" value of 80,
all incoming note messages with velocities of 60 or less are given a velocity of 60 exactly,
while all incoming messages with velocities of 80 or more are given a velocity of 80
exactly; only velocity values from 61 - 79 are preserved. Constraining allows you to create
hard velocity splits.
The MIDI In plugin editor's velocity range control is particularly useful if you want to have
multiple sounds available but hear only some when you play softly and others when you play
harder. If connected to a piano plugin, for example, you can opt to only hear the piano sound
when you play the keyboard forcefully.
Tip: after you have defined a velocity range, you may want to change the actual velocities
that are sent to your sound-generating plugin. For example, you may have created a piano
sound that you only want to be heard if the velocity value is greater than 80. However, you
may still want the piano to respond as if it was being played quietly. In such a case, set the
Min/Max velocity values to 80 and 127 respectively so that you only hear the piano when
you hit the keys hard. Then choose Scale and set the From/To values to 1 and 50
respectively. As a result, notes received with a velocity of 80 will produce notes with velocity
of 1, while notes received with a velocity of 127 will produce notes with a velocity of 50.
Notes in-between those values will be mapped somewhere in between.
8. Event Blocking - sometimes it is desirable to block certain note or continuous controller
messages coming from a controller. Although the MIDI Filter plugin is capable of this kind of
filtering and much more, MIDI In blocks include an event blocking section that conveniently

187
Gig Performer 4.x User Manual © 2016 - 2021 Deskew Technologies, LLC
Built-in Plugins
provides basic blocking capabilities to reduce the number of situations requiring the MIDI
Filter plugin.
A common scenario is that your controller has one or more knob, button, or other physical
controls that are not being used, and so not assigned to a plugin parameter. If this
unassigned control accidentally gets nudged, it could create an unintentional change to a
plugin value. Blocking the MIDI messages coming from that control prevents this accidental
modification. You might also want to use the Sustain pedal associated with another physical
keyboard but you do not want notes played on that other keyboard to come through (you'll
route them to some other synth).
The Other CC events box, when checked, blocks all continuous controller messages except
for the ones that have their own boxes (i.e. ModWheel (CC1), Volume (CC7), and Sustain
(CC64)). SysEx (System Exclusive) messages are blocked by default. Uncheck this box if you
want to pass these messages to the MIDI In block.
9. Monophonic options - this area at the bottom of the editor filters the note messages
from the controller down to a monophonic stream of notes.
- The Lowest only box, when checked, produces a mono part extracted from the lowest note
as played on the instrument.
- The Highest only box, unsurprisingly, produces a mono part extracted from the highest
note as played on the instrument.
These options can be useful for doubling melodies, or extracting a bass part from what
might have been written as a piano part. Most often, users choose to check one or the other
of these boxes, but you could check both, in which case you would be extracting lines from
both the top and bottom of what is being played.
10. Enable OSC Patchbay (this section shows up when the Enable MIDI In OSC Patchbay
option is enabled in OSC Options) - turn on this toggle button if want to send out incoming
MIDI messages as OSC messages to another application to be modified. The external
application must send back modified messages otherwise no sound will be produced from
the MIDI In block. Type in the OSC address prefix for this patchbay and IP address and port
for the remote device (target) to which you want to send the message. This is an advanced
option and not required for normal use.
11. Virtual keyboard - the virtual keyboard is used to help you set and display the current
keyboard split and to let you generate Note messages allowing instrument plugins to be
played even when an external MIDI controller is not connected. You can click on this virtual
keyboard to play a key or use the computer keyboard instead. The MIDI channel used for

188
Gig Performer 4.x User Manual © 2016 - 2021 Deskew Technologies, LLC
Built-in Plugins
these note messages is determined by the lower field associated with channel 1 in the
Channel Mapping section.
MIDI In parameters
The following parameters for MIDI In plugins are available:
· Channel 1-16 Output - allows you to change MIDI channel blocking or remapping in
real time.
· MinNote - allows you to change the keyboard split minimum (lower) note setting.
· MaxNote - allows you to change the keyboard split maximum (upper) note setting.
· Transpose - allows you to alter the key transposition. Caution: do not change this
setting while holding notes, or stuck notes may result. If you do get a stuck note, don't
panic - just click on the Panic icon to turn all notes off.
· StopAllNotes - issues a "turn all notes off" message, along with a sustain OFF
message and a Center PitchBend message, same as the Panic button except that it only
applies to the specific MIDI In block.
· StickyNoteChannel - determines the MIDI channel for the sticky note. Sticky notes
allow you to trigger loops or sample playback from a widget. It works by sending Note
On events only, as if you played a note but didn't release it. To use sticky notes, create
an on-off widget (i.e. a switch or a button) and assign it to the MIDI In plugin and a
Note On parameter. Then add a second continuous (knob or slider) widget and assign it
to the MIDI In plugin as well, but to the StickyNoteVelocity parameter. When you
activate the switch or button widget, a note will play continuously in the connected
sound-generating plugin, with the knob widget determining the velocity of the MIDI
note message.
· StickyNoteVelocity - determines the velocity of the sticky note.
· Note On C-2 through G8 (MIDI note numbers 0 - 127) - toggles On/Off
(SendNoteOn/SendNoteOff); default velocity is 64.
· MinNoteVelocity - allows you to pass through only notes with velocities equal or
greater than the minimum note velocity.
· MaxNoteVelocity - allows you to pass through only notes with velocities equal or less
than the maximum note velocity.
189
Gig Performer 4.x User Manual © 2016 - 2021 Deskew Technologies, LLC
Built-in Plugins
· MinScaledNoteVelocity - the lowest actual velocity will be adjusted to the minimum
scaled velocity.
· MaxScaledNoteVelocity - the highest actual velocity will be adjusted to the maximum
scaled velocity. All notes between are scaled according to the scale curve.
· OutputVelocityMode - allows you to change between Scaled and Constrained velocity
(to scale or constrain incoming velocity values; the latter puts a hard min/max limit).
· PC (Program Change) - allows widget movements to send MIDI program change
messages to plugins to call up different presets - note that not all plugins support this
and some require initial configuration to be able to respond to PC events.
Important note: sending PC events prevents Patch Persist from working and can result
in stuck notes depending on the plugin implementation. For those reasons, this feature
is not recommended for normal use.
· CC 0-127 - sends out CC (Continuous Controller) message with the value controlled by a
widget.
· Pitchbend - sends a pitch-wheel message.
· Aftertouch - sends an aftertouch (also known as channel pressure) messages.
· MonoLowestOnly - allows only the lowest note of a chord to pass through.
· MonoHighestOnly - allows only the highest note of a chord to pass through.
· BlockNoteOn - blocks incoming Note On messages.
· BlockNoteOff - blocks incoming Note Off messages.
· BlockPitchbend - blocks incoming Pitchbend messages.
· BlockAftertouch - blocks incoming aftertouch messages.
· BlockPolytouch - blocks incoming polytouch messages.
· BlockAllOtherControllers - blocks all CC messages not covered by listed parameters.
· BlockModWheel - blocks CC1 messages.
· BlockVolume - blocks CC7 messages.
· BlockSustain - blocks CC64 messages.
· BlockExpression - blocks CC11 messages.

190
Gig Performer 4.x User Manual © 2016 - 2021 Deskew Technologies, LLC
Built-in Plugins
· BlockSysex - blocks incoming SysEx messages (these messages are blocked by default
for compatibility with Gig Performer 3).
· NoteFollow - toggles the NoteFollowValue Off/On.
· NoteFollowValue - when on, sets the note number to the most recently played note.
Attach a widget to this parameter and then group a second widget attached to an
arbitrary plugin parameter which will then follow the note being played.
· VelocityFollow - toggles the VelocityFollowValue Off/On.
· VelocityFollowValue - when on, sets the velocity to whatever was last played. Use this
in a similar manner as NoteFollow.
· ReleaseFollow - toggles the ReleaseFollowValue Off/On.
· ReleaseFollowValue - when on, sets the release value to whatever was last played.
Not all keyboard controllers support Release values.
· OSCPatchbay - toggles Off/On the OSC Patch bay (must be enabled in OSC options)
· IgnoreGlobalTranspose - enables you to not transpose incoming MIDI notes based on
global transpose (useful when playing drums or effects samples).
· TransposeUp - increments the transpose by one step.
· TransposeDown - decrements the transpose by one step.
· InvertKeyboard - inverts the keyboard: higher incoming MIDI notes produce lower
outgoing MIDI notes.
· StopAfterChannelChange - sends all notes off whenever you change a channel (to
prevent stuck notes).
Note: the MIDI Controller plugin right-click menu is the same as other plugins, but with the
addition of the Change MIDI Input Device sub-menu; this menu allows you to reassign the
MIDI In or MIDI Out block to the MIDI controller chosen from the menu.

191
Gig Performer 4.x User Manual © 2016 - 2021 Deskew Technologies, LLC
Built-in Plugins
10.7 MIDI Outputs
This plugin is created only for connected MIDI controllers that offer one or more MIDI
outputs. It provides a single MIDI input pin and is used to send MIDI messages to external
devices such as synthesizers or samplers:
The MIDI Out plugin editors provide the following functionality:
1. MIDI Channel - sets the channel of the MIDI output.
2. Map all incoming MIDI to this channel - turns on channel mapping so that incoming
MIDI channel events have their channel changed to the specified channel. Note that
program change transmission (described below) is still associated with the specified
MIDI channel even if this box is checked.
3. Transpose all notes by - allows you to alter the key transposition of the MIDI output.
192
Gig Performer 4.x User Manual © 2016 - 2021 Deskew Technologies, LLC
Built-in Plugins
4. Pass Program Change messages - if this option is checked, then incoming program
change messages are passed through to external MIDI devices.
5. Keyboard split - allows you to set up keyboard splits for each MIDI Out block. Notes
below the Lower value and/or above the Upper value are blocked; only notes between
those values are allowed through. Note: you can use the virtual keyboard to create a
keyboard split; hold the Shift key and click on the desired key on the virtual keyboard to
set a low note. Hold the Alt key (Option key on Mac) and click on the desired key on the
virtual keyboard to set an upper note.
6. Program Change and Bank Select - allow Gig Performer to automatically transmit a
program change and/or Bank Select message every time a rackspace containing the
MIDI Out block is activated so that each of your external MIDI devices (keyboard and
rack-mount synths, drum machines, etc.) load with the correct sounds and are instantly
ready for use.
7. Set PC From Patch Name - rather than just using PC numbers, clicking on this button
allows you to select the PC number to be sent out using patch names defined in
instrument definition file (INS file) if available for your hardware synth when switching
to the current rackspace.
8. Edit... - clicking on this button opens the MIDI Helper Tool which allows you to send
arbitrary sequences of MIDI messages (including SysEx) when you switch to this
rackspace. Basically, this is the same mechanism that is in the Song Part Properties
dialog that allows you to send an arbitrary sequence of MIDI messages when switching
to a song part; in the MIDI Out block the MIDI Helper Tool won't let you change the
output device but otherwise works exactly the same way.
9. Send Now - clicking on this button allows you to send the selected MIDI messages to
this MIDI out device.
The MIDI Out (OSC) block includes additional options, as indicated with the red rectangle:

193
Gig Performer 4.x User Manual © 2016 - 2021 Deskew Technologies, LLC
Built-in Plugins
1. OSC address - allows you to enter OSC address for this block.
2. Target IP - address of the remote device to which you want to send the message.
3. Port - port number of the remote device to which you want to send the message.
The MIDI Out (OSC) block is mainly intended to send OSC wrapped MIDI messages from Gig
Performer to other applications that can respond to such OSC messages.
Note: if you are using the MIDI Helper Tool in a MIDI Out (OSC) block, then the selected
MIDI messages will be send out over OSC. The output device will display OSC rather than
MIDI Out.
MIDI Out parameters
The following parameters for the MIDI Out plugin are available:

194
Gig Performer 4.x User Manual © 2016 - 2021 Deskew Technologies, LLC
Built-in Plugins
· ChannelNumber - allows you to alter the MIDI output channel number (1-16).
· MinNote - allows you to alter the Lower note setting for the keyboard split.
· MaxNote - allows you to alter the Upper note setting for the keyboard split.
· Transpose - allows you to alter the key transposition. Caution: Do not change this
setting while holding notes, or stuck notes may result. If you do get a stuck note, don't
panic - just click on the Panic icon to turn all notes off.
· CC 0-127 - allows you to transmit the specified CC (control change) message as the
widget is moved.
· Force MIDI Channel - causes all MIDI events being transmitted to be mapped to a
specific MIDI channel.
· PC - allows widget movements to send MIDI program change messages to external
MIDI tone generators in order to call up different patches.
· Pass through incoming PC messages - toggles the Pass Program Change messages
setting in the MIDI Out plugin editor.
10.8 MIDI Processing and Monitoring
In this chapter find out more about internal plugins that help you with monitoring, blocking
and redirecting MIDI messages.
10.8.1 MIDI Monitor
This plugin provides a single MIDI input pin and a single MIDI output pin. It displays MIDI
messages from the plugin block which is connected to it and it is intended primarily for
diagnostic purposes:

195
Gig Performer 4.x User Manual © 2016 - 2021 Deskew Technologies, LLC
Built-in Plugins
Optionally, turn on the SysEx indices toggle button to display the position of each byte of a
SysEx message (this feature is intended for advanced users as a helper when writing
GPScript functions that manipulate SysEx messages).
Note: double-click an entry in this window to copy it to the clipboard. Hold the Shift key
while double-clicking on any entry to copy all entries to the clipboard.
MIDI Monitor parameters
Apart from the common parameters Bypass Plugin and Open/Close Plugin Editor, the MIDI
Monitor plugin provides no other parameters.
Note: If you want to monitor all incoming MIDI messages, see the Global MIDI Monitor
chapter.
10.8.2 MIDI Filter
The MIDI Filter plugin can be used either to block specific MIDI messages or to remap them
to other messages. Some messages can only be blocked (MIDI note messages and Active
Sense). This plugin provides a single MIDI input pin and a single MIDI output pin:

196
Gig Performer 4.x User Manual © 2016 - 2021 Deskew Technologies, LLC
Built-in Plugins
Double-clicking this plugin opens its plugin editor:
1. Passthru MIDI message - indicates that this MIDI message is passed through this
plugin.
2. Blocked MIDI message - indicates that this MIDI message is blocked.
3. Remapped MIDI message - indicates that this MIDI message is remapped (converted
into messages of another type).
4. Contextual menu - clicking on any line in the MIDI Filter plugin editor opens a
contextual menu where you can make one of four choices: Passthru, Block, Map to... or
Cancel. Hovering over the Map to... item expands the menu item, allowing you to select
the desired MIDI message.
5. Block All - blocks all MIDI messages. If you enable this option, everything, including
Notes, will be blocked. This can be very useful if you use multiple variations and want
to allow MIDI messages to go to some plugins but not others, depending on which
variation is selected. You should, however, exercise caution when doing this in real
time as you could get left with a hanging note if you block notes before the Note Off

197
Gig Performer 4.x User Manual © 2016 - 2021 Deskew Technologies, LLC
Built-in Plugins
message is sent out. If this occurs, don't panic - just click on the Panic icon in the main
toolbar to turn all notes off.
6. Allow All - allows all MIDI messages. By default, all MIDI messages are allowed.
This plugin is typically inserted between a MIDI In plugin and a sound-generating plugin,
where common usages include blocking sustain pedal messages, converting modulation
wheel messages into volume messages, and mapping aftertouch messages to mod wheel
messages.
MIDI Filter parameters
The following parameters for the MIDI Filter plugin are available:
· Pitchbend - allows you to control Pitchbend messages (passthru, block or remap).
· Aftertouch - allows you to control Aftertouch messages (passthru, block or remap).
· Polyphonic Key Aftertouch - allows you to control Polyphonic Key Aftertouch
messages (passthru, block or remap).
· Program Change - allows you to control Program Change messages (passthru, block or
remap).
· Notes - allows you to control Notes messages (passthru or block only).
· CC# (0-127) - allows you to control Control Change messages (passthru, block or
remap).
· Note On - allows you to control Note On messages (passthru or block only).
· Note Off - allows you to control Note Off messages (passthru or block only).
· Active Sense - allows you to control Active Sense messages (passthru or block only).
Like every plugin, every MIDI Filter plugin parameter can be widget-controlled. When using
on-off widgets (i.e. switches or LED buttons), the selected parameter will be passthru when
in the OFF position, and blocked when in the ON position.
The use of continuous widgets (knobs and sliders) allows you to scroll through all remapping
options in the in-between settings (the minimum setting will pass through the selected
message, while the maximum setting will block the message).
Tip: refer to this chapter to learn how you can remap MIDI messages without using the MIDI
Filter plugin.

198
Gig Performer 4.x User Manual © 2016 - 2021 Deskew Technologies, LLC
Built-in Plugins
10.8.3 MIDI Channel Constrainer
The MIDI Channel Constrainer is the only plugin that isn't shaped rectangularly; this plugin
provides a single MIDI input pin and a single MIDI output pin:
The MIDI Channel Constrainer allows you to set the MIDI input channel that is allowed
through, remap the input channel, or block all MIDI traffic that goes through this plugin.
1. Input channel is the same as the output channel - this is the default setting for all
MIDI Channel Constrainer plugins and this is how they look like when you insert them
onto the design surface.
2. Input channel is remapped - X > Y (in this case 1 > 16) indicates that option (8) is
activated and the input channel is remapped to a different output channel.
3. OMNI input channel is remapped - "|" indicates that OMNI input channel is selected;
it must be remapped to the desired output channel.
4. MIDI traffic is blocked - selecting the option (9) in the plugin's window causes that
this plugin changes its visual representation.
5. Elliptic shape - when OSC and/or GPScript are activated for this block and with a
defined handle name, this plugin adjusts its shape to include that information.
6. Input channel - this plugin provides 16 input channels and a OMNI input. By default,
the input channel is the same as the output channel. This channel is allowed through
and all other channels are muted.
7. Output channel - ticking the option (8) allows you to remap the input to the specified
output channel (1 - 16).
8. Use a different output channel - tick this check box if you want to remap the input to
a different output channel.
9. Block all MIDI traffic - when selected, all incoming MIDI events to this plugin will be
blocked.

199
Gig Performer 4.x User Manual © 2016 - 2021 Deskew Technologies, LLC
Built-in Plugins
MIDI Channel Constrainer parameters
The following parameters are available for this plugin:
· InputChannel - allows you to change the input channel (1-16).
· OutputChannel - allows you to change the output channel (1-16).
· BlockAll - allows you to pass through or block all MIDI traffic.
· RemapChannel - toggles remapping the input channel.
· OmniMode - toggles the OMNI mode for the input channel.
10.8.4 Scriptlet
The Scriplet plugin allows you to create your own MIDI processor plugins. This plugin
provides a single MIDI input pin and a single MIDI output pin:

200
Gig Performer 4.x User Manual © 2016 - 2021 Deskew Technologies, LLC
Built-in Plugins
For example, if you have a sustain pedal that is producing CC messages the wrong way
round (0 when pressed, 127 when released) then one of the solutions to fix this issue can be
a simple scriptlet:
This scriptlet receives the MIDI In events from the MIDI In block, then captures CC64, inverts
it, and lets everything else through.
If you want to see the underlying script behind this scriptlet, either click on the Edit Script
button in the Scriptlet plugin editor (indicated with the red rectangle), or hold the Shift key
while double-clicking the scriptlet block (which will open both the scriptlet's plugin editor
and the script editor):
Using the script editor, scripts can be entered or modified; refer to the GPScript chapter to
learn more.

201
Gig Performer 4.x User Manual © 2016 - 2021 Deskew Technologies, LLC
Built-in Plugins
You are also provided with the option that controls whether unhandled MIDI messages are
passed through (the default) or blocked (when this option is checked).
Scriptlets can also have their parameters, which are then displayed in the scriptlet's plugin
editor, like shown in the screenshot below:
Moreover, these parameters can be learned and controlled by widgets:
Refer to the How to connect a widget to a plugin parameter chapter to learn more.
Scriplet parameters can also be captured in the Probabilistic Sound Designer.
Click Help -> Support -> Community Shared Gigs, Rackspaces and More to check out many
Community generated content, including scriplets.

202
Gig Performer 4.x User Manual © 2016 - 2021 Deskew Technologies, LLC
Built-in Plugins
10.9 Media Players
In this chapter find out more about the integrated media player plugins in Gig Performer -
Audio File Player and MIDI File Player.
10.9.1 Audio File Player
The Audio File Player plugin provides a MIDI input pin, eight audio output pins, and a MIDI
output pin:

203
Gig Performer 4.x User Manual © 2016 - 2021 Deskew Technologies, LLC
Built-in Plugins
It allows you to load and play up to eight audio files (in AIF, FLAC, MP3, OGG or WAV
formats), either one at a time or simultaneously. You can use this plugin as a backing track
player or for looping short samples, switching seamlessly from one to another while running.
Up to eight audio output channels are available, singly or in pairs.
The Audio File Player plugin provides eight "lanes" for playback. You can think of these as
roughly equivalent to tracks on a DAW although each lane could have an entire song on it.
Its editor provides controls that enable the following operations:
1. Single/Multi - allows you to switch between playing back one audio file at a time
versus multiple files simultaneously.
2. Loop - turns looping on or off for all lanes.
3. Go To Beginning - allows you to instantly go to the beginning of all audio files.
4. Time/Tracks display - displays the current time, in hours/minutes/ seconds/hundredths
of a second, as well as the number of tracks (channels) loaded with audio files.
5. Play/Pause - allows you to start or pause file playback. The "pause" function does not
return the file to the beginning - it simply pauses it wherever it is. Clicking on the
button a second time resumes playback from the point at which it was stopped.
6. Sync - when turned on (lit green), Gig Performer will play and pause the Audio File
Player automatically when its button is engaged. This allows you to begin playback of
audio files at the same time you start a drum machine emulation plugin, for example.
7. Load Full Directory - loads a full folder of audio files at once, up to the number of
available (empty) lanes. If, for example, you have six empty lanes and you try loading
eight files using this button, only the first six files will get loaded, into lanes 3 - 8. With
this feature, you can create a directory with all of the files you will need, then load the
entire player with them at the gig by invoking only a single command.
8. Metronome - clicking on this icon provides a number of additional controls that allow
you to create a MIDI click track in sync with the tempo of your Master track. See the
MIDI metronome chapter for more details.
In addition, the Audio File Player editor offers the following lane-specific controls:
9. File name - displays the name of the file currently loaded in the lane.
10. Play/Silence this lane - enables or mutes playback of the file loaded into the lane.
11. Load New Audio File (file cabinet icon) - click this to load an audio file into the lane.

204
Gig Performer 4.x User Manual © 2016 - 2021 Deskew Technologies, LLC
Built-in Plugins
12. Remove Audio File (trashcan icon) - click this to delete the audio file from the lane.
13. Master indicator - when lit, indicates that the file in the lane is being used as the
Master, determining the actual playback length of all other files. Note that this is not a
parameter that can be changed; instead, Gig Performer automatically designates the
lane loaded with the longest audio file as the Master. If you load other lanes with new
files, the Master designation may change accordingly (if the new files are longer than
the one in the currently designated Master lane).
14. Output assignment - allows you to set the output for that lane's playback. A stereo
file should ideally be set to a pair of outputs (i.e. Output 1&2, Output 3&4, etc.) but if
it is sent to a mono output, the two channels will automatically be mixed to mono.
Conversely, sending a mono file to a pair of outputs will result in the same signal being
routed to both outputs.
15. Level indicators - shows the current playback level for that lane.
16. Volume control - allows you to adjust the volume of the lane.
17. Oneshot on/off - allows you to turn looping off for that lane, even if the master Loop
button is on (lit). Clicking on the Oneshot button (causing it to light) during playback
will cause the file in that lane to play to the end and then stop. If you then turn
Oneshot for that lane off again, the file will resume playback when the file loaded into
the Master lane ends.
18. File duration - displays the duration in seconds and samples of the file currently
loaded in the lane.
To load audio files, do any of these:
· Click the Load New Audio File button in a lane and navigate to the desired file.
· Drag and drop the file from the OS X Finder or Windows Explorer onto the lane into
which you want it loaded.
· Click the Load full directory button and navigate to a source folder of audio files to be
loaded in the Audio File Player.
To play audio files:

205
Gig Performer 4.x User Manual © 2016 - 2021 Deskew Technologies, LLC
Built-in Plugins
a) to play a single audio file, be sure the Single/Multi button is set to single and that the
lane is play-enabled, then click the Play/Pause button to start playback.
b) To play multiple files simultaneously:
i. Load all of the files you want to play.
ii. Set the Single/Multi button to Multi. This allows you to enable or mute multiple lanes.
iii. Set muting for tracks you don't want to hear.
iv. Click the Play/Pause button to start playback.
Things to note about the Audio File Player:
· The Audio File Player designates the longest file loaded as the Master, whether or not
it is play-enabled. The duration of the Master track becomes the loop length when loop
playback is enabled.
· The MIDI metronome is generated based on the length of the Master track, and
information you supply about the number of bars in the loop and the number of beats
in each bar.
· Lanes can be muted and enabled in real-time while the player is in playback. As this is
muting, not stopping playback, all files always stay in sync with the master track's
location, so if a lane is muted during playback and then enabled 10 seconds later, it
resumes playing 10 seconds later than the point at which it was muted.
· When a file is muted, you will still be able to see "ghost" meter activity for it.
· Beneath the file duration on the right of each lane is a progress bar that turns blue as
the file plays. The length of the bar represents the full duration of the file in that lane
and the progress through it of the play cursor. So, while working in Multi mode, in 10
seconds, the blue bar in a lane with a 20 second-long file is filled to one half, where as
the blue bar for a two-minute loop running at the same time in another lane is only
filled 1/12th of the way across, just a small chunk.
· To move the playhead to different locations in the Master file other than the start,
create a knob or slider widget and map it to the Playhead position parameter of the
Audio File Player.
· The Audio File Player allows files of different sample rates to be loaded into separate
lanes and played simultaneously.

206
Gig Performer 4.x User Manual © 2016 - 2021 Deskew Technologies, LLC
Built-in Plugins
Audio File Player parameters
The following parameters are available for the Audio File Player plugin:
· Play/Pause - allows you to start or pause playback.
· Play From Beginning - causes playback to start from the beginning in response to a
widget movement.
· Play From Marker - causes playback to start from the marker position (see the "Marker
position" below) in response to a widget movement.
· LOOP On/Off - allows you to turn looping on/off.
· Playhead position - allows you to change the playback start point from a widget. Using
a continuous widget (such as a knob or a slider) for this purpose enables you to seek
particular points or even to "scrub" one or more tracks while they are playing.
· Marker Position - allows you to change the marker position from a widget.
· Set Marker now - allows you to set the marker position "on the fly" from a widget.
· Click Generation On/Off - allows you to use a widget to turn the MIDI click track on or
off.
· Play Mode (single/multi) - allows you to use a widget to switch between Single and
Multi playback.
· Lane 1-8 Playing - allows you to use a widget to start playback from the specified lane
(1-8).
· Lane 1-8 One Shot On/Off - allows you to use a widget to turn the Oneshot mode on
or off for the specified lane.
· Lane 1-8 Volume - allows you to use a widget to adjust the volume of the specified
lane.
· Lane 1-8 Output Assignment - allows you to use a widget to change the output
assignment for the specified lane.
Note: we recommend the use of on-off widgets, such as one of the LED buttons, for real-
time control over most Audio File Player parameters. However, Playhead position, Marker

207
Gig Performer 4.x User Manual © 2016 - 2021 Deskew Technologies, LLC
Built-in Plugins
position, Lane 1-8 Volume, and Lane 1-8 Output Assignment are better controlled with
continuous widgets such as knobs and sliders.
10.9.1.1 MIDI metronome
Included in the Audio File Player plugin is a MIDI metronome optimized for working with
short loops. Tell the MIDI metronome the musical length of a loop and it will generate MIDI
notes for a metronome. The MIDI metronome does not do tempo detection and is unrelated
to the audio metronome.
MIDI metronome settings can be seen on the screenshot below (indicated with the yellow
rounded rectangle):
Follow these steps to use the MIDI metronome:
1. Click on the Metronome button (1) to show MIDI channel and note settings for the
metronome (indicated with the yellow rounded rectangle).
2. Load a sound file into the audio player (2). You can either load a single sound file
(indicated with the blue arrow) or load a full directory of audio files into sample lanes
(indicated with the red arrow). Note: if you want to play multiple sample lanes in
parallel, click on the Multi button (3). In Multi mode, the longest file will be designated
as the Master and used to calculate the metronome.
3. Enter the duration of the loop in bars into the Bars field (4) on the lane of the Master
track, by typing it in directly or using the +/- arrows beneath the field.
4. Enter the number of beats per bar in the loop into the Beats field (5) on the lane of the
Master track, by typing it in directly or using the +/- arrows beneath the field.

208
Gig Performer 4.x User Manual © 2016 - 2021 Deskew Technologies, LLC
Built-in Plugins
5. Choose or add a plugin as the sound source for the metronome. Choose the sound you
want to use for the metronome and set a MIDI channel for it. Don't forget to make
audio connection from the sound source to your interface outputs.
6. In the Wiring view, connect the MIDI Out port of the Audio File Player to the MIDI In
port of the plugin you want to use to generate the metronome sound.
7. Define the MIDI note, velocity, and duration (Length) to be used for both the Accent
and Beat metronome sounds (6).
8. Set the MIDI Channel field to the channel number of the metronome sound (7).
9. Click the Play/Pause button and the metronome will play, along with the audio files
(8).
Note: The MIDI metronome assumes the loop contains an exact number of bars, with the
beginning of the file being bar 1, beat 1. If this is not the case, the metronome may not sync
correctly with the Master track.
10.9.2 MIDI File Player
The MIDI File Player provides one MIDI output pin:

209
Gig Performer 4.x User Manual © 2016 - 2021 Deskew Technologies, LLC
Built-in Plugins
The MIDI File Player plugin can load up to 128 songs. For each song you can easily select
which tracks to play and optionally map them to specific channels. A looping feature is also
supported, where you can further specify both start and stop positions.
Double-clicking this plugin opens its editor window, which provides controls that enable the
following operations:
1. Information display - displays the information about the selected song (and its
corresponding MIDI file):
a. Bars - displays the current bar in the song.
b. Beats - displays the current beat within a bar in the song.
c. Length - displays the total length of a song, expressed in bars and beats (e.g. 288:4
implies 288 bars and 4 beats).

210
Gig Performer 4.x User Manual © 2016 - 2021 Deskew Technologies, LLC
Built-in Plugins
d. Tracks - displays the number of tracks in the selected song.
e. Resolution - displays the resolution of the current song, expressed in the number
of ticks.
f. Time - displays the time signature of the current song.
g. BPM - displays the initial beats per minute of the current song. This field can be
edited with a custom value (up to 640 BPM).
2. Play MIDI file - clicking on this button plays the current song. Click again to stop
playing and go to the beginning of the song.
3. Loop - clicking on this button enables you to loop the MIDI file continuously; for this
feature to work, you need to specify the loop length - clicking on the Stop button and
specifying the stop position is mandatory (see (5)).
4. Sync - clicking on this button synchronizes playback with the global playback in the
main toolbar. Use this feature If you use multiple MIDI and/or audio file players and
you want them to play or stop at the same time. Find out more about the global play
button in this chapter.
5. Start/Stop - this section allows you to enable start and stop options for the song. If
the Loop option is not enabled, specifying the Stop position will stop the MIDI File
Player when that position is reached. Start and stop positions are expressed in bars
and beats (5:1 implies 5 bars and 1 beat). If you specify the stop position e.g. at 5:1,
the playing actually stops at the last "tick" before 5:1 (i.e. 4:4). Note that you only need
to specify the end position for the loop feature to work. In that case the loaded MIDI
file will be played from the beginning of the file until the specified End position.
6. Quantization - clicking on this drop-down list allows you to choose the desired
quantization (None, 1, 1/2, 1/4, 1/8, 1/16). If you need a more sophisticated
quantization function such as triplets or a certain amount of "humanize", then you
should perform such operations on the MIDI file using your DAW and set the
Quantization in this plugin to None.
7. Tempo options - allows you to select the desired tempo option:
a. Song Tempo - allows the MIDI file to be played at its own tempo without impacting
anything else.
b. Song -> Global BPM - clicking on this option sets the global tempo from the song
tempo.

211
Gig Performer 4.x User Manual © 2016 - 2021 Deskew Technologies, LLC
Built-in Plugins
c. Global BPM -> Song - selecting this option sets the song tempo from the global
tempo.
d. Manual BPM - selecting this option allows you to set a custom BPM value for a
song.
e. Manual BPM -> Global BPM - selecting this option sets the global tempo to the
manually defined tempo.
8. Block PC messages - checking this option blocks program change events found in
tracks from being sent out.
9. Show GM Instruments - a General MIDI file typically has 16 tracks for various
instruments and there is a convention about the channel numbers. For example, drums
are always on the channel 10. This option assumes the loaded MIDI file is a GM file
and will display GM instrument names based on the program changes found in the
tracks.
10. Load a new MIDI file button - loads a new MIDI file (both .midi and .mid file
extensions are supported).
11. Location display - displays a location of the loaded MIDI file for the currently selected
song.
12. Unload selected file - clicking on this button unloads the selected MIDI file.
13. Song name - displays the name of the selected song.
14. Songs list - the MIDI File Player plugin supports loading up to 128 songs.
15. Track name - shows the track name in the current song. By default, all tracks are
enabled in the loaded MIDI file. Click on the corresponding checkbox to disable/enable
a track.
16. Map channel - checking this option allows you to map all MIDI events to the specified
channel (by default, channel 1).
17. Channel information - shows the assigned channel per the loaded MIDI file. You can
remap this channel by checking the Map channel check box (16).
18. Enable all tracks - clicking on this button enables all tracks in the selected song (by
default, all tracks are enabled).
19. Disable all tracks - clicking on this button disabled all tracks in the selected song. Use
this feature if you want to select only a few tracks to play.

212
Gig Performer 4.x User Manual © 2016 - 2021 Deskew Technologies, LLC
Built-in Plugins
MIDI File Player parameters
The following parameters are available for the MIDI File Player plugin:
· SongNumber - allows you select one of the available songs in slots 1-128.
· SongDisplayMode - allows you to select how the song name will be represented. You
can choose between "Song name" (e.g. Won't be fooled again), "Song index" (e.g. 1)
and "Both" (e.g. 1 - Won't be fooled again).
· Play - allows you to start or pause file playback.
· PrevSongName - displays the name of the previous song.
· NextSongName - displays the name of the next song.
· GotoPrevSong - goes to the previous song.
· GotoNextSong - goes to the next song.
· Loop - toggles the loop mode on/off.
· MidiTempo - allows you to select the desired tempo option (see the bullet item (7)).
· Quantization - allows you to choose the desired quantization (see the bullet item (6)).
· Sync - toggles the sync setting (disabled/enabled).
· LoopStart - toggles the Start setting (disabled/enabled).
· LoopEnd - toggles the End setting (disabled/enabled).
· Reserved 1-4 - these four parameter slots are not currently used.
· BlockProgramChanges - toggles blocking program change messages (Yes/No).
· GeneralMidiMode - toggles the General MIDI mode (Yes/No).
· BarBeatDisplay - displays bars and beats for a song.
· CurrentPosition - displays the current position (expressed in bars and beats).
· TrackEnable_# - allows you to enable or disable the specified track (# represents a
number between 1-128).

213
Gig Performer 4.x User Manual © 2016 - 2021 Deskew Technologies, LLC
Built-in Plugins
· TrackName_# - displays the name of the specified track (# represents a number
between 1-128).
· MappingEnable_# - allows you to enable or disable the channel mapping (# represents
a number between 1-128).
· MapChannelNumber_# - allows you to specify the channel number (between 1 and
16) if the mapping is enabled (# represents a number between 1-128).
Use parameters such as PrevSongName, TrackName, or BarBeatDisplay with label widgets;
insert a label widget into a rackspace (or the Global rackspace) and map it with these
parameters to see the name displayed.
10.10 Miscellaneous
In this chapter are presented the built-in plugins that belong to the Miscellaneous group:
System Actions and Comment.
10.10.1 System Actions
The System Actions plugin allows you to control various system-wide parameters and
commands using widgets (and therefore through your MIDI controllers). This plugin provides
one output pin:
The plugin editor for the Systems Actions does not have any configurable parameters. Select
parameters directly from the parameter mapping dialog in the Widget Properties Inspector:

214
Gig Performer 4.x User Manual © 2016 - 2021 Deskew Technologies, LLC
Built-in Plugins
You can, for example, set up the Red Slider widget to control your global tempo, as indicated
on the screenshot above. Using a scaling curve with a small vertical range gives you the
ability to easily push or pull the speed very slightly.
System Actions parameters
The following parameters are available for the System Actions plugin:
· Play - turns on the global playhead (value greater than 0.5).
· Stop - turns off the global playhead (value greater than 0.5).
· PlayStop - value greater than 0.5 turns on the global playhead and value less than 0.5
turns off the global playhead.

215
Gig Performer 4.x User Manual © 2016 - 2021 Deskew Technologies, LLC
Built-in Plugins
· GlobalBPM - allows you to set or view the global BPM.
· GlobalBPMUp - a value greater than 0.5 increases the beat by 1 BPM.
· GlobalBPMDown - a value less than 0.5 decreases the beat by 1 BPM.
· GlobalTranspose - allows you to set or view the global transpose.
· GlobalTransposeUp - a value greater than 0.5 increases the transpose by 1 semitone.
· GlobalTransposeDown - a value greater than 0.5 decreases the transpose by 1
semitone.
· MasterTrim - allows you to set or view the master trim value.
· Metronome - turns the metronome on or off.
· MetronomeVolume - allows you to set or view the metronome value.
· TapTempo - a value greater than 0.5 generates a tap message.
· AbletonLink - turns AbletonLink on or off.
· RackspaceName - displays the name of the current rackspace (use in a label).
· VariationName - displays the name of the current variation (use in a label).
· Rackspace-Variation-Name - displays the name of the current rackspace and the
current variation (use in a label).
· SongName - displays the name of the current song (use in a label).
· SongpartName - displays the name of the current song part (use in a label).
· Song-Songpart-Name - displays the name of the current song and the name of the
current song part (use in a label).
· ProgramChange - displays the current program change number (use in a label).
· Reserved1 - reserved for future use.
· Reserved2 - reserved for future use.
· BeatMode - Off - countoff only (1 to 16 beats); On - Always.
· Beat - value will briefly go to 1 when non-first beat occurs (attach to a pad widget to
see a visual beat).

216
Gig Performer 4.x User Manual © 2016 - 2021 Deskew Technologies, LLC
Built-in Plugins
· Accent - value will briefly go to 1 when accent occurs, i.e. the first beat (attach to a
pad widget to see a visual beat).
· MidiBeat - controls whether MIDI Note messages should be sent out on beats.
· MidiBeatNoteNumber - sets the note number for regular beat.
· MidiBeatNoteVelocity - sets the velocity of the regular beat.
· MidiBeatAccentNoteNumber - sets the note number for the accent beat.
· MidiBeatAccentNoteVelocity - sets the note number for the accent beat.
· Tuner - a value greater than 0.5 toggles the tuner mode.
· Panic - a value greater than 0.5 triggers the panic message.
· Next - a value greater than 0.5 moves to the next variation or rackspace (depending on
options).
· Prev - a value greater than 0.5 moves to the previous variation or rackspace
(depending on options).
· NextRackspace - a value greater than 0.5 moves to the next rackspace.
· PrevRackspace - a value greater than 0.5 moves to the previous rackspace.
· NextVariation - a value greater than 0.5 moves to the next variation.
· PrevVariation - a value greater than 0.5 moves to the previous variation.
· NextSong - a value greater than 0.5 moves to the next song.
· PrevSong - a value greater than 0.5 moves to the previous song.
· NextSongpart - a value greater than 0.5 moves to the next song part.
· PrevSongpart - a value greater than 0.5 moves to the previous song part.
· SelectPartOrVar - allows you to select any variation or song part (up to 128 values) of
the current rackspace or song respectively.
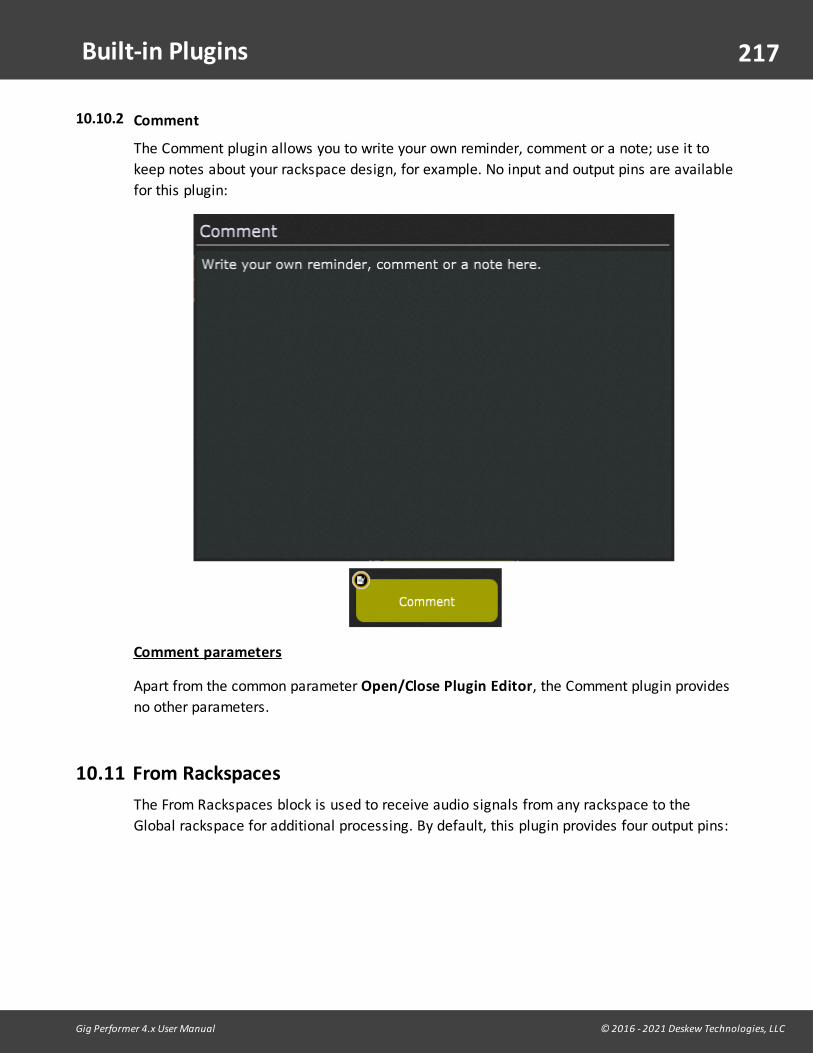
217
Gig Performer 4.x User Manual © 2016 - 2021 Deskew Technologies, LLC
Built-in Plugins
10.10.2 Comment
The Comment plugin allows you to write your own reminder, comment or a note; use it to
keep notes about your rackspace design, for example. No input and output pins are available
for this plugin:
Comment parameters
Apart from the common parameter Open/Close Plugin Editor, the Comment plugin provides
no other parameters.
10.11 From Rackspaces
The From Rackspaces block is used to receive audio signals from any rackspace to the
Global rackspace for additional processing. By default, this plugin provides four output pins:

218
Gig Performer 4.x User Manual © 2016 - 2021 Deskew Technologies, LLC
Built-in Plugins
Double-clicking this plugin opens its edit window where the number of channels can be
selected. You can select up to 64 channels for this plugin.
Important note: changing the number of channels will update all the global plugin blocks in
all rackspaces. Affected plugins are:
- To Global Rackspace
- From Global Rackspace
- From Rackspaces
- To Rackspaces
See more information on how to connect the From Rackspaces plugin in the Global
Rackspace chapter.
From Rackspaces parameters
Apart from the common parameter Open/Close Plugin Editor, the From Rackspaces plugin
provides no other parameters.
10.12 To Rackspaces
The To Rackspaces block is used to send audio signals from the Global rackspace to any
rackspace for additional processing. By default, this plugin provides four input pins:
Double-clicking this plugin opens its edit window where the number of channels can be
selected. You can select up to 64 channels for this plugin.

219
Gig Performer 4.x User Manual © 2016 - 2021 Deskew Technologies, LLC
Built-in Plugins
Important note: changing the number of channels will update all the global plugin blocks in
all rackspaces. Affected plugins are:
- To Global Rackspace
- From Global Rackspace
- From Rackspaces
- To Rackspaces
To Rackspaces parameters
Apart from the common parameter Open/Close Plugin Editor, the To Rackspaces plugin
provides no other parameters.

220
Gig Performer 4.x User Manual © 2016 - 2021 Deskew Technologies, LLC
Recording your performance
11 Recording your performance
Gig Performer includes a built-in recording feature that allows you to capture not only audio
arriving at your audio interface's inputs, before it has passed through any of the plugins, but
also all incoming MIDI messages.
By capturing the audio and saving your gig, you can replicate the performance and modify it
in post-production. To access the Recorder, just click the Recorder button in the bottom
toolbar:
Files are recorded in WAV format. Each time you start the recorder, a subfolder is created
within the (master) recording folder and named with the date of the recording (see the File
locations in Gig Performer chapter for more information about default locations in Gig
Performer). All files from your recording are placed within that subfolder. This makes it very
easy to organize recordings made at different performances during a tour.
11.1 Recorder settings
When you click on the Record button, the following dialog opens:

221
Gig Performer 4.x User Manual © 2016 - 2021 Deskew Technologies, LLC
Recording your performance
1. Recording folder - all files are recorded into subfolders of this recording folder.
Subfolders are named with the date of the recording.
2. Set master folder button - clicking this button brings up a file browser that enables
you to choose the (master) folder for your recordings.
3. Available space display - shows the amount of recording space available on the drive
where the master folder is located.
4. Clear All button - clicking this button deselects all inputs so that no channels will be
recorded. When you only need to record a few channels, it will be quicker to Clear all
and then select only the ones you need.
5. Select All button - clicking this button enables all channels for recording. When you
want to record most or all channels, it will be quicker to select all channels and then
deselect the ones you do not need.
6. Input channels - click a checkbox to select a channel for recording. On the screenshot
above, two channels are selected for recording, as indicated with red arrows.
7. Record MIDI Input - when checked, MIDI input from all physical MIDI devices is
recorded at the same time as audio. A separate track is created for each device. The

222
Gig Performer 4.x User Manual © 2016 - 2021 Deskew Technologies, LLC
Recording your performance
resulting MIDI file contains all the MIDI events separated into tracks by device name.
These files are easily imported into any DAW with MIDI capabilities or other MIDI
sequencing software.
8. Bit depth field - click this to select 8, 16, 24, or 32-bit (floating point) depth for
recording. Note that choosing a higher bit depth results in larger files.
9. Record Start mode - see the next section for more information about this option.
10. Start button - clicking this button immediately starts recording all selected input
channels.
11. Space required - shows the amount of disk space required to record the selected input
channels per minute or per hour. This display adjusts as you select or deselect
channels.
This dialog is similar to the Recording Options window where settings for recording can be
configured.
11.2 How to use the Recorder?
To record your performance:
- First make sure that there is enough free space on the drive where the (master) recording
folder is located,
- Select the audio input channels that you want to record; if you also want to record MIDI
input, turn on that option in Recorder settings,
- Select the desired bit depth and check again if space required for an hour (or couple of
hours) of your gig can fit onto your drive,
- Choose the record start mode: Start immediately or Delayed start; the Start
immediately mode allows you to begin recording as soon as the red Start button is clicked.
The Delayed start mode activates some extra options and allows you to enter a start time in
the minutes and seconds fields, as seen below:

223
Gig Performer 4.x User Manual © 2016 - 2021 Deskew Technologies, LLC
Recording your performance
This feature is useful if you want to configure and test the Recorder at soundcheck and then
set it to start recording just before the performance begins.
- Click on the Start button; note how the record button changes depending on the Record
start mode:
If Record start mode is set to Delayed start, it will blink yellow and show you how much
time is remaining until the recording process starts (1). If the Start immediately mode is
selected, it will blink red and show you elapsed time (2).
- Clicking on the Recorder button will either stop the recording process, or cancel the
scheduled recording countdown.
- To access your recording, navigate to your master folder (see default locations on Windows
and Mac here) and then enter the subfolder with the same name as your gig file (or Untitled,
if you didn't save your gig); note another subfolder (or subfolders if you made multiple
recordings) automatically named with date and time, i.e. "2020-11-17 at 2330":
The name of each WAV file matches the name of each selected audio input.
Note: incoming MIDI events from all MIDI devices known to Gig Performer are recorded,
each device to its own track in a Type 1 Standard MIDI File. Generally, each MIDI device
corresponds to a physical MIDI port. Incoming messages are recorded using a resolution of
480 ppq (ticks per quarter note).
All real-time Gig Performer tempo changes are captured as Meta Tempo events in the MIDI
file.
Note: a "dry", unprocessed input signal is recorded via the Recorder. If you are a Windows

224
Gig Performer 4.x User Manual © 2016 - 2021 Deskew Technologies, LLC
Recording your performance
user and want to record "wet", processed signal, read this blog article: How to record Gig
Performer outputs via Gig Performer's record feature.

225
Gig Performer 4.x User Manual © 2016 - 2021 Deskew Technologies, LLC
Time controls
12 Time controls
In this chapter, you will learn more about time controls in Gig Performer, how to set tempo
and time signature, use the metronome and activate Ableton Link.
12.1 Tempo and Time signature
Tempo and time signature settings are always visible on the upper toolbar (A) and can be
adjusted using the drop-down window (B):
1. Dropdown menu button - click on this button or anywhere other than the actual BPM
or Time Signature edit fields to open the drop-down menu window (B).
2. Global tempo - this is the tempo of Gig Performer's playhead. It can be edited directly
in the upper toolbar (A) by typing in the desired value, or in the drop-down window (B),
where you can either type in the desired value or use -/+ buttons to decrease/increase

226
Gig Performer 4.x User Manual © 2016 - 2021 Deskew Technologies, LLC
Time controls
the tempo value. The maximum tempo value is 640 BPM. If the metronome is enabled,
its speed and accents will be defined by the global tempo and time signature settings.
3. Tap tempo - click or tap (if you are using a touch screen device) on the Tap button at
least twice to set a corresponding tempo. Keep clicking/tapping to see how the tempo
changes, based on your clicking/tapping speed. Note: once you start tapping, the BPM
display will display the current tempo that has been detected.
4. Global time signature - this is the time signature of Gig Performer's audio metronome.
It cannot be edited directly in the upper toolbar (A), only it the dropdown menu window
(B). Click on the numerator and type in the number of beats per measure and then click
on the denominator and type in the number of beats per measure. Alternatively, use -/+
buttons to decrease/increase their values. Note: you can choose any time signature, up
to 32/16.
All plugins that respond to global tempo can be synchronized to the current tempo. You will
generally need to enable "sync" to external tempo on individual plugins for this to work.
Please check your plugin documentation for more information.
Note: there are tempo settings in the Song Properties and Song Part Properties dialogs,
besides the global tempo, and these settings are accompanied by the Override toggle button
that makes that tempo active. Selecting a song that has a tempo specified and the Override
toggle button turned on sets the global tempo to that song tempo. The global tempo will
revert to its default when you switch to a song part that does not override the global tempo.
A song part with a tempo specified and the Override toggle button turned on is the highest
priority and overrides both global and song tempos when the song part is selected.
12.2 Metronome
Gig Performer offers two separate metronomes: Audio Metronome and MIDI Metronome.
Note: the MIDI metronome is a feature of the built-in Audio File Player plugin. Refer to the
MIDI metronome chapter for more information about the MIDI metronome.
12.2.1 Audio metronome
Setup for the audio metronome is done through the General Options window. Choose
Options -> General or, press Ctrl + , (or Cmd + , on Mac) to open General options, and then
note the Metronome section:

227
Gig Performer 4.x User Manual © 2016 - 2021 Deskew Technologies, LLC
Time controls
1. On/Off button - click this toggle button to activate/deactivate the metronome.
2. Metronome playback volume - to set the volume of the metronome, drag the slider or
click in the field and enter the value directly.
3. Metronome sound select area - click the "…" buttons to select a custom sound file
(aif, wav, mp3 and ogg files are supported) for Beat and Accents sections respectively.
4. Reset Metronome sound to default - clicking on the Reset buttons resets the Beat
and Accent sounds to Gig Performer's default sounds.
5. Metronome outputs - click on the check boxes for each output to which you want the
metronome routed.
The audio metronome is simple to use: set the outputs to which you want the metronome
routed in the General tab (refer to the screenshot above, indicated with (5)). Then set the
desired global tempo and time signature in the top toolbar, and activate the metronome.
Note: the metronome on/off buttons in the top toolbar and on the General tab have identical
purposes; changing one changes the other as well.
The first beat of each bar is accented.
To learn more about setting the tempo and time signature, refer to the Tempo and Time
signature chapter.
To see more about the buttons in the top toolbar, refer to The main Gig Performer Window
chapter.

228
Gig Performer 4.x User Manual © 2016 - 2021 Deskew Technologies, LLC
Time controls
12.3 Ableton Link support
Ableton Link is a system for synchronizing multiple music applications, which may be running
on different devices, by providing unified, real-time tempo control. Link-enabled programs
find each other automatically when they are on the same network. Any "player" in the
network can change the tempo and the others follow.
To enable Gig Performer to sync to Ableton Link, click on the Link button in the upper toolbar
(A) or enable the toggle button in the drop-down menu window (B):
No configuration of any kind is necessary, just turn it on.
12.4 Rackspace or Song tempo overrides
The global tempo and time signature can be overridden by custom tempo and time signature
that can be set for each rackspace:

229
Gig Performer 4.x User Manual © 2016 - 2021 Deskew Technologies, LLC
Time controls
Check the Rackspace Properties chapter for more information.
When you enter the Setlists view, global tempo and time signature can be overridden by
custom tempo and time signature that can be set for each song:
Refer to the Song Properties chapter to learn more.
Song parts can also have their overrides and they represent the highest priority in the
override order:
This option is configured in the Song Part Properties dialog.
When the Override toggle button is not turned on, the specified tempo is inactive and has no
effect.

230
Gig Performer 4.x User Manual © 2016 - 2021 Deskew Technologies, LLC
OSC and Gig Performer
13 OSC and Gig Performer
Gig Performer provides extensive support for OSC (Open Sound Control) - a protocol for
communication among various multimedia devices and applications, with a particular focus
on applications used by artists and performers. In Gig Performer you can associate OSC
names with plugins and widgets and then send messages to them from any remote device,
such as Android phone or tablet, iPhone, iPad or other laptop to control their operation.
Learn more about OSC support in Gig Performer here.
Every parameter available in your VST, VST3 and AU plugin (if you’re on OS X) can be
controlled by widgets in Gig Performer, and every widget can be controlled just with a tap of
or sliding your fingers on your favorite mobile phone via OSC protocol. Other OSC capable
devices, like various digital mixers for example, can be controlled directly from Gig
Performer using widgets and OSC. Gig Performer's proprietary programming language
(GPScript) also supports the OSC protocol.
For example, you can use OSC to change the output levels of each plugin independently or
adjust the cutoff frequency of a synth plugin. It can also be used to set Tap Tempo, turn
Tuner View on and off, and select the desired rackspace and variation. In addition to well-
known OSC products like Lemur and TouchOSC, it is also possible to use programming tools
like Max/MSP, Ableton Live, and Plogue Bidule (to name just a few) to create very
sophisticated applications that can also work interactively with Gig Performer.
For the most current version of Gig Performer's OSC implementation, see Help ->
Documentation -> OSC Commands.
13.1 How to set up OSC
For Gig Performer and an OSC application to work with one another, make sure that both
your computer and the device running the OSC application are connected to the same local
network.
Launch Gig Performer and then click Options -> OSC setup:

231
Gig Performer 4.x User Manual © 2016 - 2021 Deskew Technologies, LLC
OSC and Gig Performer
Enable OSC by clicking on the Enable OSC button. Type in the IP address and the port of the
device running the OSC application in the Remote client IP address and Remote client port
boxes respectively.
Note that the Gig Performer IP address value cannot be changed, as this is defined by your
computer's network configuration. The address is displayed to make it easier for you to
configure your remote device to connect to Gig Performer. The Gig Performer listening port
can be changed to a custom value. Note: make sure that Gig Performer is not blocked by any
kind of software firewall.
When you perform live, you might want your FoH engineer to have access to your controls,
too. In cases when OSC applications are running on multiple devices (i.e. a tablet, a
smartphone or another computer) and you want to use multiple devices onstage, there is a
simple way to accomplish that; if you simply set three last digits of the OSC applications IP
address to 255 (i.e. 192.168.0.255) then Broadcast Mode is activated. Broadcast Mode
enables Gig Performer to send OSC messages and communicate simultaneously with all
listening clients on the specified port (i.e. 54341) on the same local network. Click here to
access our Knowledge Base article with more information.
232
Gig Performer 4.x User Manual © 2016 - 2021 Deskew Technologies, LLC
OSC and Gig Performer
If you are using an OSC application such as Lemur or another OSC application that allows
detailed control, turn on the Use Lemur augmented OSC messages toggle button. If you are
using TouchOSC or any other application with a more basic OSC implementation, leave it
turned off.
Other advanced options include MIDI In OSC Patchbay and Widget Direct Addressable OSC.
Check the OSC Options chapter for more information.
Gig Performer's supplied MIDI In (OSC) plugin is designed to receive MIDI messages from
remote OSC sources. One of the requirements of OSC is that each object in both the host
computer and remote device must have matching unique case-sensitive names comprised of
characters only (no spaces). These names must be unique within a single Gig Performer
rackspace, although they can be reused in different rackspaces.
If you're using Lemur or TouchOSC, you can download a basic Gig Performer template. For
your convenience, we have created templates that make it easy to control Gig Performer
widgets from the popular OSC apps Lemur and TouchOSC. If you are using either of these
apps, click here to download the Lemur file, or click here to download the TouchOSC file.
Note that these templates merely provide a starting point for your own OSC programming
and you certainly are not required to use them - in fact, we encourage you to construct your
own custom OSC environments. Deskew Technologies does not provide official support for
these templates.
The OSC related topics are extensively covered in the Gig Performer blog, through
applications such as Lemur, TouchOSC, Open Stage Control and Oscar. Check out our blog
for more tutorials, and also visit our Community for more tips on using OSC.
13.2 The Lemur and TouchOSC Templates
The Mixer page of the Lemur template (as viewed on a tablet or a smartphone) looks like
this:

233
Gig Performer 4.x User Manual © 2016 - 2021 Deskew Technologies, LLC
OSC and Gig Performer
1. Template page tabs - touch these tabs to switch between the Lemur template's Mixer,
Setlists, and Songs pages.
2. Current song name - when a song is loaded, the name is displayed here.
3. Song part tiles - when a song is loaded, these tiles show the names of song parts.
Clicking on a tile loads the indicated part.
4. Lemur controls - these rows of knob, fader, and button controls get mapped to
widgets in your rackspaces.
5. Previous/Next Song buttons - touch one of these to move to the next or previous
song in the current setlist.

234
Gig Performer 4.x User Manual © 2016 - 2021 Deskew Technologies, LLC
OSC and Gig Performer
6. Current rackspace name - each song part is associated with a rackspace variation.
The name of the current rackspace is displayed here.
7. Settings menu - touch here to drop down a menu that allows you to load and save
projects, plus access Lemur settings.
8. Tap Tempo button - the Tap Tempo button is always active and has the highest
priority, so it can be tapped at any time to set a tempo. This can be useful for syncing
delays to the tempo of a live performance.
9. Tuner current note display - when the tuner is on, the note currently detected from
the input is displayed here.
10. Tuner current intonation display - when the tuner is on, this display shows how
sharp or flat the note currently detected from the input actually is from the note
displayed.
11. Tuner on/off button - touch this button to bring up Gig Performer's Tuner view for
tuning. Touch it again to hide the tuner.
12. Songnotes display - a small display for a reminder or any short message you would
like to have shown on the Lemur screen. Create a label on a panel in Gig Performer,
check the Customize caption box in the Widget Properties area. and enter as the
caption the text you want displayed in Lemur. In the OSC Name field, enter
"Songnotes", and then check the Enable OSC box. The caption for that label will now
appear in Lemur in place of the Songnotes label.
13. Tempo field - displays Gig Performer's current tempo.

235
Gig Performer 4.x User Manual © 2016 - 2021 Deskew Technologies, LLC
OSC and Gig Performer
14. Snapshot button - this is the same as the Capture variation into this part button
just above the panel in the Setlist/Song view. It captures any changes you may have
made to widget settings since recalling the rackspace variation associated with the
song part, and stores the changes with the part, so they are recalled each time that
part is.
15. Snapshot indicator - when a snapshot is taken, this indicator turns red to show that
the variation has been edited. Touching the red button recalls the variation as stored.
Changes to widget values are lost.
16. Refresh button - touch this button after making changes to a Gig Performer rackspace
to update the Lemur display with the changes.
The Setlists and Song pages in the Lemur template offer quick touch access to, of course,
your setlists and songs.
Note: this template assumes that you have defined up to 10 knobs whose handles are
Knob1, Knob2, ...Knob10, 10 sliders with handles Slider1, Slider2, ... Slider10 and 10 buttons
with handles Button1, Button2, ... Button10.
The TouchOSC template, as viewed on an iPhone, looks like this:

236
Gig Performer 4.x User Manual © 2016 - 2021 Deskew Technologies, LLC
OSC and Gig Performer
Note that our Lemur template has been designed for general use, while the TouchOSC
template has been designed specifically for guitarists (an instructional video about using the
Lemur template can be found here, and an instructional video about using the TouchOSC
template can be found here). Both templates display the currently selected rackspace and
variation prominently; the Lemur template also displays the caption of a text label in the
"Songnotes" field.
If you would like to experiment with either template, relaunch Gig Performer and then touch
the Tuner On/Off button in the template. Gig Performer should immediately open the Tuner
(if for some reason the Tuner On/Off button doesn't work, double-check the communication
between the device running your OSC app and the computer running Gig Performer).
In Lemur, if you have a microphone or instrument connected to one or more inputs of your
audio interface, the virtual dial to the left of the Tuner On/Off button will move and the note
number to the left of that knob will change to reflect the note coming in on the channel(s)
Gig Performer is currently "listening" to. In TouchOSC, the box at top center will display the
note coming in, and the slider below it will show the tuning offset in cents, with the center
position indicating that you are exactly in tune.
Touch the Tuner On/Off button again to return Gig Performer to Panel View. If you are using
Lemur, touch the "Tap" button presented by the template several times. You should see the
Tempo display in the upper-right hand corner of Gig Performer's screen change the BPM
value as you do so; the shorter the intervals between taps, the higher (faster) the BPM
value.

237
Gig Performer 4.x User Manual © 2016 - 2021 Deskew Technologies, LLC
OSC and Gig Performer
Note: give your widgets the appropriate OSC names. One of the requirements of OSC is that
each object in both the host computer and remote device must have matching unique case-
sensitive names. You can make up any names you like, as long as they are comprised of
ASCII characters only, with no spaces. If you are running Lemur or TouchOSC, here are the
OSC names used in the templates we have created:
Object Lemur template TouchOSC template
Rotary knobs(Reverb and WahWah inTouchOSC template)
"Knob1" through “Knob 10” "knob1" and "knob2"
Sliders / drawbars "Slider1" through "Slider10" (none)
Buttons(Reverb, Delay, WahWah inTouchOSC template)
"Button1" through "Button10"
"button1", "button2" and"button3" respectively
Text label caption "Songnotes" (none)
To use the templates, simply put Gig Performer into Edit mode, select a widget, and in the
Widget Properties inspector, enable the Enable OSC option, enter one of the OSC names in
the "Name" field, then press Enter (this is important):
For example, if you are using the Lemur template, add a knob widget and name it "Knob1"; if
you are using the TouchOSC template, name the knob widget "knob1".
Then take Gig Performer out of edit mode and move the knob widget with your mouse. As
you do so, the identically named knob in the Lemur or TouchOSC screen changes the same
way. Because OSC is bi-directional (meaning that changes can be made in either the device
running the OSC app or the host computer running the target software - in this case, Gig
Performer), the opposite occurs too: You can move the onscreen knob in Lemur or TouchOSC
and the knob widget in Gig Performer changes the same way.

238
Gig Performer 4.x User Manual © 2016 - 2021 Deskew Technologies, LLC
OSC and Gig Performer
Do the same with a switch or LED button widget, changing its OSC name to Button1 (for use
with the Lemur template) or button1 (for use with the TouchOSC template). Exit Edit mode
and test to make sure that touching the corresponding button in your tablet or smartphone
turns the associated Gig Performer widget on or off, and vice versa.
To use OSC in rackspaces, make your existing rackspaces OSC-compatible. It's easy to make
any rackspace OSC-compatible: all you have to do is assign OSC names to your widgets that
match the names being used in the environments you create in your OSC app editor. For
example, load any of the templates while starting Gig Performer, then open the Edit mode,
and select each widget in turn. The only change you have to make to each is in the "Name"
field in the Properties area of the inspector and checking the Enable OSC box below it; all
MIDI device and plugin parameters remain the same. The only difference is that you can now
move these widgets remotely from the tablet or smartphone running your OSC app, and vice
versa (i.e. any widget adjustments you make from your laptop or from a connected MIDI
controller are reflected in the tablet/smartphone screen).
Please note that this only scratches the surface of what can be accomplished when using an
OSC app with Gig Performer. Again, the Lemur and TouchOSC templates provided on our
website make good jumping-off points towards constructing your own custom OSC
environments. Consult the documentation of your OSC app for more information.
13.3 Communication Between Lemur and Gig Performer
The first step is to provide Lemur and Gig Performer with the contact information of each
other. The contact information consists of two parts: the IP address of the device and the
port number to which the application is listening for messages. When configured properly
the communication can be established.
Important note: Deskew Technologies cannot provide support for either the Lemur
application or wireless communications in general. However, we offer the information below
to try and facilitate Gig Performer users getting the two applications working together.
1. In Gig Performer, choose the Options -> OSC Setup command. The OSC Options open.
2. The IP address of the computer running Gig Performer is shown in the Gig Performer IP
address display. The port to which Gig Performer is listening for OSC messages is
shown in the Gig Performer listening port field.
3. In the Lemur app, open the Settings menu and choose the More Settings… command.
4. In the OSC Targets area, enter the IP address of the computer running Gig Performer
into the Host field, and the port in the Port field.

239
Gig Performer 4.x User Manual © 2016 - 2021 Deskew Technologies, LLC
OSC and Gig Performer
5. The Lemur IP display shows the IP address of the device running Lemur. The right-most
segment, after the colon (":") is the port. Enter this into the Remote client IP address
field in the OSC Options in Gig Performer.
6. Enter the port portion of the Lemur IP display into the Remote client port field.
7. Turn on the Use augmented Lemur messages toggle button in the OSC Options. This
enables Gig Performer to send more detailed OSC messages, which Lemur can handle
(turn it off when using Gig Performer with TouchOSC or other more basic OSC
applications).
8. For the most reliable communications, launch Lemur first, then launch Gig Performer.

240
Gig Performer 4.x User Manual © 2016 - 2021 Deskew Technologies, LLC
Multi-instance support
14 Multi-instance support
In previous versions of Gig Performer, you needed to explicitly enable multi-instance support
by clicking at the corresponding checkbox in Options. In Gig Performer 4, multi-instance
support is always enabled.
Multi-instance support means that you can run Gig Performer multiple times in the same
computer, with each such "instance" operating independently.
This has many different practical applications. For example, each band member can have the
ability to change the rackspace affecting their particular instrument without changing the
rackspaces affecting different instruments; they can even use separate MIDI controllers or
pedal-boards to do so.
There are also many advanced usages: for example, you can use a MIDI In plugin to send
program change messages from one instance to another so that one instance can be used to
change the rackspace in another instance.
The number of instances you will be able to successfully have open at any one time is
dependent upon your system's RAM and CPU resources. Each instance can access entirely
different plugins and MIDI In blocks. Separate instances can also access different audio
interfaces.
Instances are managed through the File menu, where you can create new instances, and
open or delete existing instances:
Creating another instance of Gig Performer is easy. Just select File -> Create New
Instance... type in a name, e.g. Guitar, and you are all set:

241
Gig Performer 4.x User Manual © 2016 - 2021 Deskew Technologies, LLC
Multi-instance support
Note: do not open the same instance twice as both opened instances will respond to the
same MIDI and OSC commands and changing any settings in one of the instances will
change it for both, but only one will get the change immediately.
If you want to use two or more instances with the same audio interface, make sure to set the
same sample rate in Audio Options as one of the instances will have a sound that's slightly
out of tune and will sound incorrect.
Note: some Windows ASIO drivers still allow only one application to use the audio interface
at a time; these are known as single-client drivers. Multi-client audio drivers started coming
out years ago, but, there are still many single-client drivers in place. Two instances of Gig
Performer count as two applications, which is a problem when running on a single-client
driver. Read this blog article to find out how to run multiple instances of Gig Performer with
a single-client ASIO driver on Windows.

242
Gig Performer 4.x User Manual © 2016 - 2021 Deskew Technologies, LLC
Latency measurement tool
15 Latency measurement tool
One of the factors that impacts your overall latency is the additional latency introduced by
your audio interface. Not all audio interfaces are created equal. Some have low internal
latency for both A/D and D/A conversions while others add more latency than perhaps you
might like, so you have to lower your buffer size to get the overall desired latency.
To find out how much extra latency your interface introduces - you can use the built-in
Latency Measurement Tool. Click Window -> Measure Device Latency... to measure actual
round-trip latency:
To measure, follow these steps:
1. Mute your speakers or turn them all the way down.
2. Connect a physical patch cable from any output from your audio interface to input 1 of
the interface.
3. Click the Measure Latency Now button.
4. The result will appear in the Measured round-trip latency display.

243
Gig Performer 4.x User Manual © 2016 - 2021 Deskew Technologies, LLC
Latency measurement tool
Note: make sure you do not use any plugins, and that your input signal is not too low.
Find out more about latency, sample rate and buffer size in our free e-book The Ultimate
Guide to Optimize your Windows PC for the Stage.

244
Gig Performer 4.x User Manual © 2016 - 2021 Deskew Technologies, LLC
Options and preferences
16 Options and preferences
In this chapter you will learn about all the options and preferences that you can adjust in Gig
Performer. To open Options, simply click on the Options menu and select the desired menu
item:
Selecting any menu item will open the Options window where you can also navigate through
tabs to configure different options. Refer to the following subchapters for more information.
After you configure Gig Performer options and preferences to your taste, you can export
them to a gpsettings file. Simply click on the Export All Options... menu item and save your
gpsettings file; you can later import that file to any Gig Performer installation by clicking on
the Import All Options.. menu item and selecting the previously saved gpsettings file.
Note: a gpsettings file stores not only all settings in the Options screens, but also all global
settings including global MIDI assignments, and the entire Rig Manager setup.
16.1 General
The General tab appears when the General menu item is chosen in the Options menu, or
when its keyboard shortcut is used (Ctrl + , on Windows or Cmd + , on Mac):

245
Gig Performer 4.x User Manual © 2016 - 2021 Deskew Technologies, LLC
Options and preferences
Scan for new/changed plugins on startup - when enabled, Gig Performer will check for
new or updated plugins every time it starts. The best practice is to leave this enabled unless
you're certain that your plugins have not been updated since you last used Gig Performer. If
you're wondering why your latest plugin or update has not shown up in the plugin list, not
scanning for plugins is the most probable cause (see the Troubleshooting chapter for more
information).
Initial view - clicking on this drop-down list enables you to select the default view that
shows up when you start Gig Performer. The Last Viewed menu item is the default (the other
possibilities are the Panels view, the Wiring view, or the Setlists view).

246
Gig Performer 4.x User Manual © 2016 - 2021 Deskew Technologies, LLC
Options and preferences
Reload the last gig on startup - when enabled, Gig Performer will automatically load the
last gig file that was used; you can also choose whether you want to open to the last active
rackspace (default) or - if disabled - to load the first rackspace. Note: you can temporarily
prevent Gig Performer from loading the last gig file by holding down the Shift key while
starting Gig Performer and turning off the Load last gig file toggle button (click here for more
information).
Check for updates automatically - unless you're actually on tour, it's recommended that
you keep this option enabled so that you are informed of new updates. Note: updating any
critical software while on tour or otherwise engaged in a production project is strongly
discouraged until you have time to thoroughly test the update to ensure that it is functioning
correctly. That applies not only to Gig Performer, but to any plugin and even other
applications or operating system updates. We recommend that you do not update anything
on your computer within 3 weeks of a show so that you have time to address any issues
without stress.
Check Now - click on this button to manually check for updates. Note: this requires an
Internet connection.
Master trim level on startup - the master trim is normally reset to 0db when you start Gig
Performer. You can change that initial startup value by adjusting this slider.
Predictive loading - turn on this toggle button to activate the Predictive loading feature.
Check the Predictive loading chapter to learn more.
Limit to maximum of - this field appears when the Predictive loading feature is enabled.
Check the Predictive loading chapter to learn more.
Sync Start/Stop with Ableton Link - synchronizes start/stop with Ableton Link.
Auto-assign a permanent PC number to new rackspaces (first variation) - enable this
option to auto-assign a new PC number to the first variation when creating a new rackspace.
Quit without saving - enable this if you want to quit Gig Performer without prompting you
to save any changes. This can be useful if you're running Gig Performer on a headless
computer and just need it to shut down automatically at the end of a show.
No error reports - enable this if you don't want to send error reports to Gig Performer
development team (not recommended). If you enable this toggle button, restart Gig
Performer for changes to take effect.
Metronome - this complete section is covered in more detail in the Audio metronome
chapter.

247
Gig Performer 4.x User Manual © 2016 - 2021 Deskew Technologies, LLC
Options and preferences
16.2 Display
The Display tab appears when the Display menu item is chosen in the Options menu:
Show plugin editor when inserted - when checked, the plugin editor window will open
automatically whenever a plugin is inserted. Disable this feature if you prefer to insert and
route your plugin blocks first and edit them all later.
Keep plugin windows on top - when enabled, open plugin window editors always appear
on top of other windows.
Show information on plugin hover - when enabled, moving the mouse over blocks in the
Wiring view will cause a pop-up tooltip to appear with the information about the plugin.
Show template dialog on new gig - by default, when you create a new gig, the template
dialog pops up. Turn this option off if you don't want to use the built-in templates.
Maximum number of audio channels to display in blocks - this option prevents plugins
from showing more than a specified number of audio channels. Some plugins have a large

248
Gig Performer 4.x User Manual © 2016 - 2021 Deskew Technologies, LLC
Options and preferences
number of audio channels, most of which may never be used, making their blocks unwieldy
to view and causing them to take up a lot of horizontal space in the Wiring View. Note that
the value entered here does not apply to the audio interface Audio In and Audio Out blocks.
You can also configure the maximum number of audio channels available on individually
inserted plugins (check this chapter to learn more).
Touch friendly number editing - if you run Gig Performer on a device such as Microsoft
Surface, you may want to activate this option as it shows a large key pad for some dialogs
and allows you to enter the desired values easier with your finger.
Always start in full screen mode - enable this option if you want to always start Gig
Performer in full screen mode. Press the Esc key or use the key combination Ctrl+Alt+F (or
Cmd+Option+F on Mac) to exit the full screen mode.
Hide all tooltips - when you move your mouse over some item (a button, a slider, or an
option, for example), a little tooltip window will pop up to explain the purpose of that item.
Once you become well acquainted with Gig Performer or if you find pop-up tooltips to be
annoying, you can choose to prevent them from being displayed by checking this box. Note:
all tooltips are hidden except the one that shows up when you hover over the plugin block in
the Wiring view and which can be disabled separately (see Show information on plugin
hover).
Show hints at startup - enabled by default, every time you create a new gig a hint dialog
pops up. You can browse through many useful hints and tips in that dialog. Turn off this
toggle button to disable showing hints at startup.
Show parameter numbers in widget parameter selection list - by default, when you view
a plugin parameter list you see only the names of the parameters. If you enable this toggle
button, then each parameter name is displayed prefixed with its unique parameter number.
This can be useful if you need to control parameters from GPScript or OSC. In both of these
cases, parameter numbers rather than names are used:

249
Gig Performer 4.x User Manual © 2016 - 2021 Deskew Technologies, LLC
Options and preferences
Always show widget groups - when you gang multiple widgets together, the widget group
to which they belong (lettered A through Z) is displayed on the top left of the widget while
editing. If you would like that widget group name to stay on while not editing, enable this
option.
Reset all warnings - clicking this button will reset all "Don't show again" warnings in various
dialogs.
Graphics engine - clicking on this dropdown menu allows you to select the graphics library
that Gig Performer uses for its displays. Options are different for Windows (on the left) and
Mac OS X (on the right):
· Software Renderer - this choice means that Gig Performer uses your computer's CPU
to render the display without the help of any graphics library optimizations. Windows
users without high-performance graphics in their machines will likely get the best
results with this setting.
· CoreGraphics Renderer - Mac OS X uses its CoreGraphics engine to render the display.
Most Mac users will use this setting.
· OpenGL Renderer - on systems with high-performance graphics capabilities, OpenGL
may provide better visual quality, as such cards are often optimized to run OpenGL.
Mac users will likely never need to change this setting from CoreGraphics Renderer;
depending on the graphics card in their machine, Windows users may find that OpenGL
Renderer delivers better quality than Software Renderer.
16.3 Audio I/O
The Audio I/O tab appears when the Audio setup menu item is chosen in the Options menu;
this window is slightly different for Windows and MacOS:
Windows:

250
Gig Performer 4.x User Manual © 2016 - 2021 Deskew Technologies, LLC
Options and preferences
MacOS:

251
Gig Performer 4.x User Manual © 2016 - 2021 Deskew Technologies, LLC
Options and preferences
On MacOS you can separately select the input and output device and there is no device type
selector as there is always just one type (Core Audio); on Windows, the audio device type
selector is included and one device must be used for both input and output.
Audio device type - for best results on Windows, make sure that you always select ASIO
driver.
Device - this drop-down menu allows you to select one of the connected audio interfaces or
an aggregate device (consisting of multiple interfaces) such as ASIO4ALL or ASIO Link Pro (if
installed). On Mac this section is split into Input Device and Output Device (any aggregate
devices created in the Audio MIDI Setup utility will appear here as options as well).
Active input channels/Active output channels - determines how many input and output
channels are to be made available to Gig Performer. If you are using an audio interface with
many channels, you may not want to access them all. For example, you may have an

252
Gig Performer 4.x User Manual © 2016 - 2021 Deskew Technologies, LLC
Options and preferences
interface with 8 analog output channels and another 16 Lightpipe (ADAT optical) channels
that you're not using. So instead of displaying audio IN/OUT blocks with 24 or more
channels, you can disable the ones you don't need by unchecking them in the list.
Sample rate - the sample rate determines the quality of the audio signal. Typical values in
the live world are 44.1kHz and 48kHz. Note that there is a tradeoff between higher sample
rates, latency and CPU utilization. To view our website article about audio latency, buffer
size, and sample rate, click here.
Audio buffer size - the buffer size determines how often samples are actually processed.
The smaller the buffer size (or the higher the sample rate), the lower (better) the latency but
at the cost of higher CPU utilization. Depending on your plugins and your computer, you may
need to find a compromise that gives you the best tradeoff between CPU utilization and
latency. If you start using too many CPU cycles, you will begin to hear clicks and other noise
in the output. To view our website article about audio latency, buffer size, and sample rate,
click here.
Apply settings - this button will appear if you make any changes to the parameters in this
dialog. Click on it to accept the changes, or simply close the Options dialog to maintain the
current settings.
Note: changing the audio input or output device requires all plugins to be reset and so will
cause your entire gig file to be reloaded immediately. Further, some plugins don't properly
handle having their sample rate or buffer size changed after they have been loaded and may
crash. Therefore, we recommend that you make such changes using an empty gig file. If you
are changing your audio configuration (device, sample rate, buffer size, etc.), it can be useful
to start Gig Performer with the Shift key held down, which opens the Temporary Startup
Options dialog. Turning off the Load last gig file toggle button temporarily prevents Gig
Performer from loading your previous gig file (this applies if the Reload last gig on startup
option is enabled in the General Options).
16.4 Global MIDI
The Global MIDI tab appears when the Global MIDI menu item is chosen in the Options
menu:

253
Gig Performer 4.x User Manual © 2016 - 2021 Deskew Technologies, LLC
Options and preferences
The Global MIDI Assignments section of this dialog is where Gig Performer can learn (or you
can manually create/edit) MIDI messages, either from a continuous controller or a
momentary switch (in which case you'll normally need to click on the accompanying
"Momentary" button so that it is enabled) to accomplish the following actions:
Next Variation/Song Part - moves to the next variation/song part in the current rackspace
(or to the first variation of the next rackspace if you are at the last variation of the current
rackspace and the "Previous/Next variation stays within rackspace" toggle button is
disabled).
Previous Variation/Song Part - moves to the previous variation/song part in the current
rackspace (or to the last variation of the previous rackspace if you are at the first variation of
the current rackspace and the "Previous/Next variation stays within rackspace" toggle button
is disabled).

254
Gig Performer 4.x User Manual © 2016 - 2021 Deskew Technologies, LLC
Options and preferences
Tuner - toggles the Tuner view.
Tap Tempo - Gig Performer can receive taps from a pedal or button on a connected MIDI
controller and use that information to set the tempo of delay, echo, or looping plugins so
that they can be synced to the tempo in which you are playing. To enter Tap Tempo, click on
the Learn MIDI for selected item button and tap on the button or pedal you want to use for
setting tempo (you will most likely need to enable the Momentary option as well).
Once you start tapping, the BPM display at the main toolbar will display the current tempo
that has been detected. All plugins that respond to the global tempo will now synchronize to
this tempo (it may be necessary to enable "sync" to external tempo on individual plugins.
Please check your plugin documentation for more information). Note: the tempo used by
connected plugins is always the global tempo unless it has been overridden by individual
rackspaces or songs.
Play/Stop - starts or stops the global playhead. This will typically start or stop playback of
audio files from the supplied Audio File Player plugin or from a third-party media player
plugin.
Panic - generates "All Notes Off" messages on all MIDI channels, along with a Sustain Off
message and a Center PitchBend message, thus stopping stuck notes in their tracks. This
performs the same action as clicking on the MIDI panic button in the upper right-hand corner
of the screen.
Master Trim - Gig Performer's master trim can be remotely controlled by a MIDI controller
by clicking the Learn MIDI for selected item button and moving the physical control. Note:
when controlling the Master Trim remotely, you cannot raise the value higher than 0dB.
Variation Direct Access - Direct access allows you to use a slider or knob to switch between
variations in a rackspace. If you had a pedalboard with five MIDI switches, each switch
would be set to the same channel and controller number, but assigned a different control
value. This value would select a variation in a rackspace, so if the five pedals were assigned
values of 0, 1, 2, 3, and 4, they would recall the first five variations. This is a legacy feature
and it's generally better to use setlist mode and song parts.
Previous Rackspace/Song - moves to the previous rackspace/song. This function is useful
when you wish only to move between rackspaces, not between variations in a rackspace.
Next Rackspace/Song - moves to the next rackspace/song. This function is useful when you
wish only to move between rackspaces, not between variations in a rackspace.
Note: double-clicking a MIDI assignment puts that assignment in the Learn mode (you'll
notice that the Learn MIDI for selected item button turns red). Double-clicking a MIDI
assignment while holding the Shift key (or clicking the Edit button) opens the Edit MIDI

255
Gig Performer 4.x User Manual © 2016 - 2021 Deskew Technologies, LLC
Options and preferences
message dialog where you can manually select the desired device and the desired MIDI
message.
The only CC messages that cannot be learned by Gig Performer are CC 0 and CC 32 as these
two messages are reserved for bank selection.
Other options:
Previous/Next variation stays within rackspace - if this option is enabled, previous/next
messages are restricted to the current rackspace.
Clear selected - clicking on this button clears the selected MIDI assignment. Note: Holding
the Shift key down while clicking on the Learn MIDI for selected item button also clears
the selected MIDI assignment.
Clear all - clicking on this button clears all learned MIDI assignments.
The Program Change Control section of this dialog provides for the following options:
Accept Program Change Messages from any Device - determines whether Gig Performer
should respond to MIDI program change messages from all external devices, or only from
specific external devices.
Pass unused PC messages - when enabled, unused MIDI program change messages will be
passed onto the active rackspace. By unused we mean that a particular program change
message has not been associated with any rackspace or song part in Gig Performer. An
unused PC message passed on to the rackspace is passed on to the MIDI In blocks as any
other message. So any OMNI MIDI In blocks or MIDI In blocks for the device that generated
the PC message will all receive the PC message and can pass it on to any plugins connected
to them. If you are having trouble getting a particular program change message to arrive at a
plugin, make sure that message is not already associated.
Use zero-based PC numbers - causes Gig Performer to display program change message
numbers in the range 0-127 instead of 1-128.
Ignore bank switch commands - enabling this toggle button causes Gig Performer to ignore
incoming MIDI program bank switch messages; note that also "and map to banks # MSB #
LSB" shows up, enabling you to manually select the specified bank numbers that should
always be used.
Only accept program change messages on specific channel - Gig Performer can change
variations, rackspaces, and even instances in response to incoming MIDI program change

256
Gig Performer 4.x User Manual © 2016 - 2021 Deskew Technologies, LLC
Options and preferences
messages. Enabling this toggle button limits Gig Performer to responding only to program
change messages using the channel specified in the box.
MIDI Song select to PC - enable this toggle button if you want to interpret incoming MIDI
song select messages as program change messages; note that also "and use MIDI channel
#" shows up, enabling you to manually select the MIDI channel that you want to use when
converting song select messages. This is because MIDI song select messages do not have
channel numbers. This conversion is done at a very low level for efficiency purposes and so
be aware that when this option is enabled, the Global MIDI Monitor will see incoming song
select messages as program changes and display them as such.
Note: mappings to physical controllers made in the Widget Properties inspector override
Global MIDI Assignments.
16.5 Setlists
The Setlist tab appears when the Setlists/Songs menu item is chosen in the Options menu:

257
Gig Performer 4.x User Manual © 2016 - 2021 Deskew Technologies, LLC
Options and preferences
Song parts per row - choose a value (between 3 and 8) from the drop-down menu to set the
number of tiles per row in the song part bar (see the Setlist view chapter for more
information).
Number of rows - choose a value (between 1 and 3) from the drop-down menu to set the
number of rows of tiles in the song part bar.
Invert rows - flips the vertical order of the rows of tiles in the song part bar; instead of 1-2-
3, when this toggle button is enabled the bar shows the rows 3-2-1.
Default parts - a semicolon or comma-separated list of song part names that will be added
automatically when a new song is created. If no names are defined here, a single part called
"Part 1" will appear instead.

258
Gig Performer 4.x User Manual © 2016 - 2021 Deskew Technologies, LLC
Options and preferences
Learn MIDI for selected item button - setlist operations (i.e. Next Song or Next Song Part)
in the MIDI list can be mapped to MIDI controllers. Select the item in the list, then click on
this button, and use the MIDI controller you want mapped to it. Clicking on this button while
holding the Shift key clears the selected assignment.
Momentary button - if the physical control you are mapping is a momentary switch (rather
than a latching/toggle switch), click on this button.
Setlist operation --> MIDI controls list - this list shows setlist operations that can be
externally controlled and the MIDI events they are mapped to. To map a control, select it in
the list and click the Learn MIDI for selected item button. Double-clicking a setlist
operation activates the Learn mode; Double-clicking a setlist operation while holding the
Shift key (or clicking on the Edit button) opens the Edit MIDI message dialog where you can
manually select the desired device and the desired MIDI message.
Clear Selected button - clicking this button removes the MIDI mapping from a selected
setlist operation.
Clear All button - clicking this button removes MIDI mappings from all setlist operations.
Next/Prev song part stays within song - with this toggle button is enabled, the MIDI
controller assigned to Next and Previous operations will never move to a different song.
When the first song part in a song is reached, the Previous operation has no further effect;
when the last song part is reached, the Next operation has no further effect. Note: this
checkbox has no effect when using arrow keys on the computer keyboard to move between
song parts; they will still move to the next or previous song.
PC and Next/Previous MIDI assignments switches to setlist view automatically - when
this toggle button is enabled, any incoming MIDI program change (PC) messages or
Next/Previous Song Part or Song commands cause Gig Performer to switch to Setlist view
immediately. Note: enabling this option will prevent you from switching your rackspaces
directly using MIDI controllers; if such a MIDI message arrives - Gig Performer will switch to
the Setlist view automatically.
MIDI Out Device and Channel - these settings define a single MIDI Output device to where
program change messages are sent on song changes. Choose a MIDI device from the drop-
down menu and a corresponding Channel from its drop-down menu. If you need to send
multiple MIDI messages to different physical devices or to plugins via any MIDI In block
when you select a song part, you can do this from the Song Part Properties dialog.
Root folder - this field holds the path to the default ChordPro file folder (root folder) for Gig
Performer. The Chords/Lyrics editor can only open ChordPro files located in this folder.

259
Gig Performer 4.x User Manual © 2016 - 2021 Deskew Technologies, LLC
Options and preferences
"…" button - opens a dialog for locating the folder you want to designate as the root folder.
Refer to the ChordPro chapter for more information.
16.6 Recording
The Recording tab appears when the Recording menu item is chosen in the Options menu:
Details on this dialog are in the Recorder chapter.
16.7 MIDI Ports
The MIDI Ports tab appears when the MIDI Ports menu item is chosen in the Options menu:

260
Gig Performer 4.x User Manual © 2016 - 2021 Deskew Technologies, LLC
Options and preferences
Normally, Gig Performer will open all MIDI input and output ports automatically. On OS X this
is never an issue. However, many Windows MIDI drivers do not allow multiple applications
(and that includes multiple instances of Gig Performer if enabled) to access the same MIDI
port. If you need to run some other application that needs access to a MIDI port, you will
need to disable that port in Gig Performer so that it can be opened by the other application.
This also applies to special plugins inserted into Gig Performer which themselves need to
open a MIDI port to communicate with some specialized hardware.
In the MIDI Input Ports and MIDI Output Ports sections, simply uncheck the port or ports that
you do not want Gig Performer to use. Normally, you would uncheck both the Input and

261
Gig Performer 4.x User Manual © 2016 - 2021 Deskew Technologies, LLC
Options and preferences
Output ports but there may be special cases where you want to allow communication in one
direction.
16.8 OSC
The OSC tab appears when the OSC Setup menu item is chosen in the Options menu:
Enable OSC - click on this toggle button to turn on the OSC functionality.
Remote client IP address - the address of the remote device that is running an OSC
application.
Remote client port - the port on the remote device that is listening for OSC messages over
UDP (User Datagram Protocol).
Gig Performer IP address - the address of the computer on which is Gig Performer running.
Configure your remote device to use this IP address to connect to Gig Performer.

262
Gig Performer 4.x User Manual © 2016 - 2021 Deskew Technologies, LLC
Options and preferences
Gig Performer listening port - the port on which Gig Performer is listening for incoming OSC
messages over UDP (User Datagram Protocol). Note: while listening port in Gig Performer v3
was permanently set to 54344, in Gig Performer v4 you can change this port.
Use Lemur augmented OSC messages - if you are using Lemur or another OSC application
that supports scripting, enable this option to cause Gig Performer to transmit parameterized
OSC messages. Disable this option if you are using TouchOSC or other applications that are
not programmable.
Show MIDI In OSC Patchbay - the idea behind this concept is to leverage applications like
MaxMSP to modify incoming MIDI events. So, if the patchbay is enabled, an incoming MIDI
message will not be sent out. Instead, it will be wrapped as an OSC message and sent to
some remote listener (like MaxMSP, Ableton, or other OSC supporting application). A remote
listener application could then examine the incoming message, modify it and/or create new
MIDI messages, which would then be wrapped up in OSC and sent back to the MIDI In Block
patchbay in Gig Performer which would then extract the MIDI from the OSC wrapper and
send it on. Unless you have experience using and configuring OSC in other applications, you
should not enable this feature as misconfiguration will cause incoming MIDI events to get
lost.
Show Widget Direct Addressable OSC - widget direct OSC enables support for the
individual OSC devices which are bound to the specific IP address/port that can be set up for
each widget. Refer to the Widget Properties inspector chapter for more details.
16.9 Scripting
The Scripting tab appears when the Scripting menu item is chosen in the Options menu:

263
Gig Performer 4.x User Manual © 2016 - 2021 Deskew Technologies, LLC
Options and preferences
Prefix log entries with rackspace name - enabling this toggle button causes messages in
the Script Logger window to be identified by the rackspace that generated them. Since there
is only one log window for all rackspace scripts, troubleshooting is greatly aided when the
log is formatted this way.
Ignore script errors when loading gig files - normally, attempting to load a rackspace that
has an invalid script triggers a warning dialog. Checking this option removes this warning.
CAUTION: this is an expert function. Enabling this toggle button is not recommended unless
you know exactly what you're doing, as a rackspace with a broken script may behave in
unexpected ways or fail to work at all.
Open editor at current mouse position - clicking on this toggle button centers the window
of a script editor or the logger over the current mouse position when you open them (either
by clicking the corresponding menu items or using their key combinations).
These menu items are related to script editing:
File - Open Script From File (available when a Script Editor is opened)
File - Open Recent Script File
File - Script to File
Edit - Show Script Helper
Window - Show Rackspace Script Editor
Window - Show Song Script Editor
Window - Show Gig Script Editor
Window - Show Script Logger

264
Gig Performer 4.x User Manual © 2016 - 2021 Deskew Technologies, LLC
Options and preferences
Gig Performer uses a language called GPScript which was explicitly designed for Gig
Performer. Refer to the GPScript chapter for more information.
16.10 Extensions
The Extensions tab appears when the Extensions menu item is chosen in the Options menu:
This window allows you to easily enable or disable extensions for your devices.
Refer to the Extensions chapter for more information.

265
Gig Performer 4.x User Manual © 2016 - 2021 Deskew Technologies, LLC
Keyboard shortcuts
17 Keyboard shortcuts
In this chapter find out more about keyboard shortcuts that you can use in Gig Performer.
Besides the common keyboard shortcuts such as Ctrl+C, V, D (Cmd+C, V, D on Mac) for copy,
paste, and duplicate respectively (works for plugins, panels, and widgets), check other
useful shortcuts in the tables below.
File management
Mac OS X Windows Function
Cmd+O Ctrl+O Opens a .gig file
Cmd+S Ctrl+S Saves the current .gig file
Shift+Cmd+S Ctrl+Shift+SSaves the current work to a.gig file with a new name
Shift+Cmd+I Ctrl+Shift+IImports a single rackspacefrom a file
Shift+Cmd+E Ctrl+Shift+EExports the current rackspaceto a file
Screen management
Mac OS X Windows Function
Cmd+T Ctrl+TCycles between the Panelsand Wiring views
Cmd+E Ctrl+EToggles Panels view/Panelsview Edit mode
Cmd+Shift+L Ctrl+Shift+L Activates the Setlist view
Cmd+Option+F Ctrl+Alt+F Toggles Full Screen
Cmd+, Ctrl+, Opens the General Optionsdialog
Rackspace management
Mac OS X Windows Function
Shift+Cmd+N Ctrl+Shift+N Adds a new rackspace

266
Gig Performer 4.x User Manual © 2016 - 2021 Deskew Technologies, LLC
Keyboard shortcuts
Shift+Cmd+D Ctrl+Shift+DDuplicates the selectedrackspace
Shift+Cmd+Backspace Ctrl+Shift+BackspaceDeletes the selectedrackspace
Shift+Cmd+E Ctrl+Shift+EExports the selectedrackspace
Cmd+N Ctrl+NAdds a new variation to theselected rackspace
Cmd+Backspace Ctrl+BackspaceDeletes the selectedvariation
Cmd+J Ctrl+JOpens the QuickRackspace/Variation Finder
Cmd+G Ctrl+GShows/Hides the Globalrackspace
Wiring and plugin management
Mac OS X Windows Function
Cmd+P Ctrl+P
Opens the Quick PluginFinder(Gig Performer will switch tothe Wiring Viewautomatically if you arecurrently in the Panels View)
Shift+I Shift+IZooms in the Wiring viewsurface
Shift+O Shift+OZooms out the Wiring viewsurface
Shift+F Shift+F Zooms blocks to fit
Cmd+Shift+F Ctrl+Shift+F Fit blocks to the current view
Song/Setlist management
Mac OS X Windows Function

267
Gig Performer 4.x User Manual © 2016 - 2021 Deskew Technologies, LLC
Keyboard shortcuts
Shift+Cmd+N Ctrl+Shift+N Adds a new song
Shift+Cmd+D Ctrl+Shift+D Duplicates the selected song
Shift+Cmd+Backspace Ctrl+Shift+Backspace Removes the selected song
Cmd+L Ctrl+LLocks/unlocks the selectedsong
Cmd+N Ctrl+NAdds a new song part to theselected song
Cmd+D Ctrl+DDuplicates the selected songpart
Cmd+Backspace Ctrl+BackspaceRemoves the selected songpart
Cmd+J Ctrl+JOpens a dialog that allowsyou to assign arackspace/variation
Cmd+F Ctrl+F Opens the Quick Song Finder
Shift+Cmd+F Cmd+Shift+FOpens a dialog that allowsyou to add song(s) to thecurrent setlist
Gig Performer Window Management
Mac OS X Windows Function
Cmd+Shift+P Ctrl+Shift+P Opens the Plugin Manager
Cmd+R Ctrl+R Opens the Rig Manager
Cmd+M Ctrl+MOpens the Global MIDIMonitor
Cmd+H Ctrl+HOpens the Song Lyrics/ChordEditor

268
Gig Performer 4.x User Manual © 2016 - 2021 Deskew Technologies, LLC
GPScript
18 GPScript
Most users will find everything they need in Gig Performer's extensive feature set, but there
are always some users that require sophisticated custom functions that go beyond Gig
Performer's main feature set. For those users, we have created a proprietary programming
language called GPScript. GPScript enables you to perform incredible transformations and
perform complex tasks. While any language takes some understanding of programming,
GPScript is written to be accessible. If you can program spreadsheet macros or in a language
such as VBA, you are likely to be comfortable with GPScript.
GPScript can now be used to implement your own MIDI processing plugin filters using the
new Scriptlet plugin in Gig Performer 4. While it has always been possible to create scripts
for individual rackspaces, you can now create scripts at the song level and at the gig level.
The Gig level script has some powerful features for efficiently rerouting incoming MIDI
events, creating system wide keyboard macro shortcuts and for sending commands out to
hardware when songs or rackspaces change.
Because GPScript will not be needed by most people and requires substantial documentation
of its own, we will not cover it in this manual in great detail. However, if you are interested,
check out this simple example to get started: How to control multiple parameters with a
single widget.
Additionally, you can find an introduction to the GPScript language in this blog entry: The
GPScript programming language.
GPScript documentation can be found here (also accessible via the Help menu->
Documentation):
- System function list
- Language manual
For discussion of GPScript and help getting it to do what you need, check out the GPScript
section in the Gig Performer Community.
18.1 How to control multiple parameters with a single widget?
In Gig Performer, you can control multiple plugin parameters simultaneously:
- using widget groups,
- by assigning the same MIDI control to multiple widgets,
- using GPScript to control any number of parameters with a single widget.

269
Gig Performer 4.x User Manual © 2016 - 2021 Deskew Technologies, LLC
GPScript
In this chapter, we'll focus on a simple script that will allow you to control multiple
parameters with a single widget.
Start Gig Performer and create a new empty gig. First, click on the Wiring view and create a
simple layout. In this example, besides built-in plugins we are using two plugins - Nick Crow
8505 and OrilRiver:
Refer to this blog article for more information on how to get these plugins, insert them and
connect them.
Let's say that you want to control two parameters with a single widget: one parameter from
the NickCrow plugin and the second parameter from the OrilRiver plugin. To use a plugin in
scripting, you need to define a GPScript handle for it. Right click on the NickCrow plugin to
open its contextual menu, then expand OSC/GPScript Handle and select Set Handle... :

270
Gig Performer 4.x User Manual © 2016 - 2021 Deskew Technologies, LLC
GPScript
Type in a GPScript handle name (i.e. Nick) and check the Use in GPScript check box. Repeat
the same steps for the OrilRiver plugin and set a handle name (i.e. Oril) and check the Use
in GPScript check box. Now your layout looks like this:
The next step is to insert a widget and assign it a GPScript name so you can use it in
scripting. Open the Panels View in Edit mode and insert the Plastic Blue Knob onto the panel
(refer to this chapter for more information):
In the Widget Properties inspector, click on the Advanced tab and enter a GPScript name for
this widget (i.e. Knob1).
The last information you need is a parameter number that you want to control with this
widget. Click on the Wiring View and double-click on the Nick Crow plugin to open its plugin
editor:

271
Gig Performer 4.x User Manual © 2016 - 2021 Deskew Technologies, LLC
GPScript
Move the desired control (i.e. the Gain knob) and you'll immediately see its parameter
number (indicated with the red arrow). Repeat the same steps for the OrilRiver plugin and
note the parameter number of e.g. the Room Size knob (indicated with the red arrow):
Click on the Window menu and select the Show Rackspace Script Editor menu item and
insert this code:
Var Knob1 : Widget Nick, Oril : PluginBlock;
On WidgetValueChanged(newValue : double) from Knob1 SetParameter(Nick, 0, newValue) SetParameter(Oril, 6, newValue)

272
Gig Performer 4.x User Manual © 2016 - 2021 Deskew Technologies, LLC
GPScript
End
Now click on the Compile button:
If your script contains no errors, you'll receive a note that compilation is successful.
Open the Panels View and move the widget; you'll notice how the chosen parameters
change accordingly:

273
Gig Performer 4.x User Manual © 2016 - 2021 Deskew Technologies, LLC
GPScript
Let's take a look at the code.
In the Var section you simply declare your variables based on the GPScript names you had
previously given to them and specify their type (i.e. Knob1 : Widget or Nick, Oril :
PluginBlock). If you want to control more parameters from different plugins, simply give
those plugins the corresponding GPScript names and declare them in the Var section.
GPScript language is event-driven. The next section "On WidgetValueChanged(newValue :
double) from Knob1" tells the compiler what event to monitor and on which widget. The
newValue parameter is updated with the new value every time you move the knob (i.e. the
widget value changes). Any function in GPScript that run when a certain event occurs is
called a callback (another example is On Activate which runs when a rackspace activates).
The section of code inside the callback simply tells the compiler what to do when the event
is detected; in this example we want to set the parameter in the plugin with the name "nick"
and on the parameter number "0", with the value "newValue" (the current value of the knob
widget).
This is a very basic demonstration of GPScript which provides you with the virtually unlimited
flexibility to create sophisticated setups for your live performance.
If you are interested in learning more, join our Community to see how users incorporate
GPScript into their setups.

274
Gig Performer 4.x User Manual © 2016 - 2021 Deskew Technologies, LLC
GPScript
18.2 Local GP Port
The Local GP Port feature is a very advanced feature intended for the most sophisticated Gig
Performer users.
The Local GP Port exists only inside Gig Performer. You can create MIDI In blocks that
receive MIDI events from the Local GP Port and widgets can be associated with MIDI events
arriving at this port, just like any physical MIDI Input port.
Note: this is not a virtual MIDI port that is visible to other applications.
The purpose of this feature is to allow widgets to be able to respond to incoming SysEx
messages. GPScript lets you define a callback that will respond to incoming System Exclusive
messages. If you use this callback, you can detect the changing bytes (which could be one,
two or more, depending on the particular message) from the SysEx message and generate
standard MIDI channel messages out of them. If you then inject such messages into the new
Local GP Port, then widgets can learn those messages and then control plugin parameters as
usual.
Note: this is the reason the MIDI Monitor windows have the ability to display SysEx indices.
It makes it easier for you to see which values in the incoming message need to be detected
and captured.
MIDI events can be injected into the Local GP Port from GPScript using the InjectMidiEvent
function.
To use this feature:
1. Use GPScript (in a rackspace, scriptlet or the global GigScript) to create a MIDI channel
event (e.g. CC 42) and inject that message into the Local GP Port.
2. Open the Rig Manager and define a control that responds to that new CC event.
3. Have your widget learn the message in the usual fashion.
Note: if your trigger is another MIDI message coming from some other physical port - you
will get a popup in the Rig Manager indicating that multiple devices were detected while
learning your control:
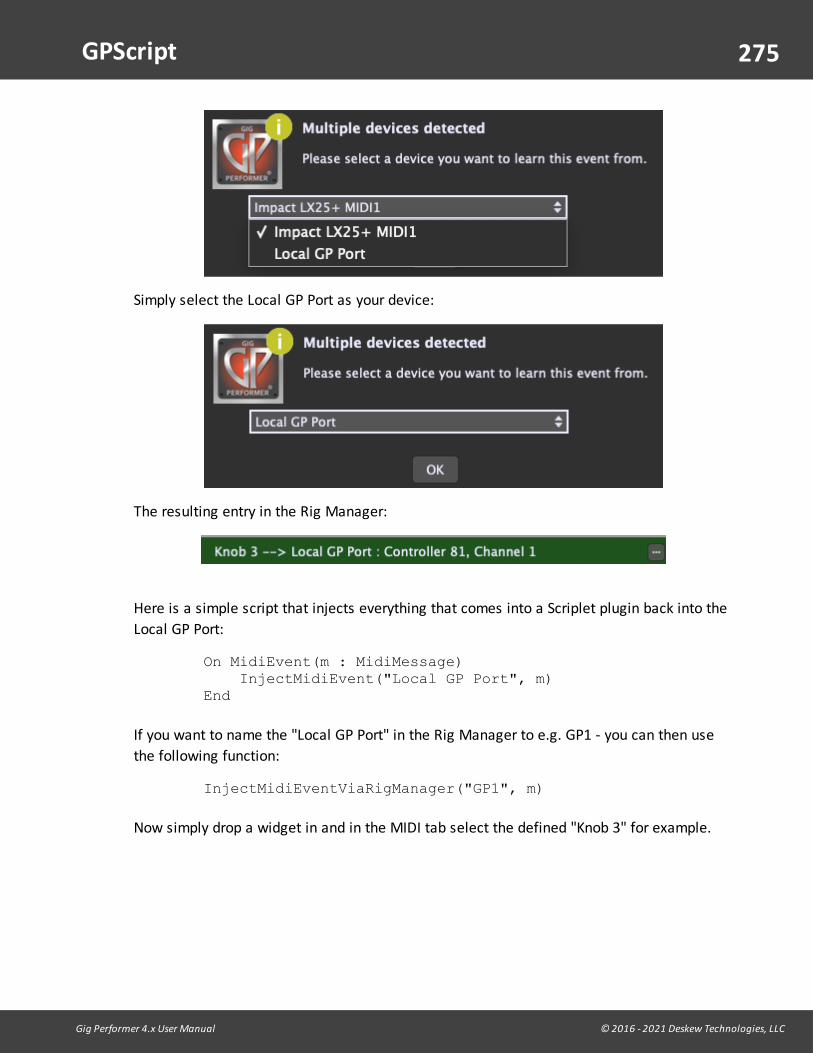
275
Gig Performer 4.x User Manual © 2016 - 2021 Deskew Technologies, LLC
GPScript
Simply select the Local GP Port as your device:
The resulting entry in the Rig Manager:
Here is a simple script that injects everything that comes into a Scriplet plugin back into the
Local GP Port:
On MidiEvent(m : MidiMessage) InjectMidiEvent("Local GP Port", m)End
If you want to name the "Local GP Port" in the Rig Manager to e.g. GP1 - you can then use
the following function:
InjectMidiEventViaRigManager("GP1", m)
Now simply drop a widget in and in the MIDI tab select the defined "Knob 3" for example.

276
Gig Performer 4.x User Manual © 2016 - 2021 Deskew Technologies, LLC
Important workflow tools and tips
19 Important workflow tools and tips
In this chapter you will learn more about workflow tools and tips that will help you get things
done quicker.
19.1 Predictive loading
One of the biggest problems for live performers is how much memory and CPU cycles are
required to keep all the desired plugins available. In particular, plugins that use a significant
number of samples can use many gigabytes of RAM to hold the required data.
In normal operation, Gig Performer loads all plugins for all rackspaces and does some
optimization to reduce the impact of hosting a large number of plugins simultaneously while
still allowing you to switch quickly from one rackspace to another. However, this comes at
the cost of RAM and CPU usage, which may create issues in systems with limited resources
and/or significant audio hosting requirements. The possible alternative - loading just one
rackspace (i.e. one set of plugins) at a time - would certainly reduce RAM and CPU
requirements considerably, but at the cost of having to wait while each new rackspace is
loaded.
Gig Performer's predictive loading feature provides a creative solution: preload only those
rackspaces that will be needed in the immediate future (e.g. while playing the current song).
Other rackspaces are not loaded and will therefore not consume any memory. As an added
benefit, startup time is significantly shortened since not all plugins need to be loaded. You
may also see some reduced overall CPU utilization.
To activate this feature, open the General Options and turn on the Predictive loading toggle
button. When this feature is activated, the Limit to maximum of field appears; here specify
the maximum number of rackspaces that will be pre-loaded around the currently selected
rackspace; you can select an odd value between 3 and 49. If your value is 7, that means that
the current rackspace as well as the next three and previous three rackspaces are also
loaded and instantly accessible:

277
Gig Performer 4.x User Manual © 2016 - 2021 Deskew Technologies, LLC
Important workflow tools and tips
In the example above, each time you click on a rackspace the Predicting... status appears, as
indicated with (A); when seven rackspaces are loaded (the current rackspace plus three
rackspaces before and three rackspaces after) the status changes to Loaded, as indicated
with (B). The current rackspace is indicated with the green arrow, predicted rackspaces are
indicated with the blue arrow, and rackspaces that are not currently loaded are indicated
with the red arrow.
The optimal use of this feature assumes you will be moving from your current rackspace to
rackspaces that are close to it (within two, if the default value of 5 is being used). As you
move to a new rackspace, Gig Performer will then load and unload other rackspaces so that
there are always two available before and two after where you are. This happens in the
background and does not affect your audio.
When using setlists, predictive loading prioritizes what gets loaded. The current song is
always fully loaded, after that are loaded, in order: the next song, previous song, and any
further songs until the limit imposed by the Limit to maximum setting is reached.
Predictive loading provides glitch-free instant switching among those rackspaces that are
currently loaded, but with the tradeoff that you might not always be able to jump to an

278
Gig Performer 4.x User Manual © 2016 - 2021 Deskew Technologies, LLC
Important workflow tools and tips
arbitrary rackspace without a short delay, depending on the particular plugin requirements.
As a result, when using this option, you should configure your rackspaces in such a way that
they are in rough order of when they will be needed in a performance, i.e. song intro -> first
verse -> first chorus, etc. In that way, you can best ensure that you will never have to "jump"
to another rackspace that is farther away that the specified number of loaded rackspaces
(defined with the Limit to maximum field).
Note: rackspaces can easily be reordered by dragging them up and down using your mouse
or trackpad; holding down the Shift key while doing so results in the dragged rackspace not
being loaded, making it more efficient to do setlist reordering without having to wait for
each rackspace to load.
More details about predictive loading can be found on the Gig Performer website: click here.
19.2 Quick plugin finder
The Ctrl+P (or Cmd+P on Mac) keyboard shortcut provides a more efficient way to create a
plugin than right-clicking since it opens the Quick plugin finder dialog (shown below), which
allows you to type a partial plugin or company name, with the resultant list restricted to
those that match:
Type in a partial string, such as "gg" to quickly find all plugins containing that name or their
developers name. You can also type in e.g. "synth" to display all your synth plugins. You can
enter multiple substrings. For example, if you have the Arturia Modeling Collection installed,
you could type "art dx" to restrict the list to the Arturia DX7 plugins. Using the substring
"presets" or "favorites" will restrict the view to presets and favorites that you have created.

279
Gig Performer 4.x User Manual © 2016 - 2021 Deskew Technologies, LLC
Important workflow tools and tips
Click on the Insert button to insert the selected plugin.
19.3 Quick Rackspace/Variation finder
The Quick Rackspace/Variation Finder is a fast way to switch to a specific rackspace and
variation, great for jamming and improv performances, or assembling setlists. It can be
opened by using any of these three methods:
- Using the Ctrl + J (or Cmd + J) key combination,
- Edit menu -> Quick Jump to Rackspace/Variation...
- More... button -> Quick Jump to Rackspace/Variation...
To switch to a different rackspace, open the Quick Jump to Rackspace/Variation... window,
then click the variation you want to select, and click the OK button (or simply double-click
the variation in the list).
Search terms can be entered in the Filter field to help find the variation you want, as
indicated in the screenshot above.

280
Gig Performer 4.x User Manual © 2016 - 2021 Deskew Technologies, LLC
Important workflow tools and tips
19.4 MIDI Assignment List window
Clicking on Window -> Show MIDI Assignments opens the MIDI Assignments List window:
This window displays the information from the Global MIDI Assignments section in the
Global MIDI Options, MIDI assignments in Setlist Options, and widget MIDI assignments. If
you are wondering why some note is not playing or some MIDI CC message doesn't seem to
be working as expected, check this assignment list to make sure that you didn't accidentally
assign the message to a widget, thereby preventing it from being passed through to a MIDI
In block.
Note: mappings to physical controllers made in the Widget Properties inspector override
Global MIDI Assignments.
19.5 Remap MIDI messages without using the MIDI Filter plugin
Like other plugins, a MIDI In block has numerous parameters that can be controlled by
widgets. These parameters include any MIDI note or continuous controller message. This
makes it possible to remap MIDI messages coming from a physical controller without using
the MIDI Filter plugin. Perform these steps to remap MIDI messages:
· First make sure that your MIDI device is connected to your computer and that you
added the corresponding MIDI In block onto the surface in the Wiring view.
· In the Panels view Edit mode, create a new widget, e.g. a Black Slider (Horizontal) and
click on it to select it (1).
· In the widget mapping area, choose the MIDI In block that corresponds to your desired
MIDI device (2).
· Choose a note or continuous controller from the Parameter list in the Mapping section
(3).

281
Gig Performer 4.x User Manual © 2016 - 2021 Deskew Technologies, LLC
Important workflow tools and tips
· In the widget properties area, click on the MIDI tab (4), then click on the Learn button
(5) and move the physical controller.
Note that this area indicated with the red rectangle changed from "(no MIDI In assignment
yet)" to something else (depends on the MIDI device you used and what physical controller
you moved).
Incoming messages from the physical controller (e.g. Controller 6, Channel 1) are now
remapped to the note or continuous controller you chose (e.g. CC15).
Of course, this incoming CC could as easily be remapped to pitchbend, aftertouch, or mod
wheel messages.
19.6 Additional tips
In this section you will learn more about useful tips that may help you to get things done
quicker.
Entering values
You can easily set values in various fields by clicking on the field and moving the mouse up
or down:
Additionally, if you also hold the Shift key, values are increased or decreased by 0.1. Note
that the dragging speed is also taken into account; moving your mouse faster will make
greater changes in values.

282
Gig Performer 4.x User Manual © 2016 - 2021 Deskew Technologies, LLC
Important workflow tools and tips
By default, clicking on the field opens a mini pad for entering values:
Click on up/down arrows to change value by 1, hold the Shift key to change value by 0.1, or
simply type in the desired value.
Turning on the Touch-friendly number editing toggle button in Display Options shows a
larger keypad instead of the mini pad:
Use this option if you run Gig Performer on a touchscreen device such as a Microsoft Surface
tablet.
Note: you can also directly enter values using MIDI numbers, by adding the letter "m" at the
end of the value. For example, if you type in "64m", Gig Performer will interpret it as an
exact value of 50.39 (roughly 50% of the maximum MIDI value of 127).
Temporary Startup Options
Hold the Shift key down while Gig Performer is starting and it will open the Temporary
Startup Options dialog:

283
Gig Performer 4.x User Manual © 2016 - 2021 Deskew Technologies, LLC
Important workflow tools and tips
This is a one-time menu, and permanent options and preferences will not be changed. For
example, Gig Performer will not load the previous gig file, even if you have the toggle button
"Reload the last gig startup" turned on in the General Options window.
Hold down the Option/Alt key during startup to block Gig Performer from autoloading and
executing a startup script.
Dragging rackspaces
Holding the Shift key while dragging rackspaces prevents the dragged rackspace from being
activated (this can be very useful for adjusting your setlist order when Predictive Loading is
enabled).
Quick stereo connection
To make a quick stereo connection, you can either hold the Shift key down and drag a wire
from an output port of one plugin to the input port of another plugin or hold the Shift key
down while dragging a plugin until its output pins touch the input pins of another plugin,
then release (unclick) the mouse. If there is already a connection, this operation will cause it
to be removed instead.
Fine control
Hold down the Cmd (Mac OS X) or Ctrl (Windows) key for fine control while adjusting a
widget.

284
Gig Performer 4.x User Manual © 2016 - 2021 Deskew Technologies, LLC
Important workflow tools and tips
MIDI In plugin channel toggling
In the MIDI In plugin editors, if you hold the Shift key down while enabling or disabling
individual MIDI channels by clicking on their respective check boxes, the other check boxes
will be set to their opposite states. This is a convenient way to quickly enable a single
channel while blocking all others.
Global MIDI options and Setlist options learn buttons
Holding the Shift key while clicking on the Learn MIDI for selected item buttons in Global
MIDI Options and Setlist Options dialog clears the MIDI assignment.
Widget captions
Normally the widget caption will be assigned the parameter name only. However, if you hold
the Shift key down while selecting a parameter, the widget caption will include the plugin
name as well as the parameter name. If you also hold the ALT key down, the widget caption
will include the plugin name only.
Quickly assign multiple widgets to a group
To quickly assign two or more selected widgets to a widget group "N", select all widgets and
press the keyboard key N while holding the Alt key (or Option on Mac).
Copy and paste curves
If you hold the Shift key down while clicking on the scaling curve (of a widget, Probabilistic
Sound Designer, or velocity curves in MIDI In blocks), the curve settings will be copied to the
clipboard:
If you then hold down Shift + Ctrl (or Shift + Cmd on Mac) and click on another curve, the
previously copied settings will replace settings of that curve:

285
Gig Performer 4.x User Manual © 2016 - 2021 Deskew Technologies, LLC
Important workflow tools and tips

286
Gig Performer 4.x User Manual © 2016 - 2021 Deskew Technologies, LLC
Extensions
20 Extensions
In this chapter you will learn more about extensions and how to enable or disable them.
20.1 What are extensions?
Extensions are basically libraries (.dll files on Windows and .lib files on MacOS) that Gig
Performer can load and provide the additional support for a hardware device. Extensions
provides your hardware device with the closer integration with Gig Performer features
communicating directly with it and not with e.g. by MIDI or OSC messages.
For example, if you had a keyboard with a display and the keyboard's manufacturer created
an extension for Gig Performer (with our SDK), Gig Performer would be able to communicate
directly with your keyboard, and show various parameters, such as Song name, Rackspace
name or Tempo on the display (or assign buttons and knobs with functions in Gig Performer).
Additionally, extensions may also provide panels and menu items that may help to use them
better.
If you are a manufacturer and want to create extensions to allow Gig Performer to support
your hardware devices, feel free to contact us about our software development kit.
20.2 Enabling/disabling extensions
If you obtained a Gig Performer extension, first make sure to place it in the Extensions folder
(refer to the File locations in Gig Performer chapter for more information). If it is supplied as
an archive (i.e. a ZIP archive), extract it directly into the Extensions folder.
Afterward, launch Gig Performer:
The New External Library dialog will appear, allowing you to install the found external
library.

287
Gig Performer 4.x User Manual © 2016 - 2021 Deskew Technologies, LLC
Extensions
Installed extensions are enabled by default. To manage installed extensions open the
Extensions Options:
If you want to reload your enabled extensions, click Options -> Reload Third Party Libraries:
If an extension provides one or more custom panels, they will be displayed under the New
panel drop-down list in the Extensions sub-menu (which is otherwise hidden if there aren't
extensions that provide additional panels):

288
Gig Performer 4.x User Manual © 2016 - 2021 Deskew Technologies, LLC
Extensions
Expand the Extensions sub-menu and select the desired panel. Alternatively, open the panel
contextual menu and expand the Extensions sub-menu (which is hidden if there aren't
extensions that provide additional panels) and select the desired panel.
Note: if you suspect that an extension is preventing Gig Performer to start normally, you can
temporarily disable extensions in the Temporary Startup Options. Check the Additional tips
chapter to learn more.

289
Gig Performer 4.x User Manual © 2016 - 2021 Deskew Technologies, LLC
Optimizing your computer for a glitch-free audioperformance
21 Optimizing your computer for a glitch-free audio performance
In this chapter find out more about latency, sample rate, buffer size and what settings are
acceptable for performing live. Also you will learn more about how to optimize your
operating system (Windows or MacOS) to ensure its maximum performance and stability.
21.1 Latency explained
In this chapter we introduce some basic terms such as audio latency, buffer size and sample
rate and suggest recommendations for live use.
Audio latency is simply the amount of time that passes between the sound being generated
and then perceived by your brain. Basically, it is a delay.
For example, if you are 10ft away from the speakers, and since the speed of sound is
approximately 1,000 ft/s in air it means that it takes 10 ft : 1000 ft/s = 0.1 seconds (or 10
milliseconds) for sound to travel from the speakers to your ears. The latency here is about 10
ms.
Buffer size is basically the number of samples that will be collected before your audio
plugins get to process them. Your audio interface is an analog-to-digital as well as digital-to-
analog converter. It takes any audio input, converts that into digital form (numbers) and then
on the output side – converts those numbers back to analog audio.
Sample rate determines how many samples your audio interface will capture every second
and do the above-mentioned conversions. A common sampling frequency for live use is 44.1
KHz.
For example, if your buffer size is 256 and your sampling rate is 44.1 KHz (44,100 times per
second, as Hz means cycles per second) then your latency will be 256/44,100 seconds which
is 0.0058 seconds or 5.8 ms.
If your buffer size is 256 and the sample rate is 96 KHz you will get 256/96,000 = 2.7 ms
latency.
You can experiment with this: If you change the buffer size to 128 and leave the sampling
frequency at 44.1 KHz – your latency will be 2.9 ms and so on.
These values directly affect the performance of your PC, as smaller latency values require
your computer to respond more quickly to process all those samples in time without
producing any glitches.

290
Gig Performer 4.x User Manual © 2016 - 2021 Deskew Technologies, LLC
Optimizing your computer for a glitch-free audioperformance
It has been shown that people can perceive differences between 3 ms – 10 ms, and that our
brain cannot distinguish anything below 3 ms.
Therefore, for live performance, many musicians use a buffer size of 256 or 128 and a
sample rate of 44.1 KHz. We are not discussing here a recording scenario, which should be
done slightly differently.
Generally speaking, using higher buffer sizes or lower sample rates lets your computer run at
lower temperatures and allows you to run more intensive plugins in parallel without crackles
or pops, but the trade-off will be higher latency or lower quality respectively.
Another factor is the additional latency introduced by your audio interface. Not all audio
interfaces are created equal. Some have low internal latency for both A/D and D/A
conversions while others add more latency than perhaps you might like, so you have to lower
your buffer size to get the overall desired latency.
To find out how much extra latency your interface introduces - you can use Gig Performer's
built in Latency Measurement Tool.
Note: Gig Performer 4 also provides you with a feature to see how much latency every new
plugin adds to your setup. Simply hover over your plugin block to show a tooltip look for the
Latency information. Find out more in the Plugins chapter.
The point is to create sufficient CPU headroom to ensure a glitch-free live performance. You
can also set smaller buffer sizes if that does not impact your live performance, but at the
cost of less CPU capacity for processing more plugins.
21.2 Optimizing your Windows PC for maximum performance andstability
To get the most from your Windows operating system for digital audio processing, many
Windows settings and features can be configured to achieve better performance and
stability.
Deskew Technologies, LLC provides you with a free e-book The Ultimate Guide to Optimize
your Windows PC for the Stage, that will help you to avoid issues like crackles, dropouts,
audio glitches, high latency and configure your PC to be a great audio platform.

291
Gig Performer 4.x User Manual © 2016 - 2021 Deskew Technologies, LLC
Optimizing your computer for a glitch-free audioperformance
21.3 Optimizing your MacOS
MacOS has real-time audio and MIDI functionality built-in. Multiple applications can use
audio and MIDI at the same time. You can also aggregate multiple audio interfaces into a
single unified "large" audio interface.
Here are some suggested optimizations:
· Turn off the Spotlight indexing.
· Turn off AirPort (wireless) or Ethernet adapters if you don't use them.
· Turn off Bluetooth if you don't use any Bluetooth devices.
· Close unnecessary applications (such as cloud syncing applications) and turn off your
antivirus, if you have one.
· Don't be connected to the Internet on stage to avoid the occasional installation of
security updates or other automatic updates.
· In System Preferences - Energy Saver, set Computer Sleep to Never. Also uncheck "Put
hard disks to sleep when possible".
· If you experience a system slowdown, try repairing disk permissions (open the Disk
Utility, select the desired drive and select "Repair Disk Permissions").

292
Gig Performer 4.x User Manual © 2016 - 2021 Deskew Technologies, LLC
Join our community
22 Join our community
Many music professionals worldwide rely on Gig Performer as their audio plugin host of
choice for live performance. The official community for Gig Performer users is located at:
https://community.gigperformer.com/
We encourage you to join our growing community and share your experiences with the best
Gig Performer experts. Besides community moderators and our active members, Gig
Performer developers are actively engaged in the community discussions as well. If you have
a problem with Gig Performer, your audio setup, or just need some advice - no problem:
many gigging musicians with ton of live performing experience will try help you, suggesting
tips or possible solutions:
The Community is organized and split into different categories; whether you want to e.g.
discuss Gig Performer on Windows or MacOS, plugins, hardware, OSC or customizing your

293
Gig Performer 4.x User Manual © 2016 - 2021 Deskew Technologies, LLC
Join our community
setup using scripts, simply select the corresponding category and open a new thread. If you
want to find a specific issue i.e. "virtual audio ports latency", use the integrated search
option.
Save your time, learn the best practices, and share your experiences with us at
community.gigperformer.com.

294
Gig Performer 4.x User Manual © 2016 - 2021 Deskew Technologies, LLC
A word from the Gig Performer creators
23 A word from the Gig Performer creators
Since the very first release of Gig Performer® in 2016 we have tried to stay true to the main
goals we set for ourselves before we wrote a single line of code. Those goals included
stability, flexibility, performance, powerful features and ease of use for musicians, including
ourselves, rather than for technicians.
· We wanted to be able to create our "sounds" without having to be distracted by having
to figure out routings, buses, inserts, sends and other constrains imposed by a channel
strip paradigm. That drove our decision to use a visual metaphor for connecting plugins
together.
· We wanted to be able to get up on stage and not be stressed out by whether pushing a
certain button or turning a knob would crash the system.
· We wanted to make sure Gig Performer was suitable for all kinds of musicians, and not
biased towards keyboard players.
David is primarily a keyboard player and Nebojsa is primarily a guitarist. This allowed for two
very different perspectives on how a plugin host out to work so as to meet such disparate
needs. The combined requirements resulted in a system that can be used by almost any kind
of musician who wants to work with technology.
We feel that we have managed to stay true to these goals in Gig Performer 4 while providing
numerous new and important features. It has been two years since we've had a major
release of Gig Performer® and this, our fourth iteration, is packed with new functionality and
powerful improvements on all fronts.
As touring musicians, we have a deep understanding of what it means to go on stage and
perform in front of a live audience. We have tried to make Gig Performer® be transparent
and invisible in your performance. In the end – it all comes down to your artistic skills and
expressions and the technology around it is simply a tool that allows you to express yourself.
We know deeply that on stage everything just “has to work”.
We are confident that you will Own the Stage® with Gig Performer 4.
We could not have done this without our awesome beta group. You may recognize some of
these names / handles from our forums.
@pianopaul – Thaddäus: There's no way we could have found some of the bugs you did.
@schamass – Erik: Nothing really escapes your watchful eye.
@rank13 – Kieran: Thank you for all the user interface improvements.

295
Gig Performer 4.x User Manual © 2016 - 2021 Deskew Technologies, LLC
A word from the Gig Performer creators
@David-san – David: Thank you for suggesting things and always pushing back when
needed.
@keyman – Antonio: There's no way we could have moved forward so fast without your
input.
@jazzundso – Lukas: Thanks for your brilliant insights.
@speed12 – Mark: You've been helping us for a long time. Thanks for your support.
@simon – Simon: Always great feedback.
@LeeHarvey – Markus: Thanks for your honest and direct comments.
@tonycore – Tony: Thanks for all your efforts in bringing people aware of GP.
@brandon : Great insights.
@elucid – Chris: Thanks for testing!
@chris_g – Chris: Thank you for the great templates.
@KCummings – Keith: Nice templates – thanks!
Rob Neal: Thank you for a wonderful design of a sustain pedal in GP4
David Jameson & Nebojsa Djogo,
Co-founders, Deskew Technologies, LLC.

296
Gig Performer 4.x User Manual © 2016 - 2021 Deskew Technologies, LLC
Appendix
24 Appendix
In this chapter review the license agreement and find out more information about the basic
terminology used in Gig Performer, file extensions and many other topics that organized as
subchapters.
24.1 License agreement
DESKEW TECHNOLOGIES, LLC - END USER LICENSE AGREEMENT FOR GIG PERFORMER
(“THE SOFTWARE”) BY CLICKING THE ACCEPT BUTTON OR DOWNLOADING THE SOFTWARE,
YOU AGREE TO BE BOUND BY AND BECOME A PARTY TO THIS AGREEMENT. DESKEW
TECHNOLOGIES, LLC‘S ACCEPTANCE AND FULFILLMENT OF YOUR ORDER ARE EXPRESSLY
CONDITIONED ON YOUR AGREEMENT TO THESE TERMS. IF YOU DO NOT AGREE TO ALL OF
THE TERMS OF THIS AGREEMENT, YOU MAY NOT DOWNLOAD, INSTALL, EVALUATE OR USE
THE SOFTWARE. CAREFULLY READ THE FOLLOWING LEGAL AGREEMENT (“AGREEMENT”)
FOR THE LICENSE OF SOFTWARE YOU ARE ABOUT TO DOWNLOAD OR INSTALL, PROVIDED
TO YOU UNDER THIS AGREEMENT AND THE ACCOMPANYING DOCUMENTATION (THE
“DOCUMENTATION”). “DESKEW” MEANS DESKEW TECHNOLOGIES LLC. “YOU” MEANS THE
INDIVIDUAL PERSON INSTALLING OR USING THE SOFTWARE ON HIS OR HER OWN BEHALF;
OR, IF THE SOFTWARE IS BEING DOWNLOADED OR INSTALLED ON BEHALF OF AN
ORGANIZATION, SUCH AS AN EMPLOYER,“YOU” MEANS THE ORGANIZATION FOR WHICH
THE SOFTWARE IS DOWNLOADED OR INSTALLED, AND THE PERSON INSTALLING OR USING
THE SOFTWARE REPRESENTS THAT HE OR SHE HAS THE AUTHORITY TO DO SOON YOUR
BEHALF. YOU HEREBY EXPRESSLY CONSENT TO DESKEW’S PROCESSING OF PERSONAL DATA
YOU PROVIDE TO DESKEW (WHICH MAY BE COLLECTED BY DESKEW OR ITS DISTRIBUTORS)
ACCORDING TO DESKEW’S CURRENT PRIVACY POLICY WHICH IS INCORPORATED INTO THIS
AGREEMENT BY REFERENCE (SEE http://www.deskew.com/privacy.html). IF “YOU” ARE AN
ORGANIZATION, YOU WILL ENSURE THAT EACH MEMBER OF YOUR ORGANIZATION
(INCLUDING EMPLOYEES AND CONTRACTORS) ABOUT WHOM PERSONAL DATA MAY BE
PROVIDED TO DESKEW HAS GIVEN HIS OR HER EXPRESS CONSENT TO DESKEW’S
PROCESSING OF SUCH PERSONAL DATA. PERSONAL DATA WILL BE PROCESSED BY DESKEW
OR ITS DISTRIBUTORS IN THE COUNTRY WHERE IT WAS COLLECTED,OR IN THE LOCATION
OF DESKEW OR ITS DISTRIBUTORS; UNITED STATES LAWS REGARDING PROCESSING OF
PERSONAL DATA MAY BE LESS STRINGENT THAN THE LAWS IN YOUR JURISDICTION.
1. License Grant. Subject to the terms and conditions of this Agreement, DESKEW hereby
grants you a non-exclusive, non-transferable right to reproduce and use a reasonable
number of copies of the Software and the accompanying Documentation solely for your

297
Gig Performer 4.x User Manual © 2016 - 2021 Deskew Technologies, LLC
Appendix
internal evaluation purposes during the term of this Agreement (as set forth in Section 3
below). You may install each authorized copy of the Software only on the computer,
workstation, personal digital assistant, pager, “smart phone”, or other electronic device for
which the Software was designed.
2. Ownership Rights. The Software is protected by United States copyright laws and
international treaty provisions. DESKEW and its suppliers retain all right, title, and interest in
and to the Software, including all copyrights, patents, trade secret rights, trademarks, and
other intellectual property rights therein. Your possession, installation, or evaluation of the
Software does not transfer to you any title to the intellectual property in the Software. All
rights in the Software and Documentation not expressly granted to you in this Agreement are
reserved by DESKEW and its suppliers.
3. Restrictions. You may not rent, lease, loan, resell, or otherwise redistribute the Software
or Documentation to any third party. You may not permit any third party to benefit from the
use or functionality of the Software via a timesharing, service bureau, or other arrangement.
You may not transfer (by assignment, sublicense, operation of law, or otherwise) any of the
rights granted to you under this Agreement; and any purported transfer will be null and void
and result in immediate termination of this Agreement. You may not reverse engineer,
decompile, or disassemble the Software, except to the extent (if at all) the foregoing
restriction is expressly prohibited by applicable law. You may not modify, or create derivative
works based upon, the Software or Documentation, in whole or in part. You may not copy the
Software or Documentation, except as expressly permitted in Section 1 above. You may not
remove any proprietary notices or labels on the Software or Documentation. The Software
may contain a usage tracking mechanism for purposes of monitoring license compliance.
You agree not to (a) disable or block the operation of this tracking mechanism and (b) delete
tracking information that may be stored with the Software. DESKEW reserves the right to
review such usage tracking information for the purpose of verifying your compliance with
this Agreement.
4. Warranty Disclaimer. THE SOFTWARE IS PROVIDED “AS IS.” TO THE MAXIMUM EXTENT
PERMITTED BY APPLICABLE LAW, DESKEW DISCLAIMS ALL WARRANTIES, WHETHER
EXPRESSOR IMPLIED OR STATUTORY, WITH RESPECT TO THE SOFTWARE AND THE
DOCUMENTATION, INCLUDING BUT NOT LIMITED TO IMPLIED WARRANTIES OF
MERCHANTABILITY, FITNESS FOR A PARTICULAR PURPOSE, AND NON INFRINGEMENT.
Without limiting the generality of the foregoing, the Software is not fault-tolerant and is not
designed or intended for use in hazardous environments requiring fail-safe performance,
such as the operation of nuclear facilities, aircraft navigation or communication systems, air
traffic control, weapons systems, direct life-support machines, and any other application in
which the failure of the Software could lead directly to death, personal injury, or severe
physical or property damage. You assume full responsibility for the installation of, use of,

298
Gig Performer 4.x User Manual © 2016 - 2021 Deskew Technologies, LLC
Appendix
and results obtained from the Software. Without limiting the foregoing, DESKEW makes no
warranty that the Software will be error-free.
5. Limitation of Liability and Indemnification. IN NO CIRCUMSTANCES AND UNDER NO
LEGAL THEORY, WHETHER IN TORT, IN CONTRACT, OR OTHERWISE, WILL DESKEW OR ITS
SUPPLIERS BE LIABLE TO YOU OR ANY OTHER PERSON FOR ANY DAMAGES WHATSOEVER,
INCLUDING DIRECT, INDIRECT, SPECIAL, INCIDENTAL, OR CONSEQUENTIAL DAMAGES OF
ANY NATURE ARISING FROM OR RELATING TO THIS AGREEMENT OR THE SOFTWARE OR
DOCUMENTATION, INCLUDING, WITHOUT LIMITATION, DAMAGES FOR LOST PROFITS, LOSS
OF GOODWILL, WORK STOPPAGE, OR COMPUTER FAILURE OR MALFUNCTION, EVEN IF
DESKEW HAS BEEN ADVISED OF THE POSSIBILITY OF SUCH DAMAGES. THESE LIMITATIONS
OF LIABILITY WILL NOT APPLY TO LIABILITY FOR DEATH OR PERSONAL INJURY TO THE
EXTENT APPLICABLE LAW PROHIBITS SUCH LIMITATION.
6. United States Government. The Software and Documentation are deemed to be
“commercial computer software” and “commercial computer software documentation,”
respectively, pursuant to DFAR Section 227.7202 and FAR Section 12.212, as applicable. Any
use, modification, reproduction, release performance, display or disclosure of the Software
and Documentation by the United States Government will be governed solely by the terms of
this Agreement and will be prohibited except to the extent expressly permitted by this
Agreement.
7. Export Controls. You are advised that the Software is subject to the U.S. Export
Administration Regulations. You will not directly or indirectly export, import, or transfer
Software contrary to U.S. or other applicable laws, and will not cause, approve, or assist
others to do so. You represent and agree that (a) neither the United States Bureau of Export
Administration nor any other federal agency has suspended, revoked or denied your export
privileges, and (b) you are not located in or a resident of any other country to which the
United States has embargoed goods.
8. Miscellaneous. This Agreement is governed by the laws of the United States and the State
of New York, without regard to conflict of laws principles. The application of the United
Nations Convention of Contracts for the International Sale of Goods is expressly excluded.
Any dispute between the parties arising out of or related to this Agreement shall be settled
by final, binding arbitration utilizing the dispute resolution procedures of the American
Arbitration Association (AAA) in San Francisco, CA. Notwithstanding the foregoing, DESKEW
may bring suit in any appropriate forum for any breach of Sections 1, 2, 5 or 10 or otherwise
for infringement or misappropriation of its intellectual property rights. BY AGREEING TO
ARBITRATION, THE PARTIES UNDERSTAND THAT THEY ARE WAIVING CERTAIN RIGHTS AND
PROTECTIONS WHICH MAY OTHERWISE BE AVAILABLE IN COURT, INCLUDING, WITHOUT
LIMITATION, THE RIGHT TO A JURY TRIAL. DESKEW will be entitled to immediate injunctive

299
Gig Performer 4.x User Manual © 2016 - 2021 Deskew Technologies, LLC
Appendix
relief (in addition to all other remedies it may have) in the event of any breach, or
threatened breach, of Section 2 or Section 5 by Licensee. No right or remedy of DESKEW
under this Agreement will be deemed waived unless such waiver is in writing and signed by
an authorized representative of DESKEW. If any provision of this Agreement is held invalid,
such provision will be deemed modified so that it is valid and enforceable to the maximum
extent allowed under applicable law and the remainder of this Agreement will continue in
full force and effect. The parties confirm that it is their wish that this Agreement has been
written in the English language only and if this Agreement is translated into any other
language, the English version will prevail. This Agreement is the entire agreement between
the parties and supersedes any other written or oral communications or understandings with
respect to the Software. This Agreement may not be modified except by a written document
signed by authorized representatives of each party that expressly states their intention to
amend this Agreement.
24.2 Basic terminology
In this chapter we present an alphabetical list of basic terms used in Gig Performer's world.
Control Change
Most commonly referred to as a "CC". A CC message consists of a controller number and a
value between 0-127. Expression pedals, knobs, faders and buttons typically send these
types of messages. Synth modules might also send these messages out when you adjust
certain parameters.
Curves
Also known as scale curves, curves are used to adjust how widgets move as a function of
incoming MIDI messages. Curves are also used to define velocity mappings for keyboards.
Extensions
Extensions are basically external libraries that Gig Performer can load and provide the
additional support for a hardware device. Extensions provides your hardware device with the
closer integration with Gig Performer features communicating directly with it and not with
e.g. by MIDI or OSC messages.
Gig
A Gig Performer file containing all the data you have created - rackspaces, variations, and all
widgets and widget groups.
Global Rackspace
A special always running rackspace that can be used to manage common plugins needed by

300
Gig Performer 4.x User Manual © 2016 - 2021 Deskew Technologies, LLC
Appendix
most or all rackspaces. For example, you might have a compressor or final EQ that you want
all rackspaces to use. Or you might want to run a looper plugin that needs to stay running
regardless of which rackspace is running. If you use the same instrument (an acoustic piano
perhaps) in almost all your rackspaces, you might insert that instrument in the global
rackspace instead, making your other rackspaces easier to manage.
Host automation
The old approach of controlling plugin parameters is through the direct MIDI controller
mapping to these parameters. However, the modern approach of controlling plugin
parameters is through the plugin's host automation support. This means that a host (Gig
Performer) can automate (manage) plugin's parameters through widgets.
Instance
Multiple copies of Gig Performer can be launched and run simultaneously on a single
computer. Each of these independent copies, running in its own window, is called an
“instance” of Gig Performer. This is useful for applications like giving different band
members the ability to change the rackspace affecting their particular instrument without
changing the rackspaces affecting other instruments.
MIDI
An acronym for Musical Instrument Digital Interface—a standard protocol for the
interchange of musical information between computers, controllers, and hardware-based
electronic musical instruments such as synthesizers and samplers.
MIDI controller
A physical device such as a keyboard or pedalboard typically connected to your computer via
USB.
OSC
Acronym for Open Sound Control—a communications protocol that is optimized for modern
networking technology.
Panel
In Gig Performer, an area (visually similar to hardware rack-mounted sound modules and
signal processors) containing widgets used to control the plugins in the rackspace
containing the panel. A rackspace can contain multiple panels, each containing one or more
widgets.
Panels View
The Gig Performer screen containing the panels and widgets used to control your sounds

301
Gig Performer 4.x User Manual © 2016 - 2021 Deskew Technologies, LLC
Appendix
during performance.
Pin
Plugins are connected by connecting virtual wires to their pins (also called plugin ports).
Plugins may have one or more input/output pins. MIDI pins are colored orange and audio
pins are colored blue. See the chapter Wiring view for more information on plugin pins.
Plugin
Also referred to as a plugin block or just "block". A package of functionality that can be
employed by any compatible audio host software. There is a tremendous variety of plugins
available in the audio/music marketplace, but many popular plugins are software emulations
of physical instruments or hardware devices. Originally developed for use within DAW
(Digital Audio Workstation) applications, some plugins (called “virtual instruments”)
generate audio, for example, emulations of musical instruments and synthesizers, while
effects plugins alter incoming audio signals, such as from a microphone, electric guitar, or
virtual instrument, offering processes like equalization, filtering, compression, limiting,
reverb, delay, flanging, chorusing, phasing, and the like.
Port
An alternate name for a MIDI input or output device.
Probabilistic Sound Designer
A new tool in Gig Performer 4 that is available for all your plugins to help you create new
sounds.
Program Change
Also referred to as a "patch change" (or "PC", when talking about MIDI messages; don't
confuse this with "computer"). These messages are commonly used to prompt hardware or
software to change a preset (or "patch"). If General MIDI is being used, the program change
number indicates a particular sound. Since this standard isn't obligatory, manufacturers may
list patches in any order they wish. See this blog article for more information to find out how
to use PCs with song parts.
Rackspace
A collection of interconnected plugins, along with one or more panels containing widgets to
control plugin parameters in real time. A rackspace can actually be pretty much anything you
like: It could represent a single sound or all the elements you need for an entire song - or
even just one part of a song. You can switch from one rackspace to another instantaneously
- and with no interruption of sound - either from your laptop, with up/down pedals, or via
MIDI program change messages.

302
Gig Performer 4.x User Manual © 2016 - 2021 Deskew Technologies, LLC
Appendix
Rig
In Gig Performer, a "Rig" is a collection of three sets of information: a set of physical MIDI
controllers, a set of virtual controllers that can be attached to widgets, and a map that
relates the two sets, thereby connecting your physical controller, through widgets, to
parameter controls.
Rig Manager
A mechanism that allows you to quickly change your connected MIDI hardware so your
rackspaces are not dependent on specific devices. The Rig Manager is also used to help you
distinguish multiple identical MIDI controllers.
Scriplet
A proprietary plugin in Gig Performer that executes GP Script code to implement specialized
MIDI transformations.
Setlist
A collection of songs arranged in a desired order. Setlists are assembled from the library of
available songs; you might have one setlist for a set you perform regularly and other setlists
for individual performances requiring different songs or a different order. A song in a setlist
is made active simply by clicking on it.
Song
A collection of song parts arranged in a desired order. Songs can execute actions when they
are made active, such as sending out a MIDI program change message, overriding the
current tempo with the song tempo, or opening a ChordPro file showing chords and lyrics. A
library of songs can be built up, making them available to be used in setlists.
Song Part
An individual section of a song, such as a verse, chorus, bridge, or interlude. A song part
consists of a reference to a rackspace along with some other properties. Selecting a song
part makes its associated rackspace variation active, and can perform other actions like
overriding the current tempo or sending out a custom string of MIDI messages. As the lowest
level building block of setlists, song parts can be easily accessed by MIDI program change
commands from an external controller, the large song part tiles in the Setlist/Song view, or
by song part tiles in the Gig Performer Lemur template (or another custom OSC template).
Variation
These are essentially rackspace presets, all containing the same plugins and
interconnections, but with different widget settings. For example, you can create a
rackspace to add phasing to a piano sound, and then add several variations, each with

303
Gig Performer 4.x User Manual © 2016 - 2021 Deskew Technologies, LLC
Appendix
different degrees of phase intensity. Since variations actually store widget settings, every
parameter you want stored in a variation must be assigned to a widget on a rack panel. As
with rackspaces, you can switch from one variation to another instantaneously - and with no
interruption of sound - either from your laptop, with up/down pedals, or via MIDI program
change messages.
Widget
A virtual object (such as a knob, slider, button, or meter) used to control and/or display
plugin settings. Widgets can be operated either with your laptop’s mouse or trackpad, or
remotely from a MIDI controller. With the use of OSC, widgets can also be operated from iOS
/ Android tablets or smartphones.
Widget group
A collection of widgets that operate ganged together, where changing one widget in the
group changes all of the others in the group, as well. This is a powerful method for
controlling multiple plugin parameters simultaneously. For example, you could create several
slider widgets that control the volume of various plugins and then raise or lower the volume
of all of them by moving any one of them. In addition, individual widget scaling allows
simple implementation of effects such as cross-fading. For more information, see the widget
group reference section.
Wiring View
Formerly called the Connection view, the Wiring view is where you create your plugins and
connect them together.
24.3 File extensions used in Gig Performer
In this section find out more about file extensions that are used in Gig Performer.
Fileextension
Description
gig a gig file contains all the data you have created: rackspaces, variations, andall widgets/widget groups
gpc this extension indicates a compiled GPScript file
gpfav used for storing the plugin or selection of plugins saved as favorites
gppanel a Gig Performer panel template file extension
gpp_audiounit
saved presets of AU plugins are stored in this format

304
Gig Performer 4.x User Manual © 2016 - 2021 Deskew Technologies, LLC
Appendix
gpp_internal saved presets of built-in plugins are stored in this format
gpp_vst saved presets of VST plugins are stored in this format
gpp_vst3 saved presets of VST3 plugins are stored in this format
gppsd_audiounit
Probabilistic Sound Designer file extension addressing AU plugins
gppsd_vst Probabilistic Sound Designer file extension addressing VST plugins
gppsd_vst3 Probabilistic Sound Designer file extension addressing VST3 plugins
gpscale stores the widget's curve scaled value
gpsettings exported Gig Performer settings are stored in this format
gpsong songs are stored in this format
rackspace this format is used to store the exported rackspace
rigsetup the Rig Manager setup is exported to this file format
24.4 File locations in Gig Performer
In this section find out more about default file locations that are used in Gig Performer.
Mac OS X Windows Description
/ApplicationsC:\Program Files\Gig Performer4
Installation folder
/Users/Shared/GigPerformer/Extensions
C:\Users\Public\Documents\GigPerformer\Extensions
3rd Party extensionsfolder
/Users/Username/Documents/Gig Performer/Favorites
C:\Users\Username\Documents\Gig Performer\Favorites
Favorites folder
/Users/Username/Documents/Gig Performer/Presets
C:\Users\Username\Documents\Gig Performer\Presets
Presets folder
/Users/Username/Documents/Gig Performer/PSD
C:\Users\Username\Documents\Gig Performer\PSD
Probabilistic SoundDesigner folder
/Users/Username/Documents/Gig Performer Song Lyrics-Chords
C:\Users\Username\Documents\Gig Performer Song Lyrics-Chords
Root folder for ChordProfiles

305
Gig Performer 4.x User Manual © 2016 - 2021 Deskew Technologies, LLC
Appendix
/Users/Username/Documents/Gig Performer Recordings
C:\Users\Username\Documents\Gig Performer Recordings
Default master folder forthe Recorder. Each set ofrecordings will be in timestamped sub folders
/Users/Username/Documents/Gig Performer/ScalingCurves
C:\Users\Username\Documents\Gig Performer\ScalingCurves
Saved scaling curves
24.5 Cross-Platform Usage
Files created by Gig Performer can be opened by both Mac (OS X) and Windows computers.
If the computer you're using to access the file is missing some of the plugins that were
present when the original file was created, Gig Performer will create a "chameleon" plugin
that mimics all the properties of the original plugin except the actual processing. This will
allow you to modify the file, save it and later re-open it on a computer that has all required
plugins installed.
Similarly, if the audio interface connected to the current system does not have enough inputs
or outputs to accommodate the setup utilized by the file, Gig Performer will prompt you to
create "Virtual channels" that produce no input or output but retain all connections. Doing so
will allow you to modify the file, save it and later reopen it on a computer that is connected
to the original audio interface.
If you plan to use Gig Performer on both OS X and Windows, you may want to consider just
using VST plugins on OS X rather than AU plugins. This will make it easier for you to use the
same gigs on both platforms, assuming of course you have the plugins themselves on both
platforms.
24.6 Troubleshooting
No sound
Test your audio system to make sure it is receiving signal from your connected audio
interface.
Make sure one or more plugins have connections from their audio output(s) to one or more
audio input(s) on your connected audio interface.
If you have multiple audio interfaces connected to your system, make sure the correct one is
selected in Audio Options.

306
Gig Performer 4.x User Manual © 2016 - 2021 Deskew Technologies, LLC
Appendix
Gig Performer isn't finding my plugins
Normally Gig Performer scans only certain "standard" folders for plugins, such as (in Mac OS
X systems) Library/Audio/Plug-ins/VST or (in Windows systems) C:\Program Files\VstPlugins.
However, some plugin and DAW manufacturers install their plugins in different folders. If
Gig Performer isn't finding your plugins, that's the likely cause. To instruct it to scan
different folders, open the Plugin Manager and click on the Manage button in the bottom
left-hand corner, then select Set VST folders for scanning... and Set VST3 folders for
scanning... In these dialogs you can easily add or delete folders to the list of those scanned
by Gig Performer.
Audio interface does not appear in the Wiring view
In most cases, Gig Performer will automatically detect all audio interfaces connected to your
system. If it does not, check to make sure that the interface is connected and powered on,
and relaunch Gig Performer. If your audio interface still does not appear, take the following
steps:
· Mac OS X: start up the Audio MIDI Setup app in the Utilities folder and make sure that
your interface appears in the list of input and output devices on the left-hand side of
the Audio Devices window. If it does not appear, consult the documentation for your
interface.
· Windows: go to Control Panel -> Hardware and Sound -> Sound and make sure that
your interface appears in the list of playback and recording devices. If it does not
appear, consult the documentation for your interface.
MIDI controller does not appear in the Wiring view
In most cases, Gig Performer will automatically detect all MIDI controllers connected to your
system via USB. If it does not, check to make sure that the controller is powered on, and
relaunch Gig Performer. If your MIDI controller still does not appear, take the following
steps:
· Mac OS X: go to Utilities -> Audio MIDI Setup and select Show MIDI Studio from the
Window menu, then make sure that your controller appears in the window and is not
grayed out. If it is grayed out or does not appear, consult the documentation for your
controller.
· Windows: press the key combination Win key + X and then select the Device Manager;
make sure that your controller appears in the "Sound, video and game controllers"
category. If it appears with a yellow question mark or exclamation point, right-click and

307
Gig Performer 4.x User Manual © 2016 - 2021 Deskew Technologies, LLC
Appendix
choose the Update Driver Software option. If it does not appear, consult the
documentation for your controller.
Widget not working
Double-click on the widget to open the Widget Properties inspector and make sure that it is
assigned to a plugin and a plugin parameter.
If your question is not answered here, please check our website's Knowledge Base and
troubleshooting tips. If your problem is still not addressed, feel free to open a new thread in
our Community or reach out to us through our support page.
24.7 OSC messages
In this section learn more about Gig Performer OSC command messages. The messages can
be sent to Gig Performer which will then respond appropriately, perhaps also returning an
OSC message or bundle with information.
Last updated: March 2021.
Non-realtime OSC messages
Address Arguments Description
/GigPerformer/GetSetListsReturns a list of availablesetlists
/GigPerformer/SelectSetList IntegerSwitch to a specific setlist
/SetList/GetSongListReturns a list of availablesongs in the currentsetlist
/SetList/GetSongPartsReturns a list of availablesong parts for the currentsong
/Song/GetSongPartsReturns a list of availablesong parts for the currentsong
/Window/ToFrontBring the main GPwindow to the front

308
Gig Performer 4.x User Manual © 2016 - 2021 Deskew Technologies, LLC
Appendix
/Window/ToBackSend the main GP windowto the back
/Window/FullScreen Make GP be fullscreen
/Actions/PanelView Switch to the Panel view
/Actions/WiringView Switch to the Wiring view
/Actions/SetlistView Switch to the Setlist view
/GigPerformer/SwitchToProgramNumber
Integer(program number)Switch to a specificrackspace using programnumber
/GigPerformer/SwitchToProgramNumber
Integer(MSB), Integer(LSB),Integer(Program number)
Switch to a specificrackspace using bankselect values andprogram number
/Tap Emulate tap tempo
/SetMasterFader Double (0.0 .. 1.0)Set the master fadervolume
/SetGlobalTranspose IntegerSet the global transposevalue
/GetGlobalTransposeReturns the currentglobal transpose value
/RecordInputs Integer(0, 1)Enables or disablesrecording
/GetRecordStatusReturns whetherrecording is enabled
/GetAbletonLinkStatusReturns whether AbletonLink is enabled
/SetAbletonLinkStatus Integer(0, 1)Enable or disable AbletonLink
/SetBPM Double(bpm) Set the global BPM
/AdjustBPM Double(offset)Adds the offset to thecurrent global BPM
/GetCurrentBPM Returns the global BPM
/Play Integer(0, 1)Enable or disable theglobal playhead
/Panic Emulate MIDI Panic

309
Gig Performer 4.x User Manual © 2016 - 2021 Deskew Technologies, LLC
Appendix
/RackSpace/ListOSCPluginsReturns the list of OSCenabled plugins
/RackSpace/ListOSCWidgetsReturns the list of OSCenabled widgets
/GigPerformer/ListAllRackspaces
Returns a list of allrackspaces
/GigPerformer/ListAllVariations
Returns the list of allvariations of the currentrackspace
/Refresh
Ask Gig Performer toresend status messages(useful if OSC connectionis flakey)
/TunerView/SetValue Integer(0, 1)Switch in or out of TunerView
/SongPart/TakeSnapshotTake a snapshot of thecurrent widget overridesin a song part
/SongPart/ClearSnapshot
Clear the snapshot,thereby resetting widgetsto the original rackspacevalues
Realtime OSC messages
Address Arguments Description
/SelectSongByIndex
/GigPerformer/SwitchToSong
/SelectSongPart
/Song/SwitchToPart
/Song/MoveDown
/Song/MoveUp
/GigPerformer/NextSong
/GigPerformer/PrevSong

310
Gig Performer 4.x User Manual © 2016 - 2021 Deskew Technologies, LLC
Appendix
/Song/NextPart
/Song/PrevPart
/RackSpace/SetVariation IntegerSwitch to the (zero based)variation
/GigPerformer/SwitchToRack Integer [Integer]
Switch to the (zero based)rackspace and optionallyto a variation in thatrackspace
/GigPerformer/SwitchToRackSpace
Integer [Integer]
Switch to the (zero based)rackspace and optionallyto a variation in thatrackspace
/GigPerformer/SwitchToRackSpace
String [Integer]
Switch to the namedrackspace and optionallyto a variation in thatrackspace
/GigPerformer/MoveDown
/GigPerformer/MoveUp
/GigPerformer/NextRackSpaceSwitch to the nextRackSpace
/GigPerformer/PrevRackSpaceSwitch to the previousRackSpace
/RackSpace/NextVariationSwitch to the nextvariation
/RackSpace/PrevVariationSwitch to the previousvariation
MIDI messages - replace "oscHandle" with the handle of the MIDI In Block
Address Arguments Description
/oscHandle/Midi 1 to 3 MIDI bytesSend an arbitrary MIDImessage - (NB sysexcurrently not supported)
/oscHandle/NoteOnInteger(Note number),Integer(Velocity), Integer(1..16)
Send a MIDI Note Onmessage on the givenchannel

311
Gig Performer 4.x User Manual © 2016 - 2021 Deskew Technologies, LLC
Appendix
/oscHandle/NoteOffInteger(Note number),Integer(Release), Integer(1..16)
Send a MIDI Note Offmessage on the givenchannel
/oscHandle/NoteInteger(Note number),Integer(Velocity), Integer(1..16),Integer(delay in ms)
Send a Note On messageand then later send amatching Note Offmessage
/oscHandle/CCInteger(Controller number),Integer(value), Integer(1..16)
Send a CC message
/oscHandle/PPInteger(Note number),Integer(pressure), Integer(1..16)
Send a polyphonicaftertouch message
/oscHandle/PBInteger(pitchbend amount),Integer(1..16)
Send a pitchbendmessage
/oscHandle/AT
/oscHandle/PC
/oscHandle/ATInteger(aftertouch amount),Integer(1..16)
Send an aftertouch(channel pressure)message
/oscHandle/PC Integer(0..127)Send a program changemessage
Widget control - replace "oscHandle" with the handle of the widget
Address Arguments Description
/oscHandle/SetValue Double(0.0 .. 1.0) Set the value of a widget
/oscHandle/SetResetValue Double(0.0 .. 1.0)Set the default resetvalue for a widget
/oscHandle/GetResetValueReturns the default resetvalue for a widget
/oscHandle/Reset
Set the widget to itsdefault value (same asdouble-clicking onwidget)
/oscHandle/SetCaption StringSet the caption of awidget

312
Gig Performer 4.x User Manual © 2016 - 2021 Deskew Technologies, LLC
Appendix
/oscHandle/GetValueReturns the current valueof the widget
/oscHandle/GetCaptionReturns the currentwidget caption
Plugin parameter control - replace "oscHandle" with the handle of a plugin block
Address Arguments Description
/oscHandle/SetParamInteger(Parameter Number),Double(0.0 .. 1.0)
Set the parameter valueof the specifiedparameter
/oscHandle/SetPreset Integer
Switch to a differentplugin preset (NB someplugins do not supportthis)
/oscHandle/GetParamCountReturns the number ofparameters in a plugin
/oscHandle/GetParam Integer(Parameter Number)Get the value of the givenparameter number
Note: some of these commands send back a lot of information. You may want to use a tool
such as OSCShark or Max to view the response messages.