Garden Railway Basics - Trains
98
GARDEN RAILWAY Kevin Strong BASICS From concept to construction to upkeep Garden Railway Basics Strong
-
Upload
khangminh22 -
Category
Documents
-
view
0 -
download
0
Transcript of Garden Railway Basics - Trains

GARDEN RAILWAY
Kevin Strong
BASICSFrom concept to construction to upkeep
Before beginning a major project such as building a garden railway, it is always good to know the basics. Popular Garden Railways columnist Kevin Strong draws on a lifetime of experience to present a foundation for building a backyard empire. In this book, you’ll learn these basic concepts of the hobby:
· Understanding gauge and scale
· Selecting power supplies and control systems
· Planning your railway
· Incorporating prototype operations
· Using landscaping tools
· Laying track for problem-free running
· Maintaining and improving your trains
The author’s Garden Railway Basics column has appeared in Garden Railways magazine for more than 10 years. He has revised and updated materials from his column for this book.
Plan, build, and maintain your own garden railway
Hobby
Gard
en R
ailway B
asics
www.KalmbachBooks.com
Stron
g
9 7 8 0 8 9 0 2 4 8 3 5 5
5 1 9 9 5ISBN 978-0-89024-835-5
$19.95 U.S. 12468
0 6 4 4 6 5 1 2 4 6 8 8
BKS-12468-CV.indd 1 2/27/13 2:22 PM

GARDEN RAILWAY
Kevin Strong
BASICSFrom concept to construction to upkeep
BKS-12468-FM.indd 1 2/27/13 2:22 PM

This book is dedicated to James P. Strong Sr., Jr., and III for three generations of proof that a love of railroading is hereditary.
Kalmbach Books 21027 Crossroads CircleWaukesha, Wisconsin 53186www.Kalmbach.com/Books
© 2013 Kevin StrongAll rights reserved. This book may not be reproduced in part or in whole by any means whether electronic or otherwise without writtenpermission of the publisher except for brief excerpts for review.
Unless otherwise noted, all photographs were taken by the author.
Published in 201317 16 15 14 13 1 2 3 4 5
Manufactured in the United States of America
ISBN: 978-0-89024-835-5
Editor: Randy RehbergArt Director: Tom FordIllustrations: Marc Horovitz
Publisher’s Cataloging-In-Publication Data
Strong, Kevin (Kevin Charles) Garden railway basics : from concept to construction to upkeep / Kevin Strong.
p. : col. ill. ; cm. -- (Garden railways books)
"The author’s Garden Railway Basics column has appeared in Garden Railways magazine for more than 10 years. He has revised and updated materials from his column for this book."--P. [4] of cover. ISBN: 978-0-89024-835-5
1. Railroads--Models--Design and construction--Handbooks, manuals, etc. 2. Backyard gardens-- Design--Handbooks, manuals, etc. I. Title. II. Title: Garden railways.
TF197 .S77 2013625.19
BKS-12468-FM.indd 2 2/27/13 2:22 PM

Contents Introduction . . . . . . . . . . . . . . . . . 4
1 . Basic concepts . . . . . . . . . . . . . . . . 9
2 . What makes them go . . . . . . . . 16
3 . Advanced control systems . . . 24
4 . Planning your railroad . . . . . . . 34
5 . Prototype operations . . . . . . . . 45
6 . Using tools . . . . . . . . . . . . . . . . . . 55
7 . Laying track . . . . . . . . . . . . . . . . . 61
8 . Maintaining your trains . . . . . . 67
9 . Proper track upkeep . . . . . . . . . 81
Glossary . . . . . . . . . . . . . . . . . . . . 90
About the author . . . . . . . . . . . . 95
BKS-12468-FM.indd 3 2/27/13 2:22 PM

4
I n t r o d u c t I o n
A new road to travel
Growing up with scenes like this in my backyard, I had little choice but to follow in my father’s footsteps when it came to building a railway. Here, No. 18 rounds the bend just south of Gum Grove on Jim Strong’s Woodland Railway in Maryland.
Where do I start? Let’s start with an introduction. My name is
Kevin Strong, and I’m a product of my environment. That is
to say, I have grown up with trains running in the garden.
I was nine years old when the first rails were laid on my dad’s
Woodland Railway in Maryland back in 1980.
4
BKS-12468-FM.indd 4 2/28/13 2:04 PM

5
I’ve literally grown up with the hobby, and have watched it progress from its infancy to where it is today. Since that time, I’ve moved around the country: college in Colorado, then to upstate New York, and back to Colorado, laying tracks in backyards all along the way, learning a lot about what makes building a railroad in one part of the country a whole lot dif-ferent than building one in another part. That’s the neat thing about this hobby—you never stop learning. There is always some new road to travel, some new aspect of it that will catch your fancy.
Along the way, I’ve had the privi-lege of sharing my thoughts through my Garden Railways Basics column in the pages of Garden Railways magazine. I write that column based on the premise that there are many aspects of this hobby, and even those who are old hands at one aspect may be complete neophytes in another. Whenever we start down a new road, we’re all beginners along that path. So whether this is the first time you’ve ever heard of model trains running outdoors, or if you’ve been at this a while, I hope you’ll find some fresh
perspectives in these pages that will encourage you to try your hand at something unfamiliar.
The idea of this bookWhen I started out in this hobby, there was no book from which to draw ideas. The hobby was very much in its infancy. In the figura-tive sense, we did write the book on how to build a garden railroad. Now, 30-some-odd years later, I’ve taken that literally. Yet it would be foolhardy for anyone to take this one reference as gospel. I would hate for anyone to adapt any idea I’ve expressed in this book at the expense of ideas expressed by others. It’s only through sharing ideas—bouncing techniques off each other to see what works and what doesn’t—that I’ve been able to learn what I’ve learned. And I’ll never learn it all. There’s always some frontier, some new tech-nique that stays just an arm’s reach away tempting me to explore.
That’s the magic of this hobby—no matter how long you’ve been in it, or how much you’ve accomplished, there’s always some avenue left to travel, some new skill to develop.
My intent is to give you a frame of reference from which to start asking questions about where you want this hobby to take you. I don’t ever want to write the definitive guide to anything. That takes the fun out of it. Garden railroading, like many pursuits, is a journey. It’s something personal, and something different for each and every one of us. This book is a foundation upon which to start your journey.
My goal is to give you food for thought, to get the wheels in your brain turning. I want you to seek out oth-ers’ experiences along the way because that’s much of the fun. There’s no way I would enjoy this hobby near as much as I do were it not for the friends I’ve made and the things I’ve learned from them.
In my “real” job in television news, there’s a cliché line that goes “Tonight, we have more questions than answers.” I hate hearing that when a reporter says it. But in this context, that’s precisely the sense I want you to walk away with. For every one thing you learn, I hope you formulate two new questions you didn’t think to ask before. If you do that, I’ve done my job. I’ve started
The friends you make in the hobby will even be there to help chase the winter blues away. The thermometer read 18°F on Christmas Eve in 1998 as friends gathered to run live steam on Tom Bowdler’s upstate New York railroad. From left, Dave Graley (standing), Jim Strong, Tom Bowdler, and myself. Ruth Strong
BKS-12468-FM.indd 5 2/27/13 2:23 PM

6
you on a fantastic journey to wherever your railroad takes you. And I hope you have as much fun along the way as I’m having.
What’s this thing called garden railroading?If you’re like many folks, you have a train sitting in a box and a small circle of track to run it on. You’ve seen trains running outside, either in pictures or in person, but you’re not sure how to get to that point, or even where to start. You don’t want to run headlong into the garden, shovel in one hand, track in the other, and just start throwing things down. You want to have some sort of vision, some basic level of a plan. This is where you have an advantage that I did not when I first started. You can draw on the experience of others. How, then, does one go about tapping into that vast array of knowledge?
Start at the beginning: go back to the store where you bought your first train set. Talk to the folks there and see if they know anyone else in the area who is as crazy as you. If you got the train from a big box retailer, you may be out of luck. If you’re fortunate enough to have a local hobby shop (let
alone one that carries large scale), get to know the folks there.
Trains are only half of the equation, so get to know the folks at your local garden center as well. While I have nothing against the big box guys here, either, I’ve found that local nurseries tend to be a lot more in touch with local conditions and what will work and not work. They also tend to have a far greater variety of plants. And it’s likely they may know one or two others in the area who are also running trains in their backyards.
That brings us to perhaps the most valuable resource any beginner can ever hope for—other modelers. In all likeli-hood, there is a garden railway society somewhere near you. Probably the best thing you could do is get involved with your local club. Each group retains a collection of knowledge. The members have been there, done that, and prob-ably have the T-shirt, or at least the bruises, to prove it.
Allow me a moment to wax senti-mental about society members and the hobby in general. It has been said that garden railroading is a family hobby. What is generally meant by this is that there is something for each member of the family to enjoy. It’s not just dad
playing with trains in the basement. It’s dad, mom, and the kids collaborating to create something magical in the garden. I would add that the people you meet in this hobby become an extended family. There’s just something about folks who play with trains outdoors that leads us to bond with one another. I’ve had the pleasure of being involved with three garden railway societies so far, and have adoptive families in each of the three communities as a result. (Unfortunately for my parents, none were willing to pick up my college tuition.)
Once you get involved with a group, it’s important to remember one old lesson: there is no such thing as a stupid question. I have yet to meet anyone who is reluctant to share knowledge about trains and gardens. When you’re just starting out, there are so many things you have to try to understand and keep straight that it gets confusing. We’ve all been there before. I’ve had my share of learning experiences. If I can keep someone from having to experience the same thing, I will. That way you won’t get frustrated and take up underwater basket weaving instead.
While a club is the best source of firsthand knowledge, there are other
It’s summer 1997, and I test-fit a new switch as I begin laying track on my former East Broad Top railroad in upstate New York. Forty yards of dirt were brought in to raise the railroad off the ground about 12" or so. Ruth Strong
BKS-12468-FM.indd 6 2/27/13 2:23 PM

7
sources of information. Train shows and conventions are great places to meet other modelers and see the products available for the hobby. The National Garden Railway Conven-tion is the largest such gathering for us, although there are a fair number of regional shows each year throughout the country. Conventions offer you a chance to go on tours, where you can see other enthusiasts’ railroads. This is a great opportunity to try to figure out what appeals to you and what doesn’t. You can get a feel for the look of a railroad, and how you are able to inter-act with it. Take lots of pictures—and steal all the ideas you can. (Your local club or neighboring groups may offer similar tours during the summer too.) There are also clinics at the conven-tions. Here, you can receive in-depth lessons on any number of topics from some of the foremost experts in the field. Then, there are other specialized conventions like the National Small Scale Steam-up for live-steam enthusi-asts or the Narrow Gauge Convention, just to name a few.
You can find out about these and other gatherings in the many maga-zines available to the hobbyist. Garden Railways is the tip of the iceberg when it comes to potential sources for literature for garden railroaders. A good hobby shop or newsstand will have a ready lineup of diverse titles available. Don’t just stick to railroad-ing magazines. Some of your best help may come from gardening magazines, particularly if there is one that caters to your climate.
Beyond the physical one-on-one interaction you get from a club or convention, the Internet is ever-increasingly becoming a global garden railway society. You’ll find manufac-turer-based forums, general model-ing forums, and forums that cater to any specific interests you have. These forums are full of people who like to share information (and show off their latest creation). Many modelers (like myself ) have their own websites or blogs to showcase what they’re doing as well. I’ve gotten to know hundreds of modelers from all corners of the globe. They, too, become something
of an extended family and an incred-ible resource for whatever projects you may want to work on. I’ve traded parts from my scrapbox with others around the world.
That, I suggest, is the key. The best thing you can do as a beginner is to find folks with similar interests. Noth-ing makes this hobby more enjoyable than sharing it with others. The friends you meet along the way will be friends for life. It doesn’t matter where you live or how often you move. Stay in this hobby long enough, and you will find an enthusiast in every port. These peo-ple will always be there to answer your most basic questions or to just have you over for a cold drink and an afternoon of running trains. There’s just some-thing neat about that.
Just do itOkay, I’m just a few pages into this book, and I’m already going to con-tradict myself. Yeah, I told you not to rush into things, that you need a solid foundation before you start building. That’s true. But sometimes you gotta sit back and brainstorm to get the
ideas flowing. And that’s where a little experimentation comes into play.
You now have a train, and it looks pretty neat running in a circle on the living room floor. You’ve been looking at the magazines, surfing the Net, and talking to folks in your garden railway society. Yet, your backyard still sits bar-ren. There are a lot of things to think about and many directions you can go. “Just how am I going to decide what I want to do?” you may ask.
The short answer is that you don’t have to decide. This, perhaps, is the largest stumbling block to new garden railroaders. There are so many choices available to today’s hobbyists that starting down a particular path can be overwhelming to the point of inaction. That variety, however, is the hobby’s strongest asset. Embrace it, and get ready to explore the many different roads you can travel.
Now’s not the time to decide what you’re going to model. Don’t worry about scale, narrow gauge vs. standard gauge, or any other choices like that. You’ll have plenty of time to figure that out later. Your focus should be on
Existing gardens can provide great inspiration when it comes to locating your garden railroad. Move the track to various parts of the yard to see what strikes your fancy. Here, an existing grape arbor provides the backdrop.
BKS-12468-FM.indd 7 2/27/13 2:23 PM

8
the first step—getting trains running outside. Everything else will come in time, and getting them running outside is really simple. Remember the loop of track you have set up in your living room? Pick it up and move it to the backyard. (Disassemble it first—it goes through the door easier.)
Where should I move it?It doesn’t matter, really. Find a place where you think you may want to build the railroad and put the track there. Hook the power up to the train, grab a chair and a cool beverage, and sit back. If you don’t like it where it is, pick the track up and move it again. Run the track through the trees, under bushes, along the deck, or just out in the middle of the yard. If you can, borrow some extra track from fellow hobbyists in your area. This will allow you greater latitude in your experimentation. My dad’s Woodland Railway started with just a few feet of track running between two trees in the woods. He saw that and said, “This is where it’s going.” There’s something magical about getting the trains outside in the open. They become real, not toys. Sometimes the mere act of bringing the trains out-side can ignite the imagination. Once
they start moving around, you’re well on your way.
Well on my way to where?Again, don’t worry. You’re headed in the right direction. Garden railroads evolve over time (and thyme evolves over garden railroads). As you watch your train running among the petunias, you will doubtless start to see a vast railroad empire running over the yard. Your heart will beat faster. Your adrenaline will increase. Guess what, though—now it’s time to apply the brakes. It’s okay to have a vision of what you think your railroad may look like years down the road. Just don’t try to do it all in one step. Great railroads don’t spring up overnight. They take planning, or you will just wind up frustrated.
I often tell the story of a gentle-man in our club (who shall remain safely anonymous) who was so gung ho about getting into this hobby that he filled his swimming pool with dirt and immediately laid a lot of track on top of the dirt. He had a very nice railroad for about three weeks, and then the dirt started to settle. Things stopped running as the entire railroad started to slide downhill toward what used to be the deep end of the pool. Frustrated, he ripped the entire thing out, sold the
whole lot, and was never seen in the club again. This is especially important to remember in these modern times of instant gratification. Anything worth doing is worth doing right, and doing it right means taking things slowly.
That doesn’t mean not moving at all. Perhaps the biggest mistake beginners make is spending so much time planning that they never get out to enjoy what they’ve planned. All these considerations can be dealt with in time, but you can’t figure out what you like without trying it first. Think of this hobby as a buffet. There are a lot of different choices. Grab your plate and sample a little of each. Then go back for the dishes that you liked the best. The key is to step up to the bar in the first place. Get the trains outside and off of the living room floor. Yes, this means you may have to vacuum the rug now. Sorry ’bout that.
So sit back, grab a cold drink, and enjoy the train running on the circle of track. While you’re doing that, read through the rest of this book. All those concepts I said not to worry about right now will be explained, and you can begin to shape your vision for the grand railroad empire in your backyard.
A dry rock garden might be an ideal setting for a railroad.
BKS-12468-FM.indd 8 2/27/13 2:23 PM

C H A P T E R O N E
Basic concepts
Timber is big business along the Tuscarora Valley. Here, Tuscarora Timber Co. No. 4 pulls across a quiet country road on its way to back to Neeleyton to pick up a load of timber. Having a theme or purpose for your garden railroad helps you create a cohesive atmosphere in your garden that invites observers into your view of the world.
Now you’ve got your circle of track moved outdoors, and
you’re pondering where you want your backyard empire to
take you. In this chapter, I’m going to look at many of the
choices we make in terms of the trains we run, how we run
them, and how we interact with the garden. To start, let’s
look at what got us here in the first place—the trains
themselves. The kinds of trains that appeal to us are as
unique as we are.
9
BKS-12468-01.indd 9 2/27/13 2:14 PM

10
Me? I’m a fan of late 1890s and early 1900s narrow gauge steam, particularly eastern narrow gauge. Chances are good that there’s something from your past that draws you to your particu-lar interest in trains. As you progress through the hobby, you’ll likely focus your railroad around those interests.
Maintaining that focus becomes a lot simpler once you grasp some of the basic principles of the prototypes for our trains.
Standard vs. narrow gaugeWhen discussing the prototypes of the trains we run in the garden, the terms
standard gauge and narrow gauge fre-quently enter the discussion. The word gauge relates specifically to the distance between the rails, but the concepts of standard gauge and narrow gauge have a far greater bearing on our railroads than just that distance. In the proto-type (full-size) world, standard gauge railroading and narrow gauge railroad-ing are two entirely different concepts.
Standard gaugeThe word standard implies that it is a universally accepted norm. How did that standard come to be? Why that and not something else? In the formative years of railroading, there was no standard. Each railroad chose a distance between the rails based on what was thought adequate for its needs. The general theory was that the wider the gauge, the more stable the trains would be. There were railroads with gauges as wide as 7'. At first, with each railroad being an isolated system, these different gauges didn’t present any problems. Since there was no interchange of equip-ment between railroads, compatibility wasn’t an issue.
It wasn’t until railroads began to connect with each other to form net-works that the distance between the rails became an issue. It was labor intensive to transfer the freight from a car of one gauge to one of another on the next system. So in order to reduce those costs, railroads decided to come to some kind of consensus on how far apart the rails would be for their networks. There was never a law man-dating a particular distance—it was primarily based on local cooperation. In the United States, most northern railroads adopted a gauge of 4' 8½" as their standard. Railroads in the south built to 5' gauge.
During the Civil War, this differ-ence proved to be quite a headache for both sides when it came to getting supplies to their respective troops. When the war ended, the southern railroads regauged to the narrower 4' 8½" gauge, and standard gauge in the country was defined. Had the South won, it’s conceivable that we could still have two standards in
The warm afternoon sun greets a long freight as it rolls through Marysville on Paul Burch’s Sierra Cascade & Pacific outside of Tacoma. Standard gauge railroads such as the Southern Pacific ran long freights and also served small industries such as those in Marysville. Paul’s consistent use of 1:29 scale equipment and buildings, along with proportional rail and ties on well-manicured roadbed, gives the scene a realistic feel. Paul Burch
In contrast to most standard gauge railroads, many narrow gauge lines had tracks that were less well manicured. The Tuscarora Railroad is no exception. Tuscarora Valley No. 5 pulls a short, daily passenger train out of Shade Gap. The slightly overgrown and unkempt vegetation gives the look of a railroad that is making just enough money to keep operating, without a lot of frills.
BKS-12468-01.indd 10 2/27/13 2:14 PM

11
North America, or the North might even have regauged to 5'.
Why 4' 8½"? That’s a difficult ques-tion to answer, and one that is fraught with fanciful stories and romantic notions. The truth is most likely quite mundane. As railroad technology devel-oped, primarily in the northern United States and Britain, early cars were adapted from horse-drawn carriages of the day. The builders simply replaced the wood wheels with flanged, iron wheels out of convenience. In many cases, the wheels ended up 4' 8½" apart, and the practice was born. Other countries either used different carts or had particular needs that predicated wider or nar-rower equipment. How arbitrary is this distance? Fewer than two-thirds of the world’s railways are built to this gauge. “Standard” gauges, depending on where you are, run anywhere from 3' to 5' 6".
There was a belief in early railroad-ing that railroad equipment became unstable when its width exceeded twice that of the gauge. This width is called loading gauge. It dictates how far from the track things like bridges, tunnels, signs, and station platforms have to be so that a passing train won’t hit them. With a gauge of 4' 8½", that meant a loading gauge of around 9' 6". Early U.S. car builders rounded this to 10', and standard gauge railroad equipment has stayed right around that mark ever since. Some large locomotives hit the 11' mark, but that was the exception. (The loading gauge in Europe isn’t as wide as it is in North America, so the equipment there tends to be a bit smaller in overall size, even though the track gauge is the same.)
When most of us think of standard gauge railroading, we envision large, powerful locomotives, long trains, and broad, sweeping curves. Branch lines that feed the major routes operate with shorter trains and smaller, lighter loco-motives. These are often overlooked in terms of model railroading, but they are every bit as important in moving freight and passengers from one place to another. Standard gauge industrial or logging railroads also tend to lack the glamour of the Class 1 main lines but are often very well suited to the garden environment.
The East Broad Top Railroad remained viable into the 1950s, partly due to its practice of retrucking standard gauge cars with narrow gauge trucks so standard gauge cars could operate on the EBT. This was accomplished by a large overhead crane. This cement hopper, being positioned on the narrow gauge trucks (standard gauge truck in the foreground) was one of many that moved over the EBT during the construction of the Pennsylvania Turnpike. Kevin Strong collection
Tuscarora Timber Co. No. 4 rumbles across Trout Run with a short freight in tow. Sticking to one scale does not necessarily mean buying only one scale. The hopper and stock car in this photo are manufactured to 1:24 scale and the locomotive to 1:20.3. However, since early narrow gauge freight equipment was noticeably smaller than that built in the later years, the smaller scale models work well for the smaller prototypes when measured in 1:20.3.
BKS-12468-01.indd 11 2/27/13 2:14 PM

12
Even in one specific scale, equipment comes in many sizes. All three locomotives in this photo are 1:20.3 scale.
Narrow gaugeNarrow gauge refers to any railroad with rails more closely spaced than what’s defined as standard. In North America, it refers to anything less than 4' 8½". (Anything wider than standard is called broad gauge.) The narrow gauge movement in North American railroading started in the early 1870s. It largely came about in response to a desire to get ore out of mountainous regions as cheaply as possible. Because of the size of the equipment, standard gauge railroads had serious limitations as to how tight curves could be and how steep grades could be. This made it expensive, if not impossible, to get to valuable commodities nestled in the rugged mountains and tight valleys. Narrow gauge equipment was smaller, lighter, and could traverse tighter curves and steeper grades, making it easier—and cheaper—to get tracks up into the hills.
By far, the most common gauge for narrow gauge railroading in the United States was 3'. There were, however, other gauges used, notably 2' gauge (primarily in Maine), with some 30" and 42" lines scattered about as well. There were more than a few schemes for a narrow gauge net-work that would rival the standard
gauge networks of the day, but none of these ever came to pass.
Ultimately, the cost savings from building and equipping a narrow gauge railroad proved to be a false economy. The ongoing expense of having to transfer the freight from one gauge to the other continually dug into the operating bottom line of many narrow gauge railroads, and narrow gauge and prof itability started to become mutually exclusive.
Competition from the emerging highway network in the 1920s and ’30s, coupled with the Great Depres-sion, spelled the end for many nar-row gauge lines. Some were acquired by the standard gauge railroads they connected with and regauged to oper-ate as branch lines, while others just faded away. The ones that survived did so out of necessity, such as the Denver & Rio Grande Western’s routes into the mountains. Others
Some manufacturers clearly mark the scales of their products on their boxes, but there’s little consistency between how they’re expressed. As with many things, you just have to read the labels.
BKS-12468-01.indd 12 2/27/13 2:15 PM

13
survived through ingenuity by finding unique ways to deal with the gauge difference, such as the East Broad Top’s practice of putting standard gauge cars on narrow gauge trucks.
Narrow gauge railroading in North America never reached the level of sophistication to which standard gauge lines rose. Dieselization was limited mostly to the small industrial lines and small locomotives. The White Pass & Yukon and the Newfoundland Rail-way were the only two major North American narrow gauge lines to switch entirely from steam to diesel. The eco-nomics inherent in narrow gauge rail-roading meant that most narrow gauge lines operated with older, outdated equipment relative to what was being used in the standard gauge world. It is often this sense of quaintness that appeals to modelers.
Theory into practiceWhy the history lesson? The models that line the shelves of our favorite hobby shops reflect many different paths in the railroading spectrum, from mainline railroads down to the smallest industrial lines.
Alas, all products still tend to be lumped under the large scale (or worse, G scale) umbrella, with little or no differentiation as to what goes with what in terms of scale, genre, or era. This leads to a great amount of confusion for anyone just entering the hobby, as they hear people talking about the differences between stan-dard and narrow gauge, but they have virtually no way to differentiate one from the other when looking at ads or products on the shelf. While most manufacturers have gravitated toward building products in specific scales, the stores haven’t necessarily shed the everything-goes-with-everything mentality that dominated the hobby’s early years.
Having a better understanding of prototype practices and how railroads work allows us to pick up where the stores leave off. By knowing what kind of equipment is associated with each genre of railroading, we can make more informed choices when purchasing product and building a
roster of equipment that best fits our personal tastes and the themes of our individual railroads. While such themes aren’t a necessary aspect of garden railroading, they do—in my opinion—make for a more effective garden railroad. Learning the his-tory and practices behind what we’re modeling is every bit as enjoyable and fascinating as running the trains, and it gives the trains we operate a sense of perspective.
Scale and gaugeUnlike our brethren in the small scales, where each scale is clearly identified and easy to determine, we in the large scale community have to deal with many different scales, all running on the same gauge track. In one sense, this is liberating, as we can pursue differ-ent interests (standard gauge, narrow gauge, industrial) without worrying about having to build multiple rail-roads or laying extra track to accom-modate these interests. Many large scale railroaders have standard gauge train sets and narrow gauge train sets that they bring out depending on their mood. Others run whatever appeals
to them—standard gauge with narrow gauge—simply because they like the models.
It’s that particular aspect of large scale that, in many ways, is both our biggest blessing and our worst curse. Because everything is designed to run on the same track, all trains made for large scale get lumped under the same generic banner.
When you go to the hobby shop and ask for large scale or G scale trains, you’re not led to an aisle where everything is laid out by individual scales and gauges, as you would if you were to ask to be shown HO or N scale trains. Instead, everything is thrown together, most often sorted by brand or occasionally by type of equipment. This usually occurs because hobby store owners approach model railroading from the one name, one scale viewpoint. Thus, G scale gets placed in a similar light, despite the G moniker often being used indis-criminately to mean anything that runs on gauge 1 track. If you want to sort through this array of boxes to find what works for your interests, you have to do a little homework.
The size difference between standard and narrow gauge equipment becomes evident when seen side by side. This freight transfer shed at Mount Union on the East Broad Top is typical of many such facilities at places where two gauges came together. Incompatibilities in track gauge meant that freight had to be transferred from cars of one gauge to cars of the other. This was most often done by hand, which—even with cheap labor—meant a steady drain on profits. Narrow gauge is on the left and standard gauge on the right. The difference in track gauge is evident as well. Kevin Strong collection
BKS-12468-01.indd 13 2/27/13 2:15 PM

14
A little historyA brief history of the development of the hobby will give some perspec-tive as to why things are the way they are. In the beginning, there was LGB (Lehmann Gross Bahn), a line of trains initially produced in the late 1960s that was designed primarily to be run outdoors. They chose an exist-ing track gauge (gauge 1, or 45mm) for their trains, but instead of modeling standard gauge trains to the existing scale of 1:32, Lehmann opted to have the track gauge represent one meter (a common European narrow gauge), resulting in a scale of 1:22.5. LGB’s
marketing efforts labeled this scale G for either garten (German for garden) or gross (German for large).
Shortly thereafter, other manufac-turers jumped on the garden railroad-ing bandwagon with their products. These were mostly built to be visually compatible with LGB’s line of trains, though not necessarily built to any one particular scale. (For its part, LGB played fast and loose with scale too—most of their models are selectively compressed in one or more dimen-sions.) Kalamazoo Toy Train Works was the first major U.S. player out of the gate, with a rather caricaturish
4-4-0 and some basic rolling stock to go with it. Delton Locomotive Works was among the first companies to try to bring scale dimensions to large scale railroading. They chose a scale of 1:24 (½" = 1'). This scale was already popu-lar with the dollhouse and miniature-car crowds, so it seemed like a logical extension. In half-inch scale, gauge 1 track scales to 42".
It wasn’t much longer before three of the current major players happened onto the scene. Bachmann entered the stage with an inexpensive 4-6-0 (its Big Hauler set), which is still being produced today with much-improved detailing and mechanics. They chose LGB’s 1:22.5 scale, although pay-ing far more attention to actual scale proportions than their German counterpart.
Aristo-Craft (then operating under the REA brand name) and USA Trains also entered the hobby. USA Trains started out with 1:22.5 and 1:24 scale models, similar in fit and proportion to LGB’s product line. Aristo-Craft chose to create its own niche, pursuing 1:29 as its chosen scale and sticking primarily with standard gauge prototypes—some-thing that had not been successfully done in the United States. The 1:29 scale, standard gauge models had the same visual mass of the large scale, narrow gauge models, so modelers could intermix them without any worry of things not looking right. USA Trains would later follow Aristo-Craft’s lead and concentrate its efforts on the emerging 1:29 market.
Today, the majority of hobbyists modeling standard gauge trains in the U.S. have settled on 1:29 as the more-or-less de facto standard scale. The proper scale (correct scale/gauge com-bination) for modeling standard gauge trains on gauge 1, 1:32 scale, has never risen here to the prominence it enjoys in Europe.
On the narrow gauge end of the spectrum, many modelers were content with the compromise of 1:22.5 and 1:24 and its 3"–6" too-wide gauge for model-ing the 3' gauge trains prevalent in the United States. The scale was enjoying strong support from after-market parts
Which car is longer? The top car is 40 scale feet long, while the bottom one is 30 scale feet.
In large scale, where the track gauge is constant, the size of the equipment increases with the scale. Here, a 1:32 scale, standard gauge car (at left) is dwarfed by its 1:20.3 narrow gauge counterpart—essentially reversing the proportions in the prototype photo shown on page 13. There is no difference in track gauge.
BKS-12468-01.indd 14 2/27/13 2:15 PM

15
and kit suppliers until the late 1990s, when Bachmann decided to step away from its existing 1:22.5 product line and introduce a Shay locomotive modeled to 1:20.3 scale, which is the accurate scale for modeling 3' gauge trains on 45mm track. That locomotive was perhaps the single most influential product in chart-ing a course for this segment of the hobby. Almost instantly, kit and parts manufacturers who were producing in 1:24 switched to 1:20.3.
Since then, there has been little new development in terms of 1:24 or 1:22.5 products. Fortunately for those working in those scales, the product lines are still well supported in terms of existing products, but virtually all new develop-ment of narrow gauge, U.S. prototype equipment in the last decade has been done in 1:20.3.
A walk down the aisleToday, the large scale hobby has at least five established scales, all run-ning on the same track, all sitting side by side on the store shelves. Sorting through the different scales would be simple if each manufacturer stuck to a single scale. It would also be nice if the manufacturers would clearly state the scales of their products on their boxes. Some do, some don’t, and in one or two instances, they do, but they’re incor-rect. Those are the things that muddy the waters, but with a little knowledge, those waters are navigable and make a walk down hobby shop aisles easier. The accompanying table lists major manufacturers, prototype gauge of models, and the scales to which they build their models.
Size disparity in a scaleBoxes, and the scale of the products in them, are a big part of the puzzle, but it’s not the whole picture. One of the most common questions I hear about scale stems from confusion over locomotive A being so much smaller than locomotive B but listed as being the same scale. This is espe-cially prevalent at the narrow gauge end of the spectrum (1:24 through 1:20.3), where prototype equipment tended to vary, in terms of size, more than the standard gauge equipment
commonly modeled by the manufac-turers. It’s sometimes hard to grasp how a little 0-4-0 switcher can be the same scale as a large 2-8-2 when there’s so much difference in physi-cal size, but such was the nature of the prototype. The flip side is that you can find products intended for one scale that can be easily adapted to another. My 1:20.3 scale Tuscarora Railroad has many cars that started out as 1:24 or 1:22.5 models and serve with little modification to their actual size. Studying the prototype, you learn that railroads weren’t nearly as concerned about aesthetics as we sometimes are in the garden.
The concept of scale versus gauge is perhaps the single most difficult idea for a newcomer to this hobby to grasp. In some ways, it’s not a concept that’s mandatory to understand in order to enjoy the hobby, much in the same vein as how Lionel O gauge enthusiasts don’t care about the selective compres-sion of their trains. However, if your interests lie in creating a coherent theme for your railroad, understanding the properties of scale and gauge will provide a solid foundation for years of enjoyment. It also makes it easier to walk into a hobby and resist the temp-tation to buy everything on the shelf simply because it can run on your track.
Manufacturers and their scalesManufacturer Product line Prototype gauge Scale Notes
Accucraft
Accucraft Classics Standard gauge, narrow gauge
1:32 (standard) 1:20.3 (narrow)
American Mainline (AML) Standard gauge 1:29
American Model Supply (AMS)
Standard gauge, narrow gauge
1:32 (standard) 1:20.3 (narrow)
Aristo-CraftAristo-Craft Standard gauge 1:29
Aristo-Craft Classics Narrow gauge 1:24 Former Delton product line
BachmannBig Hauler Narrow gauge 1:22.5 Some products incorrectly
labeled as 1:20.3
Spectrum Narrow gauge 1:20.3
Custom Model Products
Standard gauge, narrow gauge
1:32 (standard) 1:20.3 (narrow)
Manufacturerd by Accucraft and Row
Delton Locomotive Works Narrow gauge 1:24 Out of production
Hartland Locomotive Works Narrow gauge 1:24
(nominally)Includes former Kalamazoo and Delton product lines
Hartford Products Narrow gauge 1:20.3 (early products 1:24)
Wood kits, currently out of production
Kalamazoo Narrow gauge 1:24 Out of production
LGB Standard gauge, narrow gauge Varies Models selectively com-
pressed to fit average size
Lionel Standard gauge, narrow gauge Varies Out of production
Märklin Standard gauge 1:32
MDC Standard gauge, narrow gauge
1:32 and 1:24 (nominal) Out of production
MTH Standard gauge 1:32
Northeast Narrow Gauge Narrow gauge 1:24 through
1:19Wood kits, scale varies with model
Phil’s Narrow Gauge Narrow gauge 1:20.3 Wood kits
Piko Standard gauge, narrow gauge Varies U.S. prototype rolling stock
from MDC molds
USA Trains Standard gauge 1:29 Early production rolling stock is 1:24
BKS-12468-01.indd 15 2/27/13 2:15 PM

16
C H A P T E R T W O
What makes them go
Alternative forms of motive power, such as this nearly century-old, steam-powered Carette engine in gauge 1, have been with us a very long time. Marc Horovitz
When we think about model trains, many of us think of old,
clunky Lionel power supplies—even those of us who grew
up well after Lionel’s heyday. Trains and track power are
widely viewed as being synonymous and inextricably
intertwined.
16
BKS-12468-02.indd 16 2/27/13 2:15 PM

17
Of course, with onboard batteries and radio control, modern technol-ogy has changed all that. Add to that the recent growth of live steam in our scales, and there are several choices. What’s ironic is that some of the choices available today (battery and steam) have been around since the dawn of model railroading. That old Lionel transformer was, at one point, a modern innovation to power trains.
Enough history for now. The point is that, when it comes to means by which our miniature locomotives can move, we’ve got a broad palette to choose from. What may be right for one per-son may not be right for another. Each method has its strengths and weak-nesses. Let’s start with a comparison of the two biggies—the old standby, track power, and onboard batteries.
In some circles, the track power vs. battery power argument has become akin to Capulets and Montegues, Hat-fields and McCoys, or “tastes great—less filling.” Advocates on either side of the issue are vocal about the respective strengths and weaknesses. It comes down to how you enjoy running your trains. Track power is still the most common method of running trains in the garden. Every electric locomotive comes designed to be powered through the rails. It’s simplicity in itself. You buy one, set it on the rails, hook up the power supply, and off it goes.
Track powerIf you like to sit back, relax, and watch trains run around the backyard, then track power is probably your best option. Aside from routine mainte-nance, it’s hands-off and you’re free to relax, entertain, or mow the lawn while the train winds merrily through the garden. Likewise, if you like to run many trains at once, track power may also be your most logical choice. Complete automation is well within the realm of possibilities with track power. I won’t say it’s easy, but it is possible.
The Achilles’ heel of this system is keeping the electrons flowing as they should. At the most basic level, the track needs to be kept clean so the locomotive can pick up power from the rails. This means that the tops of the
rails have to be kept clean, the locomo-tive’s wheels need to be kept clean, and the joints between each section of rail have to be solid so that the electrons can flow uninhibited. If you want to run multiple trains on one track, you begin to get into the more complex world of block wiring and other elec-tronic projects. These aren’t necessarily difficult, and there are plenty of books available on the subject. Track-powered railroads are often controlled from a central command station, although wireless walkaround control is becom-ing common, which allows for a greater ability to interact with the trains as they run around the garden.
Battery powerBattery-powered radio control sits at the other end of the spectrum. The greatest advantage to onboard power
is that you don’t have to worry about clean track, complex electronic blocks, or any electronic bugaboos that plague track-powered lines. Once installed, to run the trains, all you need to do is set the locomotive on the rails, and you’re free to roam the railroad. That can be a huge advantage if you like to interact with your trains.
Prototype operations are greatly facilitated by onboard power. What you give up, though, is endurance. Your trains run only as long as the batter-ies hold up. If you can easily swap out the batteries and continue, then all the better, but they are a limiting factor. Fortunately, ever-improving technology makes for far longer run times, with batteries becoming increasingly smaller and lighter. It’s not unheard of to get 3–4 hours run time from a battery pack the size of a deck of cards.
Nearly all electrically powered engines sold today, like this Bachmann 4-6-0, are designed for track power.
Radio control frees you from the vagaries of track power, but the R/C system must be purchased separately and installed, as it was in this engine.
BKS-12468-02.indd 17 2/27/13 2:15 PM

18
If you’re at all faint of heart with using a screwdriver and disassembling a locomotive, perhaps you will want to steer away from using batteries. You can have the electronics profession-ally installed, but that’s an additional expense over what you’re going to lay out for the control throttle. Onboard control is not cheap, costing an extra $100–$300 per locomotive. If you’re a collector of locomotives, this can become cost-prohibitive. If you have a small stable of locomotives that you use regularly, it becomes more economical.
Command controlThere are a few different track-powered command control systems available for large scale, and not all of them are com-patible with each other. These control systems offer freedom of mobility and the ability to run multiple trains on the same track as onboard power does, without the need for batteries. The rails are supplied with a constant voltage, and a decoder on each locomotive uses this
for power. Control signals to the trains are also carried through the rails, with each locomotive having its own address. With command control, though, you have some of the expense and instal-lation issues of onboard power, while still having to maintain clean rails and good conductivity. DCC, or Digital Command Control, is by far the most prevalent form of this style of control. It is a standard control system, and many manufacturers make components that work with it.
Other motive powerFor the vast majority of locomotives, you’ll have to choose battery or track power to make the trains move. There are, however, alternative forms of motive power for the garden. Their histories date back to the beginning of model trains and the earliest locomotives.
Like their full-sized counterparts, some of the earliest toy train locomo-tives ran on steam. This area of the hobby is seeing renewed interest, and
some garden railroads exist today that run purely on steam—no electrons allowed. One could say that live steam is the ultimate driving experience. You have to keep water in the boiler and the fire lit in order for the train to con-tinue moving. This offers a hands-on experience like no other in the garden. It does require almost constant atten-tion. Live steam locomotives are like small children—if you turn your back for 5 seconds, they’ve gone and done something unexpected. Yet, it’s this constant attention that attracts model-ers to this aspect of the hobby. Nothing else gives you the feeling that you are actually controlling a machine.
The experience doesn’t come with-out costs. Live steam locomotives can be more expensive than their electric counterparts. The current array of choices for motive power is expanding, but so is the bottom line. Basic loco-motives start at around $500 and go up considerably from there. The other disadvantage to live steam is the mess.
Modern live steam locomotives can be simple or sophisticated, but all require more hands-on attention than other forms of power. The controls (pressure gauge and throttle) can be seen in the cab of this locomotive built by Jack Wheldon. Marc Horovitz
Pressure gauge Throttle
BKS-12468-02.indd 18 2/27/13 2:15 PM

19
Because they’re real steam locomotives, they tend to be as messy as their larger brethren, leaving oil and other grunge on the rails as they go around. This has to be cleaned off before electrons can flow freely again if you’re also run-ning track power. Live steam tends to coexist more peacefully with onboard battery-powered locomotives.
A modern counterpart to live steam comes in the occasional example of live diesel locomotives. Here, the locomo-tive has a small glow-plug engine that powers a generator, which makes elec-tricity to power the motors that turn the axles, just like the real thing.
The last common form of motive power also has roots equally as deep as live steam, yet has been largely forgot-ten. We’ve all played with toys that run on this principle—a simple spring. The same kind of mechanism that powers a kid’s Happy Meal toy has powered model trains for many years. While the number of commercially available wind-up, or clockwork, trains is infini-
tesimal today, Louis Marx, for instance, made wind-up trains for decades, and old, working Marx wind-ups are often available at train shows at reason-able prices. Their mechanisms can be adapted for our purposes. There are a handful of railroads in England that run clockwork locomotives. The chal-lenge is to wind the locomotive just enough to get from one station plat-form to the next.
There are other means of powering our trains. Wind and airplane propel-lers have been used with some degree of success. Small battery-powered cars have been converted over the years to power a wide array of railroad critters. I imagine some adventurous soul has probably tried rubber bands at one point or another as well.
The thing to remember is that we have never been tethered to a power supply. Alternative forms of motive power have always been around, whether we’ve given them a thought or not.
Electricity demystifiedBefore we get too esoteric in our motive power choices, let’s get back to the basics. If you’ve got a starter set or other basic setup, you’re probably familiar with the components needed to make our trains move. For many of us, how-ever, the language of power for model trains is foreign. How, exactly, do the trains go? What do we need to look for when it comes to powering them?
This is a fairly complex issue, but it is essential to the understanding of how and why things work. To start, let’s discuss what makes an electric motor work, specifically the type of DC (direct current) electric motor typically used in electric trains. Then, we’ll examine the magnetic and electrical principles that are the genesis of trains running in the backyard. And finish with power sup-plies and what goes on inside them.
You may think “I don’t really need to know this.” Well, you should know this if you want to be able to make informed decisions about your trains and their
While exceedingly uncommon, clockwork engines can be a lot of fun. This one was built by Marc Horovitz in 7⁄ 8 scale using a Meccano clockwork motor. Marc Horovitz
BKS-12468-02.indd 19 2/27/13 2:15 PM

20
power requirements. To truly under-stand why your train runs and, more importantly, why it may not be run-ning, you have to know what’s going on inside. Diagnosing, solving, and avoid-ing problems comes much easier if you have a firm foundation in the basics. I’ll go slowly and keep things simple. Let’s start with what’s stuck to the refrigera-tor door. That’s right—a magnet.
MagnetsWe all learned in school that a magnet has a north pole and south pole. A bar magnet has continuous magnetic lines of force (see Figure 1). They travel through the bar and outward from the north pole, then out and around the outside of the bar to reenter at the south pole. We also learned that if you have two magnets, they will either attract each other or push each other away, depending on how the poles are aligned (see Figure 2).
By placing a compass between two bar magnets, the north pole of one magnet will attract the south pole of
the compass needle, while the south pole of the other magnet will attract the north pole of the needle (see Figure 3). The resulting torque on the needle causes it to rotate, align-ing itself in the direction of the two magnets. In the process of turning, the inertia of the compass needle will make it rotate past the alignment position and be pulled back by the magnets, causing it to wobble until it finally rests (see Figure 4a).
Now what would happen if we sud-denly changed the polarity of the com-pass needle just after its inertia caused it to pass the alignment point? Revers-ing the polarity would create repulsive forces on the needle, making it con-tinue to swing away from the align-ment position and align in the opposite direction (see Figure 4b). If the polar-ity was continually changed, the needle would continue spinning. This is the theory behind an electric motor. The compass needle is the electromagnetic pole on the motor, in which magnetic polarity can be changed back and forth.
An electromagnet is simply an electrically activated magnet. There are no inherently magnetic parts to it. When electricity is passed through a wire, a magnetic field is produced (see Figure 5). By coiling this wire, we can control the direction of this field to give it a definite north pole and south pole. If the wire is coiled around an iron bar, the bar acts to increase the strength of the resulting magnetic field. Without the electricity, however, neither the wire nor the iron core has any magnetic properties.
Electric motorsAn electric motor consists of these basic parts: a commutator, an armature, and two magnets (see Figure 6a). The magnets (also called permanent magnets) are similar to those you put on your refrigerator. The commutator is a rotat-ing connection with electrically con-ductive wipers, or brushes, that allow the electricity to pass from the power supply to the electromagnets on the armature. The armature is a collection
Electric motors lie at the heart of almost all the trains we run in the garden. This is the front motor assembly from a Bachmann 2-6-6-2 articulated locomotive.
BKS-12468-02.indd 20 2/27/13 2:15 PM

21
of electromagnets attached to a shaft. For purposes of illustration, we’ll use a two-pole motor.
The poles, in this case, are the ends of one electromagnet. More compli-cated motors (three or more poles) have separate coils running around multiple iron cores. These individual coils are then called poles, even though each actually has north and south magnetic poles. The wire is wrapped around this core, and the ends are attached to the commutator. As the iron bar rotates, the power is connected and discon-nected to the wires coiled around it as the brushes make and break contact with the commutator surface. Thus, at times, it is a magnet and at other times it isn’t. The current through the wires causes the bar to have a south pole at the top and a north pole at the bottom (see Figure 6b). When the magnet is in that position, counterclockwise torque is exerted on the bar and it rotates in that direction. Soon, connectors A and B are disconnected from the power sup-ply and there is no longer torque on the turning bar (see Figure 6c).
Inertia will cause the bar to continue to rotate until another connection has been made (see Figure 6d). Again, the direction of the current in the coil causes a south pole at the top of the bar and a north pole at the bottom. The resulting torque causes the bar to continue turning counterclockwise. This cycle is what makes the motor continue to turn. The more poles on a motor, the less time there is without a magnetic field or resulting torque being created, and the smoother the motor runs.
Now you know what happens inside your locomotive. Knowing what goes on in an electric motor will help you understand why your engine needs the power it does and how to tell what kind of power supply is going to be best for your railroad.
If wire is bent into a coil around an iron bar, a �eld is concentrated in the bar, creating a bar magnet with the polarity shown.
Power source
+-
Direction of rotation
A B
A
B
A
B
Contacts A & B connect swiveling coil on bar to create an electromagnet with the above polarities, causing torque to rotate the swiveling electromagnet.
With no connection to the power source, and thus no current, inertia causes the swiveling bar to continue to rotate past the horizontal position.
When connection is made again, the polarity produced causes continued rotation in the same direction.
Commutator
Electro-magnetic poles
Armature
Magnet
Motor casing
BrushesMagnet
+ -Power source
+ -Power source
+ -Power source
A bar magnet with associated magnetic �eld
Pull
Push
Ends of opposite polarity attract each other whileends with the same polarity repulse each other.
S
N
Net torque
Net torque
Attraction of unlike polarities and repulsion of like polarities cause torque on the compass needle to align it horizontally.
S
N
Net torque
If inertia causes the needle to go past the horizontal position, attracting forces will cause it to return.
S
N
Net torque
Switching polarity of the needle would cause it to continue turning the same direction, thus continuing rotation.
Continued switching of the polarity of the needle just after passing the horizontal position will keep it turning, thus creating a motor.
Figure 1: Bar magnet Figure 2: Attract or repulse
Figure 3: TorqueFigure 6: Electric motor
Figure 4: Needle movement
(a)
(a)
(b)
(c)
(d)
(b)
Figure 5: Electromagnet
BKS-12468-02.indd 21 2/28/13 1:57 PM

22
Power suppliesLet’s start with the magic box that came with our first starter set—the plastic one that plugs into the wall and makes the train move. This is commonly called a power supply (see Figure 7). The power supply consists of three parts: a trans-former, a rectifier, and a filter. The trans-former is an electric device that changes the voltage from the 110 volts (V) that comes out of the wall to the 24V that will ultimately run the train. The current that comes out of the wall is alternat-ing current or AC, thus the 24 volts that come out of the transformer are likewise AC. The rectifier and the filter work together, changing the 24V AC to the 24V DC that the train runs on.
In order to control the train, most power supplies also come with a throttle, or regulator, that varies the voltage between 0V and 24V, causing the trains to speed up and slow down. The output of the regulator runs through a direction switch that allows us to reverse the direction of travel of the locomotive.
We know how a train turns electric-ity into motion, so let’s take a better look at that electricity and the require-ments our train may put on it. There are two things we need to consider when looking at the power require-ments for the train. First, how much voltage can the power supply give us? And, second, how much power, or cur-rent, is behind the voltage?
Current is a measure of the flow of electrons through a wire. Current and
voltage are related by a simple equation: Voltage (V) = Current (I) x Resistance (R)
Voltage is a measure of potential energy. Current (measured in amperes, or amps) is the measure of flow of elec-tricity. Resistance (measured in ohms) is anything that wants to limit that flow.
For an example, let’s go to the kitchen sink. Fill a gallon milk jug with water. This gallon of water is like voltage. It has the potential to do something, but it needs a push. That comes in the form of current. The current is akin to the rate at which it comes out. Poke a small hole in the bottom of the jug. This allows the water (V) to flow out slowly (I) because the hole offers a lot of resistance (R) to the flow of water. Now, cut off the bottom of the jug. That same gallon of water will flow through very quickly. For that same gallon of water (V), flow is high (I) when resistance (R) is low.
The more resistance there is for a given voltage, the less current is avail-able. The less resistance, the more cur-rent is allowed to flow. This is why you don’t want to put a screwdriver across the rails. The screwdriver has no resis-tance and will allow lots of current to flow. High levels of current flow create lots of heat, which is not a good thing. Heat melts wires, burns out locomotive motors, and otherwise makes things go poof ! Generally speaking, poof isn’t a good thing. Fortunately, most power supplies have circuit breakers or fuses to limit the damage that can result.
So what happens when we apply voltage to the motor? Current flows
through the rails and is picked up by the wheels on the train. From there, it goes to the wipers on the motor, through the commutator, and into the coils on the armature. This creates the magnetic fields that cause the motor to rotate.
When there is no load on the motor—that is, when it is running free—little voltage is needed to create a magnetic field strong enough to turn the armature. As we put a load on the motor, by making it turn wheels and pull a train, we increase the physical resistance to the turning armature. This requires more voltage to allow for more current. This higher current increases the strength of the magnetic field until the motor starts to rotate. (Physical resistance, in this case, mimics electrical resistance but can be categorized more as friction.) The greater the load we put on the motors, the more current is drawn to overcome the load. Once we overcome friction, increasing the volt-age and the resulting magnetic field makes the motor turn faster, increasing the speed of the train.
When we choose a power supply, we want something that will be strong enough to handle whatever load we put on it, with power to spare.
Power supplies are rated in terms of volt-amperes (VA). Anywhere else, this would be called watts, but that term is not applied to our trains. This number is the maximum amount of power you will be able to get out of a power supply: Power (P) = Voltage (V) x Current (I)
Now, let’s take a power supply rated at 24VA. This is the total amount of power (P) available. We can either have a lot of volts (V) and little current (A), or vice versa. In general, our trains draw anywhere from 0.5A to 3A under normal operation. If we wanted a sup-ply powerful enough to run our trains at 24V, drawing 3A, we would need at least 72VA. Our 24VA unit would not be up to the chore and would overheat. While our trains are designed to run on 24V, many run unprototypically fast at this voltage. Most trains run best oper-ating in the 10V–18V range. Acces-sories, such as lights, sound, and smoke, draw power as well, so remember to factor those into your power needs.
There are two common forms of motor and gear boxes in large scale. The enclosed box (on left) is common on diesels, though LGB and Hartland use them extensively on their steam locomotives as well. The motor and gear tower (right) is common on steam locomotives.
BKS-12468-02.indd 22 2/27/13 2:15 PM

23
Delivering powerThe amount of power available for the train is perhaps the most important feature to consider, but how that power is delivered is also important. There are two ways that power supplies send power to the motors (see Figure 8). The simplest method is a constant, or linear, voltage. This method changes the speed of the motor by raising and lowering the voltage going to the motor. The advantage of this method is that the motor runs smoothly and stays cooler. The disadvantage is that your slow-speed control is not as good because, generally speaking, lower volt-age means less current, hence a weaker magnetic field. There’s more of a chance the train will stall.
To respond to this, manufacturers started designing throttles with pulse-width modulation. This method uses short bursts of maximum voltage. The
speed is regulated by the time between pulses. The theory being that the short bursts of power create the strongest magnetic field, thus giving the motor the most power to start turning. However, by limiting the time this power is applied, the speed of the motor can be controlled. If there is no electricity flowing, there is no magnetic field to align the poles. The longer the time the power is applied compared to when it is off, the faster the motor will go. This method allows very slow-speed operation, but there may be an audible hum at low speeds as the voltage is quickly turned on and off.
Also, pulse-width modulation causes motors to run a bit hotter than those running with linear voltage, as the higher voltage and resulting current creates more heat. Typically, however, this is not a problem. Most of the loco-motives in our scales are robust enough to safely dissipate any heat buildup.
You may come across some incompat-ibilities or idiosyncrasies with certain sound systems when using this form of control. Check with the manufacturer if you’re not sure.
If you envision a large railroad with many trains running, you will likely want the largest, most powerful supply on the market. If you are modeling a small industrial line, the large power supply will certainly be up to the task, but you could probably scale back a bit, opting for a cheaper, simpler model instead. Use your best judgment, but always err on the side of larger capacity. In general, our trains draw about as much power as a home computer, so we’re not going to create any power shortages by run-ning triple-headed diesel lash-ups. If you keep these basic principles in mind, you shouldn’t have any trouble, except keep-ing the rails clean. That problem, I’m afraid, has no easy answers.
Transformer
Recti�er
110V AC
Filter
To track
Regulator
24V AC
0 00
24V DC Filtered 24V DC
0V
5V
O� 12V 24V
10V
15V
20V
24V
0V
5V
O� 12V 24V
10V
15V
20V
24V
Figure 7: Power supply Figure 8: Sending power to the motor
Linear voltage
Pulse-width modulation
BKS-12468-02.indd 23 2/27/13 2:15 PM

24
C H A P T E R T H R E E
Advanced control systemsControlling our trains in the garden is no longer just a matter of turning a knob and watching them run. Today’s advanced electronics allow us to run multiple trains on the same track, and each locomotive can be individually programmed to match functions of the prototype. Sorting out the alphabet soup of control systems, acronyms, and features can be daunting to a newcomer.
There have been a lot of developments over the past few
years pertaining to new and improved ways to control our
trains. Perhaps new and improved isn’t quite the correct
phrase—the core technology’s been around for quite some
time, but it has recently been developed to the point that
high-tech systems are becoming more mainstream, and
manufacturers are including ways of easily dealing with
them in their models so that the technology is within reach
of the worst technophobe.
24
BKS-12468-03.indd 24 2/27/13 2:15 PM

25
Previously, if you wanted to control more than one train at a time, your choices were fairly clear cut. If you used track power, you were relegated to a lot of wiring, blocks, and all the other things that make wiring small scale, indoor railroads the subject of hun-dreds of books and articles.
There was also Digital Command Control (DCC), which allowed mul-tiple trains to run on the same track. DCC works by overlaying a control signal atop a constant voltage in the rails. Each locomotive has its own unique decoder that reads this signal and picks up the commands intended for it while ignoring other signals.
An alternative was battery-powered radio control. Similar in concept to DCC, a transmitter sends a signal over the air to a unique receiver, thus con-trolling each locomotive individually. Power comes from onboard batteries, so there’s no need for electricity to the rails at all. DCC and radio control installations typically involved gutting a locomotive’s factory-installed electron-ics in favor of the new system.
That was then…Today, our choices are broader, the technology overlapping, and the features many. Now, it’s no longer such a clear cut “either/or” menu to choose from. You can achieve high levels of individual (and multiple-unit) control using a number of different technologies.
The old arguments concerning track and battery power still exist. Track power still requires clean rails and vigi-lance to maintain conductivity through rail joints, often necessitating the added expense of rail clamps. Battery power still requires you to figure out a way to stuff batteries into the locomotive or carry a power car behind the loco-motive to hold batteries and controls. You’re then limited by the capacity of the batteries. The less capacity, the shorter the run time between charges. The modeler still has to choose between the lesser of those two evils.
What’s different now are the variables involved in weighing those options. The evils are increasingly removed from the equation. Stainless
Aftermarket controls are found in two formats. The most common uses screw terminals and small plugs to connect the various leads to the control board (left). Typically, these are well marked or at least coded, with an installation manual illustrating what goes where. Increasingly common are plug-and-play components designed to work with the sockets found in Bachmann and Aristo-Craft locomotives (right). These plug-and-play boards often come with adapters for use in non-plug-and-play environments as well.
In a typical control installation, the top board is a sound system while the lower board contains the radio control receiver and throttle control. The lower one, Aristo-Craft’s Revolution, is a plug-and-play board, but in this installation, it is wired via the adapter board.
An advantage of plug-and-play systems is that installation is usually simple. In most cases, you plug the board into the socket and you’re ready to run. Sometimes there are some quirky issues that must be addressed in the programming, but generally, no extra wiring is needed.
BKS-12468-03.indd 25 2/27/13 2:16 PM
26
steel has made inroads in both code 332 and, more recently, code 250 track. (Code refers to the height of the rail in thousandths of an inch. More on that later.) This significantly lessens the frequency of required track cleaning. Battery technology has also advanced: batteries are far lighter and have greater capacity than they used to, so with suf-ficient power, they can run a train for three or four hours, or even longer, and fit into surprisingly small spaces.
Another big change lies in the locomotives. More manufacturers are making it easier to install aftermarket control systems in their engines. Some, like Aristo-Craft and Bachmann, use plug-and-play sockets, which allow modelers to simply plug in aftermar-ket controls and be off and running. Others have started running all perti-nent control wires to a central point, either in the tender or under the hood of a diesel so that the brains of the locomotive can be easily accessed for installation of new electronics. Some control manufacturers are also making locomotive-specific harnesses to make it easier to install their controls. Alas, there are still plenty of locomotives with wiring you’ll have to trace, cut, and modify to install the newer con-trol systems. That may never change. Fortunately, many of those locomotives have simple wiring to begin with.
What’s out thereSomething of a paradigm shift has occurred in the control systems them-
selves. The choice between track and battery power is no longer inextricably intertwined with your choice of con-trol system. Many of the commercial systems now on the market will work in both environments. Brands that are designed to work in only one environ-ment offer comparable systems that work in the other. You can come up with a list of system requirements that suits how you want to run your trains and not have to worry whether those features are available, given your choice of track or battery power.
So, what’s involved in these sys-tems? The first component is the controller itself. This is the handheld user interface that runs the trains and programs the receivers and decoders. Each manufacturer’s controller is dif-ferent, with its own unique ways of letting you know which locomotive is being controlled, how fast it’s going, its direction, and other information. This interface is arguably the most impor-tant consideration when choosing a control system. If it’s not comfortable in your hand or intuitive to use, then you’re not going to be happy with it. If it’s at all possible for you to test-drive these systems before you settle on one, by all means do so. Inquire in your local club as to what others are using and make a point to get together with them to try things out.
The next main component is the throttle, or motor-control decoder, that drives the locomotive. In many cases, it also controls directional headlights
and other lights and accessories and may contain leads to trigger sounds on separate sound boards. In terms of core functions, there’s little variation between systems. The decoder’s job is to make the motor turn one way or the other.
What separates these controllers are the extras. First, there’s the load-carrying capacity of the throttle. You want to make sure the throttle can handle the current required by the locomotive it’s controlling. For a loco-motive with only one motor, a 3-amp unit might be sufficient. If you’re running a diesel locomotive with two motors and pulling long trains, you’ll want something that can routinely handle 5 amps or more. Small critter locomotives or railcars that don’t draw a lot of current may be able to use smaller, lower-capacity (and cheaper) decoders designed for the small scales.
Some systems have the ability to read back EMF (counter electromag-netic force), which is essentially a way of measuring how hard the motor’s working. They use this to control the speed of the motor—kind of a cruise control to keep the overall speed con-stant when going up and down grades. They also may feed that information to a sound system, which uses it to con-trol things like the volume or cadence of the chuff, based on how hard the engine is working.
There’s also the sound component of these systems. This is, quite literally, the bells and whistles. There’s plenty of
The greatest advantage of plug-and-play sockets isn’t so much the plug-and-play interface but having all the pertinent locomotive information in a central spot. This board shows which pins control what, and with an ohm meter, you can trace these pins to their respective wires if they are using non-plug-and-play components. Also, not all controllable features of a locomotive can be controlled by all available plug-and-play boards, so it’s nice to be able to isolate the ones that cannot so you can wire them independently.
The top plug-and-play socket, in a Bachmann K-27 tender, is accessible by removing the coal load. Below it is an Aristo-Craft C-16, and its entire shell must be removed to gain access to the socket.
BKS-12468-03.indd 26 2/27/13 2:16 PM
27
variation in sound systems. Some pro-vide just basic sounds (chuff or diesel-engine sound), while with others the sky’s the limit.
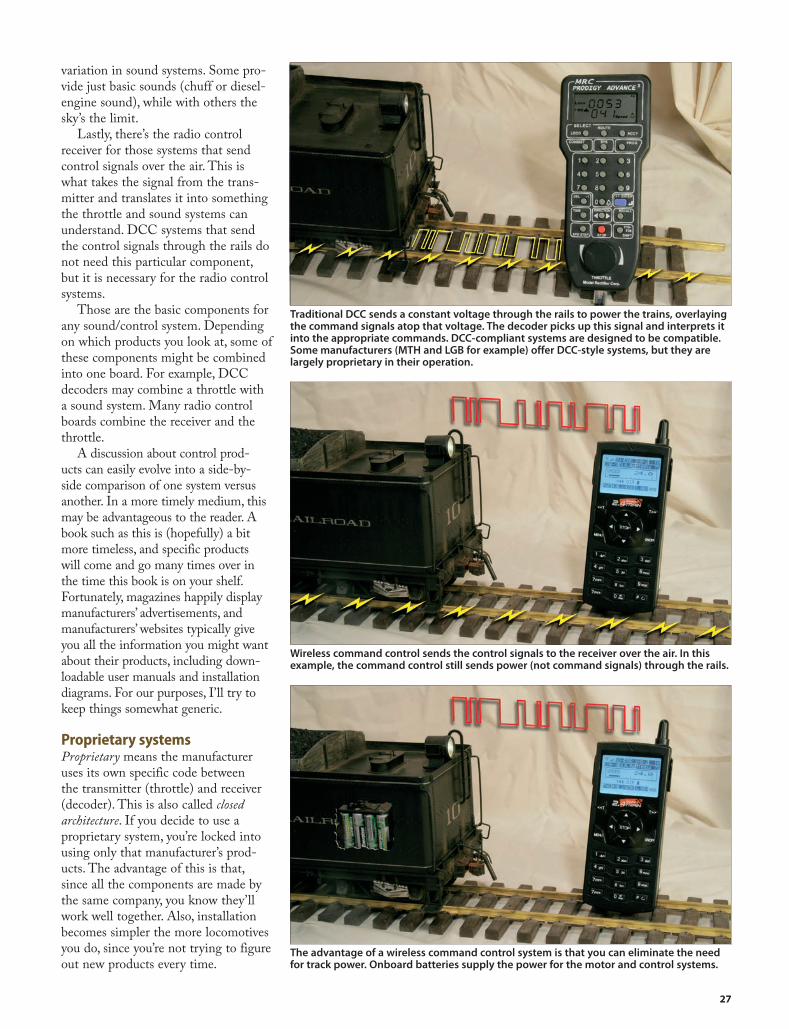
Lastly, there’s the radio control receiver for those systems that send control signals over the air. This is what takes the signal from the trans-mitter and translates it into something the throttle and sound systems can understand. DCC systems that send the control signals through the rails do not need this particular component, but it is necessary for the radio control systems.
Those are the basic components for any sound/control system. Depending on which products you look at, some of these components might be combined into one board. For example, DCC decoders may combine a throttle with a sound system. Many radio control boards combine the receiver and the throttle.
A discussion about control prod-ucts can easily evolve into a side-by-side comparison of one system versus another. In a more timely medium, this may be advantageous to the reader. A book such as this is (hopefully) a bit more timeless, and specific products will come and go many times over in the time this book is on your shelf. Fortunately, magazines happily display manufacturers’ advertisements, and manufacturers’ websites typically give you all the information you might want about their products, including down-loadable user manuals and installation diagrams. For our purposes, I’ll try to keep things somewhat generic.
Proprietary systemsProprietary means the manufacturer uses its own specific code between the transmitter (throttle) and receiver (decoder). This is also called closed architecture. If you decide to use a proprietary system, you’re locked into using only that manufacturer’s prod-ucts. The advantage of this is that, since all the components are made by the same company, you know they’ll work well together. Also, installation becomes simpler the more locomotives you do, since you’re not trying to figure out new products every time.
Traditional DCC sends a constant voltage through the rails to power the trains, overlaying the command signals atop that voltage. The decoder picks up this signal and interprets it into the appropriate commands. DCC-compliant systems are designed to be compatible. Some manufacturers (MTH and LGB for example) offer DCC-style systems, but they are largely proprietary in their operation.
Wireless command control sends the control signals to the receiver over the air. In this example, the command control still sends power (not command signals) through the rails.
The advantage of a wireless command control system is that you can eliminate the need for track power. Onboard batteries supply the power for the motor and control systems.
BKS-12468-03.indd 27 2/27/13 2:16 PM

28
The downside is that you’re banking that a particular manufacturer will be around as your roster continues to grow and will continue to offer products and support for years down the road. It’s a gamble. Historically, it’s largely proven to be a safe bet. Products may change, but individual manufacturers and sup-port have mostly stayed around.
Mixed systemsSome control systems are a mix of proprietary and off-the-shelf parts. For example, there are electronic throttles that use 2.4 GHz model airplane or car radio controls to send control signals. The throttle itself is proprietary, but it plugs into off-the-shelf receivers. While the same radio transmitter and receiver work to control multiple elec-tronic throttles, the individual throttles work differently from each other and offer different features.
Open architectureAn open architecture system is what Digital Command Control (DCC) offers. This means that there’s a base-line standard to which all manufactur-ers conform, so all systems built to that base standard are compatible. In other words, I can install a Brand X decoder in my locomotive, and Brand Y’s DCC throttle will be able to tell it what to do. I can also take my trains to some-one else’s Brand Z DCC-controlled railroad and be able to run on that system. That frees you from the need for explicit brand loyalty and, if your favorite manufacturer either goes under or doesn’t make what you need, you can just go to the next guy on the shelf and be off and running.
The disadvantage of DCC actually stems from its greatest strengths— flexibility and absolute control. DCC control systems currently provide the most precise, prototypical control of our trains. In order to customize con-trol at that level, there inherently has to be some detailed, often complex programming. For the newcomer, this can be quite confusing at first. There’s definitely a learning curve (and a rea-son why there are numerous books on the subject). Fortunately, DCC manu-facturers realize this and have made
programming the most common func-tions relatively transparent, on par with programming other control systems on the market. A user can buy a DCC system and, in many cases, never worry about programming beyond the factory default settings.
Programming higher-end fea-tures can get tricky, and because each decoder has different features at the high end of control, programming may not be consistent from one decoder to the next. Good documentation defi-nitely helps. Some decoders have PC-based programming software to make it simpler, or you can use shareware software available from the Internet.
What they doRegardless of the nature of the protocol used to control the trains, the new sys-tems, for the most part, have the same basic characteristics in terms of what they can do. The first function to look at in a system is perhaps the most basic—how it controls the train’s speed. Digital systems use speed steps to control the speed of the motor (see Figure 1). A step is simply a degree of change from one setting to the next. The more steps, the finer the speed control.
Another common variable is start voltage. This is the voltage at which the motor actually starts turning. At the moment you push the up button or start turning the knob, the throttle jumps to the speed setting at which the motor actually turns, so you’re not wasting energy pushing buttons through steps that don’t do anything.
The top voltage settings allow you to select the speed you want the loco-motive to go at the maximum throttle setting. Think of it as a speed limit. This comes in handy when giving the throttle to the local speed demon.
Different systems deal with the range between the start voltage and top speed differently. A DCC sys-tem allows for 128 steps (or 28 or 14, depending on setting) between the start voltage and top voltage. It doesn’t matter what these voltages are, you have the full range between the two. Others set the speed/voltage limits at various steps, so if you’ve got your throttle set to 100 steps, and your start
voltage is at step 15 and your top end is at step 75, you’ve now got only 60 steps between the two ends. Increasing the total number of steps (say from 100 to 200) would then give you 120 steps between your bottom and top speeds.
Speed curves allow the user to define how fast the locomotive goes relative to the position of the throttle. A motor running at 10 volts doesn’t necessarily spin at twice the speed that it does at 5 volts. A programmable speed curve allows you to set your locomotive so that each press of the up button results in a more-or-less equal change in overall speed (see Figure 2). Or you can pro-gram it so that you have finer control over speed at the lower end than at the upper end. The more points along the curve that can be programmed, the bet-ter the control. This is another aspect of control that comes into play, mostly in terms of matching two or more locomo-tives to operate together. Many modelers will probably never venture beyond the linear curve between stop and full speed.
ConsistingMost advanced control systems are designed to allow the user to run mul-tiple trains on the same track at the same time. To do this, each locomo-tive is assigned a specific locomotive address. By entering this address into the controller, you tell it which of the myriad locomotives on the track you specifically want to control.
Proprietary systems include Aristo-Craft Revolution (left) and RCS Elite. There’s no cross-compatibility between brands.
BKS-12468-03.indd 28 2/27/13 2:16 PM

29
Controlling groups of locomotives as a single unit is called consisting (see Figure 3). When consisting, you’re telling a group of different locomotive addresses to listen to the controller all at the same time. Push the direction button, and all the locomotives will be set to run the same direction. Push the up button, and all the locomotives will start moving.
Different systems deal with con-sisting differently. On some, you can program a locomotive’s behavior to be different when in a consist than when running independently. On others, when you add them to the consist, you might have to specifically tell the sec-ond locomotive, which might now be facing backward, to reverse its motor polarity to match the lead unit.
When consisting, it’s important to make sure the speeds of the locomo-tives being run as a group are at least marginally close to being the same. That’s where speed matching comes
into play. You match speeds by setting the start voltage, top voltage, and speed curves so all the locomotives run nomi-nally at the same speed. It’s not critical to be spot on, but you don’t want one locomotive running twice as fast as the other, either.
Lights, bells, and whistlesMost control systems offer some form of directional lighting. On some, it’s more programmable than others, but at the least, the front light will be on when in forward and the rear light will be on when going backward. You can also find DCC decoders with built-in flashing patterns for things like ditch lights and firebox flicker. For non-DCC systems, there are plenty of small lighting-control circuits on the market that offer similar functionality.
Currently, non-DCC systems do not offer as many independent features to be controlled as do their DCC counterparts (typically around
a half-dozen, compared to two dozen or more for the latter), but practi-cal experience has demonstrated that many users rarely use more than three or four, anyway. The rest are just “because I can” type controls. I would expect to see the non-DCC systems matching the function capacity of the DCC systems in the future. Which system is right for you has everything to do with how you intend to run your trains. Wherever you fall on the control spectrum—from “turn it on and watch it run” to the control freak, there’s a control system that will suit your needs.
So, how do you go about choosing which system might be right for you? What are the considerations? Chances are, if you’re looking to choose such a control system, you’ve already looked at the ads and read through too many manufacturers’ websites, searched online forums for input, asked club members what is best, and your eyes
Some systems use commercial radio control gear and furnish an add-on throttle, such as G-Scale Graphics’ RailBoss shown here and RCS’s Beltrol systems. Any radio control controller will work with these throttles, but the throttles cannot be linked to other manufacturers’ similar throttles for consisting or other purposes.
Open architecture DCC allows you to use any DCC controller with any DCC decoder. There may be subtle differences in how each works in terms of programming and controlling various functions, but they all work together. Shown are products by NCE (left) and MRC.
BKS-12468-03.indd 29 2/28/13 1:57 PM

30
are glazed, and you’re more confused than ever. That’s perfectly normal.
It used to be that the first consid-eration in choosing a control system was whether or not you were running track or battery power. Many of today’s control systems can be used in either environment, so the choice of track or battery is really one of personal
preference. Each has its strengths and weaknesses, and we’ll explore those in a bit. The reality is that, in terms of modifying locomotives for any form of advanced control system, there’s not a lot of difference between the two.
In terms of choosing the right system for you, first, look at what you want to be able to do. How much
control do you want over your trains? Most available systems allow you to control multiple locomotives from one transmitter and have some level of auxiliary control for lights and sounds. If there was a food pyramid of controls, you’d find these at the bottom. If you frequently run multiple locomotives as double- or triple-headed consists, not all systems allow this, so you’ll want to make sure the system you choose can handle that. At the top of the pyramid, you’ve got all the extras, like triggering specialized sounds or particular lighting functions, such as flashing strobes and ditch lights on modern diesels. These functions tend to be much more brand specific, so if you’re after that ultimate level of control, that will likely be the determining factor.
The first step is to understand what happens inside the locomotive and get a grasp on how it’s wired. Large scale locomotives run the gamut of complex-ity in wiring. At the most basic level, a locomotive takes power from the rails and sends it directly to the motor and lights (see Figure 4). In a step up from that, power comes in from the rails and goes to a printed-circuit (PC) board or two, which distributes that power sepa-rately to the lights, motor, and smoke units (see Figure 5). In complex systems,
Speed
Start speed
128 steps
Max. voltage
Preset numberof steps
Wtih DCC speeds steps, the user programs in the starting voltage and top voltage, then the DCC controller interpolates 128 steps between those two values to give smooth control between the two ends.
0
Volta
ge
Speed
Top s
peed
Start speed
0
Volta
ge
Top s
peed
Some systems, like Aristo-Craft’s Revolution, set speed steps in terms of a percentage of the entire range, then limit the start voltage and top voltage as a subset of that range. Increasing the number of overall steps increases the number of steps within that subset range.
12
12 15
15 12 15
A single controller is capable of controlling multiple locomotives at the same time. When running individually, the user must enter the address for each locomotive to be controlled, then change it to control another. When running trains in a consist, the controller groups a number of di�erent locomotives into a single consist, sending control signals to each locomotive simultaneously.
Individual controlOne controller addresseseach locomotive individually.
ConsistingOne controller sends thesame commands tomultiple locomotivessimultaneously.
Speed steps
Max. voltage
0
Volta
ge
A linear speed curve provides equal changes in speed between each step in the throttle (green). By changing the curve, the amount of change in speed from one step to another is altered. A concave curve (red) o�ers better slow-speed control, as the di�erences between steps are smaller at the slow end of the curve. A convex curve (blue) gives quicker acceleration at the low end, then less change at the top end.
Figure 1: Speed steps
Figure 3: Consisting
Figure 2: Linear speed curve
BKS-12468-03.indd 30 2/27/13 2:16 PM
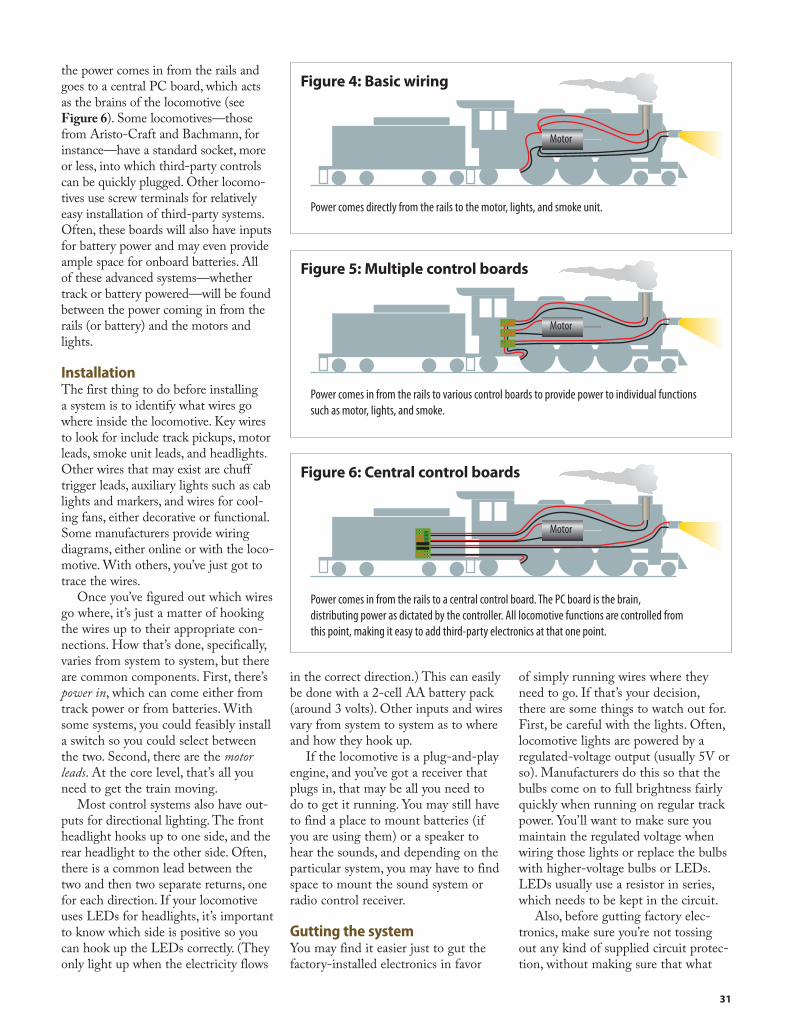
31
the power comes in from the rails and goes to a central PC board, which acts as the brains of the locomotive (see Figure 6). Some locomotives—those from Aristo-Craft and Bachmann, for instance—have a standard socket, more or less, into which third-party controls can be quickly plugged. Other locomo-tives use screw terminals for relatively easy installation of third-party systems. Often, these boards will also have inputs for battery power and may even provide ample space for onboard batteries. All of these advanced systems—whether track or battery powered—will be found between the power coming in from the rails (or battery) and the motors and lights.
InstallationThe first thing to do before installing a system is to identify what wires go where inside the locomotive. Key wires to look for include track pickups, motor leads, smoke unit leads, and headlights. Other wires that may exist are chuff trigger leads, auxiliary lights such as cab lights and markers, and wires for cool-ing fans, either decorative or functional. Some manufacturers provide wiring diagrams, either online or with the loco-motive. With others, you’ve just got to trace the wires.
Once you’ve figured out which wires go where, it’s just a matter of hooking the wires up to their appropriate con-nections. How that’s done, specifically, varies from system to system, but there are common components. First, there’s power in, which can come either from track power or from batteries. With some systems, you could feasibly install a switch so you could select between the two. Second, there are the motor leads. At the core level, that’s all you need to get the train moving.
Most control systems also have out-puts for directional lighting. The front headlight hooks up to one side, and the rear headlight to the other side. Often, there is a common lead between the two and then two separate returns, one for each direction. If your locomotive uses LEDs for headlights, it’s important to know which side is positive so you can hook up the LEDs correctly. (They only light up when the electricity flows
in the correct direction.) This can easily be done with a 2-cell AA battery pack (around 3 volts). Other inputs and wires vary from system to system as to where and how they hook up.
If the locomotive is a plug-and-play engine, and you’ve got a receiver that plugs in, that may be all you need to do to get it running. You may still have to find a place to mount batteries (if you are using them) or a speaker to hear the sounds, and depending on the particular system, you may have to find space to mount the sound system or radio control receiver.
Gutting the systemYou may find it easier just to gut the factory-installed electronics in favor
of simply running wires where they need to go. If that’s your decision, there are some things to watch out for. First, be careful with the lights. Often, locomotive lights are powered by a regulated-voltage output (usually 5V or so). Manufacturers do this so that the bulbs come on to full brightness fairly quickly when running on regular track power. You’ll want to make sure you maintain the regulated voltage when wiring those lights or replace the bulbs with higher-voltage bulbs or LEDs. LEDs usually use a resistor in series, which needs to be kept in the circuit.
Also, before gutting factory elec-tronics, make sure you’re not tossing out any kind of supplied circuit protec-tion, without making sure that what
Power comes directly from the rails to the motor, lights, and smoke unit.
Motor
Power comes in from the rails to various control boards to provide power to individual functionssuch as motor, lights, and smoke.
Motor
Power comes in from the rails to a central control board. The PC board is the brain, distributing power as dictated by the controller. All locomotive functions are controlled from this point, making it easy to add third-party electronics at that one point.
Motor
Figure 4: Basic wiring
Figure 5: Multiple control boards
Figure 6: Central control boards
BKS-12468-03.indd 31 2/27/13 2:16 PM

32
you’re replacing it with is similarly pro-tected. Regardless of the electronics I’m installing in a system, I always wire a fuse into the line carrying the power in, just in case. If nothing else, it’s cheap insurance.
Keeping things accessiblePerhaps the biggest consideration in any installation is the ability to get at key controls. The most obvious, espe-cially for battery power, is some sort of power switch and charging jack if you’re using onboard batteries. There are lots of places you can hide switches, but it’s important to make them quickly accessible in case you need to kill the power immediately. Being a steam guy, most of my electronics installations are in tenders, so I’ll typi-cally hide power switches in toolboxes, water hatches, or somewhere on the tender floor. Sometimes you have to get a bit creative.
Sound systems usually have some kind of external volume control switch, and it’s a good idea to put that in a spot where it can be fairly easily accessed. Likewise, some sound systems have the ability to be programmed via a PC, to which they connect via a plug of some kind. If you’re going to be changing your programming on a fairly routine basis, you’ll want to make sure that plug is located where you can get to it. Otherwise, you’ll have to pull the board out of the installation each time you want to tweak something.
The primary connections of any advanced control system are labeled on this board: power in, motor power out, and directional headlight controls.
It’s sometimes easier to toss the factory wiring, and wire things yourself or, as in this case, wire new electronics into a kitbashed locomotive. Here, I am soldering the wires for the front headlight and classification lamps.
For nonremovable batteries, provision must be made for charging them. Here, the power switch shares a toolbox with the charging jack.
The volume switch for this sound system is located on the front wall of the tender.
Volume switch
BKS-12468-03.indd 32 2/28/13 1:57 PM

33
Speaking of pulling stuff out, one key consideration when running on battery power is whether you want your batteries to be removable or not. The advantage to removable batteries is that you can swap out old for new and keep the same locomotive running for hours, or days, as long as you have a supply of charged batteries. The downside is that you have to provide easy access to get the packs in and out. Many of my steam locomotives have removable coal loads or tender shells for quick access to the batteries.
Others have built-in battery packs because it’s just not feasible to have easy access. On these, I’ve got a charg-ing jack somewhere on the tender itself. I just remove the tender from the track and plug the charger into it.
I wish there was a way to write a universal how-to manual on installing advanced control systems. Alas, there’s enough difference between each of the available systems and each individual locomotive that it’s just not possible. There is enough common ground, though, that the basic principles of the installation are the same. Once you have those basics down, the rest is fairly easy. If you get stuck along the way, I’ve found that manufacturers are ready to help out. Some even have installation instructions for various locomotives on their websites. Is it as easy as just putting a locomotive on the track and turning a knob? No, but it can be a lot more fun!
AB
C D
E
This plug-and-play socket is accessible by lifting out part of the boiler. Others can be accessed by removing a coal load or part of a diesel’s hood.
In order to install batteries and speakers, more of the locomotive may need to be removed.
A removable tender shell allows easy access to batteries, so they can be swapped for fresh ones.
Key components to install are (A) receiver, (B) power switch, (C) fuse, (D) speaker for sound system, and (E) batteries.
BKS-12468-03.indd 33 2/27/13 2:16 PM

34
C H A P T E R F O U R
Planning your railroad
A successful garden line is the result of careful consideration of many outside influences that can impact the railroad and its environment. Climate is just one of them. A light snow has fallen on the Woodland Railway in Maryland, as locomotive No. 18 returns to the yard after delivering its load of heating oil and firewood.
If you’re like most folks, you think the track running among
the petunias is nice, but it’s a far cry from what you envision
for your backyard empire. You see a grand railroad with
sweeping curves, long trestles, and lots of trains passing
each other. There’s only one small problem with that vision:
it may not work.
“What?” you ask. “Isn’t it my railroad? Can’t I do what I
want?”
34
BKS-12468-04.indd 34 2/27/13 2:16 PM

35
Yes, you can, but there’s a lot more to a garden railroad than just track on the ground. There are a number of things you need to seriously sit down and think about before you start tearing up the sod. These aren’t necessarily train-related thoughts but an analysis of your lifestyle and how the trains play into that. There are also some things that you can’t control, such as the weather.
Design considerationsLet’s face it—if you live in the des-ert, the chances of your re-creating a lush eastern landscape are pretty slim. Climate is perhaps the single most influential element on your railroad. The only way to change your climate is to relocate. Of course, climate doesn’t only affect the plants you put on your railroad. Temperature and environment take their toll on the track, roadbed, and structures as well. If you live in a moist climate, you have a unique set of challenges to deal with. Cold climates present their own problems. Dry, desert conditions may be great for leaving things outdoors, but the heat will adversely affect the railroad in different ways. A good litmus test for how climate will affect the railroad is to look at your house. What do you have to do to maintain it through the seasons? Chances are that what you have to do for your house will be echoed in the garden.
Perhaps the next most influential force is your family. A garden railroad will impact every family member, whether they take an active role in its construction or not. Their needs and interests must be considered. If you have small children, it might be best to locate the railroad in an area that doesn’t see much action. That way, it will be safe from soccer balls, bikes, and other things that go bump. And what about the activities of your significant other? If you enjoy entertaining, design the railroad to accommodate social functions, either by tucking it out of the way or integrating it into the social landscape. The railway can be a great conversation piece.
Of course, the space available also plays a role in determining how achiev-able your grand vision is. If you don’t
have a large yard, or if you have to restrict the size of your railroad for any of the previously mentioned reasons, then perhaps you should tailor the type of railroad you ultimately build to suit the limited space. Consider a small industrial railroad instead of a large mainline operation. Or think of ways to scale down your vision to its basic elements to fit the space.
Too much space can also be a prob-lem. If you have lots of yard to deal with, the desire to go big can be very strong. Railroads have a tendency to fill available space. If there’s a lot to start with, make sure you have a strong hold on the reins. Large railroads take an inordinate amount of time to maintain.
Regardless of how much space you have, your railroad will become an
important, if not the most important, landscape feature of your yard. Put it where it can be enjoyed from both outside and inside the house. Because the railroad is a focal point, it will draw attention wherever it can be seen. If you have a favorite room in the house, set the railroad so it can be seen from the comfortable indoors. Family rooms and dining rooms often have large picture windows that can serve as nice frames for the railroad.
The downside of a garden railroad drawing attention to itself is that the attention it draws may not be what you want it to receive. Security is an impor-tant aspect of constructing a railroad. No matter how much or how little we invest in this hobby, you hate to see someone come in and take it away.
Roger Caiazza’s Leatherstocking Line follows the natural slope of his backyard in Syracuse, N.Y. While less expensive to build, ground-level lines are more prone to accidental damage. If you have kids or large dogs, consider elevating your line a little.
An elevated railroad offers protection from foreign objects, while providing opportunities for points of interest such as trestles. Here, the brick walkway ties the railroad into the surrounding area yet provides a border that allows the railroad to stand out.
BKS-12468-04.indd 35 2/27/13 2:17 PM

36
Take a look at your neighborhood. If you leave a shovel on the front porch, will it still be there when you get home? If not, then perhaps keeping the railroad in the backyard behind a fence would be a wise move.
Many of these considerations seem to be mutually exclusive. That’s why you have to sit down and do a little planning on the railroad to see if there are ways to compromise. Perhaps a steel trestle instead of the wooden one you wanted will better survive the onslaught of errant round objects. A new hedgerow may provide some privacy, keeping the railroad out of sight from the street. There are cre-ative ways to accomplish any number of things. Ask other hobbyists in your area for their thoughts. They’ve had to make some of the same choices and considerations you’re making now. You might find that some of your fears are unfounded, or you may discover con-flicts you didn’t know existed.
Perhaps the most often-overlooked aspect of building a garden railway is your own stability in your current environment. In today’s job market, major relocations may be common. Is the location you’re in likely to be the same one you’re in 10 or 15 years down the line? If not, then perhaps
you’d better scale back your ideas. Garden railways are like any other project—they always take twice as long to complete as you originally think. If you’re only going to be in your present location three or four years, don’t plan on laying 1,000' of track. You’re not going to get it all down before you may move.
Resale of your house is another thing to consider. What will the garden look like without the trains? Will the new owners have a white elephant in the backyard that will have to be bull-dozed, or will the garden survive on its own merits?
Stability is not only a consideration for the upwardly mobile. If you’re looking forward to retirement, or are there already, you should examine your situation as well, not so much from a geographically mobile standpoint but from a physically mobile one. Age has a nasty tendency to bring limita-tions along with it. Will your railroad be able to accommodate these? If you have trouble bending over, consider elevating your railroad a few feet. It need not be high, which is especially important if you have young grand-children you wish to share the trains with. If you have trouble moving around, perhaps a compact railroad
built closer to the house will better suit your needs. What’s the fun of running trains if it hurts to do so?
Speaking of hurting, make sure the trains won’t hurt your bank account. I don’t know where the phrase dirt cheap came from, but whoever came up with it never priced topsoil. Building a gar-den can be expensive enough. Throw trains into the mix, and you really have to be budget conscious. Don’t skimp on the kids’ college education just to buy one more locomotive. You can enjoy this hobby with little discretion-ary income, but you need to tailor your railway accordingly.
Building a garden railway is some-what akin to getting a new pet. There are a lot of things to think about. The railway will be with you for years to come, and you need to plan wisely. Most of the choices you’ll make have little to do with the trains themselves but with how you interact with them and the railroad. I’m sure there are other considerations that will occur to you as you think about the future of your garden railway.
It’s a lot to ponder, but if you take a moment to plan first, you’ll be hap-pier down the line. Like a new pet, the garden railway needs to be able to play nice with everybody. If it doesn’t, then
Rock cuts lend a sense of depth and drama to the miniature landscape. The key is to make sure you can easily reach into the cut to remove leaves, twigs, and derailed equipment.
Often, a railroad is designed to be a kinetic feature to a garden, something to be enjoyed while lounging around. Doug Mayes (in red shirt) built his Colorado & Sparktown Railroad alongside his porch.
Getting the trains to and from the railroad can often be a chore. I built this small storage shed at the end of a spur on my railroad to store rolling stock for easy access.
BKS-12468-04.indd 36 2/27/13 2:17 PM

37
you’re going to find yourself getting very frustrated very fast. But at least the railroad will never ask to be let outside at three in the morning.
Starting smallThe key with any garden railroad plan is to start small. You may have a big plan in mind, but divide it up into little projects or phases. Since you’re likely just starting out, you may have no feel-ing for how much time and energy you have to devote to the railroad, or how much the railroad is going to require. Unfortunately, that’s not something anyone can help you with, either. It’s all dependent on what you have going on in your life. Starting with a small line allows you to get your feet wet with an operating railroad, and then you can expand outward as time and energy permit. Otherwise, you may end up with a weed-infested dragon in the backyard. Make sure you can reach your goals before you set them.
There is another reason for starting small. Again, it harkens back to just starting out. You’re going to make mis-takes. You’re going to do things that, for whatever reason, just won’t work in your setting. It’s a lot easier (and cheaper) to replace 100' of track than 1,000'. It also takes less time to correct the boo-boos. I like to call these learn-ing experiences. Mostly we learn that we don’t want to experience it again. You will also learn what went wrong and how to do things better the second time. The more folks you talk to before you begin, the fewer of these experi-ences you will encounter. Nothing is foolproof, however. We fools are very inventive.
Many things come in threes, and there is a third reason to start small. Remember all those choices I told you not to worry about? Well, once you get the trains running on the railroad, you’re going to start making some of those choices. That may involve chang-ing a few things on the railroad. If you go with a larger scale, you may need to increase clearances along the track. If you decide you like modern, mainline railroads, you may eventually want to broaden your curves to fit longer roll-ing stock. Live steam? Better get rid of
those steep grades. Again, it’s cheaper and easier to fix things on a small rail-way than to rip out a large one.
Creating accessThere are other considerations that may not come immediately to mind for newcomers to the hobby. In looking back on my old railroads, the one thing I realized is that I didn’t run trains as often as I would have liked. The pri-mary reason for this perhaps lies in the time needed to physically get the trains outside. I stored them on shelves in the basement and hand-carried each car out to the railroad, two or three at a time. As I enjoy prototypical operations in the garden, that generally required five or six trips up and down the stairs each time I wanted to play.
On my current railroad, nearby storage of the trains allows for much more frequent running. There are a few ways to accomplish this. One of the most common methods is to run tracks into a nearby shed or garage. I opted for a small storage shed along the fence. Many modelers build a false front on the shed to make it look like a building on the railroad (something that’s on my to-do list). A third option is to run the trains into the house through a hole in the wall. These methods eliminate the need to constantly handle the rolling stock prior to each run.
If running tracks into a storage structure is not possible, consider running them as close as possible to where the trains will be stored to
Jim Strong watches as a Woodland Railway passenger train eases down the grade from Hemlock Hills. The formal paths at the left wind their way around the outside of the entire railroad, while more informal paths allow access to the railway itself.
A flagstone path gives operators easy access to the complex switchwork at Woodland Junction on the Woodland Railway.
BKS-12468-04.indd 37 2/27/13 2:17 PM

38
minimize carrying distances. Certainly, not having to carry trains up and down flights of stairs is an advantage.
Of course, getting the trains to the railroad is only half the battle. Getting them onto the track can be equally challenging. Adequate access to all points of the railroad is very important. Dry river beds and miniature roadways are some of the most common meth-ods of gaining access, but the entire railroad can’t be a dry river bed. Places to put your feet are especially impor-tant around switches and other features that require frequent attention. Strate-gically placed stones can go a long way toward providing such access. One of my favorite methods of using stones is to have a pile of them lying around when I run trains. Anywhere I find myself needing to step, I grab a stone and set it there. I worry about how to landscape them into the surrounding terrain later—the important thing is to get them there as placeholders.
Access to tunnels is also important. Tunnels should be no longer than twice the length of your arm, for what is an obvious reason. They’re great places for a variety of wildlife to congregate, and trains will derail in the middle as a result. At the same time, make sure you can get your body to the tunnel’s entrance in order to reach in. There’s
one tunnel on my dad’s Woodland Railway that requires a bit of a contor-tionist’s act to reach into. Yes, we’ve lost trains in there. No, they didn’t emerge unscathed after being poked out with a broom handle.
Of course, if you can’t go to the mountain, the solution may be to bring the mountain to you. Elevated railways offer ease of access without the prob-lems inherent in ground-level lines. When everything’s within arm’s reach, there’s less of a need for other access features, except for routine mainte-nance chores such as weeding and cleaning track. The drawback is that elevated lines require more work at the beginning to raise the ground to a high enough level.
There are many different ways of elevating a railroad. Most common methods involve bringing in large quantities of dirt or other fill material to gain the needed elevation. The road-bed and track can be built up first and then back-filled, or you can bring in the dirt and do the landscaping before the track is laid. Regardless, you’ll want to build some kind of retaining wall so the dirt doesn’t eventually wash away. Your choice of materials for these walls is nearly limitless. Landscaping blocks, timbers, and railroad ties are the most common materials used. Natural
stone can be more expensive, but the improved aesthetics usually make the expense worth the effort. If you’re for-tunate to live in a particularly moun-tainous or rocky area, the materials may be right at your fingertips.
I’ve also seen shrubbery used effec-tively as a virtual retaining wall. With the track supported by some kind of substructure, the vegetation is allowed to grow up around the support, giving the track the appearance of running along the tops of the bushes. This method works well along fences and other areas where building a real retaining wall would otherwise block groundwater drainage.
Selecting featuresSo how do you figure out what goes where? How do you translate the blank canvas of an empty backyard or exist-ing garden? The first step is to list the features you’d like to include. Do you want a large storage yard? Perhaps a loop that passes over itself for a dra-matic over-under vignette. Stations, industries, passing sidings—anything that you want, put it on a list. If you want to sketch ideas out, by all means do so. Let the ideas flow.
Next, start doodling ideas about where you want the track to go. My favorite method is to get a few hundred
Railroad ties and landscaping blocks can be used to create a terraced garden area out of the sloping back edge of the yard. The terracing gives a formal boundary to the railway while elevating it to a workable height.
Paths don’t need to be long, or even noticeable. Here, a few well-placed rocks provide needed access to the railway without calling attention to themselves.
I use a garden hose to lay out the proposed track through an existing garden. Hoses give your eye a sense of where the track will go and how it will look. They also tend to form fairly smooth, even curves as you drape it around the landscape.
BKS-12468-04.indd 38 2/27/13 2:17 PM

39
feet of garden hose and start laying it around the yard. (If you don’t have a few hundred feet of garden hose, your neighbors may be happy to lend you theirs for an afternoon.) Run the hose wherever you think you’re going to want to put track. If it doesn’t look right, move it around until it does. If it helps to set some track and some trains out during this process, do that as well. This is the fun brainstorming phase of building the railroad. After this, it’s time to examine the space you have, and see how practical it will be to fit everything in.
Looking at curvesThe shortest distance between two points is a straight line. Unfortunately, this offers little in the way of exciting scenery. Curves are an inevitable part of any garden railroad. How we plan for and deal with them is, perhaps, the most important decision made for our railroad. Curves literally shape the rail-way. The curves we put on our railroad affect where our trains run, the types of trains we will ultimately run, and the way we view our trains.
Let’s start with a look at curves on the real thing. Real railroads don’t put curves in their track unless they abso-lutely have to. When they do, they use the broadest curves that can possibly fit, given the topography of the land. A tight curve means increased friction and drag from the train going around it, which means lost energy, time, and money. Narrow gauge railroads originally appealed to railroad builders because the equipment was smaller and could negotiate tighter curves. They were also cheaper to build because they could fit into places that standard gauge railroads couldn’t.
On our garden railways, we could run straight tracks until they absolutely have to turn, such as when they come to a tree or fence. However, this isn’t terribly exciting and often runs con-trary to our second consideration, the aesthetics of the garden.
There is a delicate balancing act in laying out track for the garden. We want the track to look prototypical. At the same time, the track forms strong lines in the garden setting. Personally, I’m not a big fan of straight track. In
For my Tuscarora Railroad, I wanted to incorporate as many features of the prototype towns along the East Broad Top’s Shade Gap branch as possible. Old Interstate Commerce Commission maps provided locations of buildings, bridges, roads, and streams, many which would ultimately be included in the railroad.
After considering the physical limitations of the yard combined with features I wanted to include in the railroad, I drew up this sketch for what would ultimately become the Tuscarora Railroad.
Mary Hutchins’ Dogleg Gulch Railway shows how small-radius curves can be used effectively in the garden. The entire railway is only about 10' x 20', yet there is a lot of track and garden in the space. You can’t see the entire line from any one spot, making it seem larger than it actually is.
BKS-12468-04.indd 39 2/27/13 2:17 PM

40
most cases, I find it rather boring, and it often serves to dissect the visual flow of a garden. You should be guided by your own taste here. One rule, how-ever, stands true from prototype to the garden—use the widest possible curve you can fit in your space. If you’re really cramped, there are tricks you can use to fool observers into thinking your curves are broader than they are. More on that later. In all my years of doing this, I’ve never heard anyone say, “Gee, I wish I used tighter curves.”
If you are limited in terms of space, and must use tight curves, tailor your trains to suit your railroad. Don’t run trains that are too big for your curves, If a 4' diameter is all you can fit in, don’t expect to run large diesel loco-motives with long passenger cars. Yes, they may work, but they’ll look hid-eous and ruin the natural scene you are trying to re-create. Operationally, you’ll be putting undue strain on the locomotive and risk derailments while trying to negotiate these curves.
Real narrow gauge railroads may have had tighter curves than standard gauge, but these were negotiated by much smaller equipment. Look to industrial lines or small narrow gauge short lines for inspiration if you’re planning a small railroad. The smaller trains will make the railroad look larger than it really is and help make the scene more believable. There are plenty of interesting and unique shortline and industrial railroads
on which to model a garden line, so chances are good you’ll find one to inspire your designs.
Also, if you’re running tighter curves, avoid going from a straight section of track smack into a tight-radius curve. Remember as a kid, how you used to run your Lionel trains as fast as they could go, until they rolled off when they hit a curve? The physics do not change in the garden. Trains don’t like being forced to change direction abruptly. Neither does the eye. Using a transition curve will go a long way toward easing your trains and eyes around tight corners.
A transition curve is a length of track that has a much wider radius than the main body of the curve that slowly guides the train into the turn (see Figure 1). If you’re using flextrack, these are easy to work—just gently bend the track as you head into a curved section. If you’re using sectional track, you can simulate a transitional curve by using a length of a wider-radius curved track before you lay the remaining sections of the tight-radius curves. You can take this one step further and use three lengths of pro-gressively shorter-radius track to make your curve, thus minimizing the total number of tight-radius sections neces-sary. Use a similar transition at the other end of the curve. This is not so much a concern if you’re using truck-mounted couplers.
When laying out your track, you’ll want to watch out for a reverse curve, where two curved sections form an S bend, (see Figure 2). If you’re using super-wide-radius curves, this isn’t so much of an issue, but for radii under 5', you’ll want to make sure there’s at least a short length of straight track between the two curved sections. This length can vary, but a good rule of thumb is to make it as long as your longest piece of rolling stock. The couplers on your trains are pulled in opposite directions as they pass over an S curve. The farther apart they are pulled, the greater the chance for a derailment. By separating these curves with a straight
When using small-radius curves, it’s best to stay with shorter prototypes, often industrial type equipment, that fit nicely into the landscape (left). Tight curves and long trains don’t go together well (right). Even if the train will make it around the curve, it won’t look good doing so.
Broad curves lead the eye around a scene, giving the mind somewhere to go. The yard at Hemlock Hills on Jim Strong’s Woodland Railway bends around with the main line.
BKS-12468-04.indd 40 2/27/13 2:17 PM

41
section, you minimize the distance the couplers are offset.
How do you combine the prototype world and the garden? It takes a bit of imagination, but you will be rewarded with a pleasing scene. Real railroads only put in curves when necessary, so give all of your curves reasons for being there. Tailor the landscaping to fill out the inside of a curve, giving the track something to go around. This could be something simple like a large bush or the side of a mountain. The edge of the railroad also gives the eye a reason to accept the track rounding a curve, but running the track right against the edge of the railroad isn’t always the best idea. You will probably want to put some space between the track and the railroad edge, so you can add plants and other things to create a bit of fore-ground to the scene.
If your space is limited, and you need to resort to tight curves, there are ways of disguising curves so they appear wider than they really are. It’s all a matter of perspective—that is, the viewer’s perspective of the curve. Curves appear wider when you stand in the middle of them. If you have to include a relatively tight curve, try to place it so that an observer is on the inside of the curve. When you have a tight curve, but you have to look at it from the outside, consider placing a visual barrier of some kind (a tall plant, rock outcropping, or tunnel) to hide part of the curve from view. If the eye doesn’t see the track doubling back on itself, then the mind accepts that the curve is wider than it really is.
Before you think your woes will be eliminated by using 20'-diameter curves, there are some things to watch out for as well. The biggest concern is the amount of real estate those curves eat up. If you are making a loop with 20'-diameter curves, that means there’s 20' of land that has to be filled with something— a lot of something. Such was the case on my previous railroad, where I needed to use large, spreading plants and ground-cover that most folks consider invasive. In the five years the railroad was in exis-tence, the plants never filled the space the way I had wanted them to, so the railroad never felt full.
Using di�erent radii of sectional track to form a transition curve.
With �extrack, transition curves of any shape are relatively easy.
On reverse curves, couplers tend to misalign, causing derailments. Always use a straight section between the two curves.
Large bushes can hide a tight curve from view and separate the railroad into small scenes through which trains pass.
Straight track following a fence line can add a dramatic border to the edge of the yard.
Figure 2: Reverse curves
Figure 1: Transition curves
BKS-12468-04.indd 41 2/27/13 2:17 PM

42
All this isn’t to say that straight track doesn’t have its place. It can be dramatic, and if you’re running along a fence line or something like that, it fits well with the aesthetics of the garden. I’ve just seen too many railroads that use a section of straight track, then a section of curved track, followed by another a section of straight track, and it just looks awful. (I’ve opted not to show a photo for fear of retribution from the offending parties.)
Making grades“Life is full of little ups and downs.” We’ve all heard that countless times. These emotional highs and lows affect us, raising our spirits or slowing us down. Our trains react the same way to ups and downs—physically, not emotionally, of course, but the effect is the same. The train will speed up or slow down. Sometimes, it may even derail. How, then, do we plan for the physical ups and downs in the rail-road? What are some of the things to watch out for?
In an ideal world, we wouldn’t have to worry about running trains up and down hills. Our railroad would be perfectly level. There’s nothing to say you can’t build a perfectly level railroad, letting the surrounding landscaping create the elevation. Many of us, how-ever, do not have a flat yard or an area large enough to grade so it sits level. (And some of us who do have relatively flat yards find ourselves yearning for a little elevation, just to have something to play with.)
The simple fact is that in most garden settings, like prototypes, deal-ing with a change in elevation is inevitable. As the track runs from one point to another, it will likely encoun-ter subtle or even dramatic changes in elevation. Even if our yards are flat, we don’t necessarily want the track to be. Having one train cross over another on a bridge offers a dramatic point of interest in the landscape of the rail-road. In order to do this, it’s necessary to raise the track gently up a slope so it can pass over itself. The key word here is gently. This applies both to the uphill and downhill sides of a grade. While it may be intuitively easier to
go downhill, there are many more dangers associated with that than going uphill. Gravity works against the train going up, but gladly helps a train on the way down. The gearing in electrically powered locomotives minimizes this to a point, but run-away trains happen, and the result isn’t always pretty.
How steep is too steep?Before answering that question, let’s take a look at how the steepness of a grade is quantified. Grades are com-monly measured in terms of a percent-age, such as a 4 percent grade (see Figure 3). This means that for every 100 units of length (or run), there is a rise of 4 units. A 10 percent grade would have a rise of 10 units for every 100 units of length.
Now, what is the maximum grade we should use in the garden? There really isn’t a definitive answer to that question. As a rule, you will want to keep things under 4 percent, maximum. This is a fairly steep grade for our trains, and it will limit the number of cars you can expect to pull up or down. Remember, the more work you make your locomotives do, the more current they draw in the process, and the hot-ter their motors get.
You can go steeper if you want, but you will need to take action to counter the effects of the grade. First, you may need to do what the prototypes do on steep grades—add helper units. On my dad’s line, the Woodland Railway, there is a long stretch of 5 percent grade that requires two locomotives to pull even a short train. The other alternative would be to model a rack railway. LGB offers a small selection of rack locomotives and rack rail for those who would like to pursue this. This option limits your flexibility in the types of trains you are able to run, but if you’ve got a steep hill, it’s defi-nitely a solution.
If you intend to run live steam, you should probably limit your maxi-mum grade to under 2 percent. These locomotives are much more sensitive to grades than their electric counter-parts and will scamper down a hill rather quickly if you let them. If you
4" rise100" run
A rise of 4" over a run of 100" = 4 percent grade
A train passing over another is dramatic, but you have to be careful of the steepness of the grade leading to the crossing. On this stretch of the Woodland Railway, the track passing through the hill is at a steep 5 percent grade. A helper locomotive on the rear of the train is a necessity.
Woodland Railway No. 6 drifts past a waiting freight after helping another train up the hill. Passing sidings should ideally be kept as level as possible to prevent equipment from rolling away. Otherwise, a small screwdriver stuck into the ballast works as a stop.
Figure 3: Determining grade
BKS-12468-04.indd 42 2/27/13 2:17 PM

43
run really long trains, the weight of the train will push it down grade very quickly, which can lead to disaster.
The multiplication effectIf you are planning a fairly steep grade, consider keeping any curves along the way as wide as possible. The grade itself causes drag on the train and the curve will add to that drag, making the loco-motive work harder. When going down hill, gravity’s tendency to accelerate the train makes curves dangerous and will lead to the occasional car flying off the track. And don’t think, “Oh, I’ll remem-ber to slow the train down.” You won’t always, and it only takes one time.
So how do we apply these rules in a typical garden setting? The first step in laying out your railway is to get an idea of how much your ground slopes and where you want your railroad to run. If you build up your railroad, you have a bit more control over this than those who build a railroad that follows the contours of the land. Either way, survey the route of the train and figure out how much of a grade you have between points along the way.
We’ll start with a sample plot of a typical yard, which we could derive from any of the various surveying meth-ods. For simplicity’s sake, stick with a single point-to-point track (no loops). The starting point is on the ground, and the ending point is 3' above that, 50' away. In the middle of this stretch is a town with a small passing siding. That needs to be level, so cars parked there don’t go rolling downhill. If the track was a straight line, the resulting grade would be 6 percent—much too steep (see Figure 4). So let’s look at what we can do to lessen the grade.
36" elevation
0" elevation
50' of travel
36" elevation
0" elevation
36" elevation
Fill
0" elevation
Figure 4: Straight up the hill Figure 5: Switchbacks Figure 6: Loops
When there is a large vertical difference between two points on the railway, but only a short distance between them, you can loop the track in and back out to add distance, as in this scene on Jim Strong’s Woodland Railway. It may take a little work and creativity to balance the steepness of the grade and the minimum track radius you want, but the effect is worth the effort.
Surveying the railroad is best done by two people. Standing at the laser, I record the measurements that my father, holding the yardstick, calls out. Ruth Strong
BKS-12468-04.indd 43 2/27/13 2:17 PM

44
The simplest solution would be to put in a switchback (see Figure 5). This is a series of tracks that double back and forth along a slope. The drawback here is that you have to stop the train along the way to change direction. It doesn’t allow for continu-ous running.
A more common solution would be to loop the track back and forth, per-haps even over itself, which lengthens the run to bring the grade down below the maximum (see Figure 6). This is common practice on a prototype.
Notable examples include Horse-shoe Curve (Pennsylvania Railroad), Tehachapi (Santa Fe), and the George-town Loop (Colorado & Southern). There are many more examples and, if you have a favorite, this gives you an excuse to incorporate it into your gar-den. As with anything, there needs to be balance. You may be able to squeeze in 200' of track to keep your grades to an absolute minimum, but you may also be crowding the garden with too much track. There needs to be a com-promise—perhaps going to a 3 percent
grade instead of 2 percent and using a bit less track in the process. This is where you get to pull together all the fun, fanciful ideas you’ve dreamt up for the garden and see how they really work together with the space you have available. So sharpen your pencil and grab a good eraser.
Surveying the yardLike any construction project, after all the design and brainstorming of ideas, the first step is to take an accu-rate survey of the landscape to ensure that everything will be practical. Even if your yard is pretty much dead flat, you’re going to need to be able to determine where the track will go, and to set the level of the subroadbed once you have the landscaping in place.
Any surveying method will work, although the advent of laser levels has made this practice particularly simple. You set the laser up on a tripod at a fixed point in the yard, and shoot it at a target placed wherever you need to take a measurement in the yard, be it a grid for a general survey or along the right-of-way to set the specific track elevations. ( Just be careful not to kick the tripod, lest your measurements get knocked out of whack.)
With an accurate survey of the yard, you can then determine how much landscape material you’ll need to bring in to accommodate the features you wish to incorporate into your garden railroad.
The track plan is perhaps the single most defining aspect of a garden rail-road. A successful one balances aes-thetics with the physical requirements of smooth operation. If you skimp on the latter, you are setting yourself up for disappointment, regardless of how beautiful the landscaping. Take your time, experiment with different ideas, and see what works. Play, but be ready to compromise some features in order to achieve others. A good plan going into construction will help you get up and running with far less frustration after the rails are in place. And a relax-ing garden railroad is perhaps one of the best ways to deal with your own ups and downs.
A yardstick is the target for the laser. Then the yardstick is placed on top of the stake measuring the distance between the laser point and the top of the stake. It’s this distance that determines the height of the railroad. If two stakes are the same distance from the beam, they are at the same level.
The completed survey of the backyard shows elevations at 5' intervals. This information is used to plot a 3-D profile of the yard to figure out how much dirt is needed for the landscaping of the grades.
BKS-12468-04.indd 44 2/27/13 2:17 PM

45
C H A P T E R F I V E
Prototype operations
This ore mill dominates one end of Rob and Sandy Ruperstrauch’s Clear Water Railroad. You can see tracks along the top, where the raw ore would be loaded, and short hoppers along the bottom for hauling away the refined material. This would then be dumped into the larger hoppers such as those in the foreground.
If there is one universal truth in railroading, it’s that each
railroad existed for a reason. Railroads were business
ventures, designed to make money for their operators
and investors. How they did that, of course, varied. Some
were simple industrial lines that hauled raw materials to
smelters or processors. Some were passenger lines and
carried commuters to the big cities. Many more were a
mixture of different tasks, with main lines carrying people
and freight from one city to the next, and branch lines
serving specific industries within each city and along
the line.
BKS-12468-05.indd 45 2/27/13 2:17 PM
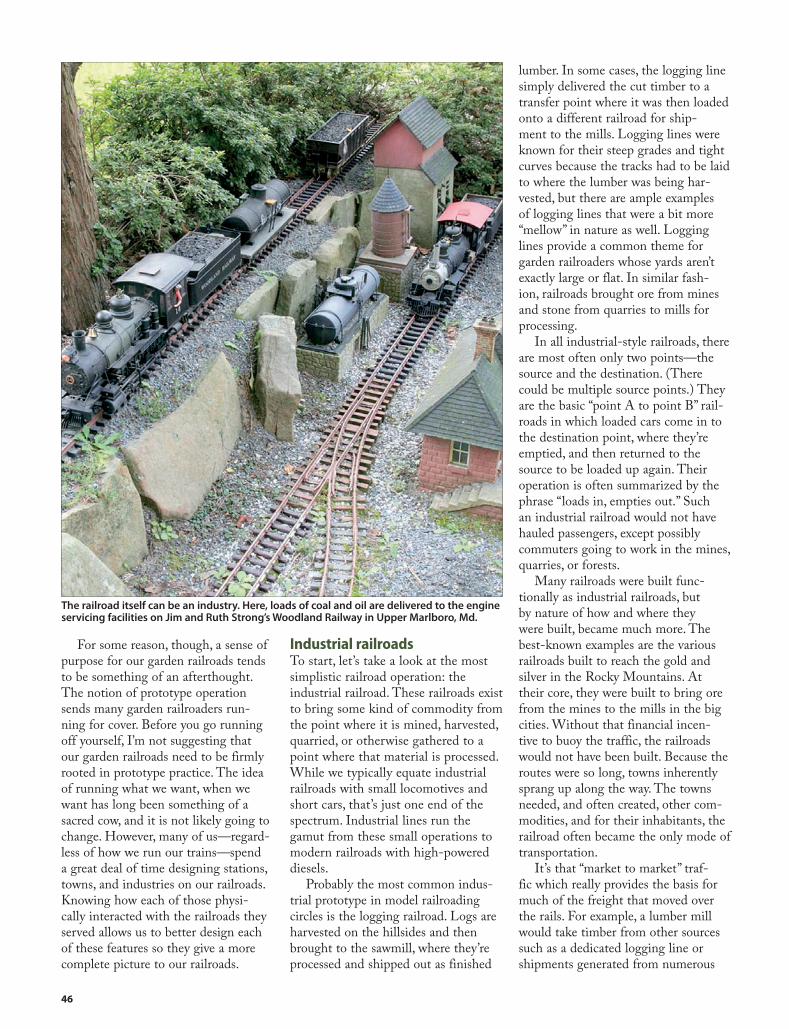
46
For some reason, though, a sense of purpose for our garden railroads tends to be something of an afterthought. The notion of prototype operation sends many garden railroaders run-ning for cover. Before you go running off yourself, I’m not suggesting that our garden railroads need to be firmly rooted in prototype practice. The idea of running what we want, when we want has long been something of a sacred cow, and it is not likely going to change. However, many of us—regard-less of how we run our trains—spend a great deal of time designing stations, towns, and industries on our railroads. Knowing how each of those physi-cally interacted with the railroads they served allows us to better design each of these features so they give a more complete picture to our railroads.
Industrial railroadsTo start, let’s take a look at the most simplistic railroad operation: the industrial railroad. These railroads exist to bring some kind of commodity from the point where it is mined, harvested, quarried, or otherwise gathered to a point where that material is processed. While we typically equate industrial railroads with small locomotives and short cars, that’s just one end of the spectrum. Industrial lines run the gamut from these small operations to modern railroads with high-powered diesels.
Probably the most common indus-trial prototype in model railroading circles is the logging railroad. Logs are harvested on the hillsides and then brought to the sawmill, where they’re processed and shipped out as finished
lumber. In some cases, the logging line simply delivered the cut timber to a transfer point where it was then loaded onto a different railroad for ship-ment to the mills. Logging lines were known for their steep grades and tight curves because the tracks had to be laid to where the lumber was being har-vested, but there are ample examples of logging lines that were a bit more “mellow” in nature as well. Logging lines provide a common theme for garden railroaders whose yards aren’t exactly large or flat. In similar fash-ion, railroads brought ore from mines and stone from quarries to mills for processing.
In all industrial-style railroads, there are most often only two points—the source and the destination. (There could be multiple source points.) They are the basic “point A to point B” rail-roads in which loaded cars come in to the destination point, where they’re emptied, and then returned to the source to be loaded up again. Their operation is often summarized by the phrase “loads in, empties out.” Such an industrial railroad would not have hauled passengers, except possibly commuters going to work in the mines, quarries, or forests.
Many railroads were built func-tionally as industrial railroads, but by nature of how and where they were built, became much more. The best-known examples are the various railroads built to reach the gold and silver in the Rocky Mountains. At their core, they were built to bring ore from the mines to the mills in the big cities. Without that financial incen-tive to buoy the traffic, the railroads would not have been built. Because the routes were so long, towns inherently sprang up along the way. The towns needed, and often created, other com-modities, and for their inhabitants, the railroad often became the only mode of transportation.
It’s that “market to market” traf-fic which really provides the basis for much of the freight that moved over the rails. For example, a lumber mill would take timber from other sources such as a dedicated logging line or shipments generated from numerous
The railroad itself can be an industry. Here, loads of coal and oil are delivered to the engine servicing facilities on Jim and Ruth Strong’s Woodland Railway in Upper Marlboro, Md.
BKS-12468-05.indd 46 2/27/13 2:17 PM

47
logging lines in the area. It would then cut that raw timber into finished lum-ber of various sizes. The lumber would then be shipped back out over the rails to other industries that would use it. In essence, the lumber mill would be “loads in and empties out” for the raw timber, and “empties in and loads out” for the finished product. Other indus-tries on the railroad that could use the finished lumber could be pretty much anything, including a general store, construction site, or freight shed where local merchants could pick up the lum-ber and other supplies.
Any given town might have two, three, or even more of these industries that would receive and ship goods over the rails, depending on the size of the town. These industries might be located right in town or perhaps on the outskirts. Some would have many tracks serving them, depend-
ing on the size of the operation, while others might have a single track often called a team track. Team tracks, even if you want to add a small platform next to the track, are particularly garden-railroad friendly since they take up so little space.
Thrown into that mix as well would be the railroad depot. In the golden age of railroading, a depot was quite often the center of commerce in the town. It’s where people arrived and boarded and where merchants came to pick up their freight. As often as not, a railroad would have separate freight and pas-senger facilities in a town—even in the smallest of boroughs.
InterchangingSo far, I’ve described railroad features on a local level. But railroads weren’t just local. They interchanged freight and passengers with railroads all across
the country. Each of these junctions would have an interchange track or small yard where cars from one railroad would be set out for a train from an adjoining railroad to pick up and move to their destination. These ranged from a single siding to large classification yards found in major cities and every-thing in between. Most of us don’t have the room for a major classification yard, but we often have room for a small siding or two off to the side. (Some modelers build a siding into a storage shed and use it to store the trains when they are not being run, as described in Chapter 4.) On my railroad, my inter-change track is a small spur that holds around four cars.
Passenger trainsOf course, freight is only half of the equation. Passenger traffic plays a major role in many of our railroads.
Logging railroads are popular in the garden. This photo shows the key elements: a logging locomotive, tall trestle, and loaded log cars. Photo courtesy Weyerhaeuser Historical Collection
Trains went where the logs were harvested. Here, lumberjacks roll a log up a ramp to top off a log car. Library of Congress
When we think of mines, we often think of tipples as shown at left. Ore cars would run from the mine to the end of the tipple and dump ore into hoppers waiting below. In later years, it was far more common to have dump trucks make the delivery, and dump the material into the waiting hopper. Friends of the East Broad Top collection
BKS-12468-05.indd 47 2/27/13 2:18 PM
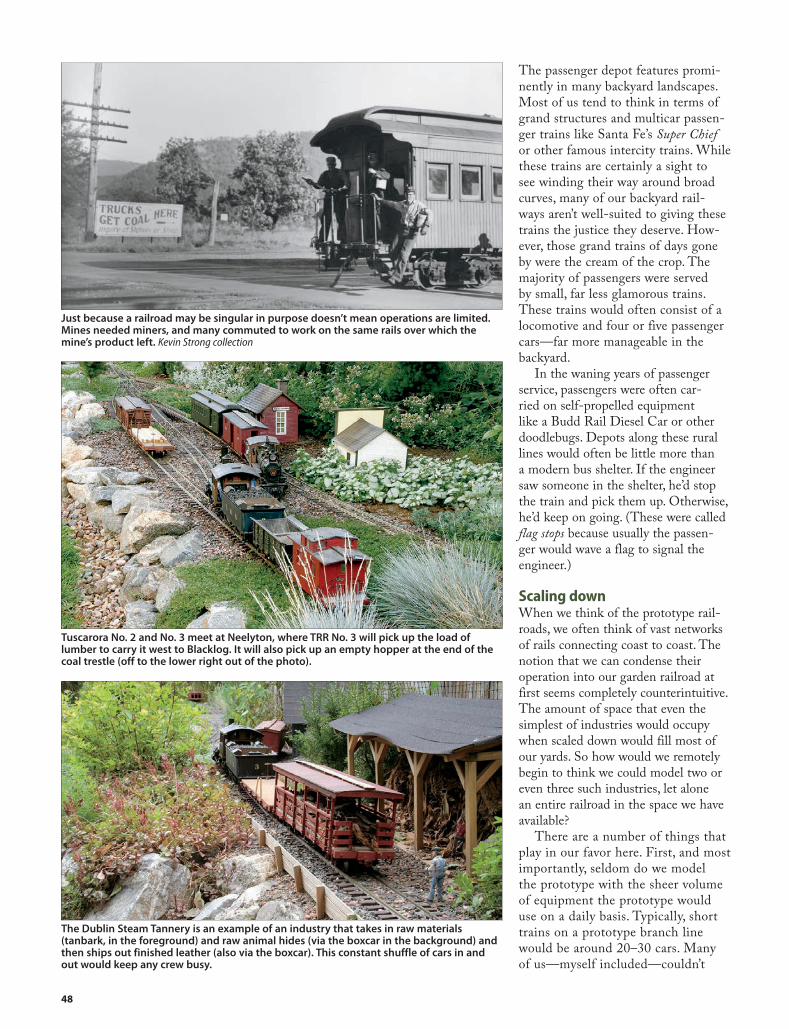
48
The passenger depot features promi-nently in many backyard landscapes. Most of us tend to think in terms of grand structures and multicar passen-ger trains like Santa Fe’s Super Chief or other famous intercity trains. While these trains are certainly a sight to see winding their way around broad curves, many of our backyard rail-ways aren’t well-suited to giving these trains the justice they deserve. How-ever, those grand trains of days gone by were the cream of the crop. The majority of passengers were served by small, far less glamorous trains. These trains would often consist of a locomotive and four or five passenger cars—far more manageable in the backyard.
In the waning years of passenger service, passengers were often car-ried on self-propelled equipment like a Budd Rail Diesel Car or other doodlebugs. Depots along these rural lines would often be little more than a modern bus shelter. If the engineer saw someone in the shelter, he’d stop the train and pick them up. Otherwise, he’d keep on going. (These were called flag stops because usually the passen-ger would wave a flag to signal the engineer.)
Scaling downWhen we think of the prototype rail-roads, we often think of vast networks of rails connecting coast to coast. The notion that we can condense their operation into our garden railroad at first seems completely counterintuitive. The amount of space that even the simplest of industries would occupy when scaled down would fill most of our yards. So how would we remotely begin to think we could model two or even three such industries, let alone an entire railroad in the space we have available?
There are a number of things that play in our favor here. First, and most importantly, seldom do we model the prototype with the sheer volume of equipment the prototype would use on a daily basis. Typically, short trains on a prototype branch line would be around 20–30 cars. Many of us—myself included—couldn’t
Just because a railroad may be singular in purpose doesn’t mean operations are limited. Mines needed miners, and many commuted to work on the same rails over which the mine’s product left. Kevin Strong collection
Tuscarora No. 2 and No. 3 meet at Neelyton, where TRR No. 3 will pick up the load of lumber to carry it west to Blacklog. It will also pick up an empty hopper at the end of the coal trestle (off to the lower right out of the photo).
The Dublin Steam Tannery is an example of an industry that takes in raw materials (tanbark, in the foreground) and raw animal hides (via the boxcar in the background) and then ships out finished leather (also via the boxcar). This constant shuffle of cars in and out would keep any crew busy.
BKS-12468-05.indd 48 2/27/13 2:18 PM

49
even fit a 20-car train on our rail-roads, let alone the 100+ car modern mainline freight trains we see today. Right there, we’re inherently limited to modeling only a portion of the prototype (even if we’re modeling the smallest industrial operations). We can compress much of the space needed for components like passing sidings and spurs simply because the trains aren’t as long as the prototype would be.
Related to that, our industries are usually more representative as opposed to full-sized models of the real thing. Instead of handling dozens of cars at a time, we’ll simulate the traffic gener-ated by an industry with one or two cars. Buildings that would scale to around 10' long in the garden can be represented by buildings a fraction of that length.
All of this is part of a modeling concept called selective compression. Typically, this phrase is used in con-junction with individual buildings, but it has just as much relevance to the broader operations of the railroad. When selectively compressing build-ings, we look at architectural features such as windows and doors and figure out how much we need to keep in the building in order to convey the look of the prototype. When dealing with complete industries or railroad operations, we do the same thing. Instead of windows and doors, we look at entire buildings, sidings, and other features and weed out what’s unimportant.
Choosing what to modelHow do we decide what’s important and what’s not? Much of that deci-sion comes down to what you want to model. There’s no directive that says you must model every part of an industry. Let’s take a steel mill for example. They take in raw materials in the form of the various ores (iron, limestone, coal, or coke) and ship out finished steel products in whatever form they produce. You can easily model just the outbound side of the mill, where finished steel is loaded for shipment, or you can choose to model just the inbound side, where iron ore from a mine is delivered. You don’t need to model the furnace itself if you don’t want to.
By choosing specific aspects of the operations, you can ignore the facili-ties of an industry dedicated to other aspects. There’s no reason the other side of the industry doesn’t really exist somewhere off the railroad. The idea is to look at your railroad, the space you have available, and what kind of equipment and structures you need to model such an operation. You need not model an entire rock quarry, but a simple tipple over the tracks would be sufficient to convey the existence of the quarry elsewhere. You don’t need to model an entire saw mill, but an unloading area next to a pond (or would-be pond) where the logs are dumped would give your trains a place to travel to.
Those are very industry-specific examples. Much of the freight moved
by railroads goes from warehouse to warehouse. That kind of operation lends itself very well to inclusion in the garden. A warehouse with a load-ing platform doesn’t need a specific purpose or industry. It can sit along a siding or spur and, with one simple building, give your railroad a sense of purpose. For those with really tight space considerations, a simple loading platform built next to the track may serve many a community’s freight needs. Train depots often had freight and passenger sides, where it would be just as common to see a boxcar sitting on the siding as it would be a passenger coach pulled up next to it. So if you’re modeling a train depot, consider choosing a depot with a freight section in addition to the pas-senger side of things or consider a separate freight depot along the same track.
The next step in the process is combining these various elements to establish a sense of purpose for the entire railroad, not just each indi-vidual scene. If your railroad has a strong overall theme, such as a log-ging or mining operation, it’s easy to tie things together. You’ll have your source, the mining or logging area, and the destination, a lumber mill or smelter. The trains have two distinct destinations depending on whether they’re loaded or empty. That’s a good place to start, but not all railroads have such a strong theme. Many are what I’ll call generic in that they’re more along the lines of a shortline
A fresh load of hemlock bark has just arrived at the Dublin Steam Tannery in Shade Gap. Now comes the fun of unloading it onto the stacks of bark in the shed.
Many freight platforms were little more than just that—a platform. Locals would back trucks or wagons up to the platform to deliver or pick up freight. Passengers usually had better accommodations.
BKS-12468-05.indd 49 2/27/13 2:18 PM

50
railroad that serves many industries without any one being dominant.
Layering industriesThe answer lies in what I like to call layering the industries. That’s where you break down everything into pairs of features. Like the mine/smelter example, every place on the railroad where you would drop cars off would need a place from where the cars originated. A warehouse would receive freight cars from an interchange with another railroad. A factory could receive cars from that same inter-change or perhaps another supplier on the railroad. Each industry, then, has a point A and point B associated with it. Some of those points can be the same for multiple industries; for example, a single interchange track can supply cars for many, if not all, the industries on your railroad. That’s actually one of the most common models for operations. The railroad contains the industries, and then the cars are taken to a storage shed or some other offline site where the string of cars is swapped out for a new string, which can then be delivered to the industries.
Once you’ve got these pairs estab-lished in your head, you can scatter the various elements around the sites on your railroad that you want to develop. On my railroad, the town of Neelyton contains two passing sidings and a small spur leading to a coal trestle (see Figure 1). A depot with a small freight office sits on one siding. That accounts for a place to spot one car, whose pair would be either the interchange track or another of the two freight depots on the railroad. The pair for the coal tres-tle is the interchange track, as I’m not modeling any actual coal mines. The siding on the opposite side of the main line is for loading timber products from the local lumber operations. The pair for this siding is either the tannery in the next town (which receives tanbark), the woodworking shop in Blacklog (cut timber), or the interchange track. So for one town, I’ve got three industries supported by the railroad that supply upward of five other destinations on the line.
Storage tracks are great for holding strings of cars for interchange, such as this one on Bob and Sandy Ruperstraucht’s railroad in Phoenix, Ariz.
Rural passenger trains were seldom the long, sleek trains of railroading’s golden era. Many were short, being two or three cars in length.
BKS-12468-05.indd 50 2/27/13 2:18 PM
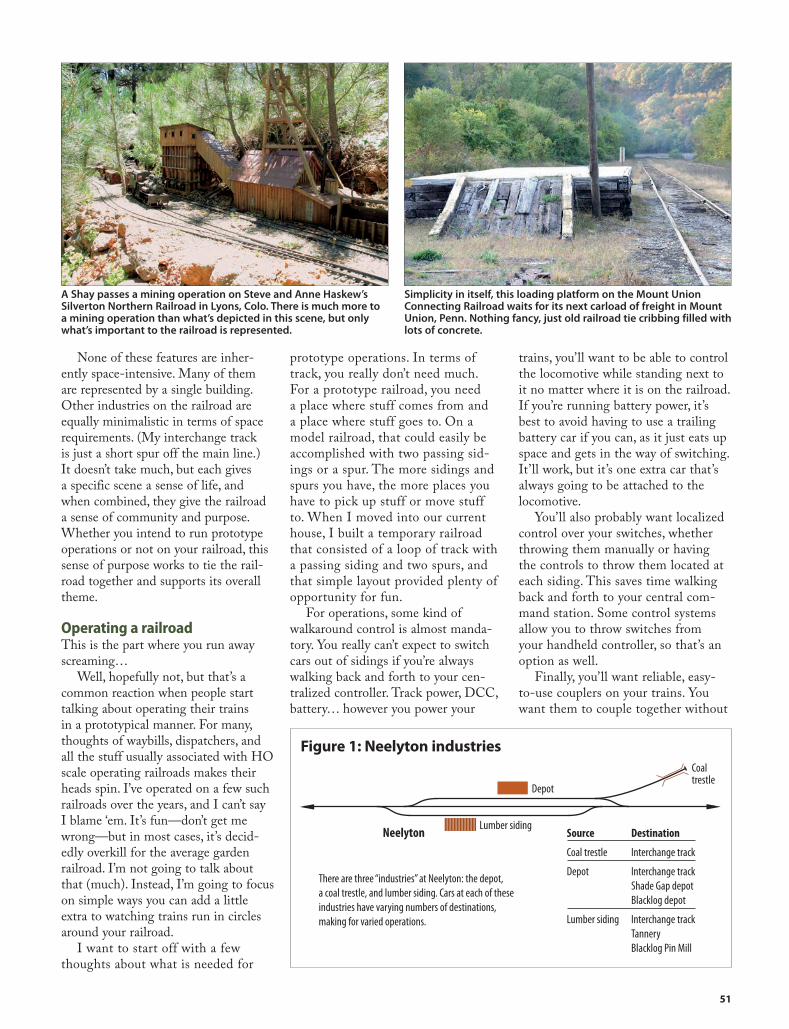
51
None of these features are inher-ently space-intensive. Many of them are represented by a single building. Other industries on the railroad are equally minimalistic in terms of space requirements. (My interchange track is just a short spur off the main line.) It doesn’t take much, but each gives a specific scene a sense of life, and when combined, they give the railroad a sense of community and purpose. Whether you intend to run prototype operations or not on your railroad, this sense of purpose works to tie the rail-road together and supports its overall theme.
Operating a railroadThis is the part where you run away screaming…
Well, hopefully not, but that’s a common reaction when people start talking about operating their trains in a prototypical manner. For many, thoughts of waybills, dispatchers, and all the stuff usually associated with HO scale operating railroads makes their heads spin. I’ve operated on a few such railroads over the years, and I can’t say I blame ‘em. It’s fun—don’t get me wrong—but in most cases, it’s decid-edly overkill for the average garden railroad. I’m not going to talk about that (much). Instead, I’m going to focus on simple ways you can add a little extra to watching trains run in circles around your railroad.
I want to start off with a few thoughts about what is needed for
prototype operations. In terms of track, you really don’t need much. For a prototype railroad, you need a place where stuff comes from and a place where stuff goes to. On a model railroad, that could easily be accomplished with two passing sid-ings or a spur. The more sidings and spurs you have, the more places you have to pick up stuff or move stuff to. When I moved into our current house, I built a temporary railroad that consisted of a loop of track with a passing siding and two spurs, and that simple layout provided plenty of opportunity for fun.
For operations, some kind of walkaround control is almost manda-tory. You really can’t expect to switch cars out of sidings if you’re always walking back and forth to your cen-tralized controller. Track power, DCC, battery… however you power your
trains, you’ll want to be able to control the locomotive while standing next to it no matter where it is on the railroad. If you’re running battery power, it’s best to avoid having to use a trailing battery car if you can, as it just eats up space and gets in the way of switching. It’ll work, but it’s one extra car that’s always going to be attached to the locomotive.
You’ll also probably want localized control over your switches, whether throwing them manually or having the controls to throw them located at each siding. This saves time walking back and forth to your central com-mand station. Some control systems allow you to throw switches from your handheld controller, so that’s an option as well.
Finally, you’ll want reliable, easy-to-use couplers on your trains. You want them to couple together without
Neelyton
Depot
Lumber siding
Coaltrestle
Source Destination
Coal trestle Interchange track
Depot Interchange track Shade Gap depot Blacklog depot
Lumber siding Interchange track Tannery Blacklog Pin Mill
There are three “industries” at Neelyton: the depot, a coal trestle, and lumber siding. Cars at each of these industries have varying numbers of destinations, making for varied operations.
A Shay passes a mining operation on Steve and Anne Haskew’s Silverton Northern Railroad in Lyons, Colo. There is much more to a mining operation than what’s depicted in this scene, but only what’s important to the railroad is represented.
Simplicity in itself, this loading platform on the Mount Union Connecting Railroad waits for its next carload of freight in Mount Union, Penn. Nothing fancy, just old railroad tie cribbing filled with lots of concrete.
Figure 1: Neelyton industries
BKS-12468-05.indd 51 2/27/13 2:18 PM

52
having to ram two cars together at warp speed, and you want them to uncouple with the touch of a lever or something like that. If you’re always having to get down and fiddle with a coupler to get it to couple or uncou-ple, the fun quickly fades from the experience.
Keeping it simpleOkay, so how do you go about operat-ing a railroad without all that fancy paperwork, dispatchers, and stuff? In most cases, garden railroads aren’t set up as large railroads operated with multiple engineers. Some of us (myself included) can only run one locomotive at a time on the railroad. That’s a good thing! It means we can keep things simple. At the simplest level, you operate your
trains prototypically when you stop to drop off a car at a siding (see Figure 2). You don’t need a waybill or anything to tell you to do that; you just stop when the mood strikes, set out a car or pick one up, and continue on your way. If all you have is one or two industries or sidings on your railroad, that’s really all you need.
Perhaps one of the simplest methods I’ve used for prototype operations features colored tabs (see Figure 3). Along the line, each location has a designated color, and you start by setting cars on various sidings around the railroad. Each car gets a tab with one of the colors used on the rail-road, and your job is to then deliver each car to the location having the same color tab. Once the cars are
all moved to their appropriate loca-tions, the tabs are flipped over and the process repeats. (The colors on the reverse side of tab are most likely not the same place the car came from originally.) I’ve seen variations of this where there’s a code within each color for a specific type of car, but often it’s as simple as knowing coal cars get spotted under the coal tipple and boxcars get spotted in front of the freight depot.
If you don’t have colored tabs handy, reach into your change jar for a handful of pennies, nickels, dimes, quarters, half-dollars, and dollars (or some loonies and toonies if you live in Canada or near the border).
At its basic level, the colored-tab system is somewhat limited in terms of
East Broad Top No. 3 passes by a spur where empty hoppers have been set out. The crew of No. 3 will pick these cars up and take them back to the mines where they’ll be filled with coal.
Industries need not take up much space on the railroad. The boxcar sits in front of a simple loading platform (inspired by the one in Mount Union shown on page 51), while a hopper sits on a small coal trestle in the background.
The mild winter sun helps warm the Tuscarora Railroad crew as they pick up an empty hopper at Neelyton. The boxcar at the depot is also on the pick-up list, as TRR No. 10 makes its way west to Blacklog, where the cars will be dropped off and left for the East Broad Top crews to pick up.
A passenger train arrives at Blacklog depot, where an empty flatcar waits. A simple scene like this gives your railroad a sense of purpose. Passengers waiting for the next train and freight waiting to be loaded are things that, in small spaces, bring life to a railroad.
BKS-12468-05.indd 52 2/27/13 2:18 PM
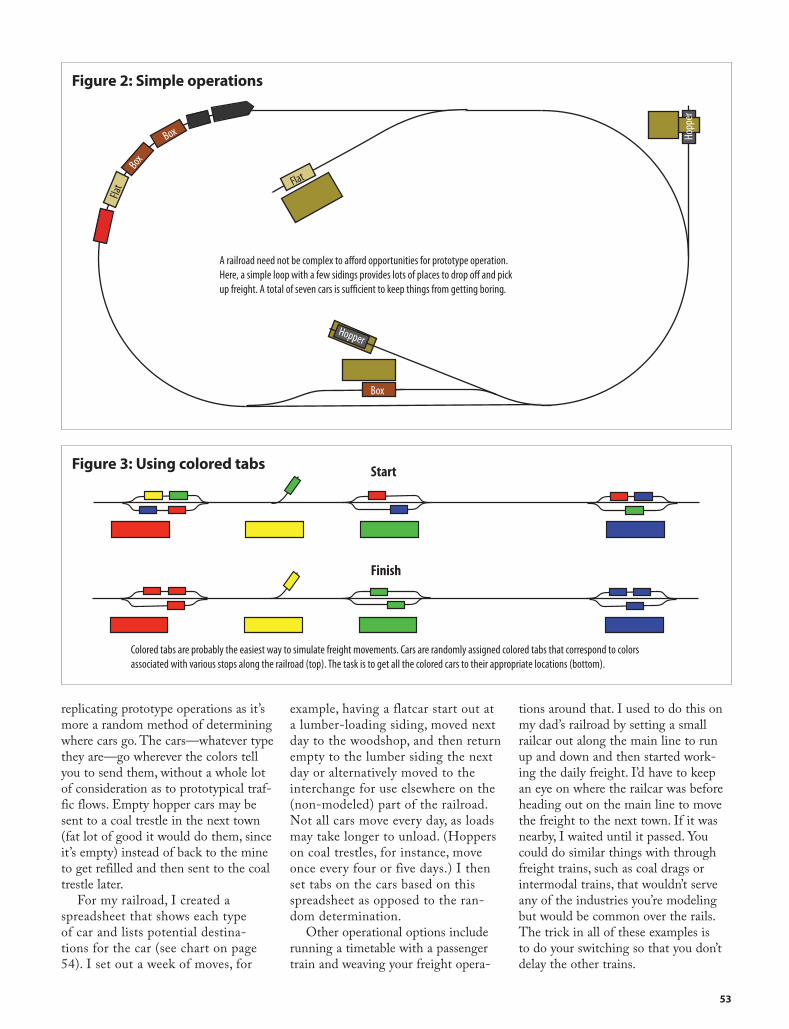
53
replicating prototype operations as it’s more a random method of determining where cars go. The cars—whatever type they are—go wherever the colors tell you to send them, without a whole lot of consideration as to prototypical traf-fic flows. Empty hopper cars may be sent to a coal trestle in the next town (fat lot of good it would do them, since it’s empty) instead of back to the mine to get refilled and then sent to the coal trestle later.
For my railroad, I created a spreadsheet that shows each type of car and lists potential destina-tions for the car (see chart on page 54). I set out a week of moves, for
example, having a flatcar start out at a lumber-loading siding, moved next day to the woodshop, and then return empty to the lumber siding the next day or alternatively moved to the interchange for use elsewhere on the (non-modeled) part of the railroad. Not all cars move every day, as loads may take longer to unload. (Hoppers on coal trestles, for instance, move once every four or five days.) I then set tabs on the cars based on this spreadsheet as opposed to the ran-dom determination.
Other operational options include running a timetable with a passenger train and weaving your freight opera-
tions around that. I used to do this on my dad’s railroad by setting a small railcar out along the main line to run up and down and then started work-ing the daily freight. I’d have to keep an eye on where the railcar was before heading out on the main line to move the freight to the next town. If it was nearby, I waited until it passed. You could do similar things with through freight trains, such as coal drags or intermodal trains, that wouldn’t serve any of the industries you’re modeling but would be common over the rails. The trick in all of these examples is to do your switching so that you don’t delay the other trains.
Flat Flat
BoxBox
Box
Hopper
Hopp
er
A railroad need not be complex to a�ord opportunities for prototype operation. Here, a simple loop with a few sidings provides lots of places to drop o� and pick up freight. A total of seven cars is su�cient to keep things from getting boring.
Colored tabs are probably the easiest way to simulate freight movements. Cars are randomly assigned colored tabs that correspond to colors associated with various stops along the railroad (top). The task is to get all the colored cars to their appropriate locations (bottom).
Start
Finish
Figure 2: Simple operations
Figure 3: Using colored tabs
BKS-12468-05.indd 53 2/27/13 2:18 PM

54
For my Tuscarora Railroad, this spreadsheet lists each type of car the railroad has and a 6-day progression of where the cars move. You pick a starting day, bring out your rolling stock, and set it up according to the chart. Then by reading the chart, you know where the car moves next. Colored tabs can then be set on the cars to make it easier for the operator to keep tabs on where things go.
You can get pretty involved with operational schemes, too, but the more complex you get, the more operators you’ll likely want to have on hand. I know of a half dozen or so garden railroads throughout the country that have regular operating sessions on the magnitude of our small scale brethren. A friend of my dad’s wrote some com-puter software to generate timetables and car-forwarding schemes for dad’s operating sessions, and there are other software packages available as well. These can usually be customized to railroads of all sizes. (TrainOps, avail-able from LargeScaleCentral.com, is expressly for large scale.) There are also
many books on prototype operations and how to design your railroad to better reflect the prototype. (Track Planning for Realistic Operation, Kalmbach Books, is one.)
I’d be lying if I told you I oper-ated my railroad every time I set trains out. Many times, I’m simply in the mood to sit back and passively watch the train run through the gar-den. But even then, I get the urge every now and then to break up the monotony by setting out one car from the train at a siding and then go back a few laps later to pick it up. Why else would we spend our money on walkaround controls, right?
Tuscarora Railroad freight movements
Sunday Monday Tuesday Wednesday Thursday Friday Saturday
Car type Start
BoxcarShade GapTannery No movement Neelyton
InterchangeBlacklogFreight
Shade GapFreight
NeelytonFreight
BlacklogInterchange
BoxcarBlacklogFreight
BlacklogInterchange
Shade GapTannery No movement No movement Blacklog
InterchangeBlacklogFreight
BoxcarNeelytonInterchange
Shade GapFreight
BlacklogInterchange No movement Neelyton
Freight No movement BlacklogInterchange
BoxcarNeelytonFreight No movement Shade Gap
FreightBlacklogFreight
BlacklogInterchange
Shade GapTannery No movement
For added realism, some computer programs allow you to design train orders and timetables such as these, developed by Ray Rogali for Jim Strong’s Woodland Railway. These outline timetables and instructions for both freight and passenger operations.
Colored tabs (painted pennies) on each car tell the operator where each car goes. On Jim and Ruth Strong’s Woodland Railway, the blue pennies indicate that the cars will be left at Hemlock Hills: the empty coal hopper under the tipple and the boxcar next to the freight depot.
With the deliveries at Hemlock Hills made, Woodland Railway No. 14 prepares to couple back onto the front of its train, ready to head to Woodland Junction. The train’s cars are grouped by tab color, so each block of cars is easy to switch out when they arrive there.
BKS-12468-05.indd 54 2/28/13 1:59 PM

55
C H A P T E R S I X
Using tools
Having the right tool for the job makes building a garden railway much easier and more enjoyable. Tools here include a wheelbarrow, tamper, and dolly for moving rocks.
There is no single right way to build a garden railroad. There
are, however, lots of wrong ways. The first step in heading
down the wrong path starts with the tools you choose for
doing the work. In garden railroading, as in any other task,
there are proper tools for the job. You will find your time
spent in the garden much more productive when armed
with the correct accessories.
BKS-12468-06.indd 55 2/27/13 2:18 PM

56
Before getting into specifics, let me say a few words about quality and longevity of tools. In essence, you get what you pay for. You will encounter a myriad of products in an equally vary-ing price range. I do not suggest that you fork over the money for the most expensive tool every time, but there are times when you will want to get the best tool you can. Oddly, though, this rule applies more often to the low-tech tools than to the high-tech ones, as these are the tools you will use day in and day out.
Basic tools form the backbone of your construction arsenal and should be up to the task. Most common gar-den tools are now available with fiber-glass handles. Some even have padded handgrips. Tools with these features are worth the added expense, as they are virtually indestructible and won’t rot if you leave them outside in the elements. They’re also a touch lighter than wood-handled tools. Make sure the business end of the tool matches the quality of the handle, though. This is especially important in small hand tools. Often, the cheap ones are indeed that, in every sense of the word.
Don’t compromise on the number of tools you need. If the job calls for a left-handed monkey wrench, get one. Trying to get by with what is on hand often leads to disaster and a trip to the store anyway. Don’t think you have to purchase every tool, though. Some specialized tools are easily rented. Beg-ging and borrowing also works well in garden railroad circles. Some clubs have tool libraries for uncommon but neces-sary tools. You may even get some extra bodies to assist—perhaps the most important tool of all.
Landscaping toolsThe following tools are the ones you’ll need to construct the railroad land-scape. While you probably have some already, others are a bit less common.
Shovel. Either a spade or flat-bladed shovel works well. Having both is bet-ter, as each has strengths. Flat shovels are good for edging and digging up sod. Spades are better for digging holes and moving larger quantities of dirt.
This assortment of common garden tools shows the basic ones needed for railroad landscaping. Although some tools are pictured with wooden handles, fiberglass handles with handgrips are lighter and more comfortable.
Hand tools, such as those shown here, are needed for planting flowers and shrubs. Stakes and spray paint are handy for marking where features go, and a sketch pad is helpful for recording notes.
BKS-12468-06.indd 56 2/28/13 2:00 PM

57
Hoe. A simple 6" garden hoe does wonders for making subroadbed trenches and similar features. The width of the blade is almost perfect for that purpose.
Mortar hoe. A mortar hoe has a large blade, usually 10"–12", which comes in handy for smoothing and grading large areas of dirt. It’s usually used to mix concrete, so when you have occasion to do that, the tool is already at hand.
Pickax. A pickax is necessary for breaking up compacted or rocky soil. It’s also useful in tilling an existing garden area.
Pruner. Pruners are used for removing small limbs from trees. They are also useful for cutting away small roots that get in the way of the subroadbed or other features of the railroad landscape.
Rake. Leaf and lawn rakes are mostly used for the final dressing up of the
landscaping. A lawn rake can also be used with a mortar hoe to form terrain.
Hose. A garden hose is most obviously used for watering the garden, but it also comes in handy for laying out the locations of landscaping features. Many track plans and ponds began as lengths of garden hose lying on the ground.
Wheelbarrow. Be careful here. You may be tempted to buy the largest wheelbarrow you can find. Instead, get the largest one you can lift! Rocks and dirt are heavy. Overfilling a wheelbarrow can lead to spilled loads and possible injury.
Garden hand tools. These tools include trowels, rakes, tillers, weeders, watering cans, and small scoops. They are all necessary when planting flowers and shrubs around the garden landscape.
Bucket. Plastic buckets, like 5-gallon paint buckets, are great for just about
anything. You can carry stuff in one or turn it over and use it as a seat. Best of all, they’re cheap. If you can’t find them lying around, go to a local construction site and ask for a few. The workers are usually more than happy to accom-modate, and you may even leave with additional construction materials as well. Some contractors view rocks as a nuisance and will let you grab what you want.
Tape measure. Distances in the gar-den often exceed the 25' of most metal tape measures, so you’ll want to invest in a 50' or 100' tape.
Laser level. A laser level makes sur-veying the backyard fairly simple. If you can get one that sits on top of a tripod, you can plot the elevation of the entire yard and use it to periodically check the level of your track once the railroad is built. When using a laser level, the laser is much easier to see in the morning or evening hours.
I use a laser level to accurately set the elevation of the subroadbed that will support the track on my Tuscarora Railroad. Ruth Strong
A power miter saw, handsaw, and tree saw handle many of the cutting tasks found in a garden railway.
BKS-12468-06.indd 57 2/27/13 2:18 PM

58
Water level. If you don’t have a laser level available, a water level makes for an inexpensive surveying device. Besides not costing much, a water level is easy to use. These are available commercially, but they can be built even more inexpensively with two yardsticks and a length of clear plastic hose. (The hose should be at least ½" in diameter.) Using this tool is a good way to figure out height differences in the yard.
Spray paint. Spray paint is great for marking where various features will go in the garden. You can buy cans designed to be sprayed upside down in a variety of colors. A drawback to spray paint is that it is not very permanent. Once you mow the lawn, the marks are gone.
Stakes. Using garden stakes (or flags) is a good way to mark where certain features will go in the yard. When bringing in dirt, these stakes allow you to see where the dirt needs to go and to what level it needs to be brought up to.
Hammer. A carpenter’s hammer is fine for regular construction tasks, such as building wood subroadbed or other structures.
Sledgehammer. A 5-pound sledge can be used for all the jobs that require a bigger hammer. Use this tool to drive stakes into the ground, move rocks into position, and complete other tasks that require brute force.
Pry bar. A pry bar is useful when you are trying to position large rocks. Leverage is your friend.
Tamper. A tamper is used to com-pact the roadbed once you’ve finished pouring the stone. It’s also good for compacting sand or fine stone as a base for flagstone or brick walkways. You can buy one or make one by screwing a thick piece of plywood to a large dowel.
Dolly. A two-wheel dolly is great for moving large rocks around the yard. The advantage of a dolly over a wheel-barrow is that you don’t have to lift the
stone; instead, you just slide it onto the dolly.
Artist’s sketch pad. I use a sketch pad for recording construction notes, sketches, and ideas I have for the rail-road. It’s nice to have everything in one book, so you don’t have to save the bar napkin you sketched your water feature on the night before.
Handsaw. Use a handsaw for cutting landscaping timbers, boards, and other items that need to be shortened.
Power miter saw. A power miter saw, or chop saw, is an alternative to a handsaw and generally much more accurate. It’s also a lot easier on the arms. It may not have the capacity to cut thick timbers, so you’ll need a chain saw for cutting any thick timber.
Tree saw. It’s always best to get rid of pesky branches before they have a chance to fall on the track. A tree saw allows you to remove many of these branches. Most tree saws have a blade for sawing larger branches and a pruner for smaller branches.
Scissors. Use a scissors for general cutting tasks. Don’t use your best pair, however. Find an old pair that can be kept with your gardening tools.
Knife. A steak knife comes in handy for cutting, but they’re also great for edging and weeding. You’ll want to find an old one that you can use solely for gardening.
These are the most common tools you’ll need, and you may already have most of them on hand. If not, don’t go out and buy all the tools at once. Just get them, and other tools you will find handy, as you need them and build up your collection slowly.
Tracklaying toolsAfter the earth has been moved and you’re ready to start putting down track, make sure you have the right tools for laying track and other tasks. Many of these will likely already be on your workbench. Some may be a bit
A cordless drill with screwdriver and drill bits and a Dremel motor tool are valuable tools for anywhere in the garden. If an extension cord is needed, make sure you have one that is long enough. A weed sprayer, paintbrush, and sandpaper help keep track clean.
BKS-12468-06.indd 58 2/27/13 2:18 PM

59
obscure, but they will become neces-sary once you begin to lay track. For-tunately, you won’t have to break the bank by purchasing most of these tools.
Extension cord. An extension cord is important for getting electricity out to the garden where you need it. Get a good, heavy-gauge cord that is robust enough to withstand the loads you want to put on it. Also, get the longest one you can. Backyards are longer than you think, so make sure you can get to the far corners. Remember, extension cords tend to snake through the garden as you use them.
Cordless drill. I’m a big fan of cord-less tools in the garden. The fewer tools you have tethered to a power outlet, the better. Cords have a habit of getting snagged on any little object, especially freshly laid track. A cordless drill is perhaps one of the most useful tools you can have, and you’ll find yourself using it for almost everything. Don’t skimp on this one. Get one that runs on at least 12 volts, more if available. Many companies sell complete lines of cordless tools that all use the same battery. This is the way to go if it’s in your budget.
Screwdriver sets (small and large). Don’t build a garden railroad with-out them. You’ll need the common, household sizes as well as miniature screwdrivers. Get both flathead and
Phillips varieties. These are necessary for maintaining the equipment you will be running. It’s also a good idea to get a set of screwdriver bits for your cordless drill.
Drill bits. Get a good-quality set of standard drill bits (½" down to 1⁄16"). These will serve most of your basic track construction needs. If you intend to work with concrete, you’ll probably want to get some masonry drill bits.
Motor tool. A Dremel or other small motor tool is valuable for getting in places where a cordless drill will not fit. A variable-speed tool is best, but it is not essential. High- and low-speed settings are sufficient in most instances. These tools are useful for grinding and cutting rail (and a thousand other model-railroad applications). Cordless models are available as well. Files (small and large). A good set of jeweler’s files or needle files are a necessity for smoothing little bumps or rough spots in the trackwork. A large mill file comes in handy for evening out rough spots in switches, solder joints, or anything that gets in the way of wheel flanges.
Sandpaper. Get several varieties for different jobs. Coarse (60 grit) is good for sanding wood and other tough jobs. For cleaning track and polishing metal wheels, you’ll want
to use a fine sandpaper (300 grit or finer). The finer the grit, the smoother the surface. You’ll want as smooth of a surface as possible, as dirt will collect in any recess, no matter how microscopic.
A fine grade of steel wool also works well for cleaning wheels. Don’t use steel wool on track or locomotive drive wheels, though, as the steel fibers will be attracted to the magnets in the motor and can cause problems.
Soldering iron. A soldering iron is a necessity for making connections between electrical components. These can be found in varying wattages, but for most of your electrical wiring needs, a simple 30–40-watt iron will suffice. The higher-wattage irons are good for soldering wires to the track, but they are much larger and will easily fry small electrical components.
Soldering gun. A soldering gun is an alternative to a large soldering iron. Typically, these guns have two heat settings and can run up to 300 watts—usually enough power to solder wire to heavy brass rail.
Propane torch. A propane torch is the heavy artillery of the soldering world. Use this when irons and guns aren’t strong enough or when you have to heat large areas at the same time. Small, butane-powered torches are also useful.
A level on a 4' board is good for checking track grade. Other tools for working with track include propane or butane torches, a soldering iron, torpedo level, hacksaw, razor saw, and rail bender.
BKS-12468-06.indd 59 2/27/13 2:18 PM

60
Needlenose pliers. Needlenose pliers are an all-around tool that should be one of the first things in your toolbox. You’ll use them to hold objects as you solder or work on them, to bend wires to attach to screw terminals, and to complete numerous other jobs. A set of differently sized pliers provides even more flexibility.
Wire cutter. Wire cutters, as the name suggests, are used to cut wire. They are also good at cutting other things, such as plastic wire ties and small twigs. If you go to a hardware store, you are more likely to find linemen’s pliers, which are fine for wiring an addition on your house, but you’ll want to get a smaller version for use in the garden (about 5" long). Radio Shack and some hobby shops and craft stores carry them.
Wire strippers. Wire strippers are used to strip the insulation from around electrical wire, so you can connect the wire to whatever it needs connecting to. There are two types, simple and auto-matic, and both work well.
Hobby knife. A hobby knife, such as an X-acto brand knife, is a sharp knife that you can use to cut almost anything
imaginable (including fingers, so be careful). You can get different blades for different tasks, but a #11 blade is valuable for a wide range of tasks.
Razor saw. A razor saw is a small, thin saw that allows you to make thin cuts in various materials. The most com-mon use in the garden is for cutting rail, although a hacksaw may work a bit quicker for that. A razor saw is best used where a hacksaw would otherwise be too big and bulky.
Rail bender. A rail bender is probably the most specialized tool you’ll need if you’re handlaying track or using flex-track. If possible, see if you can borrow one from your local club or a modeler. You may want to buy your own eventu-ally, but borrowing one is a good way to get started. There are two varieties of rail benders—one that just bends the rail itself, and a dual-rail bender, which bends track that’s already assembled. The more I maintain my railroad, the more I’ve become a firm believer that the dual-rail bender is one of the most indispensable tools in the toolbox.
Level. A 4' level (or a shorter level on a 4' board) is essential for checking
the grade of your track over a given distance. Four feet is a useful length, as it allows easy math for determining the grade. A ½" of rise is almost exactly equal to 1 percent of grade. (It’s off by about .04 percent—not enough to worry about.)
A torpedo level is a short level (about 9") that is useful for checking if the track is level from side to side, so your trains don’t lean one way or the other.
Flashlight. A flashlight helps you see inside tunnels and other dark places. It will highlight dirt and other debris that hamper your train’s progress.
Drywall sander. A drywall sander is perhaps one of the most basic track-cleaning devices you can buy. You can put fine sandpaper or a Scotch-Brite pad on the end to polish the track. The pad is nonabrasive, so it polishes the rails without scratching the surface.
Paintbrush. A 1" or 2" paintbrush is great for spreading ballast, as well as giving buildings a quick dusting. The cheap variety is more than adequate.
Toothbrush. A toothbrush is a must for clearing dirt and ballast from the points and frogs of turnouts. The good news is that you won’t have to replace it every six months.
Hand pruners. A good pair of hand pruners is essential for maintain-ing and shaping the plants in your garden. Clean cuts are important for maintaining a plant’s health, and a sharp pruner’s blade is the best way to accomplish that.
Weed sprayer. I use this more often for watering and cleaning than I do for weed control. It does a great job of setting ballast and an equally great job of cleaning splattered dirt off the sides of buildings.
There are other tools and devices that have been developed over the years for specific tasks, and you’ll likely encounter them as you progress through the hobby. But those described here will get you started in building your garden railway.
Necessary hand tools for trackwork include a wire cutter, old toothbrush, X-acto knife with #11 blade, hand pruner, automatic wire stripper, simple wire stripper, screwdrivers, needle files, needlenose pliers, and regular pliers.
BKS-12468-06.indd 60 2/27/13 2:18 PM

61
C H A P T E R S E V E N
Laying track
Good trackwork is the key to a bright future for your railroad. It’s easy to achieve with the wide array of products available for today’s modelers. Shown here is handlaid track on Marc Horovitz’s Ogden Botanical Railway.
Before you put down any track, remember just one thing:
gauge is the distance between the rails. For most of us, that
would be 45mm, or gauge 1, though as the above photo
illustrates, other gauges are sometimes present as well. If you
remember that distance, the rest is easy. Stray from this,
even by so much as a few millimeters, and you’re asking for
trouble. The rails must be the same distance apart over the
entire line. Now that we know the one constant, let’s look at
all the variables when it comes to putting down track in the
backyard.
BKS-12468-07.indd 61 2/27/13 2:18 PM

62
Sectional trackThe first choice we have in the track department is whether to use sectional track or flextrack. As the name implies, sectional track comes in sections, or preformed pieces. We can choose from a curve radius as small as 2' to as much as 15'. The radius of a curve is the distance from the midline of the track—halfway between the rails—to the center of the circle of which it is a part. The diameter of the curve is the distance across the complete circle—mathematically, twice the radius. When buying sectional track, be careful not to confuse the two measurements. A mild warning—manufacturers use both measurements almost interchangeably, so be sure you’re clear on which mea-surement you’re looking at when pur-chasing track. Straight track also comes in an variety of lengths.
The greatest advantage to sectional track is its predictability. By that, I mean it’s easy to draw up a plan using sectional track, as you know what radii of curves and what lengths of straight track you have to work with. Plans drawn for sectional track translate easily from paper to the garden. You can make out a grocery list of the sec-tions you need, head down to the local hobby shop, and buy everything to build your railroad.
At the same time, the predictability of sectional track is also its greatest disadvantage. While it’s true there are ever-increasing choices for sectional track, if you’re particular about a given brand of track because of the rail mate-rial or the shape of the ties (some are
narrow gauge while others are standard gauge) then you may be somewhat lim-ited to those particular product lines. Another limitation is that sectional track is predominantly available only in code 332. (More on code in a bit.) If you’re after a smaller, more prototypical looking rail, then your choice of sec-tional track is pretty limited, if you’re going to be able to find any at all.
FlextrackEven though the selection of track sections has increased, it’s likely that you may want more flexibility in plan-ning your garden railroad. That’s where the benefits of flextrack come into play. Flex is the key word. You can bend flextrack to fit whatever radius you need and can infinitely vary that radius to fit the lines of the garden. But that is not where the flexible options end. With flextrack, you have more choices of which rail size you can use, as well as the size and spacing of the ties on the plastic strips into which you place the rail. You also have a wider choice of rail material than with sectional track, since you’re choosing the rail material independently from the ties.
There is no real cost difference between sectional track and flextrack, given the same rail and tie materials. Cheaper materials can lower your cost per foot, but in the garden, price shouldn’t be the only consideration. There are many other considerations that come into play. Laying flextrack requires a bit more planning and work to install, but the visual end result can be worth it.
Handlaid trackA third option is handlaying the track. You have the same benefit of the choice of rail materials that you have with flextrack, and you can cut your ties to suit your needs. For the beginning garden railroader, however, I recommend sticking to either flextrack or sectional track, as they’re both con-siderably quicker and easier to install. Remember, you can always go back later and relay your track.
Rail sizeLet’s talk about the different rail sizes and materials available for use in the garden. Rail size is measured in codes. Code is nothing more than the height of the rail in thousandths of an inch. Code 250 rail is 250 thousandths, or ¼" high. Most commercially available sectional track is code 332. The reasons for using the smaller rail are largely aesthetic. Code 332 rail is generally held to be too large to be prototypical. A smaller rail size looks more realistic in the garden.
The trade-off is that the smaller rail is not as strong when compared to rail of the same material but in a larger size. (Stronger rail materials in smaller sizes may be stronger than weaker rail materials in larger sizes.) Don’t let that scare you from using the smaller rail, though. If the track is on a firm foun-dation, it’s going to stand up to a fair deal of punishment. I frequently have young children walking on my code 250 track—albeit against my wishes, but kids will be kids—and it holds up very well. Even the code 250 aluminum
Three types of track are available in the garden. Sectional track (left) is perhaps the easiest to use. Flextrack (center) offers flexibility in planning and track design. Handlaid track (right) offers the highest level of realism, but it also requires the most planning and work.
Rails come in different sizes. Code 332 (left) is the standard size rail for commercially available sectional track. Code 250 rail (middle) is a common size for flextrack and handlaid track. Code 197 (right) is a good scale height for rail, but it may be too small for reliable use outdoors by inexperienced modelers.
BKS-12468-07.indd 62 2/27/13 2:18 PM

63
rail I used on my old railroad in New York withstood the occasional misstep and snagged garden hose without any ill effects.
Rail materialIn a garden setting, the choice of rail material has more impact on perfor-mance than size. The typical choices for rail material are brass, nickel silver, aluminum, steel, and stainless steel. Brass is the most common material. It’s easy to work with, easy to solder, and the material of choice for most sec-tional track. Stainless steel is becom-ing increasingly popular for sectional track. It requires little cleaning, but it is more difficult to cut and work with for custom trackwork. Nickel silver is similar in properties to brass and has the advantage of a more realistic color. Many say you don’t need to clean nickel-silver track as often as brass, but my experience with nickel silver in the indoor scales shows that there is no real difference.
Steel rail has really fallen out of favor largely due to the fact that it rusts, often quickly to the point of non-usability. Perhaps in dry climates it can be an option, but there are better choices.
Aluminum rail is the cheapest of all available materials. Price, however, is largely its only advantage. It’s the weak-est of all the metals, so it’s more prone to bending and kinking. It’s easy to cut and shape, though. Aluminum is also
an inconsistent conductor of electricity. It’s supposed to be the most conduc-tive metal, but trouble arises in getting the electrons to flow due to oxidation between rail sections. You can’t easily solder wires to it, so any electrical con-nections have to be mechanical, made with either aluminum or stainless steel fasteners. Brass, copper, and other com-mon metals have an electrolytic reaction with aluminum, the result being that both metals corrode and the connection breaks. I recommend using aluminum only if you’re planning on building a live steam or battery-powered railroad. If you’re going to run track power, I’d recommend the added expense of either brass, nickel-silver, or stainless steel rail.
Bending trackIf you opt for flextrack, the first thing you’ll need is a rail bender. Most track manufacturers offer them as part of their line. A rail bender is the best way to get smooth, even curves, especially when you want to bend smaller radii. Rail benders come in two types. There are benders that work on single lengths of rail, which you would then string onto the tie strips (or onto handlaid ties). With dual-rail benders, you assemble the track first and then bend the track to suit, both rails at once. You don’t need to bend the curves to the exact radius, as you will be able to finesse them when you actually set the track down in the garden.
Fastening trackWhether you use flextrack or sectional track, you will need a way of fastening the track together to maintain electri-cal continuity throughout (if you’re using track power). If you think you can safely rely solely on the rail joiners that come with the track, there may be trouble down the line.
There are three basic ways to make sure the track connections are good and solid. The first is to solder each joint together, ensuring a good electri-cal connection. While this method provides almost bulletproof electrical continuity, it has its drawbacks. First, there’s the heat element. You’ll need either a very large soldering iron or a small torch to heat the rail enough for the solder to flow. This will likely melt nearby ties if you’re not careful. Second, it’s pretty permanent. You’ll have to unsolder things if you want to make changes. Also, you’ll have to allow for expansion and contraction by using an unsoldered joint every so often. (These joints should have a jumper wire sol-dered across them.)
Another popular method is using rail clamps. These replace the rail joiners and clamp the rails together. This isn’t a cheap method, but they can be removed easily to accommo-date future expansion. You can find rail clamps that allow you to clamp together two different rail sizes. With insulated rail clamps, you can create
A rail bender is used to pre-curve rail for flextrack. A dual-rail bender comes in very handy for bending rail that’s already assembled onto tie strips. This one, by Train-Li, also has levels on it for checking the geometry of track that’s already on the ground.
BKS-12468-07.indd 63 2/27/13 2:18 PM

64
electrically isolated sidings where you can park trains. Rail clamps provide a great deal of strength that you don’t get with regular rail joiners.
An inexpensive alternative to using rail clamps is to simply place a screw through the slide-on rail joiner. Some manufacturers use this feature in their track. Each rail section is predrilled and tapped for a small machine screw. If you’re not using this track, the same thing can be accomplished by drilling your own holes through the base of the rail joiner and using small, self-tapping screws to hold everything together.
There are many options available to the garden railroader when it comes to putting down track in the garden. The key isn’t so much what you use, but how you use it. You need to decide what you want and how much work you’re will-ing to do. With a solid roadbed and well-assembled track, there’s no reason why your railroad shouldn’t be able to provide you with years of reliable opera-tion. You’ll still have to weed, though.
Solid foundations“The wise man built his house upon a rock” goes the old saying. If you want your railroad to run with mini-mal derailments, then make sure your trackwork is solid. Sounds simple, right? Well, therein lies a paradox.
Logic suggests that if you want your trackwork to remain solid, you support it with something that doesn’t give and will last for generations. The indoor model-railroading crowd has gotten sturdy benchwork down to a science. The trouble is, we’re not inside. Good old Mother Nature has a tendency to throw many wrenches into the works. If we want to build a railroad to last, we need to understand how natural forces will affect the track and how to engineer around those forces.
Climate considerationsClimate is, without a doubt, the stron-gest influence on what construction techniques will work best. Heat, cold, rain, sun, snow, salt, and pollutants all work their wonders on the small ribbons of metal we call track. Let’s examine the effects of each of these and the ways to work around them.
Temperature affects much more than just the plants we choose for the railroad. Hot and cold weather brings different challenges and concerns. Heat causes thermal expansion of the rail, which in turn can cause kinks or break plastic ties, making the rails go out of gauge. Cold weather has a similar effect, as shrinking rail can cause just as much damage as expanding rail. Instead of kinks, gaps appear between the rails as they shrink. Ballast works its way into the joints, which prevents the rail from moving back into the joint when it expands again. If your rails are clamped together, you may find them breaking the ties as they attempt to move.
Cold weather also brings another challenge to the outdoor railroad—frost heave. When the water in the ground freezes, it expands and pushes the ground upwards. Anything set in the ground has a tendency to rise with its surroundings. This moving ground makes permanent foundations for track difficult to construct.
Tree roots are another ground-moving hazard that exists in every climate. As a tree grows, its roots get larger and longer. These can, and do, raise entire sidewalks and patios with-out difficulty, so miniature railroad tracks are no match for them.
Water is yet another force we need to contend with. You need to be able to control runoff and erosion so that your garden doesn’t migrate, grain by grain, to the lowest part of your yard. Roadbed needs to be constructed to remove as much water from around the track as possible to avoid unwanted washouts. Rain and sprinkler systems cause the
Soldered rail joints offer the most reliable electrical connection.
Rail clamps offer strong connections and design flexibility. These insulated clamps allow electrical isolation of an industrial spur.
Screws through the rail joiners are perhaps the simplest method of maintaining a good connection between the rails.
I attach my track to the PVC subroadbed with 1" deck screws. I leave the screws a bit loose and then check the level and adjust the ballast.
BKS-12468-07.indd 64 2/27/13 2:19 PM
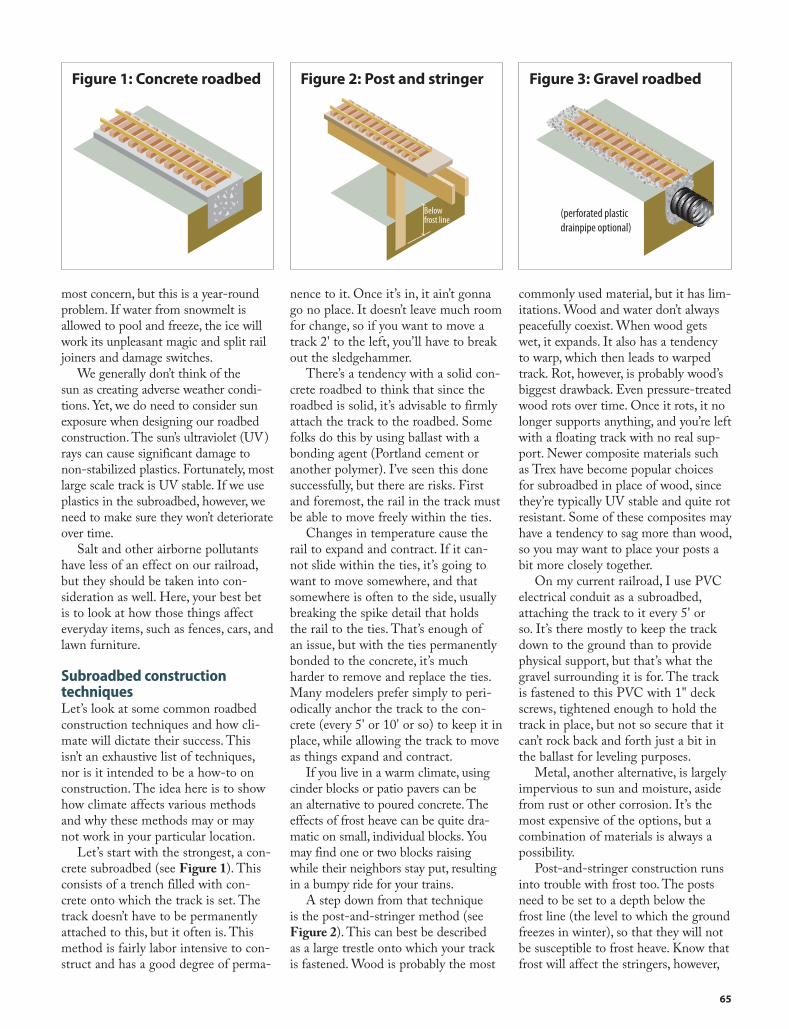
65
most concern, but this is a year-round problem. If water from snowmelt is allowed to pool and freeze, the ice will work its unpleasant magic and split rail joiners and damage switches.
We generally don’t think of the sun as creating adverse weather condi-tions. Yet, we do need to consider sun exposure when designing our roadbed construction. The sun’s ultraviolet (UV) rays can cause significant damage to non-stabilized plastics. Fortunately, most large scale track is UV stable. If we use plastics in the subroadbed, however, we need to make sure they won’t deteriorate over time.
Salt and other airborne pollutants have less of an effect on our railroad, but they should be taken into con-sideration as well. Here, your best bet is to look at how those things affect everyday items, such as fences, cars, and lawn furniture.
Subroadbed construction techniquesLet’s look at some common roadbed construction techniques and how cli-mate will dictate their success. This isn’t an exhaustive list of techniques, nor is it intended to be a how-to on construction. The idea here is to show how climate affects various methods and why these methods may or may not work in your particular location.
Let’s start with the strongest, a con-crete subroadbed (see Figure 1). This consists of a trench filled with con-crete onto which the track is set. The track doesn’t have to be permanently attached to this, but it often is. This method is fairly labor intensive to con-struct and has a good degree of perma-
nence to it. Once it’s in, it ain’t gonna go no place. It doesn’t leave much room for change, so if you want to move a track 2' to the left, you’ll have to break out the sledgehammer.
There’s a tendency with a solid con-crete roadbed to think that since the roadbed is solid, it’s advisable to firmly attach the track to the roadbed. Some folks do this by using ballast with a bonding agent (Portland cement or another polymer). I’ve seen this done successfully, but there are risks. First and foremost, the rail in the track must be able to move freely within the ties.
Changes in temperature cause the rail to expand and contract. If it can-not slide within the ties, it’s going to want to move somewhere, and that somewhere is often to the side, usually breaking the spike detail that holds the rail to the ties. That’s enough of an issue, but with the ties permanently bonded to the concrete, it’s much harder to remove and replace the ties. Many modelers prefer simply to peri-odically anchor the track to the con-crete (every 5' or 10' or so) to keep it in place, while allowing the track to move as things expand and contract.
If you live in a warm climate, using cinder blocks or patio pavers can be an alternative to poured concrete. The effects of frost heave can be quite dra-matic on small, individual blocks. You may find one or two blocks raising while their neighbors stay put, resulting in a bumpy ride for your trains.
A step down from that technique is the post-and-stringer method (see Figure 2). This can best be described as a large trestle onto which your track is fastened. Wood is probably the most
commonly used material, but it has lim-itations. Wood and water don’t always peacefully coexist. When wood gets wet, it expands. It also has a tendency to warp, which then leads to warped track. Rot, however, is probably wood’s biggest drawback. Even pressure-treated wood rots over time. Once it rots, it no longer supports anything, and you’re left with a floating track with no real sup-port. Newer composite materials such as Trex have become popular choices for subroadbed in place of wood, since they’re typically UV stable and quite rot resistant. Some of these composites may have a tendency to sag more than wood, so you may want to place your posts a bit more closely together.
On my current railroad, I use PVC electrical conduit as a subroadbed, attaching the track to it every 5' or so. It’s there mostly to keep the track down to the ground than to provide physical support, but that’s what the gravel surrounding it is for. The track is fastened to this PVC with 1" deck screws, tightened enough to hold the track in place, but not so secure that it can’t rock back and forth just a bit in the ballast for leveling purposes.
Metal, another alternative, is largely impervious to sun and moisture, aside from rust or other corrosion. It’s the most expensive of the options, but a combination of materials is always a possibility.
Post-and-stringer construction runs into trouble with frost too. The posts need to be set to a depth below the frost line (the level to which the ground freezes in winter), so that they will not be susceptible to frost heave. Know that frost will affect the stringers, however,
Belowfrost line
(perforated plasticdrainpipe optional)
Figure 1: Concrete roadbed Figure 2: Post and stringer Figure 3: Gravel roadbed
BKS-12468-07.indd 65 2/27/13 2:19 PM
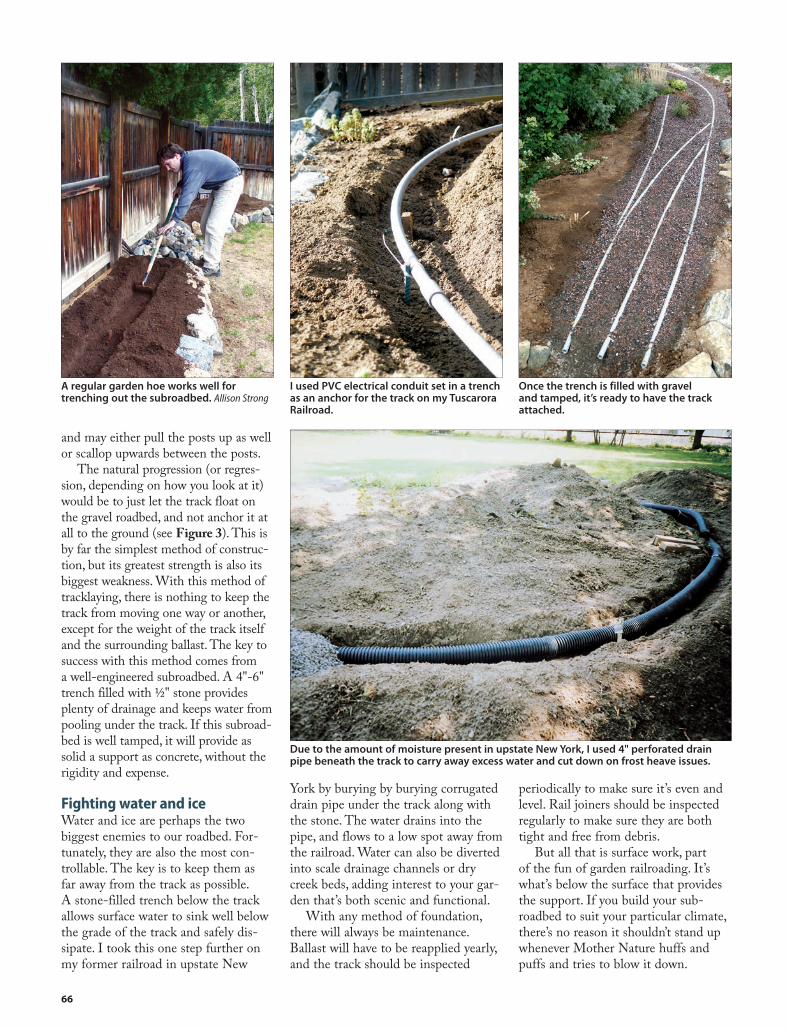
66
and may either pull the posts up as well or scallop upwards between the posts.
The natural progression (or regres-sion, depending on how you look at it) would be to just let the track float on the gravel roadbed, and not anchor it at all to the ground (see Figure 3). This is by far the simplest method of construc-tion, but its greatest strength is also its biggest weakness. With this method of tracklaying, there is nothing to keep the track from moving one way or another, except for the weight of the track itself and the surrounding ballast. The key to success with this method comes from a well-engineered subroadbed. A 4"-6" trench filled with ½" stone provides plenty of drainage and keeps water from pooling under the track. If this subroad-bed is well tamped, it will provide as solid a support as concrete, without the rigidity and expense.
Fighting water and iceWater and ice are perhaps the two biggest enemies to our roadbed. For-tunately, they are also the most con-trollable. The key is to keep them as far away from the track as possible. A stone-filled trench below the track allows surface water to sink well below the grade of the track and safely dis-sipate. I took this one step further on my former railroad in upstate New
York by burying by burying corrugated drain pipe under the track along with the stone. The water drains into the pipe, and flows to a low spot away from the railroad. Water can also be diverted into scale drainage channels or dry creek beds, adding interest to your gar-den that’s both scenic and functional.
With any method of foundation, there will always be maintenance. Ballast will have to be reapplied yearly, and the track should be inspected
periodically to make sure it’s even and level. Rail joiners should be inspected regularly to make sure they are both tight and free from debris.
But all that is surface work, part of the fun of garden railroading. It’s what’s below the surface that provides the support. If you build your sub-roadbed to suit your particular climate, there’s no reason it shouldn’t stand up whenever Mother Nature huffs and puffs and tries to blow it down.
A regular garden hoe works well for trenching out the subroadbed. Allison Strong
I used PVC electrical conduit set in a trench as an anchor for the track on my Tuscarora Railroad.
Due to the amount of moisture present in upstate New York, I used 4" perforated drain pipe beneath the track to carry away excess water and cut down on frost heave issues.
Once the trench is filled with gravel and tamped, it’s ready to have the track attached.
BKS-12468-07.indd 66 2/27/13 2:19 PM

67
C H A P T E R E i g H T
Maintaining your trainsRoutine maintenance of locomotives and rolling stock is the key to reliable operation.
As with many things, building the railway is only half the
fun. Maintenance and upkeep consume a large amount of
time, sometimes at the expense of building the next station
or extending the railroad an extra 10'. This isn’t necessarily a
bad thing, as balance is an essential part of life—as well as
the hobby. Balancing various projects within the railroad as
well as other commitments to family, work, and other
hobbies takes time, a bit of sacrifice, and a lot of patience.
BKS-12468-08.indd 67 2/27/13 2:19 PM
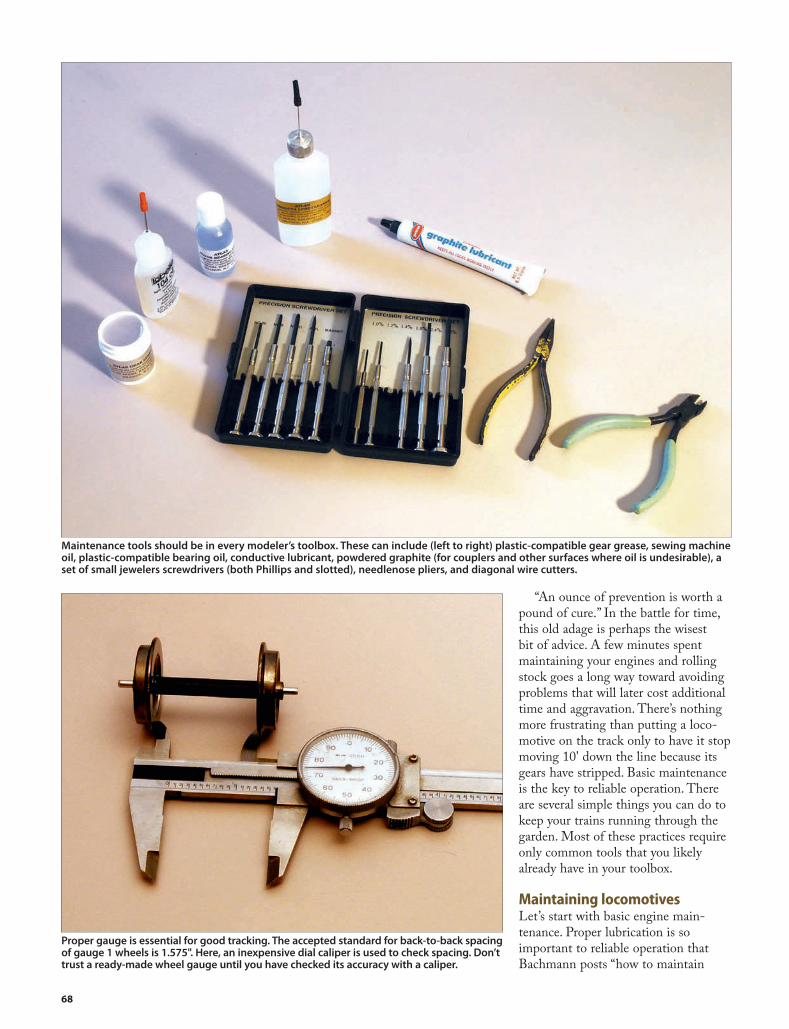
68
“An ounce of prevention is worth a pound of cure.” In the battle for time, this old adage is perhaps the wisest bit of advice. A few minutes spent maintaining your engines and rolling stock goes a long way toward avoiding problems that will later cost additional time and aggravation. There’s nothing more frustrating than putting a loco-motive on the track only to have it stop moving 10' down the line because its gears have stripped. Basic maintenance is the key to reliable operation. There are several simple things you can do to keep your trains running through the garden. Most of these practices require only common tools that you likely already have in your toolbox.
Maintaining locomotivesLet’s start with basic engine main-tenance. Proper lubrication is so important to reliable operation that Bachmann posts “how to maintain
Maintenance tools should be in every modeler’s toolbox. These can include (left to right) plastic-compatible gear grease, sewing machine oil, plastic-compatible bearing oil, conductive lubricant, powdered graphite (for couplers and other surfaces where oil is undesirable), a set of small jewelers screwdrivers (both Phillips and slotted), needlenose pliers, and diagonal wire cutters.
Proper gauge is essential for good tracking. The accepted standard for back-to-back spacing of gauge 1 wheels is 1.575". Here, an inexpensive dial caliper is used to check spacing. Don’t trust a ready-made wheel gauge until you have checked its accuracy with a caliper.
BKS-12468-08.indd 68 2/27/13 2:19 PM

69
your locomotive” videos on YouTube so modelers can keep things running smoothly. This is no less important with locomotives of other manufac-turers. Many manufacturers include exploded drawings or written instruc-tions with their locomotives on how to lubricate the gears properly.
Generally speaking, all moving parts should be kept lubricated. The most important area is the gearing. Gears should be coated with a plastic-compatible grease. If the main gears are allowed to run dry, they will be prone to stripping, accelerated wear, and even breakage. It’s just like your car—no oil, no run.
Wheel bearings should be oiled occasionally with a touch of sewing machine (or similar) oil. WD-40 is not an acceptable lubricant. It’s great for freeing up rusted bolts, but it has no long-term lubricative properties.
Occasionally put a drop of oil on the valve gear joints of steam locomo-tives. Notice that I used the words occasionally and drop. This routine oil-ing isn’t something that has to be done before every run. Depending on how often you run your trains, once or twice a year is adequate. The grease on the main gears tends to stay put for longer periods of time because, in most cases, the gear boxes are sealed.
Oil on the bearings and valve gear tends to evaporate or dry out more quickly and may need to be replen-ished more often, but you don’t need to bathe the parts in oil. There’s a reason that most oil applicators we buy for the hobby have narrow, needle-like applicators. A small drop does quite well. Oil is a viscous liquid and will, over time, pick up abrasive matter such as dirt and grit, and excess oil picks up more of this matter and distributes it into the joints the oil is supposed to be protecting. A little oil goes a long, long way.
Keeping things cleanOf course, it doesn’t matter how smoothly the running gear turns if there are no electrons getting to the motor. Proper electrical conductivity is essential for good operation. Assuming you rely on track power to run your
trains, cleaning needs to be done a little more often than lubricating, depending on your operating environment. The key areas that need to be kept clean are the wheel treads and the point at which power is transferred from the wheels to the brushes or wipers that carry electricity to the motor.
There is no magic bullet for keeping wheel treads clean. Some
manufacturers suggest coating the wheels with a conductive lubricant to aid in this endeavor. I’m not a big fan of putting any kind of liquid on the wheels as this invites trouble. (You can use these products on other electrical contact points, just not the wheel treads.) As a locomotive runs down the track, it can pick up dust from the ballast. This dust not only
Resting one wheel on a vise while gently tapping the end of the axle will widen the gauge of narrowly spaced wheels. Just don’t go too far.
Trucks need to move freely against the car but not so freely that the car wobbles when it rolls down the track. In this photo, the left-hand truck is set loosely so it can rotate around all three axes. The right truck can swivel and rotate front to back, but it cannot rock side-to-side. This eliminates any wobbling the car may otherwise want to do with loose trucks.
BKS-12468-08.indd 69 2/27/13 2:19 PM

70
gets in the way of electrical conduc-tivity, but while the train runs, the dust slowly grinds away the surfaces of the wheel and the rail.
My favorite tool for cleaning wheels is a fine Scotch-Brite pad, but fine steel wool works as well. However, steel wool particles may be attracted to the magnet in the motor and work their way into the motor bearings. It’s also possible to use a pencil eraser to clean wheel treads and other electrical con-tact points. Avoid cleaning wheels with sandpaper, as it creates microscopic grooves that actually collect dirt and grime, and you’ll just have to clean the wheels more often. The best recipe for keeping wheels clean is keeping your track clean. Equipping your rolling stock with metal wheels goes a long way toward facilitating this, as it elimi-nates the plastic buildup that causes a lot of conductivity problems.
Maintaining rolling stockWhile the majority of routine mainte-nance concerns electrical conductivity and proper lubrication, some other basic tasks should be done to every piece of rolling stock on your railroad to ensure proper operation. These are largely mechanical issues and, once resolved, should not have to be revisited.
Wheels need the most attention. They need to be properly gauged to provide smooth operation. The stan-dard back-to-back spacing for wheels running on gauge 1 track is 1.575". Wheels that are too far apart or too close together have a tendency to derail on switches or on curves, where they will want to climb the rails or fall between. It’s more common for wheels to be too close together. This can be fixed by resting the wheel on the jaws of a vise and tapping the axle lightly until the wheels are the proper distance apart. Wheels that are too far apart may be more difficult to correct, as you may need to remove some mate-rial from the plastic axle to allow the wheels to be in gauge.
A wheel may also not sit squarely on its axle, giving it a wobble as it rolls. For metal wheels, a light tapping with a hammer may correct this problem. If
A kitchen scale can be used to determine how much drawbar pull your locomotive has. I just run the locomotive forward into the top of the scale so that it pushes on the bed. While not exact, a general rule to follow is one car equals every 1.25 ounces measured on the scale.
How much our locomotives weigh has a lot to do with how well they perform. The heavier they are, the more they’ll be able to haul. But there’s a trade-off. The more they weigh, the more stress it puts on the gears. Balancing the two is something of a guessing game.
BKS-12468-08.indd 70 2/27/13 2:19 PM

71
it’s a plastic wheel, you’re likely out of luck, and replacing the wheel is usually the only solution.
Once the wheels are in gauge, make sure the trucks they’re mounted in are in good shape. A drop of plastic-compatible oil on the ends of the axle will lubricate the journals (the boxes on the truck in which the axles rotate) so the wheels turn freely. Make sure there is a slight amount of lateral play in the axles. If there isn’t, that means the journals are pressing in on the axle ends and the axle won’t rotate freely. This can be fixed by drilling out the ends of the journals ever so slightly. Be careful to use a drill that is the same size as the existing hole. Don’t enlarge the diameter, just make it a little deeper. Too much lateral movement, however, can also lead to trouble. The axles could pop out of the journals and cause a derailment. Thin washers placed on the axles between the wheels and the journals can help here by limiting the amount of play between the journal and the wheel hub.
The trucks attachment to the car should also be checked. Trucks need to be loose enough that they can turn freely but not so loose that the car wobbles as it rolls down the track. I try to keep one truck tight enough so the car has some movement back and forth longitudinally, but not side to side, while the other truck has a little side-to-side play. This allows the car to roll better over uneven track without danger of derailing.
Most of the chores here are fairly common-sensical in nature. Routine maintenance is just that—routine. I would much rather spend an evening giving my entire collection a quick once over than having to spend the same evening in a frustrated stew because the gears on my favorite locomotive need to be replaced. The less time we spend fixing problems, the more time we can spend on more constructive projects or the never-ending task of weeding. Yet, even that task is much easier when it’s accompanied by the sights and sounds of trains rolling reliably through the garden.
Lead shot makes a great weight for locomotives because of its ability to fill in any available space. It can be used in bags or mixed with putty or clay to take on a more solid form.
On my test track for adding weight, the 8'-piece of track is elevated about 4" at one end to create a 4 percent grade. The flatcar has a heavy load on it to simulate a longer train.
I placed lead in a Ziploc bag and draped it over the hood of the engine to see how it improves performance. Weight can easily be adjusted by adding or removing lead shot.
BKS-12468-08.indd 71 2/27/13 2:19 PM
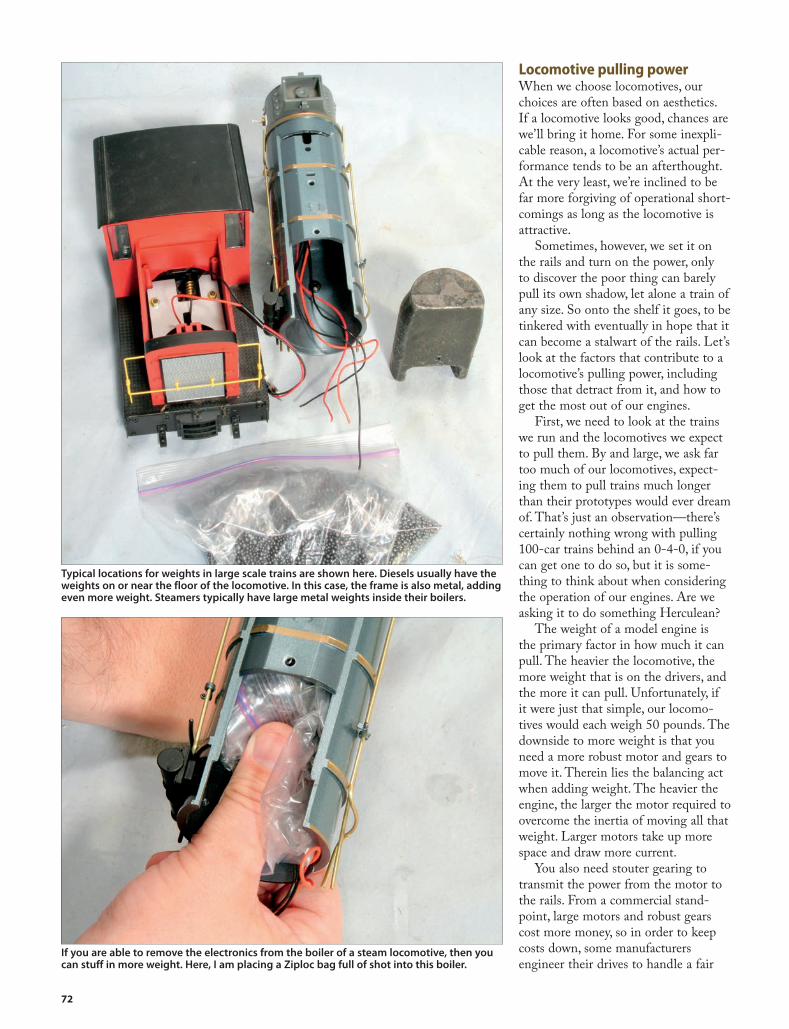
72
Locomotive pulling powerWhen we choose locomotives, our choices are often based on aesthetics. If a locomotive looks good, chances are we’ll bring it home. For some inexpli-cable reason, a locomotive’s actual per-formance tends to be an afterthought. At the very least, we’re inclined to be far more forgiving of operational short-comings as long as the locomotive is attractive.
Sometimes, however, we set it on the rails and turn on the power, only to discover the poor thing can barely pull its own shadow, let alone a train of any size. So onto the shelf it goes, to be tinkered with eventually in hope that it can become a stalwart of the rails. Let’s look at the factors that contribute to a locomotive’s pulling power, including those that detract from it, and how to get the most out of our engines.
First, we need to look at the trains we run and the locomotives we expect to pull them. By and large, we ask far too much of our locomotives, expect-ing them to pull trains much longer than their prototypes would ever dream of. That’s just an observation—there’s certainly nothing wrong with pulling 100-car trains behind an 0-4-0, if you can get one to do so, but it is some-thing to think about when considering the operation of our engines. Are we asking it to do something Herculean?
The weight of a model engine is the primary factor in how much it can pull. The heavier the locomotive, the more weight that is on the drivers, and the more it can pull. Unfortunately, if it were just that simple, our locomo-tives would each weigh 50 pounds. The downside to more weight is that you need a more robust motor and gears to move it. Therein lies the balancing act when adding weight. The heavier the engine, the larger the motor required to overcome the inertia of moving all that weight. Larger motors take up more space and draw more current.
You also need stouter gearing to transmit the power from the motor to the rails. From a commercial stand-point, large motors and robust gears cost more money, so in order to keep costs down, some manufacturers engineer their drives to handle a fair
Typical locations for weights in large scale trains are shown here. Diesels usually have the weights on or near the floor of the locomotive. In this case, the frame is also metal, adding even more weight. Steamers typically have large metal weights inside their boilers.
If you are able to remove the electronics from the boiler of a steam locomotive, then you can stuff in more weight. Here, I am placing a Ziploc bag full of shot into this boiler.
BKS-12468-08.indd 72 2/27/13 2:19 PM

73
amount of weight but not extreme amounts. (Lighter locomotives are also cheaper to ship.) Most engines can handle a little extra weight, but you don’t want to add so much that you endanger the gears.
In addition to weight on the loco-motive, other factors affect the length of train a locomotive can pull. The most obvious is the type of cars the locomotive is pulling. Heavy cars with lots of drag are going to put more strain on a locomotive than would lighter, more free-rolling ones. Passen-ger cars are typically the heaviest, most resistant cars to move. Their weight comes from their size and interior detailing. Resistance also often comes from electrical pick-ups for lights. The more drag there is on the train, the more stress is created on the engine’s gears.
Figuring grades and curvesGrades and curves play into pulling power as well. The steeper the grade, the more the cars pull back against the locomotive. Curves have the same net effect. All curves introduce some degree of additional drag, but the tight curves encountered on typical garden railroads introduce the most.
The effects of grades on our trains can be mitigated, of course, by keeping them to an absolute minimum. This is easier said than done in some gardens, but if you know you like long trains, you’ll need to design your railroad to accommodate them. Twenty cars trav-eling up a 4 percent grade behind one locomotive just isn’t practical. Curves, likewise, can be designed to lessen their effect, which is one reason you try to build a railroad using the widest curves possible.
Track materialsIf you are using track power, another factor to consider is the rail material your trains run on. Different metals have different adhesive factors. How well a locomotive pulls depends, to a degree, on the materials involved. For example, steel wheels on aluminum rail has different adhesion than does nickel on brass. There’s not much you can do about that; you’ve chosen your
Lead shot can be mixed in with Bondo to create a slurry that can be added in various places, such as the smokebox of this locomotive. I had to remove the stock weight to make room for the batteries and electronics, so the lost weight had to be made up elsewhere.
Large scale couplers come in a variety of shapes and sizes, some more prototypical than others. With no set standard from manufacturers, a modeler has the job of finding the one coupler that best meets his or her needs.
Incompatibility isn’t limited to the garden. A difference in coupler size required the East Broad Top Railroad to use a cast aluminum adaptor to mate the couplers.
BKS-12468-08.indd 73 2/27/13 2:19 PM

74
rail materials for reasons other than how well trains roll over them. Typi-cally, though, those who run battery-powered trains in the garden get better traction for no other reason than they don’t have to keep the rails polished to conduct electricity.
Adding weightI’m not a big fan of adding extra weight to locomotives. When taken as representative of the prototype, most of our locomotives, as supplied, can pull a typical train and then some. The problem is that a typical train for some small locomotives may be four or five cars at most. If your personal taste leans toward longer trains, a little extra weight here and there might help a borderline performing locomotive become the pride of the fleet. As with anything, moderation is the key. Add just enough to make the engine do what you need it to. As with our own bodies, too much extra weight takes its toll.
Even with relatively flat grades and mild curves, if your latest purchase is still too light on its feet, the solution is to add weight—but how much? There’s no single answer for that. You’ve got to look at your railroad, curves and grades, the length of train you’ll be running, and the quality of the drive in the engine. There’s no empirical way to quantify any of those aspects, so it really comes down to an educated guess.
What I usually do is to grab a Ziploc bag and start filling it with lead shot. Then I set the bag over the top of the engine to see how it improves perfor-mance. The ideal way to gauge results is to test the locomotive with a typical train on your railroad. Otherwise, I set up a temporary track on an 8' length of 2 x 4 raised to about a 4 percent grade (4' at one end). I set the locomotive on the track with a weighted hopper car or something in tow and add more weight until I get the performance I want.
The next trick is to figure out where to put that extra weight. Naturally, small locomotives, which might benefit the most from extra weight, are the hardest in which to find spots. With steam engines, the boiler is prime real
Couplers under tension pull along straight lines.
Couplers under compression hunt to the sides of the rails.
The biggest advantage of a truck-mounted coupler is its ability to navigate tighter curves because couplers stay closer to the center of the track.
A talgo, or truck-mounted, coupler is attached directly to the truck itself. Most large scale equipment comes with couplers mounted in this fashion.
Figure 1: Truck-mounted couplers
BKS-12468-08.indd 74 2/27/13 2:19 PM

75
estate. Most locomotives already have some weight in there, so it’s just a mat-ter of adding more. Diesels usually have long hoods, which are great for housing extra weight. Don’t discount areas under the frames or any hidden nooks, either. Weight is good wherever you can squeeze it in, especially on smaller locomotives.
Weight can consist of many items, but my favorite is lead shot. I use the same Ziploc bag I used for testing the weight. The bag keeps the shot in place and also fills odd-shaped spaces. If it doesn’t need to be removable, I’ll mix the lead shot with Bondo auto-body filler, and fill the cavities with that slurry. Once dry, it’s a solid, heavy mass. Other sources for weight include discarded tire weights (check your local tire shop for cast-offs) or lead fishing weights. Unfortunately, most of the lead weights that hobby shops sell are too small to be of use in our scale. For-tunately, these alternative sources are generally much cheaper.
When adding the extra weight, make sure it’s solidly attached, wher-ever it’s being added, so it won’t rattle. Also, make sure that any electronics inside the locomotive are insulated from the weights.
Installing and maintaining couplersPerhaps the most common complaint made by newcomers to this hobby (aside from the whole scale/gauge quagmire) relates to couplers; why does each manufacturer have their own style, and why, typically, don’t they match up? There is nothing more frus-trating than returning home from the hobby shop with the latest gotta-have car and having to break out the twist ties just to connect it to your favorite locomotive. Because of this disparity we’re left with the task of selecting our own standard.
In the beginning, LGB decided that the most effective coupler was a simple hook and loop. By and large, this was correct. Hook-and-loop couplers—especially with hooks on both ends of the cars—are largely bulletproof in terms of staying coupled. Unfortunately, they don’t look remotely prototypical.
Tongue droop occurs when one truck-mounted coupler slides up or down relative to the next one due to the weight of the train or because of uneven track. If the tongue droop is pronounced enough, the couplers will separate.
Because truck-mounted couplers sit low to the track, they’re prone to inadvertent uncoupling because of debris between the rails.
Body-mounted couplers are prototypically attached to the body of the car.
BKS-12468-08.indd 75 2/27/13 2:20 PM

76
In the early 1980s, Delton Loco-motive Works introduced a working knuckle coupler that operated like a prototype knuckle coupler, but it was fairly clunky. Still, it was enough to get manufacturers thinking. When Lionel and Bachmann entered the market, they offered a Delton-esque knuckle coupler with their trains. Bachmann also included hook-and-loop couplers as an option. USA Trains started out with LGB-compatible hook-and-loop couplers but soon designed its own ver-sion of a knuckle coupler. Aristo-Craft offered yet another version of a knuckle coupler. Other manufacturers followed, each with its own coupler design, and some had a different coupler for each product line!
Unfortunately, many of these cou-plers aren’t really all that compatible with each other, and some that are, are mounted at different heights! To call it a mess would be an understatement. While the small scales seem to have settled on a de facto standard coupler, the mere presence of multiple scales running on the same gauge track in large scale has pretty much precluded that from occurring. So we’re left to individually choose a coupler that best meets our own needs and convert everything that doesn’t match.
For the most part, the days of the hook-and-loop coupler being dominant are behind us. A few manufacturers still offer that style, but they’re in the minority. That leaves us with no fewer than nine different options for knuckle couplers. Which is the correct one for you? The answer to that has much to do with how you intend to run your trains.
Body mounted vs. truck mountedMany model trains come with the cou-plers mounted to the trucks, commonly called talgo coupling (see Figure 1). The big advantage to this kind of mounting is that it allows the equipment to go through very tight curves, because the coupler stays closer to the center of the track. The disadvantage is that it can put sideways stress on the truck as the train winds around curves, which could lead to derailments. This is especially
Wider-radius curves are needed for body-mounted couplers because they generally couple more closely, and the corners of the cars get in the way.
Body-mounted couplers are also less accepting of sharp transitions between straight and curved track. If the difference is too much, the cars will derail.
Couplers are perhaps the most important aspect of a train, as they constitute the hardware that allows the cars to stay together. I standardized mine with body-mounted Kadee couplers on my Tuscarora Railroad. Proper mounting is the key to reliable operation.
BKS-12468-08.indd 76 2/27/13 2:20 PM

77
true when reversing a train or when running downhill—any time the cou-plers are being pushed together by the weight of the train.
Another disadvantage to truck-mounted couplers is tongue droop. This happens when the arm the coupler is attached to drops relative to the coupler on the next car because of tension, compression, or uneven track. If the couplers misalign enough, they will separate.
Truck-mounted couplers usually sit low to the track in order to clear any details on the bottom of the car. This introduces another hazard—unwanted uncoupling due to debris. Most oper-ating knuckle couplers have a lift pin that opens the knuckle, which can usually be actuated by being pushed up from below. Twigs, leaves, rocks, acorns, and other objects can find their way between the rails and push up these levers. Yet, while there are a number of negatives associated with truck-mounted couplers, they’re ideal for railroads with tight curves (less than 8' diameter or 4' radius). You typi-cally wouldn’t be running long trains on these curves, so the physics are a bit more in your favor there.
The alternative to truck-mounted couplers is to mount them on the body of the car. Body-mounted couplers are advantageous because the weight and
Kadee couplers can be easily uncoupled by twisting a flat-bladed screwdriver between the knuckles to open them.
Many manufacturers have cloned Kadee’s draft gear and coupler boxes, so there’s a great deal of interchangeability between brands, even if the couplers themselves aren’t exactly compatible.
Some manufacturers provide a pad that easily fits Kadee couplers. This Bachmann hopper car is designed so that Kadee’s G scale draft gear can be dropped in as a direct replacement for their stock coupler.
Some brands of couplers are compatible with Kadee (on right), such as this Accucraft 1:32 coupler (on left).
BKS-12468-08.indd 77 2/28/13 2:01 PM

78
stress of the train is handled by the car’s frame, which leaves the trucks free to negotiate the track without any extra forces acting on them. It also eliminates tongue droop because the coupler is rigidly mounted to the body. The cou-plers are also mounted higher, and often closer, which results in a more prototyp-ical appearance for your rolling stock.
The disadvantage of body-mounted couplers is that you’re limited to using wider-radius curves. Because the cars are typically coupled closer together, you have to worry about the corners of adjacent cars bumping on tighter curves. But just getting into curves can cause you trouble. As one car enters a curve, its end swings away from the center and pulls the coupler on the next car with it. If there’s not enough swing in the coupler to compensate, then a derailment is soon to follow.
Aftermarket couplersOne solution to the coupler compat-ibility problem is to choose aftermarket couplers, such as those made by Kadee. Its #1 scale coupler is designed to be used with 1:32 and 1:29 scale equip-ment, while their larger G scale coupler is appropriate for 1:24 through 1:20.3 scale models. The #1 scale coupler also works for the larger scales, but would represent a 3/4 size coupler, as used by some narrow gauge railroads. Many modelers use the larger G scale coupler with the 1:32 and 1:29 trains as well, as the larger size is more forgiving of uneven track. (If you build your track right in the first place, you won’t need to worry.) Kadee makes both body- and truck-mounted variations, so what-ever your situation, there’s a coupler that will work. They also make custom-ized mounts for many locomotives.
Kadee couplers don’t work like pro-totype knuckle couplers. They’re spring loaded with the knuckle rotating off to the side. They couple by gently push-ing the cars together. Uncoupling is accomplished by using magnets in the track to force apart the metal trip pins that hang from each coupler. It’s a cool way to do business but fairly uncom-mon outdoors in large scale. Most folks uncouple Kadee couplers by inserting a flathead screwdriver between the knuckles and twisting. The trip pins then become useless and can be cut off if you wish.
Mixing couplersWhile some couplers are minimally compatible with other brands, many are not. The way around this is to equip a small handful of cars as con-version cars. These cars have one style
I cut the unsightly steel pins off of the couplers by (left) tapping the pin down around 1⁄16", (center) snipping off the pin, and (right) tapping the stub back into place. You’ll know it’s back in place when the knuckle opens and closes smoothly.
The coupler pocket is used to mark the location of the mounting holes to be drilled into the pad.
Many manufacturers’ equipment has to have a suitable mounting surface built up with styrene or wood. The small pins are pushed into the plastic frame of the car to help hold the mounting pad in place once it’s glued.
BKS-12468-08.indd 78 2/27/13 2:20 PM
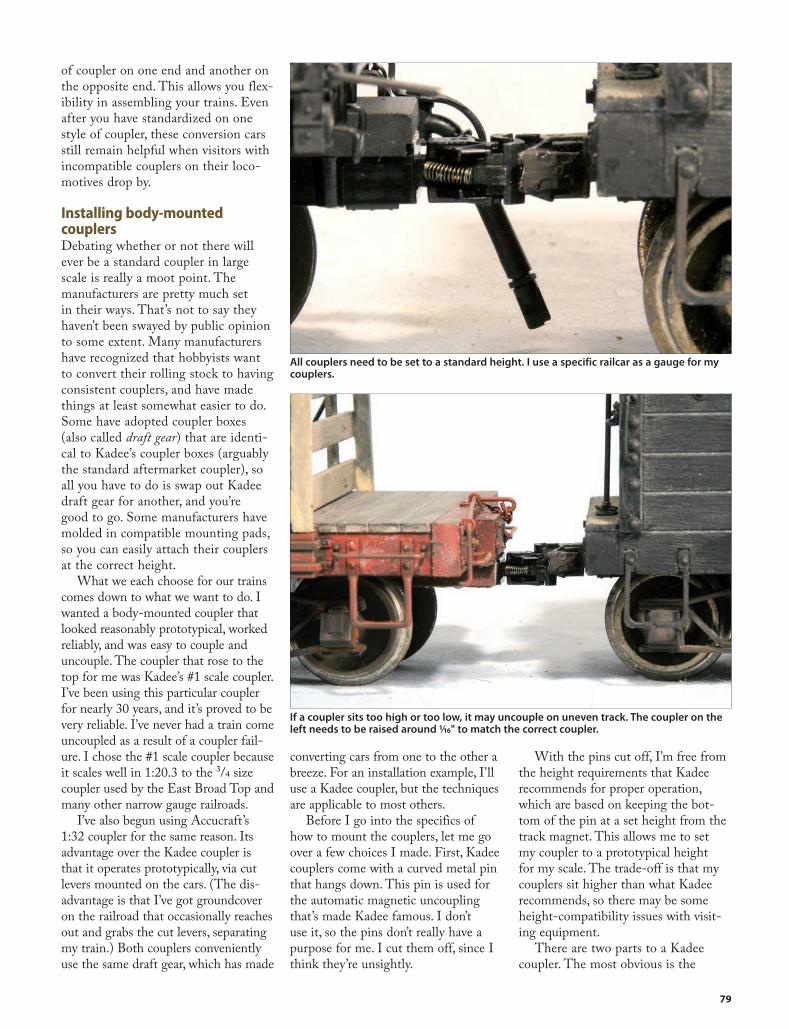
79
of coupler on one end and another on the opposite end. This allows you flex-ibility in assembling your trains. Even after you have standardized on one style of coupler, these conversion cars still remain helpful when visitors with incompatible couplers on their loco-motives drop by.
Installing body-mounted couplersDebating whether or not there will ever be a standard coupler in large scale is really a moot point. The manufacturers are pretty much set in their ways. That’s not to say they haven’t been swayed by public opinion to some extent. Many manufacturers have recognized that hobbyists want to convert their rolling stock to having consistent couplers, and have made things at least somewhat easier to do. Some have adopted coupler boxes (also called draft gear) that are identi-cal to Kadee’s coupler boxes (arguably the standard aftermarket coupler), so all you have to do is swap out Kadee draft gear for another, and you’re good to go. Some manufacturers have molded in compatible mounting pads, so you can easily attach their couplers at the correct height.
What we each choose for our trains comes down to what we want to do. I wanted a body-mounted coupler that looked reasonably prototypical, worked reliably, and was easy to couple and uncouple. The coupler that rose to the top for me was Kadee’s #1 scale coupler. I’ve been using this particular coupler for nearly 30 years, and it’s proved to be very reliable. I’ve never had a train come uncoupled as a result of a coupler fail-ure. I chose the #1 scale coupler because it scales well in 1:20.3 to the 3/4 size coupler used by the East Broad Top and many other narrow gauge railroads.
I’ve also begun using Accucraft’s 1:32 coupler for the same reason. Its advantage over the Kadee coupler is that it operates prototypically, via cut levers mounted on the cars. (The dis-advantage is that I’ve got groundcover on the railroad that occasionally reaches out and grabs the cut levers, separating my train.) Both couplers conveniently use the same draft gear, which has made
converting cars from one to the other a breeze. For an installation example, I’ll use a Kadee coupler, but the techniques are applicable to most others.
Before I go into the specifics of how to mount the couplers, let me go over a few choices I made. First, Kadee couplers come with a curved metal pin that hangs down. This pin is used for the automatic magnetic uncoupling that’s made Kadee famous. I don’t use it, so the pins don’t really have a purpose for me. I cut them off, since I think they’re unsightly.
With the pins cut off, I’m free from the height requirements that Kadee recommends for proper operation, which are based on keeping the bot-tom of the pin at a set height from the track magnet. This allows me to set my coupler to a prototypical height for my scale. The trade-off is that my couplers sit higher than what Kadee recommends, so there may be some height-compatibility issues with visit-ing equipment.
There are two parts to a Kadee coupler. The most obvious is the
All couplers need to be set to a standard height. I use a specific railcar as a gauge for my couplers.
If a coupler sits too high or too low, it may uncouple on uneven track. The coupler on the left needs to be raised around 1⁄16" to match the correct coupler.
BKS-12468-08.indd 79 2/27/13 2:20 PM

80
coupler itself. The other is the box that holds the coupler, or draft gear. The draft gear is what gets physically mounted to the equipment, and you need a flat surface on the underside of the car for mounting the draft gear. This is arguably the most critical part of the whole installation process.
The pad or surface onto which the draft gear is mounted needs to be firmly attached to the car. In some cases, manufacturers build a pad into the car. In others, you must build up a suitable surface with wood or
styrene. This built-up surface should be mechanically fastened to the car itself, not just glued. Glue joints will fail, and your coupler will fall off as a result. Often, the screws used to mount the coupler and draft gear to the car itself also hold the pad in place, but that’s not always the case.
Mounting the draft gearWith the pad built up, locating the holes to mount the draft gear is fairly simple. I hold the top cover against the pad and mark the location of the
holes with a pencil. These can then be drilled and the coupler mounted. Kadee includes 1"-long 2-56 screws for this purpose, although any small screw of sufficient length will work.
Since I don’t use Kadee’s automatic uncoupling feature and cut off the pins, I set my coupler height to the scale height of 24" above the railhead in 1:20.3. This works out to 13⁄16". I check the height of each coupler I mount against the coupler on one specific tender in my collection. This acts as my height gauge and ensures that all my couplers are mounted at the same height.
Setting the coupler to the correct height isn’t difficult, but occasional peculiarities do arise. In most cases, a coupler can be set to the correct height simply by building the pad to the appropriate thickness, typically with a few layers of styrene or wood shims.
Occasionally, the coupler sits too low, and there are a few ways around this. The most common method is to insert washers between the truck and the car body to raise the car the required amount. That’s certainly a workable solution, but raising the car off the trucks may not be aesthetically or operationally viable, as the car may become unstable. Another solution is to mount the coupler without its top cover, letting the pad itself serve that purpose. This raises the coupler around 1⁄16". If more height is needed, washers can be added.
Variations I mentioned earlier that Kadee makes different mounts for different circum-stances, where the standard draft gear just won’t fit. A visit to the company’s website (kadee.com) provides illustra-tions and, occasionally, measurements of some of their various mounts. Other manufacturers offer couplers with similar mounts, which can eas-ily be substituted for Kadee’s. It’s all a matter of personal preference. The key is to make sure the couplers are mounted sturdily to the locomotive or car and that they’re mounted to the same height. Do that, and you’re well on your way to reliable operation in the garden.
The extra nubs of the draft gear can be filed off if the coupler is mounted in a location where space is at a premium. In this case, the top of the coupler pocket is being filed off so that the coupler can be mounted without the cover.
Without the top cover, the mounting pad itself replaces it, allowing the coupler to be mounted around 1⁄16" higher than with the cover. This raises the coupler without having to add unsightly washers between the truck and the car body.
BKS-12468-08.indd 80 2/27/13 2:20 PM

81
C H A P T E R N I N E
Proper track upkeep
Tuscarora Railroad No. 3 winds its way out of the shadows of Shade Gap as it approaches a switch and Neelyton.
Proper trackwork is critical to problem-free operation.
Smooth-running, well-weighted locomotives and rolling
stock don’t mean a thing if the track they’re running on isn’t
up to snuff. And—quite frankly—this is where a lot of garden
railroads need the most work. Because it bears repeating
over and over—Proper trackwork is critical to problem-free
operation.
BKS-12468-09.indd 81 2/27/13 2:20 PM

82
All too often, I’ve been on railroad tours where the host bemoans that a particular piece of rolling stock con-stantly derails at one particular spot on the railroad. Usually, he’ll remove the car and set it on the table, saying he’ll take a look at the car later and figure out what the problem is. Rarely does he look at the spot on the track where the car has been repeatedly derailing.
There’s no rule in garden railroad-ing that says track has to be laser-level all the way around. Unless your track is set in an absolutely immovable founda-tion (unlikely), your track is going to undulate to some degree. That’s fine—our trains are designed to handle that, hence the unprototypically large flanges. But there are things you want to avoid when it comes to track geometry.
Twists, kinks, and dipsThe biggest no-no is a twist in the track, which occurs when one rail drops below the adjacent one. If the wheels are on a rigid frame, such as an unsprung steam locomotive or a four-wheel car, a twist in the track will cause one wheel to rise up in the air above the rails. If this twist is on a straight section of track, the locomotive or car will rock as it goes over the twist, but it will probably not derail since it’s going straight. If the track is curving and twisting at the same time, you can bet your last dollar that the train will derail. The wheel that rises up will ride over the rail, and you’ve got your derailment. It will happen every time. The solution to a twist is to shore up the track from side to side with a little
Twists in the track—especially on curves—are probably responsible for most non-switch-related derailments. As the track twists and curves around, flanges can ride up over the rails and derail.
Kinks can be caused by many things, including someone stepping on the track or falling rocks and branches. Minor kinks can usually be massaged out of the track, while sharper ones warrant removal. This kink was caused when I tripped over the bridge. The most egregious bends of the kink were massaged out with pliers, but a slight vertical kink still remains. It’s on a siding and has yet to cause a derailment, so it’s low on the maintenance list.
The effects of dips and humps are illustrated in these two photos. When a locomotive goes over a dip (left), the center driver will lift off the rails. This causes trouble because the nose of the locomotive may scrape on the rails at the front. Humps are problematic because the flange on the end drivers can rise up over the rail and possibly cause a derailment (right).
BKS-12468-09.indd 82 2/27/13 2:21 PM
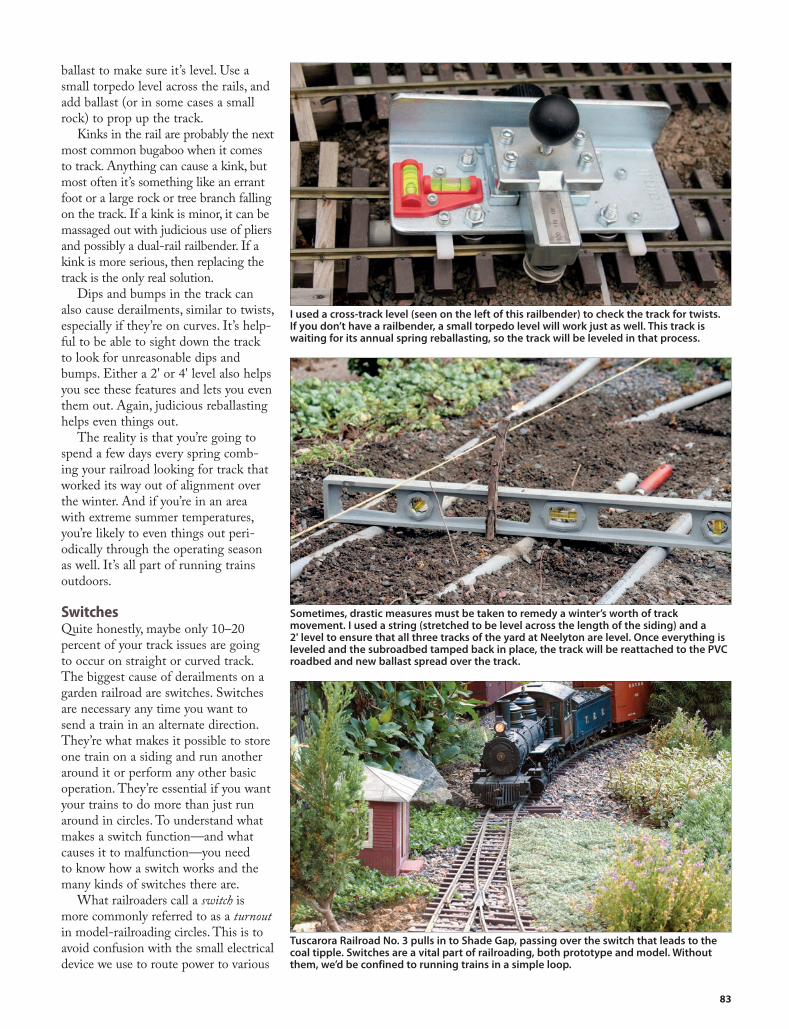
83
ballast to make sure it’s level. Use a small torpedo level across the rails, and add ballast (or in some cases a small rock) to prop up the track.
Kinks in the rail are probably the next most common bugaboo when it comes to track. Anything can cause a kink, but most often it’s something like an errant foot or a large rock or tree branch falling on the track. If a kink is minor, it can be massaged out with judicious use of pliers and possibly a dual-rail railbender. If a kink is more serious, then replacing the track is the only real solution.
Dips and bumps in the track can also cause derailments, similar to twists, especially if they’re on curves. It’s help-ful to be able to sight down the track to look for unreasonable dips and bumps. Either a 2' or 4' level also helps you see these features and lets you even them out. Again, judicious reballasting helps even things out.
The reality is that you’re going to spend a few days every spring comb-ing your railroad looking for track that worked its way out of alignment over the winter. And if you’re in an area with extreme summer temperatures, you’re likely to even things out peri-odically through the operating season as well. It’s all part of running trains outdoors.
SwitchesQuite honestly, maybe only 10–20 percent of your track issues are going to occur on straight or curved track. The biggest cause of derailments on a garden railroad are switches. Switches are necessary any time you want to send a train in an alternate direction. They’re what makes it possible to store one train on a siding and run another around it or perform any other basic operation. They’re essential if you want your trains to do more than just run around in circles. To understand what makes a switch function—and what causes it to malfunction—you need to know how a switch works and the many kinds of switches there are.
What railroaders call a switch is more commonly referred to as a turnout in model-railroading circles. This is to avoid confusion with the small electrical device we use to route power to various
I used a cross-track level (seen on the left of this railbender) to check the track for twists. If you don’t have a railbender, a small torpedo level will work just as well. This track is waiting for its annual spring reballasting, so the track will be leveled in that process.
Sometimes, drastic measures must be taken to remedy a winter’s worth of track movement. I used a string (stretched to be level across the length of the siding) and a 2' level to ensure that all three tracks of the yard at Neelyton are level. Once everything is leveled and the subroadbed tamped back in place, the track will be reattached to the PVC roadbed and new ballast spread over the track.
Tuscarora Railroad No. 3 pulls in to Shade Gap, passing over the switch that leads to the coal tipple. Switches are a vital part of railroading, both prototype and model. Without them, we’d be confined to running trains in a simple loop.
BKS-12468-09.indd 83 2/27/13 2:21 PM
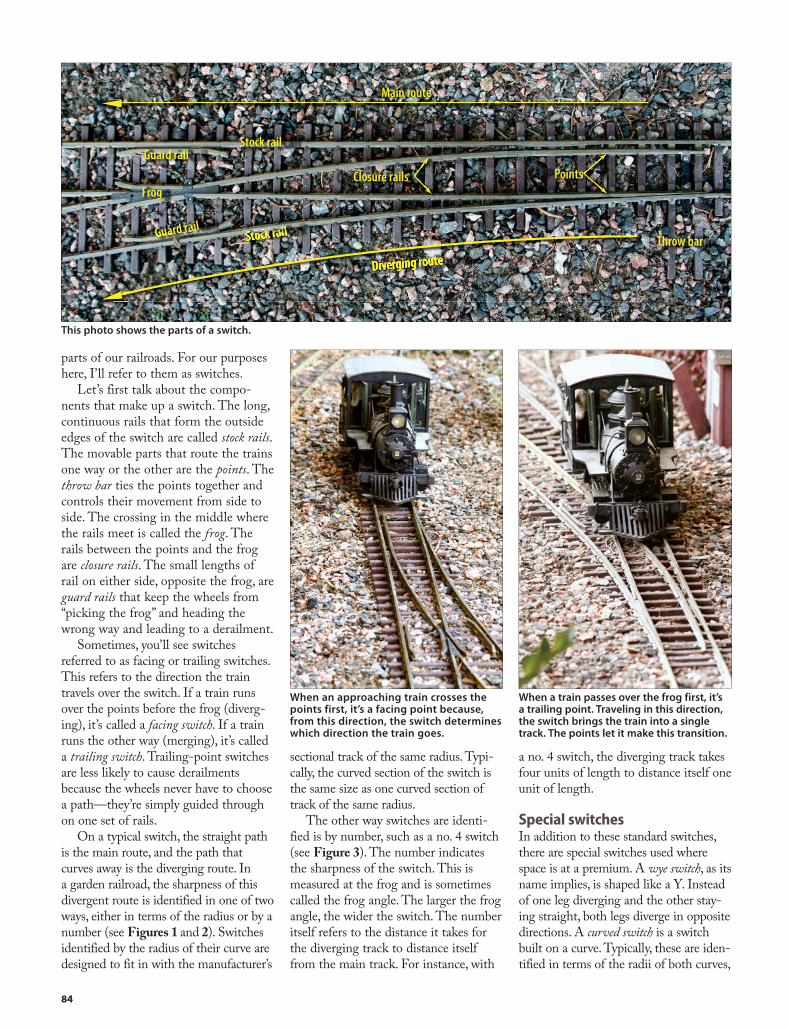
84
parts of our railroads. For our purposes here, I’ll refer to them as switches.
Let’s first talk about the compo-nents that make up a switch. The long, continuous rails that form the outside edges of the switch are called stock rails. The movable parts that route the trains one way or the other are the points. The throw bar ties the points together and controls their movement from side to side. The crossing in the middle where the rails meet is called the frog. The rails between the points and the frog are closure rails. The small lengths of rail on either side, opposite the frog, are guard rails that keep the wheels from “picking the frog” and heading the wrong way and leading to a derailment.
Sometimes, you’ll see switches referred to as facing or trailing switches. This refers to the direction the train travels over the switch. If a train runs over the points before the frog (diverg-ing), it’s called a facing switch. If a train runs the other way (merging), it’s called a trailing switch. Trailing-point switches are less likely to cause derailments because the wheels never have to choose a path—they’re simply guided through on one set of rails.
On a typical switch, the straight path is the main route, and the path that curves away is the diverging route. In a garden railroad, the sharpness of this divergent route is identified in one of two ways, either in terms of the radius or by a number (see Figures 1 and 2). Switches identified by the radius of their curve are designed to fit in with the manufacturer’s
sectional track of the same radius. Typi-cally, the curved section of the switch is the same size as one curved section of track of the same radius.
The other way switches are identi-fied is by number, such as a no. 4 switch (see Figure 3). The number indicates the sharpness of the switch. This is measured at the frog and is sometimes called the frog angle. The larger the frog angle, the wider the switch. The number itself refers to the distance it takes for the diverging track to distance itself from the main track. For instance, with
a no. 4 switch, the diverging track takes four units of length to distance itself one unit of length.
Special switchesIn addition to these standard switches, there are special switches used where space is at a premium. A wye switch, as its name implies, is shaped like a Y. Instead of one leg diverging and the other stay-ing straight, both legs diverge in opposite directions. A curved switch is a switch built on a curve. Typically, these are iden-tified in terms of the radii of both curves,
Stock rail
Stock rail
PointsFrog
Guard rail
Diverging route
Main routeMain route
Throw bar
Guard rail
Closure rails
Stock railGuard rail
Diverging route
PointsPoints
When an approaching train crosses the points first, it’s a facing point because, from this direction, the switch determines which direction the train goes.
When a train passes over the frog first, it’s a trailing point. Traveling in this direction, the switch brings the train into a single track. The points let it make this transition.
This photo shows the parts of a switch.
BKS-12468-09.indd 84 2/27/13 2:21 PM

85
Diverging route leaves at a constant radius. Divergent route leaves on a tangent.Diverging route leaves at a constant radius. Divergent route leaves on a tangent.
1
4
Figure 1: Radius switch Figure 2: Numbered switch Figure 3: No. 4 switch
On prototype and model railroads alike, curved switches are built where space is at a premium. This dual gauge (0 and 1 gauge) curved switch is on Marc Horovitz’s Ogden Botanical Railway. Dual gauge switches are considerably more complex than single gauge switches, but their operation is identical.
A three-way switch allows trains to go either left, right, or straight ahead. Notice there are two sets of points imbedded in this switch from Jim Strong’s Woodland Railway.
A double-slip switch is perhaps the most complex switch there is. Operationally, it’s four switches in one, each crossing over the other so that trains can run onto any track.
BKS-12468-09.indd 85 2/27/13 2:21 PM

86
such as 4'–6' radius curved switch. That means the larger radius is 6' while the divergent route peels off at a 4' radius. A three-way switch is essentially a wye switch with a straight track going down the middle. The most confusing piece of switchwork is called a double-slip switch, where two tracks cross at an angle, but trains are able to either go straight across or move onto the crossing track.
Another kind of switch that’s often mentioned—especially in terms of early railroading—is the stub switch. This early type of switch has no points. Instead, the rails leading to the switch are bent to line up with either the main track or the diverging track. This is where the phrase bending the iron comes from. Crews literally bent the iron rails to line up the switch. The advent of heavier trains and heavier rails brought an end to stub switches, although some examples survive on preserved railroads, particularly on narrow gauge lines.
Throwing the switchThe most important aspect of the switch is the switch throw mechanism. This is the mechanical device that holds the points against the stock rail, which causes the trains to travel in the intended direction.
There are three basic kinds of switch throws: rigid, sprung, and rubber. The rigid throw moves the points against the rails and firmly holds them there. The points can’t be opened or moved without moving the switch throw. A sprung throw holds the points against the rails but allows them to be opened by a train traveling through the switch in the opposite direction. Once the train passes, the points spring back to their original position. The third kind of throw, the rubber throw, is a varia-tion of the sprung switch. With this kind of throw, if a train comes through the switch with the points against it, it will merely push the points open to the opposite direction, where they will stay once the train has cleared.
Cleaning the pointsA switch needs a firm, flat base for smooth operation. Even if your track floats in ballast, it’s advisable to mount your switches on a sturdy base, such
Stub switches were mostly gone from railroading by the early 1900s. This example is in Robertsdale, Penn., on the East Broad Top. A railfan identified only as Dave uses the harp switchstand to “bend the iron” and bend the rails to line up the switch. Kevin Strong collection
This rigid, ground-throw switch machine on the Ogden Botanical Railway is designed to hold the points against one rail or the other so that trains can pass smoothly through. The machine is rigidly attached to the throw bar to firmly set the points against the stock rails.
In this spring switch, a rigid ground throw is attached to the throw bar via a spring wire. The spring holds the points against the stock rail but allows them to move so that trains coming through the switch in the opposite (trailing) direction can push the points open without derailing. Once past, the points return to their normal position.
Ground throwsSpring wires
BKS-12468-09.indd 86 2/27/13 2:21 PM

87
as length of 2 x 8 lumber. This keeps switches from twisting and the track leading into and out of them from drop-ping precipitously off the ends of the switch. All the rails going into and out of the switch need to be in one plane to avoid bumps, dips, and twists.
You need to also make sure the points move back and forth easily and close firmly against the stock rails. Ballast likes to migrate, and it continu-ally needs to be kept out of the works. Cleaning switch points is routine maintenance and really should be done before each operating session. I carry a small, stiff brush in my pocket when I’m running trains to get rid of wayward ballast. If your switches are controlled remotely, it may be advisable to not ballast the points, which minimizes the chance of debris working their way between the points. The flangeways through the frog and guard rails need to be swept clean as well, although these areas are less prone to debris bouncing in during regular operation.
Wheels and frogsIt is important to keep the points and flangeways clear, but that is not even half the battle in terms of proper operation. The biggest culprit when it comes to derailments at the switch is the relation-ship between the wheels on the train and the frog on the switch. The gauge and flange depth of the wheels deter-mine how well they’ll operate through a switch. Gauge is most commonly described as the distance between the rails, but it also refers to the distance between the points where the flanges meet the wheel treads on a wheelset (see Figure 4). This distance is impor-tant because it determines how well the wheels fit on the track. A wheelset that’s gauged too narrow may fall between the rails, while one that’s too wide will tend to ride up over the rails (see Figure 5). In Figure 4, you can see that there’s a bit of leeway in terms of gauge as long as the outside edges of the treads are always greater than the gauge of the track.
Back-to-back spacingAnother aspect of wheel gauge that needs to be considered for switch operation is back-to-back spacing,
This simple spring is called a rubber throw. It’s designed to hold the points against the stock rail, but it also allows trains passing in the opposite direction to push the points over. After a train passes, the points do not return to their original position but stay in the new position.
Keeping dirt and debris out of the moving points is imperative to proper operation. During operating sessions, I use a stiff brush to keep things moving freely.
The frog and guardrail flangeways—like the points—need to be kept clear. These areas aren’t quite as prone to debris jumping in during normal operations.
BKS-12468-09.indd 87 2/27/13 2:21 PM

88
which is the distance between the back sides of each wheel (see Figure 6). This measurement is criti-cal because, when a wheel enters a switch, it runs through the points and over the frog and has to navi-gate through the guard rails. For gauge 1 track (45mm), the optimum
back-to-back spacing on a wheel is 1.575". When back-to-back spacing is too narrow, the wheel rides up over the guard rail and possibly causes a derailment. If this spacing is too wide, the flange is forced to ride up on the point of the frog (picking the frog) and causes a derailment.
Fixing a switchIf the wheel is gauged properly and still derails, then the switch is likely at fault. The critical distance on the switch is the span, or the distance across the guard rails. With wheels gauged at 1.575", the ideal span should be 1.555". If it’s less than that, then even a properly gauged wheel may pick the point. The solution is to add a thin shim to the inside edge of the guard rail (between it and the stock rail) so that the span increases to a more ideal distance. This can easily be done with a thin strip of styrene glued to the rail. If the span is greater than 1.555", then the flangeway must be increased. This is easy to do by sanding away part of the guard rail with sandpaper or a file.
Wheel and track standards for gauge 1 track can be found on the NMRA (nmra.org) and G1MRA (g1mra.com) websites. There are minor differences between these two sets of standards, but they are in agreement for most major dimensions.
Proper flange depthSmooth operation through a switch also relies on the depth of the wheel flanges. Flange depth is important because, on most switches, the frog’s flangeway is a certain depth below the railhead. Ideally, this flangeway should be the same depth as the flanges on the wheels, so that the wheel rolls smoothly through the switch (see Figure 7). If the flangeway is too
Track gauge
Back-to-back spacing
Flange depth
Wheel gauge
Wheel gauge should be slightly less than track gauge to allow for smooth operation. The “standard” back-to-back spacing for wheels is1.575". For wheels with thick �anges, thismeasurement can be decreased to as little as1.560" and still provide reliable operation.
Flange too deep Flange too shallowFlange and frog correct
Flange and frog correctWheel rides smoothly
through frog
Frog too deepWheel dips down
through frog
Frog too shallowWheel rides up as it
goes through the frog
Flange depth
Frog depth
Wheel gauge too wideor track gauge too narrow
Wheel gauge too narrowor track gauge too wide Proper back-to-back
spacing through switch
Too narrow back-to-back spacing rides up on guard rails
Figure 4: Terminology
Figure 7: Flange depth through frog
Figure 5: Incorrect gauge Figure 6: Back-to-back spacing
BKS-12468-09.indd 88 2/27/13 2:21 PM

89
shallow, or the flanges are too deep, the wheel will bump up while going through the switch. If the flangeway is too deep, or the flanges too shallow, the wheel may slip down at the throat of the frog (the point where the two flange-ways converge). On many switches, it’s at this momentary point that the wheel is supported by the flange, not the tread. While flange depth through the frog will seldom cause a derailment, it can cause nerve-wracking bumps as the cars go through the switch.
Curing this problem isn’t very cut-and-dried, though, primarily because each manufacturer seems to have its own preference when it comes to flange depth. The ideal solution is to stan-dardize all your rolling stock by using a single brand of wheels. This way, you can adjust your flangeways (if necessary) to accommodate the vast majority of the wheels on your line, and live with a small handful of pieces that go bump. Usually, these are locomotives, which have more weight and are less likely to be affected by bumps. It’s also possible
to file down large flanges by mounting the offending wheel in a drill press.
Adjusting the depth of the flange-way to match the flange is a little easier. If the flangeway is too deep, small strips of styrene can be glued in to raise the surface of the flangeway to the proper depth. If it’s too shallow, a bit of sandpaper or a file will quickly take away the excess material.
Picking the pointDerailments at a switch also happen when equipment picks the point of the switch (see Figure 8). This occurs when a wheel hits the point and, instead of going the intended direction, decides that the path of least resistance is to either roll over the point or push it aside and roll through the wrong way. Often, there’s some small debris that keeps the point from resting snugly against the stock rail. Even when it does rest snugly, there may be a little bump where the point rail doesn’t taper sufficiently. The flange will catch on this and, instead of rolling to the side, will climb up. Filing
a small taper into the tip of the point so it joins the stock rail smoothly elimi-nates the bump that causes the flange to want to ride up.
I don’t think the terms trouble-free and switch can ever be considered remotely synonymous. These necessary pieces of trackwork will always find ways to confound and perplex the railroader, no matter what scale. However, with some proper care and routine mainte-nance, they can be made more reliable. And that’s about as much as we can ask.
Point rail
Stock rail
Most switch derailments occur where the points meet the stock rail. The point rail often has a little bit of a lip that catches on the �ange, causing the wheel to roll up and over the point. By �ling o� that lip at a slight angle, it’s less prone to catch the �ange, allowing the wheel to roll through without derailing.
!
If the wheelset is gauged too narrow, a light tapping on the end of the axle will move the wheel out the desired amount.
Deep flangeways can be filled with small strips of styrene to build up the base.
If the wheelset is gauged too wide, tapping the axle against the opposite wheel brings the two wheels closer together.
If the flangeways are too shallow, sanding and filing will remove excess material, so wheels can pass through without bumping.
If the wheel can be removed from the car, then it may be possible to chuck it in a drill press to file down an oversized flange.
Figure 8: Point-picking problems
BKS-12468-09.indd 89 2/27/13 2:21 PM

90
GlossaryGarden railroading has its own lingo, and knowing it allows you to better communicate and understand the advice you get from others before venturing too far into the backyard. This glossary fea-tures some of the more basic terms you will encounter on your journey outdoors.
Alternating current (AC): This is a form of electrical power in which the current goes first one direction and then the other. Household electricity is 120 volts AC. This type of power is fine for operating lightbulbs and some garden-railroad accessories (after the voltage is reduced to a manageable and safe level), but it is not intended for powering trains. See Transformer.
Ballast: Material put down around the track to provide support and allow drainage. In garden railway circles, this is usually in the form of crusher fines or other small stone.
Command Control (also DCC): A means of control by which multiple locomotives can be controlled indepen-dently from the same controller on the same track. DCC is a universal form of command control that allows different manufacturers’ products to be compatible with one another. Other manufactur-ers offer proprietary controls that which work only within that particular system.
Control panel: A central location where all the controls for the railroad are located. Often a graphic representa-tion of the railroad on the panel shows locations of turnouts and sidings with electrical switches for turning power to particular sections of the railroad on and off. If there is a fixed throttle for the railroad, it is usually located here as well.
Coupler: A device used to connect the cars in a train.
Crossing: Where two tracks cross one another, or where a road crosses the track.
Current: The flow of electrons through a wire or rail that provides power for electrical devices.
Curve radius: A measure of how tight a curve is. While many of our trains are designed to operate around a 2' radius, it’s advisable to use the widest possible radius that will fit the available space. The radius of a curve is measured from the center of the circle to the centerline of the track. Curve diameter is twice the radius. In large scale, curves are often expressed
as one or the other, so it’s important to know which measurement you’re using to get the correct curve.
Cut (or cutting): A slice through a hill or mountain through which a railroad runs. Rock cuts give a landscape a sense of drama and depth.
Direct current (DC): A form of elec-trical power in which the current flows only in one direction. This can come either from batteries or from AC power that has been rectified and filtered.
The engineer keeps a sharp eye out as he winds around the curved trestle on Jim Strong’s Woodland Railway. A trestle is often the focal point of a garden railroad, and it’s worth the time and effort to build one. They are not, however, indestructible as can be seen by the broken cross brace at the bottom.
BKS-12468-EM.indd 90 2/27/13 2:22 PM

91
Most of our trains operate on 12–24 volts DC. See Power supply.
Dogbone: This type of track plan features a loop at either end of a long, narrow section of double track.
Draft gear: The part of a coupler assembly that gets attached to the loco-motive or rolling stock.
Drainage ditch: A channel designed to carry water runoff. For our purposes, it can either mean a model of one along the right-of-way or a full-size one intended to divert water away from the railroad.
Driver: The wheels of a steam loco-motive that receive power from the cylinders via the main rod or connect-ing rod. Drivers can either be flanged or blind, meaning they don’t have flanges. This was done on prototypes to allow steam locomotives to travel
around tighter curves, and it is done on the models for the same reason.
Embankment: The side of a hill or fill. A typical angle for an embankment is around 40 degrees from the horizontal. Much steeper, and the material used in the embankment will tend to wash away.
Fill: An area where the ground is built up to support the track.
Frog: The center part of a turnout where the rails converge. In model railroad terms, a frog can be either live or dead. A live frog carries electricity to the trains, whereas a dead one doesn’t. Most commercially available turnouts have dead frogs.
Gauge: The distance between the insides of the rails on the track. The most common gauge for outdoor mod-eling in the United States is gauge 1
(45mm). Also, the distance between the intersections of the flange and the tread on a set of wheels.
Grade: A measure of the steepness of a hill or incline, most often measured in terms of a percentage. A 3 percent grade has 3" of rise for every 100" of length. It is advisable to keep grades as flat as possible in the garden. The steepest practical grade for outdoor railroads is around 4 percent. You can build them steeper if you want, but the practical length of your trains will be significantly shortened, and you will also put undue stress on locomotive motors.
Groundcover: Low-growing plants that grow along the right-of-way and elsewhere in the garden. These plants often have very small leaves, the idea being that they represent grass and other plants that would occur naturally next to a railroad.
Retaining walls are often used to elevate a railroad to a more comfortable level. Here, Dave Goodson of Seattle has used large rocks to build up the peninsula in the middle of his railroad.
BKS-12468-EM.indd 91 2/27/13 2:22 PM

92
Ground throw: A low device (as opposed to a Switch stand) used to manually throw the points of a switch one way or another.
Irrigation: A method of getting water to the plants on the railroad. This can be as simple as a lawn sprinkler or as complex as a full, drip-irrigation system. Your local nursery should be able to give you information about those, should you elect to go that route.
Live steam: A term used to describe locomotives in the garden scales that run on real steam. They have a small boiler and a burner that heats the water to create steam. This is as close to the real thing as you can get in this scale when it comes to running a locomotive.
Locomotive: The moving force on a train, normally located at the front.
Main line: The primary route of travel of a railroad.
Motor: (1) The electrical device that provides the force necessary to move the locomotive. This force is transferred to the wheels through a set of gears or pulleys. (2) A small, self-propelled rail vehicle with a gasoline engine (railcar, maintenance car). Short for rail motor.
Points: The moving rails of a switch that determine which way the train will go through. They move via a ground throw or a switch stand.
Power supply: A device that supplies the necessary power for a railroad and its accessories. It usually consists of a transformer that changes the voltage to 24V and a rectifier that converts AC power to DC. It may also contain a throttle, which varies the voltage going to the trains.
Prototype: A term applied to full-size trains, structures, or other things upon which our models are based.
Radio Control: A wireless form of command control, typically powered by onboard batteries. This arrangement frees the operator from worrying about power running through the rails.
Rail: The metal bars that support the weight of the train. When these are attached to ties, they form the track. The most common metals for rails in the garden are brass, aluminum, nickel silver, and stainless steel.
Rail joiner: This is the mechanical device that holds the sections of rail together and in alignment. Usually, these are sheets of brass or steel bent in the shape of the base of a rail, but they can take other forms such as clamps or strips of metal bolted to the rail.
Woodland Railway No. 3 (upper right, behind the trees) enters the passing siding at Strongton. Passing sidings allow two trains to pass by each other on an otherwise single-track main line.
BKS-12468-EM.indd 92 2/28/13 2:04 PM

93
Retaining wall: A structure, usually made of stone or wood, anchored firmly in the ground, that holds back the earth behind it. They are usually used in places where physical space limitations prohibit the use of an embankment. In the garden, we use both full-size and miniature retaining walls in our landscaping.
Reverse loop: The most common method for turning trains around on a railroad in which the track loops around, connecting with itself to form a tear-drop. Electrical considerations must be made when using reverse loops as the power going to the train will otherwise short-circuit.
Right-of-way: The physical space that a track occupies.
Roadbed: Ground support on which the track is laid.
Rolling stock: Railcars, such as box-cars, gondolas, and flatcars that make up the trains on a railroad.
Scale: A ratio showing the size relationship between a model and its prototype. A 1:20 scale locomotive is 1⁄20 the size of the prototype upon which it is based.
Siding: A short stretch of track along-side the main line on which a train can sit, safely out of the way of another train that passes it on the main line.
Sound system: An electronic means of making model trains sound like full-size trains. Today’s systems use digital recordings and can be quite realistic, adding to the atmosphere in the garden.
Spike: A small, specialized nail that holds the rail to the tie. Its head is
offset to one side, allowing it to overlap the base of the rail and hold it in place.
Spur: A branch line off a railroad’s main line. A spur generally runs from a railroad’s main line to a specific town or industry that the railroad serves.
Subroadbed: The foundation below the roadbed. This often takes the form of a trench filled with stone or treated lumber. The particular construction method is usually dictated by the climate in which you live.
Switch: (1) An electrical device that allows you to either turn power on or off or change the direction of current on a given section of the railroad. (2) A piece of track that allows the railroad to head off in two separate directions. (In model railroad circles, we often refer to this as a Turnout to avoid confusion with the first definition.)
Woodland Railway No. 18 leaves the tunnel and enters the cut as it starts its downhill ride to Woodland Junction. When a hill is too tall for a cut, a tunnel is bored.
BKS-12468-EM.indd 93 2/28/13 2:28 PM

94
Switch stand: This mechanical device is used to move the points on a switch. A switch stand usually features a target at the top, a device that indicates to an engineer which way the switch is set.
Terminal: The beginning or end of a railroad main line. A terminal usually has a yard for storing rolling stock and locomotive servicing facilities.
Throttle: The device that controls the speed (and direction) of a locomotive.
Tie: A piece of wood or other material used to support the rails on a stretch of track and keep them in gauge.
Track plan: A drawing or map of where the tracks in a model railroad go and how they are connected to one another. This can also show the locations of towns, buildings, and other physical and landscape features.
Transformer: An electrical device that takes household power and lowers its voltage to a safe level for running the trains in a garden railway.
Trestle: A long wooden or steel bridge used to traverse expanses where a fill is not possible or desirable.
Truck: The swiveling four- or six-wheel carriage beneath the railroad car. Two of these support the car.
Turnout: Term given to a railroad switch to avoid any confusion with the electrical switch that is used to supply power to various parts of a model railroad.
USDA Plant Hardiness Zones: A climate scale devised by the U.S. Department of Agriculture based on average minimum temperatures in the United States. This scale is used
to determine which plants are able to survive in a specific geographic region. The lower the number on the scale, the colder the temperature is in the winter.
Wiring: The electrical switches and lengths of wire used to get the power from the power supply to the model railroad. The more complex the railroad, the more complex the wiring.
Wye: A Y-shaped arrangement of track used by prototype railroads to turn trains around. These generally aren’t as popular in the garden as they tend to take up a lot of space and require special wiring. Reverse loops are the generally accepted substitute.
Yard: An array of tracks used to store trains when they are not running on the main line. Yards are usually found in small or large towns along the way and at the major terminals of a railroad.
East Broad Top Mikado No. 15 passes behind a 1:20.3 model of East Broad Top Mikado No. 12. The scale of the model is simply the relationship in size between the two objects. In this case, the model is 1/20th the size of the prototype.
BKS-12468-EM.indd 94 2/27/13 2:22 PM
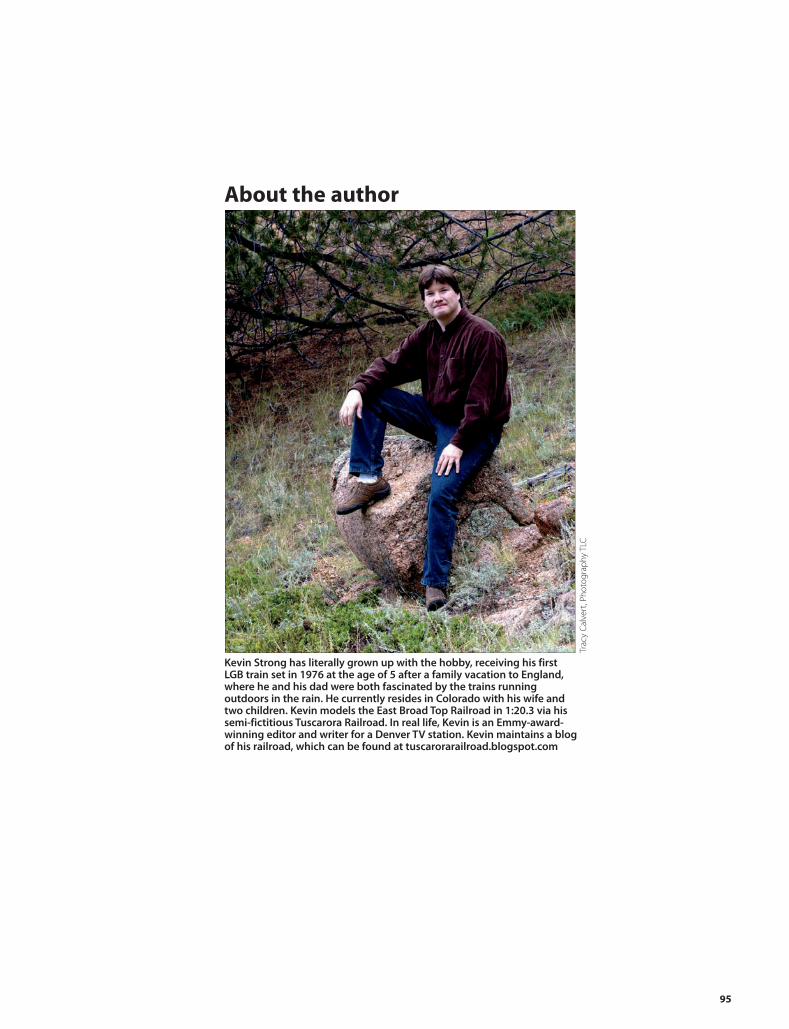
95
About the author
Kevin Strong has literally grown up with the hobby, receiving his first LGB train set in 1976 at the age of 5 after a family vacation to England, where he and his dad were both fascinated by the trains running outdoors in the rain. He currently resides in Colorado with his wife and two children. Kevin models the East Broad Top Railroad in 1:20.3 via his semi-fictitious Tuscarora Railroad. In real life, Kevin is an Emmy-award-winning editor and writer for a Denver TV station. Kevin maintains a blog of his railroad, which can be found at tuscarorarailroad.blogspot.com
Trac
y Ca
lver
t, Ph
otog
raph
y TL
C
BKS-12468-EM.indd 95 2/27/13 2:22 PM

Miniature Gardenfor beautiful rock gardens • container plantings • bonsai • garden railways
G U I D E B O O K
Nancy Norris
Building
STRUCTURES
Jack Verducci
for Your Garden Railway
Buy now from hobby shops! To fi nd a store near you, visit www.HobbyRetailer.com
www.KalmbachStore.com or call 1-800-533-6644Monday – Friday, 8:30 a.m. – 4:30 p.m. CST. Outside the United States and Canada call 262-796-8776, ext. 661.
P191
84
2XMRR
ABOUT GARDEN RAILROADING!
EXPE
RT
AD
VIC
E
This book is a comprehen-sive guide that describes everything you need to know about creating garden railway structures that can stand up to the elements. Let garden rail-road expert Jack Verducci guide your vision from researching, planning, and selecting tools and materials, to its fi nal construction.
Make your garden as great as your outdoor railroad! This extensive guide covers designing and planning the rail-way garden, selecting plants, and mastering the special needs of min-iature plants for consid-erations like hardiness zones, watering, fertil-ization, pruning, and controlling pests.
#12457 • $21.95 #12444 • $21.95
P19184.indd 1 2/13/13 8:45 AM
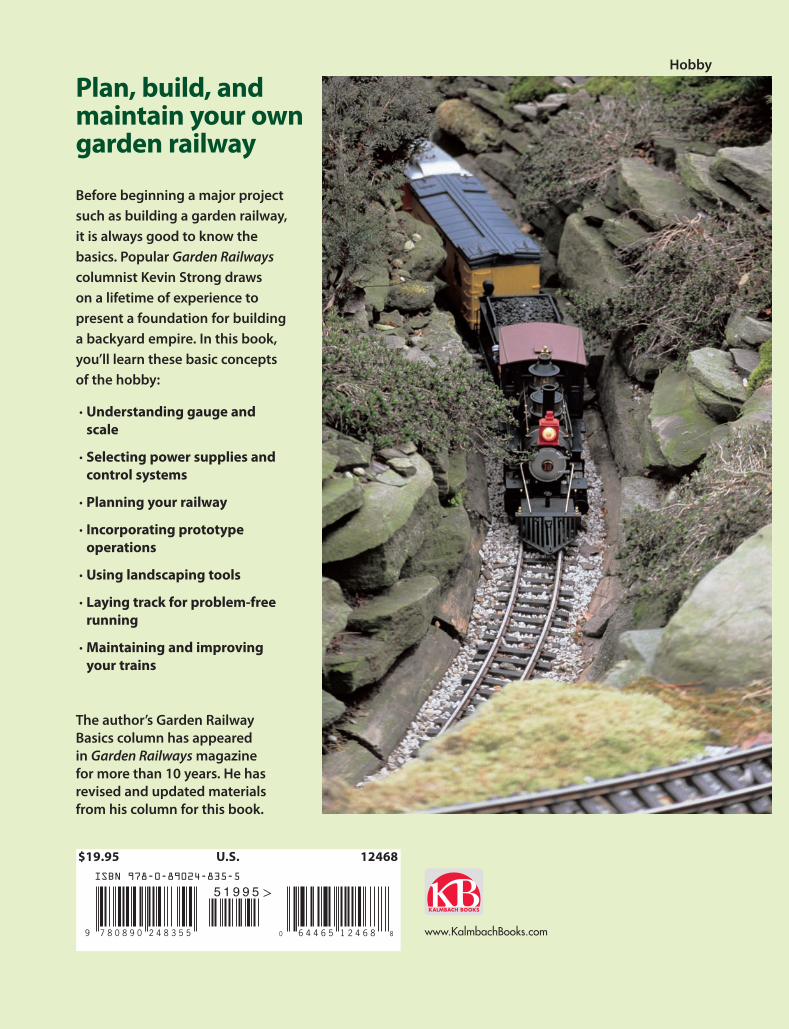
GARDEN RAILWAY
Kevin Strong
BASICSFrom concept to construction to upkeep
Before beginning a major project such as building a garden railway, it is always good to know the basics. Popular Garden Railways columnist Kevin Strong draws on a lifetime of experience to present a foundation for building a backyard empire. In this book, you’ll learn these basic concepts of the hobby:
· Understanding gauge and scale
· Selecting power supplies and control systems
· Planning your railway
· Incorporating prototype operations
· Using landscaping tools
· Laying track for problem-free running
· Maintaining and improving your trains
The author’s Garden Railway Basics column has appeared in Garden Railways magazine for more than 10 years. He has revised and updated materials from his column for this book.
Plan, build, and maintain your own garden railway
Hobby
Gard
en R
ailway B
asics
www.KalmbachBooks.com
Stron
g
9 7 8 0 8 9 0 2 4 8 3 5 5
5 1 9 9 5ISBN 978-0-89024-835-5
$19.95 U.S. 12468
0 6 4 4 6 5 1 2 4 6 8 8
BKS-12468-CV.indd 1 2/27/13 2:22 PM