CT Civil Lawsuit: First Steps as a Defendant - Connecticut ...
Upload
independentCategory
view
1download
0
FIRST STEPS WITH NAO
What is in this guide? 1. Turning NAO ON and OFF ..................................................................................................... 3
2. Create your account on the community website .................................................................. 4
3. Connect your robot to the Internet ....................................................................................... 8
4. Connect your robot to your Community account ................................................................ 12
5. Download your first apps ..................................................................................................... 14
6. Download and install Choregraphe ..................................................................................... 18
7. Setup NAO’s life .................................................................................................................... 20
8. Using NAO’s Life ................................................................................................................... 24
9. Setup your second language ................................................................................................ 26
10. Download and install Webots for NAO ................................................................................ 28
11. CONTACT US! ....................................................................................................................... 34
#NAOROBOT

2

3
1. TURNING NAO ON AND OFF
Turn NAO ON: Press the chest button once
The startup process takes about one minute. NAO is ready when he says “OGNAK GNOUK”.
Turn NAO OFF: Press and hold the chest button for 3 seconds.
NAO says “GNUK GNUK” then switches off after a few seconds.
4
2. CREATE YOUR ACCOUNT ON THE COMMUNITY WEBSITE
Once the setup of your robot is done, stay connected on our community website!
It is THE place things NAO!
Connect with Aldebaran Robotics team to get answers to your questions as well as
support and access to the thousands of other NAO users worldwide. Collaborate on
projects, explore resources, and attend community events all to develop your
expertise. From researchers, teachers and students to autism experts, software
engineers and 3D animators, you'll have the opportunity to meet and interact with
all the people currently working with NAO and shaping the face of tomorrow.
See you there!
Nicolas Rigaud, Aldebaran Robotics Community Leader
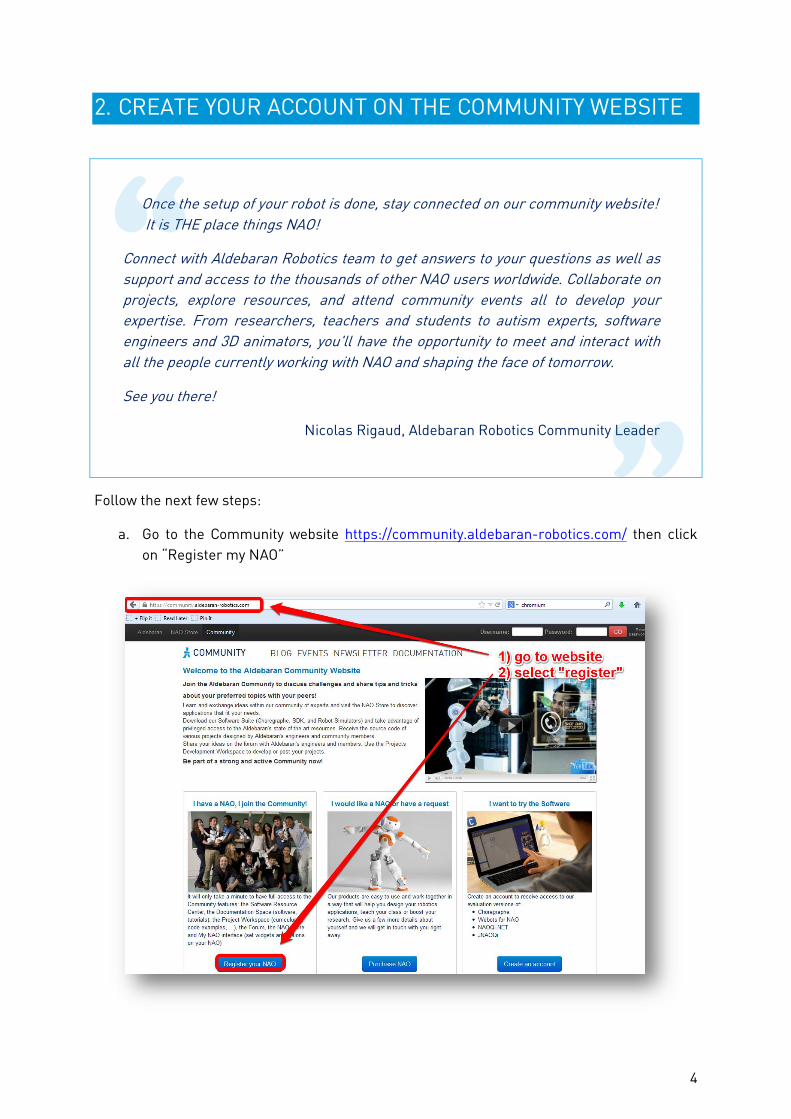
Follow the next few steps:
a. Go to the Community website https://community.aldebaran-robotics.com/ then click
on “Register my NAO”
5
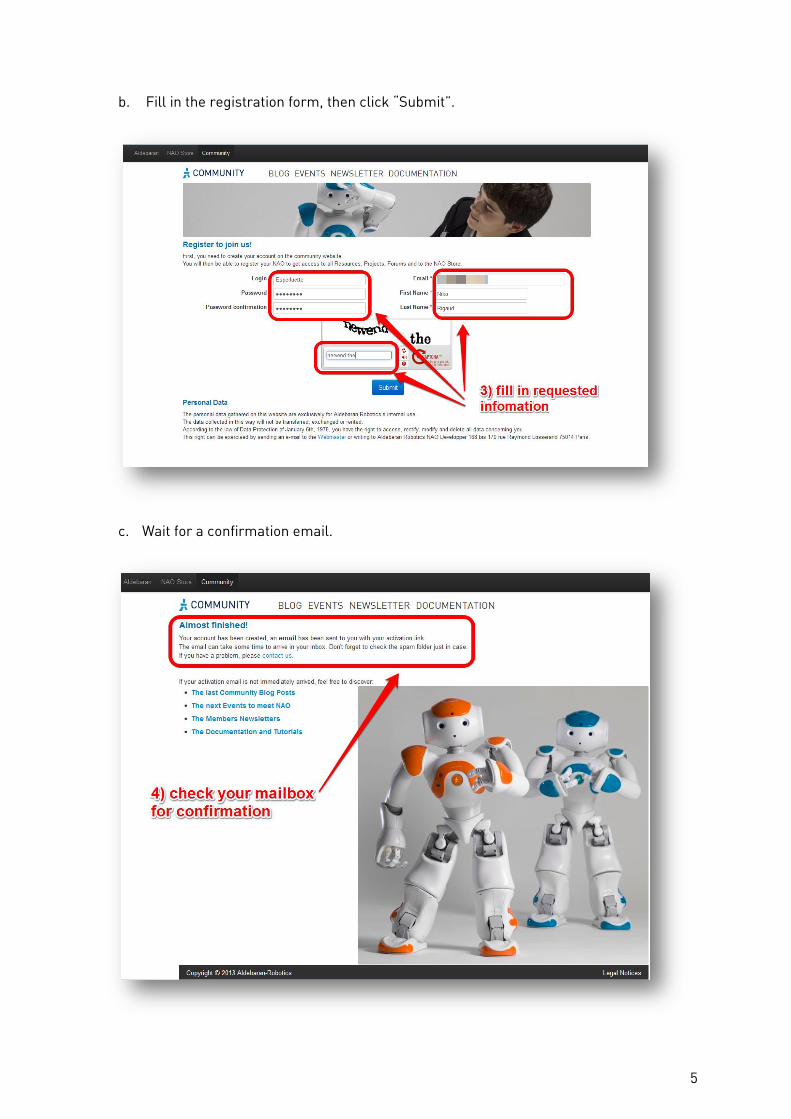
b. Fill in the registration form, then click “Submit”.
c. Wait for a confirmation email.

6
d. In the confirmation email click the validation link
e. You will be sent to a “congratulations” webpage where you can directly login using the
username and password you created in step b.
7
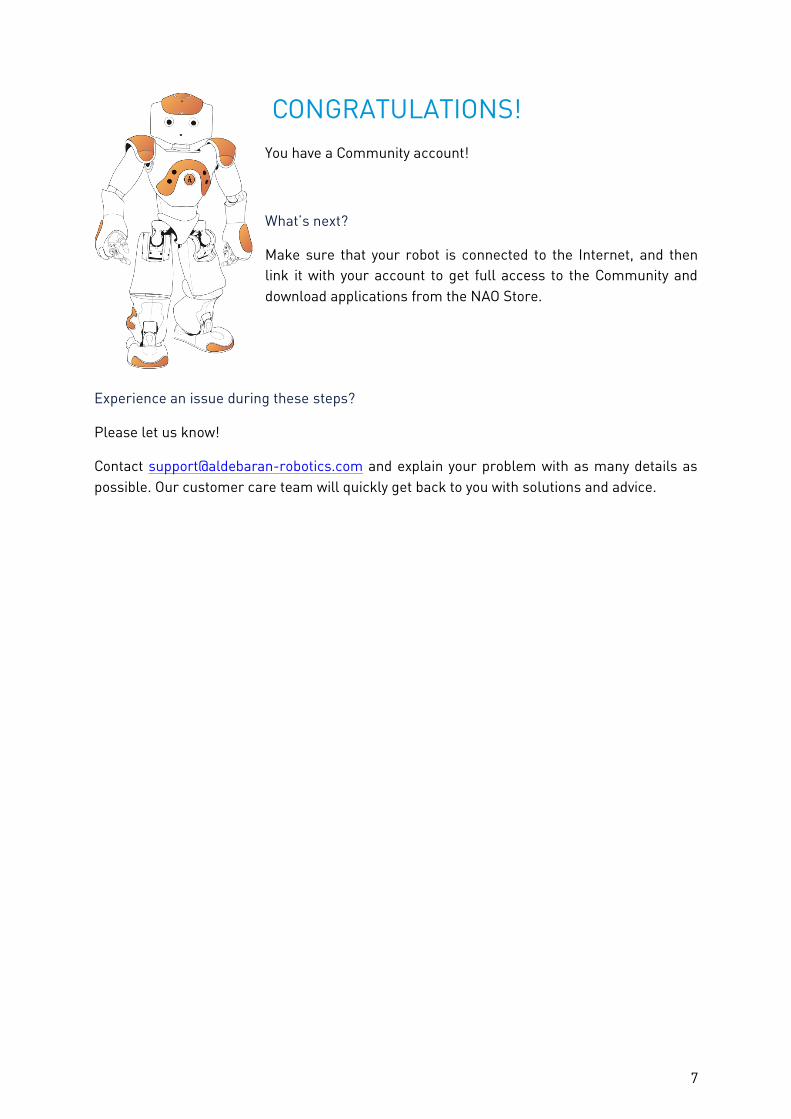
CONGRATULATIONS!
You have a Community account!
What’s next?
Make sure that your robot is connected to the Internet, and then
link it with your account to get full access to the Community and
download applications from the NAO Store.
Experience an issue during these steps?
Please let us know!
Contact [email protected] and explain your problem with as many details as
possible. Our customer care team will quickly get back to you with solutions and advice.

8
3. CONNECT YOUR ROBOT TO THE INTERNET
NAO needs to access the Internet to download apps and upgrades. You can connect NAO
using either a wired or Wi-Fi connection:
Wired connection is mandatory for the initial settings.
Wi-Fi connection is highly recommended.
Follow the next few steps:
a. Remove the hatch behind NAO’s head to access to the Ethernet socket and plug in the Ethernet cable.
b. Connect the Ethernet cable:
to your network router (if it has a spare Ethernet port)
or to your computer directly (you will need to wait a few minutes before continuing to next step, just be patient!)
c. Once connected, push the chest button. NAO will say “Hello, I’m NAO, my Internet address is…”, and the sequence of 4 sets of number of his IP address.
The format is “123.123.123.123” (four sets of numbers between 0 and 255, separated by periods).
9
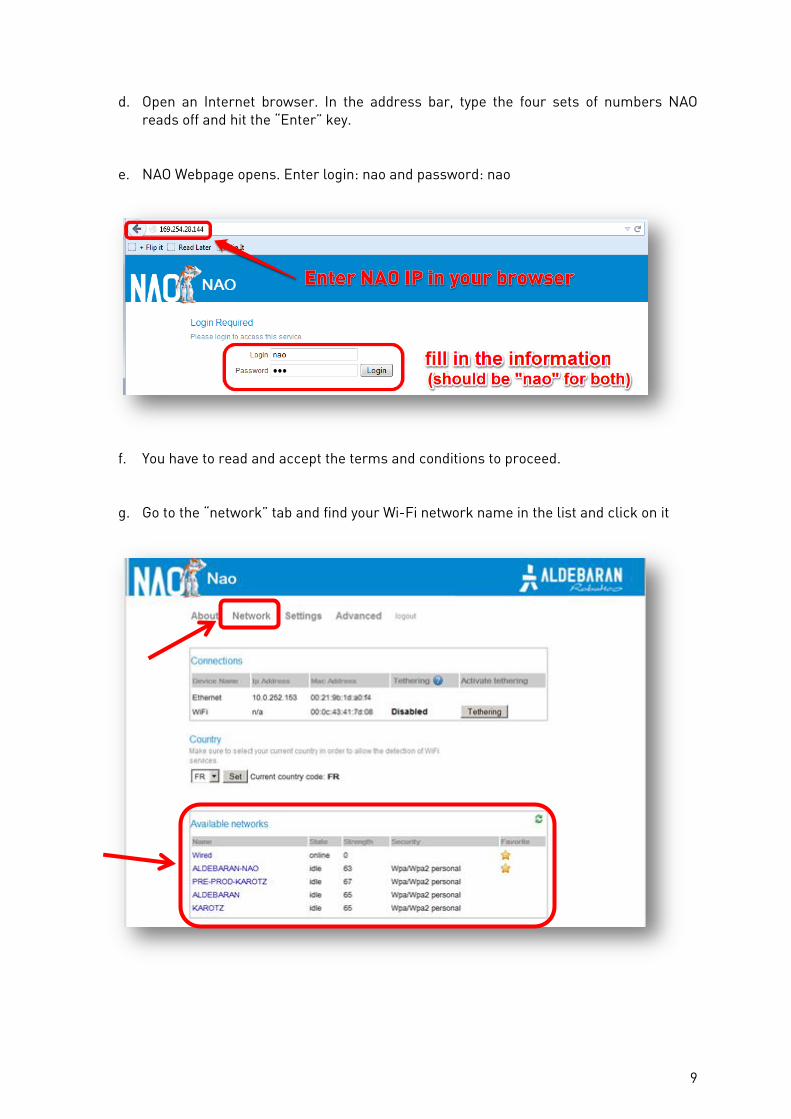
d. Open an Internet browser. In the address bar, type the four sets of numbers NAO reads off and hit the “Enter” key.
e. NAO Webpage opens. Enter login: nao and password: nao
f. You have to read and accept the terms and conditions to proceed. g. Go to the “network” tab and find your Wi-Fi network name in the list and click on it

10
h. Click “connect”
i. If required, enter the password.
j. Your robot obtains a new IP Address from your wireless network.
Note the IP Address; this is the new address to use with the Wi-Fi. You can then unplug the Ethernet cable and let NAO move freely, connected wirelessly.
k. Once you have unplugged the Ethernet, enter the new IP address in the browser.

11
CONGRATULATIONS!
NAO is now connected to your wireless
network, and can access the Internet!
What’s next?
Link NAO to your Community account to get full access to applications projects, the forum
and NAO store.
Experience any issues during these steps?
Please let us know!
Contact us (see chapter 11 for details) and explain your problem, giving as many details as
possible. Our customer care team will quickly get back to you with solutions and advice.

12
4. CONNECT YOUR ROBOT TO YOUR COMMUNITY ACCOUNT
You need to have completed sections 2 and 0 before starting this section.
a. Enter the IP Address and go to NAO Webpage (see section 0 for details). Note that the address may change, depending on your network configuration
b. Go to the “settings” tab. Under “Web services” enter your Community username and password. Then click “Connect”

13
CONGRATULATIONS!
NAO is now linked to your account!
This gives you access to all the resources on the Community, as well as to
the NAO Store!
What’s next?
Explore the NAO Store and download the main applications for your robot!
Experience any issues during these steps?
Please let us know! Contact us (see chapter 11 for details) and explain your problem, giving as
many details as possible. Our customer care team will quickly get back to you with solutions
and advice.

14
5. DOWNLOAD YOUR FIRST APPS
You need to have complete sections 2, 0 and 4 before starting this section.
a. Go to NAO Store : https://store.aldebaran-robotics.com/
b. Log in, using your Community username and password.
15
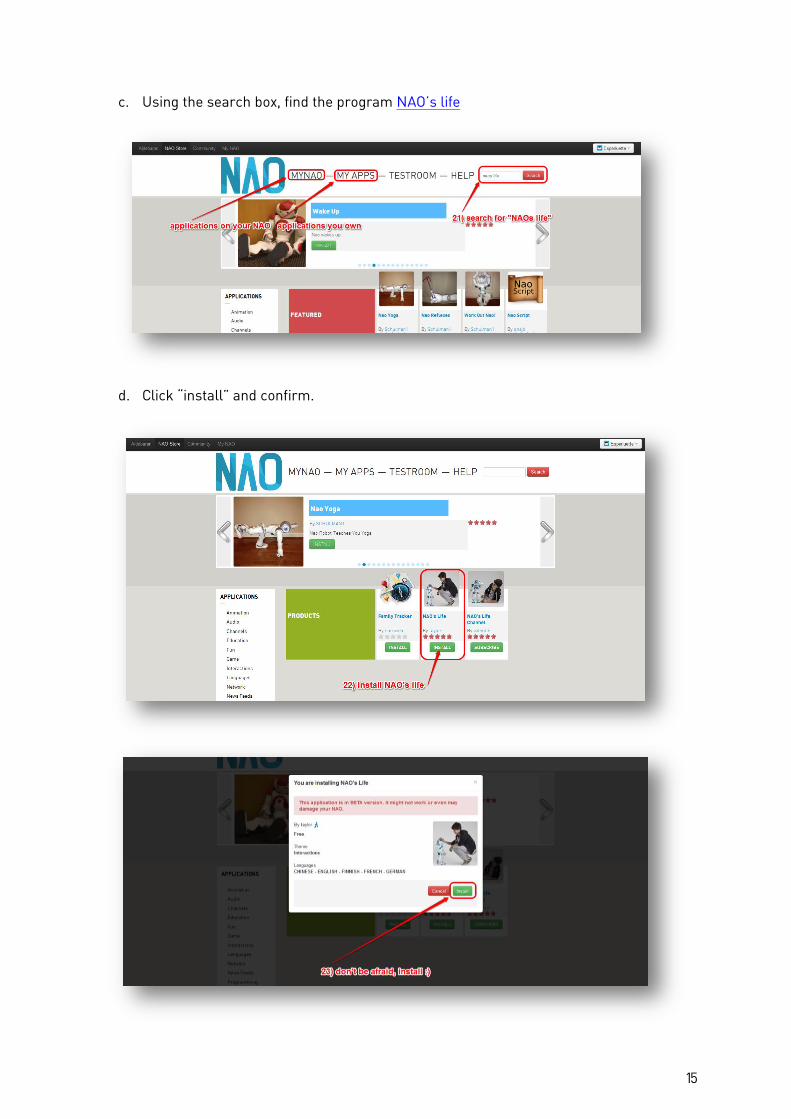
c. Using the search box, find the program NAO’s life
d. Click “install” and confirm.

16
e. Install the following programs, using the same steps:
Stand up
Sit down
Go to rest
Note: if you need to uninstall any application, go back to this same webpage and click
“remove”.
Note: NAO should say that it is installing the applications. If not, try to restart the robot, and
check if it is well connected to the Internet.

17
CONGRATULATIONS!
Your NAO has his first applications!
What’s next?
Set up NAO’s Life to run automatically, and learn how to
run other applications!
Experience any issues during these steps?
Please let us know!
Contact us (see chapter 11 for details) and explain your problem, giving as
many details as possible. Our customer care team will quickly get back to
you with solutions and advice.
18
6. DOWNLOAD AND INSTALL CHOREGRAPHE
You can download the latest version of Choregraphe from the Community website. Note that
the procedure is the same for trying the software.
To do so, you need to have completed section 2, creating your Community account.
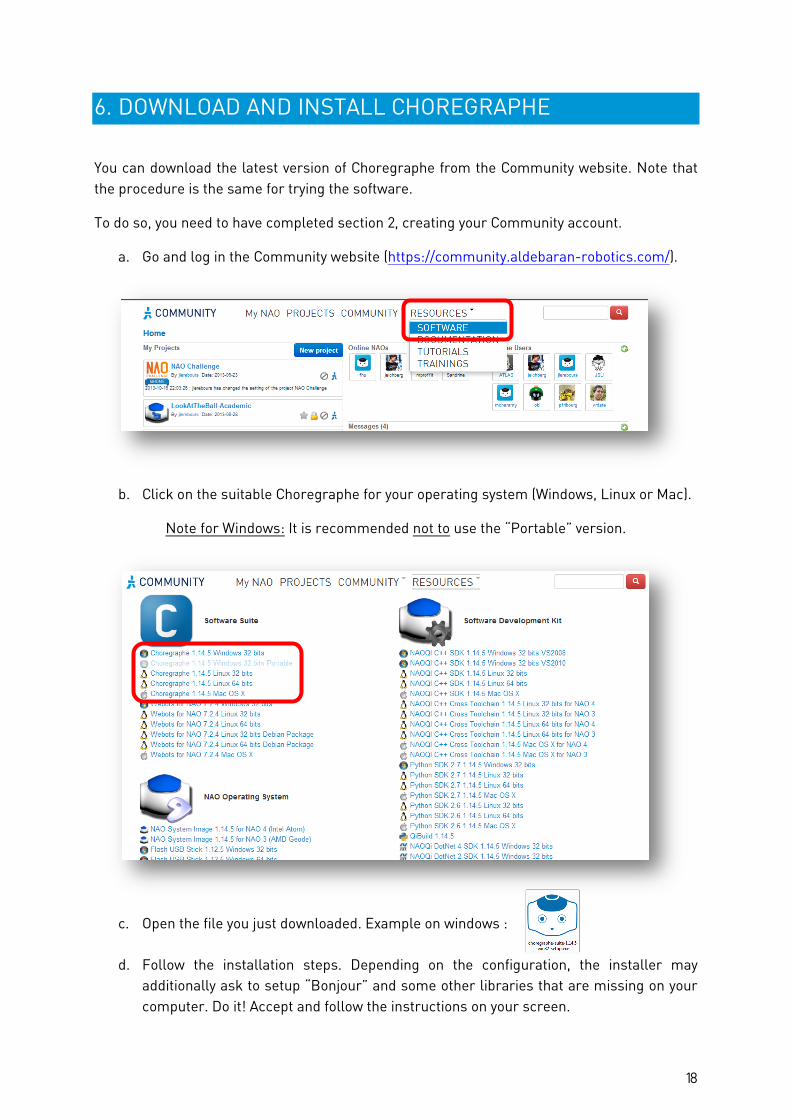
a. Go and log in the Community website (https://community.aldebaran-robotics.com/).
b. Click on the suitable Choregraphe for your operating system (Windows, Linux or Mac).
Note for Windows: It is recommended not to use the “Portable” version.
c. Open the file you just downloaded. Example on windows :
d. Follow the installation steps. Depending on the configuration, the installer may
additionally ask to setup “Bonjour” and some other libraries that are missing on your
computer. Do it! Accept and follow the instructions on your screen.

19
CONGRATULATIONS!
You now have the latest version of Choregraphe!
What’s next?
Once installed, run Choregraphe and discover its
functionalities.
If you are running Choregraphe for the first time, it may
ask for a license. You will find it in the delivery
confirmation email or on your bill. Otherwise, feel free to
try Choregraphe for 90 days!
Any issue during these steps?
Please let us know! Contact us (see chapter 11 for details) and explain your problem, giving as
many details as possible. Our customer care team will quickly get back to you with solutions
and advice.

20
7. SETUP NAO’S LIFE
NAO’s life is the best way to launch demo applications on NAO, simply by talking to him.
a. Open Choregraphe
b. Click on “connection” then “connect to…” to open the connection manager.
c. Find your robot in the list. You can connect to it by clicking on its name, or by entering its internet address on the right side of the window.
Note: The robot needs to be connected on the same network as your computer (Wi-Fi or cable). Refer to section 0 to connect your robot to a given network.
21
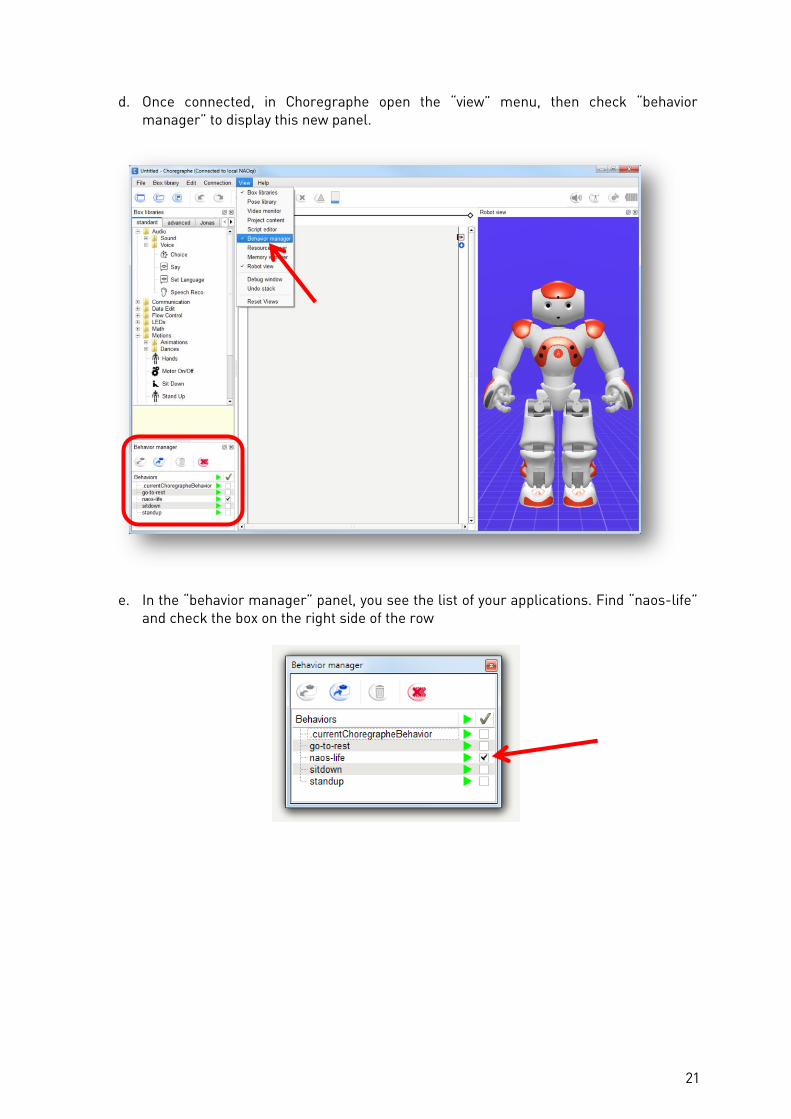
d. Once connected, in Choregraphe open the “view” menu, then check “behavior manager” to display this new panel.
e. In the “behavior manager” panel, you see the list of your applications. Find “naos-life” and check the box on the right side of the row

22
Note on the behavior manager
Each row is a program that is currently installed on NAO.
For each program (i.e. each row), the green arrow ( ) is a “play” button. Click on it if you want to run the program. While running, you can click on “stop” ( ) to stop the behavior.
The check-box allows you to configure NAO to run the selected program at start up. Here, when NAO starts, he will run NAO’s life automatically, without any additional action from you.
23
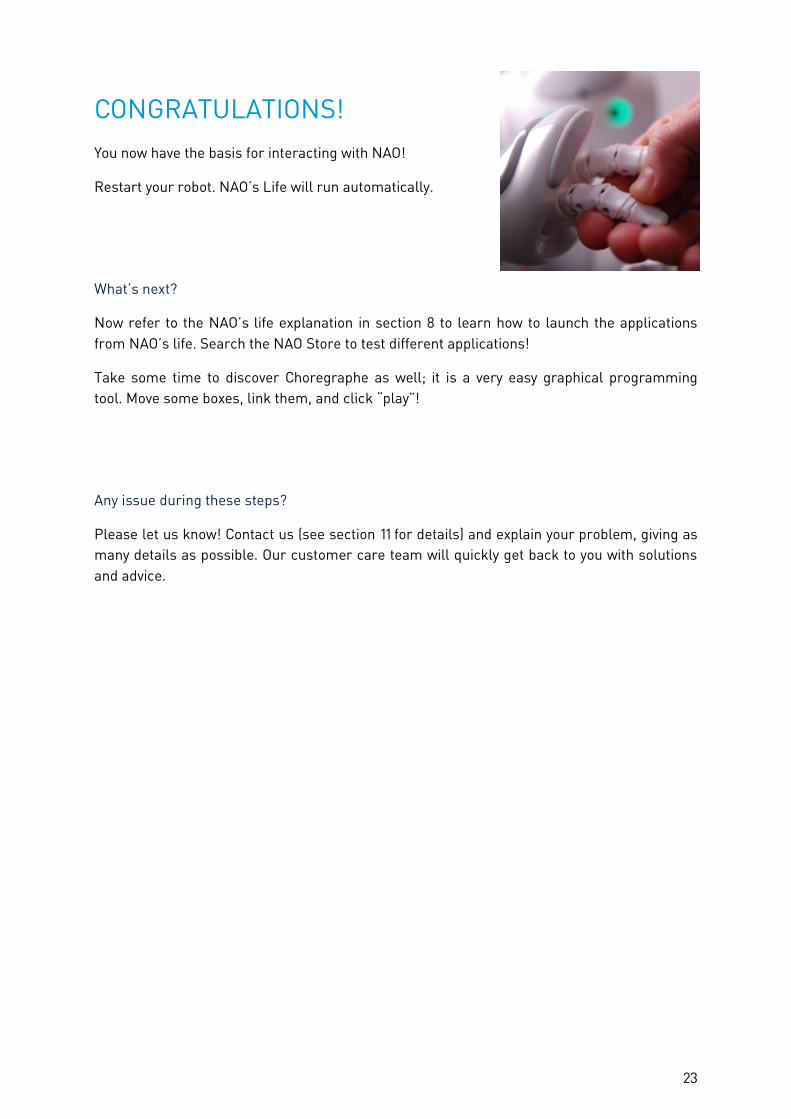
CONGRATULATIONS!
You now have the basis for interacting with NAO!
Restart your robot. NAO’s Life will run automatically.
What’s next?
Now refer to the NAO’s life explanation in section 8 to learn how to launch the applications
from NAO’s life. Search the NAO Store to test different applications!
Take some time to discover Choregraphe as well; it is a very easy graphical programming
tool. Move some boxes, link them, and click “play”!
Any issue during these steps?
Please let us know! Contact us (see section 11 for details) and explain your problem, giving as
many details as possible. Our customer care team will quickly get back to you with solutions
and advice.

24
8. USING NAO’S LIFE
Commands in NAO’s life
When NAO is not running a specific application, he starts breathing and randomly doing small
animations: this is the “NAO’s life”. You are still able to ask NAO for something, or use the
following commands at any time.
Caress
from back to front Volume Down
Caress from front to back
Volume Up
Pinch
Stand Up Expand
Sit Down
Note: the drawings represent the head tactile buttons.
Interrupt
Tap Head (all 3 buttons at the same time) Stop current action, behavior, or program. This will also wake up NAO
Safety mode
Double click on the chest button Stop the motors – security mode to avoid hurting someone. NAO will release all his joints and go limp. Hold the robot while doing so!
Start a program
1. Double click on the front tactile button. 2. NAO says “what do you want me to do?” or “I’d like to start XXXX”. 3. Wait for the beep sound (=NAO is listening) before talking! 4. Say a trigger sentence or a word. 5. NAO repeats and starts the program.
Unable to launch your program? Instead of talking (step 4), use the buttons to list the programs
Front
Previous program
Back Next
program
Middle Select this program

25
List of orders you can say
After you have already installed a few applications on NAO you can print the list of all the
trigger words or sentences you can use to launch these applications.
a. Go to the NAO store (http://store.aldebaran-robotics.com) and log in. Then go to “My
Apps” and click the printer icon.
b. You can display the trigger sentences of all the apps in the languages you need by
clicking on the flags.
Note: Most of the apps are translated into English but some may not have been translated in your language. In this case, the trigger sentence will be the name of the application.
c. Print this list!

26
9. SETUP YOUR SECOND LANGUAGE
Your NAO package includes two languages. English is necessary but you can choose the
second language.
Note: you can only choose once, and then you will not be able to edit the second language
anymore so choose wisely!
You need to have completed sections 2, 0 and 4 before starting.
a. Connect to your Community account, then click on your username (top-right of the
page), and go to “settings”
b. Select the second language in the dropdown menu.
c. A popup appears where you have to validate your choice.
d. NAO says “I am installing the application language-…”, then after some time, he says
“I can now speak …, thanks” or “I can now understand …, thanks”. This means the new
language is ready to be used!

27
CONGRATULATIONS!
NAO is now bilingual!
Need a third language?
Contact us (see chapter 11 for details)!
Any issue during these steps?
Please let us know!
Contact us (see section 11 for details) and explain your problem,
giving as many details as possible. Our customer care team will
quickly get back to you with solutions and advice.

28
10. DOWNLOAD AND INSTALL WEBOTS FOR NAO
Webots for NAO is provided on the CD that came with NAO. You can also download the latest
version from the Community website. Note that the procedure is the same for trying the
software.
To do so, you need to have completed section 2, creating your Community account.
a. Go and log in on the Community website (https://community.aldebaran-robotics.com/.)
b. Click on the suitable Webots for NAO for your operating system (Windows, Linux 32 or
64 bits, or Mac OS).
c. Open the file you just downloaded.
d. Follow the installation steps.

29
e. The first time you launch Webots, you will be asked to register your license. Click on
“register online”.
f. On the webpage that opens, enter the activation code. You will find this code with the
order details or printed on the CD.
If you want to try the software, click the “free 90 days trial” link.
30
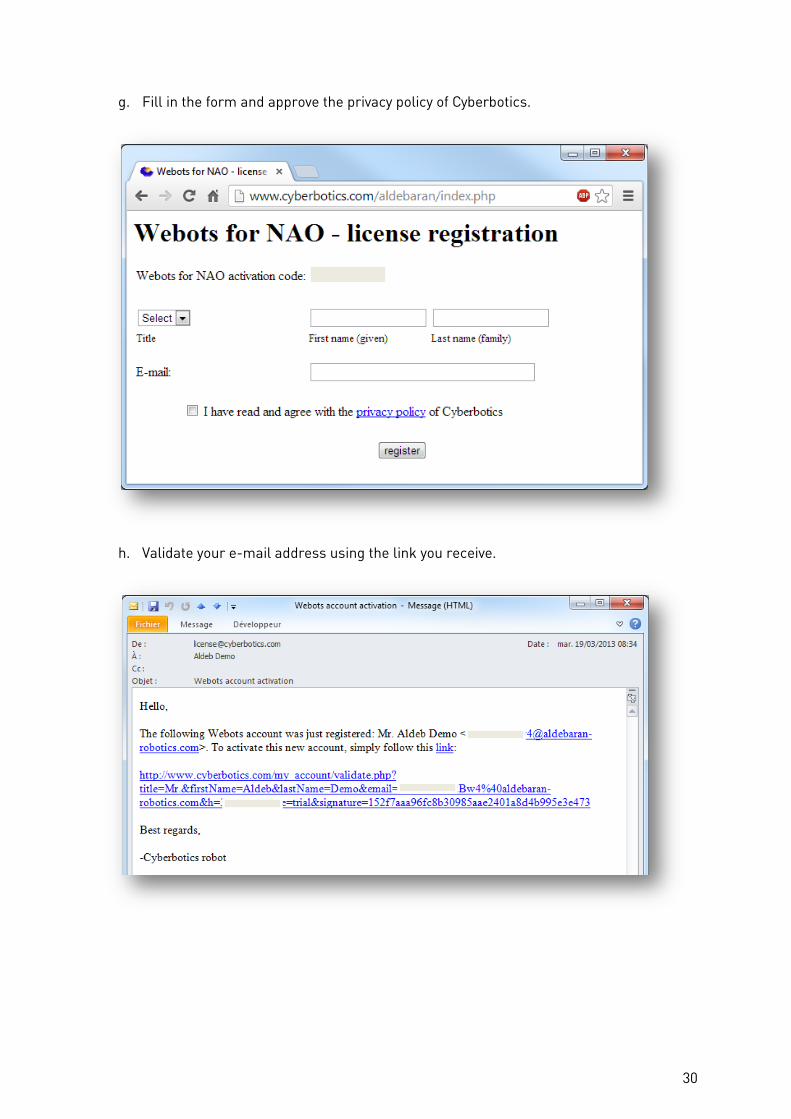
g. Fill in the form and approve the privacy policy of Cyberbotics.
h. Validate your e-mail address using the link you receive.

31
i. Go back to Webots for NAO and open the Webots Preferences window.
j. Enter your email and password, and click “OK” to confirm.

32
k. After some checks, you will get a validation window. Validate by clicking “OK”.
l. Webots for NAO starts, in the default empty world.

33
CONGRATULATIONS!
Your second NAO is alive! This one is running in
your computer!
What’s next?
Go back in Choregraphe, and connect to this new
robot (click on Connection, then “Connect To”). It
will appear with a dotted-lined head. Then you
can run the same behaviors on the virtual NAO
as on the real ones!
Any issue during these steps?
Please let us know!
Contact us (see chapter 11 for details) and explain your problem, giving as many details as
possible. Our customer care team will quickly get back to you with solutions and advice.

34
11. CONTACT US!
If you have any questions, doubts or problems, please ask us for advice!
Your best contact is our Customer Care.
Information to give us:
Please include in your request all the relevant information:
The serial number of the robot:
Unscrew the battery, is it written behind it on a silver sticker. You can also go
the NAO webpage, to the page “Advanced” “Memory”, and search for
“bodyid”.
The serial number starts with “ALDR…..”
A precise description of your problem, with screenshots and videos if possible.
The version of Choregraphe (in help about)
The version of NaoQi (NAO’s operating system):
You can find this information on the “about” page of NAO webpage.
How to contact Customer Care?
a. Go to the Community website and log in.
b. Under the login button, click on “Support”

35
c. Fill-in all the information, then click submit.
Our team may ask you a few questions to best target your issues, then will quickly come back
to you with a solution or with the best hints to help.
THANK YOU FOR USING
#NAOROBOT
Copyright © 2022 FDOKUMEN