Eventor's payment module - Orienteering SA
25
1 | Page Eventor’s payment module version 1.1 24.2.2013 The payment module lets users order and pay for entries and services, for example event entries and membership fees, within Eventor. A number of payment methods/vendors are supported; see listing later in this document. If the user makes the payment online, e.g. using a credit card, it is automatically reconciled in Eventor. This document covers the following topics: - the vocabulary that are used in the payment module - settings to make before being able to receive payments - search for orders and payments - change an order and/or its amount - registering offline payments manually - creating reports Vocabulary Payment event An competiton or similar that registers orders and payments in Eventor. Examples: event entries and services, membership fees. For each payment event, the organising club(s) determines which payment methods are available. Order An order of products or services for a payment event made by a customer, e.g. an event entry or membership application. Customer The customer is the one placing the order for a payment event. The customer is either a person or an organisation (club, state association, national association). Payment A payment for an order as stated above. The customer pays using any of the available payment methods. Payment method A payment event offers one or multiple payment methods, i.e. ways that the customer can pay. Payment methods are divided into online and offline payment methods. Online payment methods let the customer pay immediately after the order is made, and the payment is automatically reconciled in Eventor. An example of an online payment method is payment by credit card using PayPal and direct deposit using POLi Offline payment methods require that received payments are registered manually in Eventor. An example of an offline payment method is EFT, where the customer attaches the reference number when paying. Please note that the payment event’s organising club(s) must have an account set up at the payment method vendor.
-
Upload
khangminh22 -
Category
Documents
-
view
0 -
download
0
Transcript of Eventor's payment module - Orienteering SA

1 | P a g e
Eventor’s payment module version 1.1 24.2.2013
The payment module lets users order and pay for entries and services, for example event entries and
membership fees, within Eventor. A number of payment methods/vendors are supported; see listing
later in this document. If the user makes the payment online, e.g. using a credit card, it is
automatically reconciled in Eventor. This document covers the following topics:
- the vocabulary that are used in the payment module
- settings to make before being able to receive payments
- search for orders and payments
- change an order and/or its amount
- registering offline payments manually
- creating reports
Vocabulary
Payment event
An competiton or similar that registers orders and payments in Eventor. Examples: event entries and
services, membership fees. For each payment event, the organising club(s) determines which
payment methods are available.
Order
An order of products or services for a payment event made by a customer, e.g. an event entry or
membership application.
Customer
The customer is the one placing the order for a payment event. The customer is either a person or an
organisation (club, state association, national association).
Payment
A payment for an order as stated above. The customer pays using any of the available payment
methods.
Payment method
A payment event offers one or multiple payment methods, i.e. ways that the customer can pay.
Payment methods are divided into online and offline payment methods.
Online payment methods let the customer pay immediately after the order is made, and the
payment is automatically reconciled in Eventor. An example of an online payment method is
payment by credit card using PayPal and direct deposit using POLi
Offline payment methods require that received payments are registered manually in Eventor. An
example of an offline payment method is EFT, where the customer attaches the reference number
when paying.
Please note that the payment event’s organising club(s) must have an account set up at the payment
method vendor.

2 | P a g e
Eventor supports the following payment methods:
Internet banking payment using POLi (online)
Credit card or PayPal account using PayPal (online)
EFT (offline)
Note: PayPal is preferable because it provides details of payments including names as part of its
bookkeeping reports.
Reference number
Each order has a unique reference number, usually eight digits, used to keep track of the order in the
system. When a customer is paying using an offline payment method, the reference number must be
attached.
Defining default settings for payment events You are advised to first define default settings for payment events for your organisation. These
default settings are then used as a template and will be pre-populated when connecting an event to
the payment module, but can be overridden, if required, on a per-event basis.
You have to be logged in as an administrator for your organisation. Select Club/State
association/Federation > Club settings/State association settings/Federation settings (the wording
depends on the organisation level). Click Create default settings for new payment events in the
Default settings for new payment events box. The following screen is shown:
In the Payment receiver field, enter the physical address of your organisations, along with contact
details such as phone number, e-mail address and website address. No account information should
be given here.

3 | P a g e
In the Payment methods section, tick the payment methods/vendors that are offered. You can tick
one or multiple payment methods. Please note that an account has to be created and activated
before a box is ticked!
Online payment methods usually have a Test connection button which lets you check if the account
details you typed in are valid. The payment settings can’t be saved if the account details are invalid.
Please refer to Appendix 1 for information about how to set up accounts for various payment
methods.
Setting up payments for a payment event This step is dependent on the type of payment event.
For event entries, navigate to the event’s administration page and click Payment.
For membership fees, navigate to Club/State association > Membership types > Payment settings.
A screen similar to Default settings for new payment events is shown. The default settings are pre-
filled. You may change them if required, and also specify time intervals when each payment method
is available. This is useful if you don’t want offline payments to be allowed close to the event.
Some additional settings are shown at the top. For example, the number of days payments are due
after an order is made.
For more detailed information, please refer to the guides for event management and membership
management.
Finance administration Orders and payments are followed up at Club/State association/Federation > Finances. You can
search for orders and payments, edit orders and register payments manually, and create reports.

4 | P a g e
Order can be searched by a number of properties.
Person – search for orders made by a specific person.
Organisation – search for orders made by a specific organisaton.
From and To – specifies the time interval for when the order was made. If the Search on payment
time box is ticked, the search is instead performed on the times of received payments.
Reference number – search for an order by its unique reference number.
Application – search for orders within a specific application/module in Eventor, for example event
entry or membership.
Event – search for orders for a specific payment event.
Status – search for orders having a specific payment status. An order has one of the following
statuses:
Not paid – no payment has been received.
Underpaid – one or multiple payments have been received, but the amount is lower than the
amount of the order.

5 | P a g e
Paid – one or multiple payments have been received, and the amount equals the amount of
the order.
Overpaid – one or multiple payments have been received, but the amount is higher than the
amount of the order.
Invalidated – The order has been removed, either automatically due to the customer failing
to pay within time, or manually by an administrator.
Click Search to make a search. Orders matching the search criteria are shown. Click the reference
number to the left of the order to edit the order. Click the information icon to the right to show
information about the order in a dialog box.
Edit an order After having searched for orders at the Finance administration page, and clicked on a reference
number for an order, the Edit order screen is shown.

6 | P a g e
You can change, add and remove products, change customer details, add comments, or remove the
entire order.
Add a product by clicking the Add link below the Products table. Type in Product, Quantity and Price.
The Reference type and Reference ID if or internal usage only and should normally not be altered. You
may add products with negative amounts, which is useful for discounts.
To remove a product, enter 0 in the Quantity field. If the entire order should be removed, for
example if the customer made the order by mistake, tick the Invalidate order checkbox further down.
The order can be commented using the Comments field at the bottom of the page.
Click Save when finished.
There are a few links at the top of the page. Register payment lets you register a payment manually
for the current order. Merge with another order is used when a customer has made multiple orders,
but wishes to make a single payment for all orders. If the order is not yet paid, there is a Invoice link
that generates an invoice in PDF format. There is also a Pay link which leads to the order’s payment
page. When payment has been received, the Receipt link is shown, which generates a receipt in PFD
format when clicked.
Export payment summary Click the Payment summary link at the top of the Finance administration page. The following screen
is shown:
Select time interval using the From and To fields. Please note that filtering is made on payment time,
not order time. You can pick a payment event in the Event list, or include all payment events for the
club/state association/federation by selecting all.
Click OK to display a summary on the screen, or Export to Excel to create an Excel file containing the
payments.
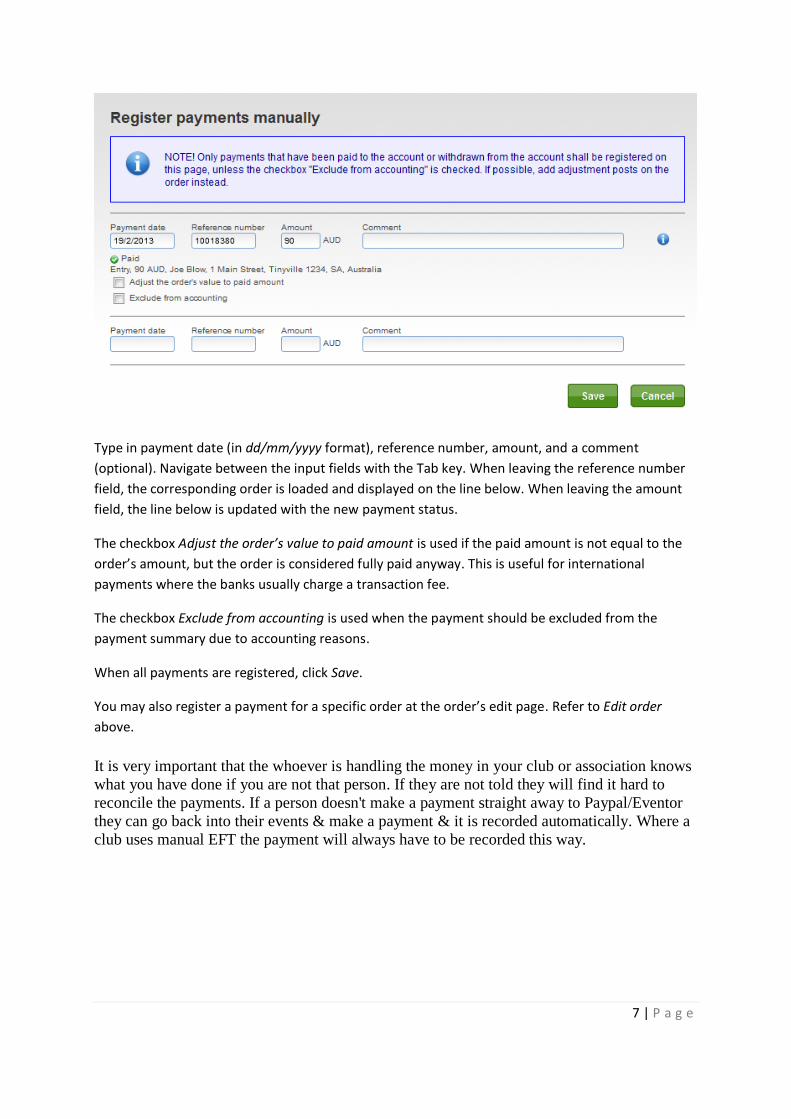
Registering payments manually Click the Register payments manually at the top of the Finance administration page. This function is
used to register payments received by offline payment methods, e.g. EFT payments.
7 | P a g e
Type in payment date (in dd/mm/yyyy format), reference number, amount, and a comment
(optional). Navigate between the input fields with the Tab key. When leaving the reference number
field, the corresponding order is loaded and displayed on the line below. When leaving the amount
field, the line below is updated with the new payment status.
The checkbox Adjust the order’s value to paid amount is used if the paid amount is not equal to the
order’s amount, but the order is considered fully paid anyway. This is useful for international
payments where the banks usually charge a transaction fee.
The checkbox Exclude from accounting is used when the payment should be excluded from the
payment summary due to accounting reasons.
When all payments are registered, click Save.
You may also register a payment for a specific order at the order’s edit page. Refer to Edit order
above.
It is very important that the whoever is handling the money in your club or association knows
what you have done if you are not that person. If they are not told they will find it hard to
reconcile the payments. If a person doesn't make a payment straight away to Paypal/Eventor
they can go back into their events & make a payment & it is recorded automatically. Where a
club uses manual EFT the payment will always have to be recorded this way.

8 | P a g e
Appendix 1 This appendix covers how to create accounts for various payment methods.

9 | P a g e
PayPal This guide covers the process of creating a PayPal business account for your club and connecting it to
an event in Eventor, making it possible for entrants to pay their entry fees through PayPal. One
PayPal account can be connected to many events in Eventor, so typically a club just needs to create a
PayPal account once.
1. Go to https://www.paypal.com and click Sign up at the top of the page.

10 | P a g e
2. Click “Get started” under “PayPal for business”.

11 | P a g e
3. At the next two pages, enter the required information for your club.

12 | P a g e
4. The account has now been created. Change the payment solution to Express Checkout.

13 | P a g e

14 | P a g e

15 | P a g e
5. Click the “Start Now” button.

16 | P a g e
6. Click ”Profile”.

17 | P a g e
7. Click ”My Profile” (might also be displayed as ”Profile”).

18 | P a g e
8. Click ”My selling tools”.

19 | P a g e
9. Click ”Update” next to ”API access”.

20 | P a g e
10. Click ”Request API credentials”.

21 | P a g e
11. Select the ”Request API signature” option and click “Agree and Submit”.

22 | P a g e
12. Your API username, password and signature are shown.

23 | P a g e
13. At the event’s administration page in Eventor, click “Payments”. Under the “Payment
methods” caption, check the “PayPal” checkbox and enter the API user name, password and
signature obtained in the previous step into the textboxes. You may click “Test connection”
to make sure everything works. Finally, click Save.

24 | P a g e
POLi Using POLi
POLi forms a link between Eventor and an entrant to their bank to make an EFT payment. POLi gives the
person a dropdown option of the banks to choose, and then the person makes their payment as a normal
internet banking transaction.
The POLi fee is charged monthly to the Association.
Signing up with POLi is not a problem because POLi is not handling anyone’s money; they are just connecting
the entry fee with the bank for a person to pay by EFT.
1. https://signup.apac.paywithpoli.com/Signup/Company to start the sign up.
2. Decide the payment plan – do some calculations of typical usage to decide whether to use the micro or the
standard. The fee calculation depends on the number of entries and entry fee. A state orienteering association
taking entries for state or national events may use the ’standard’ plan. A club may use the ’micro’ plan.
Screen shot please to show the options
3. Profile details to give details of your organisation. Screen shot please
4. Payment details are the details of the organisation’s bank account to receive payments. Screen shot please
5. Once you have signed up with POLi there is some special coding to attach it to Eventor.
A problem with POLi. POLi payments show up on the receiver’s bank statement as individual deposit identified
by a special POLi number. The details of the payer are not provided unless they are written in and the reason
for the payment is also given. If you require details of name and order (what the person is paying for), then the
transaction must be tracked back individually through the POLi number to the Eventor number. Screen shot
please to show the transaction record from POLi if possible without divulging sensitive information.
But, POLi is preferable to an unlinked EFT which may done any time after the entry. An administrator will then
have to record the payment in Eventor.

25 | P a g e
EFT TODO