Application of Integration Patterns in Salesforce Enterprise ...
86
Application of Integration Patterns in Salesforce Enterprise Environments Anton Bykovskykh Bachelor’s Thesis Degree Programme in Business Information Technology 2020
-
Upload
khangminh22 -
Category
Documents
-
view
3 -
download
0
Transcript of Application of Integration Patterns in Salesforce Enterprise ...
Application of Integration Patterns in Salesforce Enterprise
Environments
Anton Bykovskykh
Bachelor’s Thesis
Degree Programme in Business
Information Technology
2020

Abstract Degree programme
Authors
Anton Bykovskykh
The title of your thesis
Application of Integration Patterns in Salesforce Enterprise Environ-
ments
Number of pages
and appendices
85
Supervisor
Seppo Karisto
With a growth of technologies, data and the need of sharing and analysing the data be-
came increasingly important. Enterprise companies require a reliable way of moving the
data between different systems. There are many out-of-the-box products which provide
integration solutions. However, not in all cases such products justify the price or fulfil the
requirements. That is the time when custom integrations have to be built.
The goal of this thesis is to improve the development approach of custom integrations in
Salesforce environment. This goal is achieved by implementing the solution for custom
integrations based on the customer requirements, analyzing the result and implementing
the enhancements to the solution, to provide a more reliable, scalable and easily main-
tainable solution.
Basics of the Salesforce environment are explored in the theoretical part. Moreover, es-
sential parts of integrations, APIs and Salesforce integration patterns are explained in the
theoretical framework chapter.
Implementation of the project and following enhancements aims to provide a solution,
which utilizing the best development practices and enhancing all future integrations im-
plementations. Project aim to solve the real world problem and bring benefit to a specific
group of people who are working with Salesforce integration patterns solutions.
Key words
Data Integrations, Integration patterns, CRM, Salesforce, Apex, custom development

1
Table of contents
1 Introduction .................................................................................................. 5
1.1 Research Questions and Goals ........................................................... 5
1.2 Project Scope and Goals ..................................................................... 6
1.3 Research method ................................................................................. 6
1.4 Utilization of the results ........................................................................ 6
1.5 Project Plan ......................................................................................... 7
2 Theoretical Framework ................................................................................. 8
2.1 Basics of CRM and Salesforce ............................................................. 8
2.1.1 Salesforce Architecture and Products ..................................... 10
2.1.2 Multitenant kernel .................................................................... 11
2.1.3 Metadata-driven kernel ........................................................... 13
2.2 Integration between systems .............................................................. 15
2.2.1 Basics of API ........................................................................... 17
2.3 Salesforce API solutions .................................................................... 18
2.3.1.1 Apex REST API ...................................................................... 20
2.3.1.2 Authentication Methods ........................................................... 23
2.4 Salesforce Integration Patterns .......................................................... 26
2.4.1 Remote Process Invocation—Request and Reply ................... 27
2.4.2 Remote Process Invocation—Fire and Forget ......................... 30
2.4.3 Remote Call-In ........................................................................ 31
3 Case project ............................................................................................... 34
3.1 Introduction ........................................................................................ 35
3.1.1 Implementation background .................................................... 35
3.1.2 Case description ..................................................................... 36
3.1.3 Technological setup ................................................................ 37
3.1.4 Goals and requirements .......................................................... 38
3.2 Environment preparation .................................................................... 39
3.2.1 Salesforce Developer Org ....................................................... 39
3.2.2 Coding tools ............................................................................ 39
3.3 Functionality Implementation .............................................................. 40
3.3.1 Real time UI integration ........................................................... 40

2
3.3.1.1 Detailed Requirements ............................................................ 40
3.3.1.2 Endpoints Definition ................................................................ 41
3.3.1.3 Authorization details ................................................................ 44
3.3.1.4 Implementation ....................................................................... 45
3.3.2 REST Service Integration ........................................................ 49
3.3.2.1 Detailed Requirements ............................................................ 49
3.3.2.2 Endpoints Definition ................................................................ 50
3.3.2.3 Authorization Details ............................................................... 52
3.3.2.4 Implementation ....................................................................... 53
3.3.3 Data synchronization Integration ............................................. 55
3.3.3.1 Detailed Requirements ............................................................ 55
3.3.3.2 Endpoint Definitions ................................................................ 56
3.3.3.3 Authorization details ................................................................ 57
3.3.3.4 Implementation ....................................................................... 58
3.4 Solution Enhancements ..................................................................... 61
3.4.1 Configurable integration .......................................................... 62
3.4.2 Reusable callouts .................................................................... 65
3.4.3 Handling Authorization ............................................................ 69
3.4.4 Reusable Rest Resource ........................................................ 74
3.4.5 Package definition ................................................................... 75
4 Project results ............................................................................................ 78
4.1 Results evaluation .............................................................................. 78
4.2 Project roadmap ................................................................................. 79
5 Conclusion ................................................................................................. 81
6 References ................................................................................................. 82

3
Abbreviations & Terms
Apex Salesforce specific object-oriented programming language
API Application Programming Interface
Asynchronous pro-
gramming
Is a means of parallel programming in which a unit of work
runs separately from the main application thread
Chatter Salesforce Chatter is an enterprise collaboration platform from
Salesforce.
CRM Customer relationship management
CRUD Create, read, update and delete.
Data set Collection of Data
Declarative Customiza-
tion
A style of building the structure and elements without describ-
ing an actual code.
EAI Enterprise Application Integration
Einstein Salesforce AI software
ERP Enterprise resource planning
HTTP Hypertext Transfer Protocol
Hypervisor layer Small software layer that enables multiple operating systems
to run alongside each other.
JSON JavaScript Object Notation
Lightning Lightning Salesforce. Component-based framework for app
development
MDM Master Data Management
PaaS Platform as a Service
Patch Set of changes to a computer program
Postman The Collaboration Platform for API Development
Programmatic Custom-
ization
Customizations which require code to be produced.
RDBMS Relational Database Management System
Red Hat Red Hat Software. Software company that provides open
source software products to the enterprise community

4
REST Representational State Transfer
SaaS Software as a Service
Sandbox Software testing environment
SOAP
Simple Object Access Protocol
Swagger Open-source software that helps developers design, build,
document, and consume RESTful web services
UI User Interface
Visual Studio Code Source-code editor developed by Microsoft.
WDSL Web Services Description Language. XML-based interface
description language
XML Extensible Markup Language

5
1 Introduction
During the last decades, data became one of the most valuable assets of any company.
No matter which business company is doing, data helps to make better business deci-
sions, solve the problems, understand the performance and improve business processes.
According to the McKinsey & Company consulting firm, such activities as collection, gen-
eration and refinement of the data are critical operations for any business (Hürtgen &
Mohr, 2020). After data gathering operations are completed, it is time to turn insights into
actions.
Modern enterprise companies have many sources to collect the data from. There are
many CRM and ERP systems, web and mobile applications, as well as data surveys. All
of them bring a massive amount of data for enterprise companies. However, it is not an
easy task to make use of that information. It is not enough to just store the data, it should
become easily accessible across multiple applications and databases. That is the time
when integration between multiples systems is coming to play.
Data integration is not only a technical process, but it is also a strategy that allows making
a first step towards transforming data into valuable information (Doyle, 2017). While im-
plementing data integrations, it is always crucial to remember about the scalability of the
system. Modern systems in the enterprise environments should work the same good for
hundreds of records as well as for millions of records. There are multiple approaches used
during the development to achieve that goal. One of these approaches is Integration Pat-
terns, which are utilized to deliver an easily maintainable, scalable, enterprise-level solu-
tion.
1.1 Research Questions and Goals
This project is based on the practical implementation of real integrations based on cus-
tomer requirements. By implementing the solution, in the empirical part of the thesis, the
following questions appear:
- What is behind Salesforce, Data, Integrations, and why is it important?
- What are the most common Salesforce Integration Patterns?
- How to implement integration solutions based on customer requirements applying
integrations patterns in there?
- How to enhance that solution and how to utilize it for future implementations?
In my thesis, I will try to achieve a better understanding of integrations patterns and im-
plement them in a practical use case.

6
1.2 Project Scope and Goals
In this project, I aim to achieve multiple goals.
The first goal is to implement multiple integrations based on the requirements taken out of
the real companies’ use cases.
The thesis project aims to guide the reader through the custom requirements, implemen-
tation, all technical tools used and a solution outcome. Actual implementation will be thor-
oughly documented, and each step will be described. As a result of the implementation
phase, I am planning to have a complete working integration, which was requested by the
customer.
The second goal of the project is to deliver a reusable framework to make work with inte-
gration easier. I aim to analyse the delivered solution, find out how that solution could be
improved, so that it can be easily maintainable and the most critical - reusable for future
implementation. As a result of the enhancement phase of the project, I am expecting to
have both programmatic and declarative enhancements, which will allow me to create a
package or framework, which then could be distributed and delivered among other devel-
opers. It will bring consistency to all future implementations, increase the speed of devel-
opment, and change the way developers are working with integrations.
This project is a heavily technical. It will contain an actual code implementation, as well as
a description of all related processes and configurations.
The scope will include implementation of integrations, documentation of the solution, de-
scription of all the configurable items which were required before the solution. Besides,
after an actual implementation, code enhancements will be done. As a result of that, I aim
to create a framework that will contain multiple reusable classes, which could be easily
shared and utilized for any new integration implementation.
Note, the project will have a roadmap for future work, and some of the items will not be
included in this implementation. For example, unit testing of the code is not part of the
main phase of thesis project implementation.
1.3 Research method
The thesis is based on several research methods. The qualitative research method will be
used for the theoretical framework part. The case implementation method will be used for
the empirical part of the thesis.
1.4 Utilization of the results

7
Implementation of the Integration is often a big part of any Salesforce project, which does
involve multiple systems. Nowadays, data is separated into multiple systems, and it is vital
to have a proper way of communication between these systems. As a result of the project,
a code framework will be developed. It will allow developers to implement highly scalable
and maintainable integration solutions in a shorter time. The development of that frame-
work will be described in detail based on the real example, so it will be clear why certain
things have to be implemented and what are the benefits of them. As a result of the pro-
ject, developers will be able to utilize the delivered framework for different projects and
enhance the quality of their final product.
1.5 Project Plan
The project will consist of three main phases.
Introduction – the part where the project will be introduced, primary goals, questions and
descriptions will be defined. This part will give the reader an understanding what is the
overall idea about the project, why the topic is essential, what will be the methods of how
project goals will be achieved and then how the results could be utilized.
Theoretical framework – the part where the theoretical fundament of the project is initiat-
ed. The main technologies, which is the project is based on, will be investigated, and the
concept of them will be described at this part. It will allow the reader to understand the
concepts behind the thesis project better, understand which technologies it is based on
and why it is important.
Case Project – that is the central part of the thesis. It will contain an actual implementation
of the planned integrations as well as analyses and enhancements to the solution. As a
result of these modifications, the main development framework will be retrieved. Customer
requirements, as well as actual implementation of the project, will be precisely described,
and each step will contain documentation with corresponding figures and code snippets.
Final – this part will contain a reflection about what was achieved in the thesis. It will con-
tain short wrap up on the project topic. Evaluation of the delivered results will be done at
this part, which will allow the reader to understand the whole picture of the project better.

8
2 Theoretical Framework
The theoretical framework chapter will cover the main concepts, ideas and technologies
around the subject of my thesis. At first, an overall impact, history and definitions of CRM
and specifically about Salesforce will be described. Since Salesforce is the primary tech-
nology the project is based on, the more technical side of it will be analyzed. Such topics
as Salesforce architecture, integrations between systems, basics of Salesforce APIs and
authentications methods in Salesforce will be described to give the reader an in-depth
overview of the topic.
2.1 Basics of CRM and Salesforce
Nowadays, in the modern business industry, you can frequently hear a saying that ‘cus-
tomer is a king.’ In an era of human-centric design, companies are doing everything to set
a proper way of interaction with their clients.
The core behind managing all interactions with current and potential customers is cus-
tomer relationship management (CRM) systems (Kulpa, 2017).
It is essential to understand what exactly people mean when CRM is referred, as this term
could have different meanings. There are three main definitions of CRM.
CRM could be mentioned as technology, and it is often to be referred to as a product
which usually hosted in the cloud. Multiple teams inside the company would use it to col-
lect, analyze, report and share data inside the company or with an end-user.
CRM as the technology could also be referred to as CRM System or CRM Solution.
(Salesforce.com, 2016.)
The higher-level approach is to refer to CRM as a strategy, which would mean a compa-
ny’s philosophy about how to manage relationships with customers (Salesforce.com,
2016).
CRM as a process is the third definition, meaning thinking of it as a business system that
companies adopt to nurture those relationships (Salesforce.com, 2016).
In this thesis, all future mentions of the CRM will be used to refer to CRM as technology.
In other words, it will mean a system that helps companies to analyze and manage all
customer-related data thorough the whole customer journey, from the first cold calls to
closing a deal and then maintaining communication - resulting in improvements in cus-
tomer experience and business relationships. (Salesforce.com, 2016.)

9
To better understand the subject, let us just briefly deep into the history of CRM. It will
give a short overview of what was the need for this technology and how it developed.
There were multiple crucial steps in the development of CRM systems.
At first, around 1980th, companies realized that they could not observe their customer as
a large impersonal group anymore. With the help of paper-based tools, filling systems and
ledgers, companies started to store more personalized customer information, which al-
lowed them to understand better what aspects make each customer unique.
(Salesforce.com, 2016.)
Since then, the customer-focused software system started to rise. The first digital ances-
tors of modern CRM Systems were Customer Management Systems, which aimed to or-
ganize a large amount of customer data into databases. (Salesforce.com, 2016.)
The next step was a move from storing customer data to automating main customer inter-
action activities, and that is when born of the Customer Relationships Management sys-
tem declared. However, a true breakthrough in the development of those systems was a
move from on premise system to the cloud ones. (Salesforce.com, 2016.)
According to the definition given by Microsoft (2020), “Cloud computing is the delivery of
computing services—including servers, storage, databases, networking, software, analyt-
ics, and intelligence—over the Internet (“the cloud”) to offer faster innovation, flexible re-
sources, and economies of scale”.
Salesforce was founded at the age of cloud computing rise. In 1999, Marc Benioff, togeth-
er with other co-founders, decided to change the way companies get used to working with
CRM systems. Instead of building complex on-premise solutions, with thousands of hours
spent, they came up with a model where companies are easily able to buy CRM software
and have everything stored in clouds. (Carey, 2018.)
Till the current days, Salesforce is following their values. In his book “Behind the Cloud”,
Marc Benioff has identified an idea of how the Salesforce model operates.
“It is amazing to consider that no matter what size customer we were pitching, or where in
the world we were selling, a singular idea drove all our accomplishments: we never sold
features. We sold the model, and we sold the customer’s success”. (Benioff, 2009.)
But what is that Salesforce? Salesforce is a customer relationship management solution
that brings companies and customers together. It is an integrated CRM platform and it
provides a wide range of products which cover all possible need of enterprise companies,
such as sales, services, marketing, community and analytics products. A while ago it all
started as Software as a service (Saas), but gradually it became Platform as a Service
(Paas). It nowadays provides possibilities for companies to manage all their customer

10
relationships inside one platform and additionally give users and developers an opportuni-
ty to develop and distribute custom software.
According to the latest statistics provided by Datanyze, Salesforce is taking the most sig-
nificant share on the market of CRM systems - 27.3 %, having almost twice as many reg-
istered domains as the next competitor. (Datanyze.com, 2020.)
2.1.1 Salesforce Architecture and Products
There is a wide range of products and services Salesforce offers, including Service Cloud,
Sales Cloud, App Cloud, IoT cloud, Marketing Cloud, Analytics Cloud, Data Cloud and
Community Cloud (Salesforce.com, 2019).
The secret of how Salesforce could manage all of their services and product so effective
is their architecture. There are multiple features that make Salesforce architecture so
powerful. All of the listed apps are hosted on top of one platform.
To ensure the seamless flow of data and provide powerful functionality across all prod-
ucts, Salesforce is using a multi-tenant cloud architecture. The main architecture level
called ‘platform’. It’s powered by metadata and consists of multiple data services, multiple
APIs and an artificial intelligence system called Einstein. (Trailhead Salesforce.com,
2019.)
The figure below demonstrates the layers of Salesforce architecture and set of main ap-
plication living on top of the platform.
Figure 1. Salesforce Architecture (Trailhead Salesforce.com, 2019).

11
Platform layer of the architecture is a proven cloud application development platform
which powers all Salesforce applications, as well as custom application which users build
to fulfil the requirements of their specific business.
Three main components make the foundation of platform architecture.
A multitenant cloud environment is an approach of sharing resources and maintenance
across all customers (Trailhead Salesforce.com, 2019). Multitenancy is an essential tech-
nology in the Salesforce environment, and it will be described in more detail in the follow-
ing paragraph.
Metadata is another vital piece of architecture. By definition, metadata is information about
data (OpenDatasoft, 2016). Salesforce is using a metadata drive approach to allow users
to customize all applications more productively. All metadata and small pieces of applica-
tions are stored in the database and could be efficiently reused. Instead of coding each
small piece of functionality, developers reuse existing parts of metadata and concentrate
on building a business functionality. (Goel, 2020.)
API is a third component which makes Salesforce Architecture so powerful. API allows all
bits of application to communicate with each other. Salesforce provides dozens of out-of-
the-box API solutions for both data and metadata manipulations. Additionally, the API-first
approach speed-ups the development and allows developers to deliver robust API fea-
tures before implementing the UI part. (Trailhead Salesforce.com, 2019.)
2.1.2 Multitenant kernel
Since the rise of cloud computing raise, the IT world revolutionized because of enterprise-
grade computing resources, which became affordable and instantly available.
Life suddenly became much easier because clouds provide straightforward access to all
kinds of IT recourses, with no need to worry about the complexity of managing underlying
mechanisms that provide these recourses. (The Force.com Multitenant Architecture,
2016.)
Foundation, which makes the Salesforce cloud platform fast, scalable and secure, is a
metadata-drive software architecture that enables multitenant applications.
Multitenancy is a fundamental approach used by cloud services to share IT- recourses
cost-efficiently and securely. Bank services are a great analogy where many tenants cost-
efficiently share hidden infrastructures and using a defined set of highly secured services
with complete privacy from all other tenants. In the same way, multitenancy used to effi-
ciently share IT recourses among multiple applications and tenants (applications, busi-
nesses, organizations, etc.) that use clouds. For isolation of tenants, some clouds use

12
virtualization-based architectures, while others use custom software architectures. (The
Force.com Multitenant Architecture, 2016.)
An excellent way to understand what makes the Salesforce platform so unique is to com-
pare the traditional application development platforms approach with the multitenant ap-
proach used by Salesforce.
The relational database management system is at the heart of all conventional application
development platforms in its majority designed between the 1970s – 1980s to provide
individual organizations on-premises deployments. System catalogues, caching mecha-
nisms, query optimizer, and application development features are considered to be core
mechanisms in RDBMS. All of them are designed for single-tenant applications and to be
run directly on top of raw hardware and specifically tuned operation systems. In order to
utilize these mechanisms on top of multitenant cloud databases built with standard
RDBMS, the approach of virtualization should be used. However, an extra hypervisor lay-
er will usually decrease the performance of RDBMS dramatically. (Masri, 2019.)
In contracts, the Salesforce platform is a combination of multiple persistence technologies.
For example, custom-designed relational database schema. From the beginning, archi-
tected for clouds and being multitenant with no additional virtualization layers required.
(The Force.com Multitenant Architecture, 2016.)
As a result, we have a platform where all users share the same physical infrastructure and
common codebase. Multiple tenants use shared resources under the control of governor
limits. Governor limits prevent the single instance from monopolizing all recourses. Cus-
tom code each instance developed as well as org’s data are separated by a virtual parti-
tion, and users cannot see each other’s code. (Kabe, 2016.)
The figure below demonstrates an example of multiple tenants hosted on a shared server.

13
Figure 2. Multitenant environment (Kabe, 2016).
On the figure above it is shown how multiple tenants, which could be a different, totally not
related, companies are sharing the same resources of the Salesforce servers.
Another great benefit of multitenant environments is the possibility to have all instances
updated to the latest version of the software simultaneously. All updates are automatically
applied, with no actions needed from the users.
Those benefits of the Salesforce platform’s modern developed cloud solution and unique
architecture are extraordinary, which makes Salesforce platform a proven, scalable, relia-
ble and secure cloud application development platform offering services for more that
100,000 organizations, millions of users with phenomenal performance and reliability.
(The Force.com Multitenant Architecture, 2016.)
2.1.3 Metadata-driven kernel
While developing a multitenant platform, such as the Salesforce platform, there are many
things to take into considerations. The platform, first of all, should be secure, fast, scala-
ble, customizable by tenants and reliable. However, there are a lot of difficult architectural
questions that appear during that process. How to keep tenants’ data secure in a shared
database? How would tenants be able to customize their data tables and UI for custom
applications without affecting functionality for all other tenants? How to scale a platform
that works reliably for one tenant as well as for thousands of tenants? How to update or
patch code base without breaking tenant’ specific schemas?

14
It ends up multitenant platforms that cannot be statically compiled. Instead, they should be
dynamic, or polymorphic to accomplish all individual expectations of various tenants. (The
Force.com Multitenant Architecture, 2016.)
Salesforce platform designers came up with an elegant architectural solution to approach
these requirements. Core technology of Salesforce platform uses runtime engine that ma-
terializes all application data from metadata (The Force.com Multitenant Architecture,
2016).
That’s how the solution described in official Salesforce architecture documentation:
- In Force.com’s well-defined metadata-driven architecture, there is a clear separation of the
compiled runtime database engine (kernel), tenant data, and the metadata that describes
each application. These distinct boundaries make it possible to independently update the
system kernel and tenant-specific applications and schemas, with virtually no risk of one af-
fecting the others.
(The Force.com Multitenant Architecture 2016)
The figure below shows the process of generating the visual representation of Salesforce applications from the metadata.
Figure 3. Application generation from metadata (The Force.com Multitenant Architecture,
2016).
On the figure below, it is possible to see how tenant specific data and metadata are trans-
formed into meaningful database tables, relationships and UI components in Salesforce
by using runtime engine. This process is automatic and it allows Salesforce to generate a
complex applications and make it working in fast and reliable way for all customers.
As an example, if you create a simple application, a new object or apex class, the
Salesforce platform will not create an actual table in the database or compile any code to
show it statically. Instead, it stores that metadata and then virtual applications are gener-
ated during runtime. Additionally, since metadata is a crucial part of the architecture, it

15
cannot be accessed directly every time, because it would prevent the system from scaling.
That is why complicated metadata caches are used to maintain the most recent metadata
in a memory, which improves application response time. (The Force.com Multitenant Ar-
chitecture, 2016.)
2.2 Integration between systems
Nowadays, application data and data integrity are fundamental parts of delivering custom-
er experience and services. Data sharing is a compulsory part of every business. To
achieve that, core applications and data in them should be accessible to each other, very
often across multiple clouds. That is the time when integrations between systems are in-
volved.
According to Red Hat (2019), IT integration, also referred to as System Integration, is the
connection of data, devices, applications across the whole IT organization to achieve
higher performance, productivity and efficiency. Alternatively, system integrations de-
scribed not only as a technological process but also as a business mindset of a company.
Judith M. Myerson gives an excellent definition of system integrations in her book called
“Enterprise Systems Integration”:
- Systems integration involves a complete system of business processes, managerial prac-
tices, organizational interactions and structural alignments, and knowledge management. It
is an all-inclusive process designed to create relatively seamless and highly agile process-
es and organizational structures that are aligned with the strategic and financial objectives
of the enterprise. A clear economic and competitive value proposition is established be-
tween the need and objectives for systems integration and the performance of the enter-
prise.
(Myerson, 2001)
The main goal of integration is to make systems ‘talk to each other’, which will eventually
reduce the operational cost and speed up the information flows. Additionally, integrations
not only connect systems, but it also adds additional value to the companies by providing
new functionalities available as well as bring transparency between systems (Lehtonen,
2018).
Over time of the rapid growth of IT industry, IT systems grew to the large enterprise sys-
tems which were separated from each other. Entire IT stack was often connected only to
one database and storing all related information there. When it came to the business log-
ic, code was often replicated in many systems, bringing the complexity and redundancy.

16
There was a strong need to organize that process so that that system could be connected
and more lightweight. (Redhat, 2019.)
The way to solve these issues of separated systems was enterprise application integration
(EAI). An approach that involves a framework with technologies and tooling to provide
real-time, message-based integration between applications. As a rule, messages are trig-
gered by data changes or business logic. (Redhat, 2019.)
The figure below shows what the two ways how EAI could be implemented are.
Figure 4. Enterprise Application Integration models (Redhat, 2019).
Point-to-point integration designed the way that all applications communicate directly to
each other. In an enterprise environment, that solution can become quite complicated and
highly error-prone. Additionally, maintenance of such a system can be very hard, especial-
ly when software/hardware updates are required. (Redhat, 2019.)
Hub-and-spoke integration designed the way that all communications handled by the cen-
tral hub. It brings consistency to the solution since the integration of the hub spot is always
similar. However, the main downside of this approach is centralization by the hub. It be-
comes a single failure system, which means if the hub fails, the communication between
all systems will be down. (Redhat, 2019.)
That is one of the solutions, how enterprise companies implement integrations between
hundreds, if not thousands of custom-build, third-party, operating on a different platform,
sometimes legacy systems. However, how these systems communicate with each other?
How do they send a request to get the information they need, and how do they get a re-
sponse? An answer to these questions is the Application Programming Interface (API).

17
2.2.1 Basics of API Nowadays, data is one of the most valuable assets companies have. It allows companies
to analyze their customers, personalize them, target and, as a result, make better busi-
ness decisions. The key to the convenient access and usage of such data is API.
Very often, we can hear how valuable APIs are. Let us try to understand what that is, see
some examples and explore how it works.
Acronym API stands for Application Programming Interface. According to Redhat (2019),
API is defined as a set of protocols and definitions of building and integrations software
applications. It is also described by Mulesoft (2019) as a software intermediary that allows
applications to talk to each other. For example, the phone connects to the internet and
send the data to the server. The server will operate the request, make the required data
changes and send back the response. Received information then transformed into a
readable format on the phone. All of that communication happens via the API.
APIs can help both business and IT teams to collaborate by making the process of inte-
grating the new application into existing complex applications more accessible. To stay
competitive in a quickly changing business environment, companies aim to support rapid
development and continuous deployment practices. Cloud-native application development
is an obvious way to increase the speed of development. It mainly relies on connecting
microservices application architecture through the APIs. (Redhat, 2019.)
APIs is not only a great way to connect inside companies’ infrastructure, but the way to
share data with external applications. APIs which are publicly available bring stable busi-
ness value to the company because it simplifies and makes the process of connecting
with partners easier as well as allows potentially monetize your data (Redhat, 2019). In
the figure below, you can see an example of modern architecture for application sharing
its data through the API.

18
Figure 5. Data distribution through the API (Redhat, 2019).
Figure 5 describes how the backend end systems, those which contain an actual data in
their databases are connected to the end data-users like Apps, IoT devices and mobile
devices through the API management system. Backend systems, API Management sys-
tem and end devices, all of them communicate via the APIs.
It is possible to make the data secure behind the security gate. Nowadays, there are three
approaches to API release policies. They are described by the Redhat (2019) company as
those below
- Private is designed for internal use only. It allows companies to have full
control over their APIs.
- Partner is shared only with specific partners or companies. It usually
provides an additional revenue stream without composing the quality.
- Public is available for any external party. It allows building products and
applications that freely interact with an API.
The way how two different systems can communicate between each other through the
API can be categorized into two types.
Simple Object Access Protocol – SOAP or Representational State Transfer - REST.
Both of them can be used to create integration between systems, but both have a signifi-
cant difference rather. For example, SOAP is a standard communication protocol system
that permits processes using different operating systems by using HTTP and XML (Malik,
2017). At the same time, REST is not a protocol, but an architectural style of web services
that provides a channel of communication between systems over the Internet (Malik,
2017). Despite the advantages and disadvantages of both approaches, in this thesis pro-
ject, I will be using REST APIs as a base for system integrations.
2.3 Salesforce API solutions To implement the background for the Salesforce Platform layer, the Salesforce is using
API first approach.
It means that API implementation is completed before building UI. It gives more flexibility
to developers in terms of data manipulation. That is one of the reasons Salesforce pro-
vides programmatic access to org information using scalable, robust and secure pro-
gramming interfaces (Salesforce Help, 2019). Salesforce API is divided into the ones
which manipulate data and others which manipulate metadata.
Below you can find a table of most common APIs provided by Salesforce.

19
Table 1. Types of Salesforce APIs. (Trailhead Salesforce.com, 2019)
API Name Protocol Data Format Communication
REST API REST JSON, XML Synchronous
SOAP API SOAP (WSDL) XML Synchronous
Chatter REST API REST JSON, XML Synchronous (photos are processed asynchronously)
User Interface API REST JSON, XML Synchronous
Analytics REST API REST JSON, XML Synchronous
Bulk API REST CSV, JSON, XML Asynchronous
Metadata API SOAP (WSDL) JSON, XML Asynchronous
Streaming API Bayeux JSON
Asynchronous (stream of data)
Tooling API REST or SOAP (WSDL)
JSON, XML, Cus-tom
Synchronous
Each API provided by Salesforce has a specific goal, and choosing the right API is an
important decision, which is usually based on business requirements and technological
stack (Trailhead Salesforce.com, 2019).
REST API and SOAP API were already described in brief in a previous section. Both of
them are used to create, retrieve, update, or delete (CRUD) records in Salesforce. SOAP
API provides a powerful SOAP-based web service interface for integrating with
Salesforce. In contrast, REST API provides a REST-based web services interface, and it
is considered to be a more convenient way of interacting with mobile applications and web
projects. (Trailhead Salesforce.com, 2019.)
At the same time, if it is required to implement UI for CRUD operations with records, in-
cluding UI elements such as list views, actions and picklists, then User Interface API will
be the best choice (Salesforce Help, 2019).
Chatter REST API is the right choice when it is required to interact with feeds, users,
groups, and followers through the API. It is similar to the APIs provided by such networks
as Facebook or Twitter, but exposing features related to Salesforce Chatter. Such items
as datasets, lenses, and dashboards could be directly accessed from Analytics Platform
through Analytics REST API. (Salesforce Help, 2019.)
There are two types of APIs that could be used to manipulate inside the Salesforce org or
even integrate it with other orgs. Metadata API is used to retrieve, deploy, create, update,
or delete customizations for your org. It is usually used to migrate changes from one
sandbox environment to another. There are some existing tools for convenience with
Metadata API, such as Visual Studio Code and Ant Migration tool. Nevertheless, Tooling
API provides the same functionality. It is more commonly used for the complex type of

20
operations with metadata. Tooling API allows the developer to work with JSON, XML and
Custom type of data, while Metadata API will provide only XML functionality. (Trailhead
Salesforce.com, 2019.)
The last two APIs worth mentioning are Bulk API and Streaming API. As it might be clear
from the name Bulk API is specialized on loading and deleting large sets of data. It can be
used to query all data, create, update or delete millions of records. Salesforce is handling
submitted requests asynchronously using batches to split the data into smaller parts. The
easiest way to use Bulk API is through the Data Loader, standard Salesforce tool for
working with data. In contrast, Streaming API is designed to work with a smaller amount of
data. However, it provides the ability to have near-real-time integration, which is based on
an event-messaging approach. (Trailhead Salesforce.com, 2019.)
Despite the wide arrange of available APIs, REST API is considered to be the most suc-
cessful approach in integration implementation. For that reason, the following project im-
plementation will be based on the REST API.
2.3.1.1 Apex REST API
As it was already described before, REST API in Salesforce is a convenient but straight-
forward Web Service API to interact between Salesforce and external systems. Apex
(strongly typed object-oriented programming language based on Salesforce platform)
providing a possibility to utilize REST API in two different ways.
Apex REST Callouts – to execute callouts to communicate with external systems.
REST Resources to expose Salesforce endpoints for the external system to call
Salesforce.
REST callouts are based on HHTP. It is essential to understand that each callout is asso-
ciated with an HTTP endpoint and HTTP method. Each HTTP method will identify what
kind of action should be performed. Each request will be sent to the desired web service
based on endpoint provided by Trailhead Salesforce.com, 2019. A figure of how
Salesforce requests work on the web can be found below.

21
Figure 6. Apex REST Callout towards external web service Trailhead Salesforce.com,
2019).
Figure above describes how the communication between the Salesforce and an external
Web Service happens via the API request/response messages.
There are four predefined actions available to use for Apex REST Callouts.
Table 2. Some common HTTP methods. (Trailhead Salesforce.com, 2019)
Http Method Description
GET Retrieve data identified by a URL.
POST Create a resource or post data to the server.
DELETE Delete a resource identified by a URL.
PUT Create or replace the resource sent in the request body.
Each HTTP request should contain HTTP Method specified. In addition to that, each re-
quest will contain a URI, which represents the endpoint address where the web server
located. After the request is sent, the server will send back the response, which will con-
tain a status code. It will contain information on whether the request was successful or if
any errors occurred.
Usually, together with the HTTP method and endpoint, the request will contain information
in the header. As a rule, the header will contain content type and authorization infor-
mation. (Trailhead Salesforce.com, 2019.)
Below there is a code snippet example of how data could be retrieved from an external
server to Salesforce using APEX..
1. Http http = new Http(); 2. HttpRequest request = new HttpRequest();
3. request.setEndpoint('https://th-apex-http-callout.herokuapp.com/animals'); 4. request.setMethod('GET');
5. HttpResponse response = http.send(request); 6. // If the request is successul, parse the JSON response.
7. if (response.getStatusCode() == 200) { 8. // Deserialize the JSON string into collections of primitive data types.
9. Map<String, Object> results = (Map<String, Object>) JSON.deserializeUntyped(response.getBody());

22
10. // Cast the values in the 'animals' key as a list
11. List<Object> animals = (List<Object>) results.get('animals'); 12. System.debug('Received the following animals:');
13. for (Object animal: animals) { 14. System.debug(animal);
15. } 16. }
Code Snippet 1. Simple data retrieval from an external server (Trailhead Salesforce.com,
2019).
In the example above, we can see that for making request from Apex to external server,
three main classes are used.
HTTP class is used to initiate HTTP request and response.
HttpRequest class used to programmatically create HTTP requests like GET, POST, PUT,
and DELETE.
HttpResponse class to handle the HTTP response returned by the Http class.
After request was made, response object will contain a status code. On the line 7, the
check for successful code is done. If the code is 200, then the body can be parsed into
Apex data types. Debug logs printed to the console will be the list of animals which we
received from the server: "majestic badger", "fluffy bunny", "scary bear", "chicken".
Apex callout is the one way to integrate to the external system through the REST API.
Another way how REST API is utilized is by exposing an Apex class as a web service for
REST operations. By making Apex methods callable, the external server can integrate
with Salesforce to perform different types of operations. Same way as Apex Callouts call
external servers, those servers could call Salesforce when we expose apex classes as a
web service (Trailhead Salesforce.com, 2019). Below you can see the example of how an
apex class is exposed for GET operation.
1. @RestResource(urlMapping='/Account/*') 2. global with sharing class MyRestResource {
3. @HttpGet 4. global static Account getRecord() {
5. // Add your code 6. } 7. }
Code Snippet 2.Example of GET method exposed (Trailhead Salesforce.com, 2019).
To make the class exposed as a rest resource, it should be annotated with
@RestResource, the class and all resource methods should be global. Each method an-
notation will tell which operations is performed when the method is called. In the example
above getRecord() method called with GET request. Please see below the table with a list

23
of all available REST methods that Salesfroce can expose as a web services. Each anno-
tation should be used only once per Apex class.
Table 3. Common HTTP methods that could be exposed as Web Service. (Trailhead Salesforce.com, 2019)
Annotation Action Details
@HttpGet Read Reads or retrieves records.
@HttpPost Create Creates records.
@HttpDelete Delete Deletes records.
@HttpPut Upsert Typically used to update existing records or create records.
@HttpPatch Update Typically used to update fields in existing records.
That’s the way how REST API is used in Apex to do both, Apex callouts to communicate
with external systems and Apex Web Services to allow external systems to communicate
with Salesforce. In the following project both Callouts and Web Services will be utilized to
fulfil customer requirements and implement required integrations.
2.3.1.2 Authentication Methods One of the crucial parts of any enterprise application nowadays is security and secure
authentication. In the same way how Callouts and Web Services were demonstrated, au-
thentication should be available for both approaches. Apex Callouts should be authenti-
cated against external servers and servers which are calling Salesforce should be authen-
ticated against Web Services.
Let’s start with how client applications able to access REST Resources. For this reason,
there is an industry-standard protocol defined; it is called OAuth 2.0. It allows applications
to be securely authenticated to access data without handling username and passwords.
To implement that authorization method, a connected app, and OAuth 2.0 authorization
flow should be used. (Developer Salesforce.com, 2019.)
There is short list of OAuth 2.0 terminology defined by Trailhead Salesforce.com, 2019,
for a better understand an authorization flow:
- Consumer Key is a value used by consumer to identify itself in Salesforce. Re-ferred to as client_id.
- Access Token is a value used by the consumer to gain access to protected re-sources on behalf of the user, instead of using the user’s Salesforce credentials. The access token is a session ID, and can be used directly.
- Refresh Token is a token used by the consumer to obtain a new access token, without having the end user approve the access again.

24
- Authorization Code is a short-lived token that represents the access granted by the end user. The authorization code is used to obtain an access token and a refresh token.
- Connected App is an application external to Salesforce that uses the OAuth proto-col to verify both the Salesforce user and the external application.
OAuth authorization flow grants a client application restricted access to protected data on
a resource server. OAuth flow could have a multiple-use case and different types of flow.
However, as a rule, any type will consist of three main steps. To initiate the flow, the client
application will request access to a protected resource, if authorized server will grant an
access token for a client app. Each request done by an external server should consist of
access token. A resource server will validate the token and if valid, allows access to a
protected resource. (Help Salesforce.com, 2018.)
Figure 7. Authorization flow to Salesforce resource (Help Salesforce.com, 2018).
In the example above, we can see the flow process when the user is trying to access the
data from the mobile app. The user is starting the flow by opening an app to access the
data. If the user is not authenticated, it is redirected to the Authorization Server (Log-
in.Salesforce.com), which asks the user to provide credentials. After a successful login,
the server will grant access token as well as refresh token to the user and client applica-
tion. By including access token to each request from the client app to the resource server,
Salesforce will know that an app is authorized and will grant access to the required data.

25
Access will be granted until the session is valid after the session is stale, refresh token
should be used to acquire a new access token from the authorization server.
As a developer, you could choose multiple OAuth flow types based on the requirements. It
will depend if Web or mobile integration is needed, if server-to-server or IoT devices inte-
gration is needed. Below you can find the list of some available flow types provided by
Help Salesforce.com 2019 website:
- OAuth 2.0 Web Server Flow for Web App Integration
- OAuth 2.0 User-Agent Flow for Desktop or Mobile App Integration
- OAuth 2.0 JWT Bearer Flow for Server-to-Server Integration
- OAuth 2.0 Device Flow for IoT Integration
- OAuth 2.0 Asset Token Flow for Securing Connected Devices
- OAuth 2.0 Username-Password Flow for Special Scenarios
- OAuth 2.0 SAML Bearer Assertion Flow for Previously Authorized Apps
That is the way how external servers are accessing protected resources in Salesforce. At
the same time Salesforce provides different authentication methods to authorize callouts
against external resources.
The easiest and the most convenient way to send callouts and authorize against an exter-
nal resource is to use Named Credentials. Named Credentials is a tool in Salesforce
which allows to specify an endpoint, authorization method and required authorization pa-
rameters all in one definition and then utilize it when making a callout. It will work as easy
as specifying a Named Credential instead of callout endpoint. According to Help
Salesforce.com 2018, named credentials is supporting these types of callout definitions:
- Apex callouts
- External data sources of these types:
o Salesforce Connect: OData 2.0
o Salesforce Connect: OData 4.0
o Salesforce Connect: Custom (developed with the Apex Connector Frame-
work)
In addition to more effortless authentication, named credentials allow easier maintenance,
for example, if credentials or endpoint changes, no code will need to be modified, only a
named credentials record. In the examples below, you can see how named credentials
are defined in Salesforce and how it is utilized in Apex Callout.

26
Figure 8. Named credentials specifies an endpoint URL and authentication settings (Help
Salesforce.com).
That’s how named credentials is used for making an apex callout.
1. HttpRequest req = new HttpRequest();
2. req.setEndpoint('callout:My_Named_Credential/some_path'); 3. req.setMethod('GET');
4. Http http = new Http(); 5. HTTPResponse res = http.send(req); 6. System.debug(res.getBody());
Code Snippet 3. Instead of handling endpoint and authentication manually, it is handled
automatically by named credentials mechanism.
These are the ways how external resources are authenticated to Salesforce and how
Salesforce could authenticate against them. Both approaches will be heavily used in this
thesis project.
2.4 Salesforce Integration Patterns
As we already know, enterprise implementation does usually require multiple systems to
be integrated. Each integration is unique; many standard requirements and issues should
be resolved during the development. Proper implementation of integration patterns ena-
bles the production environment to run faster, having a scalable and maintenance-free set
of applications (Salesforce Documentation, 2020). In this chapter, I will investigate more
about the patterns which could cover those common integration scenarios. This chapter
will describe an overall approach for integration, rather than actual implementation. Tech-
nical implementation of the integration patterns will be used in an actual thesis project.
For the purpose of consistency and easier information perception, each pattern will be
described in a similar manner. Each description will have a problem definition, sketch with
an example, solution and results.

27
Integration patterns in this chapter will be divided into three categories, they are defined
by Salesforce official Documentation 2020:
- Data integration patterns will solve the need to synchronize data between two
or more systems in a way that all systems will have timely and meaningful data.
Although it is considered to be the most straightforward integration to implement, it
would require a proper data management technique to ensure cost efficiency and
sustainability of the solution. Integrations in this category would often include as-
pects of de-duplication, data flow design, data governance and master data man-
agement (MDM).
- Process integration patterns will solve the need to leverage the business pro-
cess across two or more systems to complete the task. Usually, when implement-
ing this integration, the system which triggers the process should call across pro-
cess boundaries to other systems. These types of integration would always re-
quire a complex design, exceptions handling and heavy testing.
- Virtual integration patterns would address the user's need to search, view and
modify data located in the external system. With the implementation of this type of
integration, data interaction happens in real time.
It is not a trivial task to choose the right integration type based on the project require-
ments. As a rule, complex integration requires a lot of different aspects to consider and
choose among multiple tools. Each pattern would fulfil the requirement of specific critical
areas, which include the volume of data, capabilities, error handling and transactionality of
other systems.
2.4.1 Remote Process Invocation—Request and Reply
Let’s imagine the scenario. Salesforce is handling opportunities, managing leads and con-
tacts. However, Salesforce does not process customer orders, it just stored the necessary
information about it. After primary data is captured about the order in Salesforce, the order
should be created in a remote system and driven to the conclusion in that system. To im-
plement this pattern, Salesforce should call an external system to create an order and wait
for successful creation. If successful, Salesforce will get an order number, which will be
used as a foreign key for subsequent updates to the remote system, as well as order sta-
tus in response and will save that data in the same transaction.
It is important to define from the beginning how an external call is triggered and at which
step process in a remote system should be initiated. There are following possible solu-
tions are defined by Salesforce Documentation 2020.
Table 4. Request and Reply pattern solutions (Salesforce Documentation, 2020)

28
Solution Fit Comment
Enhanced External Services invokes a
REST API
Best Enhanced external services allow to invoke an ex-ternal process in a declarative manner. There are some limitations for the following solution like data types in a response (only primitive data types sup-
ported).
Lightning compo-nent or page initi-
ates an Apex REST
Best A user-initiated action from Salesforce UI will make an external call from Apex Controller. Callout will
be done in a synchronous manner.
A trigger call in-voked from a data
change.
Suboptimal Triggers can be used to perform operation based on the data change. However, remote calls from
trigger must be executed in an asynchronous man-ner, which is not the best suitable in this scenario.
Batch Apex to per-form Apex callout in
a synchronous manner
Suboptimal Batch can be used for making calls to remote sys-tems. This solution would allow processing of re-mote calls and operating the response. However, batch will have a governor limit for a number of
calls.
A diagram below will illustrate a synchronous remote process invocation with Apex
callouts. It is a solution from the second row in a table above.

29
Figure 9. Salesforce calling out remote system. Request and reply pattern (Salesforce
Documentation, 2020).
In the example above, we can see that the user invokes an action from the Lightning
component. Based on that action Apex Controller makes a callout to an external REST
Endpoint. Response from an external system is operated, and data changes proceed ac-
cordingly. After that response and the correct message shown to the user. It is essential to
consider error handling, which should notify the user of the error as well as recovery sce-
nario of how to retry the operation, that no data is lost.
Significant importance in this pattern plays timeliness. Since the request is made from the
UI, the process must not keep the user waiting. Salesforce has a configurable limit of
Apex Callouts up to 120 seconds. External calls should be executed in a timely manner to
conclude with Salesforce callouts as well as user’s expectations. (Salesforce Documenta-
tion, 2020.)
In a nutshell, this pattern in used for small volume, real time data integrations, dues to the
small timeout. In some occasions, this pattern might require development of complex inte-
gration scenarios like involving complex business logic, aggregation of calls across multi-
ple systems, maintaining transaction integrity across multiple systems.

30
2.4.2 Remote Process Invocation—Fire and Forget
For this pattern, we can consider a similar scenario as in the previous one, however, with
the difference that now the remote system will not send information about created order
back. Let’s imagine that operating the request will take a much longer time from the re-
mote server; Salesforce cannot wait that long or the response. After an order, it created
result can be optionally updated back to Salesforce in a separate transaction. For fulfilling
this requirement, it is crucial to understand if the declarative approach is preferred over
custom Apex implementation. (Salesforce Documentation, 2020.)
Table 5. Fire and forget pattern solutions (Salesforce Documentation, 2020)
Solution Fit Comment
Process-driven plat-form events
Best Platform events in Salesforce is a standard feature which does not require customizations. Platform
event is event-messages based integration. One or many subscribers can listen to event and make
actions.
Customization-driven platform
events
Good Similar to process driven events, but here events are created from apex or triggers. If the same goal is achievable with declarative tools, it will be more preferred solution.
Triggers performing apex HTTP, SOAP
Callouts
Suboptimal Callouts could be made triggered by the data changes. In this scenario, all call from triggers
should be executed asynchronously.
Batch Apex which performs asynchro-
nous callouts.
Suboptimal There are limits in a number of calls for a given batch context.
Below we can see how the process will work if the process driven platform events ap-proach is used.

31
Figure 10. Salesforce calling out remote system. Fire and forget pattern (Salesforce Doc-
umentation, 2020).
In the scenario above, the process starts from setting the connection between Salesforce
and the remote system. Remote system subscribes for Salesforce platform events. Then
a data change action happens in Salesforce, and as a result, the platform event is creat-
ed. The subscriber listener receives the event, and it places the event into the queue. The
corresponding operations are happening at the application layer of a remote system.
(Salesforce Documentation, 2020.)
The solution above describes how requirements of fire and forget approach are fulfilled by
using declarative tools in Salesforce, such as process-driven platform events.
2.4.3 Remote Call-In
The pattern which will be described in this chapter is the Remote Call-In pattern, which will
involve an external system to call Salesforce. Use cases for this pattern are Salesforce
managing data about leads, pipelines, opportunities and customers. However, orders are
created in an external system. External system supposed to create and update statuses to
Salesforce based on the data changes in that system (Salesforce Documentation, 2020).

32
There are several questions like how authentication to Salesforce will be handled and how
Salesforce will be notified of the data change. Let’s look at the examples below to evalu-
ate the possible solutions.
Table 6. Remote Call-In pattern solutions (Salesforce Documentation, 2020)
Solution Fit Comment
SOAP API Best There is a wide range of accessibility Salesforce provides to remote systems via the SOAP API. Publish events, query data, crud data, obtain
metadata, run utilities.
REST API Best Similar actions and accessibility possibilities as SOAP API. Different protocols are used. Different data formal XML vs. JSON. REST API is more lightweight.
Apex Rest Services Good Approach is good, but not applicable if platform events need to be used. Requires custom imple-
mentation of Apex Class.
Bulk API Suboptimal Similar to the REST API principals, but optimized for managing large sets of data.
Sketch below represents the process diagram of using REST API approach to handle
remote call in pattern requirements.
Figure 11. Remote System Notifying Salesforce with Events Via REST API. (Salesforce
Documentation, 2020).

33
When using REST API for handling remote call it patterns integration, the first step will
always be authentication. There are plenty of out of the box tools provided by Salesforce
to handle it. After that, remote system communicates with Salesforce through the REST
API, by creating events using POST requests. As a result, Salesforce performs required
operations with data (Salesforce Documentation, 2020).
One of the versions of this integration pattern, modified for certain needs, will be used for
our case project.

34
3 Case project
Nowadays, data is one of the most critical companies’ assets. Any business aims to col-
lect data about customers, traffic, preferences, opportunities, etc.. Data allows companies
to solve business problems, analyze the process and find out what the steps should be
improved. It allows companies to analyze the performance of the teams, departments,
customer services. Moreover, data allows companies to understand their customers bet-
ter. It allows them to store information about their customers, analyze it and make predic-
tions and decisions based on that.
Unfortunately, data cannot live on its own. One of the primary goals of many enterprise
companies is to create a seamless flow of data between multiple systems. The ability to
properly share the data defines how much actual value companies are able to take from
this data.
To make this happen, any business must have integrations. Very often, not only the data
or application integration is needed. Today, it also involves the integration of business
processes, ideas and logic.
Modern software applications provide multiple options for integrations between systems.
There are many enterprise-level products which could provide out of the box integrations
and enterprise cloud data management solutions, such as MuleSoft, Boomi and Informati-
ca.
All of the tools listed above are integration providers which allow companies to configure
enterprise integration connections between multiple applications. Usually such solutions
are highly scalable, easy to configure, but fairly expensive.
However, custom integration will always take a decent role in enterprise integrations im-
plementations. For example, solutions which will be implemented during this project are
highly custom and integration connector would not fulfil all of the specific customer re-
quirements.
There are many use cases when declarative solutions are not able to fulfil the complexity
of the business need, and that is the time when custom solutions should be developed.

35
3.1 Introduction The introduction section will describe the use case of a project. It will brief the reader on
the company which integrations are implemented for, why those integrations are needed
and plan on how they will be implemented. It will also describe the technological setup, as
well as tools used for implementation.
3.1.1 Implementation background
Briefly about myself and about where and how this project will be implemented.
For the last three years, I am taking the position of Salesforce Developer in a consulting
company called Fluido. At my work, I am involved in multiple customer implementations,
which often require me to participate in both business requirements definition and work
with the customer as well as the actual implementation of the required functionality. With
support and guidance from Fluido, we have decided to create a use case based on the
frequently required models from different customers. The case project will not be related
to any exact customer or a real company, however, all requirements and integrations de-
livered are examples of the real industry projects which I am personally was heavily in-
volved in.
The idea of the project is to select a company that requires three different integrations with
Salesforce platform.
Implementation will require a custom implementation by using Apex Callouts and Apex
Rest Services.
At first, the integration will be implemented with a traditional development approach ad-
vised by official documentation.
After that, it will be evaluated on how the solution can be improved by using best code
practices and the concept of separations of concerns.
The main goal of the project is not only to implement the solution based on the customer
requirements, but also to get a particular deliverable product, which we created based on
the enhancements to the initial implementation.
I am expecting to extract a package of common, reusable classes, which could be easily
utilized for any future similar developments. As a result, it will speed up the process of
development, implement the best code and design practices, as well as will bring con-
sistency to the implementation. That implementation could be commonly used by many
developers working in the Salesforce environment to have a strong base for implementing
integrations.

36
3.1.2 Case description
The company used for a project example is a large Finnish manufacturing company. It will
be referred as Company X.
Company X is currently using Salesforce Sales Cloud Product. Their Sales department is
successfully managing opportunities, leads and contacts for several main business
streams.
Company X is an international company and its operating in more than 40 countries. It
also provides customer support worldwide. Usually, customers contact support when they
have any issues with their orders, products or delivery.
It was evaluated that the current customer service provided by the company is not suffi-
cient. The decision was made to start using Salesforce Service Cloud to provide en-
hanced support to their customer. In scope of that project, migration from an old support
system to Salesforce was handled. Around 40 million existing cases were migrated from a
legacy system. Now agents using Salesforce as their primary way to communicate with
customers who need support.
Only the basic Salesforce Service Cloud functionality was used so far. Customers are
able to create cases via Live Agent chat or by email.
Agents are using Salesforce to handle these cases, answer customers and solve their
issues. Additionally, it is was recently decided to implement the customer community so
that users are able to log in there, create cases, see their related cases and leave com-
ments to agents.
Company X requesting changes to how cases are coming to Salesforce and how agents
are able to fix them.
Requirements include:
• Possibility to create cases from the customer community to Salesforce.
• Agents should be able to access external data hub from Salesforce UI to speed up
the case handle process.
• All information about the agent’s activity during the day should be synced with the
workforce optimization system to track and analyze the performance of customer
support.
These are the three main customer requirements, and each of them will require a custom
integration pattern to be implemented. Let’s dive into the technical setup and a more de-
tailed case description.

37
3.1.3 Technological setup
Solutions that are currently used by Company X on Salesforce platform are shown below.
Figure 10. Salesforce Applications used by case project company. All process enhancements requested will be implemented based on the currently used applications. Based on the requirements a diagram of the proposed solution was developed. It can be found below.
Figure 11. Planned architecture for a required solution. The diagram above contains information about planned integrations. Each solution will be
described in more detail in an implementation phase.
The final solution will contain three custom integrations:
- Community Integration. Company X decided to use Community Cloud product. How-
ever, they would like to involve a separate provider of the front end. The front end of the
community will be stored on the AWS side and will communicate to Salesforce through

38
the REST API Web Services. User authentication will be handled through the standard
community cloud login.
- Workforce optimization integration. It required data to be sent on the daily basics
about work capacity of each agent. Sync will happen with Apex REST Callouts by using
the Apex Batches approach.
- UI Integration. Since orders, quotations and marketing data are not stored in
Salesforce, custom UI to access that information will be required. It will require the imple-
mentation of real-time integration from Salesforce UI to the data hub provided by compa-
ny’s microservices team. The request response will be visible into the agent inside the
Salesforce.
3.1.4 Goals and requirements
The first goal of the project is to implement the solution of the project based on customer
requirements. Given requirements are common for enterprise-level companies and pro-
vide a clear example of what kind of projects are often implemented in the Salesforce en-
vironment.
The second goal is to enhance the implemented solution. Implement a codebase following
the best practices and common patterns. In the end, it will be our deliverable product,
which can be used for other implementations. As a result, code could be packaged shared
publicly to be reused for similar projects. It will bring an absolute benefit to the community
and developers who are working with Salesforce integrations.
There are also some common requirements to the solution:
- Solution should follow best code practices (naming conventions, separation of
concerns, governor limits, bulk operations, unit testing, etc…)
- Solution should be scalable and work in a same way for 1 or for 1 000.000 records
- Integrations should be manageable by declarative means
- Solution should provide secure authentication
- Main common classes of the solution could be packaged and shared

39
3.2 Environment preparation
To start working on the given requirements we need to accomplish some environment
preparations. Such actions as creation of an org, configuring authentications details and
defining coding tools.
3.2.1 Salesforce Developer Org
For thesis project Salesforce Development edition environment will be used. Salesforce
provides opportunity to create free development environment.
To create an environment I have filled the details on website : https://developer.salesforce.com/signup.
There are required details to fill and then you will get an access to free salesforce org.
Please note that username is unique property across all environments in the world, so
choose the one which unique.
There are multiple steps that have to be done: - Registration for an org - Email confirmation and password change - Login - Register domain - Login to the new domain and apply it to all users
After all of these steps were done, new project org was successfully hosted on the URL: https://thesis-project-dev-ed.lightning.force.com/
Upon request credentials can be shared to get an access to that org and validate the pro-
ject.
This org will be an environment where the whole project will be implemented and tested.
3.2.2 Coding tools
For coding Visual Studio Code editor will be used. It does have a native integration to
Salesforce and allows handling all code/metadata related operations in one editor.
For integrations development and testing Postman application will be used.
For designing, documenting, and consuming RESTful web services Swagger tool will be
used.

40
3.3 Functionality Implementation
This section is the central part of the project. It will contain the implementation of each
integration with a detailed description of the requirements and solution.
3.3.1 Real time UI integration
The first integration we will start to work on is Real-Time UI integration from Salesforce to
an external server. Before actual implementation, a detailed requirement and process
diagram will be described. Authentication details, as well as definition endpoints to which
integration is done, will be cleared.
3.3.1.1 Detailed Requirements As it was mentioned earlier, support agents of company X started to use Salesforce as the
main platform to support their customers.
When case is coming to the system, it is assigned to the queue where it is waiting until it’s
picked up by the agent. 90% of the cases agents need to handle are related to the cus-
tomers’ orders. The main difficulty for them to handle is that orders are not stored in the
Salesforce platform. Company X handling customers' orders by using their own custom e-
commerce platform. In order to solve the case agent needs to open an additional platform
and search for a correct order from there to see all details regarding the order customer is
having an issue with.
In order to solve this issue and enhance the case handling time, it was decided to create
real-time UI integration from the Salesforce case handling view to an external data hub.
Company X has multiple microservices with a data hub that combines multiple sources
into one gateway. With this integration solution, instead of searching for an order in a dif-
ferent system, agent will be able to search orders and additional information such as cus-
tomer quotations and marketing emails previously sent to the customer from inside the
Salesforce and see all results in real-time.
Main process scenario specifications could be found below.
Primary actor: Support Agent.
Goal: Speed up the process of case handling. Bring more information related to case from
external system.
Scope: Search information by order number from Salesforce. Call external system by
using Apex REST Callouts, display result dynamically on the page.
In a diagram below we can see what the process of data exchange between salesforce
and data hub is.
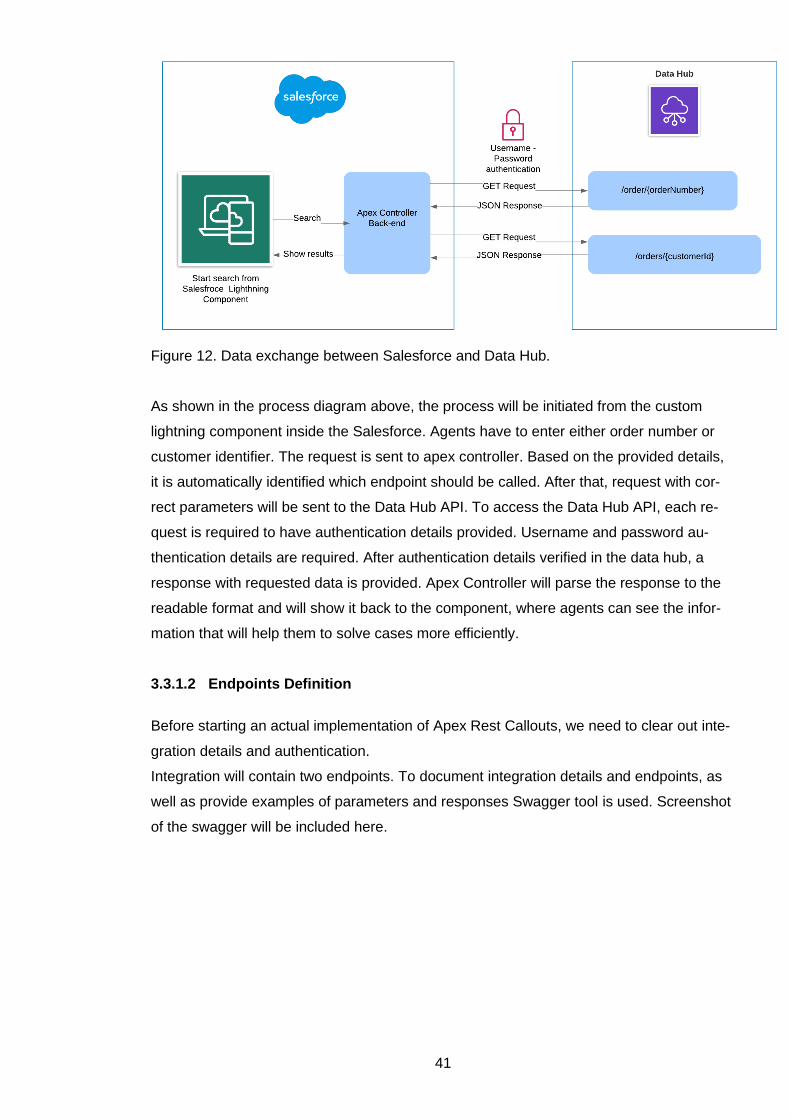
41
Figure 12. Data exchange between Salesforce and Data Hub.
As shown in the process diagram above, the process will be initiated from the custom
lightning component inside the Salesforce. Agents have to enter either order number or
customer identifier. The request is sent to apex controller. Based on the provided details,
it is automatically identified which endpoint should be called. After that, request with cor-
rect parameters will be sent to the Data Hub API. To access the Data Hub API, each re-
quest is required to have authentication details provided. Username and password au-
thentication details are required. After authentication details verified in the data hub, a
response with requested data is provided. Apex Controller will parse the response to the
readable format and will show it back to the component, where agents can see the infor-
mation that will help them to solve cases more efficiently.
3.3.1.2 Endpoints Definition
Before starting an actual implementation of Apex Rest Callouts, we need to clear out inte-
gration details and authentication.
Integration will contain two endpoints. To document integration details and endpoints, as
well as provide examples of parameters and responses Swagger tool is used. Screenshot
of the swagger will be included here.

42
Figure 13. Main integration and endpoints details.
Above you can find base URL information as well as available endpoints with API Meth-
ods.
Below you can see detailed description of /order endpoint with required parameter as well
as example of the response, which includes order information.

43
Figure 13. /order endpoint definition.
Note that for /order endpoint body return type is object. Endpoint accepts orderNumber
parameter and as a result returns detailed information if the order if found.
Below you can see detailed description of /orders endpoint with required parameter as
well as example of the response, which includes multiple orders information. In the re-
sponse below return body is array of objects.

44
Figure 13. /orders endpoint definition.
In the description above you can see that /orders endpoint accepts customerId parameter
and returns array of orders related to requested customer.
3.3.1.3 Authorization details As it is described in a process diagram each request should contain username and pass-
word details in order to access data. Authentications details were shared by the micro-
services team of Company X.
Authorization details:
Username: SalesforceSearchDev
Password: thesis2020Dev

45
The best suitable way to implement Username Password authentication is to use Named
Credentials Salesforce approach. It will allow us to easily use credentials in HTTP Re-
quest and required header will be generated automatically.
Below you can find a new record of named credential in Salesforce. In order to create we
need to provide URL of an integration, authentication protocol and specify credentials.
Figure 14. New Named Credential entry details.
After the record created, we can efficiently utilize it for Apex HTTP Callout.
3.3.1.4 Implementation The lightning component will be a place where the search is initiated, and the result is
shown. Nonetheless, UI implementation is not a priority of a current project and compo-
nents will be described just briefly.
Firstly, the custom search component ‘Search orders’ was created and located on the
case record page. Now agents are easily able to search for related orders either by order
number or customer Id. See the new custom component on the right side of the figure
below.

46
Figure 15. Case view with new Search component embedded.
Non - essential code will be included in thesis attachments. Instead main focus of the all
code examples will be on actual integration implementation.
Let’s have a look on the Apex controller implemented. It will contain the main logic for ac-
tual integration.
1. public with sharing class OrderSearchController { 2.
3. @AuraEnabled 4. public static List<OrderResponseWrapper> searchOrderByNumber(String orderNumber){
5. List<OrderResponseWrapper> responseWrapper = new List<OrderResponseWrapper>(); 6. try{
7. HttpRequest req = new HttpRequest(); 8. req.setEndpoint('callout:DataHubDev/order');
9. //Specify Named Credential name instead of URL 10. req.setMethod('GET');
11. Http http = new Http(); 12. HTTPResponse response = http.send(req);
13. 14. // If the request is successful, parse the JSON response.
15. if (response.getStatusCode() == 200) { 16. // Deserialize the JSON string into collections of wrapper classes.
17. responseWrapper = (List<OrderResponseWrapper>) JSON.deserialize( 18. response.getBody(),
19. List<OrderResponseWrapper>.class 20. );
21. } 22. return responseWrapper;
23. }catch(Exception e){ 24. throw new AuraHandledException('Error doing the query. Error: '+e.getMessage());
25. // Throw an exception in case of error 26.
27. } 28. }
29. 30. @AuraEnabled
31. public static List<OrderResponseWrapper> searchCustomerOrders(String customerId){ 32. List<OrderResponseWrapper> responseWrapper = new List<OrderResponseWrapper>();
33. try{ 34. HttpRequest req = new HttpRequest();
35. req.setEndpoint('callout:DataHubDev/orders');

47
36. //Specify Named Credential name instead of URL
37. req.setMethod('GET'); 38. Http http = new Http();
39. HTTPResponse response = http.send(req); 40.
41. // If the request is successful, parse the JSON response. 42. if (response.getStatusCode() == 200) {
43. // Deserialize the JSON string into collections of wrapper classes. 44. responseWrapper = (List<OrderResponseWrapper>) JSON.deserialize(
45. response.getBody(), 46. List<OrderResponseWrapper>.class
47. ); 48. }
49. return responseWrapper; 50. }catch(Exception e){
51. throw new AuraHandledException('Error doing the query. Error: '+e.getMessage()); 52. // Throw an exception in case of error
53. 54. }
55. } 56.
57. 58. 59. }
Code Snippet 4. UI integration implementation.
OrderSearchController contains two methods searchByOrderNumber and searchCustom-
erOrders. Correspondingly these two methods accept order number or customer id.
Based on the given parameters in a search component, the correct method will be called.
On lines 8 and 33, you can see how named credentials are used in order to specify cor-
rect URL as well as automatically generate authentication header. Usually, endpoint and
header should be provided separately, but when using named credentials, it is possible to
specify developer name of named credentials record instead of URL. Correct URL will be
taken automatically from named credential we created earlier.
Authentication header is automatically generated as well.
After request is sent, we will get HTTPResponse as a return. If the status is success, we
can proceed with deserializing the body. In order to parse the response, we need to cre-
ate a wrapper class. JSON which is coming in the request body will come parsed into that
wrapper class.
1. public with sharing class OrderResponseWrapper {
2. public Integer orderNumber; 3. public String customerId;
4. public List<OrderData> orderData; 5. public ShipmentInfo shipmentInfo;
6. 7. public class ShipmentInfo {
8. public String shipTo; 9. public String companyName;
10. public String address; 11. public Integer postCode;
12. public String town; 13. public String isoCountry;
14. } 15.
16. public class OrderData {

48
17. public Integer sourceItemId;
18. public String itemName; 19. } 20. }
Code Snippet 5. Wrapper class used for handling the response.
Above you can see the wrapper class. If you compare it with response example in swag-
ger file, you will see that apex wrapper has all the same properties.
The basic version of UI integration is now ready. It fulfils all customer requirements and
displays on the page either one order details or multiple orders when searching with cus-
tomer id. The solution is already good, however, there is still room for enhancements.
Later we will come back to UI integration to see how we can enhance it by using common
classes and best practices. For now, let’s continue with the next integration.

49
3.3.2 REST Service Integration
After successfully implemented the search functionality, agents can search for order in-
formation in a more efficient way. According to the reports, agents are now spending 30%
less time on handling the ticket. The next goal is to bring more possibilities to customers
to create cases. For now, only live chat and email are available sources. Company X de-
cided to allow customers to create case creation from their community. A community for
Company X is a website where each user is able to log in and see their profiles, track the
delivery and ask for quotations. After REST Service integration implemented, the cus-
tomer will also be able to create cases from the community and see the history of their
existing cases.
3.3.2.1 Detailed Requirements
Company X has recently implemented a community project, where they allow their cus-
tomers to log in through Salesforce Community and work quotations and their data. It was
decided that instead of native implementation of the Salesforce Community, the front end
part will be implemented on React JS instead of Lightning Components. For that reason,
there is an additional AWS server where the client-side of the application is hosted.
Salesforce community functionality is used only for user login. To communicate with
Salesforce custom REST Service endpoints are used. Let’s see how the process flow
looks below.
Figure 16. Community Cloud integration process flow.
In the diagram above, the process is initiated when the user is going to the community
login page. There user is getting the login window where credentials should be entered.

50
After successful authentication, Salesforce grants the user with an access token. All future
requests will need to contain that access token if the session is the expired user will be
prompted to login again.
After successful login user is able to perform certain actions in the community which is
currently hosted on AWS. When a user is doing some actions such as create, update,
read or delete records, requests are sent to Salesforce through the API Gateway, and the
response returned to AWS. Currently, the main requirement is to allow users to get their
existing cases as well as create the new ones.
The main process scenario specifications could be found below.
Primary actor: End User
Goal: Allow user to see the list of existing cases as well as create new cases from the
community.
Scope: Corresponding endpoints should be implemented in Salesforce by using Apex
Rest Resources.
3.3.2.2 Endpoints Definition
This section will include a plan in which endpoints should be implemented. Note that in the
previous section, the Swagger document was provided to us from the third party. Now we
will need to make it ourselves, to keep the consistency of the way endpoints are docu-
ments.
Figure 17. Salesforce Resource swagger for REST Services.

51
On the figure above two endpoints are documented. One of them returns list of existing
cases related to the customer which sent the request. Second one is used to create cases
based on the detail provided. See below the detailed description of each endpoint.
Figure 18. Description and example of /cases GET endpoint.
In the endpoint above customerId is a compulsory parameter in request path. Based on
customerId all related cases will be returned. Response will contain the payload, error-
Code and the message in the body. In case of error, corresponding message and an error
will be returned.

52
Figure 18. Description and example of /case POST endpoint.
Figure above describes how POST endpoint will be used. It will contain required body to
be provided and based on that case will be created.
Now, this documentation can be easily shared with third party developers who will be
sending requests from API gateway to Salesforce. It is a convenient way to keep the doc-
umentation up to date
3.3.2.3 Authorization Details In a previous section, endpoints were defined. The next step is to configure authentica-
tion, how external server will be able to access the Salesforce API. For this reason, we will
need to create a Connected App in Salesforce and share authorization details with exter-
nal party.

53
Figure 19. New Connected App Created. Above new connected app details, created for this integration, could be found. There are
two important properties which should be shared with external developers. Consumer key
and consumer secret, these are the values using which Gateway API will be able to con-
nect to Salesforce through the authentication request.
3.3.2.4 Implementation Now everything is ready to start an actual implementation of the Apex Web Service class.
1. @RestResource(urlMapping='/cases/*')
2. global with sharing class CaseResource {
3. @HttpGet 4. global static CaseResponse getCasesByUserId() {
5. RestRequest request = RestContext.request; 6. String customerId = RestContext.request.params.get('customerId');
7. //take user id from the request 8. List<Case> cases = [SELECT CaseNumber,Subject,Status,Origin,Priority
9. FROM Case 10. WHERE AccountId = :customerId];
11. //collect required cases 12. CaseResponse response = new CaseResponse();
13. response.payload = cases; 14. response.errorCode = 200;
15. 16. return response;
17. } 18. @HttpPost
19. global static Id createCase() { 20. Map<String, Object> requestBody = (Map<String, Object>) JSON.deserializeUntyped(RestCont
ext.request.requestBody.toString()); 21. //parse request body
22. Case newCase = new Case( 23. Origin = 'Web',
24. AccountId = (String) requestBody.get('customerId'), 25. Description = (String) requestBody.get('description'),
26. Subject = (String) requestBody.get('subject'),

54
27. Type = (String) requestBody.get('type'),
28. First_Name__c = (String) requestBody.get('firstName'), 29. Last_Name__c = (String) requestBody.get('lastName')
30. ); 31. insert newCase;
32. return newCase.Id; 33. }
34. 35.
36. global class CaseResponse { 37. global List<Case> payload { get; set; }
38. global String message { get; set; } 39. global String errorCode { get; set; }
40. 41. }
42. 43. }
Code Snippet 6. Apex Rest Resource class.
To expose an apex class as web service, we need to add @RestResource annotation to
it, and it should be global. Then each method will be annotated with the correct HTTP
method.
As per endpoints documentation we have created before, our class is having a GET
method getCasesByUserId(), it will take customerId value from the parameter and query
all related cases. The second method is createCase, which will accept the request body
with details provided in the endpoint documentation and will create a new case based on
these details.
Inside the apex class, we had to create another inner class to contain payload response
as well as error code and message parameters. This way, we allow better communication
between the external server and Salesforce and provide better visibility in case of error.
This class is the first basic version of our integration. In a future step it will be enhanced
and modified to follow the best practices.
Now Rest Service integration is ready. Now after the customer is logged in to the commu-
nity, it is possible to see all related cases which are returned by our custom endpoint. Ad-
ditionally, we added a possibility for the customer to create their own cases from the por-
tal.

55
3.3.3 Data synchronization Integration
Let’s move to the third integration, which should be implemented during this thesis project.
So far, we created a possibility for agents to handle their cases more efficiently with UI
search. We have allowed customers to create their cases from an external website, which
allows Company x to open a new source of their cases. As a result, they got better cus-
tomer satisfaction with the support provided. The next for Company X is to track the per-
formance of their agents. They decided to use a workforce optimization external system
that will collect and analyze data of each agent. Let’s see what the detailed requirements
are and what is the best way to implement it.
3.3.3.1 Detailed Requirements
According to the reports, the customer support department is handling around eight thou-
sand cases every day. This number of cases is handled by 400 professional customer
support agents, which are divided into different groups, and each group is handling specif-
ic types of cases. Unfortunately, it is not possible for Salesforce to report on the daily
workload of each department as well as the performance of each department and sepa-
rate agents. For that reason, Company X decided to use the services of external work-
force optimization provided.
According to the requirements, data should be synchronized on the daily basics. After
detailed analyzes, it was decided that the Batch Data Synchronization integration pattern
is the best suitable for this case. Below you can the process diagram for a planned inte-
gration.
Figure 20. Data synchronization process diagram

56
A figure above shows an initial plan of integration solution. The Salesforce will be sending
data through the REST Callouts every night. In the implementation sections we will go in
more details through the solution and technical tools which will be used.
3.3.3.2 Endpoint Definitions In the same way in UI integration we have received Swagger documentation file to see
endpoint details. Let’s have a look to better understand which data should be shared with
workforce optimization service.

57
Figure 21. Workforce optimization endpoint. In a figure above you can see the details for /agent-performance endpoint provided by
external partner. In each request we need to pass array of object, where each object rep-
resents one work item of agent.
3.3.3.3 Authorization details
Almost all configurations are ready for , but before that, we need to verify what kind of
authentication provided endpoint contains.
According to the documentation we got from externally provided, this integration required
OAuth2 Access Token, Refresh Token flow. It means that from the beginning, we are pro-
vided with a static access token.
Access token should be included in each request in the header. This is our key to an ex-
ternal system, and it will always be required whenever we try to call it.
Additionally, we are provided with credentials, when the token is expired, we will need to
refresh it by using credentials.
Access Token: eyJhbGciOJIUzI1NiIsInR5cCI6IkpXVCJ9GFyL3YxLyIsInN1YiI6InVzcl8
Credentials:
Username: devEnvWorkforce
Password: fd3295
Both token and credentials should be stored securely in the Salesforce and be used when
callouts are performed.
The process flow will always contain multiple steps:
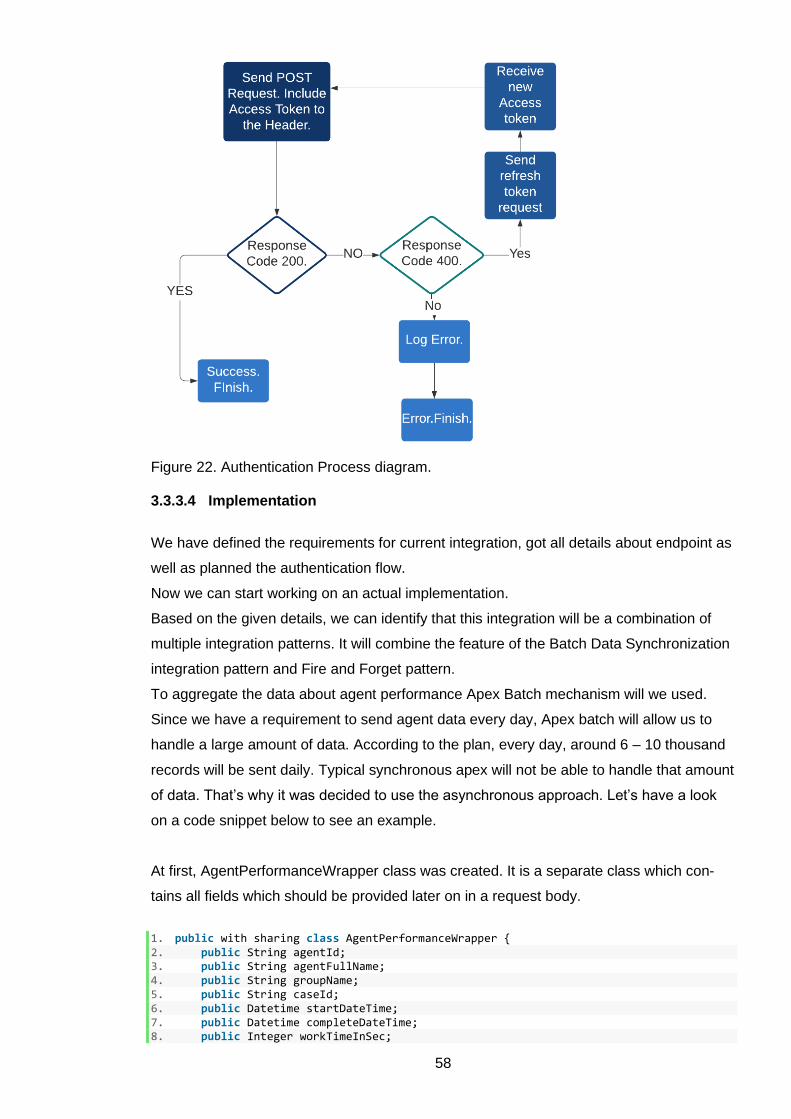
58
Figure 22. Authentication Process diagram. 3.3.3.4 Implementation
We have defined the requirements for current integration, got all details about endpoint as
well as planned the authentication flow.
Now we can start working on an actual implementation.
Based on the given details, we can identify that this integration will be a combination of
multiple integration patterns. It will combine the feature of the Batch Data Synchronization
integration pattern and Fire and Forget pattern.
To aggregate the data about agent performance Apex Batch mechanism will we used.
Since we have a requirement to send agent data every day, Apex batch will allow us to
handle a large amount of data. According to the plan, every day, around 6 – 10 thousand
records will be sent daily. Typical synchronous apex will not be able to handle that amount
of data. That’s why it was decided to use the asynchronous approach. Let’s have a look
on a code snippet below to see an example.
At first, AgentPerformanceWrapper class was created. It is a separate class which con-
tains all fields which should be provided later on in a request body.
1. public with sharing class AgentPerformanceWrapper { 2. public String agentId; 3. public String agentFullName; 4. public String groupName; 5. public String caseId; 6. public Datetime startDateTime; 7. public Datetime completeDateTime; 8. public Integer workTimeInSec;

59
9. public Integer handleTimeInSec; 10. }
Code Snippet 7. Wrapper used to send request body
After that an actual implementation batch was created.
1. global class AgentPerformanceBatch implements 2. Database.Batchable<sObject>, 3. Database.Stateful, 4. Database.AllowsCallouts 5. { 6. global Database.QueryLocator start(Database.BatchableContext BC) { 7. String soql = ' SELECT id, WorkItemId, AcceptDatetime, CloseDateTime, OwnerId
, Owner.Name, OriginalQueueId, ActiveTime'; 8. soql += ' FROM AgentWork'; 9. soql += ' WHERE CreatedDate = YESTERDAY'; 10. soql += ' ORDER BY CreatedDate ASC'; 11. //Create SOQL query to get the records created during the previous day 12. return Database.getQueryLocator(soql); 13. } 14. 15. global void execute(Database.BatchableContext bc, List<AgentWork> records){ 16. List<String> dataWrapperSerialized = new List<String>();// Wrapper to be sent
to endpoint 17. Map<Id, Group> groupsByIds = new Map<Id, Group>( 18. [Select Id, Name from Group WHERE Type = 'Queue'] 19. );// queue map to get a name of a correct queue 20. 21. for(AgentWork agentWorkRecord : records){ 22. AgentPerformanceWrapper dataWrapper = new AgentPerformanceWrapper(); 23. dataWrapper.agentId = agentWorkRecord.OwnerId; 24. dataWrapper.agentFullName = agentWorkRecord.Owner.Name; 25. dataWrapper.caseId = agentWorkRecord.WorkItemId; 26. dataWrap-
per.groupName = groupsByIds.get(agentWorkRecord.OriginalQueueId).Name; 27. dataWrapper.startDateTime = agentWorkRecord.AcceptDatetime; 28. dataWrapper.completeDateTime = agentWorkRecord.CloseDateTime; 29. dataWrapper.handleTimeInSec = agentWorkRecord.HandleTime; 30. dataWrapper.workTimeInSec = agentWorkRecord.ActiveTime; 31. String serializedWrapper = JSON.serialize(dataWrapper);// serialize wrapp
er result 32. dataWrapperSerial-
ized.add(serializedWrapper);// add serialized string to the final list 33. } 34. sendPerformance(dataWrapperSerialized); 35. 36. } 37. 38. global void finish(Database.BatchableContext bc){ 39. 40. } 41. 42. private static void sendPerformance(List<String> serializedBodyList){ 43. String refreshedToken = refreshToken(); 44. HttpRsponse response = sendHttp(serializedBodyList, refreshedToken); 45. if (response.getStatusCode() != 200 || response.getStatusCode() == null) { 46. CalloutException e = new CalloutException(); 47. e.setMessage( 48. 'Integration call failed with status : ' 49. +response.getStatus()+'. Status code: ' 50. + response.getStatusCode() 51. ); 52. throw e; 53. } else { 54. System.debug(response.getBody()); 55. } 56. 57. } 58.

60
59. pri-vate static HttpResponse sendHttp(List<String> serializedBodyList, String token){
60. Http http = new Http(); 61. HttpRequest request = new HttpRequest(); 62. request.setEndpoint('https://www.verint-optimization.com/customer-
support/agent-performance'); 63. request.setMethod('POST'); 64. request.setBody('[' + String.join(serializedBodyList, ',') + ']'); 65. request.setHeader('Content-Type', 'application/json'); 66. request.setHeader('Authorization', 'Bearer ' + token); 67. //include Authorization header with access token 68. HttpResponse response; 69. response = http.send(request); 70. return response; 71. } 72. 73. private static String refreshToken(){ 74. Http http = new Http(); 75. HttpRequest request = new HttpRequest(); 76. request.setEndpoint('https://www.verint-optimization.com/customer-
support/token?username=devEnvWorkforce&password=fd3295'); 77. request.setMethod('POST'); 78. request.setHeader('Content-Type', 'application/json'); 79. HttpResponse response; 80. response = http.send(request); 81. return response.getBody(); 82. } 83. 84. }
Code Snippet 8. Apex Batch implementation for Data Sync Integration.
Apex batch always requires three main methods.
Start – to query the required data.
Execute – to perform the main action. Aggregate data, make DML operation, send HTTP.
Finish – perform post-operation changes
In the example of the code above, you can see that at first, all AgentWork records created
during ‘YESTERDAY’ are queried. Then execution moves to the next step.
In the execution section, we create an agent wrapper for each record and populate the
required details. When body request is collected, and each wrapper is serialized sendPer-
formance method is called.
In this solution, we do not support any token storage and every time before an actual data
request, we send refresh token request to acquire a current access token. This solution is
not perfect, and it does have room for improvement, which will be done in a part of a pro-
ject enhancement.
In the actual send HTTP method, we set an endpoint, provide serialized body, set authori-
zation token received from a refresh token call and make an actual callout.
As a result of this implementation, agent performance data is taken from Salesforce, ag-
gregated to the correct format and send to an external system. Since we send the data in
bulk of data, we are not interested in waiting the response. That is how the Fire and For-
get pattern is represented in this integration.
The final step will be to schedule this apex class to run every night at 12 AM. This way, it
will take all records from the previous day and send them to an external system.

61
3.4 Solution Enhancements
Now all three requested integrations are implemented. In section 3.3, all basic functionali-
ty on the basics of customer requirements were completed.
Let’s have a small recap of what was done and what is yet to do.
During the implementation phase, UI integration from Salesforce to an External sever was
implemented. On the functional side, it allowed support agents to handle customer cases
more efficiently. Now agents don’t need to go to another system in order to see all details
regarding the customer order. From the technical side, to achieve that, we had to create a
named credential configuration in order to support authentication. The main solution can
be found in Code Snippet 5, where we have an Apex callout call to retrieve information
from an external system based on the input from UI. To handle the response, Wrapper
class, which can be found in Code Snippet 6, was created. As a result, we get a function-
ality where agent is able to input either order number or customer id from the custom
Lightning component and, as a result, get a list of information from the data hub. Accord-
ing to analyses by implementing this integration, support agents spend around 30% less
time than before.
The second integration implemented was Rest Service integration from external API
Gateway to Salesforce. By this integration, we have created a new source of customer
cases. Now customers are able to create their cases from an external website and see all
related information about their past cases from there. To fulfil this requirement, we had to
expose Apex Class as Rest Resource; it can be found in Code Snipper 7. We created two
class methods with correct annotations. As a result, the external server is able to send
information to Salesforce and create customer case or retrieve all customer cases based
on Id provided.
Moreover, the last integration implemented was data synchronization. In Salesforce, we
store all information about how much, how fast and how efficient each support agents
work. However, Salesforce reporting functionality is not enough to have a proper evalua-
tion of their work. For this reason, it was requested to synchronize agent related records
from Salesforce to workforce optimization system on daily basics. In order to achieve this
requirement, the apex batch, which can be found at Code Snippet 8, was implemented.
Data is collected every night and send to an external server. As a result, it allows Compa-
ny X to run proper reporting and analyses on the work of each agent and make corre-
sponding adjustments.

62
All three implementations are fully working examples of the functionality, which is often
requested by enterprise companies. However, there are multiple ways of how the solution
can be enhanced to be more flexible, reusable and scalable. Described integration pat-
terns are often met in other customer integrations, and it is not efficient to write certain
lines of code again and again.
According to the good design practices, our aim is to make our code reusable. Our goal is
to eliminate the amount of repetitive code, which brings unsolid implementation patters
and not needed code.
In this section, the existing solution will be enhanced to be more reusable and customiza-
ble.
3.4.1 Configurable integration While implementing integration, it is always required to collaborate with an external pro-
vider closely. Usually, it includes close collaboration about authentication methods, ex-
change authorizations keys, defines the endpoints and URLs. All of these details are
needed to integrate to an external service and to perform a callout. In an example of the
UI integration controller, we have used the Named Credentials approach, and it saved us
from hard-coding multiple HTTP details. However, in Data Sync integration Code Snippet
8, we had to provide many details like URL, token, refresh token URL. All of these details
are currently written directly in the code.
Very often, external providers are supporting multiple environments like development,
testing, production. In practice, all these environments will have different URLs and au-
thorization keys. If we continue to use the same implementation pattern as we have now,
it would require us to deploy different versions of code to each environment and change
the URL manually.
Instead of that, our goal is to make our integrations configurable by declarative means.
Luckily, Salesforce provides us a ready-made tool to achieve that. Instead of writing inte-
gration details in the code, we will use Custom Metadata Types. In Salesforce, custom
metadata is customizable, deployable, packageable, and upgradeable application
metadata. It means we can use to store integration details there and easily re-use it in
code from different environments. Each custom metadata type record will have at least
URL, timeout, named credential and endpoint properties. It will also have a username and
password values that will be used for handling authentication.
Let’s create it in our Salesforce org.

63
Figure 23. New Apex Callout Custom Metadata Types
In our Salesforce org we have created a new custom metadata type with name Apex
Callout Setting. It will contain custom fields such as endpoint, to store callout endpoint
URL, the request method, named credential in case it is used instead of standard authen-
tication and request timeout properties.
For our UI integration, we need to create a new record of this custom metadata type.
Since in UI integration, we are using Named Credentials authentication, the only thing we
have to provide for in custom metadata is the name of the named credential and the re-
quest method.
Figure 24. Data Hub custom metadata type record.

64
Now we have to create a new record to provide configurable details for Data Sync integra-
tion. Since the authorization will be handled separate, it will contain more details about
endpoint and timeout.
Figure 25. Data sync system custom metadata type record.
Now we will be able to use a declarative approach to handle any required changes related
to these two integrations. In the next section, we will see how an actual callout operation
can be modified to work in the same way for multiple classes. There we will also have an
example of how custom metadata types are used there to configure integration details
dynamically. For now, authorization is not covered by our new custom metadata type.
However, in the authorization details section, we will have a particular way how those de-
tails will be handled.
Let’s see how we will have to implement it in the code. Let’s create a common service
class to acquire a custom metadata class. It then could be easily be reused by other inte-
grations.
1. public with sharing class ApexCalloutService { 2. public Apex_Callout_Setting__mdt getSettings(String developerName) { 3. Apex_Callout_Setting__mdt integrationsConfig = [ 4. SELECT 5. Endpoint__c, Method__c, Username__c, 6. Password__c, Refresh_URL__c, 7. Named_Credential__c, Timeout__c 8. FROM Apex_Callout_Setting__mdt 9. WHERE DeveloperName =: developerName]; 10. return integrationsConfig; 11. } 12. }
Code Snippet 9. Util class to query integration settings.
Above you can find just a small reusable class, which we will need to use instead of que-
rying same details from multiple places.
Now, our integrations are configurable and easily reusable for any purpose. Let’s continue
the enhancements to see how we can make callouts reusable.

65
3.4.2 Reusable callouts Making Apex Callouts is a common way to integrate Salesforce into an external system.
We have already seen examples of how it is done with apex Http, HttpRequest and
HttpResponse classes. In Code Snippet 5 and Code Snippet 8, it is shown that both clas-
ses are making callouts. Both of them contain similar functionality and duplicate code.
Eventually, with larger implementations or with new requirements from the customer, rep-
etition of the same code will make the code base cumbersome and not clean.
In order to avoid it, we will try to make a class that could be reused for certain operations.
For example, initialization, adding a header, parameters and token could be separated
into a new class in order to reuse this functionality from multiple classes. Let’s see below
what kind of apex class we ended up making in order to make HTTP functionality more
util.
1. public virtual class HttpCalloutUtils { 2. public class HttpCalloutUtilsException extends Exception {} 3. 4. public HttpRequest request; 5. public Http httpInstance; 6. public HttpResponse response; 7. 8. private String method; 9. private String endpoint; 10. private String body; 11. private Integer timeout; 12. private Map<String,String> headers; 13. 14. public HttpCalloutUtils(){ 15. response = new HttpResponse(); 16. httpInstance = new Http(); 17. headers = new Map<String,String>(); 18. } 19. 20. public virtual HttpCalloutUtils endPoint(String endpoint){ 21. this.endPoint = endpoint; 22. return this; 23. } 24. 25. public virtual HttpCalloutUtils body(String body){ 26. this.body = body; 27. return this; 28. } 29. 30. public virtual HttpCalloutUtils bodyToJson(Object o){ 31. this.body = JSON.serialize(o); 32. return this; 33. } 34. 35. public virtual HttpCalloutUtils timeout(Integer timeout){ 36. this.timeout = timeout; 37. return this; 38. } 39. 40. public virtual HttpCalloutUtils addHeader(String key, String body){ 41. this.headers.put(key,body); 42. return this; 43. } 44.

66
45. public virtual HttpCalloutUtils method(String method){ 46. this.method = method; 47. return this; 48. } 49. 50. pub-
lic virtual HttpCalloutUtils addHeader(Map<String,String> collectionHeaders){ 51. for( String header : collectionHeaders.keySet() ) { 52. this.headers.put(header,collectionHeaders.get(header)); 53. } 54. return this; 55. } 56. 57. public virtual HttpCalloutUtils builder(){ 58. if(!String.isNotBlank(this.method) || String.isEmpty(this.method)){ 59. throw new HttpCalloutUtilsException('Method not found!'); 60. } 61. 62. if(!String.isNotBlank(this.endpoint) || String.isEmpty(this.endpoint)){ 63. throw new HttpCalloutUtilsException('Endpoint not found!'); 64. } 65. 66. if(this.timeout!=null && this.timeout > 120000){ 67. throw new HttpCalloutUtilsException('Timeout maximum exceeded!');
68. } 69. 70. this.request = new HttpRequest(); 71. this.request.setEndpoint(this.endpoint); 72. this.request.setMethod(this.method); 73. 74. if(this.body!=null){ 75. this.request.setBody(this.body); 76. } 77. 78. if(this.timeout!=null){ 79. this.request.setTimeout(this.timeout); 80. } 81. 82. if(!headers.isEmpty()) { 83. for(String header : headers.keySet() ) { 84. request.setHeader( header , headers.get( header ) ); 85. } 86. } 87. 88. 89. return this; 90. } 91. 92. public virtual HttpResponse send() { 93. try { 94. this.builder(); 95. response = httpInstance.send(this.request); 96. } catch(HttpCalloutUtilsException ex) { 97. throw new HttpCalloutUtilsException(ex.getMessage()); 98. } 99. return response; 100. } 101. }
Code Snippet 9. Utils class for http related operations.
Let’s have a detailed look at what functionality was implemented in the HttpCalloutUtils
class.

67
First of all, it is good to notice that the class and all methods inside declared as virtual, it
will allow this class to be extended or overwritten.
As you can see from line 4 to 12 main class variables are annotated. From line, 14 to 56
setter methods for these class variables are declared. To compare the solution, In code
Snippet 1, you can see what the usual way is to make Apex Callouts. In our previous im-
plementations, we used the standard way of making the requests. Now instead of defining
all callout details separately in each class, we can easily reuse methods from the class
above.
Additionally, you can see builder() and send() methods, which contain an actual sending
and building HTTP requests.
Before we start to modify our UI integration solution to utilize HttpCalloutUtils class it is
important to remember about some design practices we will use. In our implementation,
we have apex controller from where we make a request. Now we will use utils class for
this reason, and the controller will only have initialization and some settings. However, it
would be a good practice to keep the controller clean as much as possible to move an
actual configuration logic to a new separate OrderSearchService class. In this class, we
will define all callout parameters by using custom metadata type we created in a previous
section.
Let’s see how UI integration implementation will change by using our HttpCalloutUtils
class.
Now OrderSearchController will be:
1. public with sharing class OrderSearchController { 2. 3. @AuraEnabled 4. pub-
lic static List<OrderResponseWrapper> searchOrders(String orderNumber, String customerId){
5. return OrderSearchService.searchOrders(orderNumber, customerId); 6. } 7. }
Code Snippet 10. New version of OrderSearchController
It was decided to combine two search functions into one and decide which endpoint to
add based on the parameters.
On the code below, you can see how OrderSearchService class looks. This class contains
an actual logic to support callout by using configurable details as well as Apex Callout
Setting metadata.
1. public with sharing class OrderSearchService { 2. pub-
lic static List<OrderResponseWrapper> searchOrders(String orderNumber, String customerId){
3. Apex_Callout_Setting__mdt integrationsConfig = ApexCalloutService.getSettings(‘DataHub’);
4.

68
5. List<OrderResponseWrapper> responseWrapper = new List<OrderResponseWrapper>();
6. 7. try{ 8. if( 9. integrationsConfig != null 10. && integrationsConfig.Named_Credential__c != null 11. ){ 12. HttpCalloutUtils callout = new HttpCalloutUtils(); 13. HttpResponse response; 14. response = callout 15. .endPoint( 16. 'callout:' + integrationsConfig.Named_Credential__c + 17. (String.isNotBlank(orderNumber) 18. ? '/order?orderNumber=' + orderNumber 19. : String.isNotBlank(customerId) 20. ? '/orders?customerId=' + customerId 21. : '' 22. )) 23. .timeout(Integer.valueOf(integrationsConfig.Timeout__c)) 24. .method(integrationsConfig.Method__c) 25. .send(); 26. 27. if (response.getStatusCode() == 200) { 28. responseWrap-
per = (List<OrderResponseWrapper>) JSON.deserialize( 29. response.getBody(), 30. List<OrderResponseWrapper>.class 31. ); 32. } 33. } 34. return responseWrapper; 35. } catch(Exception e){ 36. throw new AuraHandledException( 37. 'Error doing the query. Error: ' 38. +e.getMessage() 39. ); 40. } 41. 42. 43. 44. } 45. }
Code Snippet 11. New OrderSearchService Class
In the class below, you can see that now instead of hardcoding URL details, we query it
dynamically from Apex Callout Settings. It allows us to configure our integration details
based on the environment. After that, instead of creating the instance of Http class and
request details manually, we could efficiently utilize HTTPCalloutUtils class. In our case,
we set endpoint, set timeout, method and send an actual request with the help of Utils
class.
It helps us to bring consistency to our code and make sure that the same code is replicat-
ed across multiple classes. Then handling and error handling happens in the same way as
it was done before.
As the next step, let’s see what changes HTTPCalloutUtils class brings to our Data Sync
integration. Since it is also using Apex Callouts approach, instead of doing requests from
scratch every time, we will reuse functionality of the common class.

69
1. private static HttpResponse sendHttp(List<String> serializedBodyList, String token){ 2. Apex_Callout_Setting__mdt integrationsConfig ApexCalloutService.getSettings(Data_Sy
nc_System'); 3. 4. HttpCalloutUtils callout = new HttpCalloutUtils(); 5. HttpResponse response; 6. response = callout 7. .endPoint(integrationsConfig.Endpoint__c) 8. .header('Authorization', 'Bearer ' + token) 9. .timeout(Integer.valueOf(integrationsConfig.Timeout__c)) 10. .method(integrationsConfig.Method__c) 11. .send(); 12. }
Code Snippet 12. Send HTTP method from AgentPerformanceBatch class.
In our apex batch class, sendHttp method is replaced with functionality to use customer
metadata type to fetch integrations details from there, as well as using HttpCalloutsUtils
class instead of initializing instances of HTTP classes separately. It is already a big im-
provement and makes the code of AgentPerformanceBatch cleaner and easier to read.
However, there is still room for improvement in the way of how authorizations is handled.
That is the way how we build a reusable class to be utilized in all places when Apex
Callout is needed. HttpCalloutsClass could be easily used for any other future projects. It
is an independent class and does not require any additional changes. It does bring more
consistency to our code, allows easier maintenance and also allows different teams of
developers to work with the same code base, which eventually will lead to a more solid
solution. In the next section, authorization handling from Apex Class will be described.
3.4.3 Handling Authorization Authorization is a crucial part of any integration process. By authorizing an external sys-
tem, you are getting access to communicate with that system. It would usually involve
posting, getting and modifying the data. If the authorization method is compromised, it
might lead to serious data security issues. That is why authorization is something that
always carefully designed and planned.
Nowadays, there are many different ways to support authorization. When authorizing to
an external system from Salesforce, it provides a bunch of ready to use, native functionali-
ty which makes the development process much easier. One of the examples of Named
Credentials was used in UI integration. However, sometimes some custom authorization
methods are used, and it requires implementing a custom authorization solution from
Salesforce. In our example of data sync integration, we had to refresh token from before

70
an actual data callout manually. The way how the current implementation is working does
not fulfill all the security and usability requirements. First of all, token in stored in the code
in a plain format, this way it could be stolen by anybody who has access to the code or
could leak by accident. Secondly, by hardcoding the token to the code we decrease the
usability since token can be changed frequently and be different for multiple environ-
ments. Additionally, credentials are stored in a plain text, which is not acceptable. That is
the reason we have to store token at some secure place and be quickly refreshed and
changed when needed.
To achieve the goal described above, we will use existing custom metadata types record
to store authentication credentials.
Figure 26. Added fields to Data Sync system record
On the figure below, you can see that we added a new Refresh URL field, which contains
a value of URL from which refresh token can be acquired. Also, we have username and
password fields to store the credentials. You can see that the values there are different
from the ones we used in the first version of integration. That is because we had to en-
crypt those values, not to store them in a plain text. In the code, we will have a part that
handling the decryption.
Now, let’s proceed to the part of the actual storage of an access token. The token is a
dynamic property; it is changed based on the expiration day. It means we will need to be
able to update token and override it with a new token value when it is needed. For this
reason, to securely store the authentication token, we will need to create custom settings
in Salesforce. Custom settings are similar to custom metadata types approach to store
some metadata and reuse it in the code. However, we are not able to perform a DML op-
eration on custom metadata types. Since we need to update our token in the system, we
will use custom settings. Let’s see how a new custom setting will look in the system.

71
Figure 27. New custom setting
On the figure above, you can see a new custom setting we create. It will have only two
custom fields, which will be the token itself and the date-time value of when the token will
get expired.
When using that record to configure integration details, we will always check if authentica-
tion token is expired, if yes, the new one will need to be acquired and override the old val-
ue.
We will have one empty record with a name WorkForceOptimization, which will be used in
the code. From the beginning, we do not need to populate either token or expire time,
since it will be filled with a first callout.
Let’s see how implementation of custom authentication will look on the technical level.
Firstly, we will create a small encryption util class, to store there encryption-related meth-
ods. Since we store our username and password in the encrypted format, we will need to
be able to decrypt them during refresh callout.
1. public with sharing class EncryptionUtils { 2. pub-
lic static final String cryptoKeyValue = 'wtDf1Wkkhn6wH/6QiCGrLiuuZhGjLE1JcSy4X54/s/s=';
3. 4. public static String decryptDataString(String value){ 5. Blob valueBlob = EncodingUtil.base64Decode(value); 6. Blob cryptoKey = EncodingUtil.base64Decode(cryptoKeyValue); 7. Blob decryptedValue = aes256DecryptData(valueBlob, cryptoKey); 8. return decryptedValue.toString(); 9. } 10. 11. public static Blob aes256DecryptData(Blob blobValue, Blob cryptoKey){ 12. return Crypto.decryptWithManagedIV('AES256', cryptoKey, blobValue); 13. } 14. }
Code Snippet 13. New encryption class to handle masked username and password.
The class above is just a support class, which we use to separate the functionality to dif-
ferent classes and make it clear which part of the process it is related to.
1. public with sharing class OAuthUtils { 2. public static String getAuthenticationToken(

72
3. String authTokenName, 4. Apex_Callout_Setting__mdt setting 5. ){ 6. AuthenticationToken__c authTokenRecord = 7. AuthenticationToken__c.getValues(authTokenName); 8. String token; 9. if( 10. isExpiring(authTokenRecord) 11. || String.isBlank(authTokenRecord.AuthToken__c) 12. ){ 13. TokenWrapper tokenWrap = requestNewToken(setting); 14. authTokenRecord.AuthToken__c = tokenWrap.token; 15. authTokenRecord.ExpiryTime__c = tokenWrap.expiresAt; 16. update authTokenRecord; 17. token = tokenWrap.token; 18. } 19. return token; 20. } 21. 22. public static Boolean isExpiring(AuthenticationToken__c authTokenRecord){ 23. //Get the token based on the record name 24. //Check that the expiry time is more than 60 seconds from the current tim
e 25. return System.now().addSeconds(60) > authTokenRecord.ExpiryTime__c; 26. } 27. 28. pri-
vate static TokenWrapper requestNewToken(Apex_Callout_Setting__mdt setting){ 29. TokenWrapper tokenWrapper = new TokenWrapper(); 30. if(setting != null){ 31. //Set request 32. HttpCalloutUtils callout = new HttpCalloutUtils(); 33. HttpResponse response; 34. response = callout 35. .endPoint(setting.Refresh_URL__c ) 36. .timeout(Integer.valueOf(setting.Timeout__c)) 37. .method('POST') 38. .addHeader('Authorization', getAuthorizationHeader(setting)) 39. .send(); 40. 41. if(response.getStatusCode() == 200){ 42. Map<String, Object> responseMap = 43. (Map<String, Object>) JSON.deserializeUntyped(response.getBody()
); 44. tokenWrapper.token = (String) responseMap.get('access_token'); 45. tokenWrap-
per.expiresAt = (Datetime) responseMap.get('expires_at'); 46. } 47. } 48. return tokenWrapper; 49. } 50. 51. pri-
vate static String getAuthorizationHeader(Apex_Callout_Setting__mdt setting){ 52. String username = 53. EncryptionUtils.decryptDataString(setting.Username__c); 54. String password = 55. EncryptionUtils.decryptDataString(setting.Password__c); 56. String authorizationHeader = username + ':' + password; 57. String base64authorizationHeader = 58. EncodingUtil.base64Encode(Blob.valueof(authorizationHeader)); 59. return 'Basic ' + base64authorizationHeader; 60. } 61. 62. 63. public class TokenWrapper{ 64. public String token{get;set;} 65. public DateTime expiresAt{get;set;} 66. public String recordName{get;set;} 67. } 68.

73
69. 70. }
Code Snippet 14. OAuth class which handles the token operations.
Above, you can follow one of the main classes which are responsible for authorization.
Now instead of handling token related operations while doing the callout, it will be enough
just to call getAuthenticationTokenMethod. When this method is called, it will be checked
if the current token for the requested record exists and if it is expired, if it is not, then an
active token will be returned. If the token is expiring or does not exist, the new token will
be requested. Response from the refresh call will be stored to the TokenWrapper class
and then stored back to the custom setting record.
In this way, it is possible to support active token storage and easy management of that
token. Let’s have a look at how an actual data callout will look like now by using our new
OAuthUtils class.
1. private static void sendPerformance(List<String> serializedBodyList){ 2. Apex_Callout_Setting__mdt integrationsConfig = ApexCalloutService.getSettings
('Data_Sync_System'); 3. String token = OAuthUtils.getAuthenticationToken('WorkForceOptimization', int
egrationsConfig); 4. HttpResponse response = sendHttp( 5. serializedBodyList, 6. token, 7. integrationsConfig.Endpoint__c, 8. integrationsConfig.Method__c 9. ); 10. if (response.getStatusCode() != 200 || response.getStatusCode() == null) { 11. CalloutException e = new CalloutException(); 12. e.setMessage( 13. 'Integration call failed with status : ' 14. +response.getStatus()+'. Status code: ' 15. + response.getStatusCode() 16. ); 17. throw e; 18. } else { 19. System.debug(response.getBody()); 20. } 21. 22. } 23. 24. pri-
vate static HttpResponse sendHttp(List<String> serializedBodyList, String token, String endpoint, String method){
25. Http http = new Http(); 26. HttpRequest request = new HttpRequest(); 27. request.setEndpoint(endpoint); 28. request.setMethod(method); 29. request.setBody('[' + String.join(serializedBodyList, ',') + ']'); 30. request.setHeader('Content-Type', 'application/json'); 31. request.setHeader('Authorization', 'Bearer ' + token); 32. //include Authorization header with access token 33. HttpResponse response; 34. response = http.send(request); 35. return response; 36. }
Code Snippet 15. AgentPerformanceBatch callout methods.

74
Above you can see how an actual sending of data methods were changed in our
AgentPerformanceBatch class. The full batch code can be found at Code Snippet 8.
As a result of the enhancement of the authorization process, we have dramatically re-
duced the amount and complexity of the code. Now authorization details are securely
stored in the system and could be easy reused for any other new integrations. Additional-
ly, details are configurable and could be changed based on the environment. OAuthUtils
class now can be used for any other integrations to ensure the consistency, reusability
and scalability of the solution.
3.4.4 Reusable Rest Resource In the previous sections, we have modified existing solutions and enhanced it with config-
urable integration details, reusable classes for HTTP callouts and modified the process of
how authorization is handled. Now it is time to look into how our Apex Rest Resource
class can be enhanced. The original version of the class can be found at Code Snippet 6.
For complex implementations of custom endpoints, it is always important to keep con-
sistency in the integration approach. When integration is done with multiple different ser-
vices, it is crucial to follow a similar pattern for the majority of implementation. Usually, a
similar pattern would be to use similar definitions of the response body, as well status
codes. It is a good practice to have one defined model of the body which your custom
endpoints return as well as have a similar list of status codes to share across the whole
org.
In our example of CaseResource, we decided to have a response of payload, message
and error code response. It is already the right approach; however, now it is used only
locally. Let’s make a response class util and make it available to be extended whenever
new resource class is created.
1. global abstract class CommonResponse { 2. global String message { get; set; } 3. global String errorCode { get; set; } 4. }
Code Snippet 16. Common resource response.
We have created a typical response class which can be found above. Now, instead of
specifying the response body in each class, we can extend the common response class.
1. global class CaseResponse extends CommonResponse { 2. global List<Case> payload { get; set; } 3. }
Code Snippet 17. Response of the CaseResource class.

75
In the figure above, you can see an example of how CommonResponse is utilized in the
CaseResource class. It is considered to be a good practice to follow the same pattern
across multiple implementations. So CommonResponse could be easily used for all re-
source classes in the org.
Next step will be to create a common class of reusable integration status codes. In this
way, we will not need to define status codes for each integration separately and agree
what each code will mean. Instead we created a class you can find below.
1. public class HTTPStatus { 2. public static final Integer OK = 200; 3. public static final Integer CREATED = 201; 4. public static final Integer ACCEPTED = 202; 5. public static final Integer NO_CONTENT = 204; 6. public static final Integer PARTIAL_CONTENT = 206; 7. public static final Integer MULTIPLE_CHOICES = 300; 8. public static final Integer MOVED_PERMANENTLY = 301; 9. public static final Integer FOUND = 302; 10. public static final Integer NOT_MODIFIED = 304; 11. public static final Integer BAD_REQUEST = 400; 12. public static final Integer UNAUTHORIZED = 401; 13. public static final Integer FORBIDDEN = 403; 14. public static final Integer NOT_FOUND = 404; 15. public static final Integer METHOD_NOT_ALLOWED = 405; 16. public static final Integer NOT_ACCEPTABLE = 406; 17. public static final Integer CONFLICT = 409; 18. public static final Integer GONE = 410; 19. public static final Integer PRECONDITION_FAILED = 412; 20. public static final Integer REQUEST_ENTITY_TOO_LARGE = 413; 21. public static final Integer REQUEST_URI_TOO_LARGE = 414; 22. public static final Integer UNSUPPORTED_MEDIA_TYPE = 415; 23. public static final Integer EXPECTATION_FAILED = 417; 24. public static final Integer INTERNAL_SERVER_ERROR = 500; 25. public static final Integer SERVER_UNAVAILABLE = 503; 26. }
Code Snippet 19. Reusable status codes.
Now all of the codes above could be used by CaseResource class to send it back in the
body response. In this way we could always keep a consistency of the codes used.
3.4.5 Package definition In the previous sections, we worked on the enhancements to the solution and adding utils
reusable classes. Now we will have a small recap on what enhancements were done and
how it influences the overall solution. Additionally, we will define an XML file that will rep-
resent a package of classes, which could be easily deployed to any other environment
and be a starting point for any implementation.
Custom metadata type Apex Callout Setting was created to avoid hard coding integration
details into the code. It will contain all basics information about integration, such as end-
point details, request details and authorization details. New record of this metadata will

76
need to be created for each integration developer starts to work on. It can be easily que-
ried in the code.
For easier querying of the Apex Callout Setting metadata, we have created Apex-
CalloutService class, which contains a util query of the metadata record. It can be reused
in all places, where metadata should be fetched from the database.
To perform an actual callout execution, HttpCalloutUtils class was created. It handled all
basic HTTP classes. As a result, it makes the work with Http Requests easier. Class is
responsible for handling main request details such as method, header, endpoint. It is a
convenient way to reuse the same callout pattern across multiple integrations.
Since many integrations require the implementation of custom authorizations, it some-
times not possible to utilize standard Salesforce authorization tools. For this reason, OAu-
thUtils class was created. It handles the storage of the token and expiration time of the
token. This class supports the retrieval of the token from the custom setting record as well
as token refresh and saving the new token to the custom setting.
To store token securely, AuthenticationToken custom setting was created. It contains the
property of the token itself as well and time when the token will get expired.
To handle the decryption of authentication credentials, EncryptionUtils class was created.
It is using static token to decrypt the values of username and password, which earlier was
encrypted with that token. It was done to avoid storing credentials in a plain format. Now
user credentials are stored securely and can be easily modified for different environments
and integrations.
To enhance the implementation of custom apex endpoints util response class Common-
Response class was implemented. It contains a basic response body, which is extended
from actual resource classes. It allows to keep consistently across multiple resource clas-
ses and provide similar response body to any integration.
Finally, HTTPStatus class was created and it contains all available status codes as a stat-
ic variable, so it can be reused from any class as a code response.
Now let’s have a look how the package of the described classes will look in XML.
1. <?xml version="1.0" encoding="UTF-8"?> 2. <Package xmlns="http://soap.sforce.com/2006/04/metadata"> 3. <types> 4. <members>EncryptionUtils</members> 5. <members>OAuthUtils</members> 6. <members>HttpCalloutUtils</members> 7. <members>ApexCalloutService</members>

77
8. <members>HTTPStatus</members> 9. <members>CommonResponse</members> 10. <name>ApexClass</name> 11. </types> 12. 13. <types> 14. <members>Apex_Callout_Setting__mdt</members> 15. <members>AuthenticationToken__c</members> 16. <name>CustomObject</name> 17. </types> 18. 19. <version>47.0</version> 20. </Package>
Code Snippet 20. XML Package of util classes.
This package is an XML package which could be used to deploy the following classes to
any environment. This set of classes can be considered as a good starting point for any
integration work.
78
4 Project results
Now the project is finally ready. This part will conclude the project work, which I was work-
ing on during the last three months. It will contain an evaluation of the project. The main
questions to answer in this part will be what was achieved by implementing the project,
how it was achieved and how the results could be utilized now. In addition, the project
roadmap will contain a future plan of the project, some missing parts and required en-
hancements to be implemented into the project results.
4.1 Results evaluation
Part 3 contains the central part of the successfully delivered thesis project. At the begin-
ning of the project, together with more experienced colleagues from Fluido, we have cre-
ated a practical use case, which does contain various requirements. Their requirements
were gathered across multiple real customer use cases and were combined into a virtual
project use case.
In the initial stage of the project implementation, such preparation activities as the investi-
gation of the requirements, gathering more detailed specifications, preparing the org were
carried.
After all the requirements were ready, I have started one by one, an actual implementation
of each integration. Detailed implementation is described in part 3.3. In all cases, imple-
mentation required definition of the endpoint either created by us or created by a third-
party partner and delivered to us. In this project, endpoint details were conducted with the
Swagger tool. Besides, each integration required authentication either to Salesforce or to
an external server. During implementation, I had to keep that in mind and deliver corre-
sponding means to fulfill these requirements. By this part I have completed the first goal of
my project, which was to implement a real integration solution based on the customer re-
quirements.
After the main development of the required integrations was completed, in part 3.4 I have
started to analyze how the solution could be enhanced. The code which we implemented
previously was working perfectly fine and was fulfilling all customer requirements.
However, second goal of my thesis was to find out how the delivered solution can be en-
hanced so that with the next project, it should not be started from scratch but existing
codebase would be easily reused. I evaluated which part of the code was replicating each
other in several integration implementations. I also investigated how the solution could be
made more scalable so that when we need to implement new integration, it does not re-
quire writing all the code again. I tried to find the way, how integration details could be
securely stored in the system and how all pieces of code be more consistent and follow
the best Salesforce practices.

79
Each part, such as apex callouts, authentication, apex web services, was evaluated and
enhanced. As a result, I have come up with a combination of classes, custom settings and
custom metadata types, which allows us to have highly scalable, customizable and main-
tainable solutions, which can be easily reused. That second part of implementation has
completed my second goal of the project. As a result of the enhancements, I received a
desirable outcome of package of files, which could now be reused for any future similar
implementations.
All components could be found in the XML file, which represented in the last section.
There are still multiple additional features, which could be implemented to make the pack-
age more extant. After the solution is verified and unit tests are implemented, the solution
could be distributed to other projects to be used as a code base for any integration.
4.2 Project roadmap
The basic version of the implementation and the product was completed. However, I do
not want to stop working on it yet. Now my goal is to make a solution working for more
complex and challenging use cases. Make sure that solution is proven, collect feedback
on the fellow developers and architects as well as gather feedback from the community.
In the figure below, you can see the timeline of an existing implementation as well as the
road map for the future enhancements.

80
Figure 28. Roadmap of the project.
On the figure above you can see the timeline of the project implementation. Main key
points are indicated above. For the next months I am planning to finalize the solution, cre-
ate unit tests and test it with a group of professional developers.

81
5 Conclusion
Data integration is, in fact, a crucial part of any companies’ operations nowadays. There
are multiple enterprise tools to provide out of the box integrations. However, sometimes
developers need to implement custom integrations when out of the box tools could not
solve a required problem.
There are multiple ways of approaching development. In complex enterprise environ-
ments, with multiple teams working on different features, it is essential to stick to the same
approach, keep the consistency across all implementations and produce the easily main-
tainable product. With pure management and not following best practices, it is quite easy
to lose track of the code quality and of the way how certain things are implemented.
In my thesis, I tried to tackle these issues. As a result, I was able to approach this problem
from different angles and improve an overall solution of how developers could work with
similar integrations projects.

82
6 References
Salesforce Official Documentation. What is CRM?. URL:
https://www.salesforce.com/eu/learning-centre/crm/what-is-crm/. Accessed: 3 February
2020.
Salesforce Official Documentation. Bring your CRM to the future. URL:
https://www.salesforce.com/crm/#. Accessed 8 February 2020.
Datanyze. 2020. Customer Relationship Management. URL :
https://www.datanyze.com/market-share/customer-relationship-management--33. Ac-
cessed 8 February 2020.
Kulpa, J. 2017. Why Is Customer Relationship Management So Important? URL:
https://www.forbes.com/sites/forbesagencycouncil/2017/10/24/why-is-customer-
relationship-management-so-important/#175b13667dac. Accessed 12 February 2020.
https://www.computerworld.com/article/3427741/a-brief-history-of-salesforce-com.html
Carey, S. 2018. A brief history of Salesforce.com. URL:
https://www.computerworld.com/article/3427741/a-brief-history-of-salesforce-com.html.
Accessed 12 February 2020.
Benioff, M. & Adler, C. 2009. Behind the Cloud. Accessed 18 February 2020.
Salesforce.com Trailhead. 2019. Understand the Salesforce Architecture. URL:
https://trailhead.salesforce.com/en/content/learn/modules/starting_force_com/starting_und
erstanding_arch. Accessed 27 February 2020.
Opendatasoft.com. 2016. What Is Metadata and Why Is It as Important as the Data Itself?.
URL: https://www.opendatasoft.com/blog/2016/08/25/what-is-metadata-and-why-is-it-
important-data. Accessed 02 March 2020.
Fawcett, A. 2014. Force.com Enterprise Architecture. Second Edition. Accessed 03 March
2020.
Developer Salesforce Documentation. 2016. The Force.com Multitenant Architecture.
URL : https://developer.salesforce.com/page/Multi_Tenant_Architecture. Accessed 05
March 2020.

83
Kabe, S. 2016. Salesforce Platform App Builder Certification Handbook. Accessed 10
March 2020.
Hohpe. G. & Woolf, B. 2019. Solving Integration Problems using Patterns. URL:
https://www.enterpriseintegrationpatterns.com/patterns/messaging/Chapter1.html. Ac-
cessed 12 March 2020.
RedHat. 2018. What is integration?. URL:
https://www.redhat.com/en/topics/integration/what-is-integration. Accessed 12 March
2020.
Lehtonen, K. 2018. WHAT IS SYSTEM INTEGRATION? URL:
https://www.youredi.com/blog/what-is-system-integration. Accessed 12 March 2020.
Myerson, Judith M. 2001. Enterprise Systems Integration. Second Edition. Accessed 15
Match 2020.
Project Open Data. 2016. API basics. URL: https://project-open-data.cio.gov/api-basics/.
Accessed 21 March 2020.
Simmons, L. 2016. Api Tutorial for Beginners. URL: https://blog.cloudrail.com/api-tutorial-
for-beginners/. Accessed 21 March 2020.
Help Salesforce.com. 2017. Named Credentials. URL:
https://help.salesforce.com/articleView?id=named_credentials_about.htm&type=5.
Accessed 25 March 2020.
Help Salesforce.com. 2017. Named Credentials. URL:
https://help.salesforce.com/articleView?id=remoteaccess_oauth_flows.htm.
Accessed 25 March 2020.
Trailhead Salesforce.com. 2018. Understand Security and Authentication. URL:
https://trailhead.salesforce.com/en/content/learn/modules/mobile_sdk_introduction/mobile
sdk_intro_security. Accessed 29 March 2020.

84
Developer Salesforce Documentation. 2020. Integration Patterns and Practices. URL:
https://blog.bessereau.eu/assets/pdfs/integration_patterns_and_practices.pdf. Accessed
03 April 2020.
Hürtger, H. & Mohr, N. 2018. Achieving business impact with data. URL:
https://www.mckinsey.com/business-functions/mckinsey-analytics/our-insights/achieving-
business-impact-with-data. Accessed 03 May 2020.