An Introduction to Wool-Working for Readers of Greek and ...
12
1 Text & Textile: An Introduction to Wool-Working for Readers of Greek and Latin Supplementary Pages How to Get Started Spinning and Weaving If you are new to hand spinning and weaving, you may be surprised to know that thousands of people across the United States practice these age-old crafts, either professionally (as artists, artisans, or teachers) or for pure enjoyment. Thus finding information and advice will be relatively easy once you get started. Sources of general information Local stores that sell yarn to knitters often also sell spinning or weaving supplies and may know about teachers in your area. Stores that sell supplies specifically for hand spinners and weavers also exist and usually offer on-line ordering. Websites of weaving and spinning suppliers The following are just a few of many: http://www.woolery.com http://www.harrisville.com http://www.yarnbarn-ks.com http://www.the-mannings.com http://www.halcyonyarn.com Local and regional agricultural fairs, especially those devoted to sheep and wool, are great places to meet other spinners, weavers, and vendors of fiber and tools. Often beginners’ classes are offered. Many such fairs have websites. A few examples are: Maryland Sheep & Wool Festival (May): www.sheepandwool.org Wool Festival of the Southwest (November): www.woolfestivalsw.itctv.com Vermont Sheep & Wool Festival (October): www.vermontsheep.org New York State Sheep & Wool Festival (October): www.sheepandwool.com Michigan Fiber Festival (August): www.michiganfiberfestival.org Search under ‘sheep and wool festival’ or ‘fiber festival.’ Handweavers guilds or fiber guilds typically have monthly programs and educational events. Generally, guilds welcome anyone interested in weaving or spinning. Some members have a lot of knowledge and are willing to share it. To find a guild near you, check the website of the Handweavers Guild of America (www.weavespindye.org). Schools, whether residential craft schools, local arts schools, or universities often offer instruction in spinning and weaving.
-
Upload
khangminh22 -
Category
Documents
-
view
2 -
download
0
Transcript of An Introduction to Wool-Working for Readers of Greek and ...

1
Text & Textile: An Introduction to Wool-Working for Readers of Greek and Latin
Supplementary Pages
How to Get Started Spinning and Weaving If you are new to hand spinning and weaving, you may be surprised to know that thousands of people across the United States practice these age-old crafts, either professionally (as artists, artisans, or teachers) or for pure enjoyment. Thus finding information and advice will be relatively easy once you get started. Sources of general information Local stores that sell yarn to knitters often also sell spinning or weaving supplies and may know about teachers in your area. Stores that sell supplies specifically for hand spinners and weavers also exist and usually offer on-line ordering. Websites of weaving and spinning suppliers The following are just a few of many:
http://www.woolery.com http://www.harrisville.com http://www.yarnbarn-ks.com http://www.the-mannings.com http://www.halcyonyarn.com
Local and regional agricultural fairs, especially those devoted to sheep and wool, are great places to meet other spinners, weavers, and vendors of fiber and tools. Often beginners’ classes are offered. Many such fairs have websites. A few examples are:
Maryland Sheep & Wool Festival (May): www.sheepandwool.org Wool Festival of the Southwest (November): www.woolfestivalsw.itctv.com Vermont Sheep & Wool Festival (October): www.vermontsheep.org New York State Sheep & Wool Festival (October): www.sheepandwool.com Michigan Fiber Festival (August): www.michiganfiberfestival.org
Search under ‘sheep and wool festival’ or ‘fiber festival.’ Handweavers guilds or fiber guilds typically have monthly programs and educational events. Generally, guilds welcome anyone interested in weaving or spinning. Some members have a lot of knowledge and are willing to share it. To find a guild near you, check the website of the Handweavers Guild of America (www.weavespindye.org). Schools, whether residential craft schools, local arts schools, or universities often offer instruction in spinning and weaving.
2
Learning to Spin Spinners today may use hand spindles (sometimes called ‘drop spindles’), as the ancient Greeks and Romans did, or they may use spinning wheels (which came into use in Europe during medieval times). Hand spindles are of two types: high whorl and low whorl. Ancient Greeks and Romans used low whorl spindles, while the ancient Egyptians used high whorl spindles. Today, spinners usually have a distinct preference, but expertise on one pretty easily translates into expertise on the other. It is easier to learn spinning from a person than from a book. Look for classes or a teacher (see under “Sources of general information,” above). If you can’t find a teacher, don’t be discouraged. A motivated person can learn from a book. Two good, basic books on spinning: (Note that these books also include information on fiber preparation, which is an important part of the process.) Hands on Spinning by Lee Raven, Interweave Press, Loveland, Colorado 1987. Contains information on spinning with a wheel, but also with a low-whorl spindle. High Whorling: A spinner’s guide to an old world skill by Priscilla Gibson-Roberts, Nomad Press, Cedar Ridge, Colorado, 1998. As the title suggests, the author is passionately in favor of high-whorl spindles, but the book is a great introduction to any kind of hand spinning with a spindle. Spin-Off magazine for hand spinners is published four times a year by Interweave Press (www.interweave.com). Learning to Weave Looms of many sizes, types, and degrees of complexity are manufactured for today’s hand weavers. Most are either frame (or two-beam) looms used for tapestry or horizontal looms operated with treadles or levers. The warp-weighted loom is a distinct rarity. Conventional Hand Weaving A basic knowledge of conventional hand weaving will help reduce the error that inevitably goes with a trial of weaving on a warp-weighted loom—though it is not a prerequisite. Many equipment vendors offer weaving classes, as do arts and crafts schools and some colleges and universities. A motivated person can learn enough to weave on his or her own with a few days of instruction (and a good book or two). Often looms can be borrowed or rented. Used

3
looms and weaving equipment can sometimes be acquired at minimal expense (check with a local weaver’s guild). A canvas stretcher, available at minimal cost from an art supply store, makes a simple frame loom. Two good, basic books are: Learning to Weave by Deborah Chandler, Interweave Press; Revised edition (March 1, 1995). Provides detailed instruction for weaving on a horizontal loom. The Weaving, Spinning, and Dyeing Book by Rachel Brown, Alfred A. Knopf; Second revised edition (May 1, 1983). More comprehensive. Better if you want to make your own equipment (although the diagram of a warp-weighted loom will not be helpful). Weaving on a Warp-Weighted Loom There is still a very small living tradition in northern Scandinavia of making wool coverlets on warp-weighted looms. A web search will also turn up medieval re-enactors who are constructing and using warp-weighted looms. Almost all of these looms differ somewhat from the ancient warp-weighted loom, especially in having the shed rod much closer to the ground. Nevertheless, the basic operation is the same. Two companies that make warp-weighted looms Fireside Fiberarts (www.firesidelooms.com) makes a Scandinavian-type loom Indigo Hound (2367 Bryansville Rd., Delta, PA 17314; 717 456-7645) also makes a
Scandinavian-type loom, but will customize it to make it more like an ancient Greek loom.
Making and using a simple warp-weighted loom The following pages contain detailed instructions for constructing and using a warp-weighted loom of the type used in classical antiquity. Please remember that local and temporal variation is to be expected in any kind of craft and “Greek and Roman antiquity” can encompass more than a thousand years. Practically all looms pictured in vase paintings or other ancient sources differ from each other in some respect. Some would be simply non-functional if constructed exactly as drawn. The details given in the following pages are based on information in Prehistoric Textiles and The Warp-Weighted Loom (see Bibliography), as well as personal experience. What is offered is a functional loom modeled as closely as possible on ancient sources. The directions give specific materials. This is for your convenience only. If you have other similar materials more readily available, by all means use them. If you care to, you will find

4
more elegant ways to construct your loom than those offered. Similarly, your loom can be of any size your materials will allow. We suggest that you follow the instructions for making your heading band and attaching it to the loom quite carefully (although there are actually many other ways to do it). You will at least have a functional warp and once you have tried it and understood it, you can experiment with other methods. Making a simple warp-weighted loom The diagram below gives you an idea of what your loom will look like and how it will operate.
Materials list (Note: these are suggested materials; feel free to improvise) For loom: 1. Two lengths of 2 x 3 lumber, 6 feet (72”) long 2. Two wooden dowels, 1 ½” diameter (or more, if possible) 4 feet (48”) long 3. One wooden dowel, 7/8” in diameter, 3 ½ feet (42”) long 4. A ball of strong twine; it should be of natural material (e.g. jute) and non-slippery; also some smooth string 5. Optional: four 2 ½” nails; two stout 4” nails; an electric drill with a bit somewhat larger in diameter than the nails; 36” stick-on Velcro tape or 10 – 12 thumbtacks 6. Loom weights: You will have to experiment to find the proper amount of weight and the proper number of weights for your loom. Start with something that can be easily adjusted, for example, small plastic bottles, of the kind spring water comes in. It is easy to see the level of water, and thus make them of uniform weight. Plastic bags filled with sand also work, although they are harder to attach to your warp threads.
5
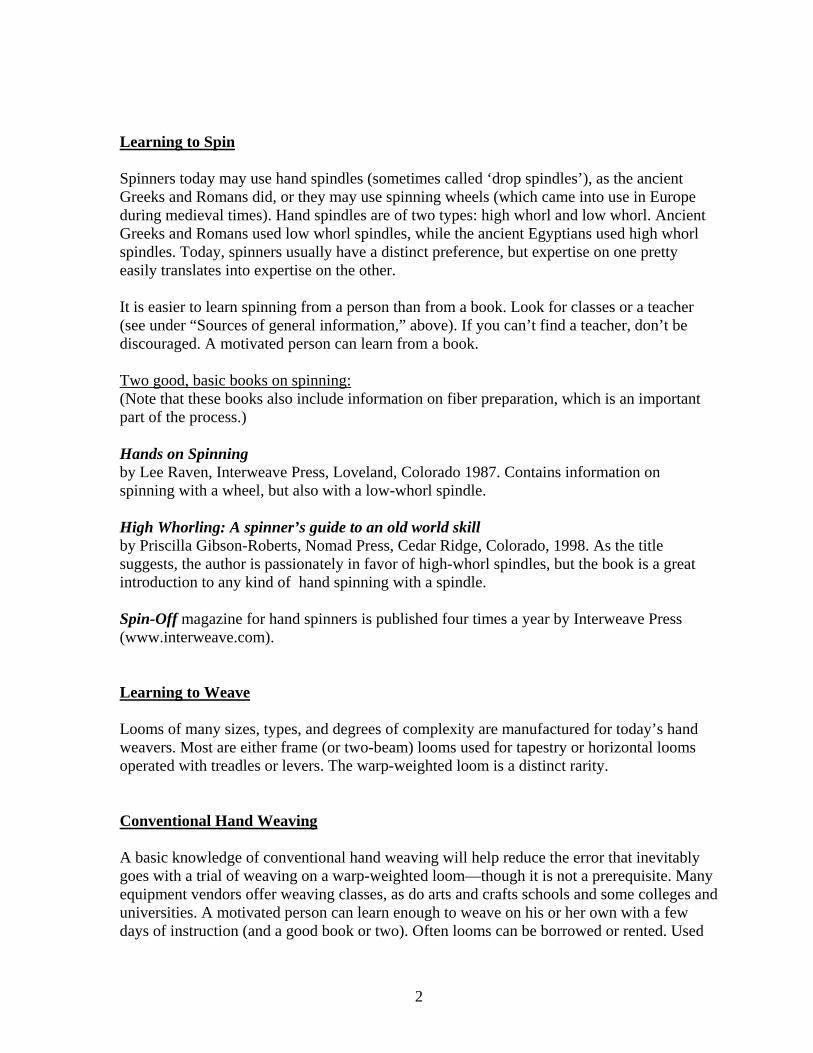
7. A beater. This might be a 3-4 foot-long flexible stick (it must be very smooth) or some kind of paddle. A wide flat wooden rule with the corners rounded at one end would work. 8. A shuttle. A pencil or similar stick will do. If you spin your weft thread on a spindle with a detachable spindle whorl, the spindle could function as your shuttle. For band loom (to make heading band): 1. A long table to which you can attach clamps 2. Some rubber bands 3. Three or four or more clamps (e.g., “Quick-Grip” Micro Bar Clamp, 8” size) or c-clamps. 4. A shedding device such as a rigid heddle or warping paddle. The following are some options: --A warping paddle, available from weavers supply stores (e.g., www.halcyonyarn.com) will cost about $17. --Rigid heddles are removable parts of rigid heddle looms (often small table looms). --You can make a rigid heddle by cutting alternating slots and elongated holes out of some smooth, reasonably rigid material (like the size of a gallon plastic jug). You should have a rectangle about 4” x 6”. Cut alternating slots and ovals to look like this:
The slots and ovals should be large enough to allow your yarn to move through them freely. --Alternatively, make a rectangular frame from small dowels or sticks, making sure the corners are secure. The frame should have an opening about 4” x 5”. Then cut 10 lengths of smooth string or strong thread about three times as long as the shorter side of the frame. Take one of the lengths of string, pass it around one side of your frame, and bring the two ends together. Make an overhand knot in the double length of string, not quite half way between the two sides of the frame. Make a second knot about a quarter inch away from the first. Then separate the two ends of the string and tie them snugly around the other side of your frame. You will have made one heddle for your shedding device. This heddle corresponds to one of the shorter holes in the diagram above. Make eight or nine more heddles, spacing them about a quarter inch apart across your rectangular frame. The space between these string heddles functions like the long slots in the diagram above. Yarn for heading band, warp, and weft: You can use the same yarn for all three, or not, as you choose. The yarn for the heading band and the warp should be strong enough not to come apart if you hold it between your two
6
hands, pull it taut and then pull a little harder. (Don’t plan to use your first hand spun yarn as warp, although you may be able to use it as weft.) Finer yarn will make finer cloth. Thicker yarn will be easier to work with, as long as it is not very soft or very hairy. Although the ancient Greeks wove with wool and linen, primarily, you may find cotton to be the easiest to work with. Fairly fine cotton string is a possible choice. Sewing thread is much too fine for a first try. My suggestion is that you supply yourself with 16 ounces or more of yarn and get started with that. If you want to figure what you need more exactly, do it as follows: --For heading band warp: (width of cloth to be woven + 12”) x number of warps in heading band (e.g. 20) (This will be the number of long slots + the number of round or oval slots in your shedding device. If you have made a frame and string rigid heddle, you will have one thread for each heddle, plus one thread for each space between two heddles.) --For heading band weft (= warp on your warp-weighted loom): This is hard to determine until you actually make your heading band (a catch 22 situation). You need to know how many heading band wefts there will be per inch (which depends on the thickness of all your yarns as well as how tightly you weave). You have two choices: make a test heading band (you will be able to take it apart and re-use the yarn), or supply yourself with plenty of yarn. Basically, you need: (width of cloth you want to weave, in inches) x (number of heading band wefts per inch) x (length of cloth you want to weave + distance from shed rod to floor on your loom). --For weft for your finished cloth: Again, you would need to make a sample to be able to figure this precisely. You will need: (width of your cloth, in inches) x (length of your cloth, in inches) x (the number of wefts per inch in your weaving). The latter will, again, depend on the characteristics of both your yarn and your weaving technique. Constructing your warp-weighted loom 1. Lay your 2x3’s on the floor parallel to each other and about 3 ½ feet apart. 2. Lay your 4-foot dowels on top of the 2x3’s, one about two inches from one end (this will be the cloth beam), and the other about three feet from the other end (this will be the shed rod). 3. With your twine, tie the cloth beam and the shed rod firmly to the uprights. You should wrap the twine around a number of times to ensure that the beams will not slip. You may want to tie the twine in a way that it can easily be untied, un-wrapped, and re-tied (see below). An option: In order to prevent the cloth beam from sliding down the loom once the weights are attached, you could hammer in two 2 ½” nails about three inches from the top of each 2x3 for the cloth beam to rest on. (Do not nail the cloth beam to the 2x3’s, however.)

7
Also optional: If you want to use your loom to actually make a length of cloth, you will need a way to roll the cloth on the cloth beam as you weave. Simply loosening the twine, rolling the beam and re-tying will work, but the cloth may unroll when the loom weights are reattached. To prevent unrolling, drill one hole through one of the uprights, near the top and at the side (not the front) of the upright. Then drill another hole not quite through the end of the cloth beam. Once you begin to roll cloth on the cloth beam, you can insert a nail in each hole, as shown below (in the drawing, the upright is shown as round rather than as a 2x3):
Setting up the loom The loom you have constructed will be quite floppy. Set it up at an angle to the wall, letting the diagram of the whole loom above be your guide. As you weave, you will get a better idea of the exact angle you need. Find a way to ensure that it will not slide on the floor or slip from side to side against the wall. Ideally, you would put a peg in the wall on either side of the loom. Bracing it within a window frame is another option. Or put a small, non-slippery foam pad between the wall and the loom uprights. A bit of non-slip rug pad under each of the uprights might also be a good idea. Making a heading band This is the most complex part of preparing to weave on a warp-weighted loom. It is not actually difficult, however. Read the instructions through to get an idea of where you are going. Again, there are many possible ways to do this, but this is way that works. Let us suppose that you want to weave a cloth 30” wide and about three feet long, just to try out the loom (i.e., very little, if any, will end up wound on the cloth beam). You must allow about three feet extra warp for the shedding and loom weights, so you will make a warp for your warp-weighted loom that is six feet long. Since the warp for the loom is the weft of the heading band, the heading band weft will be 72” long (6 feet). 1. The heading band warp will be 42” long (width of cloth to be woven + 12”). Measure out enough 42” strands of yarn to fill all the holes and all the slots in your rigid heddle. (Note: If one color yarn is in all the holes and a second color in all the slots, you will end up with stripes in your heading band.) Insert one of these threads (i.e., pieces of yarn) through each slot and each hole. Even up the ends, so the threads are in a neat bunch. Tie an overhand knot

8
as close to one end of the bunch as you can, but make sure all the threads are firmly caught. Ask someone to hold the knot for you, or slip it over one of your clamps; then, holding the other end of the bunch, run your shedding device back and forth a few times to even out the threads. Once they are all aligned, tie another overhand knot in the other end of the bunch. 2. Position your clamps at one end of the table so that they provide two uprights. (See diagram, below.) Place your heading band warp so that one knot goes around each upright and the warp is held quite taut. 3. Tie one end of your yarn (the weft of the heading band, which will be the warp on the warp-weighted loom) to one of the uprights. (In the diagrams below, the yarn is tied to the upright on the upper left.) Lift your rigid heddle to create a shed (space between the even warps and the odd ones). Pull a loop of yarn through the shed; continue to pull until the loop is six feet long (or however long you want your warp to be on your warp-weighted loom). Now, position one or more other clamps so that you can place the end of the loom over one of them. The two sides of the loop should move as a single thread, only opening at the very end to go around the upright. The diagrams below show two alternative ways of arranging the clamps on your table top. The diagram on the right shows how to make weft loops longer than your table. Obviously, with more clamps you can increase the length of the warp further. Note that the two sides of the loop travel together until they loop around the final upright.
4. Once the end clamp is in place, depress the rigid heddle to create the opposite shed. You will see the warp threads cross the weft loop you have inserted. Pull another loop through and place the end on the same upright you used for the last loop. You will continue in this way, lifting and depressing the rigid heddle to make sheds, and pulling a loop through each one. As you change the shed, tighten the weaving in the band by pulling the odd and even threads away from each other. Try to keep the edge of the band that is closer to the yarn source even by pulling the loops snug on that side. Two people working together can accomplish the whole process more easily than one. 5. After you have woven an inch or so of your heading band, you will see that if you keep weaving along in this way, the weft loops will get to be of different lengths because the point of the band at which you are weaving keeps moving in relation to the end upright, which is holding the loops. You must tie them off and move the upright(s). The arrows in the diagrams above show the direction in which to move the upright.

9
Before you move the upright, you must tie off and cut the loops. With a piece of string, tie one side of the bunch of loops together about 6” from the upright. Tie the other side with another piece of string. Do not tie the two sides to each other. (See diagram below.) Once you have tied the two sides securely, cut the threads at the point where they went around the upright. You now have two bunches of threads. Note each bunch has in it one of the two sides of each loop that came through the heading band warp. Wind each bunch around your hand and secure with a rubber band so that they will not become tangled.
6. Reposition the upright that hold the loops so that it is again 6 feet from the point where the next loop will come through the heading band. Continue weaving, tying off and cutting the threads, securing the bunches, and repositioning the uprights until you have woven 30”. 7. Remove one end of the heading band warp from an upright. Untie the knot in the end and secure the ends so they will not unravel. This is best done by making a fringe, e.g. by braiding or plying the threads in small groups, or simply tying them off in groups of 4 or 6. (You could also run the end of the band through a sewing machine.) Do the same to the other end of the band. You will now have a heading band a little longer than 30” with a lot of bunches of yarn hanging from it. Warping the loom 1. Lay the loom flat on the floor and attach the heading band to the cloth beam of your loom. If you are not going to be rolling the cloth onto the beam, you can simply sew the band around the beam. If you are going to roll your cloth, the best solution would be to have a series of holed drilled through the beam for sewing on the band. An alternative is to apply a strip of stick-on Velcro (the hooked side) along the beam. This will hold any wool cloth you weave. If you are weaving cotton, especially fine, smooth cotton, you might want to insert a row of thumb tacks along the heading band, making sure to push them in tightly so that they will not create lumps on your cloth as it is wound on. 2. Place the loom upright (at an angle to the wall) and secure it from slipping out from the wall or sliding from side to side. Release the warp threads from one of each pair of bunches, letting them fall behind the center beam (the shed rod) on your loom. Note that two warp thread must be discarded (one on each end) as there is nothing to hold them into the heading band.

10
3. Tie loom weights to these rear warp threads. You will have to experiment to find the right heaviness and the right number of warp threads to tie to each weight. According to Marta Hoffman (in The Warp-Weighted Loom), ancient Greek loom weights were as small as 150 grams and as heavy as 1,000 grams, with the largest number between 500 and 700 grams (i.e. a little over a pound). Be aware that many pictures, including the diagram of a warp-weighted loom in Prehistoric Textiles, show each loom weight attached to a single warp. This is schematic and does not represent a real weaving situation. Start with relatively light weights, attaching each weight to 6 or 8 rear warp threads. Before you tie on the read weight, release a corresponding number of front warps from their bundles. Place them in front of the shed rod. You can now tie on the rear weight and the balancing front weight at the same time. The diagram below shows how to tie on a water-bottle weight. The bunches of warp threads are formed into a lark’s head knot, which is placed over the neck of the bottle:
4. Place a row of twining along the shed rod to hold the front warps in place. Take a length of string about four yards long (4-5 times as long as your warp is wide). Find the center and tie the string at that point to the shed rod just to the left of your left-most warp. Be sure that the warps on the shed rod are aligned with their positions in the heading band. Crossing the two ends of the string behind the shed rod, bring them to the front of the rod and cross them over the first warp. Cross them again behind the rod, and proceed in this way until all the front warps are tied in place on the shed rod as in the diagram below.
6. Make heddles. The traditional way is to use a single length of string, passing it behind each rear warp and knitting it over the heddle rod. I have found it easier to use individual heddles
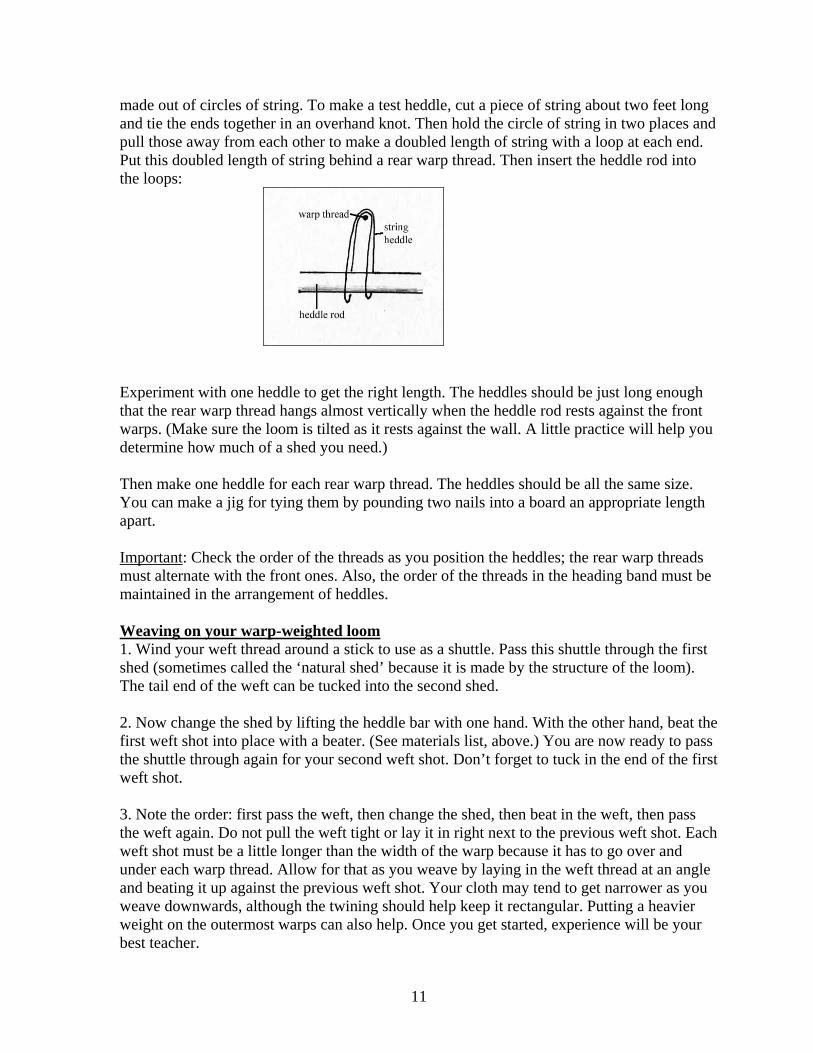
11
made out of circles of string. To make a test heddle, cut a piece of string about two feet long and tie the ends together in an overhand knot. Then hold the circle of string in two places and pull those away from each other to make a doubled length of string with a loop at each end. Put this doubled length of string behind a rear warp thread. Then insert the heddle rod into the loops:
Experiment with one heddle to get the right length. The heddles should be just long enough that the rear warp thread hangs almost vertically when the heddle rod rests against the front warps. (Make sure the loom is tilted as it rests against the wall. A little practice will help you determine how much of a shed you need.) Then make one heddle for each rear warp thread. The heddles should be all the same size. You can make a jig for tying them by pounding two nails into a board an appropriate length apart. Important: Check the order of the threads as you position the heddles; the rear warp threads must alternate with the front ones. Also, the order of the threads in the heading band must be maintained in the arrangement of heddles. Weaving on your warp-weighted loom 1. Wind your weft thread around a stick to use as a shuttle. Pass this shuttle through the first shed (sometimes called the ‘natural shed’ because it is made by the structure of the loom). The tail end of the weft can be tucked into the second shed. 2. Now change the shed by lifting the heddle bar with one hand. With the other hand, beat the first weft shot into place with a beater. (See materials list, above.) You are now ready to pass the shuttle through again for your second weft shot. Don’t forget to tuck in the end of the first weft shot. 3. Note the order: first pass the weft, then change the shed, then beat in the weft, then pass the weft again. Do not pull the weft tight or lay it in right next to the previous weft shot. Each weft shot must be a little longer than the width of the warp because it has to go over and under each warp thread. Allow for that as you weave by laying in the weft thread at an angle and beating it up against the previous weft shot. Your cloth may tend to get narrower as you weave downwards, although the twining should help keep it rectangular. Putting a heavier weight on the outermost warps can also help. Once you get started, experience will be your best teacher.

12
Finishing When you have finished weaving, you must braid, tie, or ply the warp ends—or else quickly sew a hem before they can unweave themselves. If your cloth looks disappointingly crude, try washing it in a washing machine with a mild soap or shampoo for one or two minutes. (Fill the washing machine first, then put the cloth in. Let it agitate for a minute or so, then stop it and take the cloth out. Drain the machine, put the cloth back in and spin. Too much agitation or tumbling may ruin the cloth.) Wool will react much more to agitation than cotton or a synthetic fiber. Rinse it gently (unless it needs more fulling), spin the water out without agitating, and lay it flat to dry. Once dry it can be brushed. The weave structure resulting from the directions given is plain weave. Once you understand how plain weave is done on a warp-weighted loom, you will easily see how to adapt the loom for other weave structures, such as twills—as long as you understand those structurmay