editor 2 B Unhook and lay down. F Lepas kaitannya dan...
4
© 2016 Seiko Epson Corporation. All rights reserved. Printed in XXXXXX Windows EN Start Here ID Mulai di Sini 3 Do not connect a USB cable unless instructed to do so. Jangan hubungkan kabel USB kecuali Anda diminta untuk melakukannya. 1 Contents may vary by location. Isi tergantung lokasi. 2 Remove all protective materials. Lepas semua pelindung. Connect and plug in. Hubungkan dan colokkan. Turn on the printer and wait until P stops flashing. Hidupkan printer dan tunggu hingga P berhenti berkedip. Read This First / Baca Keterangan Ini This printer requires careful handling of ink. Ink may splatter when the ink tanks are filled or refilled with ink. If ink gets on your clothes or belongings, it may not come off. Printer ini memerlukan penanganan tinta dengan hati-hati. Tinta dapat tumpah saat mengisi atau mengisi ulang tangki tinta. Bekas tinta mungkin tidak dapat hilang jika mengenai pakaian atau barang Anda. c Important; must be observed to avoid damage to your equipment. Penting; harus diperhatikan untuk menghindari kerusakan pada peralatan. Q O Do not open the ink bottle package until you are ready to fill the ink tank. The ink bottle is vacuum packed to maintain its reliability. O Even if some ink bottles are dented, the quality and quantity of ink are guaranteed, and they can be used safely. O Jangan buka kemasan botol tinta hingga Anda siap mengisi tangki tinta. Botol tinta dikemas kedap udara untuk menjaga keandalannya. O Meskipun sebagian botol tinta agak cacat, kualitas dan kuantitas tinta tetap dijamin dan botol tetap dapat digunakan dengan aman. c O Use the ink bottles that came with your printer. O Epson cannot guarantee the quality or reliability of non-genuine ink. The use of non-genuine ink may cause damage that is not covered by Epson’s warranties. O Gunakan botol tinta yang disertakan bersama printer. O Epson tidak dapat menjamin kualitas atau keandalan tinta yang tidak asli. Penggunaan tinta tidak asli dapat mengakibatkan kerusakan yang tidak tercakup dalam garansi Epson. Unhook and lay down. Lepas kaitannya dan baringkan. Q Do not pull the tubes. Jangan tarik tabung. Open and remove. Buka dan keluarkan. Snap off, remove, and then close tightly. Buka tutup lepas lalu tutup dengan erat. Match the ink color with the tank, and then fill with all of the ink. Sesuaikan warna tinta dengan tangkinya, lalu isikan semua tinta. Q Install. Pasang. Close securely. Tutup dengan benar. Close. Tutup. Repeat steps C to F for each ink bottle. Ulangi langkah C sampai dengan F untuk tiap botol tinta. Hook onto the printer. Pasang pada printer. C D E F A B G H I J K Charging ink takes about 20 minutes. Wait until the light turns on. Pengisian tinta memerlukan waktu sekitar 20 menit. Tunggu hingga lampu menyala. M L Press y for 3 seconds until P starts flashing. Ink charging starts. Tekan y selama 3 detik hingga P mulai berkedip. Pengisian tinta dimulai. http://epson.sn Q If the Firewall alert appears, allow access for Epson applications. Bila muncul peringatan Firewall, perbolehkan akses untuk aplikasi Epson. Visit the website to start the setup process, install software, and configure network settings. Kunjungi situs web untuk memulai proses setup, menginstal perangkat lunak, dan mengonfigurasi pengaturan jaringan. Proceed to the next step (Section 3). Lanjutkan ke langkah berikutnya (Bagian 3). Windows (No CD/DVD drive) Mac OS X No PC Windows with CD/DVD drive You can also use attached CD to start the setup process, install software, and configure network. Anda juga bisa menggunakan CD yang terlampir untuk memulai proses setup, menginstal perangkat lunak, dan mengonfigurasi jaringan.
Transcript of editor 2 B Unhook and lay down. F Lepas kaitannya dan...
Proof Sign-off:A. Yoshizawa CRM S. TanakaM. Ishigamieditor
R41AG1100Start Here Rev.C_Final
R41AG1100_SH-EN_ID.indd A3 size2016/06/07
© 2016 Seiko Epson Corporation. All rights reserved.Printed in XXXXXX
4132749-00 BlackFront
Windows
EN Start Here
ID Mulai di Sini
3
Do not connect a USB cable unless instructed to do so.Jangan hubungkan kabel USB kecuali Anda diminta untuk melakukannya.
1
Contents may vary by location.Isi tergantung lokasi.
2
Remove all protective materials.Lepas semua pelindung.
Connect and plug in.Hubungkan dan colokkan.
Turn on the printer and wait until P stops flashing.Hidupkan printer dan tunggu hingga P berhenti berkedip.
Read This First / Baca Keterangan IniThis printer requires careful handling of ink. Ink may splatter when the ink tanks are filled or refilled with ink. If ink gets on your clothes or belongings, it may not come off.Printer ini memerlukan penanganan tinta dengan hati-hati. Tinta dapat tumpah saat mengisi atau mengisi ulang tangki tinta. Bekas tinta mungkin tidak dapat hilang jika mengenai pakaian atau barang Anda.
c Important; must be observed to avoid damage to your equipment.Penting; harus diperhatikan untuk menghindari kerusakan pada peralatan.
Q O Do not open the ink bottle package until you are ready to fill the ink tank. The ink bottle is vacuum packed to maintain its reliability.
O Even if some ink bottles are dented, the quality and quantity of ink are guaranteed, and they can be used safely.
O Jangan buka kemasan botol tinta hingga Anda siap mengisi tangki tinta. Botol tinta dikemas kedap udara untuk menjaga keandalannya.
O Meskipun sebagian botol tinta agak cacat, kualitas dan kuantitas tinta tetap dijamin dan botol tetap dapat digunakan dengan aman.
c O Use the ink bottles that came with your printer. O Epson cannot guarantee the quality or reliability of non-genuine ink. The use of non-genuine ink may cause damage that is not covered by Epson’s warranties.
O Gunakan botol tinta yang disertakan bersama printer. O Epson tidak dapat menjamin kualitas atau keandalan tinta yang tidak asli. Penggunaan tinta tidak asli dapat mengakibatkan kerusakan yang tidak tercakup dalam garansi Epson.
Unhook and lay down.Lepas kaitannya dan baringkan.
Q Do not pull the tubes.Jangan tarik tabung.
Open and remove.Buka dan keluarkan.
Snap off, remove, and then close tightly.Buka tutup lepas lalu tutup dengan erat.
Match the ink color with the tank, and then fill with all of the ink.Sesuaikan warna tinta dengan tangkinya, lalu isikan semua tinta.
Q Install.Pasang.
Close securely.Tutup dengan benar.
Close.Tutup.
Repeat steps C to F for each ink bottle.Ulangi langkah C sampai dengan F untuk tiap botol tinta.
Hook onto the printer.Pasang pada printer.
C
D
E
F
A
B
G
H
I
J
K
Charging ink takes about 20 minutes. Wait until the light turns on.Pengisian tinta memerlukan waktu sekitar 20 menit. Tunggu hingga lampu menyala.
M
L
Press y for 3 seconds until P starts flashing. Ink charging starts.Tekan y selama 3 detik hingga P mulai berkedip. Pengisian tinta dimulai.
http://epson.sn
Q If the Firewall alert appears, allow access for Epson applications. Bila muncul peringatan Firewall, perbolehkan akses untuk aplikasi Epson.
Visit the website to start the setup process, install software, and configure network settings.Kunjungi situs web untuk memulai proses setup, menginstal perangkat lunak, dan mengonfigurasi pengaturan jaringan.
Proceed to the next step (Section 3).Lanjutkan ke langkah berikutnya (Bagian 3).
Windows (No CD/DVD drive)Mac OS X
No PC
Windows with CD/DVD driveYou can also use attached CD to start the setup process, install software, and configure network.Anda juga bisa menggunakan CD yang terlampir untuk memulai proses setup, menginstal perangkat lunak, dan mengonfigurasi jaringan.
Proof Sign-off:A. Yoshizawa CRM S. TanakaM. Ishigamieditor
R41AG1100Start Here Rev.C_Final
R41AG1100_SH-EN_ID.indd A3 size2016/06/07
4132749-00 BlackFront
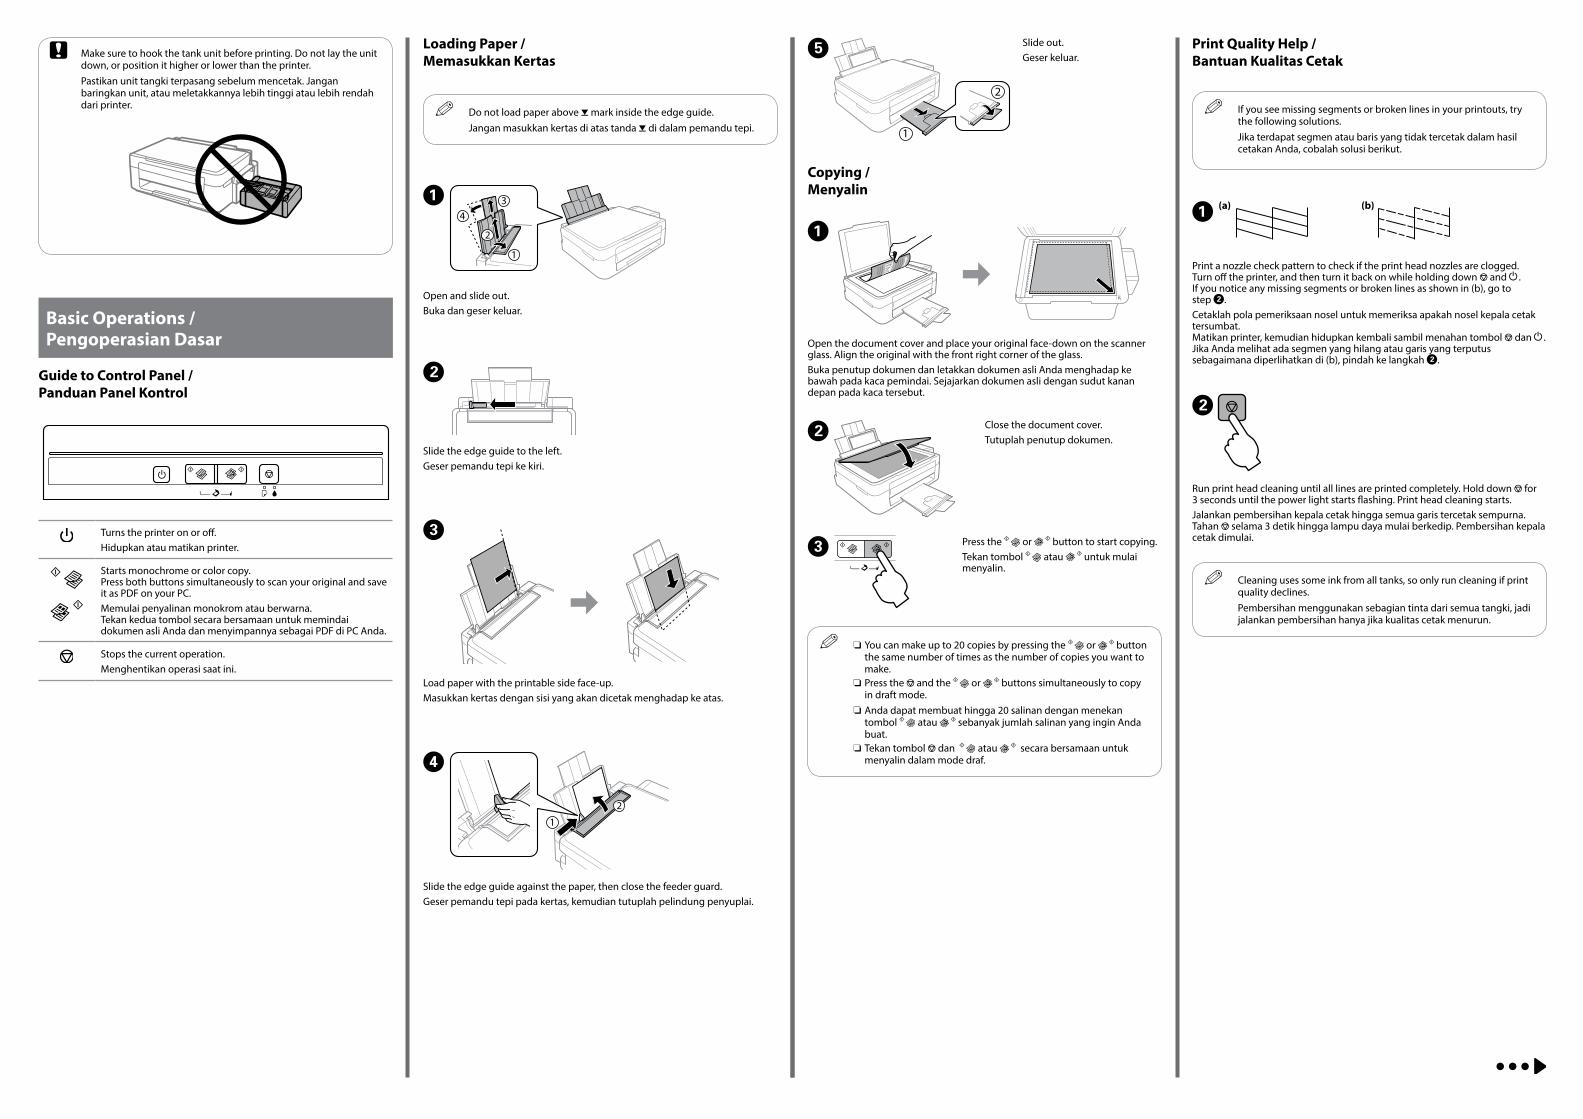
Basic Operations / Pengoperasian Dasar
Guide to Control Panel / Panduan Panel Kontrol
Loading Paper / Memasukkan Kertas
A
Open and slide out.Buka dan geser keluar.
C
Load paper with the printable side face-up.Masukkan kertas dengan sisi yang akan dicetak menghadap ke atas.
D
Slide the edge guide against the paper, then close the feeder guard.Geser pemandu tepi pada kertas, kemudian tutuplah pelindung penyuplai.
E
Copying / Menyalin
A
Turns the printer on or off.Hidupkan atau matikan printer.
Starts monochrome or color copy. Press both buttons simultaneously to scan your original and save it as PDF on your PC.Memulai penyalinan monokrom atau berwarna. Tekan kedua tombol secara bersamaan untuk memindai dokumen asli Anda dan menyimpannya sebagai PDF di PC Anda.
Stops the current operation.Menghentikan operasi saat ini.
Q Do not load paper above H mark inside the edge guide.Jangan masukkan kertas di atas tanda H di dalam pemandu tepi.
Q Cleaning uses some ink from all tanks, so only run cleaning if print quality declines.Pembersihan menggunakan sebagian tinta dari semua tangki, jadi jalankan pembersihan hanya jika kualitas cetak menurun.
Open the document cover and place your original face-down on the scanner glass. Align the original with the front right corner of the glass.Buka penutup dokumen dan letakkan dokumen asli Anda menghadap ke bawah pada kaca pemindai. Sejajarkan dokumen asli dengan sudut kanan depan pada kaca tersebut.
BClose the document cover.Tutuplah penutup dokumen.
B
Slide the edge guide to the left.Geser pemandu tepi ke kiri.
Slide out.Geser keluar. c Make sure to hook the tank unit before printing. Do not lay the unit
down, or position it higher or lower than the printer.Pastikan unit tangki terpasang sebelum mencetak. Jangan baringkan unit, atau meletakkannya lebih tinggi atau lebih rendah dari printer.
C Press the or button to start copying.Tekan tombol atau untuk mulai menyalin.
Q O You can make up to 20 copies by pressing the or button the same number of times as the number of copies you want to make.
O Press the y and the or buttons simultaneously to copy in draft mode.
O Anda dapat membuat hingga 20 salinan dengan menekan tombol atau sebanyak jumlah salinan yang ingin Anda buat.
O Tekan tombol y dan atau secara bersamaan untuk menyalin dalam mode draf.
Print Quality Help / Bantuan Kualitas Cetak
(a) (b)
Print a nozzle check pattern to check if the print head nozzles are clogged. Turn off the printer, and then turn it back on while holding down y and P.If you notice any missing segments or broken lines as shown in (b), go to step B.Cetaklah pola pemeriksaan nosel untuk memeriksa apakah nosel kepala cetak tersumbat. Matikan printer, kemudian hidupkan kembali sambil menahan tombol y dan P.Jika Anda melihat ada segmen yang hilang atau garis yang terputus sebagaimana diperlihatkan di (b), pindah ke langkah B.
Q If you see missing segments or broken lines in your printouts, try the following solutions.Jika terdapat segmen atau baris yang tidak tercetak dalam hasil cetakan Anda, cobalah solusi berikut.
A
B
Run print head cleaning until all lines are printed completely. Hold down y for 3 seconds until the power light starts flashing. Print head cleaning starts.Jalankan pembersihan kepala cetak hingga semua garis tercetak sempurna. Tahan y selama 3 detik hingga lampu daya mulai berkedip. Pembersihan kepala cetak dimulai.
Proof Sign-off:A. Yoshizawa CRM S. TanakaM. Ishigamieditor
R41AG1100Start Here Rev.C_Final
R41AG1100_SH-EN_ID.indd A3 size2016/06/07
4132749-00 BlackBack
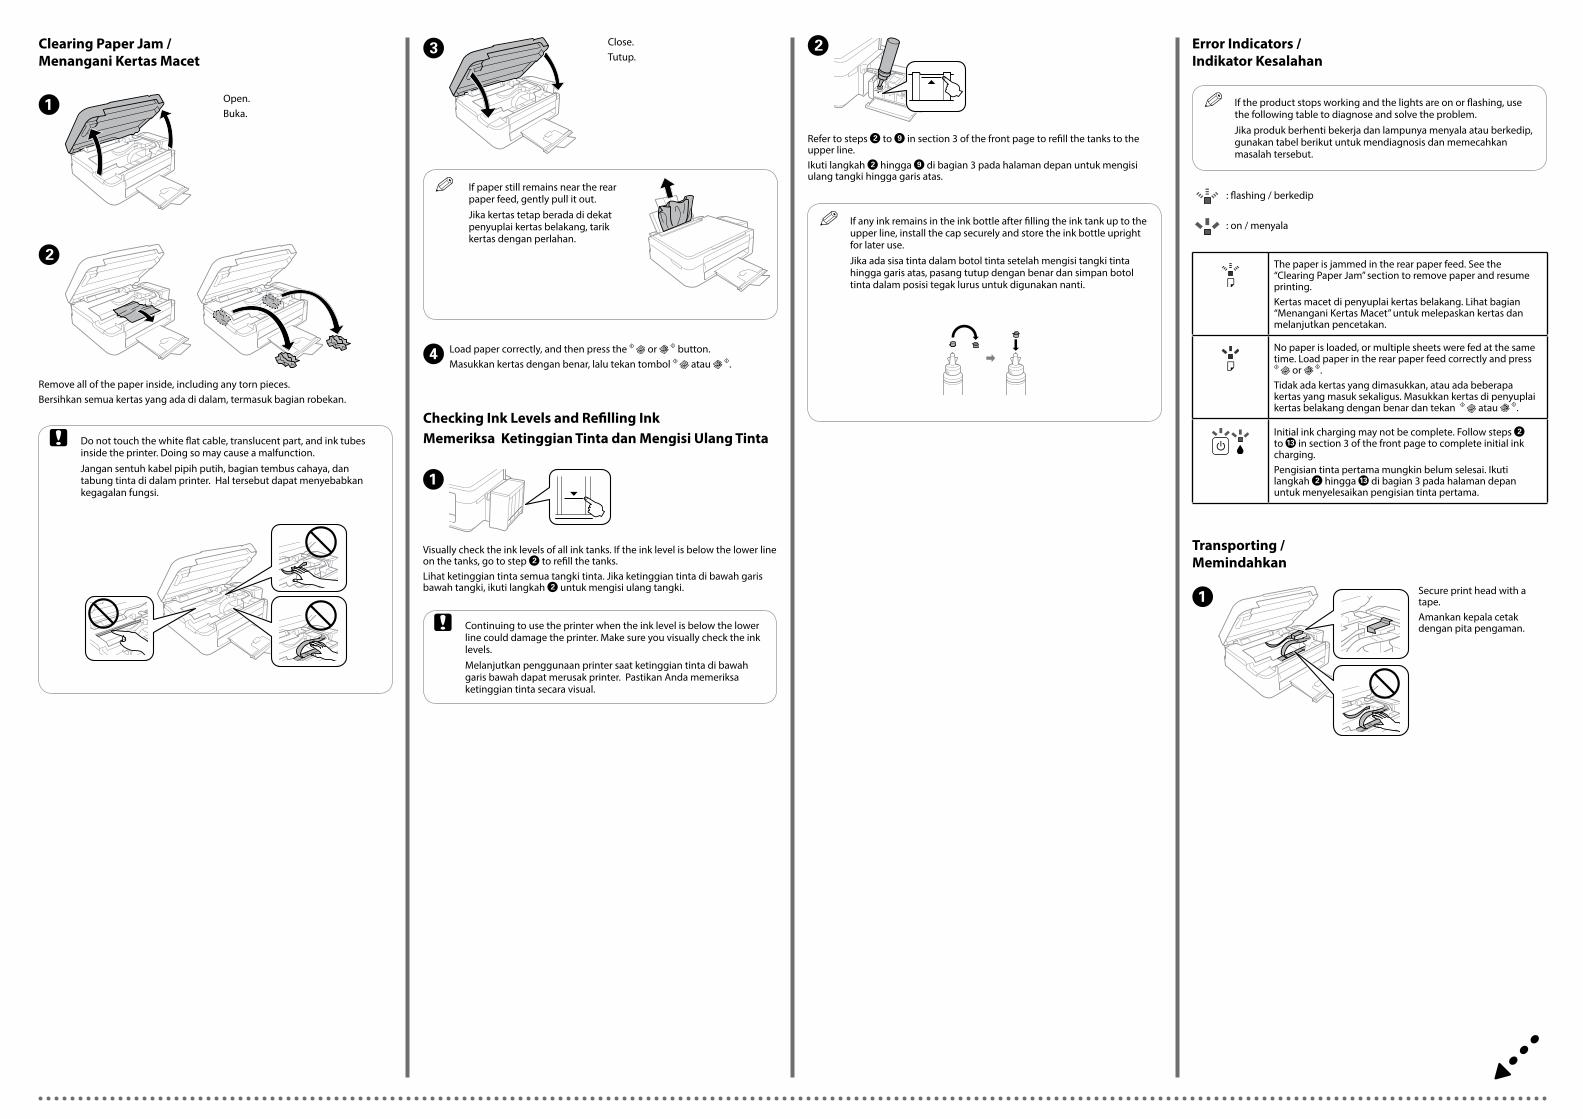
Remove all of the paper inside, including any torn pieces.Bersihkan semua kertas yang ada di dalam, termasuk bagian robekan.
A
B
C
Open.Buka.
Close.Tutup.
D Load paper correctly, and then press the or button.Masukkan kertas dengan benar, lalu tekan tombol atau .
Checking Ink Levels and Refilling InkMemeriksa Ketinggian Tinta dan Mengisi Ulang Tinta
c Continuing to use the printer when the ink level is below the lower line could damage the printer. Make sure you visually check the ink levels. Melanjutkan penggunaan printer saat ketinggian tinta di bawah garis bawah dapat merusak printer. Pastikan Anda memeriksa ketinggian tinta secara visual.
Visually check the ink levels of all ink tanks. If the ink level is below the lower line on the tanks, go to step B to refill the tanks.Lihat ketinggian tinta semua tangki tinta. Jika ketinggian tinta di bawah garis bawah tangki, ikuti langkah B untuk mengisi ulang tangki.
A
Refer to steps B to I in section 3 of the front page to refill the tanks to the upper line. Ikuti langkah B hingga I di bagian 3 pada halaman depan untuk mengisi ulang tangki hingga garis atas.
Q If any ink remains in the ink bottle after filling the ink tank up to the upper line, install the cap securely and store the ink bottle upright for later use. Jika ada sisa tinta dalam botol tinta setelah mengisi tangki tinta hingga garis atas, pasang tutup dengan benar dan simpan botol tinta dalam posisi tegak lurus untuk digunakan nanti.
B
c Do not touch the white flat cable, translucent part, and ink tubes inside the printer. Doing so may cause a malfunction.Jangan sentuh kabel pipih putih, bagian tembus cahaya, dan tabung tinta di dalam printer. Hal tersebut dapat menyebabkan kegagalan fungsi.
Q If paper still remains near the rear paper feed, gently pull it out.Jika kertas tetap berada di dekat penyuplai kertas belakang, tarik kertas dengan perlahan.
Clearing Paper Jam / Menangani Kertas Macet
Error Indicators / Indikator Kesalahan
The paper is jammed in the rear paper feed. See the “Clearing Paper Jam” section to remove paper and resume printing.Kertas macet di penyuplai kertas belakang. Lihat bagian “Menangani Kertas Macet” untuk melepaskan kertas dan melanjutkan pencetakan.
No paper is loaded, or multiple sheets were fed at the same time. Load paper in the rear paper feed correctly and press
or .Tidak ada kertas yang dimasukkan, atau ada beberapa kertas yang masuk sekaligus. Masukkan kertas di penyuplai kertas belakang dengan benar dan tekan atau .
Initial ink charging may not be complete. Follow steps B to M in section 3 of the front page to complete initial ink charging.Pengisian tinta pertama mungkin belum selesai. Ikuti langkah B hingga M di bagian 3 pada halaman depan untuk menyelesaikan pengisian tinta pertama.
Q If the product stops working and the lights are on or flashing, use the following table to diagnose and solve the problem. Jika produk berhenti bekerja dan lampunya menyala atau berkedip, gunakan tabel berikut untuk mendiagnosis dan memecahkan masalah tersebut.
: on / menyala
: flashing / berkedip
Transporting / Memindahkan
ASecure print head with a tape.Amankan kepala cetak dengan pita pengaman.

Proof Sign-off:A. Yoshizawa CRM S. TanakaM. Ishigamieditor
R41AG1100Start Here Rev.C_Final
R41AG1100_SH-EN_ID.indd A3 size2016/06/07
4132749-00 BlackBack
Use only the power cord that comes with the printer. Use of another cord may cause fire or shock. Do not use the cord with any other equipment.Gunakan hanya kabel listrik yang disertakan bersama printer. Penggunaan kabel lain dapat mengakibatkan kebakaran atau sengatan listrik. Jangan gunakan kabel pada perangkat lainnya.
Be sure your AC power cord meets the relevant local safety standard.Pastikan kabel listrik memenuhi seluruh standar keselamatan setempat yang terkait.
Except as specifically explained in your documentation, do not attempt to service the printer yourself.Kecuali secara khusus dijelaskan di dokumentasi, jangan mencoba menyervis printer sendiri.
Safety Instructions / Petunjuk Keselamatan
Place the printer near a wall outlet where the power cord can be easily unplugged.Letakkan printer di dekat stopkontak dinding sehingga kabel listrik dapat dengan mudah dicabut.
Do not let the power cord become damaged or frayed.Jangan biarkan kabel listrik rusak atau terkelupas.
Do not place or store the product outdoors, near excessive dirt or dust, water, heat sources, or in locations subject to shocks, vibrations, high temperature or humidity.Jangan letakkan atau simpan produk di luar ruangan, dekat dengan debu atau kotoran yang berlebihan, air, sumber panas, atau di tempat-tempat yang mudah terguncang, bergetar, bersuhu tinggi atau lembab.
Take care not to spill liquid on the product and not to handle the product with wet hands.Berhati-hatilah agar tidak menumpahkan cairan ke produk dan agar tidak memegang produk dengan tangan basah.
Windows® is a registered trademark of the Microsoft Corporation.
Mac OS is a trademark of Apple Inc., registered in the U.S. and other countries.
The contents of this manual and the specifications of this product are subject to change without notice.
Questions?
You can open the User’s Guide (PDF) from the shortcut icon, or download the latest versions from the following website.Anda dapat membuka Panduan Pengguna (PDF) dari ikon pintasan atau unduh versi terbaru dari situs web berikut.
BK C M Y
664 664 664 664
Ink Bottles / Botol Tinta
c Use of genuine Epson ink other than specified could cause damage that is not covered by Epson’s warranties.Penggunaan tinta asli Epson selain yang disebutkan dapat mengakibatkan kerusakan yang tidak tercakup dalam jaminan Epson.
D Pack the printer with protective materials to prevent the ink tank unit from being unhooked.Kemas printer dengan bahan pelindung untuk mencegah unit tangki tinta lepas.
c After you move it, remove the tape securing the print head. If you notice a decline in print quality, run a cleaning cycle or align the print head.Setelah dipindahkan, lepas pita pengaman pada kepala cetak. Jika Anda melihat adanya penurunan kualitas cetakan, jalankan siklus pembersihan atau sejajarkan kepala cetak.
c Keep the printer level as you transport it. Otherwise, ink may leak. As you transport the ink bottle, be sure to keep it upright when tightening the cap, and take measures to prevent ink from leaking.Pertahankan permukaan printer saat
Anda memindahkannya. Jika tidak, tinta bisa bocor. Saat Anda memindah botol tinta, pastikan untuk menjaganya tetap tegak saat mengencangkan tutupnya, dan lakukan tindakan untuk mencegah agar tinta tidak bocor.
Keep ink bottles and the ink tank unit out of the reach of children and do not drink the ink.Jauhkan botol dan unit tangki tinta dari jangkauan anak-anak dan jangan meminum tintanya.
Do not tilt or shake an ink bottle after removing its seal; this can cause leakage.Jangan memiringkan atau mengocok botol tinta setelah melepas tutupnya; kebocoran dapat terjadi.
Be sure to keep the ink bottles upright and do not subject them to impacts or temperature changes.Pastikan botol tinta dalam posisi tegak dan jangan biarkan terkena benturan atau perubahan suhu.
If ink gets on your skin, wash the area thoroughly with soap and water. If ink gets into your eyes, flush them immediately with water. If discomfort or vision problems continue after a thorough flushing, see a doctor immediately. If ink gets into your mouth, see a doctor right away.Jika tinta mengenai kulit, cuci hingga bersih dengan sabun dan
air. Jika tinta mengenai mata, segera bilas dengan air. Jika Anda masih merasa tidak nyaman atau mengalami masalah penglihatan setelah membilas mata hingga bersih, segera kunjungi dokter. Jika tinta masuk ke mulut, segera kunjungi dokter.
http://support.epson.net/
CMake sure to hook on.Pastikan benar-benar terkait.
BClose securely.Tutup dengan benar.
c Do not put ink bottles.Jangan letakkan botol tinta.
Tipe Unit : Mesin Printer Multifungsi Berwarna Inkjet
Model Unit : Epson L380
Resolusi Optikal :
5760×1440 dpi
Ukuran Dokumen :
A4, A5, A6, B5, 10×15 cm (4×6 inci), 13×18 cm (5×7 inci), 9×13 cm (3.5×5 inci), Letter (8 1/2×11 inci), Legal (8 1/2×14 inci), Half Letter (5 1/2×8 1/2 inci), 13×20 cm (5×8 inci), 20×25 cm (8×10 inci), 16:9 wide size, 100×148 mm, Envelopes: #10 (4 1/8×9 1/2 inci), DL (110×220 mm), C6 (114×162 mm)
Kecepatan : Fungsi Mencetak (Print)33 ppm (Draft Hitam)15 ppm (Draft Berwarna)27 detik per foto (Draft, 10×15 cm/4×6 inci)69 detik per foto (Foto Default, 10×15 cm/4×6 inci)
Fungsi Menyalin (Fotokopi)5 detik (Draft Hitam)10 detik (Draft Berwarna)
Fungsi Memindai (Scan)2.4 mdtk/baris (Dokumen A4 Hitam Putih 300 dpi)9.5 mdtk/baris (Dokumen A4 Berwarna 300 dpi)
Tegangan dan Frekuensi :
100 V–240 V ~ 50–60 Hz
Spesifikasi :
Petunjuk Perawatan :1. Gunakan kain lembab untuk membersihkan mesin printer.
Jangan pernah menggunakan cairan yang mudah terbakar, seperti alkohol, bensin, atau tiner.
2. Biasakan selalu untuk mencabut stop kontak mesin printer sebelum membersihkan mesin. Jika Anda kebetulan membersihkan mesin printer ketika mesin dalam keadaan menyala, maka Anda dapat melukai diri anda sendiri atau merusak mesin printer tersebut.
3. Jangan sekali-kali membongkar atau memodifikasi mesin printer. Tidak ada bagian dalam mesin printer yang bisa diperbaiki sendiri.
4. Mesin pencetak mengandung komponen tegangan tinggi. Jangan pernah mencoba melakukan prosedur yang tidak dijelaskan di dalam petunjuk ini.
5. Jangan menghubungkan peralatan selain yang direkomendasikan ke penghubung pada mesin printer (penghubung kabel atau Port Cetak Langsung, dll. Karena hal ini dapat menyebabkan kebakaran atau sengatan listrik).
Diimpor oleh :PT Epson IndonesiaWisma KEIAI Lt. 16Jl. Jend. Sudirman Kav. 3Jakarta 10220Buatan Filipina